1
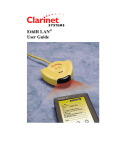
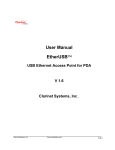
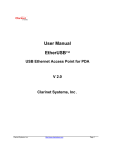
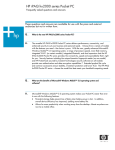
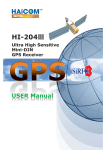
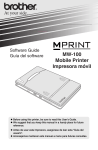
ESB3011b Getting Started Guide
ESB3011b
802.11b Uplink
802.11b access point
(Not included)
Up to 4Mbps
from handheld to
switch via IR
Handheld PC
TABLE OF CONTENTS
SETUP ESB3011B HARDWARE
4
CONFIGURE ESB3011B SETTING
4
USING WINDOWS CONFIGURATION TOOL:
USING PALM CONFIGURATION TOOL:
5
8
TROUBLESHOOTING AND FAQ
9
Setup ESB3011b Hardware
Mini-DIN cable
The ESB3011b comes equipped with:
!
!
!
!
EthIR Switch single port
EthIR Beam with mini-DIN connector
110/220 power supply
Mini-DIN cable
ESB3011b rear view
EthIR Beam rear view
Mini-DIN Port
Mini-DIN Port
Power
To setup the ESB3011b hardware, simply follow the steps below:
1. Connect the EthIR Switch and EthIR Beam by using the provided mini-DIN cable as shown
below.
2. Connect the power supply to the EthIR Switch power jack and a 110/220 electrical outlet as
shown below.
3. Once the EthIR Switch is powered on, proceed to the next section to configure the switch.
ES3011b
EthIR
Mini-DIN Cable
Configure ESB3011b Settings
Due to the nature of the ESB3011b, the user MUST configure the switch’s settings before it can
connect to the user’s 802.11b Access Point. The configuration is done via IR using either Palm
Configuration Tool or Windows Configuration Tool. The configuration software is available for
downloading at Clarinet Systems’ web site, http://www.clarinetsys.com/
Note: The ESB3011b assigns the primary IP address to the connecting IR device. Therefore, the switch is not
accessible for configuration while an IR device is connected to the ESB3011b. As soon as the connection has been
dropped, the IP address is freed for configuration if needed.
The following are the default settings for the ESB3011b. Some of the fields must be modified by the
user before the switch can be used.
IP Address:
Wireless Channel:
ESSID:
Authentication:
WEP Encryption:
192.168.101.137
Auto
CSI
Open System
Disabled
The following information is necessary for completing the configuration of the ESB3011b. This
information can be obtained from a network administrator.
Configuration
IP Address
Subnet Mask
Gateway
DNS Server IP
ESSID
Authentication
WEP Encryption
WEP Key
Notes
Only if not using DHCP
Only if not using DHCP
Only if not using DHCP
Only if not using DHCP
Only if authentication is turned on
Only if authentication is turned on
Using Windows Configuration Tool:
The following are the instructions for configuring the ESB3011b using the Windows Configuration
Tool with a Windows 95/98/2000 laptop PC:
Note: Windows Configuration Tool in IR mode does NOT support Windows NT systems.
1. Place the EthIR Beam in front of the IR port of the laptop and launch Windows
Configuration Tool. Make sure that the laptop's IR port is within 1 meter of the EthIR beam,
and within a 30 degree projected cone from the EthIR Beam.
2. Select Configure via Infrared at the top of the Configuration Tool window.
3. Click on the Edit Configuration button and an IP Editor window will appear.
4. In the General Information tab, please check the Use DHCP box if DHCP is used. If
DHCP is not used, please enter valid network information for the fields of Switch IP,
Subnet Mask, Gateway, and at least DNS IP1.
5. In the RF-Card Info tab, please modify the ESSID field and select Open System
Authentication, no encryption, or Shared Key Authentication, enable encryption.
6. If Shared Key Authentication is selected, please go to the WEP tab and select either 64-bit
or 128-bit in the Encryption Key field and enter the correct key in the fields below.
7. When finished, please click Update followed by Done to save the setting in the switch. The
switch will reboot and should connect to the 802.11b network shortly.
Using Palm Configuration Tool:
The following are instructions for configuring the ESB3011b using the Palm Configuration Tool
with a Palm OS version 3.3 or above:
1. Locate and click on EthIR Config to start the Palm
Configuration Tool. Once the application is loaded, click the
Find button while your IR port is directed at your EthIR Beam.
For Palm's and other PDA's, make sure that the Palm's IR port is
within 20 centimeters of the EthIR beam, and within a 30 degree
projected cone from the EthIR Beam.
2. Keep the IR port directly facing the EthIR Beam and click the
Setting button to start editing the ESB3011b configuration.
3. Pull down the drop-down menu on the upper-right-hand
corner and select LAN Related option. Check the Switch
Use DHCP box if DHCP is used. If DHCP is not used,
please enter valid network information for the fields of
Switch IP, Subnet Mask, Gateway, and at least DNS IP1.
4. Pull down the drop-down menu on the upper-right-hand
corner and select Card Info option. Modify the ESSID field
and select Open System Authentication, no encryption, or
Shared Key Authentication, encryption enabled.
5. If Shared Key Authentication is selected, select WEP in
the upper-right-hand corner of the drop-down menu to enter
the encryption key. Select either the 64-bit or 128-bit key
and enter the key value and selection.
6. When finished, please click Update followed by Done to
save the setting in the switch while your IR port is directed at
your EthIR Beam. The switch will reboot and should
connect to the 802.11b network shortly.
Troubleshooting and FAQ
My configuration tool cannot find or connect to the switch using IR.
Make sure the power cable is plugged in securely. Wait until the status light is lit steadily
before trying to configure the switch. If the status light continues to blink for over 30
seconds, proceed to configure the switch as if the status light is lit steadily.
Status light on EthIR Beam is not blinking while I try to connect or configure the switch.
Make sure there is power to the ESB3011b unit, and that the mini-DIN cable is securely
connected to both the EthIR Beam and the ESB3011b.
AP light is off after I’ve configured and rebooted the switch.
Check to see if the ESSID, WEP Encryption and Default Tx Key match with your Access
Point’s settings. Make sure the ESSID field does not contain a blank space in front and after
the ID, and use Auto for the Channel setting. Also, make sure all valid security data, such as
MAC address, is entered into the Access Point if other security settings are implemented in
the Access Point.
Status light is blinking continuously over 45 seconds while AP light is lit steadily after I’ve
configured and rebooted the switch.
Check to see if your network has a functional DHCP server with free IP(s). Also check if
your 802.11b Access Point allows DHCP traffic to pass though. Running the ESB3011b
using static IP will also solve this problem.
How should I position my ESB3011b and 802.11b Access Point?
The general rule of thumb is to place both the 802.11b Access Point and the ESB3011b on
higher ground away from major electronic devices. Keep in mind that distance plays a major
factor in the connection quality. Movement between the ESB3011b and the Access Point
also has significant effect on the quality of the connection.
How do I establish a LAN connection between ESB3011b and my IR-enabled device?
IR-enabled devices, such as PocketPC, Palm or laptop, can establish a LAN connection with
ESB3011b via IR by using ClarinetIR freeware. Please to go to http://www.clarinetsys.com/
for more information.
Why can't I access the server on my network after I establish a LAN connection with ESB3011b?
Please make sure your ESB3011b is using the correct IP address and subnet. In some cases,
you will also need a valid gateway IP and DNS IP. Also make sure the Access Point settings
allow you to connect to servers on the network. Please contact your network administrator
for further assistance.
Why can't I access the Internet after I establish a LAN connection with the ESB3011b?
Please make sure your ESB3011b is using the correct IP address, subnet, gateway IP and
DNS IP. Also, make sure the Access Point settings allow you to connect to servers on the
network and that Internet accessibility is available for the network. Please contact your
network administrator for further assistance.
Where can I get the latest information and updates for my ESB3011b?
You can find all the latest information regarding our products at http://www.clarinetsys.com/.
Software and firmware updates are also available on our site for free download, along with
FAQ and helpful tips. Firmware upgrade is done using Windows Configuration Tool in IP
mode only.