1
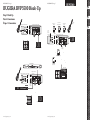
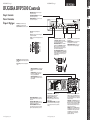
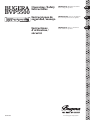
BUGERA
BVP5500
A50-76740-24001
Operating/Safety
Instructions
IMPORTANT: Read this document
before using this product.
EN
Instrucciones de
seguridad/manejo
IMPORTANTE: Lea este documento
antes de empezar a usar este aparato.
ES
Instructions
d’utilisation/
sécurité
IMPORTANT: Lisez ce document
avant d’utiliser le produit.
FR
www.bugera-amps.com
BUGERA BVP5500 • pg 2
EN EN
Important Safety
Instructions
ES
FR
Caution
High voltage! Risk of death! To avoid lethal
electric shock, do not open the casing.
There are no user-serviceable components inside. Refer all
maintenance to qualified service personnel. Remove the
mains cable when the unit is not in use.
Warning
To eliminate the risk of fire and electric
shock, do not expose this unit to rain or
moisture and splashing or dripping liquid, which might
enter the device. Do not place any objects filled with
liquid, such as vases, on the unit.
This symbol, wherever it appears, alerts
you to the presence of uninsulated
dangerous voltage inside the enclosure—
voltage that may be sufficient to constitute a risk
of shock.
This symbol, wherever it appears, alerts
you to important operating and
maintenance instructions in the
accompanying literature. Please read the manual.
1. Read these instructions.
2. Keep these instructions.
3. Heed all warnings.
4. Follow all instructions.
5. Do not use this apparatus near water.
6. Clean only with dry cloth.
7. Do not block any ventilation openings. Install in
accordance with the manufacturer’s instructions.
8. Do not install near any heat sources such as
radiators, heat registers, stoves, or other apparatus
(including amplifiers) that produce heat.
9. Do not defeat the safety purpose of the polarized or
grounding-type plug. A polarized plug has two blades
with one wider than the other. A grounding type plug
has two blades and a third grounding prong. The wide
blade or the third prong are provided for your safety. If
the provided plug does not fit into your outlet, consult an
electrician for replacement of the obsolete outlet.
10. Protect the power cord from being walked on or
pinched particularly at plugs, convenience receptacles,
and the point where they exit from the apparatus.
11. Only use attachments/accessories specified by the
manufacturer.
BUGERA BVP5500 • pg 3
12. Use only with
the cart, stand, tripod,
bracket, or table specified
by the manufacturer, or
sold with the apparatus.
When a cart is used, use
caution when moving the
cart/apparatus combination to avoid injury from tip-over.
13. Unplug this apparatus during lightning storms or
when unused for long periods of time.
14. Refer all servicing to qualified service personnel.
Servicing is required when the apparatus has been
damaged in any way, such as power supply cord or plug
is damaged, liquid has been spilled or objects have fallen
into the apparatus, the apparatus has been exposed
to rain or moisture, does not operate normally, or has
been dropped.
15. The apparatus shall be connected to a MAINS socket
outlet with a protective earthing connection.
16. Where the MAINS plug or an appliance coupler is
used as the disconnect device, the disconnect device shall
remain readily operable.
17. CAUTION! - These service instructions are for use by
qualified service personnel only. To reduce the risk of
electric shock do not perform any servicing other than
that contained in the operation instructions unless you
are qualified to do so.
ES
Instrucciones de
seguridad
Atención
¡Alta tensión! ¡Peligro de muerte! Incluso
después de apagar el amplifi cador pueden
existir tensiones de hasta 500 V DC en el interior del
amplifi cador. Para evitar choques eléctricos fatales
no retire las tapas superior o trasera del aparato. No
hay partes en el interior del aparato que puedan ser
reparadas por el usuario. Las reparaciones deben ser
llevadas a cabo exclusivamente por personal cualifi cado.
Desenchufe el aparato de la red de corriente eléctrica si
no lo va a utilizar.
Atención
ADVERTENCIA: para evitar peligros debidos
a fuego o choque eléctrico, no exponga el
aparato a lluvia o humedad, ni permita que caigan gotas
en el interior del mismo. No coloque recipientes que
contengan líquidos, como jarrones, sobre el aparato.
www.bugera-amps.com
Este símbolo, siempre que aparece, le
advierte de la presencia de voltaje
peligroso sin aislar dentro de la caja. Este
voltaje puede ser suficiente para constituir un riesgo de
descarga.
Este símbolo, siempre que aparece, le
advierte sobre instrucciones operativas y
de mantenimiento que aparecen el la
documentación que se adjunta. Por favor, lea el manual.
1. Lea las instrucciones.
2. Conserve estas instrucciones.
3. Preste atención a todas las advertencias.
4. Siga todas las instrucciones.
5. No use este aparato cerca del agua.
6. Limpie este aparato con un paño seco.
7. No bloquee las aberturas de ventilación. Instale el
equipo de acuerdo con las instrucciones del fabricante.
8. No instale este equipo cerca de fuentes de calor
tales como radiadores, acumuladores de calor, estufas u
otros aparatos (incluyendo amplifi cadores) que puedan
producir calor.
9. No pase por alto las ventajas en materia de
seguridad que le ofrece un enchufe polarizado o uno con
puesta a tierra. Un enchufe polarizado tiene dos clavijas,
una más ancha que la otra. Un enchufe con puesta a tierra
tiene dos clavijas y una tercera de puesta a tierra. La
clavija ancha o la tercera clavija son las que garantizan
la seguridad. Si el enchufe suministrado con el equipo
no concuerda con la toma de corriente, consulte con un
electricista para cambiar la toma de corriente obsoleta.
10. Proteja los cables de suministro de energía de tal
forma que no sean pisados o doblados, especialmente los
enchufes y los cables en el punto donde salen del aparato.
11. Use únicameor el fabricante.
12. Use únicamente la
carretilla, plataforma,
trípode, soporte o mesa
especificados por el
fabricante o suministrados
junto con el equipo. Si
utiliza una carretilla, tenga
cuidado cuando mueva
el equipo para evitar daños producidos por un temblor
excesivo.
13. Desenchufe el equipo durante tormentas o si no va a
utilizarlo durante un periodo largo.
14. Confíe las reparaciones únicamente a servicios
técnicos cualifi cados. Se requiere mantenimiento siempre
que la unidad se haya dañado, cuando por ejemplo el
cable de suministro de energía o el enchufe presenten
daños, se haya derramado líquido o hayan caído objetos
dentro del equipo, cuando se haya expuesto el aparato a
la humedad o lluvia, cuando no funcione normalmente o
cuando se haya dejado caer.
15. Al conectar la unidad a la toma de corriente eléctrica
asegúrese de que la conexión disponga de una unión a
tierra.
16. Si el enchufe o conector de red sirve como único
medio de desconexión, éste debe ser accesible fácilmente.
17. ¡PRECAUCIÓN! Las instrucciones de servicio deben
llevarlas a cabo exclusivamente personal cualifi cado.
Para evitar el riesgo de una descarga eléctrica, no realice
reparaciones que no se encuentren descritas dentro
del manual de operaciones. Las reparaciones deben ser
realizadas exclusivamente por personal cualifi cado.
18. ¡PRECAUCIÓN! Durante la operación, las válvulas se
calientan mucho y, por lo mismo, algunas partes en la
parte trasera también alcanzan temperaturas muy
elevadas. Para evitar quemaduras, realice todo el cableado
mientras el amplifi cador está frío.
FR
Consignes de sécurité
Attention
Haute tension ! Danger de mort ! Même
après avoir déconnecté l’appareil du
secteur, des tensions élevées atteignant 500 Volts peuvent
être présentes à l’intérieur de l’appareil. Pour éviter tout
risque d’électrocution, n’ouvrez pas le couvercle ou le
panneau arrière de l’appareil. L’intérieur de l’appareil ne
contient pas de composants réparables par l’utilisateur.
Les réparations doivent être impérativement effectuées
par un personnel qualifié. Déconnectez l’appareil du
secteur lorsque vous ne l’utilisez pas.
Attention
MISE EN GARDE : Pour éviter tout risque
de blessure par le feu ou tout risque
d’électrocution, n’exposez pas l’appareil à la pluie ou à
l’humidité et évitez toute projection liquide. Ne posez
aucun récipient contenant du liquide sur l’appareil (verre,
par exemple).
Ce symbole vous avertit de la présence
d’une tension dangereuse non isolée a
l’intérieur de l’appareil. Elle peut
provoquer un risque d’électrocution.
Ce symbole signale la présence de
consignes d’utilisation et d’entretien
importantes dans la documentation
fournie. Lisez les consignes de sécurité du mode d’emploi
de l’appareil.
1. Lisez ces consignes.
2. Conservez ces consignes.
3. Respectez toutes les mises en garde.
4. Respectez toutes les consignes d’utilisation.
5. N’utilisez jamais l’appareil à proximité d’une source
liquide.
6. Nettoyez l’appareil avec un chiffon sec.
7. Veillez à ne pas empêcher la bonne ventilation de
l’appareil par les ouvertures. Respectez les consignes du
fabricant concernant l’installation de l’appareil.
8. Ne placez pas l’appareil à proximité d’une source
de chaleur telle qu’un chauffage, une cuisinière ou tout
appareil dégageant de la chaleur (y compris un ampli de
puissance).
9. Ne supprimez jamais la mise à la terre et/ou le
repérage de polarisation (Canada) des prises de terre. Les
prises canadiennes possèdent deux broches de largeur
différente. La plus large correspond à la phase. Les prises
avec terre possèdent deux contacts plus une mise à la
terre. Si la fiche de l’adaptateur secteur ou du cordon
d’alimentation fourni ne correspond pas à celles de votre
installation électrique, faites appel à un électricien pour
effectuer les modifications.
10. Installez le cordon d’alimentation de telle façon qu’il
ne puisse pas être endommagé, tout particulièrement à
proximité des prises et rallonges électriques ainsi qu’à la
sortie de l’appareil.
11. Utilisez exclusivement des accessoires et des
équipements externes recommandés par le fabricant.
12. Utilisez exclusivement
des chariots, des trépieds,
des pieds et des surfaces
de travail recommandés
par le fabricant ou livrés
avec le produit. Déplacez
avec précaution le chariot
pour éviter toute blessure
en cas de chute.
13. Débranchez l’appareil du secteur en cas d’orage ou si
l’appareil reste inutilisé pendant longtemps.
14. Les travaux d’entretien de l’appareil doivent
être effectués uniquement par un personnel qualifié.
Aucun entretien n’est nécessaire sauf si l’appareil est
endommagé de quelque façon que ce soit (dommages sur
le cordon d’alimentation ou la fiche secteur, par exemple),
si un liquide ou un objet a pénétré à l’intérieur du boîtier,
si l’appareil a été exposé à la pluie ou à l’humidité, ou s’il
ne fonctionne pas correctement ou à la suite d’une chute.
15. L’appareil doit être connecté à une prise secteur avec
mise à la terre.
16. La fiche électrique ou l’embase IEC de tout appareil
dénué d’interrupteur marche/arrêt doit rester accessible
en permanence.
17. MISE EN GARDE - Ces consignes de sécurité et
d’entretien sont destinées à un personnel qualifié. Pour
éviter tout risque d’électrocution, utilisez cet l’appareil
uniquement dans le cadre défini par ces consignes de
sécurité, sauf si vous êtes qualifié pour effectuer les
réparations ou opérations d’entretien.
18. ATTENTION ! Les lampes chauffent beaucoup
pendant le fonctionnement, et certaines parties de la face
arrière peuvent être très chaudes. Pour éviter toute
brûlure, effectuez le câblage et l’installation de l’appareil
pendant qu’il est froid.
Technical specifications and appearance are subject to change without
notice. The information contained herein is correct at the time of printing.
All trademarks (except BUGERA, the BUGERA logo, and THE SOUL OF VALVES)
mentioned belong to their respective owners, and such use neither constitutes
a claim of the trademarks by RED CHIP COMPANY LTD nor affiliation of the
trademark owners with RED CHIP COMPANY LTD. RED CHIP COMPANY LTD
accepts no liability for any loss which may be suffered by any person who
relies either wholly or in part upon any description, photograph or statement
contained herein. Colors and specifications may vary slightly from product.
Our Products are sold through authorized dealers only. This manual is
copyrighted. No part of this manual may be reproduced or transmitted in
any form or by any means, electronic or mechanical, including photocopying
and recording of any kind, for any purpose, without the express written
permission of RED CHIP COMPANY LTD. BUGERA-products are distributed
exclusively by the BEHRINGER Group of companies globally, and specifically by
BEHRINGER Luxembourg Sàrl in the European Union.
ALL RIGHTS RESERVED.
2009 Red Chip Company Ltd.
Trident Chambers, Wickhams Cay, P.O. Box 146,
Road Town, Tortola, British Virgin Islands
©
Las especificaciones técnicas y el aspecto exterior de este aparato están sujetos
a cambios sin previo aviso. Toda la información contenida en este documento
es correcta en el momento de su impresión. RED CHIP COMPANY LTD no
acepta ningún tipo de responsabilidad por cualquier pérdida o perjuicio que
pueda producirse por el uso de cualquier descripción, fotografía o explicación
que aparezca contenida aquí. Los colores y especifi caciones de este aparato
pueden variar ligeramente de un producto a otro. Todos nuestros productos
son comercializados únicamente a través de distribuidores autorizados.
Este manual no puede ser reproducido o transmitido (completo o en partes)
por ningún tipo de medio, electrónico o mecánico, incluyendo la fotocopia
o registro de cualquier tipo, para ningún fi n sin el permiso expreso y por
escrito de RED CHIP COMPANY LTD. Los productos BUGERA son distribuidos
en exclusiva por el grupo de empresas BEHRINGER a nivel mundial, y específi
camente por BEHRINGER Luxembourg Sàrl dentro de los países de la Unión
Europea.
RESERVADOS TODOS LOS DERECHOS.
2009 Red Chip Company Ltd.
Trident Chambers, Wickhams Cay, P.O. Box 146,
Road Town, Tortola, British Virgin Islands
©
Caractéristiques techniques et apparence sujettes à modifications sans
préavis. Les informations contenues dans ce mode d’emploi sont correctes
au moment de l’impression. La société RED CHIP COMPANY LTD n’accepte
aucune responsabilité pour toute perte occasionnée aux personnes se fiant
entièrement ou en partie aux descriptions, photographies ou déclarations
contenues dans ce mode d’emploi. Les couleurs et caractéristiques peuvent
varier. Nos produits sont vendus exclusivement par des revendeurs agréés. Ce
mode d’emploi est protégé par les lois sur les droits d’auteur et les Copyrights.
Il ne peut être, en aucune façon, reproduit ou transmis en tout ou partie, et
par quel moyen que ce soit — électronique ou mécanique (ce qui comprend
par photocopie et par enregistrement), de quelle façon ou dans quel but que
ce soit, sans la permission écrite de RED CHIP COMPANY LTD. Les produits
BUGERA sont distribués globalement exclusivement par les sociétés du groupe
BEHRINGER, et de façon spécifique par BEHRINGER Luxembourg Sàrl dans la
communauté européenne.
TOUS DROITS RÉSERVÉS.
2009 Red Chip Company Ltd.
Trident Chambers, Wickhams Cay, P.O. Box 146,
Road Town, Tortola, British Virgin Islands
©
www.bugera-amps.com
EN
ES
FR
BUGERA BVP5500 • pg 4
BUGERA BVP5500 • pg 5
IMPORTANT NOTICE
Failure to observe the following points may
result in damage to the amplifier or
loudspeakers. Damage caused in such a
way are not covered by warranty.
•Observe the correct impedance for your loudspeaker
and use the appropriate output socket.
•Always use loudspeaker cables for connection between
the amplifier and the loudspeaker. Never use other
types of cable such as instrument cable and
microphone cable.
Before you get started
Your product was carefully packed at the factory to ensure safe transport. Nevertheless, if the box is damaged
inspect the unit immediately for signs of damage.
•If the unit is damaged please do NOT return it to us,
but notify your dealer and the shipping company
immediately, otherwise, claims for damage or
replacement may not be granted.
•Always use the original box to prevent damage during
storage or transport.
•Make sure that children cannot play unsupervised with
the unit or its packaging.
•Please ensure proper disposal of all packing materials.
•Ensure adequate air supply and to avoid overheating do
not place the unit near radiators etc.
•Please make sure that all devices are properly
grounded. For your own safety, never remove or disable
the ground conductors from the devices or on the power
cords. The unit must always be connected to the mains
outlet with a protective grounding connection.
Important notes concerning
installation
•The sound quality may diminish within the range of
powerful broadcasting stations and high-frequency
sources. Increase the distance between the transmitter
and the device and use shielded cables for all
connections.
La no observancia de los aspectos
siguientes puede dar lugar a daños en el
amplificador y/o los altavoces. Los daños
que se puedan ocasionar por este motivo no quedaran
cubiertos por la garantia.
•Preste atención a las especifi caciones de impedancia
de su altavoz y utilice el tipo de conector de salida
adecuado.
•Utilice siempre cables de altavoz para realizar la
conexión entre el amplifi cador y los altavoces. No
use nunca ningún otro tipo de cable como el de
instrumentos o micros.
Pasos previos
Hemos embalado cuidadosamente este aparato para evitar
problemas durante el transporte. Si las condiciones del
embalaje le hacen pensar que ha sufrido daños, inspeccione este aparato inmediatamente en busca de posibles
indicaciones de daños.
•NUNCA nos devuelva directamente una unidad dañada.
Informe al comercio en el que haya adquirido la unidad
y a la empresa de transportes responsable. El no hacer
esto invalidará cualquier reclamación/sustitución
posterior.
•Cuando vaya a transportar o almacenar esta unidad
utilice siempre el embalaje original para evitar daños.
•Nunca permita que los niños jueguen con este aparato o
con su embalaje o queden sin supervisión.
•Recuerde seguir las normas de reciclaje a la hora de
deshacerse del embalaje y las protecciones.
•Asegúrese de que esta unidad esté correctamente
ventilada y no la coloque nunca cerca de aparatos que
generen calor para evitar que se recaliente.
•Asegúrese siempre de que todos los dispositivos
eléctricos estén correctamente conectados a tierra. Por
su propia seguridad, nunca elimine los conductores
de conexión a tierra de los aparatos o cables de
alimentación. Este aparato siempre debe estar
conectada a una salida de corriente eléctrica que
disponga de una toma de tierra de protección.
Nota importante acerca de la
instalación
•La calidad del sonido de este aparato puede verse
reducida si queda dentro del rango de alcance de
estaciones broadcast potentes y fuentes de altas
frecuencias. Aumente la separación entre la fuente
de esas emisiones y este aparato y utilice cables con
blindaje para todas las conexiones.
www.bugera-amps.com
Mise en garde ! Le non respect des points
suivants peut entraîner des dommages à
l’amplificateur ou aux enceintes. Les
dommages causés de cette façon ne sont pas couverts par
la garantie.
•Veuillez vérifier l’impédance de vos enceintes et utilisez
les connecteurs adaptés.
•Utilisez uniquement des câbles pour haut-parleur pour
connecter l’enceinte à l’amplificateur. Veillez à ne jamais
utiliser d’autres types de câbles (tels que les câbles
micro, les câbles instrument, etc.).
Avant de commencer
Ce produit a été emballé avec soin dans nos usines pour
garantir un transport fiable. Si l’emballage est endommagé, inspectez immédiatement le produit.
•Si l’appareil est endommagé, ne nous le renvoyez
PAS — notifiez immédiatement votre revendeur et le
transporteur. Dans le cas contraire nous ne pourrons
pas remplacer ou réparer le produit.
•Utilisez toujours le boîtier d’origine pour éviter tout
dommage lors du stockage ou du transport.
•Assurez-vous que les enfants ne puissent pas jouer avec
le produit ou son emballage.
•Débarrassez-vous convenablement de l’emballage.
•Vérifiez que le produit soit correctement ventilé pour
éviter toute surchauffe. Éloignez cet appareil de toute
source de chaleur.
•Veillez à ce que tous les équipements soient
correctement reliés à la terre. Pour votre sécurité,
veillez à ne jamais supprimer ou désactiver la terre
sur l’appareil ou sur sa fiche secteur. Cet appareil doit
toujours être relié à une ligne secteur avec terre.
Remarques importantes sur
l’installation
•La qualité sonore peut se dégrader en présence de
stations émettrices et de sources hautes fréquences
puissantes. Éloignez l’appareil de l’émetteur et utilisez
des câbles blindés pour toutes les connexions.
Warranty
§ 1 Other warranty rights and
national law
[1]. This warranty does not exclude or limit the buyer’s
statutory rights provided by national law, in
particular, any such rights against the seller that
arise from a legally effective purchase contract.
[2]. The warranty regulations mentioned herein are
applicable unless they constitute an infringement
of national warranty law.
§ 5 Warranty regulations
§ 6 Warranty transferability
[1]. Warranty services will be furnished only if the
This warranty is extended exclusively to the original
buyer (customer of retail dealer) and is not transferable
to anyone who may subsequently purchase this product.
No other person (retail dealer, etc.) shall be entitled to
give any warranty promise on behalf of BUGERA.
[2].
§ 2 Online registration
Please do remember to register your new BUGERA
equipment right after your purchase by visiting
http://www.behringer.com and kindly read the terms and
conditions of our warranty carefully. Registering your
purchase and equipment with us helps us process your
repair claims quicker and more efficiently.
Thank you for your cooperation!
§ 3 Warranty
[3].
[1]. BUGERA (BUGERA International GmbH including
all BUGERA subsidiaries, except BUGERA Japan)
warrants the mechanical and electronic components
of this product to be free of defects in material and
workmanship for a period of one (1) year* from the
original date of purchase, in accordance with the
warranty regulations described below. If the product
shows any defects within the specified warranty
period that are not excluded from this warranty as
described under § 5, BUGERA shall, at its discretion,
either replace or repair the product using suitable
new or reconditioned parts. In the case that other
parts are used which constitute an improvement,
BUGERA may, at its discretion, charge the customer
for the additional cost of these parts.
[2]. If the warranty claim proves to be justified, the
product will be returned to the user freight prepaid.
[3]. Warranty claims other than those indicated above
are expressly excluded.
[4].
[5].
§ 4 Return authorization number
[1]. To obtain warranty service, the buyer (or his
authorized dealer) must call BUGERA during normal business hours BEFORE returning the product.
All inquiries must be accompanied by a description
of the problem. BUGERA will then issue a return
authorization number.
[2]. Subsequently, the product must be returned in
its original shipping carton, together with the return
authorization number to the address indicated
by BUGERA.
[3]. Shipments without freight prepaid will not
be accepted.
[6].
[7].
product is accompanied by a copy of the original
retail dealer’s invoice. Any product deemed eligible
for repair or replacement under the terms of this
warranty will be repaired or replaced.
If the product needs to be modified or adapted in
order to comply with applicable technical or safety
standards on a national or local level, in any country
which is not the country for which the product
was originally developed and manufactured, this
modification/adaptation shall not be considered a
defect in materials or workmanship. The warranty
does not cover any such modification/adaptation,
irrespective of whether it was carried out properly
or not. Under the terms of this warranty, BUGERA
shall not be held responsible for any cost resulting
from such a modification/adaptation.
Free inspections and maintenance/repair work are
expressly excluded from this warranty, in particular,
if caused by improper handling of the product by
the user. This also applies to defects caused by
normal wear and tear, in particular, of faders, crossfaders, potentiometers, keys/buttons, tubes, guitar
strings, illuminants and similar parts.
Damage/defects caused by the following conditions
are not covered by this warranty:
• improper handling, neglect or failure to operate the
unit in compliance with the instructions given in
BUGERA user or service manuals;
• connection or operation of the unit in any way
that does not comply with the technical or safety
regulations applicable in the country where the
product is used;
• damage/defects caused by force majeure or any
other condition that is beyond the control
of BUGERA.
Any repair or opening of the unit carried out by
unauthorized personnel (user included) will void
the warranty.
If an inspection of the product by BUGERA shows
that the defect in question is not covered by the
warranty, the inspection costs are payable by
the customer.
Products which do not meet the terms of this
warranty will be repaired exclusively at the buyer’s
expense. BUGERA will inform the buyer of any such
circumstance. If the buyer fails to submit a written
repair order within 6 weeks after notification,
BUGERA will return the unit C.O.D. with a separate
invoice for freight and packing. Such costs will also
be invoiced separately when the buyer has sent in a
written repair order.
§ 7 Claim for damage
Failure of BUGERA to provide proper warranty service
shall not entitle the buyer to claim (consequential) damages. In no event shall the liability of BUGERA exceed the
invoiced value of the product.
* Customers in the European Union please contact BUGERA
Germany Support for further details.
www.bugera-amps.com
BUGERA BVP5500 • pg 6
BVP5500
BUGERA BVP5500 • pg 7
BUGERA BVP5500 Hook-Up
Step 1: Hook-Up
ES
Paso 1: Conexiones
Étape 1 : Connexions
EN
front/panel frontal/Face avant
Bass Chorus
BCH100
back/panel trasero/Face arrière
Bass Limiter
Enhancer BLE 100
Ultra Octaver
UO300
Bass/bajo/
Basse
FR
Front/
Panel
frontal/
Face avant
Return/ Back/Panel trasero/Face arrière
Retorno/
Retour
FSB102BVP Dual
Footswitch
Send/
Envío/
Départ
FSB102BVP Dual Footswitch
Echo Machine EM600
Racktuner BTR2000
TU300 Tuner
Xenyx 1202FX
Back/Panel trasero/
Face arrière
Front/Panel frontal/Face avant Return/
Retorno/
Retour
Send/
Envío/
Départ
Virtualizer Pro DSP2024P
FSB102BVP Dual Footswitch
www.bugera-amps.com
www.bugera-amps.com
BUGERA BVP5500 • pg 8
BUGERA BVP5500 • pg 9
BUGERA BVP5500 Controls
PRIMARY TONE CONTROLS—Shape your tone by boosting or
cutting various frequency ranges.
CONTROLES DE TONO PRIMARIOS—Modele el tono realzando o
cortando los diversos rangos de frecuencia.
RÉGLAGES DE TIMBRE—Modiffiez votre sonorité en accentuant
et/ou en atténuant certaines fréquences.
Step 2: Controls
Paso 2: Controles
Étape 2 : Réglages
BVP5500
ES
INPUT JACK—Plug your instrument into this jack.
Toma INPUT —Conecte su instrumento a esta toma.
JACK d’entrée INPUT—Reliez votre instrument à cette entrée.
FR
(CLIP) LED—Monitor the signal level throughout the
amplifier circuit.
Piloto (CLIP) — Le permite controlar el nivel de señal que pasa a
través del circuito del amplificador.
Led (CLIP) — Cette Led contrôle le niveau du signal dans les circuits
de l’amplificateur.
GAIN
GAIN
GAIN
L
J
L
MASTER VOLUME and VALVE GAIN—Control the amp volume
with MASTER VOLUME. For VALVE GAIN, turn this control fully
clockwise for maximum dynamic response; turn the control counterclockwise for valve compression and harmonics.
MASTER VOLUME y VALVE GAIN — Controle el volumen del
amplificador con el mando MASTER VOLUME. En cuanto a VALVE
GAIN, gire este control al tope de la derecha para conseguir la
máxima respuesta dinámica y gírelo hacia la izquierda para una
mayor compresión de la válvula y más armónicos.
Réglages MASTER VOLUME et VALVE GAIN — Réglez le volume
de l’ampli avec le MASTER VOLUME. Tournez le bouton VALVE GAIN au
maximum pour obtenir une réponse dynamique maximale ; tournez
le bouton au minimum pour obtenir le son de compression et les
harmoniques des lampes.
9-BAND GRAPHIC EQ—Boost or cut specific frequency bands with
the Graphic EQ sliders.
EQ GRAFICO DE 9 BANDAS — Realce o corte una banda concreta
con los mandos deslizantes de este ecualizador gráfico.
ÉGALISEUR GRAPHIQUE À 9 BANDES — Atténuez ou accentuez
certaines fréquences avec les curseurs de l’égaliseur graphique
GAIN CONTROL—Adjust the preamp input level using this knob.
CONTROL GAIN — Ajuste el nivel de entrada del previo por medio
de este mando.
Bouton de GAIN — Réglez le niveau d’entrée du préampli avec
ce bouton
TUNER OUTPUT/FOOTSWITCH—Route a signal directly from
the INPUT JACK to an external tuner and connect the FSB102BVP
footswitch.
SALIDA TUNER/FOOTSW — Le permite enviar una señal
directamente desde la toma INPUT a un afinador exterior /
conexión para la pedalera doble FSB102BVP.
SORTIE ACCORDEUR/PÉDALIER — Dirigez directement le
signal de l’entrée INPUT vers un accordeur externe et connectez
le pédalier FSB102BVP.
EFFECTS LOOP/INSERT CHANNEL—Route an external effects
processor into your signal chain or send your preamp tone out to a
power amplifier.
BUCLE DE EFECTO/INSERCION DE CANAL — Introduzca un
procesador de efectos externo en su ruta de señal o envíe su sonido
preamplificado a una etapa de potencia externa.
BOUCLE D’EFFETS/INSERSION DE CANAL — Utilisez un
processeur d’effets externe pour traiter votre son ou transmettre le
signal de votre préampli à un amplificateur de puissance externe.
www.bugera-amps.com
EN
SPEAKER CABLE JACKS—Connect the BVP5500 to the speaker
cabinet with professional speaker cables with either ¼" or
locking-style plugs. Total minimum load is 4 Ohms.
SALIDAS DE ALTAVOZ — Conecte el BVP5500 a sus recintos
acústicos por medio de cables de altavoz con conectores de tipo
bayoneta o de 6,3 mm.
SORTIES POUR ENCEINTES EXTERNES — Connectez le BVP5500
à vos enceintes externes à l’aide de cordons pour enceintes équipés
de connecteurs Jacks 6,35 mm ou de connecteurs professionnels à
verrouillage.
www.bugera-amps.com
LINE OUTPUT—The BALANCED OUTPUT jack routes a signal from
the BVP5500 into a mixer or recorder. The LEVEL knob controls the
signal volume. Use the PRE/POST button to choose between a signal
straight from the front panel instrument input, or a signal processed
by the preamp and effects loop.
SALIDA DE LINEA — La toma BALANCED OUTPUT le permite enviar
la señal del BVP5500 a una mesa de mezclas o grabadora. El mando
LEVEL controla el volumen de dicha señal. Utilice el botón PRE/POST
para elegir si quiere que la señal sea enviada directamente desde
la entrada de instrumentos del panel frontal o que sea una señal
procesada por el previo y el bucle de efectos.
SORTIE LIGNE — L’embase de sortie BALANCED OUTPUT transmet
le signal du BVP5500 à une console de mixage ou à un enregistreur.
Le bouton LEVEL détermine le niveau du signal de sortie. Utilisez
la touche PRE/POST pour prélever directement le signal de
sortie identique au signal d’entrée, ou le signal traité par le
préamplificateur et la boucle d’effets.
BUGERA BVP5500 • pg 10
BUGERA BVP5500 • pg 11
BUGERA BVP5500 Getting star ted 1-7
Step 3: Getting
started
Paso 3: Puesta en
marcha
Étape 3 : Mise en
oeuvre
Set all controls as shown: GAIN CONTROL and
MASTER VOLUME all the way down, VALVE GAIN
to maximum, all others centered.
Ajuste todos los controles como le mostramos
aquí: CONTROL GAIN y MASTER VOLUME al mínimo; VALVE
GAIN al máximo y el resto en su posición central.
Réglez comme indiqué : Les boutons GAIN CONTROL et
MASTER VOLUME au minimum, le bouton VALVE GAIN au
maximum, et tous les autres réglages en position centrale
Plug your bass guitar into the INPUT JACK using
an instrument cable with a ¼" TS plug.
Conecte su bajo a la toma INPUT por medio
de un cable de instrumento con un conector
TS de 6,3 mm.
Connectez votre basse à l’entrée INPUT à l’aide d’un cordon
pour instrument avec deux Jacks mono 6,35 mm.
Raise the volume by turning the MASTER
OUTPUT VOLUME CONTROL to the desired level.
Suba el volumen girando el CONTROL MASTER
OUTPUT VOLUME hasta el nivel que quiera.
Montez le volume en tournant le bouton MASTER OUTPUT
VOLUME, selon le volume sonore souhaité.
Adjust the VALVE GAIN CONTROL to taste.
Ajuste el CONTROL VALVE GAIN a su gusto.
Réglez le bouton VALVE GAIN selon vos souhaits.
GAIN
GAIN
www.bugera-amps.com
EN
ES
FR
Adjust the PRIMARY TONE CONTROLS to taste.
Ajuste los CONTROLES DE TONO PRIMARIOS de
acuerdo a sus gustos personales.
Modifiez les réglages de timbre selon la
sonorité recherchée.
Move the GRAPHIC EQ sliders up or down for
final adjustments to your tone. Adjust the LEVEL
slider to compensate for gain changes from the
main GRAPHIC EQ sliders.
Suba o baje los mandos deslizantes del EQ GRAFICO para
realizar los retoques finales del sonido. Ajuste el mando deslizante LEVEL para compensar cualquier posible cambio de
ganancia producido tras el ajuste de los mandos deslizantes
del EQ GRAFICO.
Déplacez les curseurs de l’égaliseur graphique selon la
correction sonore souhaitée. Réglez le curseur LEVEL pour
compenser les variations de gain générées par la courbe de
correction des curseurs de l’égaliseur graphique.
Turn the GAIN CONTROL clockwise while playing
until the (CLIP) LED lights occasionally, but not
constantly.
Mientras toca, gire el CONTROL GAIN a la derecha hasta que el piloto (CLIP) se ilumine de forma puntual,
nunca continuamente.
Tournez le bouton GAIN CONTROL vers la droite tout en
jouant, jusqu’à ce que la Led (CLIP) s’alllume uniquement sur
les passages les plus forts.
GAIN
BVP5500
L
J
L
www.bugera-amps.com
BUGERA BVP5500 • pg 12
BUGERA BVP5500 • pg 13
Specifications
AUDIO INPUTS/ENTRADA AUDIO/ENTRÉES AUDIO
INPUT/ENTRADA/ENTRÉES
Input Impedance/Impedancia de entrada/
Impédance d’entrée
¼" mono jack unbalanced (0dB/-15 dB)/conector mono
de 6,3 mm no balanceado (0 dB / -15 dB)/Jack 6,35 mm
mono asymétrique (0dB/-15 dB)
1 MΩ, unbalanced (pad 82 kΩ, unbalanced)/
1 MΩ, no balanceado (amortiguación o pad 82 kΩ,
no balanceado)/1 MΩ, asymétrique (atténuateur 82 kΩ,
asymétrique)
TONE CONTROLS/CONTROLES DE TONO/
RÉGLAGES DE TIMBRE
Bass/Graves/Basses
±12dB @ 50 Hz/ ±12 dB à 50 Hz
Mid/Medios/Médiums
±15dB @ 220Hz, 450Hz, 800Hz, 1.6 kHz, 3kHz/ ±15 dB à
220 Hz, 450 Hz, 800 Hz, 1,6 kHz, 3 kHz
Treble/Agudos/Aigus
+14dB, -19dB @ 5kHz/+14 dB, -19 dB à 5 kHz
GRAPHIC EQ/EQ GRAFICO/Égaliseur graphique
EFFECTS LOOP RETURN/RETORNO DE BUCLE DE
EFECTOS/RETOUR DE BOUCLE D’EFFETS
¼" mono jack, unbalanced/ conector mono de 6,3 mm,
no balanceado/Jack 6,35 mm mono asymétrique
33 Hz
±15dB
80 Hz
±8dB
Input Impedance/Impedancia de entrada/
Impédance d’entrée
100 kΩ, unbalanced/100 kΩ, no balanceado/
100 kΩ, asymétrique
150 Hz
±8dB
300 Hz
±8dB
POWER AMP INPUT/ENTRADA DE ETAPA DE
POTENCIA/ ENTRÉE AMPLI DE PUISSANCE
¼" mono jack, unbalanced/conector mono de 6,3 mm,
no balanceado/Jack 6,35 mm mono asymétrique
600 Hz
±8dB
Input Impedance/Impedancia de entrada/
Impédance d’entrée
100 kΩ, unbalanced/100 kΩ, no balanceado/
100 kΩ, asymétrique
900 Hz
±8dB
2 kHz
±8dB
5 kHz
±9dB
AUDIO OUTPUTS/SALIDAS AUDIO/SORTIES AUDIO
TUNER OUTPUT/SALIDA DE AFINADOR/
SORTIE ACCORDEUR
¼" mono jack, unbalanced/conector mono de 6,3 mm,
no balanceado/Jack 6,35 mm mono asymétrique
8 kHz
±10dB
Level
±10dB
Output Impedance/Impedancia de salida/
Impédance de sortie
2.2 kΩ, unbalanced/2.2 kΩ, no balanceado/
2,2 kΩ, asymétrique
BRIGHT SWITCH/INTERRUPTOR BRIGHT/
TOUCHE BRIGHT
+6dB @ 2kHz
EFFECTS LOOP SEND/ENVIO DE BUCLE DE EFECTOS/ DÉPART DE BOUCLE D’EFFETS
¼" mono jack, unbalanced/conector mono de 6,3 mm,
no balanceado/Jack 6,35 mm mono asymétrique
ULTRA HIGH SWITCH/INTERRUPTOR ULTRA
HIGH / TOUCHE ULTRA HIGH
+6dB @ 5kHz
Output Impedance/Impedancia de salida/
Impédance de sortie
2.2 kΩ, unbalanced/2.2 kΩ, no balanceado/
2,2 kΩ, asymétrique
LINE OUTPUT/SALIDA DE LINEA/SORTIE LIGNE
XLR connector, balanced/Conector XLR, balanceado/
Connecteur XLR symétrique
ULTRA LOW SWITCH/INTERRUPTOR ULTRA LOW/ +2.5dB @ 50Hz/+2,5 dB à 50 Hz
TOUCHE ULTRA LOW
-12dB @ 560 Hz/-12 dB à 560 Hz
+1.5dB @ 5kHz/+1,5 dB à 5 kHz
Output Impedance/Impedancia de salida/
Impédance de sortie
300 kΩ, unbalanced/300 kΩ, no balanceado/
300 kΩ, asymétrique
PREAMP OUTPUT/SALIDA DE PREVIO/
SORTIE PRÉAMPLI
¼" mono jack, unbalanced/conector mono de 6,3 mm,
no balanceado/Jack 6,35 mm mono asymétrique
Output Impedance/Impedancia de salida/
Impédance de sortie
2.2 kΩ, unbalanced/2.2 kΩ, no balanceado/
2,2 kΩ, asymétrique
Output Level/Nivel de salida/Niveau de sortie
max. +4 dBu/máximo +4 dBu/+4 dBu maximum
LOUDSPEAKER CONNECTORS/CONECTORES DE
ALTAVOZ/ CONNECTEURS D’ENCEINTES
2 x ¼" TS jack, 1 x twist-lock professional speaker connector/ 2 x conectores TS de 6,3 mm, 1 x conector de altavoz
profesional de tipo bayoneta/2 Jacks mono 6,35 mm,
1 connecteur professionnel pour enceinte à
verrouillage
Load Impedance/Impedancia de carga/
Impédance de charge
POWER SUPPLY/FUENTE DE ALIMENTACION/ALIMENTATION
POWER CONSUMPTION/CONSUMO/
CONSOMMATION ÉLECTRIQUE
max. 650 W
MAINS VOLTAGE/VOLTAJE/TENSION SECTEUR
100 -120 V ~ (50/60 Hz)
T 8 A H 250 V
220 -230 V ~ (50/60 Hz)
T 4 A H 250 V
MAINS CONNECTOR/CONECTOR ELECTRICO/
CONNEXION AU SECTEUR
standard IEC receptacle/receptáculo IEC standard/
Embase IEC standard
DIMENSIONS, WEIGHT/DIMENSIONES, PESO/DIMENSIONS, POIDS
DIMENSIONS (H x W x D)/DIMENSIONES (A x L x P)/ 19.1 in/48,5 cm x 12.4 in/31,5 cm x 3.7 in/9,5 cm
DIMENSIONS (H x L x P)
WEIGHT/PESO/POIDS
27.3 lb/12,4 kg
min. 4 Ω/mínimo 4 Ω/4 Ω minimum
SYSTEM DATA/DATOS DEL SISTEMA/DONNÉES PHYSIQUES
OUTPUT POWER/POTENCIA DE SALIDA/
PUISSANCE DE SORTIE
Peak Power/Potencia en picos/Puissance crête
www.bugera-amps.com
550 Watts, 4 Ω/550 watios, 4 Ω/550 Watts, 4 Ω
300 Watts, 8 Ω/300 watios, 8 Ω/ 300 Watts, 8 Ω
www.bugera-amps.com
BUGERA BVP5500 • pg 14
BUGERA BVP5500 • pg 15
Other important information
Important
information
Aspectos
importantes
Informations
importantes
1. Register online. Please register your new
BUGERA equipment right after you purchase it by visiting
www. bugera- amps. com. Registering your purchase
using our simple online form helps us to process your
repair claims more quickly and efficiently. Also, read the
terms and conditions of our warranty, if applicable.
2. Malfunction. Should your BUGERA product
malfunction, it is our intention to get it repaired
as quickly as possible. Please contact the retailer
from whom the equipment was purchased. Should
your BUGERA dealer not be located in your vicinity,
contact one of our subsidiaries or distributors listed at
www. bugera- amps. com in the WHERE TO BUY section.
3. Power Connections. Before plugging the
unit into a power socket, please make sure you are using
the correct mains voltage for your particular model.
Faulty fuses must be replaced with fuses of the same type
and rating without exception.
1. Registro online. Le recomendamos
que registre su nuevo aparato BUGERA justo
después de su compra accediendo a la página web
www. bugera- amps. com. El registro de su compra a través
de nuestro sencillo sistema online nos ayudará a resolver
cualquier incidencia que se presente a la mayor brevedad
posible. Además, aproveche para leer los términos y
condiciones de nuestra garantía, si es aplicable en
su caso.
EN
1. Enregistrez-vous en ligne. Prenez le
temps d’enregistrer votre produit BUGERA aussi vite que
possible sur le site Internet www. bugera- amps. com. Le
fait d’enregistrer le produit en ligne nous permet de gérer
les réparations plus rapidement et plus efficacement.
Prenez également le temps de lire les termes et
conditions de notre garantie.
ES
FR
2. Dysfonctionnement. Si le produit
BUGERA venait à ne pas fonctionner correctement, nous
ferons notre possible pour le réparer dans les plus brefs
délais. Contactez le revendeur BUGERA où vous avez
acheté l’appareil. Si le revendeur BUGERA n’est pas à
proximité, contactez l’un de nos distributeurs ou l’une
de nos filiales dont la liste se trouve sur le site Internet
www. bugera- amps. com, dans la section
d’assistance WHERE TO BUY.
3. Raccordement au secteur. Avant de
raccoder cet équipement au secteur, assurez-vous que la
tension du secteur de votre région soit compatible avec
l’appareil. Veillez à remplacer les fusibles uniquement
par des modèles exactement de même taille et de même
valeur électrique — sans aucune exception.
2. Averías. En el improbable caso de que su
aparato BUGERA esté averiado, nuestro compromiso es
repararlo lo antes posible. Póngase en contacto con el
comercio en el que adquirió este aparato. En caso de que
no pueda localizar un comercio BUGERA en las cercanías,
también puede ponerse en contacto con cualquiera de
nuestros distribuidores o empresas subsidiarias que
aparecen dentro de la sección WHERE TO BUY de la página
web www. bugera- amps. com.
3. Conexiones de corriente. Antes
de enchufar este aparato a una salida de corriente,
asegúrese de que dicha salida sea del voltaje adecuado
para su modelo concreto. En caso de que deba sustituir
un fusible quemado, deberá hacerlo por otro de idénticas
especificaciones, sin excepción.
www.bugera-amps.com
www.bugera-amps.com
EN
BUGERA
BVP5500
ES
FR
www.bugera-amps.com