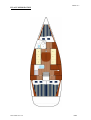
1
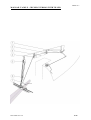
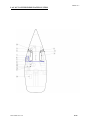
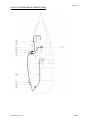
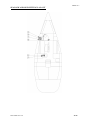
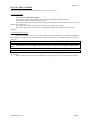
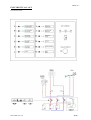
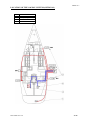
FIRST 36.7
OWNER’S MANUAL
FIRST 36.7
FR-BEY _ _ _ _ _ _ _ _ _
BENETEAU REF :
055194
SUMMARY:
I) INTRODUCTION ................................................................................................................................................3
II) IDENTITY CARD OF THE BOAT....................................................................................................................4
III) ACCOMMODATION .......................................................................................................................................6
IV) DECK (Location of the life raft) ........................................................................................................................8
V) SAILS AND RIGGING ......................................................................................................................................9
VI) FRESH WATER SYSTEM .............................................................................................................................17
VII)BILGE PUMP SYSTEM.................................................................................................................................19
VIII) SEACOCKS AND SKIN FITTINGS ...........................................................................................................21
IX) ELECTRIC SYSTEMS ...................................................................................................................................23
X) GAS SYSTEM ..................................................................................................................................................29
XI) EMERGENCY SYSTEM OF THE STEERING SYSTEM ...........................................................................31
XII) MOTORIZATION .........................................................................................................................................32
XIII) HANDLING..................................................................................................................................................34
XIV) MAINTENANCE .........................................................................................................................................35
XV) ENVIRONMENT...........................................................................................................................................38
EXPLANATION OF THE TYPOGRAPHY USED:
DANGER
WARNING
TAKE CARE
MAJ ANG 09/07/01
FIRST 36.7
RECEIPT
OWNER’S NAME
…………………………………………………………………………..
ADDRESS
…………………………………………………………………………..
…………………………………………………………………………..
…………………………………………………………………………..
Owner of the FIRST 36.7 n° ……………………………………………………………………………….
Do certify that I have accepted delivery and read the information in the owner’s manual delivered with the boat.
On …………………………………………
Signature
Please keep this copy for your records
•••••••••••••••••••••••••••••••••••••••••••••••••••••••••••••••••••••••••••••••••••••••••••••••••••
RECEIPT
OWNER’S NAME
:
…………………………………………………………………………..
ADDRESS
:
…………………………………………………………………………..
…………………………………………………………………………..
…………………………………………………………………………..
Owner of the FIRST 36.7 n° ……………………………………………………………………………….
Do certify that I have taken delivery and read the information in the owner’s manual delivered with the boat.
On …………………………………………
Signature
Please send back this copy to BENETEAU S.A
ZI des Mares BP66
85270 Saint Hilaire de Riez
FRANCE
MAJ ANG 29/11/01
2/38
FIRST 36.7
I) INTRODUCTION
Dear Madam, Dear Sir,
You have just taken delivery of your new BENETEAU boat and we would like to congratulate you first
of all for the confidence you showed to us in choosing a product of our mark.
A BENETEAU boat is built to last : each boat is subject to particular care in the slightest details, as
early as when she is designed, when she leaves the factory and she is launched ; this way, she will come up to
your expectations for many years.
This manual was meant to help you to enjoy your boat safely. You will find in it the details of your
boat , her fittings and information about the use and maintenance. Read it carefully and get to know her before
you put out to sea.
If this is your first boat, or if you change to a new type of boat (to which you are not used) get some
training to control and sail her , to ensure your safety and comfort. Then you will be able to assume the command
of the boat. Your dealer, your national sailing association or your Yacht club will be very happy to recommend
you local sailing schools or professional instructors.
Have fine and safe sailing time.
(1) Throughout their lives, our boats are regularly improved and benefit from our experience and our
customers’ experience ; therefore the specifications given in this owner’s manual are not contractual and may be
modified without prior notice and up dating obligation.
In the same way, this manual has a general purpose and it may sometimes list some equipments or refer
to some points which are not relevant to your own boat. In case of doubt, you shall always refer to the inventory
list.
KEEP THIS MANUAL IN A SAFE PLACE AND HAND IT OVER TO THE NEW OWNER IF YOU SELL
THE BOAT.
MAJ ANG 29/11/01
3/38
FIRST 36.7
II) IDENTITY CARD OF THE BOAT
Type........................................................
Name of Builder ....................................
Design Category .....................................
N° of acknowledged body ......................
FIRST 36.7
BENETEAU SA
A
CE 0607
Length of Hull
Beam
Draught:
m
m
m
m
m
10.68
3.45
2.20
1.80
17.00
Deep keel
Shoal keel
Air draught
Maxi Authorized Engine Power :
Fuel Capacity
Fresh Water Capacity
Battery Capacity
25 kW
75 Litres
300 Litres
2x70 Amp
Category
Height of Waves
(m)
>4
<4
<2
< 0.5
A
B
C
D
Wind Force
(Beaufort)
>8
<8
<6
<4
For additional information concerning the fitted equipments, please refer to their manuals enclosed in
the boat literature.
Maximum recommended number of persons on board by design category:
Category
A
B
C
D
Number of
persons
8
8
8
10
The CE certified equipments of the boat are : The fuel tanks, the parts of the steering system, the parts of the gas
system and the hatches and portholes.
(1)
MAJ ANG 29/11/01
4/38
FIRST 36.7
WEIGHT ESTIMATION
SAILING CATEGORIES
A
B
C
D
5 597
110
50
112
5 869
65
5 597
110
50
112
5 869
65
5 597
110
50
112
5 869
65
5 597
110
50
112
5 869
65
600
300
56
265
329
140
50
20
10
20
20
20
26
3
20
225
600
300
56
265
329
140
50
20
10
20
20
20
26
3
20
225
600
300
56
265
329
140
50
20
10
20
20
20
26
3
20
225
750
300
56
190
329
140
50
20
10
20
20
20
26
3
20
150
MAXIMUM LOAD DISPLACEMENT
(Kg)
7 709
7 709
7 709
7 709
MAXIMUM LOAD (Kg)
1 840
1 840
1 840
1 840
Light Boat :
Safety Equipment :
Sail :
Building margin :
Light Displacement :
Life Raft :
Crew :
Water :
Fuel :
Personal Equipment :
Optional Equipment :
Including teak deck :
Holding Tank :
Auto Pilot Gear :
Spinnaker Rigging :
Roof Sprayhood :
Bimini Top :
3 batteries:
Windlass :
Charger 220 :
Fridge :
Margin for Extra Equipment :
MAXIMUM LOAD = MAXIMUM LOAD DISPLACEMENT – LIGHT BOAT
ANY OVERLOADING CARRIES A RISK OF FLOODING OR LOSS OF
STABILITY
MAJ ANG 29/11/01
5/38
FIRST 36.7
III) ACCOMMODATION
MAJ ANG 29/11/01
6/38
FIRST 36.7
EXIT IN CASE OF FIRE
The boat is delivered without any fire extinguisher. It is your own responsibility to comply with
the laws and regulations of your own country (Number, capacity, type and place of fire extinguishers).
We advise you at least to install an extinguisher less than 5 metres away from each berth, less than 2
meters away from the extinguisher aperture in the engine compartment, less than 2 meters away from any
naked flame device and less than 1 meter avay from the helm pedestal. We advise a total capacity of the
portable extinguishers reaching 8A/64B, each extinguisher having at least a 5A/34B capacity. The CO2
extinguishers shall be used to fight fires in the galley or electric fires.
= Recommended Exits
= Recommended locations for the extinguishers
MAJ ANG 29/11/01
7/38
FIRST 36.7
IV) DECK
- The safe lines can be fastened either on the mooring cleats or on the toe rail.
Some boats are fitted with a foldaway swimming ladder. The swimming ladder shall be in its
usual place as soon as you are on board.
Make sure that the hatches and portholes are closed before you put out to sea.
In case of rough sea, close the boat with her door and washboard so that no water may come into
the boat
Check that nothing blocks up the draining holes ; never seal them.
1
Location of the life-raft
MAJ ANG 29/11/01
8/38
FIRST 36.7
V) SAILS AND RIGGING
Specifications of the Sails :
SAIL
Total
Main Sail
Genoa (maxi)
Spinnaker
CRUISING
73
36
37
90
RACING
78.5
38
40.5
90
Specifications of the Standing Rigging:
V : Vertical
D : Diagonal
MARK
1
2
3
4
5
6
CABLE
V1 (Shroud)
D1 (Lower
Shroud)
V2 (Upper Shroud)
D2 (Inter)
Forestay
Backstay
MAJ ANG 29/11/01
Ø mm
m²
m²
m²
m²
m²
I
J
P
E
LP
SL
SMW
14.15
3.975
13.85
4.75
5.75
13.86
7.09
m
m
m
m
m
m
m
Mast with 3 spreaders – Rod rigging
MARK
ROD
REF
10
8
1
2
V1 (Shroud)
Dash 17
D1 (Lower Shroud) Dash 10
8
6
8
7
3
4
5
6
7
8
V2 (Lower Shroud)
D2 (Inter)
Forestay
Backstay
D3
V3D4
Dash 12
Dash 6
Dash 12
Dash 10
Dash 4
Dash 10
9/38
FIRST 36.7
DECK FITTING LAY OUT – CRUISING VERSION
REF.
1
2
3
4
5
6
7
8
9
10
DESIGNATION
Genoa Furling Line
Genoa Halyard
Reefing Line n° 2
Mainsail Sheet
Mainsail Foot Tuning Line
Boom Downhaul
Reefing Line n° 1
Mainsail Halyard
Linking Strap
Genoa Traveller
MAJ ANG 29/11/01
10/38
FIRST 36.7
DECK FITTING LAY OUT – RACING VERSION
REF.
1
2
3
4
5
6
7
8
9
10
11
12
13
DESIGNATION
Portside Spinnaker Halyard
Genoa Halyard
Reefing Line n° 2
Mainsail Foot Tuning Line
Boom Downhaul
Reefing Line n° 1
Mainsail Halyard
Spinnaker Boom Topping Lift
Starboard Spinnaker Halyard
Linking Strap
Genoa Traveller
Spinnaker Barber Hauler
Spinnaker Boom Downhaul
MAJ ANG 29/11/01
11/38
FIRST 36.7
TUNING OF THE BACKSTAY – CRUISING AND RACING VERSIONS
TACKLE FOR BOOM DOWNHAUL – CRUISING AND RACING VERSIONS
REF.
1
2
3
4
DESIGNATION
Block – Ø 60 2601
Block – Ø 60 1611
Double Block – H 127
Single Block H 168 x 3
REF.
1
2
3
4
REF.
1
2
3
4
5
6
7
8
DESIGNATION
Triangular batten
Tensioner
Briddle cable 7 x 19
Tackle 1/6
DESIGNATION
Block Ø 80 2801
Line in Dyneema Ø 12
Block Ø 60 2601
Line in Dyneema Ø 10
Block Ø 60 1611
Line in Dyneema Ø 8
Safety in Dyneema Ø 9
Tackle 1/6
MAJ ANG 29/11/01
12/38
FIRST 36.7
MAINSAIL TACKLE – CRUISING VERSION WITH TILLER
MAJ ANG 29/11/01
13/38
FIRST 36.7
MAINSAIL TACKLE – RACING VERSION WITH TILLER
MAJ ANG 29/11/01
14/38
FIRST 36.7
MAINSAIL TACKLE – CRUISING VERSION WITH STEERING WHEEL
MAJ ANG 29/11/01
15/38
FIRST 36.7
MAINSAIL TACKLE – RACING VERSION WITH STEERING WHEEL
MAJ ANG 29/11/01
16/38
FIRST 36.7
VI) FRESH WATER SYSTEM
REF
1
2
3
4
5
6
7
8
9
10
13
14
15
16
DESCRIPTION
Water Tank 150 l
Water Tank 150 l
Filler _ Fresh Water Tank
Filler – Fresh Water Tank
Vent Hole – Fresh Water Tank
Collector Fresh Water System
Filter – Fresh Water System
Water Pump
Foot pump – Fresh Water (optional)
Boiler (capacity : 22 l)
Galley Sink
Washbasin/Shower
Icebox – capacity : 90 l
Fridge
The fresh water system supplies the sink in the galley and the washbasins. This supply is made
depending on the models, either by a manual pump, or by an electric pump ; before this pump there is a filter it is
necessary to clean regularly.
Never run an electric pump when the tank is empty otherwise it might be irreparably damaged.
Never force the filling nozzle deep down the filler pipe in order to prevent any over pressure in the
systems and keep an eye on the vent hole(s) through which the water in excess will be discharged.
When the system has not been used for a long period of time, the tanks and pipes shall be cleansed with
an acetic acid solution (white vinegar)
The water flows out from the sink and wash basins through their own skin fitting seacocks ; Close them when the
water system is not used.
MAJ ANG 29/11/01
17/38
FIRST 36.7
LAY OUT OF THE FRESH WATER SYSTEM
MAJ ANG 29/11/01
18/38
FIRST 36.7
VII) BILGE PUMP SYSTEM
REF
1
2
3
4
5
6
7
8
9
10
11
DESCRIPTION
Electric Bilge Pump 17 l/mn
Filter of the Electric Bilge Pump
Sump
Manual Bilge Pump 0.75 l/each time
Electric Bilge Pump Intake
Manual Bilge Pump Intake
Delivery of the Electric Pumps
Manual Bilge Pump Delivery
Shower Intake
Filter of the Electric Shower Pump
Electric Shower Pump 17 l/mn
Make sure the bilge pump system is in good working order before you put out to sea.
Make yourself acquainted with the way the bilge pump system of your boat works :
- Locate the manual bilge pump and the handle which enables you to make it work.
- Locate the on switch of the electric bilge pump and get to know how the seacocks work
(for the boats fitted with an electric bilge pump).
(See the lay out drawing of the system in the owner’s handbook)
Make sure that the bilge pump intake strum box is not blocked with dirts.
Regularly clean the intake strum box on the sump and the filter of the system in case of an electric pump.
MAJ ANG 29/11/01
19/38
FIRST 36.7
LAY OUT OF THE BILGE PUMP SYSTEM
MAJ ANG 29/11/01
20/38
FIRST 36.7
VIII) SEACOCKS AND SKIN FITTINGS
Close all the seacocks when you leave the boat.
The flushing toilets may be situated below the waterline ; get into the habit of systematically
closing the seacocks after each use.
Make sure that all the seacocks which are not used are closed before you put out to sea. (in the owner’s
manual, see the drawing where the lay out of the skin fittings is shown).
Opening and closing of the seacocks
Open
Closed
REF
1
2
3
5
7
9
DESCRIPTION
Heads Outlet
Heads Intake
Washbasin Outlet
Sink Outlet
Sea Water Foot Pump Intake – Icebox Outlet
Log / Sounder Skin Fitting
MAJ ANG 29/11/01
21/38
FIRST 36.7
SEACOCK AND SKIN FITTING LAY OUT
MAJ ANG 29/11/01
22/38
FIRST 36.7
IX) ELECTRIC SYSTEMS
When the voltage is not specified, all the functions or panels are in 12 Volts.
12V Electric System
Never work on a live electric fitting.
Never tamper with an electric fitting. Call in a technician qualified in marine electricity.
The batteries must be carefully and safely stowed.
In order to prevent a short circuit between the battery terminals, do not store conductive objects near the
batteries (e.g. metal tools, ...)
Never alter the specifications of the devices which protect against overstrength.
Never fit or replace the electric materials or appliances by components which exceed the system
amperage.
110V-220V Electric System
Some boats are fitted with a 110V or a 220 V system (some as standard, others as an option, depending
on the models). We advise you to follow the below mentioned steps in order to avoid the risks of electric shocks
and of fire.
Do not work on a live fitting.
Connect the boat / shore supply cable in the boat before you plug it into the shore supply socket
itself.
Do not immerse the boat / shore cable sockets.
Switch off the shore supply with the switch on board before you plug in or unplug the boat / shore
supply cable.
Do not tamper with the connections of the Boat / shore supply cable. Use only compatible connections.
MAJ ANG 29/11/01
23/38
FIRST 36.7
ELECTRICITY LAY OUT
12V Electric Panel
MAJ ANG 29/11/01
24/38
FIRST 36.7
LAY OUT OF THE 12V LIGHTS AND APPLIANCES
REF
1
10
5
6
30
31
32
33
34
35
36
37
38
40
41
42
43
44
45
46
13
14
11
16
21
22
DESCRIPTION
Bicolour Navigation Bow Light
White Stern Navigation Light
Mooring Light
Steaming Light
Ceiling Light
Reading Light
Reading Light
Ceiling Light
Ceiling Light
Ceiling Light
Reading Light
Reading Light
Neon Tube
Ceiling Light
Ceiling Light
Ceiling Light
Ceiling Light
Ceiling Light
Ceiling Light
Ceiling Light
Water Pump
Bilge pump
Fridge
Shower Pump
Water Tank Gauge
Water Tank Gauge
FUNCTION ON PANEL
Navigation Lights
Navigation Lights
Mooring Light
Steaming Light
Cabin Lights
Cabin Lights
Cabin Lights
Cabin Lights
Cabin Lights
Cabin Lights
Cabin Lights
Cabin Lights
Cabin Lights
Saloon Lights
Saloon Lights
Saloon Lights
Saloon Lights
Saloon Lights
Saloon Lights
Saloon Lights
Water Pump
Bilge pump
Fridge
Comfort
Gauge n° 1
Gauge n° 2
12V FUNCTIONS
REF
FUNCTION
220 V FUNCTIONS
AMPERAGE
( A)
10
5
5
10
10
10
5
10
10
10
10
16
10
10
A
B
C
D
E
F
G
H
I
J
K
L
M
N
Navigation Light
Mooring Light
Steaming Light
Deck Light
Cabin Lights
Saloon Lights
Instrument Lights
DC 12 V Socket
Water Pump
Bilge Pump
Fridge
Comfort 1
Navigation Instruments
VHF/HIFI
O
Spare 1
10
P
Comfort 2
16
MAJ ANG 29/11/01
REF
Q
R
S
T
FUNCTION
General Power Supply
Battery Charger
220 V Socket
Boiler
AMPERAGE
(A)
70
16
10
10
25/38
FIRST 36.7
12V LIGHT AND APPLIANCE LAY OUT
MAJ ANG 29/11/01
26/38
FIRST 36.7
LOCATION OF THE 110/220V SYSTEM (OPTIONAL)
REF.
1
2
3
4
DESCRIPTION
Shore Supply Socket
Battery Charger
110/220V Socket
Boiler
MAJ ANG 29/11/01
27/38
FIRST 36.7
LAY OUT OF THE OPTIONAL EXTRA SHEATHES
REF
2
1
4
5
6
6
DESCRIPTION
Sheath from Panel to Automatic Steering Gear
Sheath for the passage from Portside to Starboard
Sheath from Panel to Mast Foot
Sheath from Panel to Sounder
Sheath from Windlass to Relay Box
Sheath from Panel to Instrument Consol
Passage in the hull inner moulding
Passage in the deck inner moulding
MAJ ANG 29/11/01
28/38
FIRST 36.7
X) GAS SYSTEM
Gas Stove
Do not fit or store flammable materials above or over the stove (Curtains, papers,
napkins, and so on……).
Never leave the boat unattended when the gas or spirit appliances are working.
The appliances which use fuel consume the oxygen within the cabin and release the combustion
products into the boat. It is necessary to ventilate the boat when the gas cooking appliances are working.
Do not obstruct the air vents of the boat.
Do not smoke or use a naked flame when you are trying to locate a gas leak or when you change
the gas bottle or whenever you intervene on the gas system.
If you smell gas or find that the burners have gone out, by accident, (although appliance models
cut off the gas automatically if the flames go out) turn off the gas taps and do ventilate the boat in order to
get rid of any residual gas. Find the root of the problem.
For the stoves with an integral gas cylinder you shall change the cylinder outside the boat. Test
the stove before you put it back in the galley. Pay particular attention to the stove fittings and make sure
the stoves are locked after they have been put in their places.
Do not use cooking appliances to heat the inside of the boat.
Make sure that the taps of the burners are turned off before you turn on the tap of the hoses and
of the cylinder.
Turn off the tap on the feed hose and the taps on the cylinders when you do not use the
appliances.
Do not obstruct the access to the gas system components, in particular the access to the taps (cylinders
and gas cooker).
The flexible hoses which connect the gas cylinder at one end of the system and the stove at the other
end, shall be changed in pursuance of the regulations in force in your country. Only use hoses which meet the
safety standards of your country.
Do not use the gas cylinder storage space to store other equipments.
Pay particular attention to keep in good condition the screw thread of the cylinder on which the
regulator is. Check the condition of the regulator every year and change it if necessary. Use a regulator identical
to the ones which are fitted.
Make sure that the taps of the empty cylinders are turned off and disconnected from the system.
Do not use ammonia based products to clean it or to discover a leak.
MAJ ANG 29/11/01
29/38
FIRST 36.7
Spirit Stove
Some boats are fitted with a spirit stove.
Do not smoke when handling the fuel.
Keep the fuel in a can for this purpose, a good distance away from the stove, the engine and any
other sources of heat.
Follow the manufacturer’s recommendations as far as the filling of the burners is concerned. Do
not pour the spirit directly into the burner over the stove.
Only use methylated spirits. Petrol, oil, propane, diesel oil, fuel oil or other fuels and flammable
materials are to be proscribed.
Any fuel overflow out of the burner tank shall be wiped up immediately.
LAY OUT OF THE GAS SYSTEM
REF
1
2
3
4
MAJ ANG 29/11/01
DESCRIPTION
Gas Locker
Tap
Regulator
Gas Locker Ventilation
30/38
FIRST 36.7
XI) STEERING SYSTEM, EMERGENCY SYSTEM
Boats who are fitted with a steering wheel carry an emergency tiller ; keep clear emergency tiller
access.
Lift the aft cover, open the cap, drive the emergency tiller into the print on the rudderstock head..
REF
1
2
3
4
5
6
7
8
DESCRIPTION
Emergency Tiller
Cap to the Rudder Stock
Upper Bearing
Rod of the Steering Wheel
Rod of the Tiller Stop
Sealing Washer
Lower bearing
Compensation Washer
MAJ ANG 29/11/01
31/38
FIRST 36.7
XII) MOTORIZATION
Stop the engine, do not smoke while you are filling up the fuel tank.
Before you start the engine, make sure that the engine compartment bilge is clean and dry. If
there is the slightest presence of fuel in the bottom, you must not start the engine.
For the boats fitted with a petrol engine, ventilate the engine compartment for 5 minutes with the
bilge ventilators so that the possible petrol vapours may be removed completely.
For the outboard engines with a spare can, fill up the portable tank outside the boat in a well
ventilated place and away from any risk of possible fire.
The fuels that are stored outside the tanks (spare cans, jerrycans,...) shall be kept and stored in a
ventilated place.
Know exactly where the extinguisher aperture is located in the engine compartment bilge so you
will be able to put out a fire breaking out in it.
A fixed system of extinguisher which enables you to put out a fire breaking out in the engine
compartment bilge is fitted in the boats with petrol engines. Know where the release mechanism is and the
way it works. It is necessary to ventilate the engine compartment after this mechanism has been released.
REF
1
2
3
4
5
6
7
8
9
10
11
DESCRIPTION
Engine Ventilation Grid
Engine Air Vent
Anti- Siphon
Vent Hole of Fuel Tank
Extinguisher aperture
Engine Battery
Engine Block
Fuel Gauge
Baffle Box
Service Battery
Engine Control Handle in the Cockpit
MAJ ANG 29/11/01
REF
14
6
17
19
23
24
25
26
27
28
29
DESCRIPTION
Tank
Propeller
Exhaust Pipe
Battery Breaker
Exhaust Outlet
Sea Water Filter
Decanter Filter
Engine Stop Control
Pull Handle to Stop the Fuel Oil Intake
Fuel Oil Filling Cap
Stern Tube Seacock
32/38
FIRST 36.7
ENGINE LAY OUT
MAJ ANG 29/11/01
33/38
FIRST 36.7
XIII) HANDLING
Contact your BENETEAU dealer for the maintenance and repairs of your boat. He will advise properly,
will supply you with the spare parts you need or the materials that are suited to your boat.
Have your boat examined and maintained once a year during the winter storage.
POSITION OF CRANING STRAPS AND CRADLE POSITION.
MAJ ANG 29/11/01
34/38
FIRST 36.7
XIV) MAINTENANCE
Because you have chosen to invest your money in a recreational item that spends its life in a harsh
environment, it is very important to ensure that your boat is well and regularly maintained. Furthermore,
a fair number of accidents are due to negligence and the lack of maintenance. These two reasons (the
protection of your property and safety) must make you become aware of the importance of a regular and
thorough maintenance of your boat.
The advice you will find hereafter and your PERSONAL NOTES will help you.
1) THE HULL
It is in laminated GRP. It is made with high quality products. However it would be wrong to assert that it
will keep its original condition for life if you do not give over to it a minimum care.
The gel coat is fragile and the knocks and scratches it might have when you manoeuvre might leave
marks on it. Have always a member of your crew ready to put a fender at the right place.
It will be useful to hose off the hull and deck with fresh water, as often as you can.
Hull Preparation
Beforehand, you may apply on the gel coat an epoxy paint ; it will protect the bottom (the careen) of
your boat against the natural attacks of the sea environment.
Moreover, the bottom shall be covered with a protective antifouling paint which will prevent the
adhesion of the sea vegetation.
When you apply the antifouling paint, be careful : do not paint the anodes, the heads of the electronic
instruments and do not obstruct the strainers of the water intakes, in particular the strainers of the engine-cooling
system.
In all events, remove the grease from the bottom and slightly hand rub down with at least # 400 grit sand
paper and water.
Maintenance
In order to keep the good looking gel coat of your boat, a preventive and regular maintenance of it is
necessary. For this, do not hesitate to ask your dealer who will give you advice about the methods to follow and
the most appropriate products to use.
2) THE DECK
Regularly rinse the deck and deck fittings with fresh water.
Regularly scrub the deck with a mild detergent liquid.
Deck Fitting :
Regularly lubricate the blocks, sheaves, turnbuckles, winches, windlass, rails, travellers, and so on with
grease or light oil.
Polish with an appropriate polish paste the stainless steels which may have small pits or superficial
oxidisation pits.
MAJ ANG 29/11/01
35/38
FIRST 36.7
The Outside Teak Woodworks :
Scrub the woodworks using water.
The teak woodworks do not need any particular protection. If you just rub them down with fine
sandpaper, it will renovate the look of the teak.
Plexiglass:
Rinse with fresh water. Clean them using a sponge and a cleaning product for windows.
The Rudder :
Every year have the whole steering system overhauled.
3) INSIDE
Whenever the weather makes it possible, air and ventilate regularly your boat, take off the floorboards,
the berth spreads and put them vertically when you leave the boat.
Protect the inside of your boat as often as you can with the fitted curtains.
Make sure that the bilges are clean and dry.
The internal woodworks are varnished in most of our boats ; therefore you have to rinse them with fresh
water and a liquid detergent, then polish them with a chamois leather.
The cleaning of the fabrics, cushions or lining of your boat depends on the materials used. Therefore you
must contact a skilled specialist before you do anything.
Fresh Water System
It is possible to sterilize the tanks with Clonazone tablets (Dygerma in UK, or a product sold in your
country and containing the equivalent molecule, i.e. Tosylchloramid) which are available at the Chemist’s.
If the boat is not used for a long period of time, rinse the tanks and pipes with water and vinegar.
Engine
Have the whole drive system overhauled and maintained by a skilled mechanic and refer to the
instructions by the engine manufacturer , These instructions are supplied with your boat.
Keep the fuel tank as full as you possibly can in order to avoid condensation.
4) RIGGING
You must examine once a year the running and standing rigging. Take advantage of this examination to
maintain them.
Carefully rinse the running rigging with fresh water at the end of each season.
MAJ ANG 29/11/01
36/38
FIRST 36.7
5) SAILS
Whenever it is possible, rinse the sails with fresh water and let them dry.
The sails cannot stand the sun and water ; therefore, unrig them whenever you can or at least protect
them, using appropriate covers.
6) WINTER STORAGE
LAYING UP
Remove from the boat all the documents of the boat, the lines which are not useful to moor the boat, the
supplies, the clothes, the safety equipment, the batteries, the gas cylinder, and so on...
Have your safety equipment overhauled.
During this laying up period, draw up a complete inventory of the equipment on your boat.
PROTECTION AND MAINTENANCE
a) Inside:
Drain the fresh water pipes and rinse them with water and vinegar.
Close the water intake seacocks (except if your boat is dried out), rinse and drain the toilets pans and
pumps.
Store the sounder and speedometer heads.
Carefully drain and dry all the bilges.
Put the floorboards, the cushions and berth spreads vertically in order to favour the airing of the
compartments.
b) Outside :
Rinse with plenty of water the hull, the deck, the deck fittings, lubricate all the mechanical and mobile
parts.
Protect your boat with fenders and make sure that the mooring lines are taut
Fix the rudder so that it may not move
c) Engine :
Only a skilled mechanic can do the winter laying up of the engine. It will not be the same if the boat
remains afloat or ashore.
All THESE RECOMMENDATIONS DO NOT MAKE UP AN EXHAUSTIVE CHECK LIST. YOUR
DEALER WILL GIVE YOU THE ADVICE YOU NEED AND WILL CARRY OUT THE TECHNICAL
MAINTENANCE OF YOUR BOAT
MAJ ANG 29/11/01
37/38
FIRST 36.7
XV) ENVIRONMENT
Do not pour to the sea the oil you have just drained, use appropriate waste tanks.
When you fill up the engine tank, take all the precautions in order to avoid the hydrocarbon overflowing.
In the harbour, do not use the heads on board if they are not equipped with holding tanks.
The use of detergent contributes to the deterioration of the sea fauna and flora ; choose entirely
biodegradable products for your cleaning operations.
Do not throw to the sea plastic bags and rubbish bags ; use the dustbins for this purpose in the places of
call.
You love the sea, just as we do ; therefore help us to protect it and do not pollute it.
MAJ ANG 29/11/01
38/38