1
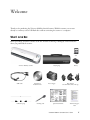
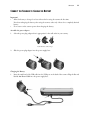
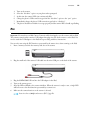
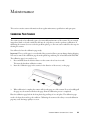
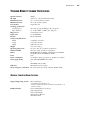
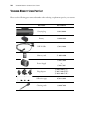
Visioneer ®
Mobility
User's Guide
Visioneer
Mobility
User’s Guide
COPYRIGHT INFORMATION
Copyright © 2011 Visioneer, Inc. All Rights Reserved.
Reproduction, adaptation, or translation without prior written permission is prohibited, except as allowed under the copyright laws.
The Visioneer® brand name and logo are registered trademarks of Visioneer, Inc. The PaperPort® and OmniPage® Pro brand name and logo are registered trademarks of
Nuance Communications, Inc. The NewSoft Presto! BizCard® name and logo are registered trademarks of NewSoft Technology Corporation in the United States and/or
other countries. VRS™ is a trademark of Kofax Image Products, Inc. Adobe®, Adobe® Acrobat®, Adobe® Reader®, and the Adobe® PDF logo are registered trademarks of
Adobe Systems Incorporated in the United States and/or other countries. The Adobe PDF logo will appear in this product’s software, and full access to Adobe software features
is only available if any Adobe product is installed on your computer. iPad® is a trademark of Apple Inc., registered in the U.S. and other countries. BlackBerry®, RIM®,
Research In Motion®, and related trademarks, names and logos are the property of Research In Motion Limited and are registered and/or used in the U.S. and countries
around the world. Android™ mobile technology platform is a trademark of Google, Inc., in the United States and/or other countries.
This product is covered by one or more of the following patents: 6, 480, 304; 5,818,976; 5,499,108; 5,517,332.
Microsoft is a U.S. registered trademark of Microsoft Corporation. Windows is a trademark and SharePoint® is a registered trademark of Microsoft Corporation. ZyINDEX
is a registered trademark of ZyLAB International, Inc. ZyINDEX toolkit portions, Copyright © 1990-1998, ZyLAB International, Inc. All Rights Reserved. All other
products mentioned herein may be trademarks of their respective companies.
Information is subject to change without notice and does not represent a commitment on the part of Visioneer. The software described is furnished under a licensing
agreement. The software may be used or copied only in accordance with the terms of such an agreement. It is against the law to copy the software on any medium except as
specifically allowed in the licensing agreement. No part of this document may be reproduced or transmitted in any form or by any means, electronic or mechanical, including
photocopying, recording, or information storage and retrieval systems, or translated to another language, for any purpose other than the licensee's personal use and as
specifically allowed in the licensing agreement, without the express written permission of Visioneer.
Part Number: 05-0822-000
Restricted Rights Legend
Use, duplication, or disclosure is subject to restrictions as set forth in contract subdivision (c)(1)(ii) of the Rights in Technical Data and Computer Software Clause 52.227FAR14. Material scanned by this product may be protected by governmental laws and other regulations, such as copyright laws. The customer is solely responsible for
complying with all such laws and regulations.
Visioneer's Limited Product Warranty
IF YOU FIND PHYSICAL DEFECTS IN THE MATERIALS OR THE WORKMANSHIP USED IN MAKING THE PRODUCT DESCRIBED IN THIS
DOCUMENT, VISIONEER WILL REPAIR, OR AT ITS OPTION, REPLACE THE PRODUCT AT NO CHARGE TO YOU, PROVIDED YOU RETURN IT
(POSTAGE PREPAID, WITH PROOF OF YOUR PURCHASE FROM THE ORIGINAL RESELLER) DURING THE 90-DAY PERIOD AFTER THE DATE OF
YOUR ORIGINAL PURCHASE OF THE PRODUCT. UPON RECEIPT DURING THE INITIAL 90-PERIOD BY VISIONEER OF A VALID REGISTRATION OF
THE PRODUCT, THIS LIMITED PRODUCT WARRANTY PERIOD IS EXTENDED TO THE
12-MONTH PERIOD AFTER THE DATE OF YOUR ORIGINAL PURCHASE. IF A VALID REGISTRATION IS NOT RECEIVED DURING THE INITIAL 90DAY PERIOD, THE 12-MONTH WARRANTY IS NO LONGER AVAILABLE AND YOUR PRODUCT WARRANTY WILL TERMINATE AFTER THE 90-DAY
INITIAL PERIOD EXPIRES.
THIS IS VISIONEER'S ONLY WARRANTY AND YOUR EXCLUSIVE REMEDY CONCERNING THE PRODUCT, ALL OTHER REPRESENTATIONS,
WARRANTIES OR CONDITIONS, EXPRESS OR IMPLIED, WRITTEN OR ORAL, INCLUDING ANY WARRANTY OF MERCHANTABILITY, FITNESS FOR
A PARTICULAR PURPOSE OR NON-INFRINGEMENT, ARE EXPRESSLY EXCLUDED. AS A RESULT, EXCEPT AS SET OUT ABOVE, THE PRODUCT IS
SOLD “AS IS” AND YOU ARE ASSUMING THE ENTIRE RISK AS TO THE PRODUCT'S SUITABILITY TO YOUR NEEDS, ITS QUALITY AND ITS
PERFORMANCE.
IN NO EVENT WILL VISIONEER BE LIABLE FOR DIRECT, INDIRECT, SPECIAL, INCIDENTAL OR CONSEQUENTIAL DAMAGES RESULTING FROM
ANY DEFECT IN THE PRODUCT OR FROM ITS USE, EVEN IF ADVISED OF THE POSSIBILITY OF SUCH DAMAGES.
All exclusions and limitations in this warranty are made only to the extent permitted by applicable law and shall be of no effect to the extent in conflict with the express
requirements of applicable law.
RoHS and WEEE Compliance
This product is compliant with RoHS Regulations of the European Parliament and Council Directive on the Restrictions of the Use of Certain Hazardous Substances in
Electrical and Electronic Equipment (2002/95/EC), and with the Waste Electrical and Electronic Equipment (WEEE) Directive (2002/96/EC).
FCC Radio Frequency Interference Statement
This equipment has been tested and found to comply with the limits for the class B digital device, pursuant to part 15 of the FCC Rules. These limits are designed to provide
reasonable protection against interference in a residential installation. This equipment generates, uses and can radiate radio frequency energy and if not installed, and used in
accordance with the instructions, may cause harmful interference to radio communications. However, there is no guarantee that interference will not occur in a particular
installation. If this equipment does cause harmful interference to radio or television reception, which can be determined by turning the equipment off and on, the user is
encouraged to try and correct the interference by one or more of the following measures:
•
Reorient or relocate the receiving antenna.
•
Increase the separation between the equipment and receiver.
•
Connect the equipment into an outlet on a circuit different from that to which the receiver is connected.
•
Consult the dealer or an experienced radio/TV technician for help.
This equipment has been certified to comply with the limits for a class B computing device, pursuant to FCC Rules. In order to maintain compliance with FCC regulations,
shielded cables must be used with this equipment. Operation with non-approved equipment or unshielded cables is likely to result in interference to radio and TV reception.
The user is cautioned that changes and modifications made to the equipment without the approval of manufacturer could void the user's authority to operate this equipment.
This device complies with part 15 of the FCC Rules. Operation is subject to the following two conditions: (1) This device may not cause harmful interference, and (2) this
device must accept any interference received, including interference that may cause undesired operation.
Energy Star for the USA
Energy Program compliance
The Visioneer Mobility is ENERGY STAR qualified under the ENERGY STAR Program Requirements for Imaging Equipment.
The ENERGY STAR and ENERGY STAR MARK are registered United States trademarks. The ENERGY STAR Imaging Equipment Program is a team
effort between U.S., European Union and Japanese governments and the office equipment industry to promote energy-efficient copiers, printers, fax,
multifunction machine, personal computers, and monitors. Reducing product energy consumption helps combat smog, acid rain and long-term changes to
the climate by decreasing the emissions that result from generating electricity.
Warning
This device is not intended for use in the direct field of view at visual display workplaces. To avoid incommoding reflections at visual display workplaces this device must not
be placed in the direct field of view.
CAUTION
RISK OF EXPLOSION IF BATTERY IS REPLACED BY AN INCORRECT TYPE. DISPOSE OF USED BATTERIES ACCORDING TO THE INSTRUCTIONS.
TABLE OF CONTENTS
5
TA B L E O F C O N T E N T S
Welcome . . . . . . . . . . . . . . . . . . . . . . . . . . . . . . . . . . . . . . . . . . . . . . . . . . . . . . . 7
What’s in the Box . . . . . . . . . . . . . . . . . . . . . . . . . . . . . . . . . . . . . . . . . . . . . . . . . . . . . . . . . . . . . . . . . 7
The Visioneer Mobility Scanner . . . . . . . . . . . . . . . . . . . . . . . . . . . . . . . . . . . . . . . . . . . . . . . . . . . . . . . 8
Insert the Battery . . . . . . . . . . . . . . . . . . . . . . . . . . . . . . . . . . . . . . . . . . . . . . . . . . . . . . . . . . . . . . . . . 10
Connect the Scanner to Charge the Battery . . . . . . . . . . . . . . . . . . . . . . . . . . . . . . . . . . . . . . . . . . . . . 11
Register Your Scanner . . . . . . . . . . . . . . . . . . . . . . . . . . . . . . . . . . . . . . . . . . . . . . . . . . . . . . . . . . . . . 13
Scanning . . . . . . . . . . . . . . . . . . . . . . . . . . . . . . . . . . . . . . . . . . . . . . . . . . . . . . 15
Memory Card or USB Flash Drive . . . . . . . . . . . . . . . . . . . . . . . . . . . . . . . . . . . . . . . . . . . . . . . . . . . . 15
Retrieving the Scanned Images . . . . . . . . . . . . . . . . . . . . . . . . . . . . . . . . . . . . . . . . . . . . . . . . . . 16
Smartphones . . . . . . . . . . . . . . . . . . . . . . . . . . . . . . . . . . . . . . . . . . . . . . . . . . . . . . . . . . . . . . . . . . . . 17
Retrieving the Scanned Images . . . . . . . . . . . . . . . . . . . . . . . . . . . . . . . . . . . . . . . . . . . . . . . . . . 18
Troubleshooting Connection Issues . . . . . . . . . . . . . . . . . . . . . . . . . . . . . . . . . . . . . . . . . . . . . . 18
iPad . . . . . . . . . . . . . . . . . . . . . . . . . . . . . . . . . . . . . . . . . . . . . . . . . . . . . . . . . . . . . . . . . . . . . . . . . . . 19
Other Tablets . . . . . . . . . . . . . . . . . . . . . . . . . . . . . . . . . . . . . . . . . . . . . . . . . . . . . . . . . . . . . . . . . . . . 20
Maintenance . . . . . . . . . . . . . . . . . . . . . . . . . . . . . . . . . . . . . . . . . . . . . . . . . . . 21
Calibrating Your Scanner . . . . . . . . . . . . . . . . . . . . . . . . . . . . . . . . . . . . . . . . . . . . . . . . . . . . . . . . . . . 21
Cleaning Your Scanner . . . . . . . . . . . . . . . . . . . . . . . . . . . . . . . . . . . . . . . . . . . . . . . . . . . . . . . . . . . . . 22
Visioneer Mobility Scanner Specifications . . . . . . . . . . . . . . . . . . . . . . . . . . . . . . . . . . . . . . . . . . . . . . 23
Windows Compatible Bonus Software . . . . . . . . . . . . . . . . . . . . . . . . . . . . . . . . . . . . . . . . . . . . 23
Visioneer Mobility Spare Part List . . . . . . . . . . . . . . . . . . . . . . . . . . . . . . . . . . . . . . . . . . . . . . . . . . . . 24
6
TABLE OF CONTENTS
Welcome
Thank you for purchasing the Visioneer Mobility sheetfed scanner. With this scanner you can scan
directly to a memory card or USB flash drive without connecting the scanner to a computer.
WHAT’S IN THE BOX
Before proceeding, check the contents of the box. If items are missing or damaged, contact the dealer
where you purchased the scanner.
Memory
card
Visioneer Mobility Scanner
USB Cable
Calibration page
Carrying bag
Windows™
Installation Disc
Cleaning swab
Power Supply
Battery
Plug adapters
(North America, U.K., Europe)
Quick Install Guide
Technical Support
Card
VISIONEER MOBILITY SCANNER USER’S GUIDE
7
8
VISIONEER MOBILITY SCANNER USER’S GUIDE
THE VISIONEER MOBILITY SCANNER
Status LEDs
Function button
Scan functions
Power button
Battery LED
Glass release
button
USB flash drive port
Alignment
arrow
Paper feed slot
USB cable
port
Memory
card slot
Battery
compartment
Paper feed slot—Insert an item face up in the scanner, aligned to the arrow at the end of the paper feed
slot.
Control panel—Scanner controls.
• Power button—Press, hold-down for 3 seconds, then release the power button to turn the scanner on
or off. Note that the scanner will automatically power off after 2 minutes if not in use.
• Function button—Tap this button to cycle through the scan functions. Press, hold-down for 2
seconds, then release the button to initiate a calibration.
• Status LEDs—Indicates the scanner’s current status. When it is reporting an error, all 3 LEDs will
blink simultaneously a few times, pause, then blink again. The number of times the LEDs flash
between pauses indicates the type of error.
LED pattern Scanner status
2 blinks
Paper jam—the scanner has detected that a page is stuck. If possible, pull the page out
of the scanner from the back. Power cycle the scanner if needed.
3 blinks
Scanner not linked—the scanner does not detect a storage device. Make sure a USB
flash drive or memory card is fully inserted into the back of the scanner. Power cycle
the scanner if needed.
4 blinks
Calibration error—the scanner needs to be calibrated or the scanner failed to calibrate
successfully during a calibration routine. Re-start the calibration routine by press,
hold-down for 2 seconds, then release the function button.
5 blinks
Timeout—the scanner timeout has started.
Continuous Scanner busy—either the scanner is scanning, saving files to the attached device, or it
is being calibrated.
•
Scan functions—The icon represents the color mode and file format for the scanned image.
Scans in color at 300dpi and creates a JPG (*.jpg) file.
WELCOME
9
Scans in black & white at 300dpi and creates an Adobe PDF (*.pdf ) file.
Scans in color at 300dpi and creates an Adobe PDF (*.pdf ) file.
•
Battery LED—This light indicates the scanner’s power status.
Off
On
Blink
The scanner is not plugged in, the battery is not in the scanner, or the scanner is turned off.
The scanner power is on.
The battery power is getting low and needs to be recharged.
USB cable port—Connect the provided USB cable to charge the scanner. When connected to a
computer, you can transfer images from the USB flash drive or memory card.
USB flash drive port—Insert a USB flash drive into this port to scan directly to the flash drive.
Memory card slot—Insert an SD memory card into this slot to scan directly to a memory card.
Battery compartment—Holds the rechargeable battery that powers the scanner.
Glass release button—Separates the glass and rollers inside the scanner so that you can clean the scanner
using the cleaning swab.
10
VISIONEER MOBILITY SCANNER USER’S GUIDE
INSERT THE BATTERY
The battery comes pre-installed in the scanner’s battery compartment. Simply turn the scanner over and
remove the protective plastic strip from the battery compartment.
If the battery is not pre-installed in your unit, or if you need to replace the battery for any reason, please
follow these instructions for installing the battery.
Warning: Only use the battery model provided with the scanner (NP120 for 3.7V 1700mAh).
1. Open the battery cover on the underside of the scanner.
2.
Insert the battery into the compartment. Make sure the battery is inserted in the correct position.
3.
Lower the compartment lid and slide the lid in place to lock it.
WELCOME
11
CONNECT THE SCANNER TO CHARGE THE BATTERY
Important!
• Allow the battery to charge for at least 8 hours before using the scanner the first time.
Note that recharging the battery, after using the scanner, takes only 4 hours for a completely drained
battery.
• Do not turn on the scanner power when charging the battery.
Assemble the power adapter:
1. Select the power plug adapter that is appropriate for the wall outlet in your country.
North America, U.K., Europe
2.
Slide the power plug adapter into the power supply base.
Charging the Battery:
1. Insert the small end of the USB cable into the USB port on the back of the scanner. Plug the flat end
labeled Aux Power Cable into the power supply base.
12
2.
VISIONEER MOBILITY SCANNER USER’S GUIDE
Plug the power supply into a wall outlet.
Note: You can also charge the scanner battery by plugging both ends of the USB cable into two USB ports
on your computer.
WELCOME
13
REGISTER YOUR SCANNER
Registering your scanner is important as it provides you with access to our free telephone support service.
Registration also gives you free access to software updates for your scanner.
You will need an active internet connection to register your scanner. If you do not have internet access,
you can contact our Customer Service department to register the scanner. Please refer to the Technical
Support Card, that your received with the scanner, for our contact information.
1. Open an Internet Explorer window, or other internet browser that you have installed on your
computer.
2. In the web address field type: www.visioneer.com
3. Press Enter on your computer’s keyboard or click the option on screen to go to the web address.
4. When the Visioneer web page loads, click on the Support & Drivers link at the top of the page.
5. Click on Register Your Product at the bottom of the Support & Drivers page.
6. Fill in the registration form, all required fields have an asterisk (*).
Note: A valid e-mail address is required for registration.
7.
8.
You will be asked to enter the serial number for the scanner, it is located on either the back or
underneath the scanner.
After filling in the form, click on Submit Your Registration to complete the registration.
14
VISIONEER MOBILITY SCANNER USER’S GUIDE
Scanning
You can scan approximately 300 pages on each battery charge. You can scan items between 2”x2” and
8.5”x11.69”, and the scanner will automatically crop the scanned image to the width and height of the
item scanned.
MEMORY CARD OR USB FLASH DRIVE
You can only scan to either a memory card or a USB flash drive. If you have both inserted in the scanner,
the scanner will detect and use the memory card for scanning.
1. Remove the memory card from its case.
2. Place the memory card, with the copper strips face down, in the SD slot on the back of the scanner.
If you have a USB flash drive, you can connect it to the USB port on the back of the scanner instead
of using a memory card.
3.
4.
5.
Turn on the scanner power.
All of the LEDs will flash as the scanner initializes. When the scanner is ready to scan, a single LED
will be lit next to the first function represented by a camera icon.
Tap the function button on the scanner to cycle through the scan options until the LED is lit next to
the option you want to use to scan.
Scans in color at 300dpi and creates a JPG (*.jpg) file.
Scans in black & white at 300dpi and creates an Adobe PDF (*.pdf ) file.
Scans in color at 300dpi and creates an Adobe PDF (*.pdf ) file.
VISIONEER MOBILITY SCANNER USER’S GUIDE
15
16
VISIONEER MOBILITY SCANNER USER’S GUIDE
6.
Insert an item face up in the paper feed slot, aligned to the left side of the scanner.
7.
The scanner detects the page and starts to feed it through the scanner.
Note that there will be a short pause after you insert the page before the scanner starts to feed the
page. This pause allows you to straighten the item in the paper feed slot.
When scanning is finished, the image is saved on the memory card or USB flash drive.
8.
RETRIEVING THE SCANNED IMAGES
1.
2.
Remove the memory card from the scanner and insert it into the memory card reader in your
computer.
If you are using a USB flash drive, remove it from the scanner and plug it into a USB port on your
computer.
The memory card or USB flash drive will be detected by the computer as a disc drive from which you
can copy or move the images.
Alternatively, you can copy the images directly from the scanner when the scanner is connected to a
computer with its USB cable. Simply leave the memory card or USB flash drive in the scanner, and then
connect the scanner’s USB cable to the scanner and plug the DATA Cable end into a computer.
Turn on the scanner power and the scanner will be detected as a disc drive for you to copy the images from
the scanner.
SCANNING
17
SMARTPHONES
You can connect the scanner to your Smartphone and scan directly to the phone’s storage. When the
phone is connected to the scanner, the scanner detects the phone’s memory card as the USB flash drive.
1. If a memory card is in the scanner, remove it before proceeding with these instructions.
2. Connect the phone’s USB cable to the phone.
3. Connect the other end of the USB cable to the USB port in the back of the scanner.
4.
5.
6.
7.
Turn on the scanner.
The LEDs on the scanner will flash until the phone is properly detected as a USB flash drive.
Your phone should now prompt you to choose the USB connection type. On your phone choose the
USB connection type to mount it as a disc drive.
This is the same prompt you would receive when you plug your phone into a computer with a USB
cable. If you do not see this prompt, refer to the troubleshooting steps below.
The LEDs on the scanner will stop flashing when the phone is properly set and detected as a USB
storage device. When the scanner is ready to scan, a single LED will be lit next to the currently
selected scan function.
Tap the function button on the scanner to cycle through the scan options until the LED is lit next to
the option you want to use to scan.
Scans in color at 300dpi and creates a JPG (*.jpg) file.
Scans in black & white at 300dpi and creates an Adobe PDF (*.pdf ) file.
Scans in color at 300dpi and creates an Adobe PDF (*.pdf ) file.
8.
Insert an item face up in the paper feed slot, aligned to the left side of the scanner.
18
VISIONEER MOBILITY SCANNER USER’S GUIDE
9.
The scanner detects the page and starts to feed it through the scanner.
Note that there will be a short pause after you insert the page before the scanner starts to feed the
page. This pause allows you to straighten the item in the paper feed slot.
10. When scanning is finished, the image is saved to the phone.
RETRIEVING THE SCANNED IMAGES
Please follow your normal process for viewing, saving, or forwarding files on your phone. In most cases,
you will need to disconnect the phone from the scanner to be able to access the scanned files.
TROUBLESHOOTING CONNECTION ISSUES
While several models of BlackBerry and Google Android mobile technology based phones have been
tested to work with the scanner, we cannot guarantee that every Smartphone or feature phone will work,
nor guarantee that every phone will work as described above.
Here are some basic troubleshooting steps you can try if your scanner is unable to recognize the phone as a
destination drive.
• The phone did not display a prompt to choose the USB connection type.
Refer to your phone’s user manual for the available USB connection options when you plug the
phone into a computer.
Most phones have at least 3 USB options and they are usually to either “charge” the phone via the
USB cable, “sync” the phone with the software on the computer, or mount it as a “disc drive” to
transfer files to/from the phone.
These are the same options you should see when you plug the USB cable into the scanner instead of
to the computer. If you do not see the prompt, check your phone’s USB connection settings and
change it to be a disc drive if that option is not already selected.
The phone may have an option to always choose the previously selected USB connection and never
prompt you to make the selection again. This may be why you are not getting a prompt to choose
your connection type.
• The phone is connected as a disc drive but the LEDs never stop flashing.
Solution 1:
Check to see if you have a memory card installed on the phone (such as a mini-SD or micro-SD
card). An external memory card must be installed in the phone for the scanner to detect the phone as
a storage device.
Solution 2:
Some of the phones we tested did not work immediately when selecting the option to use the phone
as a disc drive. If you run into this problem with your phone, try the workaround steps listed below.
If you find that this procedure works, it must be used each time you connect the scanner to the
phone:
1. Connect the phone’s USB cable to the phone.
2. Connect the other end of the USB cable to the USB port in the back of the scanner.
SCANNING
3.
4.
5.
6.
7.
8.
19
Turn on the scanner.
Select the “disc drive” option on your phone when prompted.
At this time the scanner LEDs just continuously flash.
Change the phone’s USB connection type from the “disc drive” option to the “sync” option.
Immediately change the phone’s USB connection type back to “disc drive”.
The phone should now initialize its storage properly and the scanner LEDs should stop flashing.
IPAD
Important: You must have an iPad Camera Connection Kit from Apple to use the scanner with an iPad.
The camera connection kit contains a USB adapter that plugs into the dock connector on the iPad. You
need to attach the USB adapter to the iPad before proceeding with these instructions.
You can only scan using the JPG function, represented by the camera icon, when scanning to the iPad.
1. Insert a memory card into the memory card slot on the scanner.
2.
Plug the small end of the scanner’s USB cable into the mini-USB port on the back of the scanner.
3.
4.
5.
Plug the DATA Cable USB end into the USB adapter in the iPad.
Turn on the scanner power.
All of the LEDs will flash as the scanner initializes. When the scanner is ready to scan, a single LED
will be lit next to the first function represented by a camera icon.
Make sure the camera function on the scanner is selected.
6.
Scans in color at 300dpi and creates a JPG (*.jpg) file.
20
VISIONEER MOBILITY SCANNER USER’S GUIDE
7.
Insert an item face up in the paper feed slot, aligned to the left side of the scanner.
8.
The scanner detects the page and starts to feed it through the scanner.
Note that there will be a short pause after you insert the page before the scanner starts to feed the
page. This pause allows you to straighten the item in the paper feed slot.
When scanning is finished, the images show in the iPad gallery ready to be imported. Please follow
your normal process for importing and viewing files in the iPad.
9.
OTHER TABLETS
As with the Smartphones, there are several tablet models available with Google Android mobile
technology platform, as well as BlackBerry tablets and Windows tablets. Please follow the instructions in
the section on scanning to “Smartphones”. If you are unable to scan to the tablet following those
instructions, and a standard USB port is available on your tablet device, try following the instructions in
the section for scanning to an “iPad”.
Maintenance
This section contains scanner information about regular maintenance, specifications and spare parts.
CALIBRATING YOUR SCANNER
The scanner needs to be calibrated as part of your monthly maintenance of the scanner. If your scanned
images have black or colored vertical lines this may be a sign that you need to perform a calibration. If
calibrating the scanner does not resolve the problem, please go to the next section and follow the steps for
cleaning the scanner.
You will need to have the calibration page ready.
Important! The top of the page is covered with a blue protective film to prevent damage during shipping.
You need to remove the calibration page from the plastic bag and then peel off and discard the blue film.
The calibration page is now ready to use.
1. Press and hold down the function button on the scanner for at least 2 seconds.
This starts the hardware calibration routine.
2. Insert the Calibration page in the scanner, in the direction of the arrow(s) on the page.
3.
When calibration is complete the scanner will eject the page out of the scanner. Do not forcefully pull
the page out, the scanner will release the page when the calibration process is completed.
Place the calibration page back in the clear plastic bag and keep it in a safe place. The calibration page
needs to be kept clean and in good condition. Calibrating the scanner with a dirty or creased calibration
page may cause the image quality to worsen.
VISIONEER MOBILITY SCANNER USER’S GUIDE
21
22
VISIONEER MOBILITY SCANNER USER’S GUIDE
CLEANING YOUR SCANNER
If you still see streaks or lines in the scanned image after calibrating the scanner, use the cleaning swab to
clean the scanner glass.
1. Dampen the tip of the cleaning swab with some Isopropyl rubbing alcohol (95%)
2. Facing the back of the scanner, press and hold the button on the side of the scanner. This button
separates the glass from the rollers for cleaning.
Note that if you release the button, the glass will be set back in place for scanning. You must press and
hold the button while cleaning.
3. Insert the tip of the cleaning swab into the back of the scanner.
4. Swipe the tip across the inside of the scanner from right-to-left. Repeat this 5 or 6 times to
thoroughly clean the scanner.
5.
When you are finished cleaning the scanner, release the button on the side of the scanner. Store the
cleaning swab in a clean, dust-free area.
MAINTENANCE
VISIONEER MOBILITY SCANNER SPECIFICATIONS
Optical resolution
Bit depth
Maximum item size
Minimum item size
Scan method
Scanning specifications
Scanning Speed
Paper Thickness
Image Sensor
Light source
Interface
Scanner body dimensions
Width
Depth
Height
Weight
Operating temperature
Relative humidity
Battery
300 dpi
24-bit color, 1-bit bitonal (black & white)
8.5" x 11.69"(216mm x 297mm)
2.0" x 2.0" (51mm x 51mm)
Single Sheet Fed
10 seconds per page @ 200 dpi in all color modes
16 - 28 lbs. (0.002" - 0.006") (60 - 105 g/m2)
Contact Image Sensor
3-color RGB-LED
Hi-Speed USB 2.0
11.50 inches (293 mm)
2.75 inches (70 mm)
2.00 inches (51 mm)
22.5 ounces (638 g)
68°~95° F (20°~35° C without condensation)
10%~85% (@35° C without condensation)
EM-HG001-NP120, DEAN, CAPACITY:3.7V/1700mAh,
Internal Resistance ≤220mΩ,0~45°, RoHS
Power
5Vdc
Power consumption
≤ 3.85 Watts (during operation); ≤ 1.86 Watts (on standby)
Power supply model
DSA-10CU-05 050200 made by DVE
or
WA-10H05 made by APD
USB cable
Mini-USB connector Y-Cable
Safety and agency certifications UL, C-UL, FCC Class B, CE, TUV/GS, WEEE, RoHS
WINDOWS COMPATIBLE BONUS SOFTWARE
Supported Operating Systems
Bundled Software
Microsoft Windows
- 32-bit XP (Service Pack 2 or 3)
- 32-bit or 64-bit Vista (with or without Service Pack 1 or 2)
- 32-bit or 64-bit 7
Visioneer® Mobility PC Connector
Nuance PaperPort®
Nuance OmniPage®
NewSoft Presto! BizCard
Adobe® Reader®
23
24
VISIONEER MOBILITY SCANNER USER’S GUIDE
VISIONEER MOBILITY SPARE PART LIST
Please use the following part name and number when ordering a replacement part for your scanner.
Part Name
Part Number
Carrying bag
88-0630-000
Battery
28-0008-000
USB Y-Cable
35-0232-000
Memory card
51-0002-0000
Power Supply
35-0095-000
or
35-0095-001
Plug adapters
35-0096-000 (U.S.)
35-0097-000 (EUR)
35-0098-000 (U.K.)
Calibration page
05-0823-000
Cleaning swab
33-0007-000
visioneer
Copyright © 2011 Visioneer, Inc.
05-0822-000