1
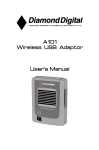
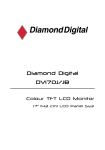
DIAMOND VIEW® DV190
Colour TFT LCD Monitor
19.0” (48.26 cm) LCD Panel Size
User’s Manual
2
Copyright 2003, Mitsubishi Electric Australia Pty. Ltd. All rights reserved.
No part of this publication may be reproduced, transmitted, transcribed, stored in a retrieval system
or translated into any language or computer language, in any form or by any means, electronic,
mechanical, magnetic, optical, chemical, manual or otherwise, without the prior written permission.
2
MA/MONDV190/0903/1
Table of Contents
1
Important Safety Instructions .......................................... 3
2
Features ............................................................................. 4
3
Unpacking the Monitor ..................................................... 5
4
Hardware Installation........................................................ 6
VGA Cable Installation...................................................... 6
DVI-D Cable Installation …………………………………….7
Power Cable Installation ................................................... 7
5
Windows Software Installation ........................................ 8
Windows 95 ...................................................................... 8
Windows 98 ...................................................................... 8
Windows Millennium Edition (Windows ME)..................... 9
Windows 2000 and Windows XPError! Bookmark not defined.
6
Setting the Display Resolution ...................................... 11
Choosing The Best Resolution ....................................... 11
Supported Graphics Modes and Refresh Rates ............. 12
7
Adjusting the Monitor ..................................................... 16
Picture Optimisation........................................................ 16
Manual Picture Adjustment ............................................. 16
8
Security Lock Installation............................................... 20
9
Frequently Asked Questions.......................................... 21
10 Specifications.................................................................. 23
11 Service Contacts ............................................................. 25
Australian Service Contacts............................................ 25
New Zealand Service Contacts....................................... 26
i
Copyright Notice
Copyright 2003, Mitsubishi Electric Australia Pty. Ltd. All rights reserved. No
part of this publication may be reproduced, transmitted, transcribed, stored in
a retrieval system or translated into any language or computer language, in
any form or by any means, electronic, mechanical, magnetic, optical,
chemical, manual or otherwise, without the prior written permission.
Disclaimer
Mitsubishi Electric Australia Pty. Ltd. makes no representations or warranties,
either expressed or implied, with respect to the contents hereof and
specifically disclaims any warranties, merchantability or fitness for any
particular purpose. Further, Mitsubishi Electric Australia reserves the right to
revise this publication and to make changes from time to time in the contents
hereof without obligation to notify any person of such revision or changes.
Diamond View is a registered trademark of Mitsubishi Electric Australia Pty. Ltd.
Microsoft and Windows are registered trademarks of Microsoft Corporation.
All other trademarks remain the property of their respective owners.
Reference Information
For future reference, write the following information about your
monitor in the space below. The serial number is on the back of
the product or on the bottom of its stand.
Monitor Information
Product Name:
DV190
Serial Number:
Date of Purchase:
Dealer Information
Dealer:
Telephone
Number:
Address:
ii
1
Important Safety
Instructions
Please read the following safety instructions before installing or cleaning
your Diamond View monitor:
1.
The AC adapter isolates this equipment from the AC supply.
2.
Unplug this product from the wall outlet before cleaning. Do not use
liquid or aerosol cleaners. Use a soft cloth to clean the monitor housing
and sticky tape to remove dust and fingerprints from the screen panel.
3.
Slots and openings on the back or top of the cabinet are provided for
ventilation. They must not be blocked or covered. This product should
never be placed near or over a radiator or other heat source, or in a
built-in installation unless proper ventilation is provided.
4.
This product should be operated from the type of power indicated on
the marking label. If you are not sure of the type of power available,
consult your dealer or local power company.
5.
Never push objects of any kind, or spill liquid of any kind into this
product.
6.
Do not attempt to service this product yourself, as opening or removing
covers may expose you to dangerous voltages or other risks. If any
problems or accidents (dropping, incorrect operation) occur, contact a
qualified service agent for servicing.
3
2 Features
Your Diamond View DV190 Monitor has the following features:
♦ High Resolution, 1280 x 1024 Pixel LCD Panel
♦ Super Slim Bezel Border Design
♦ High Brightness, Contrast Ratio and Super Wide Viewing Angle
250 cd/m² brightness, 700:1 contrast ratio and ±85/±85(H/V) viewing
angle.
♦ Dual Input Supported
Supports both analogue (D-sub) and digital (DVI-D) input.
♦ Plug and Play Compatibility
With Microsoft® Windows® 95, 98, 2000, Millenium Edition and XP.
♦ Space Saving - only 193 mm deep including the stand
♦ Light Weight - only 8.5 kg
♦ Lower Power Consumption - 40 W maximum.
♦ Power Saving
Power management complies with VESA DPMS standard. When the
system is idle (in power saving mode), the monitor automatically cuts
its power consumption to less than 1 W.
♦ On Screen Display
Allows you to adjust all settings simply using on-screen menus.
♦ True Colour Display
With dithering support, the Diamond View DV190 monitor enhances
visual effects and offers you better image quality.
♦ Auto Adjustment Function
The auto adjustment key automatically optimises the displayed image.
♦ Removable Stand with VESA Standard Mounting
4
3 Unpacking the Monitor
Please check that the following items are included with your monitor. If they
are missing or damaged, please contact your place of purchase immediately.
♦ LCD monitor
♦ User’s manual
♦ VGA cable
♦ DVI-D cable
♦ Power adapter
♦ Power cord
♦ Utilities and Driver Floppy Diskette
Locate the model name and the serial number label on the back of your
monitor and write the details of the monitor and your place of purchase in the
space on page (ii) of this manual for future reference.
5
4 Hardware Installation
Your monitor is equipped with an automatic power supply with a voltage
range from 100 to 240 Volts AC at a frequency of 50 to 60 Hz. Make sure
that your local power supply is within the supported range. If you are unsure,
please contact your electricity supplier.
To install your Diamond View DV190 monitor:
VGA Cable Installation
1. Make sure that the power to the computer and to the monitor are both
turned off.
2. Connect one end of the monitor’s VGA cable to the analog VGA
connector (15-pin socket) of the computer‘s conventional graphics card.
3. Connect the other end of the monitor’s VGA cable to the VGA connector
(15-pin socket) in the rear of the monitor.
6
DVI-D Cable Installation(Optional)
1.
Make sure that the power to the computer and to the monitor are both
turned off.
2. Connect one end of the monitor’s DVI-D cable to the digital DVI-D
connector (24-pin socket) of the computer‘s graphics card.
3. Connect the other end of the monitor’s DVI-D cable to the DVI-D
connector (24-pin socket) in the rear of the monitor.
Power Cable Installation
Connect one end of the power cord to the rear of the monitor, and the other
end to the wall outlet (as shown).
7
5 Windows
Software
Installation
To get best performance with Windows 95, 98, Millenium Edition, 2000 or XP
you should set the PC to use the driver supplied with your DV190 monitor.
Windows 95
The first time you start Windows after connecting your new monitor, the
system will detect it and automatically install the driver for Plug and Play
displays. To install the Diamond View DV190 driver and colour profile:
1. Insert the Diamond View LCD Monitor Utilities floppy disk into your
floppy disk drive.
2. Right-click on the Windows desktop and select Properties or open the
Control Panel and double-click Display.
3. From the Display Properties window, select the Settings tab and then
click the Advanced Properties button at the bottom, right corner.
4. Select the Monitor tab and then click the Change button.
5. Click the Have Disk button at the bottom right corner. The Install From
Disk window will appear with the floppy drive A:\ selected. Click OK.
6. Select DV190 from the list and click OK again to install the driver.
7. You will be returned to the Advanced Graphics Properties dialogue
box. Close this window by clicking OK and confirm the subsequent
messages by clicking Yes. Click OK and then Yes once more.
8. The installation is now complete, click OK to close Display Properties.
Windows 98
The first time you start Windows with a new monitor; the system will detect it
and automatically start the Add New Hardware wizard.
1. Click the Next button. Select Search for the best driver for your
device (recommended) and click Next.
2. Insert the Diamond View LCD Monitor Utilities floppy disk into your
floppy disk drive. Select the Floppy disk drive check box and click Next.
3. Click Next again and then click Continue. The driver and monitor colour
profile will be installed. Click Finish to complete the installation.
8
Windows Millennium Edition (Windows ME)
The first time you start Windows with a new monitor; the system will detect it
and automatically start the Add New Hardware wizard.
1. Insert the Diamond View LCD Monitor Utilities floppy disk into your
floppy disk drive. Select the Floppy disk drive check box and click Next.
2. Select Search for the best driver for your device (recommended),
tick the Removable Media (Floppy, CD-ROM…) and click Next.
3. Click Next again and then Finish to complete the installation.
Windows 2000
The first time you start Windows with the new monitor; the system will detect
it and automatically load the native Plug & Play driver. To install the driver
from the Utilities floppy disk, please do the following:
1. Click on the Start button, go to Settings and select Control Panel.
2. Double click on Display, then click on the Settings tab at the top of the
window that appears and select the Advanced button.
3. Click on the Monitor tab, and select Properties.
4. Click on the Driver tab at the top of the window, then select Update
Driver.
5. Click Next, then select “Display a list of the known drivers, so that I
can choose a specific driver” and click Next.
6. Select Have Disk…, then use Browse, navigate to the floppy drive,
highlight the MEA DV190 driver and click Open and OK.
7. Highlight the monitor driver in the Models list and click Next. If a
windows appears stating that “the digital signature was not found”,
click on Yes.
8. Click Finish to complete the driver installation.
Windows XP
The first time you start Windows with the new monitor; the system will detect
it and automatically load the native Plug & Play driver. To install the driver
from the Utilities floppy disk, please do the following:
9
1. Click on the Start button, go to Settings and select Control Panel. If
needed, select Switch to Classic view from the left-hand side of the
Control Panel window.
2. Double click on Display, then click on the Settings tab at the top of the
window that appears and select the Advanced button.
3. Click on the Driver tab at the top of the window, then select Update
Driver.
4. Select “Install from a list or specific location” and click Next.
5. Select “Don’t search, I will choose the driver to install.” And click
Next.
6. Select Have Disk…, then use Browse, navigate to the floppy drive,
highlight the MEA DV190 driver and click Open and OK.
7. Highlight the monitor driver in the Models list and click Next. If a
Windows Logo testing window appears, click on Continue Anyway.
8. Click Finish to complete the driver installation.
10
6 Setting
the Display
Resolution
Choosing The Best Resolution
All Liquid Crystal Displays (LCDs) have a fixed resolution that is the same as
the maximum resolution that may be displayed on the LCD. In the case of
the DV190 the LCD resolution is 1280 x 1024 pixels. This is also known as
the “native” resolution of the monitor. Lower resolutions can be displayed at
full screen through an interpolation circuit. Because the lower resolution
must be expanded, the quality of the displayed image is not as good as that
available when the native resolution is displayed. For optimal performance
from any LCD monitor, you must use the monitor’s native resolution.
If you are using Windows 95, 98, 2000, Me, XP or NT 4.0, you can change
the resolution as follows:
1. Double-click the Display icon in the control panel.
2. From the Display Properties dialogue box, select the Settings tab.
There is a slider on the right-hand side in the middle of the dialogue box
that alters the displayed resolution. Set the resolution to 1280 x 1024.
3. For Windows NT users only: select a refresh rate of either 60Hz or 75
Hz and click Test. A test pattern will be displayed. Make sure that there
are no error messages shown by the monitor. If an error message is
displayed, check the resolution and refresh rate settings or choose a
different refresh rate.
4. Click OK to close Display Properties.
If you are using an Apple Macintosh, change the resolution by doing the
following:
MacOS 8.x/9.x
1. Click the Apple icon at the top, left corner of the screen, select Control
Panel and then select Monitors.
2. Select a resolution of 1280 x 1024 pixels with between 60Hz and 75Hz
refresh rate.
3. If refresh rates of 60Hz or 75Hz are not available, click Recommended
in the Show drop-down box and change it to All. Select the resolution
and refresh rate as above.
11
4. A colour depth of either Thousands or Millions is recommended.
MacOS X
1. Click the Apple icon at the top, left corner of the screen, select System
Preferences and then select Displays.
2. Select a resolution of 1280 x 1024 pixels with between 60Hz and 75Hz
refresh rate.
3. A colour depth of either Thousands or Millions is recommended.
Supported Graphics Modes and Refresh Rates
There is no need to choose the highest possible refresh rate when using an
LCD monitor. It is not technically possible for an LCD monitor to flicker. Even
at a refresh rate of 60 Hz you will get an absolutely flicker-free image.
For best results, it is important that you set the graphics adaptor to use one
of the monitor’s preset display modes shown in Table 1 on the next page.
Other graphics signals may be displayed poorly or not at all. Note that the
DV190’s preset modes correspond to VESA standard graphics signals for
these resolutions. All recent models of graphics adaptor should be able to
support these modes. For the native resolution of 1280 x 1024 pixels, for
example, refresh rates of 60, 70 and 75 Hertz are supported.
With Windows 95, 98, 2000, Millenium Edition or XP you can change the
refresh rate of the graphics signal as follows:
1. Double click the Display icon in the control panel.
2. From the Display Properties dialogue, select the Settings tab and click
the Advanced Properties button.
3. For Windows 95, 98 and ME select the Adapter tab, for 2000 and XP
select the Monitor tab. The refresh rate selection field is located in the
centre, at the bottom of the dialogue box.
4. Choose a refresh rate that corresponds with one of the factory modes
from the table below.
5. Click Apply, and then OK twice.
Please Note:
12
• Graphics modes that are not listed in the table may not be supported.
For an optimal picture it is recommended that you choose a graphics
mode with a resolution of 1280 x 1024pixels that is listed in Table 1 on
the next page. All 22 modes are compatible with Microsoft Windows.
Resolutions of 640 x 480, 800 x 600, 1024 x 768 and 1280 x 1024
pixels are supported by most other operating systems, including the
Apple Macintosh’s Mac OS.
• The displayed image may show some distortion or noise. This can be
caused by the signal from the VGA card if it does not correspond with
the usual standard. This is not, however, a problem with the monitor. If
it is still visible after using the Automatic adjustment, you can usually
improve the displayed image by manually adjusting the phase,
horizontal position and pixel frequency settings using the "Fine Tune "
and “Position“ menu. See Chapter 7, Adjusting the Monitor, for more
details.
• When you shut Windows down you may see interference lines on your
screen. This caused by the manner in which Windows controls the
graphics card at this point and is normal with all LCD monitors.
• To extend the service life of the product, we recommend that you use
your computer's power management functions to turn the monitor off
after extended idle periods.
Input Signal (Multi-scan mode)
13
Resolution
Horizontal
Frequency
(kHz)
Vertical
Frequency
(Hz)
Pixel
Frequency
(MHz)
Comments
640x350
31.47(P)
70.08(N)
25.17
DOS
720x400
31.47(N)
70.08(P)
28.32
DOS
640x480
31.47(N)
60.00(N)
25.18
DOS
640x480
37.86(N)
72.80(N)
31.50
VESA
640x480
37.50(N)
75.00(N)
31.50
VESA
640x480
35.00(N)
66.67(N)
30.24
Macintosh
800x600
37.88(P)
60.32(P)
40.00
VESA
800x600
48.08(P)
72.19(P)
50.00
VESA
800x600
46.87(P)
75.00(P)
49.50
VESA
832x624
49.72(N)
74.55(N)
57.29
Macintosh
1024x768
48.36(N)
60.00(N)
65.00
VESA
1024x768
56.48(N)
70.10(N)
75.00
VESA
Continued on next page…
Table 1
14
Input Signal (Multi-scan mode)
Resolution
Horizontal
Frequency
(kHz)
Vertical
Frequency
(Hz)
Pixel
Frequency
(MHz)
Comments
1024x768
60.02(P)
75.00(P)
78.75
VESA
1024x768
60.24 (N)
74.93 (N)
80.00
Macintosh
1152x864
67.50(P)
75.00(P)
108.00
VESA
1152x870
68.68(N)
75.06(N)
100.00
Macintosh
1152x900
61.80(N)
66.00(N)
94.50
Sun
1152x900
61.80(N)
76.14(N)
108.00
Sun
1280x1024
64.00(P)
60.00(P)
108.00
VESA
1280x1024
75.83(N)
71.53(N)
128.00
IBM
1280x1024
80.00(P)
75.00(P)
135.00
VESA
1280x1024
81.18(N)
76.16(N)
135.09
Sun
Table 1 (continued from previous page)
15
7 Adjusting the Monitor
Picture Optimisation
The easiest way to obtain an optimal picture is by using the AUTO button.
This only works reliably if the graphics adaptor is set to use one of the
monitor’s factory modes (see Table 1 in the previous chapter) and if you are
displaying an appropriate full-screen test pattern.
Windows users should run the adjustment software (Auto.exe) from the
Utilities floppy disk to display the correct test pattern. Press the Auto button
once the test pattern is displayed. You can quit Auto.exe by clicking the left
mouse button once and clicking on Exit.
Test patterns in TIFF and JPEG file formats are also available from the File
Downloads section of Mitsubishi Electric Australia’s web site at
www.mitsubishi-electric.com.au. Follow the link to the TFT LCD monitors
page and download a pattern with the resolution that you need. Display the
test pattern at its actual size (100% zoom), preferably at full screen and then
press the monitor’s Auto button.
If you are still not satisfied with the result, you can enhance the image by
using the monitor’s manual adjustment functions.
Manual Picture Adjustment
Adjustments to the displayed image are made using the On-Screen Display
(OSD), controlled by 5 buttons on the front of the monitor.
The user’s controls include Power, AUTO, Exit and Enter. < and > are used
to select menu items and to change the values of image parameters.
16
6 5 4 3 2 1
1.Power on/ off: Turn the monitor on or off.
2.Enter:
Enter sub-menus, select items, save changes.
Hot Key: Press and hold for 3 seconds, to select between “ Picture
Mode” and “ Text Mode”. ( Note* )
3. < >:
Use these buttons to select a menu item or make an
adjustment when using the OSD.
Hot-Key: “>” acts as a hot key for Brightness, and “<” acts as a hot
key for Contrast adjustment.
4. Exit:
Hot Key:
5.Auto:
Return to the main menu or exit the OSD menu with saving.
Press the exit key when the OSD is not displayed to adjust
the audio volume.
Press this hot key to do Input Select when both standard
RGB and DVI inputs are plugged in.
Automatically adjusts the vertical position, pixel phase,
horizontal position and pixel clock.
Note*: Picture Mode is factory preset mode, which can extent to maximum
brightness; and suitable for most picture screen usage environment. In some
cases, user may feel screen too bright when doing document processing;
press hot-key to turn monitor into Text Mode can easily turn screen darker,
rather than tediously adjust OSD.
17
To manually adjust the image:
1. Display the adjustment test pattern. This is the best way to observe
changes as you adjust the image. Windows users should run the
Auto.exe test pattern program. For non-Windows operating systems, you
also can use the test pattern described in the previous section or
another full-screen image, such the desktop of the operating system.
2. Open the OSD menu by pressing the Enter button on the monitor.
3. Use < or > to select Pixel Clock and then press Enter.
4. Check the current setting. Use < or > to tune the sampling clock to get
the optimum picture. Look at the centre section of the test pattern that
has alternating black and white vertical lines that are each 1 pixel wide.
There should be no vertical noise bands visible within the image. The
centre section will clearly show the alternating black and white lines or a
uniform level of noise will appear across the image. Close the clock
submenu by pressing Exit to main menu.
5. Use < or > to select H. Position and press Enter.
6. Adjust the horizontal position so that the image is centered. Its width
should be the same as the visible width of the screen. Press Exit to go
back to the main menu.
7. If some noise or distortion is still visible in the centre section of the test
pattern, use < or > to select Phase and press Enter.
8. Adjust the phase of the monitor’s sampling clock by using < or > to
optimise the displayed image. The alternating black and white lines
should be clearly visible. Press Exit to main menu.
If you are still not satisfied with the result, try repeating the procedure using a
graphics signal that has a different refresh rate.
Notes:
You must use one of the factory modes. If the AUTO button is not working,
or the NON PRESET MODE message is shown on the OSD you are not
using one of the supported modes. If you are having difficulties generating a
supported mode, ask your computer dealer or the distributor or manufacturer
of your graphics card for assistance.
The procedures described in this chapter should be performed for every
resolution and type of graphics signal that you wish to use. For example, if a
particular application requires a resolution of 800 x 600 pixels, but all other
applications use the monitor’s native resolution, you will need to display the
test pattern and make adjustments.
18
The monitor will remember your settings and use them whenever you turn
the monitor on. Note that you may need to readjust the monitor if it is
connected to a different computer or if the computer’s graphics adaptor is
replaced.
19
8
Security Lock Installation
The Diamond View DV190 can be secured to your desk or any other fixed
object with a Kensington lock security product. The Kensington lock‘s cable
can be attached to a slot located at the rear of the monitor.
1. Insert the lock in the slot located on the rear of the monitor.
2. Turn the key to lock the Security Lock.
3. Remove the key and store it in a safe place.
Note: Kensington locks are not available from Mitsubishi Electric Australia.
Please contact your reseller for more information.
20
9 Frequently
Asked
Questions
The image is blurred, how can I get the best quality picture?
- Read chapter 6, Setting the Display Resolution, and then select a
graphics signal with the correct resolution and refresh rate. Then read
chapter 7, Adjusting the Monitor, and make adjustments to the displayed
image based on these instructions.
- Have you used a VGA extension cable?
If so, remove the extension cable and check the displayed image. Is the
image quality improved? Optimise the image using the procedures in
chapter 7 with the extension cable removed. Reconnect the extension
cable once the image has been optimised. Depending on the
characteristics and type of the extension cable, some blurring or
distortion may occur due to conduction losses of the extension cable.
You can minimise these losses by using an extension cable with better
conduction quality or with a built-in booster.
- Does the blurring only occur at resolutions lower than the native
(maximum) resolution?
Please read chapter 6, Setting the Display Resolution. Select a
graphics signal that uses the monitor’s the native resolution (1280 x
1024 pixels).
Why does the image look yellow, blue or pink instead of showing the
correct colours?
- The most common cause of this problem is a loose VGA signal cable or
connector. Check that the cable is securely connected to the computer.
- Check the VGA signal cable for damage. If any pins are bent or broken
off, contact your dealer or an authorised Mitsubishi Electric service agent
(see Chapter 11 for details).
- Check the monitor’s colour settings. Press the Enter button and use < or
> to select the Color Settings menu. Select the Recall menu item and
press Enter.
21
No image is displayed, what can I do?
- Check that the light (LED) next to the monitor’s power button is lit and is
green in colour. If the LED is green, press the "Exit" button on the monitor
to access the On Screen Display. If the message "NON PRESET MODE"
appears there, please read chapter 6, Setting the Display Resolution and
reset the graphics card to one of the monitor’s supported graphics signals.
- If the LED is orange the monitor is in power saving mode. Press a button
on the computer keyboard or move the mouse to wake the computer. If
that does not help, check that the VGA cable is securely plugged into the
computer. Also check the pins of the VGA cable’s connector. If any pins
are bent or broken off, then contact your dealer (see Chapter 11 for
details).
- If the LED is not lit at all, check that the monitor is plugged into the power
supply mains socket and that the power switch is turned on. Check that
the monitor’s power switch is also turned on.
The image is or distorted, flashes or flickers:
- Check that the monitor’s signal cable is securely connected to the
computer.
- Read the chapters 6 and 7 of this manual, then select the correct
resolution, refresh rate and make adjustments based on these
instructions.
The image is displaced in one direction:
- Use the Hor. Position (horizontal position) adjustment in the Position
menu of the monitor’s OSD to reposition the image.
- Read the chapters 6 and 7 and then select the correct resolution, refresh
rate and make adjustments based on these instructions.
22
10 Specifications
Model
Diamond View DV190
Display Characteristics
Display Type
19.0“ active matrix Thin Film
Transistor Liquid Crystal Display
Viewable Diagonal Area
48.26 cm / 19.0”
Native (Maximum) Resolution
1280 x 1024 pixels
Colours
16.7 million
Contrast Ratio / Brightness
700:1 / 250 cd/m² (typical)
Response Time
25 ms (typical)
Viewing Angle (Left/Right, Up/Down)
±85°,±85° (typical)
Dot Pitch
0.294 mm
User Interface
Controls
Power button, 4 buttons to control
On-Screen Display, Automatic
image adjustment
On-Screen Display Functions
Auto Adjust, H./ V. Position, Phase,
Pixel Clock, Brightness, Contrast,
Colour, Language, Recall, OSD
Time, Input Select, OSD, Info
Microprocessor Controlled Graphics
Modes
Input Signal
22 factory modes:
3 DOS modes, 11 VESA modes
Line Frequency
31.5 – 81.2 kHz multi-frequency
Image Frequency (Refresh Rate)
56 - 76 Hz
Within the parameters detailed in
chapter 6
Video Signal
RGB analog and digital
0.7 Vpp/75 Ohm
23
Synchronisation
TTL separate, composite TTL
Signal Connection
15-pin mini D-sub cable
24- pin DVI-D cable
Physical Characteristics
Power Management
VESA DPMS, Energy Star
Maximum Power Consumption
40 Watts
Power Saving Mode
< 1 Watts
Operating Voltage
Automatic switched mode power
supply, 100 - 264 V, 50 - 60Hz
Dimensions (W x H x D)
Net Weight
415.4 x 436.1 x 192.7 mm
8.5kg
Temperature (Operating)
5°C - 35 °C
Air Humidity (Operating)
20% - 85%
Regulatory Certification
Safety
AS/NZS 60950, CB
EMI/EMC
AS/NZS 3548 Class B (C-Tick), FCC
Class B, CE Mark
Other
MPR-II
24
11
Service Contacts
If problems remain after checking this manual, please contact your place of
purchase or contact
Australian Service Contacts
Visit the Mitsubishi Electric Australia web site at
www.mitsubishi-electric.com.au
For details of your nearest Mitsubishi Electric Authorised Service Centre or
contact the Service Department for your state:
New South Wales and Australian Capital Territory
348 Victoria Road
Rydalmere, NSW, 2116
Telephone: 1300 651 808
Fax:
(02) 9684-7684
Queensland
1 / 104 Newmarket Road
Windsor, Qld, 4030
Telephone: (07) 3357-8877
Fax:
(07) 3357-8488
South Australia and Northern Territory
77 Port Road
Hindmarsh, SA, 5007
Telephone: (08) 8340-0444
Fax:
(08) 8340-0555
25
Victoria and Tasmania
4 / 303 Burwood Hwy
East Burwood, Vic, 3151
Telephone: (03) 9262-9899
Fax:
(03) 9262-9850
Western Australia
5 / 329 Collier Road
Bassendean, WA, 6054
Telephone: (08) 9377-3411
Fax:
(08) 9377-3499
New Zealand Service Contacts
Contact:
BDT Ltd.
1 Parliament St.
Lower Hutt
Wellington
Telephone: (04) 560-9100
Fax:
(04) 560-9140
Web site: www.bdt.co.nz
26