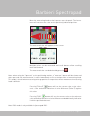
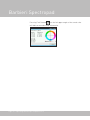
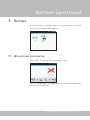
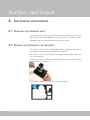
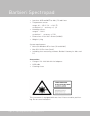
1
Series 2
Reflection spectrophotometer
for digital imaging market
Operating Manual
edition 08/14 for Firmware version 6.00 or newer
Barbieri Spectropad
1. Contents
1.Introduction...................................................................................... 4
1.1 What you can do with this instrument..................................... 5
1.2Unpacking the instrument...................................................... 6
1.3Components.......................................................................... 7
2.Putting into operation. ...................................................................... 8
2.1 Battery charging................................................................... 8
2.2USB connection. .................................................................. 9
2.1Product registration........................................................... 12
3.Using the instrument....................................................................... 13
3.1Statusbar........................................................................... 13
3.2 Beginner-Mode. ................................................................. 13
3.3Touch panel........................................................................ 14
3.4Showing instrument information........................................... 14
3.5Calibration......................................................................... 15
3.6Measuring reflective samples............................................... 16
3.7Measure thin reflective samples........................................... 18
4.Chart measuring mode...................................................................... 19
5.DOC measuring mode. ...................................................................... 22
Measuring a reference strip................................................ 23
Measuring a control strip................................................... 24
6.Spot measuring mode........................................................................ 26
6.1 Image Quality Mode............................................................. 29
6.2Line measuring mode............................................................ 30
7.Settings.......................................................................................... 31
7.1 Wifi interface configuration. ............................................... 31
7.2 Beginner Mode configuration. ............................................. 33
8.Instrument maintenance................................................................... 34
8.1Changing the reference white. ............................................. 34
8.2Packing the instrument for transport.................................. 34
9.Specifications.................................................................................. 35
Operating Manual Spectropad Series 2 - Page 3
Barbieri Spectropad
1. Introduction
We congratulate you on your choice!
We from BARBIERI electronic are proud of presenting to you the spectrophotometer Spectropad. This instrument features the latest technology in precise optics, state-of-the-art electronics and software
functionality. It is especially created for use in digital imaging market
and in particular for industrial printing applications.
May we suggest you read the operating manual first for fully enjoying
the capabilities of this instrument; thus you will be able to get familiar
with its functions step by step. As always, Barbieri electronic supports
you with a one year warranty through its service organizations. Please
get in touch with us in case of need.
May we also thank you for the confidence you have put in us by purchasing this instrument.
Stefan Barbieri
Managing Director
Page 4 - Operating Manual Spectropad Series 2
Barbieri Spectropad
1.1 What you can do with this instrument
The Spectropad introduces a new way of accurate color control in industrial printing.
Based on the high precision Barbieri qb-technology, a technology specifically designed for industrial printing applications, this instrument
features highest measuring accuracy which forms the basis to highest
color quality on your printed results.
The instrument has been designed according to ISO 13655-2009.
Quality control
With its DOC option (digital output control) you can check print quality
directly on the printer with immediate feedback if printing conditions
are within tolerances.
Printer calibration and profiling
The chart measurement ability allows you to quickly measure calibration and profiling charts.
Spot color measurement
The instrument allows measurement of single colors and indication of
the respective L*a*b* values and Delta E deviations against reference
colors.
Operating Manual Spectropad Series 2 - Page 5
Barbieri Spectropad
1.2 Unpacking the instrument
The instrument is delivered with the following components:
1.
Barbieri Spectropad
2.
Rechargeable battery module
3. Power adapter/ charger
4.
USB cable
5.
USB stick or CD with software/ drivers
6.
Quick Guide in printed format
7.
Microfiber cleaning cloth
For security reasons, the rechargeable battery is separately packed
with the instrument. This assures transport security by guaranteed
switch-off of WiFi signals.
Before putting into operation the instrument, please insert the rechargeable battery module into its slot.
Charge the battery for 2 hourse before use.
Page 6 - Operating Manual Spectropad Series 2
Barbieri Spectropad
1.3 Components
1: Measuring head
2: Touch display
3: Calibration switch
1
4: On/Off switch
5: USB connector
2
6: Power connector
4
5
3
6
7: Reference white
8: Position wheel
8
7
9: Battery holder
9
Operating Manual Spectropad Series 2 - Page 7
Barbieri Spectropad
2. Putting into operation
The instrument is switched on, by shortly pressing the On/Off button.
The main screen appears:
To switch off the device, select the “Switch off” button on the screen or
alternatively press the On/Off switch on the instrument.
Pressing the On/Off switch for more than 5 seconds will force the instrument to switch off in case it is in a blocked condition.
2.1 Battery charging
The instrument is equipped with a rechargeable battery. The battery
can be charged by connecting the power adapter to the instrument.
A LED near the power connector indicates the correct charging. When
instrument is switched on, the battery indicator in the status line indicates additionally if battery is charging.
Charging is finished after approx. 4 hours charge time with power
adapter.
Note: The battery is charged also over the USB cable when connected,
but only when instrument is switched off. Charging time is approx. 20
hours over USB cable.
Page 8 - Operating Manual Spectropad Series 2
Barbieri Spectropad
2.2 USB connection
Before connecting the instrument to the computer, please install the
Barbieri Gateway measuring software supplied on the USB stick/CD
accompanying your instrument.
This will also install the required USB driver.
Then connect the instrument with your computer and launch the Barbieri Gateway software.
Installing on a Mac computer under OS X
Switch off the Spectropad. Insert the supplied USB stick/CD-Rom into
your computer, run the Gateway Installer program and follow the instructions.
Check if driver is correctly installed:
• Switch on instrument
• Open “System Information” (About this Mac/ More info...)
• Show the “System Report” and check “Hardware/ USB”. The instrument “Spectropad” must be listed
Operating Manual Spectropad Series 2 - Page 9
Barbieri Spectropad
Installing on a PC with Microsoft Windows XP or later
Switch off the Spectropad. Insert the supplied USB stick/CD-Rom into
your computer, run the Gateway Installer program and follow the instructions.
The USB driver is now on your computer.
• Connect the Spectropad to the computer using the supplied USB
cable.
• Switch the Spectropad on.
There are two drivers to be installed for the connection between your
computer and Spectropad:
1. High speed USB to serial converter
2. USB virtual serial port driver
The installation procedures are guided automatically by an installation
wizard.
Note: The two installations follow automatically each other!
Your new Hardware is now installed and ready for use!
Page 10 - Operating Manual Spectropad Series 2
Barbieri Spectropad
To check if the installed hardware is listed on your computer:
• Open “Control Panel”, “System”
• Select “Hardware” and click “Device Manager”.
• You will find the just installed hardware in the appearing list under
“Ports” and “Universal Serial Bus controllers”.
Operating Manual Spectropad Series 2 - Page 11
Barbieri Spectropad
2.1 Product registration
It is recommended to register your instrument with Barbieri electronic
in order to get access to privileged information like access to download
area, product information/ firmware updates etc.
Registration can be done through the Barbieri Gateway measuring
software or manually by registering on the Barbieri web site: www.
barbierielectronic.com
Page 12 - Operating Manual Spectropad Series 2
Barbieri Spectropad
3. Using the instrument
3.1 Statusbar
The upper status bar in the display indicates the following information:
WiFi connection and signal strength
Sound on
Sound off
Battery status
Information button
Exit window (go back)
Some additional information on the current job is also indicated in this
Statusbar:
M0, M1, M2
Measuring condition (Light condition)
Measuring direction unidirectional from right to left
Measuring direction unidirectional from left to right
Measuring direction bi-directional
Spot measurement under optical aperture
3.2 Beginner-Mode
The instrument will show additional step-by-step instructions
when the “beginner-mode” is enabled.
When disabled, these instructions do disappear.
It can be switched on- and off by blicking on this icon.
Operating Manual Spectropad Series 2 - Page 13
Barbieri Spectropad
3.3 Touch panel
The instrument is equipped with a touch panel which can be operated
by your fingers, or by a pointer.
Please make sure to not scratch the panel by avoiding using hard items.
The panel can be cleaned with the soft cloth included with the instrument.
Note: the color indicated on the screen are only approximate colors and
no color management is applied for this screen!
3.4 Showing instrument information
On the main screen, click on
in the upper right of the statusbar to
show the instrument information:
The following information is displayed:
-
Firmware version
-
Serial number (Instrument/ Modul)
-
MAC address (WiFi)
-
Clock
-
Temperature
-
relative Humidity
Note: the clock is set automatically to the computer time and date
when connecting the instrument to a computer and launching a measuring software.
Page 14 - Operating Manual Spectropad Series 2
Barbieri Spectropad
3.5 Calibration
For accurate measurements, the device must be calibrated before the
use.
The measuring head is equipped with a switch which allows manual
insertion of the white reference.
When this switch is operated, the instrument will automatically detect
this and inform you that it is being calibrated.
Release the switch when calibration is terminated.
Operating Manual Spectropad Series 2 - Page 15
Barbieri Spectropad
3.6 Measuring reflective samples
The instrument can measure most reflective materials used in large
format printing. The samples are placed on an even surface.
For thin materials (paper, textiles) please see next chapter.
First, get familiar with the movement of the Spectropad. The instrument is equipped with two rollers and two rubbers on its lower side:
rubbers
rollers
Place the instrument on a table, and put your hand on the instrument
as indicated in the picture below. When pushing down your heel of the
hand, the instrument is lifted up slightly and movement of the instrument in Y-direction can be done by pushing it.
Page 16 - Operating Manual Spectropad Series 2
Barbieri Spectropad
Put the instrument centered on a printed chart.
Position the instrument on the center of the bottom chart line by
centering the two laser beams:
When this is done, keep the instrument panel fixed, and move the
measuring head to the beginning of the chart row
Now the instrument is ready to start the measurement. See chapter
“Chart measuring mode” to learn how to start measurements.
Measuring speed:
A position wheel under the measuring head will recognize the current
position and recognize when the end of the line has reached.
It also recognizes the speed of movement:
Make sure the speed indicator is in green range during measurement,
as this will allow most exact measurements.
Note: The instrument supports Bi-directional measurements. This
means, lines can be measured in direction from left to right and from
right to left. For beginners it is recommended to start with uni-directional measurement.
Operating Manual Spectropad Series 2 - Page 17
Barbieri Spectropad
3.7 Measure thin reflective samples
When measuring thin materials (e.g. paper), the measurement must
be effected on a staple of same material. This will assure accurate and
repeatable measurements independent on the surface the material is
placed.
Alternatively, you may place the sample to be measured on a white
surface corresponding to ISO 13655-2009 white backing specifications.
Page 18 - Operating Manual Spectropad Series 2
Barbieri Spectropad
4. Chart measuring mode
The chart measuring mode is used to measure complete color charts.
Predefined job definition files which have been created with the Barbieri Gateway software or 3rd party software are offered for selection
and can be measured:
Select the desired job and confirm with “Select”.
Select the measuring direction to be used.
Note: the selected direction is always indicated in the Statusbar. It can be modified by clicking on the
arrow icon in the Statusbar.
Note: to disable display of this message (disable Beginners-mode), click on the icon in the right
lower corner.
Operating Manual Spectropad Series 2 - Page 19
Barbieri Spectropad
A window will appear which shows you where to position the marker
before starting measurement.
The chart measuring window will appear:
Measure the complete chart line by line as requested.
The measuring head needs to be positioned at the beginning of the line
to be measured.
Stop shortly to make the instrument recognize that the start position
has been found and then start moving the head over the full length of
the line until the instrument tells you by a beep and by a message that
measurement is terminated.
Note: Charts are measured from bottom up!
Page 20 - Operating Manual Spectropad Series 2
Barbieri Spectropad
In case you stop before the end of the line, a warning will appear.
In case the measuring speed was too high, a warning will eppear:
Note: A “X” symbol indicates that data is missing.
In case the wrong line is measured, an warning will appear:
When pressing “cancel” button, the measurement can be repeated.
When pressing “confirm” button, data is accepted. This might be necessary if measured line is correct.
Note: A triangle symbol (stands for “delta”) indicates measurements to be verified because of high
Delta E color difference against the reference value.
Operating Manual Spectropad Series 2 - Page 21
Barbieri Spectropad
5. DOC measuring mode
The DOC (Digital Output Control) measuring mode allows measurement of control strips and evaluation against reference values.
The instrument supports the following control strips and their respective evaluations:
- Barbieri DOC Control strip CMYK
- FOGRA Media Wedge CMYK LFP (relative and absolute evaluation)
- IDEAlliance Digital Control strip 2009 and Control Wedge 2013
Note: This mode is only available in model Spectropad DOC. To enable
DOC measuring mode, you need to order a TAN code and activate the
mode through Gateway software.
If the DOC Mode is not enabled, the functionality can be tested with a
Demo job.
Select one of the offered jobs in the jobs list. Jobs are defined/created
in Barbieri Gateway software or 3rt party software and copied into the
device.
A sample job with name “DEMO_Printer1_Media1” is already delivered with the device. This job uses the “Barbieri DOC strip CMYK” and
comes without reference data and a predefined tolerance set. The first
measurement is used as reference data.
Page 22 - Operating Manual Spectropad Series 2
Barbieri Spectropad
Measuring a reference strip
Reference values can be supplied by a reference file or by saving a
measurement as reference.
In case of the sample job “DEMO_Printer1_Media1”, you need to print
out a Barbieri DOC control strip on your printer and measure this as
your reference.
Measure the printed strip as described in chapter “chart measuring
mode”.
when chart measurement is terminated, you can save the measurement as reference with button “Save as Ref.” or “Close” and discard
measurement.
When choosing “Edit” button from the job list in the “Select Job” window, the actual reference file is shown.
If requested, the reference file can be deleted and this allows to measure a new strip as reference strip.
Operating Manual Spectropad Series 2 - Page 23
Barbieri Spectropad
Measuring a control strip
Measure your printed control strip by selecting the job and proceeding
as described in “Chart measuring mode”.
When measurement is terminated the instrument checks the measured values against reference values and result is indicated on the display:
This page does indicate if the measured strip is within/ without the allowed tolerances.
The following parameters are evaluated:
ΔE00 is a color distance formula also denominated Delta E 2000
Parameter
ΔE00 average, ΔE00 max.
ΔE00 prim./sec. max
ΔE00 grayscale avg.
ΔE00 media
Page 24 - Operating Manual Spectropad Series 2
Description
Compare of color Gamut
Compare of ink primaries and
secondaries (RGB) to indicate if
ink colors have changed
Average deviation of grayscale
values. Indicate linearization shift
Deviation of media white point.
Indicates color shift on media
Barbieri Spectropad
By pressing the “i” button, additional information is indicated:
Note: the current measurement is saved and can be transferred to the
Barbieri Gateway software or 3rt party software for printout of a report.
Please see Barbieri Gateway software operating manual for more information on job parameters and job creation/ modification.
Operating Manual Spectropad Series 2 - Page 25
Barbieri Spectropad
6. Spot measuring mode
In spot measuring mode, single colors can be measured.
Select one of the offered jobs. The job settings are defined in Barbieri
Gateway software or 3rd party software.
Select the positioning marker to be used.
A window will appear which shows you where to position the marker
before starting measurement.
The Spot measuring window will appear.
Position the measuring head of the instrument on a color patch by
centering it with the indicator on the measuring head.
Page 26 - Operating Manual Spectropad Series 2
Barbieri Spectropad
Move the measuring head so that it passes over the patch. The instrument will measure the color on the previously indicated position.
The measured color will appear on the screen.
Multiple colors can be measured and scroll buttons allow scrolling
back and forward.
The measured color can be deleted by pressing
Note: when using the “aperture” as the positioning marker, a “measure” button will be shown and
when pressed, the measurement is taken immediately on the actual position of measuring head.
This mode is useful when measuring on large patches or on patches where movement of measuring
head is difficult.
Pressing “Delta E”
button will set the current color to the reference color and allow indication of color difference (Delta E) against
this color.
Pressing “DOC”
button will set the current color to the reference
color and allow indication of color difference and additionally indication
if within specified tolerance.
Note: DOC mode is only available in Spectropad DOC.
Operating Manual Spectropad Series 2 - Page 27
Barbieri Spectropad
Pressing “info” button
on the left upper angle of the actual color
will indicate more detailed information
Page 28 - Operating Manual Spectropad Series 2
Barbieri Spectropad
6.1 Image Quality Mode
This mode allows to determine the homogeneity of the printer/prints
using the Fogra M-Score formula.
Note: This Mode is acitve when “DOC Mode” is activated.
The required Light/ Medium/ Darg grey targets (supplied on USB stick/
CD with instrument) must be printed and measured by the device.
Results are shown as follows:
According to FOGRA, the resulting values are to be interpreted as follows:
M-Score
≥ 95
Meaning
Perfect
≥ 80
Very good
≥ 70
Good
≥ 60
Satisfactory
≥ 50
Adequate
< 50
Poor
Example
Inkjetprint on proofing substrate showing no visible inhomogeneities
Print with slightly visible inhomogeneities (e.g. some Mottling). No visible
stripes.
Print with visible inhomogeneities
(Mottling) but almost no visible stripes.
Mottling and stripes visible. Is still accepted by most observers.
Print with clearly visible mottling and/
or stripes. Acceptance is highly dependent on the printed image.
Clearly visible mottling and stripes.
Not accepted as high quality print
More infomation on M-Score: www.fogra.org
Operating Manual Spectropad Series 2 - Page 29
Barbieri Spectropad
6.2 Line measuring mode
This mode is only activated by external software and allows measurement of a single line of color patches. A window pops up indicating an
empty line.
This mode is similar to the “Chart mode”, but uses only one line.
For additional instructions, see chapter “Chart measuring mode”.
Page 30 - Operating Manual Spectropad Series 2
Barbieri Spectropad
7. Settings
When pressing the “Settings” button on the touch panel of the main
screen, the following windows appears:
7.1 Wifi interface configuration
Select “WiFi” to enter the WiFi configuration mode:
Click on “Enable WLan” to enable the Wlan interface (disabled by default on new instruments).
Operating Manual Spectropad Series 2 - Page 31
Barbieri Spectropad
The Message “preparing Access Point” appears and the default instrument IP address is indicated as soon as ready.
The instrument supports 2 connection modes:
-
SpectroPad to WLan (Router mode)
-
PC to SpectroPad (Access Point mode)
By default, the instrument is in Access Point mode which allows a PC
to directly connect to the instrument by using the IP-address indicated.
In this mode there is no encryption enabled.
When selecting the “SpectroPad to WLan” mode, the instrument lists
the available WLans:
Choose the desired WLan and press “Connect”. The instrument will
then try to connect to the selected WLan. This operation might take
some time.
Page 32 - Operating Manual Spectropad Series 2
Barbieri Spectropad
When successfully connected, the new IP number and signal strength
are shown on the screen.
For secure connections the instrument supports the WEP, WPA and
WPA2 standard. If you choose a new WLan network the passphrase
must be inserted.
Please note: the instrument uses TCP/IP port 9760 to communicate
over the network with your software. Make sure this port is not blocked
by a firewall in your network.
7.2 Beginner Mode configuration
Switch on and off the beginner mode message boxes.
Operating Manual Spectropad Series 2 - Page 33
Barbieri Spectropad
8. Instrument maintenance
8.1 Changing the reference white
The instruments reference white located on the bottom of the measuring head, can be exchanged by releasing it with a screwdriver. A detailed description comes with the new reference white.
8.2 Packing the instrument for transport
For security reasons, the rechargeable lithium Ion battery must be removed before packing the instrument for shipment.
This makes sure, no fire accident can happen and the WiFi radio signals are turned off.
Remove the battery holder by unlocking the lock accessible from the
bottom side of instrument.
Place battery holder in its space in original packing.
Page 34 - Operating Manual Spectropad Series 2
Barbieri Spectropad
9. Specifications
Technical data
• Measuring modes:
• Reflectance spot color with Delta E
• Reflectance strip scanning with automatic patch detection (linearization, profiling),
• DOC (Digital Output Control – optional) with pass/ fail analysis
• Measurement: manual with expandable ruler for X-direction and
roller guide for Y-direction
• Positioning: with laser pointers
• Measuring aperture: 6 mm diameter
• Patch size: 12x12 mm recommended
• Scanning speed: max. 200 meas./sec
• Maximum strip length: 290 mm
• Geometry: 45:0
• Physical illumination: 3 point circumferential, 7 LED-chip D50 illumination
• ISO 13655-2009 measuring mode M1 and additional M0, M2 (UVcut)
• Measuring sensor: diffraction grating with diode array
• Spectral range: 380 ... 750 nm
• Spectral resolution: 2 nm
• Optical resolution: 10 nm
• Calibration: manual with internal white reference
• Repeatability: < 0,2 ΔE00 on white
• Inter-instrum. agreement: 0,5 ΔE00 average, 1,0 ΔE00 max.
on BCRA series II tiles
• Internal memory: 2 GByte
• Ports: USB 1.1,
• WiFi Interface: 2,4 GHz IEEE 802.11b+g, Open, WEP, WPA, WPA2
Security, FCC (USA), IC (Canada), CE (Europe), MIC (Japan), KCC
(South Korea) certified
• Display: 320x240 pixel, touch screen
• Battery: Li-Ion accumulator (2 hours continuous measurement)
Operating Manual Spectropad Series 2 - Page 35
Barbieri Spectropad
• Interface: USB and WiFi for Mac, PC and Linux
• Temperature sensor:
range -20 … +50 °C (-4 … +122 °F)
resolution 0,1 accuracy: +/- 1,0
• Humidity sensor:
range 0 … 100 %
resolution 1 accuracy: +/- 5%
• Dimensions: 210 x 220 x 90 mm (LxWxH)
• Weight: 1,4 kg
System requirements
• Microsoft Windows XP or later (32 and 64 bit)
• Mac OS X 10.5 or later (Intel).
• Including free measuring software Barbieri Gateway for Mac and
PC
Accessories:
• Charger: 110…240 Volt with intl adapters
• USB cable
• Cleaning tissue
This instrument is equipped with two class II lasers used for positioning. Do not stare into beam!
Page 36 - Operating Manual Spectropad Series 2
Barbieri Spectropad
Specifications are subject to change without notice
EG-Konformitätserklärung
Für das folgend bezeichnete Erzeugnis
Spectropad
wird hiermit bestätigt, daß es den wesentlichen Schutzanforderungen
entspricht, die in der Richtlinie des Rates zur Angleichung der Rechtsvorschriften der Mitgliedsstaaten über die elektromagnetische Verträglichkeit (89/336/EWG) festgelegt sind.
Diese Erklärung wird verantwortlich für den Hersteller:
BARBIERI electronic OHG
I. Seidner Str. 35
I-39042 Brixen (BZ)
Italien
abgegeben durch den gesetzlichen Vertreter: Barbieri Markus.
Federal Communication Commission Notice
This equipment has been tested and found to comply with the limits for
a Class A digital device, pursuant to Part 15 of the FCC Rules. These
limits are designed to provide reasonable protection against harmful
interference when the equipment is operated in a commercial environment. This equipment generates, uses, and can radiate radio frequency energy and, if not installed and used in accordance with the
instruction manual, may cause harmful interference to radio communications. Operation of this equipment in a residential area is likely to
cause harmful interference in which case the user will be required to
correct the interference at his own expense.
CAUTION: Operational hazard exists if AC adaptor other than original
is used.
NOTE: Shielded interface cables must be used in order to maintain
compliance with the desired FCC and European emission requirements.
Operating Manual Spectropad Series 2 - Page 37
Barbieri Spectropad
For Italy:
INFORMAZIONE AGLI UTENTI
Ai sensi dell’art. 13 del Decreto Legislativo 25 luglio 2005, n.151 “Attuazione delle Direttive 2002/95/CE, 2002/96/CE e 2003/108/CE, relative
alla riduzione dell’uso di sostanze pericolose nelle apparecchiature
elettriche ed elettroniche, nonché allo smaltimento dei rifiuti”.
Il simbolo del cassonetto barrato riportato sull’apparecchiatura o sulla
sua confezione indica che il prodotto alla fine della propria vita utile
deve essere raccolto separatamente dagli altri rifiuti.
La raccolta differenziata delle presente apparecchiatura giunta a fine
vita e’organizzata e gestita dal produttore. L’utente che vorrà disfarsi
della presente apparecchiatura dovrà quindi contattare il produttore
e seguire il sistema che questo ha adottato per consentire la raccolta
separate dell’apparecchiatura giunta a fine vita.
L’adeguata
raccolta
differenziata
per
l’avvio
successivo
dell’apparecchiatura dimessa al riciclaggio, al trattamento e allo smaltimento ambientalmente compatibile contribuisce ad evitare possibili
effetti negativi sull’ambiente e sulla salute e favorisce il reimpiego e/o
riciclo dei materiali di cui è composta l’apparecchiatura. Lo smaltimento abusivo del prodotto da parte del detentore comporta l’applicazione
delle sanzioni amministrative previste dalla normative vigente.
Page 38 - Operating Manual Spectropad Series 2
Barbieri Spectropad
Operating Manual Spectropad Series 2 - Page 39
Barbieri Spectropad
Contact information:
BARBIERI electronic snc/OHG
Via I.-Seidner-Str. 35
39042 Bressanone/Brixen – Italy
Tel. +39 0472 834024
Fax +39 0472 833845
[email protected]
www.BARBIERIelectronic.com
Page 40 - Operating Manual Spectropad Series 2