1
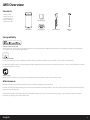
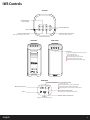
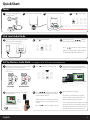
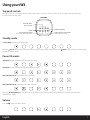
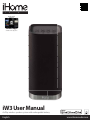
works with
iHome+apps
available on the App Store
works with
iW3 User Manual
AirPlay wireless speaker system with rechargeable battery
English
www.ihomeaudio.com
Welcome to the iHome iW3
Thank you for choosing iHome. The Air Series represents the new frontier of product offerings from iHome that
embrace Wi-Fi connectivity and AirPlay, Apple’s new wireless streaming technology.
The iHome iW3 with AirPlay offers the latest experience in home audio entertainment allowing users to stream digital
audio over Wi-Fi from iTunes, iPad, iPhone and iPod touch. Featuring SRS® DSP technology and a built-in rechargeable lithium-ion battery, the iW3 offers high fidelity audio that is truly wireless.
You can use the iW3 to:
• Stream music directly from iTunes on your Mac or PC using your home Wi-Fi network
• Stream your favorite music from your iPad, iPhone, and iPod touch’s iPod music library or popular music apps like
PANDORA®, iHeartRadio®, and Tunein® available on the App Store
• Play and charge your iPad, iPhone, and iPod with included USB sync cable
• Enjoy true wireless audio anywhere around the house with the iW3’s rechargeable battery, convenient charging
base and integrated handle
• Add multiple iW3 speakers to enjoy multi-room audio anywhere in the home (note: streaming to multiple
speakers simultaneously requires iTunes as the source)
• Download and enjoy iHome+apps available on the App Store:
- iHome Set, a free iHome utility app for easy network setup, device settings and firmware updates
- iHome Sleep, a free music alarm clock app
Keep reading to discover everything you need to know to get the most from your iHome iW3.
English
2
iW3 Overview
Contents
1. iW3 speaker
2. iW3 start guide
3. Charging base
4. Power adaptor
5. USB sync cable
iW3 start guide
iW3 speaker
charging base
power adaptor
USB sync
cable
Compatibility
USB connector works with:
iPod touch (2nd, 3rd, and 4th generation), iPod nano (2nd, 3rd, 4th, 5th, and 6th generation), iPhone 4S, iPhone 4, iPhone 3GS, and iPhone
3G, and iPad (1st, 2nd, and 3rd generation).
AirPlay works with:
iTunes, iPod touch (2nd, 3rd, and 4th generation), iPhone 4S, iPhone 4, iPhone 3GS, and iPad (1st, 2nd, and 3rd generation).
For AirPlay, the iW3 must be connected to Wi-Fi with networked access to a Mac or PC running iTunes 10.1 or later; or an iPad, iPhone, or iPod
touch running iOS 4.2 or later.
iHome+apps:
iHome Sleep and iHome Set apps work only with iPad, iPhone, iPod touch and require iOS 4.2 or later
Maintenance
Place the unit on a level surface away from sources of direct sunlight or excessive hear.
Protect your furniture when placing your unit on a natural wood and lacquered finish. A cloth or other protective material should be placed
between it and the furniture.
Clean your unit with a soft cloth moistened only with mild soap and water. Stronger cleaning agents, such as benzene thinner or similar
materials can damage the surface of the unit.
English
3
iW3 Controls
TOP PANEL
iPod and iTunes
music controls
Volume Up/Down
Power
Local iPod audio mode
AirPlay wireless audio mode
(play audio via USB sync cable or aux-in)
(audio via iOS device or iTunes)
REAR PANEL
FRONT PANEL
Status LED
OFF, when in Standby or Power OFF mode and
battery is fully charged
Green, solid when unit is ON
Green, blinking when volume is muted
Red, solid when battery is charging
Red, blinking when battery needs charging
power
network setup
off | on
REAR PANEL
Wi-Fi network status LED
power
network setup
Master power switch
Master power is OFF
Green, solid when connected to a Wi-Fi network
Green, flashing when in Network Setup mode
Red, blinking when NOT connected to a Wi-Fi network
off | on
Wi-Fi network setup button
Aux-in
(Wi-Fi Sharing via iOS & manual network setup)
USB Port
firmware button & status LED
(Charge, play and firmware updates)
English
4
Quick Start
Power
1
2
Connect charging base to
power source
Place iW3 on charging base
3
Turn master power switch ON
4
Press
power button
outlet
power
off | on
12V
network setup
power
allow 30 seconds
pressing the power button will switch
for the iW3 to startup the iW3 from power ON and standby
off | on
For best results, charge unit fully before use.
iPod Local Audio Mode
1
Connect iPad/iPhone/iPod using iPod
USB sync cable and USB port
2
Press
for iPod mode
3
In iPod mode, press
buttons
on the iW3 to control your iPod music.
(iPod and aux-in play in parallel)
power
p
Press
network
t
k setup
t p
buttons to adjust volume.
off | on
Note: Use iPod mode for audio playback
via iPod with USB cable and Aux-in.
AirPlay Wireless Audio Mode
1
Verify that your iW3 speaker is successfully
connected to your Wi-Fi network.
(visit pages 8-9 for Wi-Fi network configuration)
2
Press
for AirPlay wireless mode
3
(visit page 8 for connecting your iW3 speaker to your
Wi-Fi network)
status
power
network setup
network setup
off | on
status
power
network setup
network setup
off | on
AirPlay only works with iPod touch, iPhone, iPad,
or iTunes (Mac or PC)
Connected
Not Connected
AirPlay
Wireless Audio
Mode
4
Select the iHome iW3 as your AirPlay
audio speaker
5
Press
buttons on the iW3 or
use your iTunes, iPad, iPhone, or iPod
touch controls directly.
Adjust volume on the iW3 or wirelessly
control volume on your AirPlay source
device.
Press
buttons to adjust volume.
Look for the AirPlay logo
to select your speaker
English
Launch iTunes or use your iPad, iPhone,
iPad touch. Verify iW3 and AirPlay source
device is on same Wi-Fi network.
!
Note: for AirPlay streaming:
iPad, iPhone, and iPod touch support
point-to-point audio streaming to one
AirPlay enabled speaker at a time.
iTunes supports point-to-multipoint audio
streaming to up to three AirPlay enabled
speakers (performance depends on both
your Wi-Fi network and environment).
5
Getting Started
Master Power Switch
The iW3 has a master power switch that is used to power the unit ON or OFF, help conserve battery life, and reset the iW3 speaker. In order
for the iW3 speaker to power ON, the battery must be charged or placed on the charging base connected to an AC outlet.
power
Master Power ON - Slide the Master Power Switch (on rear panel) to the ON position to activate your iW3 speaker.
Master Power OFF - Slide the Master Power Switch to the OFF position to power the iW3 speaker OFF.
off | on
Note: If the iW3 is in the Master Power OFF state the iW3 will only allow charging of the iW3’s internal battery and will not support
iPod/iPhone charging, AirPlay, network setup, nor firmware updates.
Powering your iW3 speaker ON
To power the iW3 speaker ON:
1. Plug AC adaptor into Charging Base, and plug into a live AC wall outlet.
2. Place the iW3 Speaker on top of the Charging Base.
3. Slide the Master Power Switch (on rear panel) to the ON position.
Note: Allow 30 seconds for the speaker to startup before interacting with the iW3 speaker.
4. Press the
Power button to switch between power ON and Standby mode.
The iW3 speaker will power ON to the previous mode (default is AirPlay mode).
1
2
3
outlet
power
off | on
12V
network setup
power
off | on
30s for startup
Rechargeable Battery
The iW3 speaker has an internal rechargeable battery and supports audio playback anywhere in the home when the battery is charged.
To Charge the Battery:
1. Plug AC adaptor into Charging Base, and plug into a live AC wall outlet.
2. Place iW3 Speaker on top of Charging Base.
Note: Allow up to 10 hours to fully charge the iW3’s battery
Resetting your iW3 speaker
It is possible for the iW3 speaker to lockup and be unresponsive, making it necessary to reset the unit.
To reset the iW3 speaker:
1. Remove the iW3 Speaker from the Charging Base.
2. Using a paper clip, press the Reset Button on the bottom of cabinet within the charging base recess.
The iW3 will reboot and power ON again.
English
Reset button
Reset the iW3 speaker by using a
paper clip
to press the reset button
6
Using your iW3
Top panel controls
The iW3 speaker has a control interface for power, mode, volume, and music controls. Controls are lit according to the status of the iW3
speaker and the selected mode.
TOP PANEL
iPod and iTunes
music controls
Power
Local iPod Audio mode
(play audio via USB sync cable or aux-in)
Volume Up/Down
AirPlay wireless audio mode
(audio via iOS device or iTunes)
Standby mode
Standby Mode (master power switch is ON):
Press the
Power button to place the iW3 speaker in standby mode and stop audio playback. The
the iW3 is in standby mode.
Power button will pulse on/off to indicate
Power ON modes
iPod Mode (iPad/iPhone/iPod detected via USB connector):
iPod Mode (iPad/iPhone/iPod not detected via USB connector):
AirPlay Wireless Mode (connected to a Wi-Fi network):
AirPlay Wireless Mode (not connected to a Wi-Fi network):
Note: The
AirPlay Wireless button will continuously flash on/off to indicate that the iW3 is not linked to a network when ON and in
AirPlay Wireless mode.
Volume
Press
English
buttons to adjust volume.
7
Wi-Fi Network Setup for AirPlay
Check list
Please verify the following steps before attempting to connect your iW3 speaker to a Wi-Fi network:
To enjoy AirPlay wireless audio, you must have the following:
- iTunes or an iOS device (iPod touch, iPhone, or iPad).
- A functioning home network with Wi-Fi.
Download the latest software updates for iTunes and your iOS device to ensure that you are able to enjoy the latest AirPlay
enhancements and compatibility.
Download the
iHome Set app for iPod touch, iPhone and iPad.
Have your Wi-Fi network name (SSID) and password (if applicable) available for reference.
Note: AirPlay requires iTunes 10.1 (Mac and PC) or later; OR an iPad (3rd, 2nd, and 1st generations), iPhone 4S, iPhone 4, iPhone 3GS, iPod
touch (4th, 3rd, and 2nd generations) with iOS 4.2 or later. The iHome Set app requires iOS 4.0 or later.
Option A - Connecting via Wi-Fi sharing for iPod Touch, iPhone, or iPad (Recommended)
If you have an iPod touch, iPhone, or iPad with iOS 5.0 or later, we
recommend that you use Wi-Fi sharing for the quickest network
setup experience.
2
power
network setup
off | on
To connect your iW3 speaker to a Wi-Fi network using Wi-Fi sharing,
follow these steps:
1. Activate Wi-Fi on your iPad/iPhone/iPod touch (with iOS 5.0 or
later) and ensure you are connected to the network whose
settings you wish to share network settings with the iW3
speaker.
2. Connect your iOS device to the iW3 using the included iPod
USB sync cable.
3. Press the
Connect
3
status
power
p
network setup
network
k setup
p
off | on
Network Setup button on the back of the iW3.
4. A pop-up message will appear on the iOS device asking if you
want to share your Wi-Fi settings. Select ‘Allow’.
The iOS will share current wireless network credentials with the iW3
and a confirmation tone will sound.
10:09 PM
Connect
4
Success!
Share Wi-Fi Settings?
Congratulations, you have successfully connected your iW3 to your
wireless network and now you can start enjoying wireless audio
anywhere in your home or office. Verify that the Network Status
LED is green and then keep reading to learn how to use iW3 to
stream your iTunes and iOS audio content using AirPlay.
status
power
network setup
network setup
off | on
Connected
status
power
Allow
Ignore
network setup
network setup
Problem?
off | on
Not Connected
Note: Your AirPlay source devices (Mac or PC with your iTunes
library as well as your iPod touch, iPhone or iPad) must be
connected to the same Wi-Fi network as the iW3 speaker is
connected to before using AirPlay wireless streaming.
English
Do you want to share your Wi-Fi
settings so this accessory can
connect to the Wi-Fi network?
Reset the iW3 Speaker:
- Unplug the AC cable/remove the iW3 from the charging
base
- Slide the rear Power Switch to the OFF and then ON position
- Reconnect AC cable, place iW3 on charging base and wait 30
seconds
- Repeat iW3 Wi-Fi Network Setup process if necessary
- See Troubleshooting on page 12-13 for other tips.
8
Wi-Fi Network Setup continued...
Option B - Manually connecting & managing settings with the iHome Set app
If you have an iPod touch, iPhone, or iPad with iOS 4.0 or later, we
recommend that you use our free iHome Set app to easily rename
your iW3 speaker and configure network settings.
1
power
network setup
off | on
power
To connect your iW3 speaker to a Wi-Fi network using iHome Set,
follow these steps:
off | on
1. Connect AC power and power ON the iW3 speaker.
2. Connect your iOS device to the iW3 using the included iPod
USB sync cable.
3. Download our free
and launch the app.
iHome Set app from the
2
p
power
App Store
network
k setup
p
off | on
iHome Set
4. Scroll down the app interface and select the ‘Network’ tab
interface and then select ‘Manual Setup’ button.
5. Select your preferred Wi-Fi network from the list of available
networks and enter password if prompted. Select ‘Other
Network’ to connect to network with a hidden SSID.
4
5
10:09 PM
10:09 PM
Note: Connecting to a network may take up to 120 seconds. If
network connection is unsuccessful, reset the unit or disconnect
your iOS device and reconnect and repeat the above steps.
iW3
About
Network
Refresh
Your Wi-Fi Network
Other Wi-Fi Network
Step 2: When prompted, press
“Allow” to share your Wi-Fi settings
Speaker Name
Name
Choose a Network for iW3
Step1: Press the “Network Setup”
button on the rear panel of your
AirPlay speaker.
Show Details
iHome iW3 XXXXXX
Other Wi-Fi Network
Other Wi-Fi Network
Note: it can take up to 3 minutes for your
AirPlay speaker to connect to the Wi-Fi
network you just shared. The “Network
Status” LED on the rear panel of your
speaker will turn solid green when it has
successfully established a connection.
Firmware Update
Search for Update
Wi-Fi Networks
Settings
Manual Setup
Quick Wi-Fi Setup Instructions
Wi-Fi
6. OPTIONAL: To rename your iW3 speaker, exit manual network
setup, select ‘Speaker Name’ and customize how your iW3
speaker will present itself on your network. Press ‘DONE’ to
confirm the new name.
10:09 PM
Networks
iW3
Other Wi-Fi Network
Model: iHome iW3 • Firmware: 8.0.0
Other network
Success!
Congratulations, you have successfully connected your iW3 to your
wireless network and now you can start enjoying wireless audio
anywhere in your home or office. Verify that the Network Status
LED is green and then keep reading to learn how to use iW3 to
stream your iTunes and iOS audio content using AirPlay.
30s
Choose your Wi-Fi network from the available networks
and wait as the iW3 attempts to connect.
6
10:09 PM
10:09 PM
About
Network
iW3
Change Device Name
Refresh
Wi-Fi
Show Details
status
network setup
status
network setup
This name will be displayed when selecting your
speaker from a list of available AirPlay devices.
Speaker Name
Name
iHome iW3 XXXXXX
Firmware Update
power
network setup
off | on
power
network setup
off | on
Livingroom Speaker
Search for Update
Q W E R T Y U
I
O P
A S D F G H J K L
Model: iHome iW3 • Firmware: 8.0.0
Z X C V B N M
Connected
Not Connected
Note: Your AirPlay source devices (Mac or PC with your iTunes
library as well as your iPod touch, iPhone or iPad) must be
connected to the same Wi-Fi network that the iW3 speaker is
connected before using AirPlay wireless streaming.
English
?123
space
Done
Problem?
Reset the iW3 Speaker:
- Unplug the AC cable/remove the iW3 from the charging base
- Slide the rear Power Switch to the OFF and then ON position
- Reconnect AC cable, place iW3 on charging base and wait 30
seconds
- Repeat iW3 Wi-Fi Network Setup process if necessary
- See Troubleshooting on page 12-13 for other tips.
9
Wi-Fi Network Setup continued...
Option C - Connecting with your Mac or PC over Wi-Fi
To connect your iW3 speaker to a Wi-Fi network using a Mac or PC,
follow these steps:
1
power
off | on
2
network setup
power
status
1. Connect AC power and power ON the iW3 speaker.
2. Press and hold (5 sec.)
unit.
network setup
off | on
power
network setup
off | on
Network Setup button on the back of
Note: The Network Status LED will begin flashing green and the top
control panel will also flash.
3
YOUR Wi-Fi NETWORK
Internet access
iHome Setup ######
Your Wi-Fi network
Another network
Another network
3. On your Mac or PC, select the network called "iHome Setup ######"
from Wi-Fi network settings.
iHome Setup ######
Information sent over this network
might be visible to others.
Connect
Join Other Network...
Create Network...
Open Network Preferences...
Note: This process can take up to 2 minutes. Be patient and refresh your
network list if necessary.
Open Network and Sharing Center
9:42
01/15/2011
upper right corner of
Mac screen
4. Launch a web browser (ex. Safari, Chrome, or Firefox) and enter
http://192.168.1.12 in the address bar.
Note: If the page is not initially available or becomes unresponsive,
reload the page. See “troubleshooting” if problem persists.
5. Rename the iW3 speaker and click ‘Apply’. (optional)
Currently connected to:
AirPort: On
Turn AirPort Off
lower right corner of
PC Screen
30-120s
30-120s
4
http://192.168.1.12
6. Select the ‘Networking Tab’ , click ‘Configure Network Settings’,
choose preferred Wi-Fi network from the list of available and click
‘Apply’.
Note: Connecting to a network may take up to 120 seconds. If network
connection is unsuccessful reset the iW3 by powering OFF/ON again
and then repeat the above steps.
For support and product information, visit
www.ihomeaudio.com/support
5
Device Name
Networking
Device name
This name will be used when your speaker appears in a list of
available AirPlay devices.
iHome iW3 XXXXXX
Apply
Model: iW3
Firmware: 08.0.0
Success!
addres
add
ddress
s: a3
a3:
a3:4b
4b 61:e5:2
4b:61
:e5:24
e5 24:22
22
MAC address:
a3:4b:61:e5:24:22
1. Verify that the Network Status LED is green to confirm if the iW3 is
successfully connected to a network.
2. Disconnect from “iHome Setup ######” and connect your Mac/PC
to the same network you connected the iW3 speaker.
3. Keep reading to learn how to use the iW3 to stream and control
your iTunes and iOS audio content.
http://192.168.1.12
For support and product information, visit
www.ihomeaudio.com/support
Device Name
status
network setup
status
network setup
6
Network status: Not Connected
Networking
Type: not available
IP address: 192.168.1.12
Model: iW3
power
network setup
off | on
power
network setup
Firmware: 08.0.0
Not Connected
Note: Your AirPlay source devices (Mac or PC with your iTunes library as
well as your iPod touch, iPhone or iPad) must be connected to the same
Wi-Fi network that the iW3 speaker is connected before using AirPlay
wireless streaming.
English
Signal strength: excellent
off | on
MAC address: a3:4b:61:e5:24:22
Connected
SSID: not available
Problem?
Configure Network Settings...
SSID:
Available Networks
Password:
•••••••••
Automatic IP address (DHCP):
On
Off
Apply
10
Music Connectivity
Connecting to the iW3 speaker
You can connect to your iHome iW3 speaker three different ways:
1. Using AirPlay® to stream wirelessly from iTunes or your iPad, iPhone, and iPod touch.
2. Using the USB port on the rear panel with a iPod USB sync cable for audio and charging your iPod or iPhone.
3. Using an auxiliary audio device (mp3 or CD player) connected to the aux-in port on the rear panel.
AirPlay & iPod touch, iPhone, or iPad
Using an iOS device:
1. Connect yyour iOS device to the same Wi-Fi network as iW3. Go to
Settings -->
Wi-Fi on your iOS device.
2. Tap on
iPod/Music app, look for the
AirPlay button next to the iPod music transport controls.
3. Tap on the
AirPlay icon and choose iW3 from the list of speakers. If the iW3 speaker is not available, restart your iOS device and verify
that the iW3 is powered on and connected to the same Wi-Fi network.
4. Press play.
AirPlay & iTunes
Using a Mac or PC with iTunes:
1. Connect your Mac or PC to the same Wi-Fi network as iW3.
2. Open
iTunes on your computer.
3. Within iTunes open “Preferences”, Select the “Devices” tab, and activate the following option:
“Allow iTunes control from remote speakers”
4. Click OK, close iTunes preferences.
5. Look for the
AirPlay icon in the bottom right corner of the iTunes window.
6. Click the
AirPlay icon and choose iW3 from the list of speakers. Click "Multiple Speakers..." to select additional AirPlay speakers.
If the iW3 speaker is not available, restart iTunes and verify that the iW3 is powered on and connected to the same Wi-Fi network.
7. Press play.
AirPlay Wireless Audio Mode
Enjoy AirPlay audio anywhere:
1. Press to exit standby mode and power the iW3 ON.
2. Press for wireless audio mode and to listen to AirPlay music.
3. Use the
buttons on the iW3 to control streaming AirPlay content.
Local iPod Audio Mode
Charge and Play using iPod USB sync cable:
1. Connect USB sync cable to iW3’s USB port.
2. Press Local Playback mode button and enjoy iPod and iPhone charging and audio playback.
3. Use the
buttons on the iW3 in iPod mode to control your music.
Note: Use Local Audio mode for both iPod and Aux-in audio playback.
English
11
Control
SRS TruBass
The iW3 features SRS TruBass® digital sound processing to enhance the audio performance and ensure proper bass response when listening
to your music. The SRS TruBass function is on by default and can only be turned off using the iHome Set app.
EQ
The iW3 has an EQ feature that is controlled using the iHome Set app to adjust Bass and Treble.
TREBLE +/- buttons: Adjust treble levels between -5 and +5. Default is 0
BASS +/- buttons: Adjust treble levels between -5 and +5. Default is 0
Firmware update
It may be necessary to update the firmware of your iW3 speaker to ensure the latest compatibility and optimal functionality. The iW3 offers
three different methods for performing the firmware upgrade, detailed below as Option A, B and C. You only need to choose one.
Note: If you have access to an iOS device running 4.2 or later we recommend option A.
Option A - Firmware update using iHome Set
1.
2.
3.
4.
5.
6.
10:09 PM
Power ON the iW3 speaker and place on the charging base.
Connect your iOS device to the iW3 using the included iPod USB sync cable.
Download our free
iHome Set app from the
App Store and launch the app.
Scroll down the app interface and select ‘Search for Update’ .
If there is an update available, a message will pop-up asking if you would like to apply the firmware upgrade.
Select ‘Upgrade’.
About
Network
Refresh
Wi-Fi
Show Details
Speaker Name
Name
iHome iW3 XXXXXX
Firmware Update
Option B - Firmware update using USB mass storage device
Search for Update
Model: iHome iW3 • Firmware: 8.0.0
1. Using your computer visit www.ihomeaudio.com/support/product/iW3 and download the latest firmware from
the top right corner of the support page. Please be sure to remember the location where you save the file to on
your computer.
2. Locate the file from step 1 and load the file onto a USB mass storage device
Note: You must load it to the root (main) directory. Do not create a separate folder within the USB device.
3. Power on your iW3. When the iW3 is fully powered on connect the USB drive to the port located on the rear panel.
4. Press and Hold the
Firmware button for 5 seconds.
Note: The update process will take around 3 minutes to complete.
During Firmware Update:
There are two indicators on the iW3 to track the progress of the update:
1. The firmware update LED will remain RED
2. The top panel LED's will light up in succession to note the progress of the update (see diagram below)
Note: If the Firmware LED remains unlit this indicates that the process was unable to begin. Please be sure the proper file was loaded on the
USB drive and start over from step 3 above.
no LEDs
installation = 0%
English
25%
50%
75%
100%
12
Firmware update continued...
Option C - Firmware update using Mac/PC
Follow these steps to update the firmware of your iW3 speaker
using only your Mac or PC. Please note that we recommend trying
option A or B before attempting this method.
http://10.0.1.2
1. Using your computer visit:
www.ihomeaudio.com/support/product/iW3 and download
the latest firmware from the top right corner of the support
page. Please be sure to remember the location where you save
the file to on your computer.
For support and product information, visit
www.ihomeaudio.com/support
Device Name
Current Firmware Version : 00.0.0
Networking
2. Verify that your iW3 is successfully connected to your home
network.
To update the firmware of this device, you must first visit
iHomeaudio.com/support and download the latest firmware for
this speaker.
Firmware
3. Open a web browser (we recommend Safari) and access the
iHome Device Management webpage by using Bonjour
services or directly typing in the iW3’s IP address. The IP address
can be found using iHome Set under network details or by
re-initiating the network setup mode on page 10.
Once you have the new firmware file, you can initiate the
firmware update process.
Model: iW3
Firmware: 08.0.0
Begin Update
MAC address: a3:4b:61:e5:24:22
Note: If a file selection interface does not appear in approximately
30 seconds, you may try reloading this page using the reload
button on your web browser.
You can only complete firmware update using this page from a
PC or Mac.
Note: Make sure that you have enabled Bonjour service in your
PC. Take Windows XP for example: to enable the service, you can
click Start->Settings->Control Panel, and double click Administrative Tools-> Services->Bonjour Service, then click Start
followed by OK on the pop-up menu.
4. If everything was done correctly you'll see the page pictured.
5. Click the "Firmware" tab on the left column and follow the
on-screen instructions.
During Firmware Update:
1. The top panel LED's will light up in succession to note the progress of the update (see diagram below)
2. The iW3’s device management web page will indicate progress.
The iW3 will restart if firmware update is successful.
Note: This process can take 4-5 minutes.
no LEDs
installation = 0%
English
25%
50%
75%
100%
13
Troubleshooting
Quick tips for common problems:
I am unable to connect the iW3 to my home Wi-Fi network:
- The iW3 does not support WEP or WPA/WPA2 Enterprise security types. We recommend Open, WPA Personal (-PSK), WPA2 Personal
(-PSK). Once you change the security type on your router, we suggest rebooting your Wi-Fi router and your iW3 speaker.
- Make sure router firmware is up to date.
- Make sure that your wireless network is not on a conflicting channel with one of your neighbors. You can use software like
iStumbler on Mac or Netstumbler on Windows to verify that adjacent networks, sorted by SNR, aren't on the same channel.
Channels 1, 6, and 11 are the three non-overlapping 802.11g channels.
- If you cannot see your network on the list of available networks, ensure that your network is not hidden. If so unhide and reboot the
router.
I cannot find the MAC address of my iW3 speaker:
- Use the iHome Set app with the iPad/iPhone/iPod touch, connected with the USB sync cable and select ‘Show Details’ under the
NETWORK tab (note: you can also discover the MAC address using the manual network setup method - see page 10).
I’ve successfully connected the iW3 to my home network, but I cannot select the iW3 speaker from iTunes or my iOS Device:
Note: The iW3 speaker must be on the same Wi-Fi network as your airplay source
iTunes Solutions:
- Make sure that you have the latest version if iTunes.
- Try restarting iTunes.
- In order for the iW3 to be able to access track controls in iTunes you need to allow it in iTunes:
• In iTunes, go to Preferences.
• In the Devices tab, check "Allow iTunes audio control from remote speaker"
iOS device solutions:
- Make sure the iOS device has the latest software.
- If you’re unable to see the Airplay icon on the iOS device, restart your iOS device;
- Verify that your device is connected to the correct Wi-Fi network.
I’ve selected the iW3 speaker as my AirPlay audio source, but I do not hear any music:
- Verify that the volume is not muted or set to 0.
- Verify that there is not another iTunes library or iOS device connected to the iW3 speaker.
- Try restarting iTunes or your iOS device.
- Reset the iW3 speaker and reboot your Wi-Fi router.
The iW3 doesn’t respond or doesn’t turn ON:
- Place the iW3 on the charging base and fully charge your speaker.
USB Cable issue: Error message “this device is not supported”:
- Please restart your iW3 speaker as well as your iOS device and then try again.
Quick tips for network setup via Mac/PC:
I cannot access http://192.168.1.12 webpage:
- Please make sure that your Mac/PC is connected to the ‘iHome Setup XXXXXX’ network on your list of available networks
(note: internet access is not needed for this)
- Disable any firewalls that may prevent you from accessing this address: (i.e. anti-virus protection)
- Restart your browser.
I put my password in and hit “Join Network” and the network status is still blinking red:
- Please verify that you have entered the correct password for your wireless network.
- Restart the iW3 speaker.
English
14
AirPlay & Network Setup
Problems
Possible Solutions
I am unable to connect the iW3 to my
home Wi-Fi network.
1. Verify that your Wi-Fi network is functioning and Wi-Fi certified. This device is only
compatible with Wi-Fi certified routers.
2. Move the iW3 closer to your network access point; the Wi-Fi signal is weak or there
are overlapping Wi-Fi signals or the iW3 is out of range of your Wi-Fi network.
3. Make sure that your wireless network is not on a conflicting channel with one of your
neighbors. You can use software like iStumbler on Mac or Netstumbler on Windows
to verify that adjacent networks, sorted by SNR, aren't on the same channel.
Channels 1, 6, and 11 are the three non-overlapping 802.11g channels.
4. Use a WPA or WPA2 Personal key for security. We do not recommend the use of any
WEP key for security and WPA/WPA2 enterprise is not compatible with AirPlay.
5. Keep away from potential sources of interference which may affect Wi-Fi signal, such
as microwave ovens.
6. Make sure that the SSID name of your home router consists of normal characters or
digits, with no space or special characters like %/#/* inserted.
7. If you choose to rename the AirPlay device ‘iHome iW3 XXXXXX’ in the settings menu,
do not use special characters or symbols.
8. Reset the iW3 Hardware and repeat network setup:
- Using a paper clip, reset the iW3 speaker by pressing the Reset Button on the
bottom of the speaker within the charging base recess. The iW3 will reboot and
power ON again.
- Repeat iW3 Wi-Fi Network Setup process if necessary.
9. If the problem remains, it is strongly recommended to use our free iHome Set app for
your iPod Touch/iPhone/iPad to do the first time Wi-Fi setup as some PC settings may
affect the Wi-Fi network setup.
I’ve successfully connected the iW3 to
my home network, but I cannot select
the iW3 speaker from iTunes or from
my iOS device.
1. The iW3 speaker must be on the same network as your AirPlay source.
2. Verify you have the latest version of iTunes and/or iOS.
3. Disable the firewall software and security software, which may block ports that
AirPlay uses to stream content.
4. Try restarting iTunes, your iOS device, and your router.
Note: The original iPhone, iPhone 3G, and iPod touch (1st gen) do not support AirPlay.
No AirPlay icon in iTunes or on my
iPad/iPhone/iPod touch
1. Make sure that the device has already joined the AirPlay network.
2. Before you open iTunes, make sure that you have enabled Bonjour service in your
PC. Take Windows XP for example: to enable the service, you can click Start>Settings-> Control Panel, and double click Administrative Tools-> Services>Bonjour Service, then click Start followed by OK on the pop-up menu.
3. Within iTunes open “Preferences”, select the “Devices” tab, and activate the option
that says “Allow iTunes control from remote speakers.”
4. Try restarting iTunes, your iOS device, and your router.
Note: The original iPhone, iPhone 3G, and iPod touch (1st gen) do not support AirPlay.
Questions? Visit www.ihomeaudio.com/support/airplay/
English
15
Problems
Possible Solutions
I’ve selected the iW3 speaker as my
AirPlay audio source, but I do not hear
any music.
1. Verify that the volume is not muted or set to 0.
2. Verify that there is not another iTunes library or iOS device connected to the iW3
speaker.
3. Try restarting iTunes or your iOS device.
4. Try restarting your iW3:
- Unplug the AC cable/remove the iW3 from the charging base.
- Slide the rear Power Switch to the OFF and then ON position.
5. Upgrade the software on your AirPlay compatible device (iTunes, iPad, iPhone, or
iPod touch).
Occasional breaking of AirPlay music
streaming.
Do one or all of the following:
1. Enable the Auto Channel Scan option (if available on the Wi-Fi router).
2. Enable the Wireless Intelligent Stream Handling (WISH) option (if available on the
Wi-Fi router).
3. Enable the Quality of Service (QoS) option (if available on the Wi-Fi router).
4. Move your iW3 speaker closer to your Wi-Fi access point.
5. Change network security settings to WPA (WPA2) Personal. WEP is known to cause
issue with AirPlay streaming and we do not recommend this legacy security format.
6. Restart your iPod Touch/iPhone/iPad or iTunes or iW3 speaker.
7. Browsing Internet content like news, music, video, etc. via your home Wi-Fi network
from other Wi-Fi devices may affect the AirPlay performance. In case of AirPlay
break or disconnection, it is recommended to stop or limit Internet surfing.
Problems using the iHome Set app.
Sometimes there is an authentication error with an iOS device (common to any iOS
accessory) that causes the device running the iHome Set app to be unable to detect the
iW3. The user may correctly connect the iW3 with the USB sync cable, but the app will
keep showing the message “Please connect your iHome AirPlay compatible device with
an iPod USB sync cable”.
1. Verify sync cable is connected to the rear USB port on the iW3 and securely
connected to your iOS device (iPad, iPhone, iPod touch)
2. Restart iHome Set app (takes 10 sec.)
- Exit app and double tap home button
- Press & hold iHome Set app
- Close app and exit app manager
- Restart iHome Set
3. Restart iOS device (takes 1 minute)
4. Reset the iW3 speaker (takes 30 seconds)
- Using a paper clip, reset the iW3 speaker by pressing the Reset Button on the
bottom of the speaker within the charging base recess. The iW3 will reboot and
power ON again.
- Repeat iW3 Wi-Fi Network Setup process if necessary.
Note: iHome Set only works when docked with iHome AirPlay products and requires
iOS 4.0 to work.
Questions? Visit www.ihomeaudio.com/support/airplay/
English
16
General
Problems
Possible Solutions
The iW3 doesn’t respond or doesn’t
turn ON.
1 Verify that the adaptor is connected and the power outlet is always ‘live’ (not
controlled by a wall switch).
2. Reset the iW3 Speaker:
- Using a paper clip, reset the iW3 speaker by pressing the Reset Button on the
bottom of the speaker within the charging base recess. The iW3 will reboot and
power ON again.
- Repeat iW3 Wi-Fi Network Setup process if necessary.
No sound.
1. Verify that the volume is not muted or set to 0.
2. Verify the mode (AirPlay Wireless or iPod mode).
3. Verify iPod or iPhone is properly connected with the USB sync cable and connected
to the iW3’s USB port.
4. Verify that there is not another iTunes library or iOS device connected to the iW3
speaker.
5. Check the network connection. Set up the network again if needed.
6. Try restarting iTunes or your iOS device.
iPad/iPhone/iPod doesn’t charge or
play audio in iPod mode.
1. iPad/iPhone/iPod is not docked properly – Disconnect your iPad/iPhone/iPod from the
USB sync cable and check for obstruction on the connectors in the USB sync cable, on
your iPad/iPhone/iPod, or USB port on the iW3.
2. Reset your iPhone/iPod - Please see the user manual or the Apple web site for details.
Typically, holding the sleep button and the home button on a newer iPad, iPhone or
iPod will reset it.
3. Upgrade the software on your iPad, iPhone or iPod to the latest version by connecting
it to a computer with iTunes installed and checking through iTunes that your unit has
the most recent software. Update if needed.
4. Verify that the iW3 is compatible with your iPad, iPhone or iPod:
iPod touch (2nd, 3rd, and 4th generation), iPod nano (2nd, 3rd, 4th, 5th, and 6th generation), iPhone 4S, iPhone 4, iPhone 3GS, iPhone 3G, iPad, iPad 2, and iPad 3rd generation.
Sound crackles, is distorted, has a loud
hum or buzzing.
1. Turn the iPod device or other source component’s volume down.
2. Make sure that the iPod’s device EQ setting is set to “OFF.”
3. Make sure that the USB sync cable is plugged all the way into your iPad, iPhone, or
iPod and connected all the way to the iW3’s USB port.
4. Make sure that the audio cable is plugged all the way into the iW3’s Aux Input jack.
Replace the aux-in cable or iPod sync cable.
5. Unplug the power supply and connect it to a different AC outlet.
6. Move unit away from potential sources of interference, such as microwave ovens,
fluorescent lights, etc.
Questions? Visit www.ihomeaudio.com/support/airplay/
English
17
FAQ’s
What is AirPlay?
AirPlay is a wireless audio and video platform designed by Apple to stream digital media over a home network (Wi-Fi or Ethernet). AirPlay is
built-in to iTunes and the iPad, iPhone, and iPod touch running the latest software. For AirPlay enabled speakers, this means:
1. Consumers can stream their iTunes music to our iW3 AirPlay enabled speaker, their Apple TV, or other AirPlay enabled speakers.
2. iPad/iPhone/iPod touch owners can stream their iPod music AND audio content from other music apps like Pandora and iHeartRadio
to our iW3 AirPlay enabled speaker, their Apple TV, or other AirPlay enabled speakers.
3. iTunes is unique because a user can stream whatever is playing in iTunes to multiple speakers around the house.
4. iOS devices (iPad/iPhone/iPod touch) can only stream to one AirPlay enabled device at a time.
What other equipment do I require to use iW3 with AirPlay?
Using the iHome iW3 with AirPlay requires a Mac or PC running iTunes (10.1 or later), or an Apple iOS device running iOS (4.2 or later)
connected to the same network. Typically, a network will consist of a Wi-Fi router or hub.
What devices are compatible with AirPlay?
AirPlay works with iPod touch (2nd, 3rd, and 4th generation), iPhone 4, iPhone 3GS, iPad 3rd gen, iPad 2, iPad with iOS 4.2 and iTunes 10.1
(Mac or PC) or later.
What Apple devices are compatible with iW3’s USB connector?
iW3 supports USB docking for iPhone and iPod for audio and charging with included USB sync cable. The USB connector works with iPod
touch (1st, 2nd, 3rd, and 4th generation), iPod nano (2nd, 3rd, 4th, 5th, and 6th generation), iPhone 4S, iPhone 4, iPhone 3GS, iPhone 3G,
iPad 3rd generation, iPad 2, and iPad.
Can I stream audio wirelessly to the iW3 without a network connection?
No, the iW3 and AirPlay audio source must be connected to the same Wi-Fi network via a router or hub.
Can I stream video wirelessly to iW3?
No, only audio streaming is supported.
Does the iW3 have an AUX-input for my TV or other audio device?
Yes, the iW3 can be used as a speaker system with many products that have headphone, stereo RCA or audio outputs (cable not included).
How many iHome iW3 units can I stream to at once?
This will depend on your network equipment capabilities and set-up. For Mac/PC with iTunes with a high performance network, up to three
iHome iW3’s may be used. An iPad, iPhone, or iPod touch can only stream to a single iW3 speaker.
What Wi-Fi technologies does iW3 support?
The iW3 is Wi-Fi certified to work with networks that use the 802.11b/g wireless standards.
What network security types does the iW3 support?
The iW3 supports the following security types: Open, WPA Personal (-PSK), WPA2 Personal (-PSK).
iHome does not recommend using iW3 on security networks configured with WEP security due to inconsistencies in compatibility with that
aging security standard. The iW3 does not support WPA/WPA2 Enterprise security types.
For instructions on changing security types of your home network, refer to your Wi-Fi access-point's documentation. For best results, ensure
your Wi-Fi access point is Wi-Fi-certified and is configured to support 802.11g communications.
English
18
Consumer Product Safety Guide
Safety Instructions
FCC Statement
1.
FCC ID: EMOiW3. IC: 986B-iW3
Water and Moisture – The unit should not be used near water. For example: near
a bathtub, washbowl, kitchen sink, laundry tub, swimming pool or in a wet
basement.
2. Ventilation – The unit should be situated so that its location or position does not
interfere with its proper ventilation. For example, it should not be situated on a
bed, sofa, rug or similar surface that may block ventilation openings. Also, it
should not be placed in a built-in installation, such as a bookcase or cabinet,
which may impede the flow of air through the ventilation openings.
3. Heat – The unit should be situated away from heat sources such as radiators,
heat registers, stoves or other appliances (including amplifiers) that produce
heat.
4. Power Sources – The unit should be connected to a power supply only of the
type described in the operating instructions or as marked on the appliance.
5. Power Cable Protection – Power supply cables should be routed so that they are
not likely to be walked on or pinched by items placed upon or against them. It is
always best to have a clear area from where the cable exits the unit to where it is
plugged into an AC socket.
6. Cleaning – The unit should be cleaned only as recommended. See the
Maintenance section of this manual for cleaning instructions.
7. Objects and Liquid Entry – Care should be taken so that objects do not fall and
liquids are not spilled into any openings or vents located on the product.
8 Attachments – Do not use attachments not recommended by the product
manufacturer.
9 Lightning and Power Surge Protection – Unplug the unit from the wall socket
and disconnect the antenna or cable system during a lightning storm or when it
is left unattended and unused for long periods of time. This will prevent damage
to the product due to lightning and power-line surges.
10. Overloading – Do not overload wall sockets, extension cords, or integral
convenience receptacles as this can result in a risk of fire or electric shock.
11. Damage Requiring Service – The unit should be serviced by qualified service
personnel when:
A.
B.
C.
D.
E.
the power supply cable or plug has been damaged.
objects have fallen into or liquid has been spilled into the enclosure.
the unit has been exposed to rain.
the unit has been dropped or the enclosure damaged.
the unit exhibits a marked change in performance or does not operate normally.
12. Antenna – Do not connect an external antenna to the unit (other than that
provided).
13. Periods of None Use – If the unit is to be left unused for an extended period of
time, such as a month or longer, the power cable should be unplugged from the
unit to prevent damage or corrosion.
14. Servicing – The user should not attempt to service the unit beyond those
methods described in the user’s operating instructions. Service methods not
covered in the operating instructions should be referred to qualified service
personnel.
This equipment has been tested and found to comply with the limits for a Class B
digital device, pursuant to part 15 of the FCC Rules. These limits are designed to
provide reasonable protection against harmful interference in a residential
installation. This equipment generates uses and can radiate radio frequency energy
and, if not installed and used in accordance with the instructions, may cause harmful
interference to radio communications. However, there is no guarantee that
interference will not occur in a particular installation. If this equipment does cause
harmful interference to radio or television reception, which can be determined by
turning the equipment off and on, the user is encouraged to try to correct the
interference by one or more of the following measures:
• Reorient or relocate the receiving antenna.
• Increase the separation between the equipment and receiver.
• Connect the equipment into an outlet on a circuit different from that to which
the receiver is connected.
• Consult the dealer or an experienced radio/TV technician for help.
Modifying or tampering with your system’s internal components can cause a
malfunction and might invalidate the system’s warranty and void your FCC
authorization to operate it.
The separation distance between the equipment and the user shall not be less than
20 cm.
This Class B digital apparatus complies with Canadian ICES-003. Cet appareil
numérique de la classe B est conforme à la norme NMB-003 du Canada.
FCC Radiation Exposure Statement
This device complies with FCC radiation exposure limits set forth for an uncontrolled
environment and it also complies with Part 15 of the FCC RF Rules. This transmitter
must not be co-located or operating in conjunction with any other antenna or
transmitter.
Operation is subject to the following two conditions:
1. This device may not cause interference and
2. This device must accept any interference received, including interference that
may cause undesired operation
Caution!
The manufacturer is not responsible for any radio or TV interference caused by
unauthorized modifications to this equipment. Such modifications could void the
user authority to operate the equipment.
English
19
Warranty
Limited 1 Year Warranty Information
iHome, a division of SDI Technologies Inc. (hereafter referred to as
SDI Technologies), warrants this product to be free from defects in
workmanship and materials, under normal use and conditions, for a
period of 1 Year from the date of original purchase.
Should this product fail to function in a satisfactory manner, it is best
to first return it to the store where it was originally purchased.
Should this fail to resolve the matter and service still be required by
reason of any defect or malfunction during the warranty period, SDI
Technologies will repair or, at its discretion, replace this product
without charge (except for a $30.00 charge for handling, packing,
return UPS/postage, and insurance). This decision is subject to
verification of the defect or malfunction upon delivery of this
product to the Factory Service Center listed below. The product
must include proof of purchase, including date of purchase. The fee
for service without proof of purchase is $60.00.
Before returning this product for service:
Before returning this product for service, please check our support
section at www.ihomeaudio.com/support or call our customer
service team to resolve any problems you may be experiencing.
Disclaimer of Warranty:
NOTE: This warranty is valid only if the product is used for the
purpose for which it was designed. It does not cover (i) products
which have been damaged by negligence or willful actions, misuse
or accident, or which have been modified or repaired by unauthorized persons; (ii) cracked or broken cabinets, or units damaged by
excessive heat; (iii) damage to digital media players, computers,
routers, CD’s or tape cassettes (if applicable); (iv) the cost of shipping
this product to the Factory Service Center and its return to the
owner.
This warranty is valid only in the United States of America and does
not extend to owners of the product other than to the original
purchaser. In no event will SDI Technologies or any of its affiliates,
contractors, resellers, their officers, directors, shareholders, members or agents be liable to you or any third party for any consequential or incidental damages, any lost profits, actual, exemplary or
punitive damages. (Some states do not allow limitations on implied
warranties or exclusion of consequential damages, so these
restrictions may not apply to you.) This warranty gives you specific
legal rights, and you may also have other rights which vary from
state to state.
If service is still required:
1. Pack unit in a well padded, heavy corrugated box.
2. Enclose a photocopy of your sales receipt, credit card statement,
or other proof of the date of purchase, if within the warranty
period.
Your acknowledgment and agreement to fully and completely
abide by the above mentioned disclaimer of warranty is contractually binding to you upon your transfer of currency (money order,
cashier's check, or credit card) for purchase of your SDI Technologies
product.
3. Enclose a check or money order payable to the order of SDI
Technologies, for the sum of $30.00 ($60.00 without proof of
purchase).
4. Send the unit prepaid and insured, to the Factory Service Center
listed below.
Consumer Repair Department
SDI Technologies Inc.
1330 Goodyear Dr.
El Paso, TX 79936-6420
Questions? Visit www.ihomeaudio.com/support/airplay
Toll Free Customer Service: 1-800-288-2792
©SDI Technologies 2012 All rights Reserved.
iW3 09032012-0
Made in China
English
is a registered trademarks of SRS Labs, Inc. TruBass
technology is incorporated under license from
SRS Labs, Inc.
SRS WOW®, which features TruBass®, significantly improves the
playback quality of audio, delivering a dynamic 3D entertainment
experience with deep, rich bass and high frequency clarity for
crisp detail.
20
www.ihomeaudio.com