1
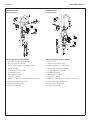
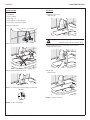
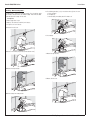
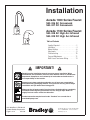
Installation
Aerada 1000 Series Faucet
S53-326 AC Gooseneck
S53-327 DC Gooseneck
Aerada 1100 Series Faucet
S53-328 AC High Arc Infrared
S53-329 DC High Arc Infrared
Aerada 1000
Table of Contents
Aerada 1100
Supplies Required . . . . . . . . . . . . . . . . . . . . . . . 2
Installation . . . . . . . . . . . . . . . . . . . . . . . . . . . . . 4
Manual Settings . . . . . . . . . . . . . . . . . . . . . . . . 6
Adjustments. . . . . . . . . . . . . . . . . . . . . . . . . . .9
Troubleshooting . . . . . . . . . . . . . . . . . . . . . . 10
Care and Maintenance . . . . . . . . . . . . . . . . . 12
Multi-Faucet Transformer Wiring . . . . . . . . . 14
IMPORTANT!
Read this entire installation manual to ensure proper installation. When
finished with the installation, file this manual with the owner or maintenance
department. Compliance and conformity to local codes and ordinances is
the responsibility of the installer.
Installation
Packing List
IS
TH
SIDE
UP
•
•
•
•
Separate parts from packaging and make sure all parts are accounted for
before discarding packaging material. If any parts are missing, do not begin
installation until you obtain the missing parts.
Make sure that all water supply lines have been flushed and then completely
turned off before beginning installation. Do not use pipe dope. Debris in
supply lines can cause valves to malfunction.
Product warranties may be found under “Products” on our web site at
www.bradleycorp.com.
215-1628 Rev. A; EN 08-201
© 2008 Bradley Corporation
Page 1 of 14
5/21/08
P.O. Box 309, Menomonee Falls, WI 53052-0309
Phone: 1-800-BRADLEY Fax: 262-253-4161
www.bradleycorp.com
Aerada 1000/1100 Series
Installation
EXPLANATION OF SYMBOLS
SAFETY INFORMATION
Read this entire user guide to ensure proper installation.
Symbol
Compliance and conformity to local codes and ordinances is the responsibility of
the installer.
Meaning
WARNING
Refers to a situation of potential danger that
may cause serious injury or death.
CAUTION
• Make sure there is enough space and lighting available during installation and
service.
Refers to a situation of potential danger that
may cause slight or medium injury or property
damage.
• Do not modify or convert this Faucet; any modifications will void warranties.
Refers to important information.
The following safety notes must always be complied with during handling of this
product:
Installation may be performed at different times of construction by
different individuals. For this reason, these instructions should be left
on-site with the facility or maintenance manager.
Pressurized plumbing fixtures shall be installed in accordance with
manufacturer´s recommendations. The supply piping to these devices
shall be securely anchored to the building structure to prevent installed
device from unnecessary movement when operated by the user. Care
shall be exercised when installing the device to prevent marring the
exposed significant surface.
A
DA
•COM
PL
ACCESSORIES
IANT
BRADLEY PART NO.
4” Cover Plate
150-221
TECHNICAL SUPPORT
Plugin Transformer
232-008
For additional technical assistance, visit our website or call us:
Hardwired Transformer (1–8 faucets)
232-009
• www.bradleycorp.com
2.2 GPM Laminar Flow for Gooseneck
269-1923
• 1-800-BRADLEY
2.2 GPM Laminar Flow for Lavatory
269-1922
6V Lithium Battery CR-P2
261-010
ORDERS
For orders, contact your local representative, visit our website or call us:
• www.bradleycorp.com
• 1-800-BRADLEY
2
5/21/08
Bradley Corporation • 215-1628 Rev. A; EN 08-201
Aerada 1000/1100 Series
Installation
COMPONENT PARTS
Aerada 1000 Series
COMPONENT PARTS
Aerada 1100 Series
2
12
12
1 a/b
1
3
4
3
5
2
11
7
6
11
4
5
7
8
10
8
6
9
10
9
High Arc Components & Bradley Part Nos.
Gooseneck Components & Bradley Part Nos.
1. Spout with External Mixer opening [269-1960]
1. Spout [269-1958]
2. Shut Off Screw Assembly [269-1944]
2. Shut Off Screw Assembly [269-1944]
3. Outlet Assembly Kit Lavatory Spout (.5 GPM) [269-1946]
3. Outlet Assembly Kit Spout (.5 GPM) [269-1947]
4. Mixer Kit [269-1945]
4. Gooseneck Base without opening [269-1959]
5. 6 V Lithium Battery CR-P2 [261-010]
5. 6 V Lithium Battery CR-P2 [261-010]
6. AC Adaptor Kit [269-1942]
6. AC Adaptor Kit [269-1942]
7. Battery Holder Kit [269-1961]
7. Battery Holder Kit [269-1961]
8. Check Valve (1) [198-013]
8. Check Valve (1) [198-013]
9. Braided Hose (1) with inlet filter [269-1943]; Filter only [269-1948]
9. Braided Hose (1) with inlet filter [269-1943]; Filter only [269-1948]
10. Deck Mounting Hardware Kit [269-1949]
10. Deck Mounting Hardware Kit [269-1949]
11. Electronics Module Kit [269-1941]
11. Electronics Module Kit [269-1941]
12. Solenoid Valve [269-1940]
12. Solenoid Valve [269-1940]
Bradley Corporation • 215-1628 Rev. A; EN 08-201
5/21/08
3
Aerada 1000/1100 Series
Installation
INSTALLATION
This faucet comes with all the components needed for installation,however, some
tools and supplies are not included.
3 Mount bracket from underneath. Place hoses through large opening and
mounting rod through small opening. Make sure flange sits securely against
surface.
• Basin Wrench
• Adjustable Wrench
• Adjustable Locking Pliers
• Plumber´s Putty
• Hex Key (supplied)
• Outlet Key (supplied)
Do not use pipe dope on faucet and supply connections. Possible
solenoid contamination could occur and will void any warranty.
Mounting of Lavatory and Gooseneck Faucet
4 Place nut onto mounting rod and tighten with wrench.
Prerequisites
• Supply valve is installed
• Water supply lines are flushed properly
• For AC faucets, power outlet is installed
It is not necessary to unscrew the connection between braided hose
and housing to install the product.
Do not remove protective covering from sensor until starting up faucet
operation.
Do not tighten locknut before step 4 is completed.
5 If faucet was installed with cover plate, secure with basin washer, flat washer
and locknut.
6 Install aerator and tighten with aerator key (supplied).
1 Mount cover plate if required. Plumber´s putty is recommended to seal the
cover plate to the sink. Security pin must be located on the left side.
7 For Gooseneck faucets, tighten spout with wrench.
8 Connect braided hose with filter to supply valve
Cold water > white label Hot water > no label
2 Mount gasket and put faucet into sink.
For AC faucets, please refer to the plugin or hardwired transformer
installation instructions.
9 Connect to power supply.
Result: The faucet is now mounted.
4
5/21/08
Bradley Corporation • 215-1628 Rev. A; EN 08-201
Aerada 1000/1100 Series
Installation
Start-up Operation
Test Function
1 Hold hand in front of sensor.
> Water flow starts
Prerequisites
• Faucet is mounted
• Water supply is on
• Water supply lines are flushed properly
• For AC faucets, power outlet is installed.
1 Fully open supply valves.
WARNING
Hot water may burn your skin.
Hold hand carefully under water and remove quickly
2 Remove all items from sink.
2 For faucets with external mixer, turn mixer handle from cold to warm.
> Water temperature increases
3 Remove protective covering from sensor.
3 Remove hand.
> Water flow stops
4 Wait for 15 seconds for the faucet to calibrate to its environment.
15 sec.
Result: The function is now tested.
Result: The faucet is now activated.
Bradley Corporation • 215-1628 Rev. A; EN 08-201
5/21/08
5
Aerada 1000/1100 Series
Installation
Enabling “Manual Setting Mode”
A battery model is shown in the following example. These instructions apply
to all models. After 30 minutes, the “Manual Setting” mode will be disabled
automatically and all settings will be saved.
5 The following procedure (a, b, c) must be done three (3) times in a row.
a - Re-insert battery
b - LED lights up
c - Remove battery immediately after LED switches off
Prerequisites
a
• Water supply valve is open
• Battery is full (LED does not blink) for DC faucets
c
• AC power is on for AC faucets
1 Remove shut-off screw.
b
6 Insert battery.
2 Remove mixer handle (only for faucets with external mixer).
7 Mount housing vertically.
3 Remove housing vertically.
8 Mount shut-off screw.
4 Remove battery from battery holder.
6
5/21/08
Bradley Corporation • 215-1628 Rev. A; EN 08-201
Aerada 1000/1100 Series
Installation
9 Mount mixer handle (only for faucets with external mixer)
B - Setting Normal Mode
Setting the normal mode will allow the faucet to activate only when it senses a
hand presence.
1 Enable “Manual Setting” Mode
> See “Enabling Manual Setting Mode” section
2 Fully cover sensor with hand. Water flow stops after 5 seconds - Continue to
hold on for one (1) additional water pulse.
Result: The faucet is now mounted.
A - Setting Cleaning Mode
Setting the cleaning mode will make the faucet inactive for 90 seconds.
1 Enable “Manual Setting” Mode
> See “Enabling Manual Setting Mode” section
2 Fully cover sensor with hand, until water flow stops. (This takes 5 seconds.)
3 Remove hand.
Result: Normal Mode is now activated.
C - Setting Metering Mode (10 seconds)
Setting the metering mode will allow the faucet to activate for a full 10 seconds
after if senses a hand presence.
1 Enable “Manual Setting” Mode
> See “Enabling Manual Setting Mode” section
2 Fully cover sensor with hand. Water flow stops after 5 seconds - Continue to
hold on for another two (2) additional water pulses.
3 Remove hand.
Result: The Cleaning Mode is now active. For the next 90 seconds, the faucet
will be inactive.
3 Remove hand.
Result: Metering Mode is now activated for 10 seconds.
Bradley Corporation • 215-1628 Rev. A; EN 08-201
5/21/08
7
Aerada 1000/1100 Series
Installation
D - Setting Scrub Mode (60 seconds)
Setting scrub mode for 60 seconds will allow the faucet to activate for 60
seconds from the last hand presence.
2 Fully cover sensor with hand. Water flow stops after 5 seconds - Continue to
hold on for five (5) additional water pulses.
1 Enable “Manual Setting” Mode
> see “Enabling Manual Setting Mode” section
2 Fully cover sensor with hand. Water flow stops after 5 seconds - Continue to
hold on for another three (3) additional water pulses.
4 Remove hand.
3 Remove hand.
Result: Scrub Mode is now activated for 60 seconds.
5 Hold hand in the current detection area until LED flashes. Then move hand
to the desired detection distance. When LED stays lit for two (2) seconds,
detection distance has been re-set to new location.
E - Setting Scrub Mode (180 seconds)
Setting scrub mode for 180 seconds will allow the faucet to activate for 180
seconds from the last hand presence.
1 Enable “Manual Setting” Mode
> See “Enabling Manual Setting Mode” section
2 Fully cover sensor with hand. Water flow stops after 5 seconds - Continue to
hold on for another four (4) additional water pulses.
Result: The detection distance is now calibrated.
G - Reset
All settings will be reset to default setting. The “Manual Setting” Mode will be
disabled.
3 Remove hand.
Result: Scrub Mode is now activated for 180 seconds.
> The procedure for the reset is the same as “Enabling Manual Setting Mode”,
but step 5 needs to be done six (6) times in a row.
F - Sensor Range Adjustment
Result: All settings are reset to default settings and the manual-setting-mode is
now disabled.
The detection distance of the sensor can be adjusted between approximately
4 - 11 inches from the infrared window.
1 Enable “Manual Setting” Mode
> See “Enabling Manual Setting Mode” section
2 Remove all items from the sink.
8
5/21/08
Bradley Corporation • 215-1628 Rev. A; EN 08-201
Aerada 1000/1100 Series
Installation
FAUCET ADJUSTMENTS
Operating modes and sensor ranges can be adjusted with a manual operation through the infrared sensor.
Faucet adjustment operations apply to all models.
OPERATING MODES
Operating Modes
Description
A Cleaning Mode
The faucet is inactive for 90 seconds.
B Normal Mode
The faucet is activated if it senses a hand presence. This is the default operating mode of the faucet.
C Metering Mode (10 s)
The faucet will shut off after 10 seconds regardless of hand presence detected.
D Scrub Mode (60 s)
The faucet will shut off 60 seconds after the detection of the last hand presence.
E Scrub Mode (180 s)
The faucet will shut off 180 seconds after the detection of the last hand presence.
F Sensor Range Adjustment
Change the detection distance of the infrared sensor. The default sensor range is approximately 1” beyond the spout.
G Reset
All settings will be reset to original factory settings.
In order to set the operating modes, the faucet needs to be placed into “Manual Setting” mode. At this time, operating modes can be changed within the next 30
minutes.
The following is a functional diagram to show the different settings available for manual faucet adjustment. See detailed instructions on pages 6 through 8.
FUNCTION DIAGRAM OF OPERATING MODES
Modes
Water pulses in seconds [s]
5
4
1 4
1 4
1 4
1 4
1
A - Cleaning Mode
Legend:
Water is off
Water is on
B - Normal Mode
C - Metering Mode 10 s
D - Scrub Mode 60 s
E - Scrub Mode 180 s
F - Sensor Range Adjustment
Bradley Corporation • 215-1628 Rev. A; EN 08-201
5/21/08
9
Aerada 1000/1100 Series
Installation
TROUBLESHOOTING
Problem
Possible Cause
Solution
No water flow
Supply valves are closed
Open supply valves
Aerator is blocked or dirty
Clean or replace aerator (See "Care and Maintenance")
Inlet water line filter is dirty or Clean or replace filter (See "Care and Maintenance")
blocked
10
Braided hose is kinked
Eliminate braided hose kink
No external water pressure
Check water pressure/Provide water pressure
Battery is drained (DC
faucets only)
Replace battery (See "Care and Maintenance")
Battery contacts are
corroded (DC faucets only)
Clean contacts or replace battery
(See "Care and Maintenance")
Reverse battery insertion
Insert battery correctly
Connector between
transformer and power
adapter unplugged (AC
faucets only)
Plug connector
Power adapter contacts are
corroded (AC faucets only)
Clean contacts
Connecting cable is kinked
or broken (AC faucets only)
Replace defective parts (See "Replacement Parts")
No external power supply
(AC faucets only)
Check external power supply/Provide power supply
Shut-off screw is missing or
defective
Replace shut-off screw (See "Replacement Parts")
Solenoid valve inoperable
Replace solenoid valve (See "Replacement Parts")
Faucet is in cleaning mode
Wait for cleaning mode to end (appr. 90 seconds)
Electronics module
inoperable
Contact Bradley technical service or replace power adapter (See
“Replacement Parts”)
Power adapter defective (AC
faucets only)
Contact Bradley technical service or replace power adapter (See
“Replacement Parts”)
Sensor distance is not
adjusted properly
Reset sensor monitoring range
Remove and re-install shut-off screw. Do not disturb sensor scanning
procedure (wait until water flow stops and LED switches off)
Infrared window sctatched
or dirty
Clean window with smooth cloth
5/21/08
Bradley Corporation • 215-1628 Rev. A; EN 08-201
Aerada 1000/1100 Series
Installation
Problem
Possible Cause
Solution
Water runs
continuously and
stops when object
present
Connector between
electronics module and
solenoid valve plug is
reversed
Plug connector properly
Water runs
continuously
Interfering object is in
monitoring range
Remove object from monitoring area
Remove and re-install shut-off screw. Do not disturb sensor scanning
procedure (wait until water flow stops and LED switches off)
Defective electronics module
Replace electronics module (See “Replacement Parts”)
Improper sensor mode
Change mode or reset sensor (See “Care and Maintenance”)
External water pressure too
high
Check external water pressure
Provide pressure between 20 - 125 psi
Solenoid valve inoperable
Replace solenoid valve (See “Replacement Parts”)
Electronics module is
inoperable
Replace electronics module (See “Replacement Parts”)
Water drops on infrared
window
Clean window with smooth cloth
Infrared window is dirty or
scratched
Clean window with smooth cloth
Input line pressure fluctuates
Install appropriate line pressure regulators
Connections between
housing and braided hoses
are loose
Check O-rings
Replace O-rings when damaged or missing
Connection between braided
hose and inlet supply are
loose
Check rubber washers
Replace washers when damaged or missing
Connection between valve
body and solenoid valve is
loose
Check O-rings
Replace O-rings when damaged. Carefully reinstall solenoid valve and
do not overtighten.
Faucet drips, solenoid valve
does not close properly
Clean or replace solenoid valve (See “Replacement Parts”)
No, or too little hot or cold
water. Supply valves are not
fully opened
Fully open supply valves
Water flows although
shut-off screw is
removed
Faucet turns on by
itself
Faucet is leaking
water
Temperature cannot
be adjusted properly
Inlet water line filter is dirty or Clean or replace filter (See “Care and Maintenance”)
blocked
Braided hose is kinked
Eliminate braided hose kink
Backflow preventer in faucet
inlet is blocked
Unblock backflow preventer
Temperature of hot or cold
water supply is too low
Check inlet water temperature or inspect boiler
Hot water temperature not
sufficient
Reverse hot water limiter (See “Care and Maintenance”)
Braided hoses are connected Correct the connections
improperly (cold to hot and
hot to cold)
Bradley Corporation • 215-1628 Rev. A; EN 08-201
5/21/08
11
Aerada 1000/1100 Series
Installation
CARE AND MAINTENANCE INSTRUCTIONS
3 Remove housing vertically.
The following instructions are described in this section:
• Activating Cleaning Mode
• Replacing Battery
• Cleaning or Replacing Inlet Filter
• Adjusting Water Temperature (Internal Mixer)
• Adjusting Hot Water Limiter (External Mixer)
• Cleaning or Replacing Aerator
Activating Cleaning Mode
In order to set the cleaning mode, the faucet needs to be have been set once into
the “Manual Setting” mode. See “Manual Setting” instructions. When cleaning
mode is activated, the faucet will be inoperable for 90 seconds.
4 Remove used battery from battery holder and recycle.
1 Fully cover sensor with hand, until water flow stops. (This takes approximately
5 seconds.)
5 Insert new battery.
> LED lights up for 1 second
2 Remove hand.
Result: Cleaning Mode is now activated.
Replacing Battery
A traditional lavatory faucet is shown as an example. These instructions apply to
all DC models.
Prerequisites
• Battery is low (LED is lit)
• New 6 V Lithium battery (CR-P2) is required
6 Mount housing vertically.
1 Remove shut-off screw
2 Remove mixer handle (for faucets with external mixer only)
12
5/21/08
Bradley Corporation • 215-1628 Rev. A; EN 08-201
Aerada 1000/1100 Series
Installation
7 Install shut-off screw.
Adjusting Hot Water Limiter (External Mixer)
The proportion of hot water can be switched from approximately 85% to 95%
(or reverse) depending upon inlet water pressures and temperatures. The default
setting is 85%.
WARNING
Hot water may burn your skin.
Hold hand carefully under water and remove quickly
1 Remove mixer handle.
8 Install mixer handle (for faucets with external mixer only).
2 Carefully pull out hot water limiter from handle (using pliers) and reverse by
180°.
Result: The battery is now replaced.
Cleaning or Replacing Inlet Filter
180°
1 Close supply valves.
> Settings of hot water limiter (View from placement in mixer handle)
85%
2 Disconnected braided hoses and clean or replace filter
(for a new filter, see “common replacement parts”).
95%
3 Mount mixer handle.
3 Connect braided hose with filter to supply valve
Cold water > white label Hot water > no label
Result: The proportion of hot water is now changed.
Result: The filter is now cleaned or replaced.
Bradley Corporation • 215-1628 Rev. A; EN 08-201
5/21/08
13
Aerada 1000/1100 Series
Installation
Cleaning or Replacing Aerator
1 Remove shut-off screw.
3 Install shut-off screw.
2 Remove aerator with vandal resistant wrench supplied with the faucet. Clean or
replace aerator, then reinstall.
Result: The aerator is now cleaned or replaced.
Multi-Faucet Transformer Installaion
AC CONNECTOR
FROM FAUCET
BANK INSTALLATION
ADAPTER WIRE
BANK INSTALLATION ADAPTER
WIRE (INCL. W/AC FAUCET)
232-009 (1–8 faucets)
ADDITIONAL WIRING (IF NEEDED)
TO BE SUPPLIED BY CUSTOMER
(22 GA min; 50 ft. max. length)
Transformer can be used to connect up to 8
faucets. All units must be connected in parallel.
14
5/21/08
Bradley Corporation • 215-1628 Rev. A; EN 08-201