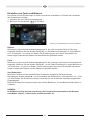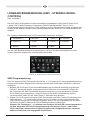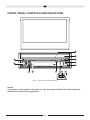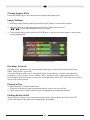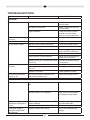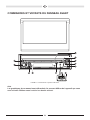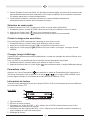
1
VXE 3010
BEDIENUNGSANLEITUNG/GARANTIEURKUNDE
OWNER’S MANUAL/WARRANTY DOCUMENT
MODE D’EMPLOI/CERTIFICAT DE GARANTIE
“Made for iPod,” and “Made for iPhone” mean that an electronic accessory has been
designed to connect specifically to iPod or iPhone, respectively, and has been certified
by the developer to meet Apple performance standards. Apple is not responsible for the
operation of this device or its compliance with safety and regulatory standards. Please
note that the use of this accessory with iPod or iPhone may affect wireless performance.
iPhone, iPod touch and iPod nano are trademarks of Apple Inc., registered in the U.S.
and other countries.
Bluetooth® is a trademark of Bluetooth Special Interest Group (SIG) Inc.
Bitte führen Sie das Gerät am Ende seiner Lebensdauer den zur Verfügung
stehenden Rückgabe- und Sammelsystemen zu.
At the end of the product’s useful life, please dispose of it at appropriate
collection points provided in your country.
Une fois le produit en fin de vie, veuillez le déposer dans un point de recyclage
approprié.
4
48
90
Danke, dass Sie sich für ein Produkt von Audiovox entschieden haben. Wir hoffen, Ihnen die
Funktion des Geräts mit den in dieser Bedienungsanleitung beschriebenen Anweisungen einfach
und verständlich erklären zu können. Bitte nehmen Sie sich einige Minuten Zeit um sich mit
der Bedienungsanleitung zu befassen. Dieses erleichtert Ihnen dann später die Bedienung des
Gerätes.
BESTIMMUNGSGEMÄSSER GEBRAUCH
Dieses Gerät ist für den Einbau in einen 1-DIN-Armaturenschacht eines Kraftfahrzeuges mit 12 V
Bordnetzspannung und Minus gegen Masse konzipiert.
Lesen Sie diese Anleitung und die Installationsanleitung vollständig durch, bevor Sie mit der
Montage des Geräts beginnen.
Wir empfehlen, die Montage des Audiovox VXE 3010 Receivers von einem Fachmann vornehmen
zu lassen.
Versuchen Sie nicht, das Gerät zu öffnen oder zu reparieren.
Reparaturen müssen immer qualifizierten Fachkräften überlassen werden.
KONFORMITÄTSERKLÄRUNG
Hiermit erklärt die Firma Audiovox Audio Produkte GmbH, dass sich das Gerät VXE 3010 in
Übereinstimmung mit den grundlegenden Anforderungen und anderen relevanten Vorschriften der
Richtlinie 1999/5/EG befindet.
Die Konformitätserklärung finden Sie unter www.audiovox.de im Downloadbereich des Gerätes.
INHALT
Sicherheitshinweise
Allgemeine Hinweise
Funktionen
Optionales Zubehör
Bedienelemente und Anzeigen auf der Gerätevorderseite
Fernbedienung
Austauschen der Batterie der Fernbedienung
Kurzanleitung
Systemeinstellungen
Radiobetrieb
Wiedergabe von Audiodateien
Equalizer-Menü
Bedienelemente für iPod®/iPhone®
Bluetooth-Betrieb
Bedienelemente für AV-In1/AV-In2
Lenkradfernbedienung (SWC – Steering Wheel Control)
Betrieb einer Rückfahrkamera
Fehlerbehebung
Technische Daten
Pflege und Wartung
4
5
5
6
7
8
10
13
14
17
21
24
30
32
34
38
39
40
41
45
46
SICHERHEITSHINWEISE
• Montieren Sie das Gerät nicht an einem Ort, an dem die Sicherheit beim Fahren durch die
Bedienung und die Verwendung des Geräts beeinträchtigt werden könnte.
• Die Sicherheit im Straßenverkehr steht immer an erster Stelle. Das Autoradio ist immer so zu
benutzen, dass sie Ihr Fahrzeug sicher steuern können und der aktuellen Verkehrssituation
gewachsen sind.
• Falls Sie Schwierigkeiten beim Ablesen des Displays haben oder das Autoradio nicht bedienen
können, parken Sie Ihr Fahrzeug, um dann die Einstellungen vorzunehmen.
• Als Fahrer dürfen Sie nicht Anwendungen während der Fahrt vornehmen, die Sie vom Verkehr
ablenken (z. Bsp. Zieleingabe bei der Navigation, Betrachten von Bildern oder Videos).
• Der Ansage des Navigationssystems ist unter Berücksichtigung der Verkehrsregeln zu folgen
(Straßenschilder, Vorfahrtsschilder, Vorfahrtsregeln etc.).
• Zu lautes Hören von Musik kann zu Gehörschäden führen.
• Um akustische Warnsignale zu hören (z. Bsp. Martinshorn der Polizei, Feuerwehr), ist eine zu
hohe Lautstärke zu vermeiden.
• Erhöhen Sie nicht die Lautstärke, wenn das Autoradio stumm geschaltet ist (z. B. bei Anwahl
der BT Funktion).
• Verwenden Sie die Videofunktion des Gerätes nie während der Fahrt, um Unfälle zu vermeiden
(mit Ausnahme der Videofunktion für die Rückfahrkamera). Die Verwendung während der Fahrt
ist gesetzlich verboten.
• Durch die Verwendung einer falschen Sicherung kann das Gerät beschädigt oder in Brand
gesetzt werden.
• Das Gerät darf nicht zerlegt oder verändert werden.
• Schützen Sie das Gerät vor Feuchtigkeit und Wasser, um Verletzungen durch einen
Stromschlag oder Feuer zu verhindern.
ALLGEMEINE HINWEISE
• Im Falle einer Fehlfunktion lesen Sie bitte die Hinweise im Kapitel Fehlerbehebung. Sollte
der Fehler dort nicht beschrieben sein, drücken Sie den RESET-Knopf in Nähe des USBEinganges, um die Werkseinstellung wiederherzustellen.
• Verwenden Sie ausschließlich Datenträger im Standardformat.
5
FUNKTIONEN
Bitte lesen Sie vor dem Gebrauch die Bedienungsanleitung. Die mitgelieferte Dokumentation
enthält Informationen zu sämtlichen Funktionen Ihres neuen mobilen Audiovox VXE
3010-Multimedia-Receivers. Lesen Sie die Anleitung vollständig, bevor Sie mit der Montage des
Geräts beginnen, und bewahren Sie sie für den späteren Gebrauch auf.
Wir empfehlen, die Montage des VXE 3010 von einem zuverlässigen Fachhändler vornehmen zu
lassen.
DVD/CD-Player
•
•
•
•
•
•
•
Kompatible Disk-Medien: DVD +/- R/ +/- RW (Single und Dual Layer) und CD-R/-RW
Kompatible Medienformate: CD-DA, MP3, WMA, VCD, SVCD, Xvid, AVI, MPEG 1/2
Rauschabstand: >95 dBA
Dynamikbereich: >95 dB
Frequenzgang: 20 Hz bis 20 kHz, -3 dB
Übersprechdämpfung: > 60 dB bei 1 kHz
Digital/Analog-Wandler: High Performance 24 Bit / 192 kHz Abtastrate, Multi-Bit Sigma-Delta
Modulator
• Bildformate: Cinema, Normal und Aus (Standby)
Video
• Format: PAL / NTSC (automatische Erkennung)
• Ausgang: 1 Vp-p (75 Ohm)
• Eingang: 1 Vp-p (75 Ohm)
CD / MP3 / WMA
•
•
•
•
CD-Text-kompatibel
Anzeige des Album Fotos (ID3-Tag kompatibel)
Verzeichnissuche (nur MP3 / WMA)
Abspielen von selbsterstellten CDs/ DVD+R/RWs mit bis zu 2000 MP3- und WMA Dateien
UKW-Radio
• RDS (Radio Data System): AF (Alternative Frequenzen), CT (Uhrzeitsynchronisation), EON
(Enhanced Other Networks), PS (Programm Service), PTY (Programm-Typen), RT (Radiotext),
TA (Verkehrsmeldungen)
• Abstimmbereich: 87,5 MHz – 107,9 MHz
• 18 Sender-Speicherplätze
• Auto Stereo/Mono
• Lokal/Distanz
• Mono-Rauschempfindlichkeit (-30 dB): 9 dBf
• Empfindlichkeit bei Rauschabstand (-50 dB): 15 dBf
• Trennschärfe: 70 dB
• Rauschabstand bei 1 kHz: 58 dB
• Frequenzgang: 30 Hz – 15 kHz, -3 dB
MW-Radio
• Abstimmbereich: 522 kHz – 1620 kHz
• 12 Sender-Speicherplätze
6
Bluetooth
• Freisprecheinrichtung mit separatem Mikrofon
• Audiostreaming
• Bluetooth-Modul mit AVRCP/A2DP-Profil
Monitor
• Bildschirmgröße: 17,8 cm / (7”) LCD TS (Touch Screen) mit LED Backlight
• Typ: High Definition TFT-Monitor mit LCD-Display (Liquid Crystal Display),
• Auflösung: 1,152,000 Sub-Pixel, 800 (B) x 480 (H)
OPTIONALES ZUBEHÖR
Rückfahrkamera Audiovox RVC1
Der VXE 3010 ist für die Verwendung einer Kamera vorbereitet. Bevor Sie auf die
Kamerafunktionen zugreifen können, müssen Sie eine Rückfahr-Videokamera kaufen und
installieren.
7
BEDIENELEMENTE UND ANZEIGEN AUF DER
GERÄTEVORDERSEITE
Abbildung 1. Bedienelemente und Anzeigen des VXE 3010
Achtung:
Die Abbildungen in dieser Anleitung haben lediglich Referenzcharakter. Abweichungen
gegenüber Ihrem Gerät sind möglich. Bitte beachten Sie die tatsächliche
Geräteausführung.
8
1.
SRC-Taste ( ) EIN/AUS und Menü zum Auswählen der Quelle: Drücken Sie diese Taste,
um das Gerät einzuschalten. Wenn Sie bei eingeschaltetem Gerät kurz auf die Taste [SRC]
drücken, wird der Haupt-Touchscreen mit dem Menü zum Auswählen der Quelle angezeigt.
Halten Sie die Taste 2 Sekunden gedrückt, um das Gerät auszuschalten
2.Drehregler: Drehen Sie diesen Regler, um eine Lautstärke zwischen 0 und 50 einzustellen.
Durch kurzes Drücken dieses Reglers wird die Audiowiedergabe stumm geschaltet. Drücken
Sie den Regler erneut, um die Audiowiedergabe wieder einzuschalten.
Die Werkseinstellung für die Lautstärke von Verkehrsnachrichten hat den Wert 20.
Um die Lautstärke der Verkehrsnachrichten zu verändern, stellen Sie während der
Verkehrsdurchsage die Lautstärke mit dem Drehregler ein. Das Gerät speichert den aktuell
eingestellten Lautstärkewert automatisch.
3.
Taste REVERSE [
]: Drücken Sie
, um die Rückwärtssuche zu starten. Drücken Sie im
, um einen Sender mit einer niedrigeren Frequenz zu suchen.
Radiomodus
4.
Taste FORWARD [
]: Drücken Sie
, um die Vorwärtssuche zu starten. Drücken Sie im
, um einen Sender mit einer höheren Frequenz zu suchen.
Radiomodus
5.
IR-Sensor für die Fernbedienung: Empfängt die Signale von der Fernbedienung.
6.
Abdeckung der USB-Schnittstelle: Abdeckung über dem Anschluss der USB-Schnittstelle.
Öffnen Sie die Abdeckung und stecken Sie ein USB-Gerät ein.
7.Reset-Taste: Drücken Sie diese Taste, um die Systemeinstellungen (mit Ausnahme des
Passwortes) zurückzusetzen und um eine Systemstörung zu beheben oder einen nicht
zulässigen Bedienvorgang zurückzusetzen. Verwenden Sie zum Drücken der Reset-Taste die
Spitze eines Stiftes.
8.A/V-Eingang: Dient zum Anschließen eines kompatiblen Audio-/Videogeräts.
9.
Taste für den TFT-Monitor [Ausfahren/Einfahren]: Drücken Sie diese Taste, um
den automatischen Ausfahr-Mechanismus zu aktivieren und den TFT-Monitor in
Wiedergabeposition zu bringen. Drücken Sie erneut auf diese Taste, um den TFT-Monitor
wieder einzufahren. Halten Sie die Taste bei ausgefahrenem TFT-Monitor gedrückt, um den
Einstellmodus für den Anzeigewinkel aufzurufen, und wählen Sie mit dem Drehregler die
gewünschte Einstellung. Drücken und halten Sie nach dem Einstellen den Drehregler, um
die Position des TFT-Monitors zu speichern, oder warten Sie, bis der Einstellmodus nach
4 Sekunden automatisch beendet wird.
10. Taste [ DISP ]: Drücken Sie bei ausgefahrenem Monitor während der DVD-Wiedergabe
einmal auf diese Taste, um Informationen zu Spielzeit, Titel und Kapitel anzuzeigen, oder
drücken Sie zweimal, um Informationen zu Audio, Untertitel, Winkel und Bitrate anzuzeigen.
Bei eingefahrenem Monitor können durch Drücken dieser Taste Informationen auf dem
alternativen LCD-Display angezeigt werden.
11. Taste EJECT [
]: Drücken Sie diese Taste, um eine DVD/CD/MP3-Disc auszuwerfen.
Die Disc-Wiedergabe wird beendet und die Disc ausgeworfen. Das Gerät wechselt in den
Radiomodus. Wenn die Disc nicht aus dem Gerät entnommen wird und Sie die Taste erneut
drücken, wird die Disc wieder geladen. Wird die Disc nicht innerhalb von 10 Sekunden nach
dem Auswerfen aus dem Disc-Schlitz entfernt, wird sie automatisch wieder geladen, um eine
Beschädigung zu vermeiden.
12.DISC-Schlitz: Zur Aufnahme von DVD/CD/MP3-Discs. Bei eingeschaltetem Gerät startet die
Wiedergabe, sobald eine Disc eingelegt wird.
9
FERNBEDIENUNG
Abbildung 2. VXE 3010 Fernbedienung
10
Funktionen der Fernbedienung
1. Taste SOURCE (SRC): Drücken Sie diese Taste, um zwischen den verfügbaren Quellen
(Radio/Disc/Bluetooth/USB/Bluetooth-Audio/SWC/AUX-1/AUX-2/Kamera) zu wechseln.
2. Taste EJECT ( ): Drücken Sie diese Taste, um eine DVD/CD/MP3-Disc auszuwerfen.
Die Disc-Wiedergabe wird beendet und die Disc ausgeworfen. Das Gerät wechselt in den
Radiomodus. Wenn die Disc nicht aus dem Gerät entnommen wird und Sie die Taste erneut
drücken, wird die Disc wieder geladen. Wird die Disc nicht innerhalb von 10 Sekunden nach
dem Auswerfen aus dem Disc-Schlitz entfernt, wird sie automatisch wieder geladen, um eine
Beschädigung zu vermeiden.
3. Taste AUDIO: Durch Drücken dieser Taste können Sie die Sprache für die Audiowiedergabe
im DVD-Modus anzeigen und auswählen. Die Sprache ändert sich mit jedem Tastendruck.
Hinweis: Die verfügbaren Sprachen für die Audiowiedergabe sind abhängig von der
Disc.
4. Taste VOLUME (VOL + und -): Drücken Sie diese Tasten, um die Wiedergabelautstärke zu
verringern oder zu erhöhen.
5. Taste ZOOM: (zum Anzeigen von Video-/Bilddateien)
Videodateien:
Drücken der ZOOM-Taste
EinmalDas Bild wird auf 125 % der Originalgröße vergrößert
Vorgang beim CD-Player
ZweimalDas Bild wird auf 150 % der Originalgröße vergrößert
DreimalDas Bild wird auf 200 % der Originalgröße vergrößert
ViermalDas Bild wird wieder in Originalgröße angezeigt
Bilddateien:
Drücken der ZOOM-Taste
EinmalDas Bild wird auf 100 % der Originalgröße vergrößert
Vorgang beim SD-Karten-Player
Zweimal
DreimalDas Bild wird auf 300 % der Originalgröße vergrößert
Viermal
Das Bild wird auf 200 % der Originalgröße vergrößert
Das Bild wird wieder in Originalgröße angezeigt
6. Taste BAND: Drücken Sie diese Taste, um zwischen gespeicherten Sendern zu wechseln. Im
Disc-Betrieb dient diese Taste zur schnellen/langsamen Wiedergabe. Drücken Sie diese Taste,
um einen eingehenden Bluetooth-Anruf anzunehmen.
7. Taste [WIDE]: Ändern des Anzeigemodus.
8. Taste [PRESET
/
]: Auswählen eines gespeicherten Radiosenders.
9. Equalizer-Taste (EQ): Drücken Sie diese Taste, um in allen Audiowiedergabemodi auf das
Equalizer-Menü zuzugreifen.
10.Taste GOTO: Drücken Sie diese Taste, um während der Wiedergabe einer Disc den
Suchbildschirm für die Direkteingabe zu öffnen.
BLUETOOTH-Taste: Drücken Sie diese Taste, um die Bluetooth-Funktion aufzurufen.
11.Taste [OPEN/CLOSE]: Aus- bzw. Einfahren des TFT-Monitors.
11
12.Taste [TILT
/
]: Diese Taste dient zum Einstellen des Neigungswinkels des TFT-Monitors.
13.Taste [RPT A-B]: A-B-Wiederholung
14.Taste [RPT]: Wiederholte Wiedergabe
15.Taste MUTE: Drücken Sie diese Taste, um die Audioausgabe ein- bzw. auszuschalten.
16.Taste POWER (
): Drücken Sie diese Taste, um das Gerät ein- bzw. auszuschalten.
17.Taste SUBTITLE: Mit dieser Taste können Sie im DVD-Modus die Sprache für die Untertitel
anzeigen und auswählen. Die Untertitelsprache ändert sich mit jedem Tastendruck.
Hinweis: Art und Anzahl der für Untertitel verfügbaren Sprachen ist abhängig von der
Disc.
18.Taste ANGLE: Mit dieser Taste können Sie im DVD-Modus verschiedene Kamerawinkel
anzeigen und auswählen. Der Winkel ändert sich mit jedem Tastendruck.
Hinweis: Die Anzahl der Kamerawinkel ist abhängig von der jeweiligen DVD. Diese
Option ist nicht bei allen DVDs verfügbar.
19.Taste MENU: Drücken Sie diese Taste, um während der Wiedergabe einer DVD oder CD das
Hauptmenü zu öffnen. Wird innerhalb von 10 Sekunden keine Auswahl getroffen, wird das
Hauptmenü wieder geschlossen und die normale Wiedergabe fortgesetzt. Diese Taste dient
auch zur Auswahl des Fotomodus bei MP3-Playern.
20.Taste [TITLE]: Anzeigen des Titels der DVD.
21.Taste SETUP: Drücken Sie diese Taste, um das Menü für Systemeinstellungen aufzurufen.
22.Taste Fast Forward [
]: Drücken Sie diese Taste, um einen Vorlauf der Disc mit 2-facher,
4-facher, 8-facher oder 20-facher Geschwindigkeit durchzuführen. Drücken Sie diese Taste im
Radiomodus, um auf höheren Frequenzen nach verfügbaren Radiosendern zu suchen.
23.Taste NEXT forward (
): Drücken Sie diese Taste, um während der Disc-Wiedergabe zum
nächsten Kapitel, Track oder Titel zu wechseln. Drücken Sie die Taste im Radiomodus, um auf
höheren Frequenzen nach verfügbaren Radiosendern zu suchen.
24.Taste PLAY / PAUSE (
): Drücken Sie diese Taste, um die Wiedergabe einer Disc zu
unterbrechen. Drücken Sie die Taste erneut, um die Wiedergabe normal fortzusetzen.
25.Taste PREVIOUS (
): Drücken Sie diese Taste, um während der Disc-Wiedergabe zum
vorherigen Kapitel, Track oder Titel zu wechseln. Drücken Sie die Taste im Radiomodus, um
auf niedrigeren Frequenzen nach verfügbaren Radiosendern zu suchen.
26.Taste [PIC]: Bildeinstellung. Drücken Sie diese Taste, um Helligkeit/Kontrast und Farbsättigung
einzustellen.
27.Taste Fast Reverse [
]: Drücken Sie diese Taste, um einen Rücklauf der Disc mit 2-facher,
4-facher, 8-facher oder 20-facher Geschwindigkeit durchzuführen. Drücken Sie die Taste im
Radiomodus, um auf niedrigeren Frequenzen nach verfügbaren Radiosendern zu suchen.
28.Taste [ /
]: Wiedergabe beenden/Auflegen. Drücken Sie diese Taste, um einen aktiven
Bluetooth-Anruf zu beenden.
29.Taste [DISP/CLEAR]: Informationen anzeigen/Informationen löschen.
30.Nummerntasten (0-9): Drücken Sie diese Tasten, um direkt auf Kapitel und Tracks
zuzugreifen, Telefonnummern zu wählen oder Passwörter einzugeben.
31.Taste RANDOM ( ): Drücken Sie diese Taste, um Tracks oder Kapitel auf einer Disc in
zufälliger Reihenfolge wiederzugeben.
32.Taste [INT]: Intro-Wiedergabe.
12
Hinweise zur Verwendung der Fernbedienung
• Richten Sie die Fernbedienung auf den Fernbedienungssensor am Gerät aus.
• Entnehmen Sie die Batterien aus der Fernbedienung oder legen Sie einen Isolierstreifen ein,
wenn die Fernbedienung länger als einen Monat nicht verwendet wird.
• Um die ordnungsgemäße Funktion der Fernbedienung sicherzustellen, darf sie NICHT bei
direkter Sonneneinstrahlung oder hohen Temperaturen aufbewahrt werden.
• Unter normalen Bedingungen hält die Batterie bis zu 6 Monate. Sollte die Fernbedienung nicht
funktionieren, tauschen Sie die Batterie au.
• Es dürfen ausschließlich Lithium-Knopfzellen des Typs CR2025 (3 V) verwendet werden.
• Die Batterie darf NICHT aufgeladen, zerlegt, hohen Temperaturen oder offenem Feuer
ausgesetzt werden.
• Achten Sie beim Einsetzen der Batterie auf die korrekte Ausrichtung der Pole ( + / - ).
• Lagern Sie die Batterie außerhalb der Reichweite von Kindern, um Unfallgefahren zu
vermeiden.
Austauschen der Batterie der Fernbedienung
Einsetzen der Batterie
Es dürfen ausschließlich Lithium-Knopfzellen des Typs CR2025 (3 V) verwendet werden. Setzen
Sie die Batterie mit korrekt ausgerichteten Polen ( + / - ) in das Batteriefach ein.
HINWEIS: Achten Sie beim Einsetzen darauf, dass sich der Pluspol der Batterie (+) UNTER
der Metalllasche im Batteriefach befindet.
Entnehmen der Batterie
Öffnen Sie das Batteriefach unten auf der Rückseite der Fernbedienung.
Abbildung 3. Austauschen der Batterie bei der Fernbedienung des VXE 3010
13
KURZANLEITUNG
Ein- bzw. Ausschalten des Geräts
Drücken Sie zum Einschalten des Geräts die Ein/Aus- bzw. Menütaste [
/ SRC ] auf der
Gerätevorderseite. Halten Sie zum Ausschalten des Geräts die Ein/Aus- bzw. Menütaste
[
/ SRC ] 2 Sekunden lang gedrückt.
Auswählen einer Audio-/Videoquelle, der Bluetooth®-Funktion, der
Lenkradsteuerung oder der Rückfahrkamera
So greifen Sie auf eine Audio-/Videoquelle zu:
1. Drücken Sie kurz die Ein/Aus- bzw. Menütaste auf der Gerätevorderseite oder berühren Sie
das Menüsymbol
oben links im Display, um das Hauptmenü anzuzeigen.
Menütaste
Bildschirm 1
Bildschirm 2
Abbildung 4. Hauptmenü des VXE 3010
2. Berühren Sie auf einem der beiden Hauptmenü-Bildschirme das Symbol für die gewünschte
Quelle.
Bildschirm 1 von 2: Radio, Disc, Bluetooth (BT), USB.
Berühren Sie den Seitenpfeil (→) unten auf dem Bildschirm, um Bildschirm 2 von 2 zu öffnen:
Bluetooth (Audio), Lenkradfernbedienung (SWC), AV-IN1, AV-IN2 oder Kamera.
Stummschaltung
Drücken Sie den Lautstärkeregler auf der Gerätevorderseite oder drücken Sie auf der
Fernbedienung die Taste [MUTE], um den Ton des Geräts stumm zu schalten.
14
Lautstärkeregulierung
Lautstärke erhöhen/reduzieren
Um die Lautstärke zu erhöhen oder zu reduzieren, drehen Sie den Drehregler auf der
Gerätevorderseite. Wenn der Lautstärkepegel auf 0 oder 50 eingestellt wird, zeigt ein akustisches
Signal an, dass die Einstellgrenze für die Lautstärke erreicht ist. Auf dem TFT-Monitor wird der
eingestellte Lautstärkepegel 3 Sekunden lang angezeigt.
Bestätigung durch akustisches Signal
Jede Funktionsauswahl wird durch ein akustisches Signal bestätigt. Das akustische Signal kann
über das Setup-Menü deaktiviert werden.
Verwenden des TFT-Monitors
Aus-/Einfahren des Monitors
Drücken Sie die Taste [OPEN] auf der Gerätevorderseite oder auf der Fernbedienung, um das
Display aus- oder einzufahren.
HINWEIS: Das Display darf keinesfalls manuell aus-/eingeschoben werden.
Ändern des Neigungswinkels des Monitors
LCD-Displays bieten aufgrund ihrer technischen Merkmale unterschiedlich gute Sicht aus
verschiedenen Betrachtungswinkeln. Der Anzeigewinkel dieses Displays ist einstellbar. Sie
können also den Winkel wählen, der Ihnen die beste Sicht bietet. Halten Sie die Taste [OPEN]
gedrückt, um den Einstellmodus für den Anzeigewinkel aufzurufen, und wählen Sie mit dem
Drehregler die gewünschte Einstellung.
HINWEIS: Der Neigungswinkel des Displays darf keinesfalls manuell geändert werden.
System zurücksetzen
Soft-Reset
Um einen Systemabsturz oder eine unzulässige Bedienung zu korrigieren, benutzen Sie einen
Stift, um den Reset-Knopf hinter der USB-Abdeckung zu drücken und loszulassen.
[RESET] Button
Abbildung 5. Taste zum Zurücksetzen des Systems
Hard-Reset
Berühren Sie das Symbol “Werkseinstellung” zum Zurücksetzen des Systems im EinstellungsMenü unter “DVD”.
Durch das Zurücksetzen des Systems werden die Werkseinstellungen des Geräts
wiederhergestellt.
HINWEIS: Wenn Sie das Gerät während der Wiedergabe einer DVD zurücksetzen, wird nach
Abschluss des Vorgangs wieder das Hauptmenü angezeigt
15
Ändern des Seitenverhältnisses
Drücken Sie die Taste [WIDE] auf der Fernbedienung, um das Seitenverhältnis anzupassen.
Bildeinstellungen
1. Rufen Sie den Bildeinstellmodus mit der Taste [PIC] auf der Fernbedienung auf.
2. Wählen Sie das einzustellende Element aus und berühren Sie eines der Richtungssymbole[
]/[
] auf der Benutzeroberfläche, um den Wert anzupassen.
3. Um den Bildeinstellmodus zu beenden, drücken Sie die Taste [PIC] auf der Fernbedienung
erneut oder nehmen Sie einfach keine Einstellungen mehr vor.
Abbildung 6. Bildschirm für Bildeinstellungen
Equalizer-Bedienelemente
Equalizer (EQ): Einstellungen können nach dem Aufrufen einer der Audio-/Videoquellen (Disc,
Radio, USB, AV-IN1 oder AV-IN2) vorgenommen werden.
Berühren Sie das Equalizer-Symbol (EQ), um den Bildschirm zur Equalizer-Steuerung anzuzeigen
und die gewünschte Audio-Voreinstellung ( Pop / Techno / Rock / Classic / Jazz / Optimal
oder User) auszuwählen, die Einstellungen für Audiobalance und Fade anzupassen oder die
Lautstärkeoption ein- bzw. auszuschalten. Berühren Sie das Zurück-Symbol, um zur aktuellen
Quelle zurückzukehren.
Disc-Wiedergabe
So starten Sie die Wiedergabe einer Audio/Video-Disc:
1. Drücken Sie den Drehregler für Ein/Aus/Lautstärke/Stummschaltung auf der Gerätevorderseite,
um das Gerät einzuschalten.
2. Legen Sie eine Disc mit der beschrifteten Seite nach oben ein. Die Wiedergabe wird
automatisch gestartet.
Handbremsensperre
Wenn das pinkfarbene Parkkabel an den Schaltkreis der Handbremse angeschlossen ist, wird auf
dem vorderen TFT-Monitor nur dann Video ausgegeben, wenn die Handbremse angezogen ist.
16
SYSTEMEINSTELLUNGEN
1. Berühren Sie das Menüsymbol
anzuzeigen.
oben links auf dem Display, um das Hauptmenü
2. Berühren Sie das Einstellungssymbol [
]. Das Einstellungsmenü wird angezeigt.
Abbildung 7. Einstellungsmenü
Allgemeine Einstellungen
1. Berühren Sie ggf. die Taste [ General ].
2. Berühren Sie eine Einstellung, um diese zu markieren und eine Option anzuzeigen/
auszuwählen.
Allgemeine Einstellungen
Radio region
Radiobereich
Piepston
Kalibrierung
Demo
Optionen
Beschreibung
USA/Asia/Japan/
Europa/Eur LW/ Wählen Sie je nach Standort eine Region aus.
Oirt
Lokal
Wählen Sie „Local“, um nur Sender mit
besonders starkem Signal zu empfangen.
Fern
Akustisches Signal einschalten. Bei jedem
On
Tastendruck ertönt ein akustisches Signal.
Off
Akustisches Signal ausschalten.
Start
Touchscreen kalibrieren.
On
Demo-Modus einschalten.
Demo-Modus ausschalten.
Off
3. Berühren Sie das Menüsymbol
oben links auf dem Display, um das Menü zu schließen.
17
Kalibrierung
Kalibrieren Sie den Touchscreen mit der Kalibrierfunktion.
Neukalibrieren des Touchscreens:
1. Wählen Sie im Setup-Menü die Option [ Kalibrierung ]
2. Berühren Sie [ Yes ], um die Kalibrierungsfunktion zu öffnen.
3. Halten Sie die Mitte des Kreuzes [ + ] 5 Sekunden lang gedrückt. Das Kreuz [ + ] bewegt sich
automatisch.
4. Berühren Sie das Kreuz [ + ] mittig und folgen Sie dem in der Abbildung dargestellten Pfad.
Nach Abschluss der Schritte 1-4 wird der Kalibriermodus automatisch beendet.
Abbildung 8. Kalibrierbildschirm
Videoeinstellungen
1. Berühren Sie [Video].
2. Berühren Sie eine Option wiederholt, um die gewünschte Auswahl zu treffen:
Videoeinstellungen
Bildformat
Rückkamera
Optionen
Voll
Normal
Spiegeln
Normal
Beschreibung
Seitenverhältnis einstellen.
Kamerabild wie beim Blick in den Rückspiegel
umkehren.
3. Berühren Sie das Zurück-Symbol, um das Menü zu verlassen und zum vorherigen Bildschirm
zurückzukehren.
18
Zeiteinstellungen
1. Berühren Sie [ Time ].
2. Berühren Sie eine Option wiederholt, um die gewünschte Auswahl zu treffen:
Zeiteinstellungen
Optionen
Datum
Year / Mon / Day
Uhr Modus
12Hr/24Hr
Zeit
Hour / Min / AM /
PM
Beschreibung
Berühren Sie [
] oder [
] t], um das Jahr,
den Monat und den Tag einzustellen.
Berühren Sie [12Hr] oder [24Hr], um den
Uhrzeitmodus umzuschalten.
] oder [
], um die Stunden
Berühren Sie [
und Minuten einzustellen.
Berühren Sie [
] oder [
], um AM/PM
einzustellen (nur bei 12-Stunden-Uhr).
3. Berühren Sie das Zurück-Symbol, um das Menü zu verlassen und zum vorherigen Bildschirm
zurückzukehren.
Audioeinstellungen
1. Berühren Sie [ Audio ].
2. Berühren Sie eine Option wiederholt, um die gewünschte Auswahl zu treffen:
Audioeinstellungen
Optionen
Beschreibung
On
Subwoofer einschalten.
Tieftöner
Off
Subwoofer ausschalten.
80Hz
Wählen Sie eine Übergangsfrequenz aus,
Tieftöner Filter
120Hz
um eine Eckfrequenz für den LPF (Low Pass
Filter) des Subwoofers einzustellen.
160Hz
Aus
Verstärkung nur für den Bassbereich oder
Loudness
Lo Boost
Verstärkung bei hohen und tiefen Frequenzen.
Hi&Lo
400Hz
Loudness Center
800Hz
Wählen Sie die Center-Frequenz aus.
2.4KHz
3. Berühren Sie das Zurück-Symbol, um das Menü zu verlassen und zum vorherigen Bildschirm
zurückzukehren.
Spracheinstellungen
1. Berühren Sie [ Language ].
2. Berühren Sie eine Option wiederholt, um die gewünschte Auswahl zu treffen:
Spracheinstellungen Beschreibung
OSD
DVD Audio
DVD Untertitel
DVD Menü
Auswählen der Sprache für die Bildschirmanzeige.
Auswählen der Sprache für DVD-Audio. Die verfügbaren Optionen
sind abhängig von der DVD.
Auswählen der Sprache für DVD-Untertitel. Die verfügbaren
Optionen sind abhängig von der DVD.
Auswählen der Sprache für das DVD-Menü. Die verfügbaren
Optionen sind abhängig von der DVD.
3. Berühren Sie das Zurück-Symbol, um das Menü zu verlassen und zum vorherigen Bildschirm
zurückzukehren.
19
Bluetooth®-Einstellungen
1. Berühren Sie [Bluetooth].
2. Berühren Sie eine Option wiederholt, um die gewünschte Auswahl zu treffen:
Bluetooth®Einstellungen
Optionen
Beschreibung
Bluetooth®-Funktion einschalten.
Bluetooth®-Funktion ausschalten.
Befindet sich das gekoppelte Gerät innerhalb der
On
Reichweite, stellt das Gerät automatisch erneut eine
Verbindung zu dem gekoppelten Gerät her.
Automat. Verbindung
Die Verbindung muss manuell erneut hergestellt
Off
werden.
Auf dem gekoppelten Gerät eingehende Anrufe
On
werden automatisch angenommen.
Automat. Antwort
Off
Anrufe müssen manuell angenommen werden.
Einstellen des Passworts zum Koppeln des Geräts mit einem
Kopplungscode
anderen Bluetooth®-Gerät.
Bluetooth
On
Off
3. Berühren Sie das Zurück-Symbol, um das Menü zu verlassen und zum vorherigen Bildschirm
zurückzukehren.
DVD
1. Berühren Sie [ DVD ].
2. Berühren Sie eine Option wiederholt, um die gewünschte Auswahl zu treffen:
Werkseinstellung
SW Version
Optionen
Beschreibung
Ja/Nein
Auf Werkseinstellung zurücksetzen
Nur Anzeige Anzeige der Software Version
3. Berühren Sie das Zurück-Symbol, um das Menü zu verlassen und zum vorherigen Bildschirm
zurückzukehren.
Anpassen der Lautstärkeeinstellungen
Sie können für verschiedene Quellen unterschiedliche Lautstärken einstellen.
1. Berühren Sie das Symbol [Lautstärke], um das Untermenü für die Lautstärkeeinstellung
anzuzeigen.
2. Berühren Sie die Quelle, für die Sie Einstellungen vornehmen möchten.
3. Berühren Sie [
] oder [
] um einen Wert zwischen 0 und 12 einzustellen. Beim Wechsel zu
der jeweiligen Quelle wird die Lautstärke automatisch entsprechend erhöht.
4. Berühren Sie das Zurück-Symbol, um das Menü zu verlassen und zum vorherigen Bildschirm
zurückzukehren.
20
RADIOBETRIEB
Auswählen des Radios als Wiedergabequelle
Öffnen Sie das Menü zum Auswählen der Quelle und berühren Sie [Radio].
Auswählen eines Radiobands
Drücken Sie die Taste [BAND] auf der Fernbedienung oder berühren Sie das Symbol [ ] auf der
Benutzeroberfläche, um eines der Radiobänder FM1, FM2, FM3, AM1 oder AM2 auszuwählen.
Abbildung 9. Radiobildschirm
Senderwahl
Automatische Sendersuche
Drücken Sie die Tasten [
]/[
] auf der Fernbedienung oder berühren Sie die Symbole
]/[
] auf der Benutzeroberfläche, um nach einem höheren/niedrigeren Sender zu suchen.
[
Um die Suche zu beenden, wiederholen Sie diesen Vorgang oder drücken Sie eine andere Taste
mit Radiofunktion.
HINWEIS: Sobald ein Sender empfangen wird, wird die Suche beendet und der Sender
gespielt
Manuelle Senderwahl
Vorgehensweise1:
Halten Sie das Symbol [
] oder [
] 1 Sekunde lang gedrückt, um zur manuellen Senderwahl
zu wechseln. Bei der manuellen Senderwahl wird die Frequenz schrittweise geändert.
Berühren Sie das Symbol [
]/[
] auf der Benutzeroberfläche, um einen höheren/niedrigeren
Sender einzustellen.
Das Gerät kehrt nach ca. 15 Sekunden automatisch wieder in den automatischen Suchmodus
zurück. Sie können auch zur automatischen Suche zurückkehren, indem Sie kurz die die Taste
[Auto] drücken und dann die Taste [Vor] oder [Zurück].
Vorgehensweise 2:
1. Berühren Sie das Nummernfeld-Symbol [
]. Das Nummernfeld wird angezeigt. Geben Sie
die gewünschte Frequenz mit den Tasten ein.
2. Berühren Sie [
] um die eingegebenen Zahlen schrittweise zu löschen.
3. Berühren Sie [ OK ] um die Eingabe zu bestätigen.
21
Senderspeicher
Das Gerät bietet 5 Frequenzbänder (FM1, FM2, FM3, AM1, AM2). In jedem Band können
6 Sender, d. h. insgesamt 30 Sender, gespeichert werden.
Manuelles Speichern
1. Stellen Sie den gewünschten Sender ein.
2. Halten Sie eine der Speicherplatznummern (1 bis 6) gedrückt, um den ausgewählten Sender
zu speichern.
Automatische Sendersuche
Berühren Sie das Suchsymbol [
] um nach Sendern zu suchen und die 6 stärksten Sender im
aktuellen Band automatisch zu speichern.
Aufrufen eines gespeicherten Senders
1. Wählen Sie ein Band aus.
2. Berühren Sie eine der Speichertasten auf dem Display, um den gewünschten gespeicherten
Sender aufzurufen.
Suchen nach lokal empfangbaren Sendern (LOC)
Ist die Lokalfunktion aktiviert, werden nur Sender wiedergegeben, für die ein starkes lokales
Signal empfangen wird. Um die Lokalfunktion im UKW/MW-Radio-Modus zu aktivieren, berühren
] zur
Sie [ ] auf dem Bildschirm. Die Optionen werden angezeigt. Berühren Sie das Symbol [
Auswahl der Option LOCAL oder DISTANCE. Wenn die Funktion LOCAL aktiv ist, erscheint die
LOCAL-Anzeige oben im Bildschirm. Wenn die Funktion DISTANCE aktiv ist, erscheint die DXAnzeige oben im Bildschirm.
EQ-Auswahl
Berühren Sie das Equalizer-Symbol [
] und rufen Sie die EQ-Einstellungen auf.
RDS
Mittels RDS (Radio Data System) werden Daten an das Radio übermittelt. Diese Informationen,
z. B. der Sendername, der Name von Interpret und Titel, werden auf dem Radio angezeigt.
Die Verfügbarkeit des RDS-Dienstes kann regional variieren. Berücksichtigen Sie, dass der
nachfolgend beschriebene Dienst nicht verwendet werden kann, wenn er in Ihrer Region nicht
verfügbar ist.
Anpassen der RDS-Einstellungen
1. Berühren Sie im Radiomenü [ ] und [ Option ]. Das Optionsmenü wird angezeigt.
2. Berühren Sie die ausgewählte Option, um die Einstellung zu ändern.
[RDS]:Ein- oder Ausschalten der RDS-Funktion
[AF]: Ein- oder Ausschalten der AF Funktion
[EON]:Ein- oder Ausschalten der EON Funktion
[TA]: Ein- oder Ausschalten der TA Funktion
[CT]: Ein- oder Ausschalten der Uhrzeitsynchronisation
[PTY]:Anzeigen der PTY-Liste
22
AF
Das Gerät kann automatisch auf eine Alternativfrequenz (AF) desselben Senders wechseln, wenn
der Empfang schlecht wird. Drücken Sie die Schaltfläche AUS/EIN, um die automatische Auswahl
von Alternativfrequenzen bei RDS Empfang ein- bzw. auszuschalten.
EON (Enhanced Other networks)
TA: Verkehrsmeldungen können von dem aktuell eingestellten Sender oder von Sendern in
anderen Netzwerken empfangen werden.
AF: Die Frequenzliste voreingestellter RDS-Sender wird um EON-Daten erweitert.
EON ermöglicht eine erweiterte Nutzung von RDS-Informationen. Die AF-Liste voreingestellter
Sender wird permanent aktualisiert, einschließlich des aktuellen Senders. Wenn Sie einen
Sender in Ihrer Wohnregion einstellen, können Sie denselben Sender mit einer alternativen
Frequenz empfangen, oder jeden anderen Sender, der dasselbe Programm anbietet. EON sucht
kontinuierlich nach lokalen TP (Traffic Program)-Sendern.
TA
Drücken Sie die Schaltfläche TA EIN/AUS, um den Vorrang für Verkehrsmeldungen ein- bzw.
auszuschalten.
TA Lautstärke
Die Werkseinstellung für die Lautstärke von Verkehrsnachrichten hat den Wert 20. Um die
Lautstärke der Verkehrsnachrichten zu verändern, stellen Sie während der Verkehrsdurchsage die
Lautstärke mit dem Drehregler ein. Das Gerät speichert den aktuell eingestellten Lautstärkewert
automatisch.
CT (Clock Time) – Zeitsignal
Einige Sender übertragen zusammen mit dem codierten RDS-Signal auch Uhrzeit und Datum.
Wenn die Option „CT“ aktiviert ist, wird das Zeitsignal automatisch angepasst
Hinweis: Sender in der Nähe anderer Zeitzonen strahlen ggf. nicht die korrekte Uhrzeit für Ihre
Region aus. Schalten Sie in diesem Fall die CT-Funktion aus und stellen Sie die Uhrzeit manuell
ein.
PTY-Funktion
PTY (Programmtyp) ist eine Funktion zur Anzeige der Programmkategorie des aktuellen Senders
(Nachrichten, Sport, Talk usw.). Mit der Bildlaufleiste können Sie Codes für verschiedene
Kategorien auswählen.
Nach Auswahl eines Kategoriecodes werden die PTY-Optionen angezeigt.
Bei Auswahl einer PTY-Option (z. B. Nachrichten) wird die automatische Suche nach dem
nächsten verfügbaren Programm dieses Typs durchgeführt, indem die Senderfrequenz erhöht
wird, bis der PTY des Senders mit dem des aktuellen Senders übereinstimmt. Wurde kein
passender PTY gefunden, kehrt das Gerät wieder zur ursprünglichen Senderfrequenz zurück.
23
WIEDERGABE VON AUDIODATEIEN
Kompatible Audio-Discs
Auf diesem System können die folgenden Disc-Typen wiedergegeben werden:
DVD
- DVDs mit Audio- und/oder Videodateien.
Audio-Discs - Audio-CDs mit Audio-, Video- und Bilddateien.
MP3-Discs - Discs mit Audio-, Video- und Bilddateien (beispielsweise eine CD-R mit
heruntergeladenen MP3-Dateien).
HINWEIS: Das Gerät ist für die Wiedergabe bespielter (Original-)CDs/DVDs bestimmt.
Aufgrund von abweichenden Aufzeichnungsformaten können möglicherweise nicht alle
gebrannten CDs/DVDs abgespielt werden.
DVD-Betrieb
DVD-Hauptmenü
HINWEIS: Bei einer ordnungsgemäßen Installation ist die DVD-Wiedergabe auf dem HauptTFT-Monitor nur bei angezogener Handbremse möglich. Wenn Sie versuchen, während der
Fahrt eine DVD wiederzugeben, wird auf dem TFT-Monitor Folgendes angezeigt:
Warnung!
Das Anschauen von Videos ist beim Führen oder Bedienen eines Kraftfahrzeugs nicht
zulässig. Aktivieren Sie die Handbremse, um sich das Video anzusehen.
Berühren Sie auf dem Hauptmenü-Bildschirm das Symbol DISC oder legen Sie eine Disc mit der
beschrifteten Seite nach oben in den Disc-Schlitz ein. Die Wiedergabe startet, wenn eine Disc
korrekt eingelegt wird.
Einlegen einer Disc
Nach dem Einlegen einer Disc wechselt das Gerät automatisch zum [DISP]-Modus.
Auswerfen der Disc
Drücken Sie die Taste[
Disc auszuwerfen.
] auf der Vorderseite des Geräts oder auf der Fernbedienung, um die
Bedienelemente auf dem Touchscreen
Die wichtigsten Punkte des Touchscreens für die DVD-Wiedergabe sind nachfolgend dargestellt:
A: Zurück zum Hauptmenü
B: Disc-Typ
C: Spielzeit-Anzeige
D:Video-Wiedergabe und Anzeige von
Wiedergabeinformationen
E: Bildschirmmenü
Abbildung 10. Bedienbereiche auf dem Bildschirm
24
Steuern der Wiedergabe
Um auf die Bildschirm-Bedienelemente zuzugreifen, berühren Sie den Bildschirm an einer
beliebigen Stelle außer der oberen linken Ecke. Berühren Sie den Bildschirm erneut, um die
Anzeige abzubrechen.
Anschließen eines USB-Geräts
1. Öffnen Sie die Abdeckung des USB-Anschlusses.
2. Stecken Sie ein USB-Gerät in den USB-Anschluss ein. Die Wiedergabe startet automatisch.
Hinweise:
1. Enthält der USB-Stick unterstützte Audiodateien, wird automatisch das Menü für Audiodateien
geöffnet.
Enthält der USB-Stick keine Audio-, sondern unterstützte Videodateien, wird automatisch das
Menü für Videodateien geöffnet.
Enthält der USB-Stick keine Audio- oder Video-, sondern unterstützte Bilddateien, wird
automatisch das Menü für Bilddateien geöffnet.
Sind auf dem USB-Stick weder unterstützte Audio-, noch Video- oder Bilddateien vorhanden,
wird die folgende Meldung angezeigt: There are no audio/video/picture files supported. (Keine
unterstützten Audio-/Video-/Bilddateien vorhanden).
2. Nicht alle USB-Geräte sind mit dem System kompatibel.
Wiedergabe
Sobald eine Disc eingelegt oder ein USB-Gerät eingesteckt wurde, wird die Wiedergabe
automatisch gestartet.
Pause
Drücken Sie während der Wiedergabe der Audio-/Videodatei die Taste [
] auf der
Fernbedienung oder öffnen Sie das Bildschirmmenü mit den Bediensymbolen und berühren Sie
das Symbol [
]. Drücken Sie erneut auf [
] um die Wiedergabe fortzusetzen.
Stop
Drücken Sie während der Wiedergabe von Audio- oder Videodateien die Stopptaste [ ■ ] auf
der Fernbedienung oder öffnen Sie das Bildschirmmenü mit den Bediensymbolen und berühren
Sie das Stoppsymbol [ ■ ], um die Wiedergabe zu stoppen. Drücken Sie Taste [
] um die
Wiedergabe an der Stelle fortzusetzen, an der sie unterbrochen wurde.
Berühren Sie erneut das Stoppsymbol [ ■ ] um die Wiedergabe ganz anzuhalten, oder drücken Sie
die Stopptaste[ ■ ] auf der Fernbedienung. Drücken Sie [
] , um die Wiedergabe mit der ersten
Datei zu starten.
Zurück/Vor
Berühren Sie die Taste [
Kapitel zu wechseln.
]/[
] auf dem Bildschirm, um zum vorherigen/nächsten Track/
25
Ordnersuche
Alle Ordner
] Taste, um zum Menü zu
Drücken Sie die [
gelangen.
1. Berühren Sie [
] um alle verfügbaren Ordner
anzuzeigen.
2. Berühren Sie einen Ordner und dann die
gewünschte Datei.
3. Berühren Sie die Datei erneut, um die Wiedergabe
zu starten.
Abbildung 11. Ordnerbildschirm
Audiodateien
1. Berühren Sie [
], um alle verfügbaren Audioordner anzuzeigen.
2. Berühren Sie einen Ordner und dann die gewünschte Datei.
3. Berühren Sie die Datei erneut, um die Wiedergabe zu starten.
Videodateien
1. Berühren Sie das Videosymbol [
], um alle verfügbaren Videoordner anzuzeigen.
2. Berühren Sie einen Ordner und dann die gewünschte Datei.
3. Berühren Sie die Datei erneut, um die Wiedergabe zu starten.
Bilddateien
1. Berühren Sie das Bildsymbol [
], um alle verfügbaren Bildordner anzuzeigen.
2. Berühren Sie einen Ordner und dann die gewünschte Datei.
3. Berühren Sie die Datei erneut, um die Wiedergabe zu starten.
Wiederholte Wiedergabe
Drücken Sie die Wiederholungstaste [RPT] auf der Fernbedienung oder öffnen Sie das
Bildschirmmenü mit den Bediensymbolen und berühren Sie das Wiederholungssymbol [
wie folgt zwischen den Wiederholmodi zu wechseln:
], um
Abbildung 12. Wiederholmodus
A-B-Wiederholen
Sie können bei der Wiedergabe einer DVD oder VCD die Inhalte zwischen den Zeitpunkten A und
B mehrfach wiederholen:
Abbildung 13. Repeat A-B Ein und Aus
Zufallswiedergabe
Sie können alle Audiotracks/-dateien in zufälliger Reihenfolge wiedergeben. Drücken Sie während
der CD-Wiedergabe wiederholt die Taste [RDM] auf der Fernbedienung, um die Zufallswiedergabe
ein- bzw. auszuschalten.
26
HINWEIS:
Ist [Shuffle] deaktiviert, wird die Wiedergabe bei der aktuellen Sequenz fortgesetzt.
Wiedergabesteuerung
Diese Funktion ist bei VCD-Discs mit Playback Control (Version 2.0 oder höher) verfügbar.
Drücken Sie die Taste [MENU] auf der Fernbedienung oder öffnen Sie das Bildschirmmenü
mit den Bediensymbolen und berühren Sie wiederholt das Symbol [
] um diese Funktion zu
aktivieren. Drücken Sie erneut, um die Wiedergabesteuerung zu beenden.
Hinweise:
1. Bei aktivierter Wiedergabesteuerung wird die Wiedergabe mit dem ersten Track in der
Trackliste erneut gestartet.
2. Bei aktivierter Wiedergabesteuerung ist die schnelle und langsame Wiedergabe oder das
Suchen durch Überspringen verfügbar, die Wiedergabewiederholung und die Suche nach
einem bestimmten Kapitel oder Track jedoch nicht möglich.
3. Wird bei aktivierter Wiedergabekontrolle die Zufallswiedergabe, die Funktion zum Scannen
oder zum Durchsuchen verwendet, wird die Wiedergabekontrolle automatisch ausgeschaltet.
Auswählen des Audiomodus
Bei der VCD-Wiedergabe kann ein Audiomodus (R/L/Stereo) ausgewählt werden.
1. Berühren Sie während der Wiedergabe die untere Hälfte des Bildschirms, um das
Bildschirmmenü anzuzeigen.
2. Berühren Sie das Weiter-Symbol [ ], um das 2. Menü anzuzeigen.
3. Berühren Sie mehrfach das Audio-Symbol [
] bis der Audiomodus ausgewählt ist.
Auswählen der Untertitelsprache
DVDs mit zwei oder mehr Untertitelsprachen:
1. Berühren Sie während der Wiedergabe den Bildschirm, um das Bildschirmmenü anzuzeigen.
2. Berühren Sie das Weiter-Symbol [ ], um das 2. Menü anzuzeigen.
3. Berühren Sie wiederholt das Sprachsymbol [
], um eine Sprache auszuwählen. Die
ausgewählte Sprache wird angezeigt.
Ändern des Sichtwinkels
Einige DVDs enthalten alternative Szenen, z. B. aus unterschiedlichen Kamerawinkeln
aufgezeichnete Szenen.
Bei diesen DVDs können Sie eine der verfügbaren alternativen Szenen auswählen.
1.Berühren Sie während der Wiedergabe den Bildschirm, um das Bildschirmmenü anzuzeigen.
2. Drücken Sie auf der Fernbedienung wiederholt auf das Winkelsymbol [
. Der Sichtwinkel
wird geändert.
Videoeinstellung
Berühren Sie das Einstellungssymbol [
], um den Video-Einstellmodus zu aktivieren. Berühren
Sie die Richtungssymbole [
]/[
], um den gewünschten Effekt einzustellen. Sie können
die Helligkeit, den Kontrast und die Farbsättigung der Videoausgabe auf einen Wert von 1 bis 20
einstellen.
27
Wiedergabeinformationen
Berühren Sie während der Wiedergabe einer DVD oder VCD den Bildschirm. Die
Wiedergabeinformationen werden im oberen Bereich des TFT-Monitors angezeigt.
Für DVD:
Abbildung 14. DVD Informationsanzeige
1. Disc-Type.
2. Zurück zum Hauptmenü.
3. DVD-Titelinformationen. „1/6“ bedeutet, dass die DVD 6 Titel enthält, von denen aktuell der
erste wiedergegeben wird.
4. DVD-Kapitelinformationen. „2/9“ bedeutet, dass der aktuelle Titel 9 Kapitel enthält, von denen
aktuell das fünfte wiedergegeben wird.
5. Spielzeit-Anzeige.
Für VCD:
Abbildung 15. VCD Informationsanzeige
1. Disc-Typ.
2. Zurück zum Hauptmenü.
3. VCD-Trackinformationen. „1/16“ bedeutet, dass die VCD 16 Tracks enthält, von denen aktuell
der erste wiedergegeben wird.
4. Spielzeit-Anzeige.
Bisherige Spielzeit
1. Bisherige Spielzeit des aktuellen Tracks.
2. Gesamte Spielzeit des aktuellen Tracks.
Abbildung 16. Anzeige der bisherigen Spielzeit
Direkte Track-Eingabe
Um einen Track direkt auszuwählen, berühren Sie das Symbol [
] auf dem Bildschirm,
um das Menü für die Direkteingabe anzuzeigen. Geben Sie den gewünschten Track mit
Hilfe des angezeigten Nummernblocks ein. Drücken Sie [ OK ], um den ausgewählten Track
wiederzugeben.
Bilder drehen
1.Berühren Sie beim Anzeigen von Bildern den Bildschirm, um das Bildschirmmenü anzuzeigen.
2. Berühren Sie wiederholt das Drehsymbol [
] um das Bild zu drehen.
Zoom
Bilder können zum Vergrößern herangezoomt werden.
1.Berühren Sie beim Anzeigen von Bildern den Bildschirm, um das
Bildschirmmenü anzuzeigen.
2. Berühren Sie wiederholt [
] , um das Bild heranzuzoomen.
28
Abbildung 17. Zoom
Allgemeine Disc-Informationen
Disc-Eigenschaften
Symbol
Eigenschaften (12-cm-Disc)
Single Side Single Layer (DVD-5)
Single Side Double Layer (DVD-9)
Double Side Single Layer (DVD-10)
Double Side Double Layer (DVD-18)
Single Side Single Layer (VCD)
Single Side Single Layer
Max. Spieldauer
(MPEG 2-Verfahren)
133 Minuten
242 Minuten
266 Minuten
484 Minuten
(MPEG 1-Verfahren)
74 Minuten
74 Minuten
Disc Symbole
Symbol
Bedeutung
Anzahl der verfügbaren Sprachen. Die Ziffer innerhalb des Symbols zeigt die
Anzahl der Sprachen an, die auf der Disc verfügbar sind (maximal 8).
Anzahl der verfügbaren Untertitelsprachen auf der Disc (maximal 32).
Anzahl der verfügbaren Blickwinkel (maximal 9).
Verfügbare Bildformate. „LB“ steht für „Letter Box“ und „PS“ steht für „Pan/Scan“.
Im Beispiel links kann das 16:9-Video in ein LB-Format-Video konvertiert werden.
Gibt den Ländercode für die Disc an.
Region 1: USA, Kanada, Ostpazifische Inseln
Region 2: Japan, Westeuropa, Nordeuropa, Ägypten, Südafrika, Mittlerer Osten
Region 3: Taiwan, Hongkong, Südkorea, Thailand, Indonesien, Südostasien
Region 4: Australien, Neuseeland, Mittel- und Südamerika, Südpazifische Inseln/
Ozeanien
Region 5: Russland, Mongolei, Indien, Mittelasien, Osteuropa, Nordkorea,
Nordafrika, Nordwestasien
Region 6: China
ALL: Alle Regionen
29
EQUALIZER-MENÜ
Equalizer-Einstellungen
Auf dem Bildschirm mit den Equalizer-Einstellungen können Sie das Audiosystem ganz einfach
an die akustischen Gegebenheiten im Fahrzeug anpassen, die je nach Fahrzeugtyp und
Innenraumgröße unterschiedlich sein können. Beispiel: Durch korrekte Audioeinstellungen kann
der Frequenzgang der Lautsprecher optimiert werden.
Auch die Balance/Fader-Einstellungen sowie die Lautstärkeoption einer ausgewählten Audio-/
Videoquelle (Disc, Radio, USB, AV-IN1 oder AV-IN2) werden auf dem Equalizer-Einstellbildschirm
vorgenommen.
Equalizer (EQ)
Berühren Sie das Equalizer-Symbol (EQ /
), um die Audio-Voreinstellungen ( Pop / Techno /
Rock / Classic / Jazz / Optimal oder User) anzuzeigen und die gewünschte Voreinstellung
auszuwählen).
HINWEIS: Der Equalizer wechselt automatisch in den Modus „Nutzer“, wenn einzelne
Audiofunktionen eingestellt werden.
Abbildung 18. Equalizer-Bildschirm (EQ)
Mit dem programmierbaren Equalizer können Sie die Bass, Mitten- und Höhenwiedergabe sowohl
in der Stärke als auch in der Frequenz und dem Q-Wert (Filterbandbreite) einstellen.
Die Werte dafür sind
Für den Bassbereich: Frequenz: 60 / 80 / 100 / 200 kHz
Q-Wert: 1 / 1,25 / 1,5 / 2
Für die mittleren Frequenzen: Frequenz: 0,5 / 1 / 1,5 / 2,5 kHz
Q-Wert: 0,5 / 0,75 / 1,0 / 1,25
Für die Hochtonbereiche:
Frequenz:
10 / 12,5 / 15 / 17,5 kHz
30
Einstellen von Fader und Balance
Hier können Sie die Einstellungen für Fader vorne/hinten und Balance L/R sowie die Lautstärke
des Subwoofers einstellen.
1. Wechseln Sie zum EQ-Einrichtungsmodus.
2. Berühren Sie das Symbol [
] im EQ-Menü.
Abbildung 19. Einstellbildschirm für Fade und Balance
Balance
Mit dieser Funktion wird der Audioausgangspegel für die linke und rechte Seite im Fahrzeug
eingestellt. Berühren Sie das Symbol ◄ oder ►, um die Balance-Einstellungen in einem Bereich
von -12 (links) bis +12 (rechts) zu ändern. Die Einstellung kann auch durch Verschieben der
blauen Kugel innerhalb des Rasters auf dem Bildschirm geändert werden.
Fader
Mit dieser Funktion wird der Audioausgangspegel für den vorderen und hinteren Fahrzeugbereich
eingestellt. Berühren Sie das Symbol ◄ oder ► , um die Fade-Einstellungen in einem Bereich von
-12 (hinten) bis +12 (vorne) zu ändern. Die Einstellung kann auch durch Verschieben der blauen
Kugel innerhalb des Rasters auf dem Bildschirm geändert werden.
Sub (Subwoofer)
Mit dieser Funktion wird die Lautstärke des Subwoofers eingestellt. Berühren Sie das
Schieberegler-Symbol ◄ oder ►, um die Lautstärke des Subwoofers in einem Bereich von -12 bis
+12 einzustellen. Die Einstellung variiert je nach dem für den Subwoofer-Verstärker eingestellten
Eingangspegel.
Berühren Sie das Zurück-Symbol oben links auf dem Bildschirm, um das Balance/Fader-Menü zu
verlassen.
HINWEIS:
Im EQ-Modus erfolgt bei einer Anpassung des Frequenzwerts automatisch ein Wechsel
zum Modus „Nutzer“, sofern dieser nicht bereits aktiv ist.
31
BEDIENELEMENTE FÜR iPod®/iPhone®
Aktivieren des iPod®-Modus
Sie können über den Touchscreen auf Alben, Titel, Videos usw. auf Ihrem iPod®/iPhone®
zugreifen.
HINWEIS: Zur Verwendung der Grundfunktionen muss der iPod®/das iPhone® mit dem
im Lieferumfang des iPod®/iPhone® enthaltenen Adapterkabel (auch separat erhältlich)
an das System angeschlossen werden. Für die Videowiedergabe vom iPod®/iPhone®
wird ein jLink-USB-Kabel mit USB-Anschluss und 3,5-mm-AV-Buchse benötigt. Stellen
Sie sicher, dass auf Ihrem iPod®/iPhone® die neueste Apple-Firmware installiert ist, um
Verbindungsprobleme zu vermeiden.
Das Gerät schaltet automatisch in den iPod®-Modus, wenn ein iPod®, iPod® touch oder iPhone®
an den USB-Anschluss auf der Gerätevorderseite angeschlossen wird. Der Zugriff auf den iPod®
kann auch über das Hauptmenü erfolgen. Berühren Sie dazu das iPod®-Symbol (nur verfügbar,
wenn ein iPod® oder iPhone® an den USB-Anschluss auf der Gerätevorderseite angeschlossen
ist).
Abbildung 20. Anschließen von iPod®/iPhone®
iPod®/iPhone®-Hauptmenü
Um zum iPod®-Modus zu wechseln, berühren Sie im Hauptmenü [iPod].
Das iPod-Menü wird geöffnet. Berühren Sie das Symbol p oder q, um in dem Menü zu navigieren.
3
4
5
1
2
Abbildung 21. iPod/iPhone-Menü
1. Zurück zum Hauptmenü / 2. Dateiliste: Zum Verschieben nach oben/unten ziehen / 3.
Musikdateien anzeigen 4. Videodateien anzeigen / 5. Fotodateien anzeigen
HINWEIS:
Apple unterstützt nicht die Video- und Bildwiedergabe bei neuen Geräten mit dem
Lightning Anschluss. Davon betroffen sind u.a. die Apple Geräte iPhone 5, iPhone 5s/5c,
iPod touch 5G, iPod Nano 7G.
32
Anhalten der Wiedergabe
1. Berühren Sie das Pause-Symbol [ ] unten auf dem Bildschirm, um die Wiedergabe
anzuhalten. Auf dem Display wird „PAUSE“ angezeigt, und anstelle des Pausesymbols[ ] wird
ein Wiedergabesymbol[ ] angezeigt.
2.Berühren Sie das Wiedergabesymbol [ ], um die Wiedergabe fortzusetzen.
Auswählen eines Tracks
Track nach vorne
Berühren Sie das Vorwärtssymbol [
], um zum Beginn des nächsten Tracks zu gelangen.
Track zurück
1.Berühren Sie das Rückwärtssymbol [
] einmal, um zurück zum Beginn des aktuellen Tracks
zu gelangen.
2. Berühren Sie das Rückwärtssymbol [
] zweimal, um zurück zum Beginn des vorherigen
Tracks zu gelangen.
Schneller Vorlauf/Schneller Rücklauf
Schneller Vorlauf
Halten Sie das Vorwärtssymbol gedrückt [
], um einen schnellen Vorlauf durchzuführen.
Schneller Rücklauf
Halten Sie das Rückwärtssymbol gedrückt [
], um einen schnellen Rücklauf durchzuführen.
Abbildung 22. Wiedergabe/Pause und Track-Steuerung für iPod©/iPhone©
Wiederholung
Mit dieser Funktion können Sie den Track wiederholt wiedergeben. Berühren Sie das
], um die Option „Repeat One“ oder „Repeat All“ auszuwählen.
Wiederholungssymbol [
Zufallswiedergabe
Mit dieser Funktion können Sie alle Tracks in zufälliger Reihenfolge wiedergeben. Berühren Sie
das Symbol für Zufallswiedergabe [
], um die Zufallswiedergabe zu aktivieren.
Abbildung 23. Bedienelemente für Wiederholung und Zufallswiedergabe mit iPod®/iPhone®
33
BLUETOOTH®-BETRIEB
Die Bluetooth®-Technologie bietet die Möglichkeit, Geräte drahtlos zu synchronisieren
und Daten zwischen Geräten zu übertragen. Die Bluetooth®-Audiofähigkeiten können für
Freisprecheinrichtungen von Mobiltelefonen verwendet werden.
Bevor Sie versuchen, die Bluetooth®-Funktionen des Geräts zu nutzen, vergewissern Sie sich,
dass Ihr Mobiltelefon Bluetooth®-Funktionen unterstützt.
Wir nutzen die neueste Bluetooth®-Technologie, um Ihnen beste Verbindungsqualität, zahlreiche
Features und einfachste Kopplung mit anderen Geräten zu bieten. Allerdings unterscheiden sich
die Funktionsweisen von Telefonen. Bitte lesen Sie auch die Bedienungsanleitung Ihres Telefons
und machen sich mit den verfügbaren Bluetooth®-Funktionen vertraut. Nicht alles Features
funktionieren mit allen Telefonen.
HINWEIS:
Die Entfernung zwischen dem Audiovox-Gerät und Ihrem Mobiltelefon darf maximal 2,4 Meter
betragen, um mit der drahtlosen Bluetooth®-Technologie Sprache und Daten senden und
empfangen zu können.
Stellen Sie sicher, dass Ihr Mobiltelefon Bluetooth®-Funktionen unterstützt (Headset und/oder
Freisprechfunktion). Bitte beachten Sie folgende Hinweise:
• Bevor Sie Bluetooth®-Funktionen verwenden können, müssen Sie eine Verbindung zwischen
Ihrem Mobiltelefon und dem VXE 3010 herstellen (s. Kapitel “Verbinden eines Mobiltelefons mit
dem Audiovox-Gerät”). Für bestmöglichen Empfang für die Kopplung und Wiederverbindung
stellen Sie bitte vorab sicher, dass Ihr Mobiltelefon vollständig aufgeladen ist.
• Die Kopplung sollte vorzugsweise innerhalb weniger Minuten nach dem Einschalten des
Mobiltelefons vorgenommen werden.
• Wenn das Gerät mit dem Mobiltelefon gekoppelt wurde, erscheint die Modellbezeichnung VXE
3010 auf dem Display Ihres Mobiltelefons.
• Der Abstand zwischen dem VXE 3010 und dem Mobiltelefon sollte max. 3 Meter betragen.
• Der Weg zwischen Mobiltelefon und VXE 3010 sollte frei sein. Platzieren Sie kein metallischen
Gegenstände oder andere Hindernisse zwischen Mobiltelefon und Naviceiver.
• Einige Mobiltelefone (z. B. Sony Ericsson) besitzen einen Energiesparmodus. Bitte
deaktivieren Sie den Energiesparmodus, wenn Sie das Mobiltelefon mit dem VXE 3010
verbinden.
• Bevor Sie ein Telefonat führen, stellen Sie bitte sicher, dass die Bluetooth®-Funktion an Ihrem
Mobiltelefon eingeschaltet ist.
• Für einen bestmöglichen Sprachempfang sollten Sie max. 1 Meter vom Mikrofon entfernt sein.
• Um das Mobiltelefon manuell vom Naviceiver zu trennen, drücken Sie die KettengliedSchaltfläche auf der Bluetooth®-Benutzerberfläche (neben dem Namen des Mobiltelefons) und
die Bluetooth®-Verbindung wird getrennt, das Gerät bleibt aber gekoppelt.
Koppeln von Bluetooth®-fähigen Geräten
Zum Herstellen einer Verbindung zwischen Ihrem Bluetooth®-Telefon und dem System müssen
Telefon und System zunächst gekoppelt werden. Die Kopplung muss lediglich einmal durchgeführt
werden. Es können bis zu fünf Telefone mit dem System gekoppelt werden. Die Suche nach
Bluetooth®-Geräten kann über das Mobiltelefon erfolgen.
1. Aktivieren Sie die Bluetooth®-Funktion am System.
2. Suchen Sie auf dem Mobiltelefon nach Bluetooth®-Geräten.
3. Suchen Sie auf dem Mobiltelefon nach Bluetooth®-Geräten.
4. Geben Sie das Standardpasswort „0000“ ein.
34
HINWEISE:
• Die Reichweite zwischen diesem System und Bluetooth®-Geräten beträgt ca. 5 m.
•Machen Sie sich vor dem Verbinden dieses Systems mit einem Bluetooth®-Gerät mit den
Bluetooth®-Funktionen des Geräts vertraut.
• Die Kompatibilität mit allen Bluetooth®-Geräten wird nicht garantiert.
•Zwischen diesem System und einem Bluetooth®-Gerät befindliche Hindernisse können die
Reichweite reduzieren.
•Halten Sie dieses System entfernt von anderen elektronischen Geräten, die Störungen
verursachen können.
Abbildung 24. Bluetooth®-Menü
Trennen der Verbindung zu einem Bluetooth®-Gerät
Um die Verbindung zu einem Gerät zu trennen, berühren Sie [ Trenne ]. Ein Bildschirm mit
einer Liste gekoppelter Geräte wird angezeigt. Drücken Sie auf das grüne „Stecker“-Symbol,
um ein zuvor gekoppeltes Telefon wieder mit dem BT-Radio zu verbinden. Drücken Sie auf das
„Papierkorb“-Symbol neben einem Gerätenamen, um die Kopplung zwischen Telefon und Radio
zu trennen.
HINWEISE
•Die Verbindung zum Gerät wird getrennt, wenn der Abstand des Geräts die Reichweite
überschreitet.
• Um die Verbindung wieder herzustellen, platzieren Sie das Gerät wieder in Reichweite des
Systems.
• Möchten Sie die Verbindung zwischen Gerät und System nicht automatisch wieder herstellen,
berühren Sie [ Option ] und wählen Sie dann für [ Aut. Verbdg. ] die Option [ OFF ].
Weitere Informationen finden Sie im Abschnitt „Anpassen der Bluetooth®-Einstellungen“.
Abbildung 25. Bluetooth®-Eingabefeld und Optionsbildschirm
35
Anruf tätigen
1. Wählen Sie im Startmenü die Bluetooth®-Funktion aus.
2. Drücken Sie auf der Optionsseite unter „Telefon Sync“ auf „Sync“, um das Telefonbuch mit dem
BT-Gerät zu synchronisieren. Wenn Sie viele Kontakte haben, kann dies 3-4 Minuten dauern.
3. Suchen Sie in folgenden Listen nach der Telefonnummer:
[Phone Book]
[Call History]
[Verpasst]
[Empfang]
[Gewählt]
Oder geben Sie die Rufnummer direkt über den Nummernblock ein und wählen Sie mit [ ].
Abbildung 26. Bedienelemente für Bluetooth®-Anrufprotokolle
Anruf annehmen
Standardmäßig werden eingehende Anrufe automatisch angenommen.
1.Geht ein Anruf ein, wird auf dem Bildschirm „Eingeh. Anruf...“ angezeigt.
2. Berühren Sie den Bildschirm, um [ hang up ] oder [ Answer ] auszuwählen.
Sprechen Sie in das Bluetooth-Mikrofon.
Tipp
Wahlweise können Sie Anrufe auch manuell annehmen. Wählen Sie dazu in der Einstellung
[Aut. Antwort] die Option [OFF].
Abbildung 27. Bildschirm für eingehenden Bluetooth®-Anruf
Anpassen der Bluetooth-Einstellungen
1. Berühren Sie im Bluetooth-Menü [ Options ].
Das Optionsmenü wird angezeigt.
2. Berühren Sie die ausgewählte Option, um die Einstellung zu ändern.
∙ [Bluetooth]:
Ein- oder Ausschalten der Bluetooth-Funktion.
∙ [Aut. Verbdg.]: Ein- oder Ausschalten der Funktion „Aut. Verbdg.“.
∙ [Aut. Antwort]: Ein- oder Ausschalten der Funktion „Aut. Antwort“.
∙ [Pairing code]: Einstellen des Kopplungscodes.
∙ [Telefon Sync]:Wählen Sie zum Synchronisieren des Telefonbuchs im Untermenü [ OK ].
Bei der Erstkonfiguration kann die Synchronisation des Telefonbuchs
mehrere Minuten lang dauern.
36
HINWEIS:
Die Bluetooth®-Einstellungen können auch im Einstellungsmenü geändert werden.
Abbildung 28. Bluetooth®-Einstellungsmenü
Bluetooth® Music Function
Die A2DP (Advanced Audio Distribution Profile)-Technologie ermöglicht die Übertragung von
Audiosignalen von einem Mobiltelefon oder portablen Multimediaplayer (z. B. MP3 Player) via
Bluetooth®. So können Sie mit Ihrem Audiovox-Gerät Musikstücke von Ihrem Mobiltelefon oder
MP3 Player abspielen, wenn eine Bluetooth®-Verbindung besteht.
Hinweis: Bevor Sie einen Anruf tätigen, sollten Sie den A2DP-Modus verlassen, da es
abhängig vom Modell Ihres Mobiltelefons zu unvorhergesehenen Resultaten kommen kann.
Das AVRCP (Audio/Video Remote Control Profile) ermöglicht die Steuerung eines Bluetooth®Audioplayers. Bluetooth®-kompatible Audiogeräte (oder Bluetooth®-kompatible Adapter) können
an das Audiovox-Gerät angeschlossen werden.
Bluetooth®-Audioplayer können via A2DP (Advanced Audio Distribution Profile) oder
AVRCP (Audio/Video Remote Control Profile) über das Gerät gesteuert werden. Mit diesen
Profilen kompatible Bluetooth®-Audioplayer (oder Bluetooth®-Adapter) können an das Gerät
angeschlossen werden.
Während der Musikwiedergabe von einer beliebigen Quelle können Anrufe über das Tastenfeld
des Mobiltelefons getätigt werden. Die Musikwiedergabe wird angehalten und auf dem TFTMonitor wird „Calling“ angezeigt. Wenn der Anruf angenommen wird, wird die Stimme über
das Gerät wiedergegeben. Bei Anrufende wird auf dem Bildschirm das Musikwiedergabemenü
angezeigt.
Geht ein Anruf ein, wird die Musikwiedergabe angehalten und auf dem Bildschirm wird „Incoming“
angezeigt. Bei Anrufende wird auf dem Bildschirm das Musikwiedergabemenü angezeigt
Abbildung 29. Bluetooth®-Audiomenü
37
BEDIENELEMENTE FÜR AV-IN1/AV-IN2
AV-In1
AV-In1 dient zur Audio-/Videowiedergabe von einem externen Gerät, das über eine 3,5-mmBuchse auf der Gerätevorderseite angeschlossen ist.
AV-In2
AV-In2 dient zur Audio-/Videowiedergabe von einem externen Gerät, das über RCA-Anschlüsse
auf der Geräterückseite angeschlossen ist.
Sie können ein externes Audio-/Videogerät mit dem System verbinden.
1. Schließen Sie das externe Gerät mit einem geeigneten AV-Kabel an
2. Berühren Sie die obere linke Ecke, um das Hauptmenü anzuzeigen.
3. Berühren Sie [Aux 1] / [Aux 2], um auf das externe Gerät zuzugreifen.
HINWEIS: Das Audio-/Videogerät muss mit einem separat erhältlichen Audio/VideoAdapterkabel an das System angeschlossen werden.
HINWEIS: Die Videowiedergabe ist nur mit angezogener Handbremse möglich. Für diese
Funktion muss die Handbremse entsprechend angeschlossen sein.
1
2
3
4
Left Audio
Right Audio
Ground
Video
3.5 mm A/V Cable(not included)
Abbildung 30. Anschließen externer Geräte
38
LENKRADFERNBEDIENUNG (SWC - STEERING WHEEL
CONTROL)
(falls vorhanden)
Das VXE 3010 ist kompatibel mit den Lenkradsteuerungsadaptern Dietz UNICO DUAL PLUS
+ Kabel, PAC (Pacific Accessory Corporation) SWI-PS und Metra ASWC. Eine 3,5 mmKlinkenbuchse (gekennzeichnet mit „SWC Interface“) auf der Rückseite des Geräts ermöglicht den
Anschluss der Adapter. Ausführliche Installationsanweisungen finden Sie im Gerätehandbuch der
Adapter.
Die folgenden Bedienelemente sind für die meisten Fahrzeuge verfügbar:
1. Lautstärke (+)
4. Nächster
7. Preset (+)
10. Antworte
2. Volume (-)
5. Zurück
8. Preset (-)
11. beendet
3. Stumm
6. Quelle
9. Band
Um die SWC-Bedienelemente zu programmieren, berühren Sie das Lenkradsymbol auf der
zweiten Seite des Hauptmenüs zum Auswählen der Quelle.
Abbildung 31. Bildschirme für die SWC-Programmierung
SWC-Programmierung
Über die integrierte SWC-Schnittstelle können bis zu 11 Funktionen für die Lenkradfernbedienung
programmiert werden. Möglicherweise werden nicht bei allen Fahrzeugen sämtliche Funktionen
unterstützt.
1. Beliebte OE-Funktionen für die Lenkradfernbedienung sind bereits werkseitig programmiert.
Falls Ihr Fahrzeug die bereits vorprogrammierten Funktionen nicht unterstützt, müssen Sie
die Funktionen der SWC-Schnittstelle löschen/zurücksetzen und die korrekten Funktionen
für Ihr Fahrzeug programmieren. Um die Funktionen der SWC-Schnittstelle zu löschen/
zurückzusetzen, halten Sie die Taste „Reset“ 2 Sekunden lang gedrückt.
2. Wählen Sie zur Programmierung der SWC-Schnittstelle nach dem Löschen/Zurücksetzen eine
Zahl zwischen 1 ~ 11 und drücken Sie dann auf eine Funktion. An der entsprechenden Zahl
und Funktion wird jeweils ein Häkchen angezeigt. Setzen Sie die Programmierung auf diese
Weise fort, bis alle Funktionen der OE-Lenkradfernbedienung belegt sind.
Hinweis: Die Funktionen 1 ~ 11 müssen einer Funktion auf dem OE-Lenkrad zugewiesen
werden. Wenn das OE-Lenkrad beispielsweise die Funktionen Preset + und Preset nicht unterstützt, müssen diese Funktionen gelöscht/zurückgesetzt werden, damit die
anderen Funktionen ordnungsgemäß funktionieren.
39
3. Zum „Einlernen“ der in Schritt 2 durchgeführten Programmierung drücken Sie die Taste
„Program“. Sie werden aufgefordert, die einzelnen Tasten auf dem OE-Lenkrad (1 Sekunde) zu
drücken, damit das System die entsprechende Funktion übernimmt.
4. Das „Einlernen“/Programmieren der SWC ist damit abgeschlossen.
BETRIEB DER RÜCKFAHRKAMERA
Das Gerät ist für die Verwendung einer Kamera vorbereitet. Bevor Sie auf die Kamerafunktionen
zugreifen können, müssen Sie eine Rückfahrkamera (nicht im Lieferumfang enthalten) installieren.
Ist die Kamera installiert, wird ein Bild des Bereichs hinter dem Fahrzeug angezeigt, wenn Sie
den Rückwärtsgang einlegen. Beim Verlassen des Rückwärtsgangs wird wieder der vorherige
Bildschirm angezeigt.
40
Fehlerbehebung
Problem
Ursache
Allgemein
Das Gerät lässt sich Die Sicherung des Radios ist
nicht einschalten!
durchgebrannt.
Die Sicherung der Autobatterie ist
durchgebrannt.
Unzulässiger Bedienvorgang.
Kein Audioausgang/ Die Verbindungen des
Audioausgangs sind fehlerhaft.
Leiser
Audioausgang
Die Lautstärke ist zu niedrig
eingestellt.
Das MUTE-Kabel ist fehlerhaft
angeschlossen.
Die Lautsprecher sind beschädigt.
Stark verzerrte Balance.
Schlechte
Soundqualität
Lautsprecherkabel hat Kontakt mit
einem metallenen Fahrzeugteil.
Eine Raubkopie wird verwendet.
Leistung des Lautsprechers ist nicht
kompatibel.
Kurzschluss des Lautsprechers.
Das Gerät
setzt sich bei
ausgeschaltetem
Motor zurück
Der Anschluss zwischen ACC und
dem positiven Pol der Batterie ist
nicht korrekt.
41
Lösung
Setzen Sie eine neue Sicherung
des richtigen Typs und mit der
richtigen Amperezahl ein.
Setzen Sie eine neue Sicherung
des richtigen Typs und mit der
richtigen Amperezahl ein.
Drücken Sie die Taste
RESET auf der
Gerätevorderseite.
Überprüfen Sie die Verkabelung,
und korrigieren Sie sie ggf.
Erhöhen Sie die Lautstärke.
Schauen Sie sich das Schaltbild
an, und überprüfen Sie den
Anschluss des MUTE-Kabels.
Tauschen Sie die Lautsprecher
aus.
Stellen Sie die Kanal-Balance auf
die mittlere Position ein.
Isolieren Sie alle
Lautsprecherkabel.
Verwenden Sie die
Originalversion.
Schließen Sie die richtigen
Lautsprecher an.
Überprüfen Sie die
Lautsprecheranschlüsse.
Überprüfen Sie die Verkabelung,
und korrigieren Sie sie ggf.
Problem
Ursache
Lösung
Der Anschluss der Handbremse ist
fehlerhaft.
Überprüfen Sie die Verkabelung,
und korrigieren Sie sie ggf.
Die Handbremse ist nicht
angezogen.
Halten Sie das Fahrzeug an einer
sicheren Stelle an, und ziehen Sie
die Handbremse.
Die Batterie ist leer.
Tauschen Sie die Batterie aus.
Die Batterie ist falsch eingesetzt.
Die DVD ist nicht mit den aktuellen
Fernsehsystem Einstellungen
kompatibel.
Fehlerhafte Video
Signalverkabelung.
Es wurde das falsche Bildformat
ausgewählt.
Setzen Sie die Batterie richtig ein.
Ändern Sie das Setup gemäß der
eingelegten Disc.
Die Autoantenne ist nicht vollständig
ausgefahren.
Die Autoantenne ist nicht korrekt
angeschlossen.
Die Funktion LOCAL ist aktiviert.
Überprüfen Sie den
Antennenanschluss.
Überprüfen Sie den
Antennenanschluss.
Schalten Sei die LOCAL-Funktion
aus.
TFT Monitor
Kein Bild
Fernbedienung
funktioniert nicht
Flackerndes Bild
oder Bildstörungen
Verlangsamtes
Bild oder Anzeige
mit fehlerhaftem
horizontalen
oder vertikalen
Bildformat
RADIO
Schwache
Empfangssignale
bei der
Sendersuche
Überprüfen Sie die Verkabelung,
und korrigieren Sie sie ggf.
Verwenden Sie das richtige
Bildformat.
DISC
Die Disc kann nicht Disc bereits im Gerät.
eingelegt werden
Das Bild ist
Es wird eine Raubkopie verwendet.
verschwommen,
verzerrt oder dunkel
42
Aktuelle Disc entnehmen und
neue einlegen.
Verwenden Sie die
Originalversion.
Problem
Ursache
Lösung
Disc wird nicht
wiedergegeben
Die Disc ist verbogen oder
verkratzt.
Verwenden Sie eine einwandfreie
Disc.
Disc ist verschmutzt oder feucht.
Reinigen Sie die Disc mit einem
weichen Tuch.
Die Laserlinse ist verschmutzt.
Reinigen Sie die Laserlinse mit
einer Reinigungs-CD.
Eine inkompatible Disc wird
Verwenden Sie eine kompatible
verwendet.
Disc.
Der Ländercode ist nicht mit dem Verwenden Sie eine Disc mit
Gerät kompatibel.
kompatiblem Ländercode.
Die Disc wurde falsch herum
Legen Sie die Disc mit dem Label
eingelegt.
nach oben ein.
Die
Wiedergabesteuerung
kann während der
VCD-Wiedergabe nicht
verwendet werden.
Die WiedergabesteuerungsFunktion ist für die Disc nicht
verfügbar.
Keine Wiederholung oder Die Wiedergabesteuerung (PBC) Deaktivieren Sie die
Suchfunktion während
ist aktiviert.
Wiedergabesteuerung.
der VCD-Wiedergabe
MP3
Die Wiedergabe wurde
unterbrochen
Die Disc ist verschmutzt oder
verkratzt.
Die Datei ist defekt/wurde nicht
korrekt gespeichert.
43
Reinigen Sie die Disc, oder
tauschen Sie sie aus.
Erstellen Sie eine Disc mit
fehlerfrei gespeicherten Dateien.
Fehlermeldungen
Angezeigte Meldung
Ursache
Lösung
No Disc
Die Disc ist verschmutzt.
Reinigen Sie die Disc mit
einem weichen Tuch.
Die Disc wurde falsch herum
eingelegt.
Legen Sie die Disc richtig
herum ein.
Es befindet sich keine Disc
im Fach.
Legen Sie eine Disc ein.
Die Disc ist verschmutzt.
Reinigen Sie die Disc mit
einem weichen Tuch.
Die Disc wurde falsch herum
eingelegt.
Legen Sie die Disc richtig
herum ein.
Unknown disc
Die Disc wurde falsch herum
eingelegt.
Legen Sie die Disc richtig
herum ein.
Region Error
Das Discformat ist nicht mit
diesem Gerät kompatibel.
Error
Nicht zulässiger
Bedienvorgang.
Bad Disc
44
Drücken Sie 5 Sekunden
lang die Taste EJECT, um
den Lademechanismus
zurückzusetzen.
TECHNISCHE DATEN
DVD/CD-Player
Kompatible Disc-Medien: DVD +/- R/ +/- RW (Single und Dual Layer) und CD-R/-RW
Kompatible Medienformate: CD-DA, MP3, WMA, VCD, SVCD, Xvid, DivX, AVI,
MPEG 1/2
Rauschabstand: >95 dBA
Dynamikbereich:>95 dB
Frequenzgang: 20 Hz bis 20 kHz, -3 dB
Übersprechdämpfung: > 60 dB bei 1 kHz
Digital/Analog-Wandler: High Performance 24 Bit / 192 kHz Abtastrate, Multi-Bit Sigma-Delta
Modulator
Video
Format: NTSC, PAL (auto-detection)
Ausgang: 1Vp-p (75-ohm)
Eingang: 1Vp-p (75-ohm)
UKW-Tuner (FM)
Frequenzbereich: 87,5 MHz - 107,9 MHz
Mono-Rauschempfindlichkeit (-30 dB): 9 dBf
Empfindlichkeit bei Rauschabstand (-50 dB): 15 dBf
Trennschärfe: 70 dB
Rauschabstand bei 1 kHz: 58 dB
Spiegelfrequenzunterdrückung: 80 dB
Kanaltrennung bei 1 kHz: > 30 dB
Frequenzgang: 30 Hz - 15 kHz, -3 dB
MW-Radio (AM)
Frequenzbereich: 522 kHz - 1620 kHz
Empfindlichkeit (-20 dB): 15 uV
Rauschabstand bei 1 kHz: 50 dB
Spiegelfrequenzunterdrückung: 60 dB
Frequenzgang: 50 Hz - 2 kHz, -3 dB
Monitor
Bildschirmgröße: 7“ (17,8 cm, in der Diagonale gemessen), 16:9-Format
Typ: High Definition TFT Liquid Crystal Display (LCD
Auflösung: 336.960 Sub-Pixel, 1440 (B) x 234 (H)
45
Allgemein
Auxiliary-Eingangsimpedanz: 10k
Spannungsversorgung: 11 bis 16VDC, Gleichstrom, negativer Masseanschluss
Aktive Antenne (Blau): 500mA max, Überstromschutz
Remote-Verstärkeranschluss (Blau/Weiß): max. 500 mA, Überstromschutz
Betriebstemperatur: -20C ~ 65C
Sicherung: 15 Ampere, ATM/MIN-Flachsicherung
DIN-Chassis-Abmessungen: 7” X 7” X 2” (178mm x 178mm x 50mm)
Ausgangsleistung: max. 4 x 40 Watt
Rauschabstand: 70 dBA unter Referenzwert (Referenzwert: 1 Watt, 4 Ohm)
Frequenzgang: 20 Hz - 20 kHz, -3 dB. (bei Aux-Eingang als Referenzeingang)
Referenzwert für Netzspannung: 14,4 V Gleichstrom
*Änderung der technischen Daten ohne vorherige Ankündigung vorbehalten.
PFLEGE UND WARTUNG
1. Verwenden Sie zur Reinigung der Gerätevorderseite oder des Monitors ein sauberes Tuch und
ein neutrales Reinigungsmittel. Ein raues Tuch und ein nicht neutrales Reinigungsmittel (zum
Beispiel Alkohol) können die Konsole oder den Monitor verkratzen oder die Farbe lösen.
2. Sprühen Sie keine flüssigen Reinigungsmittel oder Wasser auf das Gerät.
3. Wenn der Player zu heiß wird, wird automatisch ein Schutzmechanismus aktiviert, der die
Wiedergabe der Disc stoppt. Lassen Sie das Gerät in diesem Fall abkühlen, bevor Sie den
Player wieder in Betrieb nehmen.
4. Legen Sie immer nur 5-Zoll-CDs (12 cm) in den Player ein. Alle anderen Gegenstände oder
Discformate können den Mechanismus beschädigen.
5. Legen Sie in dieses Gerät keine 3-Zoll-CDs (8 cm) ein (weder mit noch ohne Adapter), da
dadurch der Player und/oder die Disc beschädigt werden können. Eine auf diese Weise
verursachte Beschädigung wird nicht durch die Garantie für dieses Produkt abgedeckt.
6. Bei extremer Hitze oder Kälte können Funktionsstörungen des CD-Players auftreten. Warten
Sie in diesem Fall, bis im Inneren des Fahrzeugs eine normale Temperatur erreicht wurde,
bevor Sie den Player erneut in Betrieb nehmen.
7. Wenn das Innere des Fahrzeugs bei kalten Außentemperaturen geheizt wird oder wenn eine
hohe Luftfeuchtigkeit besteht, kann sich Kondenswasser auf dem LCD-Display absetzen. In
diesem Fall funktioniert das Display erst wieder fehlerfrei, nachdem die Feuchtigkeit verdunstet
ist.
8. Wir empfehlen, dieses Gerät häufiger mit einer Reinigungs-CD zu reinigen als Ihr Gerät zu
Hause, da Geräte im Inneren des Fahrzeugs aufgrund der Umgebungsbedingungen schneller
verschmutzen.
46
47
Thank you for choosing an Audiovox product. We hope you will find the instructions in this owner’s
manual clear and easy to follow. If you take a few minutes to look through it, you’ll learn how to
use all the features of your new Audiovox VXE 3010 Mobile Multimedia Receiver for maximum
enjoyment.
NORMAL USE
This unit is designed to be installed into a 1.0 DIN dashboard opening of a car with 12V battery
voltage and negative ground.
Please read through the instruction manual carefully before starting to istall the device.
For the installation of the VXE 3010 receiver into the car we recommend to turn to a specialist.
Do not try to open this receiver and repair this receiver. Repairs must always be conducted by
qualified specialists.
DECLARATION OF CONFORMITY
Hereby, Audiovox Audio Produkte GmbH declares that the VXE 3010 is in compliance with the
essential requirements and other relevant provisions of directive 1999/5/EC. The Declaration of
Conformity can be found at http://www.audiovox.de in the download area of the VXE 3010.
CONTENTS
Safety Precautions
General information
Features
Optional equipment
Front panel Controls and Indicators
Remote Control operation
Remote Control Battery replacement
Quick Start
System Settings
Radio Tuner Mode
Playback of audio files
Equalizer Controls Menu
iPod®/iPhone® controls
Bluetooth® Operation
AV-In1/AV-In2 CONTROLS
Steering Wheel Control (SWC) Operation
Rear Camera Operation
Troubleshooting
Specifications
Care and Maintenance
49
49
50
51
52
54
57
58
61
65
68
74
76
78
82
83
84
85
88
89
48
SAFETY PRECAUTIONS
• Do not mount the unit in a place which would make it difficult to operate and use whilst driving,
thereby impairing your safety.
• Road traffic safety is always of paramount importance. You should only ever use the car radio if
you are able to control your vehicle safely and are aware of the current traffic situation.
• If you have any difficulty reading the display or you are unable to operate the car radio, park
your car and then adjust the settings.
• As a driver, you must not use any applications during the journey that could distract you from
the road ahead (e.g. entering a destination for navigation, viewing images or videos, etc.).
• The announcements made by the navigation system are to be followed while taking the
corresponding traffic rules into account (e.g. road signs, give way signs, rights of way, etc.).
• Listening to music at high volume can damage your hearing.
• In order to hear warning sounds (e.g. police sirens, fire sirens, etc.) do not select an excessive
volume.
• Do not increase the volume when the car radio has been muted (e.g. when selecting the BT
function).
• To avoid accidents, never use the video function whilst driving (with the exception of the video
function for the rear view camera). Use while driving is prohibited by law.
• Using an incorrect fuse may damage the unit or cause it to catch fire.
• The unit must not be disassembled or modified.
• To prevent personal injury from electric shock or fire, protect the unit from moisture and water.
GENERAL INFORMATION
• In the event of a malfunction, please read the instructions in the 'Troubleshooting' section. If
the fault is not described, press the RESET button near the USB input to restore the factory
settings.
• Only use data media in a standard format
49
FEATURES
Please read the instruction manual for this product before using. The documentation provided will
allow the user to fully enjoy all the features of your new Audiovox VXE 3010 Mobile Multimedia
Receiver. Please read all of the instructions before beginning the installation and save this manual
for future reference.
We recommend having your Audiovox VXE 3010 installed by a reputable installation shop.
DVD/CD-Player
•
•
•
•
•
•
•
•
Compatible disc media: DVD +/- R/ +/- RW (single and dual layer) and CD-R/-RW
Compatible media formats: CD-DA, MP3, WMA, VCD, SVCD, Xvid, AVI, MPEG 1/2
Signal to noise ratio: >95 dBA
Dynamic range: >95 dB
Frequency response: 20 Hz to 20 kHz, -3 dB
Channel separation: > 60 dB at 1 kHz
D/A converter: high performance 24-bit / 192 kHz sample rate, multi-bit sigma-delta modulator
Screen fomats: cinema, normal and off (standby)
Video
• Format: PAL / NTSC (auto-detection)
• Output: 1 Vp-p (75-ohm)
• Input: 1 Vp-p (75-ohm)
CD / MP3 / WMA
•
•
•
•
CD text compatible
Display of album picture (ID3-tag compatible)
Directory search (MP3 / WMA only)
Playback of self-made CDs/ DVD+R/RWs with up to 2000 MP3 and WMA files
FM Tuner
• RDS (Radio Data System): AF (Alternative Frequencies), CT (Clock Time), EON (Enhanced
Other Networks), PS (Programme Service), PTY (Programme Type), RT (Radio Text), TA
(Traffic Announcements)
• Tuning range: 87.5 MHz – 107.9 MHz
• 18 station presets
• Auto stereo/mono
•Local/distance
• Mono sensitivity (-30 dB): 9 dBf
• Quieting sensitivity (-50 dB): 15 dBf
• Alternate channel selectivity: 70 dB
• Signal to noise ratio at 1 kHz: 58 dB
• Frequency response: 30 Hz – 15 kHz, -3 dB
AM Tuner
• Tuning range: 522 kHz – 1620 kHz
• 12 station presets
50
Bluetooth
• Hands-free operation via separate microphone
• Audio streaming
• Bluetooth® module with AVRCP/A2DP profile
Monitor
• Screen size: 17.8 cm / (7”) LCD TS (Touch Screen) with LED backlight
• Screen type: high definition TFT monitor with LCD display (Liquid Crystal Display)
• Resolution: 1,152,000 sub pixels, 800 (W) x 480 (H)
OPTIONAL EQUIPMENT
Rear Camera Audiovox RVC1
The VXE 3010 is “camera ready.” Before accessing any camera features, you must purchase and
install a rear video camera.
51
FRONT PANEL CONTROLS AND INDICATORS
Figure 1. VXE 3010 Controls and Indicators
Notice:
The graphic in this manual is for reference only, and may be different from the actual unit.
Reference to actual unit is suggested.
52
1.
SRC Button ( ) Power ON/OFF, and Source Menu: Press the button to turn the unit ON.
Once the unit is ON, momentarily pressing the [SRC] button will display the Main Touch
Screen Source Menu. Press and hold the knob for 2 seconds to turn the unit OFF.
2.
Rotary Encoder Knob: Rotate the knob to adjust the volume from 0 to 50. Press the knob
momentarily to mute the audio. Press the knob again to restore the audio.
The volume used for traffic announcements is set to 20 by default. To change the volume of
these announcements, adjust the volume knob during the traffic announcement. The unit will
then store the currently selected volume automatically.
3.
REVERSE [
] Button: Press
seek a lower station.
to seek backward. With the radio mode, Press
4.
FORWARD [
] Button: Press
a higher station.
to seek forward. With the radio mode,Press
5.
IR Remote Sensor: Used to receive command signals from the remote control.
6.
USB Interface Cover: Covers the USB interface connector. Open the cover and insert a USB
device.
7.
Reset Button: Press this button to reset the system settings (except password settings) and
to correct a system halt or other illegal operation. Use the tip of a pen to press the Reset
button.
8.
A/V Input: Attach a compatible A/V device.
9.
TFT monitor [Open/Close] Button: Press to activate the automatic mechanical system
and move the TFT monitor into the viewing position. Press again to close the TFT. With the
monitor open, press and hold to enter display angle setting mode, and rotate the knob to
adjust. Press and hold after adjustment, to save TFT position or let the feature time-out after
4 seconds.
to
to seek
10. [ DISP ] Button: With the monitor open, during DVD playback, press once to view Time, Title,
Chapter info or twice for Audio, Subtitle, Angle, and Bit Rate info. With the monitor closed,
press to view alternate LCD display information.
11. EJECT [
] Button: Press this button to eject a DVD/CD/MP3 disc. Disc play is stopped,
the disc is ejected and the unit will change to radio operation. If the disc is not removed from
the unit and the button is pressed again, the disc will be re-loaded. If the disc is not removed
from the disc slot within 10 seconds of being ejected, it will be automatically reloaded to
prevent it from being accidentally damaged.
12. DISC SLOT: Accepts DVD/CD/MP3 discs. If the unit is turned on, playback begins when a
disc is inserted.
53
REMOTE CONTROL OPERATION
Figure 2. VXE 3010 Remote Control
54
Remote Control Functional Description
1.SOURCE (SRC) Button: Press this button to switch between and select available sources.
(Radio/Disc/Bluetooth/USB/Bluetooth Audio/SWC/AUX-1/AUX-2/Camera)
2. EJECT Button ( ): Press this button to eject a DVD/CD/MP3 disc. Disc play is stopped,
the disc is ejected and the unit will change to radio operation. If the disc is not removed from
the unit and the button is pressed again, the disc will be re-loaded. If the disc is not removed
from the disc slot within 10 seconds of being ejected, it will be automatically reloaded to
prevent it from being accidentally damaged.
3.AUDIO Button: Press to display and select the audio language in DVD mode. Each time the
button is pressed, the language changes.
Note: The languages for audio vary from disc to disc.
4. VOLUME Button (VOL + and -): Press these buttons to increase or decrease the playback
volume.
5. ZOOM Button: (for viewing video/image files)
Video files:
Press ZOOM button
CD Player Performs
OnceEnlarge the picture 125% of the original size
2 timesEnlarge the picture 150% of the original size
3 timesEnlarge the picture 200% of the original size
4 times
Picture is returned to original size
Image files:
Press ZOOM button
SD Card Player Performs
OnceEnlarge the picture 100% of the original size
2 timesEnlarge the picture 200% of the original size
3 timesEnlarge the picture 300% of the original size
4 times
Picture is returned to original size
6. BAND Button: Press this button to scroll though preset stations or when in disc mode, this
button is used for Fast playback / Slow playback.
Press this button to answer an incoming Bluetooth® phone call.
7. [WIDE] Button: Change display mode.
8. [PRESET / ] Button: Select preset radio station.
9.EQUALIZER Button (EQ): Press this button to accesses the equalizer menu in all audio
playback modes.
10.GOTO Button: Press this button to open direct entry search screen during the playback of a
disc.
BLUETOOTH Button: Press this button to enter the Bluetooth® feature.
11. [OPEN/CLOSE] Button: Open / Close the TFT monitor.
12.[TILT
/
] Button: This button is used to adjusting the TFT Monitor tilting angle.
13. [RPT A-B] Button: A-B repeat.
14. [RPT] Key: Repeat playback
55
15. MUTE Button: Press this button to turn the audio output ON and OFF.
16.POWER Button (
): Press this button to turn the unit ON and OFF.
17.SUBTITLE Button: Press to display and select the subtitle language in DVD mode. Each
time the button is pressed, the subtitle language changes.
NOTE: The type and number of languages for subtitles vary from disc to disc.
18.ANGLE Button: Press to display and select different camera angles in DVD mode. Each
time the button is pressed, the angle changes.
NOTE: The numbers of angles vary from disc to disc. Not all discs contain this option.
19.MENU Button: Press this button to access the root menu of a DVD or CD during playback.
The disc will return to normal playback and the root menu will disappear if no selection is
made within 10 seconds. This button is also used to select photo mode of an MP3 player.
20. [ TITLE] Button: Used to display DVD Tittle.
21. SETUP Button: Press to this button to enter the system settings menu.
22. FAST FORWARD [
] Button: Press this button to forward Disc play 2x, 4x, 8x or 20x
normal speed. Press this button while in Radio mode to search available radio station by
increasing tuning frequency.
23.NEXT FORWARD [
] Button: Press this button to skip to the next chapter, track or song
during playback of a disc. Press this button while in Radio mode to search available radio
station by increasing tuning frequency.
24.PLAY / PAUSE [
] Button: Press this button to pause the playback of a disc. Press this
button again to resume normal playback.
25.PREVIOUS [
] Button: Press this button to go back to the previous chapter, track or
song during playback of a disc. Press this button while in Radio mode to search available
radio station by increasing tuning frequency.
26. [PIC] Button: Image setting, press this button to adjust the Brightness/Contrast and
Saturation.
27. FAST REVERSE [
] Button: Press this button to reverse Disc play 2x, 4x, 8x or 20x
normal speed. Press this button while in Radio mode to search available radio station by
decreasing tuning frequency.
28. [ /
] Button: Stop Playback / Hangup. Press this button to disconnect an active
Bluetooth® phone call.
29. [DISP/CLEAR] Button: Display information /Clear information.
30.NUMBER Buttons (0-9): Press these buttons to directly access chapters and tracks, dialing
phone numbers, or entering passwords.
31.RANDOM Button [ ): Press this button to play tracks or chapters in random order while
playing a disc.
32. [INT] Button: Intro playback.
56
Notes on Remote Control Usage
Aim the remote control at the remote sensor on the unit.
• Replace the battery from the remote control or insert a battery insulator if the battery has not
been used for a month or longer.
• DO NOT store the remote control in direct sunlight or in high temperature environment, or it
may not function properly.
• The battery can work for 6 months under normal condition. If the remote control won’t work,
please change the battery.
• Use“button shaped” lithium battery “CR2025”(3V) only.
• DO NOT recharge, disassemble, heat or expose the battery in fire.
• Insert the battery in proper direction according to the ( + ) and ( - ) poles.
• Store the battery in a place where children cannot reach to avoid the risk of accident.
REMOTE CONTROL BATTERY REPLACEMENT
Install Battery
Use button-shaped lithium battery CR2025 (3V)” only. Insert the battery to the battery tray with
proper direction according to the (+) and (-) poles.
NOTE: Be sure and insert the positive (+) side of the battery UNDER the metal tab in the
battery compartment.
Uninstall Battery
Slide out the battery compartment tray at the bottom on the back of the remote control.
Figure 3. VXE 3010 Remote Control Battery Replacement.
57
QUICK START GUIDE
Turning the Unit ON or OFF
Press the front panel Power/Menu button [
/ SRC ] to turn the unit ON. To turn the unit OFF,
press and hold the front panel Power/Menu button [
/ SRC ] for 2 seconds.
Selecting an Audio/Video Source, Bluetooth, Steering Wheel Controls or
Backup Camera
To access an Audio/Video source:
1. Momenterily press the front panel Power/Menu button or touch the Menu icon
in the upper left corner of the display to view the Main Menu Screen.
Screen 1
located
Screen 2
Figure 4. VXE 3010 Main Menu Screen
2. Touch the desired source icon on one of the two main menu screens.
Screen 1 of 2: Radio, Disc, Bluetooth (BT), USB.
Touch page arrow (→) at the bottom of the screen to access Screen 2 of 2: Bluetooth (Audio),
Steering Wheel Control (SWC), AV-IN1, AV-IN2, or Camera.
58
Mute
Press the volume knob on the front panel or press the [MUTE] Button on the remote control to
mute the volume from the unit.
Volume Adjustment
Volume Increase/Decrease
To increase or decrease the volume level, turn the rotary encoder on the front panel. When the
volume level reaches "0" or "50", a beep sounds, indicating that the adjustment limit has been
reached. The TFT screen displays the volume level for 3 seconds.
Audible Beep Confirmation
An audible beep tone confirms each function selection. The beep tone can be disabled through the
Setup menu.
Using the TFT Monitor
Open / Close monitor
Press the [OPEN] Button on the front panel or remote control to open or close the display panel.
NOTE: Never manualy open or close the display panel.
Change the monitor tilt angle
Due to the inherent character of LCD, you will get different vision impressions when you watch it
from different angles. The display angle of this unit can be changed; hence you can select the best
angle where you can get the best vision impression. Press and hold the [OPEN] Button to enter
display angle setting mode, and rotate the knob to adjust.
NOTE: Never manually tilt the display panel.
Resetting the System
Soft Reset
To correct a system halt or other illegal operation, use the tip of a pen to press and release the
reset button located just below the front panel control knob.
[RESET] Button
Figure 5. System Reset Button
Hard Reset
Touch the System Reset Icon on the Third Settings Screen.
After a system reset,the unit restores all factory default settings.
NOTE: If the unit is reset while a DVD is playing, the unit will return to Main Menu once the
reset is complete.
59
Change Aspect Ratio
Press the [WIDE] key on the remote control to adjust the aspect ratio.
Image Settings
1. ADFEnter image setting mode by pressing the [PIC] Button on the remote control.
2. Select the item to be adjusted and touch the Left or Right direction icons
[
]/[
] on the user interface to adjust the value.
3. To exit image setting mode, press the [PIC] Button on the remote control again or simply stop
making adjustments.
Figure 6. Image Settings Screen
Equalizer Controls
Equalizer (EQ): Adjustment can be made after entering one of the audio/video sources (Disc,
Radio, USB, AV-IN1, or AV-IN2)
Touch the Equalizer (EQ) icon to view the Equalizer Control Screen to select a desired audio
preset level ( Pop / Techno / Rock / Classic / Jazz / Optimal or User), make adjustments to the
audio Balance and Fade levels or to turn the Loudness option ON or OFF. Touch the return icon to
return to the current source.
Playing a Disc
To begin playback of an Audio/Video Disc:
1. Press the front panel Power/Volume/Mute control knob to turn the unit ON.
2. Insert a disc with the label side facing UP and playback will begin automatically.
Parking Brake Inhibit
When the pink “Parking” wire is connected to the vehicle Parking Brake circuit, the front TFT
monitor will display video when the Parking Brake is engaged.
60
SYSTEM SETTINGS
1. Touch the Menu icon
located in the upper left corner of the display to display the main
menu.
2. Touch the Settings icon [
] and the settings menu is displayed.
Figure 7. Settings Menu Screen
General Settings
1. Touch [ General ], if necessary.
2. Touch to highlight a setting to display/select an option.
General settings
Options
Description
Radio region
USA/Asia/Japan/Europe/Eur
LW/Oirt
Select one that matches your location.
Radio range
Beep
Calibration
Demo
3. Touch Menu icon
Select Local to receive only stations with
extremely strong signal.
Local
Distance
On
Turn-ON the beep sound. Each time you
press a button, the unit beeps.
Off
Turn-OFF the beep sound.
Start
Calibrate the touch screen.
On
Turn-ON Retail Demo Mode.
Off
Turn-OFF Retail Demo Mode
located in the upper left corner of the display to exit.
61
Calibration
Calibrate the touch screen using the calibration setting function.
Recalibrating the touch screen
1. Press the [ Calibration ] option on the setup menu to enter.
2. Touch [ Yes ] to enter.
3. Press and hold the center of [ + ] for 5 seconds, the [ + ] will move automatically.
4. Aim at center of [ + ], follow the path as shown in the figure. Once steps 1-4 are complete the
system will automatically exit calibrating mode.
Figure 8. Calibration Screen
Video Settings
1. Touch [Video].
2. Touch an option repeatedly to select.
Video settings
Aspect Ratio
Rear Camera
Options
Full
Normal
Mirror
Normal
Description
Adjust aspect ratio.
Reverse the camera image as if looking through a
rear-view mirror.
3. Touch the return icon to exit and return to the previous screen.
62
Time Settings
1. Touch [ Time ].
2. Touch an option repeatedly to select:
Time settings
Options
Date
Year / Mon / Day
Clock mode
12Hr/24Hr
Time
Hour / Min / AM
/ PM
Description
Touch [
] or [
] to set year, month and day.
Touch [12Hr] or [24Hr] to switch clock mode.
] or [
] to set hour and minutes.
Touch [
Touch [
] or [
] to set AM/PM (only for 12Hr).
3. Touch the return icon to exit and return to the previous screen.
Audio Settings
1. Touch [ Audio ].
2. Touch an option repeatedly to select.
Audio settings
Sub woofer
Sub woofer filter
Loudness
Loudness Center
Options
On
Off
80Hz
120Hz
160Hz
Off
Lo Boost
Hi&Lo
400Hz
800Hz
Description
Turn-ON the subwoofer.
Turn-OFF the subwoofer
Select a crossover frequency to set a cut-off
frequency for the subwoofer’s LPF (low-pass
filter).
Select low frequency boost only or high and low
frequency boost.
Select loudness center frequency.
2.4KHz
3. Touch the return icon to exit and return to the previous screen.
Language Settings
1. Touch [ Language ].
2. Touch an option repeatedly to select.
Language settings
Description
OSD
Select on-screen display language.
Select DVD audio language. Options available depending on DVD
disc.
Select DVD subtitle language. Options available depending on DVD
disc.
Select DVD menu language. Options available depending on DVD
disc.
DVD audio
DVD subtitle
DVD menu
3. Touch the return icon to exit and return to the previous screen.
63
Bluetooth® Settings
1. Touch [Bluetooth].
2. Touch an option repeatedly to select.
Bluetooth® settings Options
Description
Bluetooth
On
Off
Auto connect
On
Off
Turn-ON the Bluetooth® function.
Turn-OFF the Bluetooth® function.
If the pre-paired device is within the effective
range, the unit re-connects to pre-paired device
automatically.
Need to re-connect manually.
Auto answer
On
Answer paired phone call automatically.
Off
Answer phone call manually.
Pairing code
Set the password for pairing the unit with other Bluetooth® device.
3. Touch the return icon to exit and return to the previous screen.
DVD
1. Touch [ DVD ].
2. Touch an option repeatedly to select.
Factory settings
SW version
Options
Description
Yes/No
Reset to factory settings
Display only Display of software version
3. Touch the return icon to exit and return to the previous screen.
Adjust Volume Settings
You can set different volumes for different sources.
1. Touch the [Volume] icon to display and access the volume setting sub-menu
2. Touch the source to be adjusted.
3. Touch [
] or [
] to assign value: 0 to 12. When switching to the source, the volume
increases automatically.
4. Touch the return icon to exit and return to the previous screen.setting menu.
64
RADIO TUNER MODE
Select radio as playing source
Open the SOURCE MENU and then touch [Radio].
Selecting a Radio Band
Press the [BAND] Button on the remote control or touch the [ ] icon on the user interface to
select one radio band among FM1, FM2, FM3, AM1 and AM2.
Figure 9. Radio Screen
Tune
Auto Tuning
Press the [
]/[
Buttons on the remote control or touch the [
]/[
] icons on the user
interface to seek a higher / lower station.
To stop searching, repeat the operation above or press other Buttons having radio functions.
NOTE: When a station is received, searching stops and the station is played.
Manual Tuning
Method 1:
Press and hold the [
] or [
] icon for 1 second to enter Manual Tuning mode.During manual
tuning, the frequency will be changed in steps.
Touch the [
]/[
] icon on the user interface to tune in a higher / lower station.
The unit will automatically return to the automatic search mode after approx. 15 seconds. You
can also return to the automatic search mode by briefly pressing the [Auto] button, followed by
[Forwards] or [Back].
Method 2:
1. Touch the numeric keypad icon [
]. Numeric keyboard is displayed, touch numbers to input
frequency.
2. Touch [
] to delete the input numbers step by step.
3. Touch [ OK ] to enter.
65
Preset Station
The unit has 5 bands, such as FM1, FM2, FM3, AM1, AM2, and each band can store 6 stations;
hence the unit can store 30 stations in total.
Manual Store
1. Tune to a desired station.
2. Touch and hold one of the presets (1 to 6) to save the selected station.
Search Stations Automatically
Touch the search icon [
band automatically.
] to search stations and store the 6 strongest stations in the current
Recalling a Station
1. Select a band.
2. Touch an on-screen preset button to select the corresponding stored station.
Local radio station seeking (LOC)
When the Local function is on, only radio stations with a strong local radio signal are played. To
activate the Local function in the AM/FM tuner mode, touch [ ] on the screen. The Options tab
is revealed. Touch [
] icon and choose the Radio Local or Distance. When the Local function
is active, the LOC indicator at the top of the screen is illuminated. When the Distant function is
active, the DX indicator at the top of the screen is illuminated.
EQ Selection
Touch the Equalizer [
] icon and enter the EQ setup.
RDS
RDS( Radio Data System ) transmits data to the radio which displays information such as station
identification, song artist, and song title.
RDS service availability varies with areas. Please understand if RDS service is not available in you
area, the following service is not available.
Adjust RDS Settings
1. In Radio menu, touch [ ] and [ Option ].The option menu is displayed.
2. Touch on the selected option to change the setting.
[RDS]:To turn the “RDS” function ON or OFF.
[AF]: To turn the AF function on or off
[EON]:To turn the EON function on or off
[TA]: To turn the TA function on or off
[CT]: To turn on or off “Clock Time” synchronization function.
[PTY]:To show PTY list.
66
AF
The unit can automatically switch to an alternative frequency (AF) of the same station if reception
becomes poor. Press the ON/OFF button to enable or disable the automatic scanning function for
alternative frequencies of an RDS station.
EON (Enhanced Other networks)
TA: Traffic messages can be received from the current station or stations in other networks.
AF: The frequency list of preset RDS stations is updated by EON data.
EON enables the radio to make fuller use of RDS information. The AF list of preset stations is
constantly updated, including the currently selected station. If you tune into a station in your home
region, you will be able to receive the same station with an alternative frequency, or any other
station that offers the same programme. EON continuously searches for local TP (Traffic Program)
stations.
TA
Press the TA ON/OFF button to switch the priority for traffic announcements on or off.
TA volume
The volume used for traffic announcements is set to 20 by default. To change the volume of these
announcements, adjust the volume knob during the traffic announcement. The unit will then store
the currently selected volume automatically.
CT (Clock Time)
Some stations broadcast the time and date within the encoded RDS signal. The clock time is
automatically adjusted when ‘CT’ is set to ‘ON’.
Note: Stations broadcasting close to time zones may not broadcast the correct time in your
particular area. In this case, turn CT Off and manually set the time.
PTY Function
TY is the abbreviation for Program Type which is the function that displays the program category
P
of the current station such as category (news, sports, talk etc.) Use the scroll bar to select various
category codes.
Once a category code is selected the PTY options will display on the screen.
hen one PTY option is touched (e.g. News), auto search for next available PTY by increasing
W
tuning frequency until the PTY of the next station matches the current. If no matched PTY has
been found, the unit will return to the original radio frequency.
67
PLAYBACK OF AUDIO FILES
Compatible Audio Discs Types
This system will play the following types of discs:
DVD
- DVDs that contain audio and/or video.
Audio discs - Audio CDs that contain audio, video and image files.
MP3 discs - A disc that contains audio, video and image files (for example, a CD-R with
downloaded MP3 files).
NOTE: This unit is designed to play pre-recorded (original) CD/DVDs. Some burned CD /
DVDs may not play due to different recording formats.
DVD Operation
DVD Main Menu
NOTE: When properly installed, DVD video cannot be displayed on the main TFT screen
unless the parking brake is applied. If you attempt to play a DVD while the vehicle is
moving, the TFT screen displays:
WARNING!!!
IT IS ILLEGAL TO VIEW VIDEO WHILE DRIVING OR OPERATING A MOTOR VEHICLE. SET
PARKING BRAKE TO VIEW VIDEO.
From the Main Menu Screen touch the DISC Icon or insert a disc into the disc slot, label side up.
Playback begins when a disc is inserted correctly.
Insert a disc
Upon inserting a disc, the unit will switch to [DISP] mode automatically.
Eject the disc
Press the [
] key on the front panel or remote control to eject the disc.
Touch screen controls
The touch key areas for DVD playback are outlined below:
A: Return to the main menu
B: Disc type
C: Time display
D:Play the video and display playback
information
E: Display onscreen control menu
Figure 10. Screen Control Areas
68
Controlling Playback
To access the on-screen controls, touch the screen anywhere except for the upper left corner and
touch again to cancel display.
Connect an USB Device
1. Open the USB door.
2. Connect an USB device into the USB connector. Play starts automatically.
NOTES:
1.If there are audio files supported on the USB stick, the system will enter the audio files menu
automatically.
If there are no audio files, but there are video files supported on the USB stick, the system will
enter the video files menu automatically.
If there are no audio or video files, but there are picture files supported on the USB stick, the
system will enter the picture files menu automatically.
If there no above audio/video/picture files supported in the USB stick, the screen will display:
There are no audio/video/picture files supported.
2. Not all USB devices are compatible with the unit.
Play
Once a disc, or a USB device is inserted, play starts automatically.
Pause
When play the audio/video file, press the [
] key on the remote control or open the on-screen
] icon, press the [
] again and continue to play.
control icons menu and then touch the [
Stop
For audio files or video files, press the Stop [ ■ ] Button on the remote control or open the onscreen control icons menu and then touch the Stop [ ■ ] icon to stop. Press the [
] to resume
from the pausing point.
Touch the Stop [ ■ ] icon again to stop entirely, and press the Stop [ ■ ] Button on the remote
control. Press the [
] to playback from the top file.
Previous/Next
Touch [
]/[
] key on the screen to skip to previous / next track / chapter.
Search for a Folder
For Folder Control
Press the [
] button to access the menu.
1. Touch [
] to display all available folders.
2. Touch a folder, then touch the desired file.
3. Touch the file again to start play.
69
Figure 11. Folder Screen
For Audio Files
1. Touch [
] to display all available audio folders.
2. Touch a folder, then touch the desired file.
3. Touch the file again to start play.
Video Files
1. Touch Video icon [
] to display all available video folders.
2. Touch a folder, then touch the desired file.
3. Touch the file again to start play.
Picture Files
1. Touch Picture icon [
] to display all available picture folders
2. Touch a folder, then touch the desired file.
3. Touch the file again to start play.
Repeat playback
Press the Repeat [RPT] Butto on the remote control or open the on-screen control icons menu and
] icon to switch the repeat modes as below:
then touch the Repeat[
Figure 12. Repeat Mode
Repeat A-B
When a DVD, VCD is played back, you can play back the contents between the time points from A
to B repeatedly:
Figure 13. Repeat A-B ON and OFF
Random Play
You can play audio tracks/files in random order. During play CD,press the [RDM] key on the
remote control repeatedly to turn Random play ON or OFF.
NOTE:
When [Shuffle] is off, the unit resumes play from the current sequence.
Playback Control function
This function is available for the VCD discs with Playback Control function (Ver 2.0 or higher).
Press the [MENU] Button on the remote control or open the on-screen control icons menu and
] icon repeatedly to activate this function. Press again to cancel.
then touch the [
Notes:
1. When Playback Control is ON, playback goes back to the track list and starts from the first
track.
70
2. When Playback Control is on, fast motion playback, slow motion playback or skip search is
available but repeat playback and searching for a particular chapter or track is prohibited.
3. If you use random playback, scan playback or searching playback when Playback Control is
ON, Playback Control will be OFF automatically.
Select Audio Mode
When playing VCDs, the user can select an audio mode (R/L/Stereo).
1. During playback, touch the bottom half of the screen to display menu on the screen.
2. Touch the Next icon [ ] to display the 2nd menu.
3. Touch the Audio icon [
] repeatedly until the audio mode is selected.
Select Subtitle Language
For DVD discs that contain two or more subtitle languages.
1. During play, touch the screen to display menu on the screen.
2. Touch the Next icon[ ] to display the 2nd menu.
3. Touch the Language icon [
] repeatedly to select a language. The selected language is
displayed.
Change Viewing Angle
Some DVDs contain alternate scenes, such as scenes recorded from different camera angles.
For such DVDs, you can select from the available alternate scenes.
1.During playback, touch the screen to display menu on the screen.
2. Press the Angle icon [
] repeatedly on the remote control. The viewing angle is changed.
Video Setup
Touch the Settings icon [
] to access video setup mode, touch Left or Right direction icons
[ ]/[
] to set the desired effect. You may set the brightness, contrast, and saturation of the
video output from 1 to 20.
Playback Information
Touch the screen during playback of a DVD or VCD disc and the playback information will be
displayed on the top area of the TFT.
For DVD:
Figure 14. DVD Information Display
1. Disc type.
2. Return to the main menu.
3. DVD Title information. “1/6” indicates that this DVD has 6 titles and the title playing back now is
the first title.
4. DVD Chapter information. “2/9” indicates that current title has 9 chapters and the chapter
playing back now is the fifth chapter.
5. Time display.
71
For VCD:
Figure 15. VCD Information Display
1. Disc type.
2. Return to the main menu.
3. VCD Track information. “1/16” indicates that this VCD has 16 tracks and the track playing back
now is the first title.
4. Time display.
Elapsed Time
1. Elapsed time of the current track.
2. Total time of the current track.
Figure 16. Elapsed Time Display
Direct Track Entry
To select a track directly, touch the [
] icon on screen control to display the direct entry menu.
Enter the desired track using the on-screen number pad. Press [ OK ] to the selected track.
Rotate Pictures
1.When viewing pictures, touch the screen to display menu on the screen.
2. Touch the Rotate Icon [
] repeatedly to rotate the picture.
Zoom
The user can zoom in pictures for a close view.
1.When viewing pictures, touch the screen to display menu on the screen.
2. Touch [
] repeatedly to zoom in the picture.
Figure 17. Zoom
72
General Disc Information
Disc Properties
Symbol
12cm Disc Properties
Single side single layer (DVD-5)
Single side double layer (DVD-9)
Double side single layer (DVD-10)
Double side double layer (DVD-18)
Single side single layer (VCD)
Single side single layer
Max Play Time
(MPEG 2 Method)
133 minutes
242 minutes
266 minutes
484 minutes
(MPEG 1 Method)
74 minutes
74 minutes
Disc Symbols
Symbol
Meaning
Number of voice languages recorded. The number inside the icon indicates the
number languages on the disc (maximum of 8).
Number of subtitle languages available on the disc (maximum of 32).
Number of angles provided (maximum of 9).
Aspect ratios available. “LB” stands for Letter Box and “PS” stands for Pan/Scan.
In the example on the left, the 16:9 video can be converted to Letter Box video.
Indicates the region code where the disc can be played.
• Region 1: USA, Canada, East Pacific Ocean Islands
• Region 2: Japan, Western Europe, Northern Europe, Egypt, South Africa,
Middle East
• Region 3: Taiwan, Hong Kong, South Korea, Thailand, Indonesia, South-East
Asia
• Region 4: Australia, New Zealand, Middle and South America, South Pacific
Ocean Islands/Oceania
• Region 5: Russia, Mongolia, India, Middle Asia, Eastern Europe, North Korea,
North Africa, North-West Asia
• Region 6: Mainland China
ALL: All regions
73
EQUALIZER CONTROL MENU
Adjusting Equalizer Controls
The Equalizer adjustment screen allows the user to easily adjust the audio system to meet the
acoustical characteristics of the vehicle depending on vehicle type and cabin dimensions. For
example: proper setting of the audio controls can improve the speakers frequency response.
The Balance/Fade levels and Loudness ON/OFF option of a selected audio/video source (Disc,
Radio, USB, AV-IN1, or AV-IN2) is also adjusted through the Equalizer adjustment screen.
Equalizer (EQ)
Touch the Equalizer (EQ /
) icon to view and select a desired acoustical preset level ( Pop /
Techno / Rock / Classic / Jazz / Optimal or User)
NOTE: The equalizer will automatically change to “USER” when individual audio functions
are adjusted.
Figure 18. Equalizer (EQ) Screen
The programmable equalizer allows you to adjust the bass, mid and treble range both in terms of
intensity as well as in terms of frequency and the Q value (filter bandwidth).
The values for this are as follows:
For the bass range: Frequency: 60 / 80 / 100 / 200 kHz
Q value: 1 / 1.25 / 1.5 / 2
For the mid-range frequencies:
Frequency: 0.5 / 1 / 1.5 / 2.5 kHz
Q value: 0.5 / 0.75 / 1.0 / 1.25
For the treble range:
Frequency:
10 / 12.5 / 15 / 17.5 kHz
74
Adjusting the Fader and Balance
The user can adjust front/rear fader settings, L/R balance settings, and subwoofer levels here.
1. Enter the EQ setup mode.
2. Touch the [
] icon in the EQ interface menu.
Figure 19. Fade-Balance Adjustment Screen
Balance
This feature is used to balance the audio output levels between the left and right side of the
vehicle. Touch the ◄ or ► icons to change the balance control settings -12 (Left) to +12 (Right).
The setting can also be changed by touching screen within the grid to move the blue sphere.
Fader
This feature is used to fade the audio output levels between the front and rear of the vehicle.
Touch the ◄ or ► icons to change the fade control settings -12 (Rear) to +12 (Front). The setting
can also be changed by touching screen within the grid to move the blue sphere.
Sub (Subwoofer)
This feature is used to reduce or increase the subwoofer sound level. Touch the slide bar ◄ or ►
icons to adjust the subwoofer volume from -12 to +12. This setting will vary depending on the input
level setting of your subwoofer amplifier.
To exit the balance-fader touch the return icon on the top left corner of the screen.
NOTE:
The EQ mode will change to ‘User’ automatically when you adjust the frequency value in all
modes besides ‘User’.
75
iPod/iPhone® CONTROLS
Accessing iPod® Mode
The user can control an iPod®/iPhone® using the touch screen to access, albums, songs, videos,
etc.
NOTE: For basic connectivity, the iPod®/iPhone® must be connected to the unit using the
iPod®/iPhone® adapter cable that came with the iPod/iPhone (also available separately).
For iPod®/iPhone® video playback, use a jLink USB cable.equipped with a USB connector
and a 3.5 mm AV jack. Be sure your iPod®/iPhone® has the latest Apple firmware installed
to avoid connectivity issues.
The unit will automatically switch to iPod® mode when an iPod®, iPod® touch or iPhone® is
plugged into the front panel USB connector. Also the iPod® can be accessed from the Main Menu
Screen by touching the iPod® icon (only available when an iPod® or iPhone® is connected to the
front panel USB connector).
Figure 20. Connecting the iPod®/iPhone®
iPod®/iPhone® Main Menu
To access the iPod® mode touch [iPod] on the main menu to enter iPod® menu.
Access iPod menu from here. Touch ▲ or ▼ icons to browse menu.
3
4
5
1
2
Figure 21. iPod®/iPhone® Menu
1. Return to main menu / 2. File list Drag up/down to scroll / 3. Show Music files 4. Show Video
files / 5. Show Photo files
Note: Apple does not support video and image playback for new devices with a Lightning
port. This affects, but is not limited to, the following Apple devices: iPhone 5, iPhone 5s/5c,
iPod touch 5G, iPod Nano 7G.
76
Pausing Playback
1. Touch the Pause icon [ ] on the bottom of the screen to pause play. “PAUSE” appears in the
display, and Pause icon[ ] will switch to a Play icon[ ].
2.Touch the Play icon [ ] to resume playback.
Selecting a Track
Track-up
Touch the Forward icon [
Track-down
1.Touch the Back icon [
2.Touch the Back icon[
] to move to the beginning of the next track.
] once to move back to the beginning of the current track.
] twice to move back to the beginning of the previous track.
Fast Forward/Fast Reverse
Fast forward
Touch and hold the Forward icon [
].to fast forward a track.
Fast reverse
Touch and hold the Back icon [
]to fast reverse a track.
Figure 22. iPod®/iPhone® Play/Pause and Track Controls
Repeat Play
This function allows the user to play the track repeatedly by touching the Repeat icon [
select Repeat one or Repeat all.
] to
Random play
This function allowsthe user to play all tracks recorded in a random order by touching the Random
icon [
] to perform random play.
Figure 23. iPod®/iPhone® Repeat Play and Random Play Controls
77
BLUETOOTH® OPERATION
Bluetooth® technology has the capability to wirelessly synchronize and transfer data among
devices. The Bluetooth® audio capabilities can be used for wireless phones hands free
applications. Before attempting to use the Bluetooth® functions on the unit, please make sure your
wireless phone supports Bluetooth® functions.
We use the latest Bluetooth® Technology in order to offer you the best connection, most features,
and easiest pairing, but all phones operate differently. Please read your phone’s owner’s manual
and familiarize yourself with its available Bluetooth® features and functions. Not all features will
work with all phones.
NOTE: The distance between this unit and your cellular phone must be 8 feet (2.4 meters) or less for
sending and receiving voice and data via Bluetooth® wireless technology.
Please make sure your mobile phone supports Bluetooth® functions (Headset or Handsfree
profiles or both). Adhere to the following guidelines for successful operation:
• Before using Bluetooth® functions, you must pair your mobile phone to the VXE 3010 head unit
(see “Pairing the Bluetooth® System with Your Mobile Phone and Head Unit”). To ensure the
best reception for pairing and re-connection, please make sure the mobile phone battery is fully
charged before you begin.
• Try to perform pairing within a few minutes of the mobile phone being turned on.
• Once the unit has been paired with the mobile phone, the unit’s model number, “VXE 3010”,
will be displayed on the mobile phone.
• To achieve the best performance, always keep the mobile phone within 3 meters of the head
unit.
• Always keep a clear path between the mobile phone and the head unit. Never place a metal
object or any other obstacle between the mobile phone and the head unit.
• Some mobile phones (like Sony Ericsson) may have a “Power Saving Mode” option. PLEASE
DO NOT use the power saving mode with the VXE 3010.
• Before accepting or making a call, make sure your mobile phone’s “Bluetooth® function” is
turned on.
• To ensure the best conversation quality/performance, stay within one meter of the microphone
when talking.
• To manually disconnect the mobile phone from the head unit, press the “Chain Link” icon on
the Bluetooth® user interface (next to the mobile phone name) and the Bluetooth® will be
“disconnected”, but still paired.
Pairing Bluetooth® Enabled Devices
To connect your Bluetooth® phone to the unit, the user needs to pair the phone to the unit.
Pairing needs only to be done once. The user can pair up to five phones The user can search for
Bluetooth® head units by mobile phone.
1.
2.
3.
4.
Turn ON the Bluetooth® function on the device.
Search for Bluetooth® devices by mobile phone.
Select the Bluetooth® device ID “VXE 3010” in the pairing list.
Enter default password “0000”.
78
NOTES:
•The operational range between this unit and a Bluetooth® device is approximately 5 meters.
•Before you connect a Bluetooth® device to this unit, familiarize yourself with the Bluetooth®
capabilities of the device.
• Compatibility with all Bluetooth® device is not guaranteed.
•Any obstacle between this unit and a Bluetooth® device can reduce the operational range.
•Keep this unit away from any other electronic device that may cause interference.
Figure 24. Bluetooth® Menu
Disconnecting a Bluetooth® Device
To disconnect one device, touch [ Disconnect ]. After "Disconnect" is pressed, the radio will display
a screen listing paired devices. Pressing the Green "Plug" icon will reconnect a previously paired
phone to the BT radio. Pressing the "Wastebin" icon next to a device's name will unpair the phone
from the radio.
NOTES.
•The device will be disconnected when the device is moved beyond the operational range.
•If you want to reconnect the device to the unit, place it within the operational range.
• If you do not want to reconnect the device to the unit automatically, touch
[ Options ], then set [ Auto connect ] to [ OFF ].
For details, see the “Adjust Bluetooth® Settings” section.
Figure 25. Bluetooth® Entry Pad and Option Screen
Making a Call
1. Select Bluetooth® function in the home menu.
2. On Option page, see the "Phone Synch" item, and press "Synch" to synchronize the phone
book with the BT. If you have many contacts, this may take up to 3-4 minutes.
79
3. Search for phone number from the following list:
[Phone Book]
[Call History]
[Missed calls]
[Received calls]
[Dialed calls]
Or touch the number pad directly, then touch [
] to dial.
Figure 26. Bluetooth® Call Log Controls
Receiving a Call
By default, all incoming calls are received automaticaly.
1.If there is an incoming call, the screen will display “Incoming call...”.
2. Touch the screen to select [ hang up ] or [ Answer ].
Speak into the Bluetooth® microphone.
Tip
You can select to receive calls manually by setting [Auto answer] to [OFF]
Figure 27. Bluetooth® Incoming Call Screen
Adjust Bluetooth® Settings
1. In Bluetooth menu, touch [ Options ].
The option menu is displayed.
2. Touch on the selected option to change the setting.
∙ [Bluetooth]:To turn the “Bluetooth” function ON or OFF.
∙ [Auto connect]:To turn the “Auto Connect” function ON or OFF .
∙ [Auto answer]:To turn the “Auto Answer” function ON or OFF .
∙ [Pairing code]:To set the paring code.
∙ [Phone sync]:To synchronize phone book, touch [ OK ] on the sub-menu
Phonebook Synch may take several minutes to load on initial setup.
80
NOTE:
You can also adjust Bluetooth® settings in the “Settings” menu.
Figure 28. Bluetooth® Settings Menu
Bluetooth® Music Function
Bluetooth® provides an Advanced Audio Distribution Profile (A2DP) profile for streaming music
from a mobile phone or a portable multimedia player (PMP), sometimes referred to as a MP3
player. The unit allows you to play back audio files from your mobile phone or a PMP using a
Bluetooth® connection.
NOTE: Please quit A2DP mode before attempting to make a phone call, as unexpected
results may occur depending on your mobile phone model.
AVRCP is short for Audio/Video Remote Control Profile. Mobile phones supporting this function
can control the playback of a Bluetooth® audio player.
The unit can control a Bluetooth® audio player via Advanced Audio Distribution Profile (A2DP) or
Audio/Video Remote Control Profile (AVRCP). Bluetooth® audio players (or Bluetooth® adapters)
compatible with these profiles can be connected to this unit.
While listening to music from any source, the user can make a phone call by pressing the number
keys on the mobile phone. The unit will stop playing music and the TFT screen will display
“Calling”, after the call received, the voice will be transferred to the unit. When the call ends, the
screen will display music playing menu.
If there is an incoming phone call, the music will stop, and the screen will display “Incoming”.
When the call ends, the screen will display music playing menu.
Figure 29. Bluetooth® Audio Menu
81
AV-IN1/AV-IN2 CONTROLS
AV-In1
AV-In1 is used for playback of audio/video from an external device connected
to the unit through a 3.5mm jack located on the font panel.
AV-In2
AV-In2 is used for playback of audio/video from an external device connected
through RCA connectors located on the back of the unit.
You can connect an external audio/video device to the unit.
1. Connect the external device with an appropriate AV cable.
2. Touch the upper left corner to display the main menu.
3. Touch [Aux 1] / [Aux 2] to access external device.
NOTE: Audio/Video device must be connected to the unit using an audio/video adapter
cable that is available separately.
NOTE: Video will only play when the vehicle parking brake is engaged. The parking brake
must be connected for this feature to operate.
1
2
3
4
Left Audio
Right Audio
Ground
Video
3.5 mm A/V Cable(not included)
Figure 30. Connecting External Devices
82
STEERING WHEEL CONTROLS (SWC)
(if equipped)
The VXE 3010 is compatible with following steering wheel control adapters: Dietz UNICO DUAL
PLUS + cable, PAC (Pacific Accessory Corporation) SWI-PS and Metra ASWC. A 3.5 mm
female connector (labeled “SWC Interface”) on the back of the head unit allows connectivity to
the adapters. Please refer to the instructions included with the adapters for detailed installation
information.
The following controls are available for most vehicles:
1. Volume Up (+)
4. Seek Up (Next)
7. Preset (+)
10. Answer
2. Volume Down (-)
5. Seek Down (Prev)
8. Preset (-)
11. BT End
3. Mute
6. Source
9. Band
To access the SWC Controls for programing, touch the Steering Wheel icon on the second page of
the Main Source Menu.
Figure 31. SWC Programing Screens
SWC Programing
Up to 11 steering wheel control functions can be programmed via the built-in SWC interface. Not
all functions may be supported for each vehicle.
1. Popular OE steering wheel functions are already pre-programmed from the factory. If your
vehicle does not support the exact same functions already pre-programmed, you will need to
clear / reset the SWC interface and program in the exact functions of your vehicle. To clear /
reset the SWC interface, press and hold “Reset” for 2 seconds.
2. To begin programming the SWC interface after it has been cleared / reset, press a number
1 ~ 11, then press a function. A check mark should appear corresponding to the number
and function. Continue programming in this manner until all of the OE steering wheel control
functions are completed.
Note: Functions 1 ~ 11 must be assigned to a function on the OE steering wheel. For
example, if the OE steering wheel does not support Preset + and Preset -, then these
functions must be cleared / reset in order for the other functions to work correctly.
3. To “learn” the programming completed in step 2 above, press the “Program” button. You will
then be prompted to push each button on the OE steering wheel (for 1 second), so the unit can
learn the corresponding function.
4. SWC learning / programming is now complete.
83
REAR CAMERA OPERATION
This unit is “camera ready.” Before accessing any camera features, you must install a rear video
camera (e. g. Audiovox RVC1, sold separately).
When the camera is installed, the rear view image of what is behind the vehicle will appear when
the vehicle is placed in reverse gear. When leaving reverse gear, the unit displays the previous
screen.
84
TROUBLESHOOTING
Problem
Cause
Corrective Action
Radio Fuse blown.
Battery depleted
Install a new fuse with the
correct rating.
Install a new fuse with the
correct rating.
Press the RESET button
located over the rotary
encoder on the front panel.
Change the battery
Battery installed incorrectly.
Improper audio output connection.
Volume set too low.
Install the battery correctly
Check wiring and correct.
Increase volume level.
General
Unit will not power on
Car battery fuse blown.
Illegal operation.
Remote control does
not work
No/low audio output
Improper “MUTE” connection.
Poor sound quality or
distortion
Unit resets itself when
engine is off
Review wiring diagram and
check “MUTE” connection.
Speakers damaged.
Replace speakers.
Heavily biased volume balance.
Adjust the channel balance
to the center position.
Speaker wiring is in contact with metal Insulate all speaker wiring
part of car.
connections.
Pirated disc is in use.
Use original copy.
Speaker power rating not compatible
Connect proper speakers.
with unit.
Speaker is shorted.
Check speaker contact.
Incorrect connection between ACC
and positive battery wire.
Check wiring and correct.
Incorrect connection to parking brake
wire.
Check wiring and correct..
Parking brake is not engaged.
Stop vehicle in safe place
and apply parking brake.
DVD is not compatible with current TV
system settings.
Improper video signal connections.
Improper aspect ratio setup.
Change setup to
accommodate disc.
Check wiring and correct.
Use correct aspect ratio
setting.
TFT Monitor
No image
Flashing image or
interference appears on
screen
Prolonged image or
improper height/width
ratio display
85
Problem
Cause
Corrective Action
Auto antenna is not fully extended.
Connect the auto antenna
control cable properly.
Connect the auto antenna
control cable properly.
Turn LOCAL function off.
TUNER
Weak station searching
Auto antenna not properly connected.
LOCAL function is activated.
DISC
Cannot insert disc
Disc already inside unit.
Image blurred, distorted
or dark
Disc is illegally copied.
Eject current disc and insert
new one.
Use original disc.
Disc does not play back
Disc is warped or scratched.
Use disc in good condition.
Disc is dirty or wet.
Clean disc with soft cloth.
Laser pickup is dirty.
Clean laser pickup with
cleaning disc.
Use compatible disc.
Incompatible disc is used.
Disc region code is not compatible
with unit.
Disc is inserted upside down.
PBC cannot be used
during VCD playback
No repeat or searching
while playing VCD
Use disc with proper region
code.
Insert disc with label side
up.
PBC is not available on the disc.
PBC is on.
Turn PBC off.
Disc is dirty or scratched.
Clean disc or replace.
File is damaged/bad recording.
Recreate disc with good
files.
MP3
Interruption occurred
during playback
86
Disc Error Messages
Message Displayed
Cause
Loading
No Disc
Disc is being read.
Disc is dirty.
Disc is upside down.
Disc not present in loading
compartment.
Disc is dirty.
Disc is upside down.
Disc format is not compatible
with this unit.
DVD is not compatible with
region code of unit.
Illegal mechanism operation.
Bad Disc
Unknown disc
Region Error
Error
Corrective Action
87
Clean disc with soft cloth.
Insert disc with label side up.
Insert disc.
Clean disc with soft cloth.
Insert disc with label side up.
Use compatible disc.
Use disc with proper region
code.
Press EJECT key for 5
seconds to reset loading
mechanism.
SPECIFICATIONS
DVD/CD Player
Compatible Disc Media: DVD + R / RW (Single and Dual Layer) and CD-R / RW
Compatible Media Formats: CD-DA, MP3, WMA, VCD, SVCD, Xvid, AVI, MPEG 1/2
Signal to Noise Ratio: >95dBA
Dynamic Range: >95dB
Frequency Response: 20Hz to 20 kHz, -3dB
Channel Separation: > 60dB @ 1 kHz
D/A Converter: High performance 24-bit / 192 kHz sample rate, Multi-Bit Sigma-Delta Modulator
Video
Format: NTSC, PAL (auto-detection)
Output: 1Vp-p (75-ohm)
Input: 1Vp-p (75-ohm)
FM Tuner
Tuning Range: 87.5MHz - 107.9MHz
Mono Sensitivity (-30dB): 9dBf
Quieting Sensitivity (-50dB): 15dBf
Alternate Channel Selectivity: 70dB
Signal to Noise Ratio @ 1 kHz: 58dB
Image Rejection: 80dB
Stereo Separation @ 1 kHz: >30dB
Frequency Response: 30Hz - 15 kHz, -3dB
AM Tuner
Tuning Range: 530 kHz - 1620 kHz
Sensitivity (-20dB): 15uV
Signal to Noise Ratio @ 1 kHz: 50dB
Image Rejection: 60dB
Frequency Response: 50Hz - 2 kHz, -3dB
Monitor
Screen Size: 7.0” (Measured diagonally), 16:9 Widescreen
Screen Type: TFT Liquid Crystal Display (LCD) active matrix
Resolution: 1,152,000 pixels, 800W (x3) X 480H WVGA
88
General
Auxiliary Input impedance: 10k
Power Supply: 11 to 16VDC, negative ground
Power Antenna (Blue): 500mA max, current limited protection
Amplifier Remote (Blue/White): 500mA max, current limited protection
Operating Temperature: -20C ~ 65C
Fuse: 15-amp, mini ATM type
DIN chassis dimensions: 7” X 7” X 2” (178mm x 178mm x 50mm)
Power Output: 4 x 40 Watt max.
Signal to Noise Ratio: 70dBA below reference (Reference: 1 Watt, 4-Ohms)
Frequency Response: 20 Hz - 20 kHz, -3dB. (Aux Input used as reference input)
Reference Supply Voltage: 14.4VDC
*Specifications subject to change without notice.
CARE AND MAINTENANCE
1. Use only a clean silicone cloth and neutral detergent to clean the front panel or monitor.
A rough cloth and non-neutral detergent (such as alcohol) may result in scratching or
discoloration.
2. Do not get water or cleaning fluids on the unit.
3. If the temperature inside the player gets too hot, a protective circuit
automatically stops play of the disc. If this occurs, allow the unit to cool before operating the
player again.
4. Never insert anything other than a 12 cm (5”) compact disc into the player as the mechanism
can be damaged by foreign objects.
5. Do not attempt to use a 8 cm (3”) CD-Single disc in this unit, either with or
without an adaptor, as damage to the player and/or disc may occur. Such
damage is not covered by the Warranty on this product.
6. The CD player may not operate properly in extreme hot or cold. If such conditions occur, allow
the interior of the vehicle to reach a normal temperature before
using player.
7. When the vehicle warms up during cold weather or under damp conditions,
condensation may appear on the LCD panel. Should this occur, the screen will
not operate properly until the moisture has evaporated.
8. We suggest you use a cleaning disc in this unit more frequently than in the unit in your home
due to the environmental conditions of the vehicle.
89
Merci d’avoir opté pour un produit Audiovox. Nous espérons que les instructions de ce manuel
seront claires et simples à suivre. Il suffit de quelques minutes pour apprendre comment utiliser
toutes les fonctions de notre nouveau récepteur multimédia mobile Audiovox VXE 3010 NAV et en
apprécier toutes les options.
UTILISATION NORMALE
Cet appareil est conçu pour s’accomoder à une ouverture de tableau de bord 1.0 DIN d’une
véhicule avec un système de 12 volts à masse négative.
Veuillez lire attentivement la notice d’utilisation avant l‘installation de l’appareil.
Il est préférable de confier le montage du Audiovox VXE 3010 NAV à un spécialiste.
N‘essayez pas d‘ouvrir ou réparer l‘appareil.
Confiez systématiquement toute réparation à un personnel qualifié.
DÉCLARATION DE CONFORMITÉ
Audiovox Audio Produkte GmbH déclarons que le produit VXE 3010 NAV est conforme aux
exigences essentielles et aux autres dispositions pertinentes de la Directive 1999/5/EC. Une copie
de la Déclaration de conformité est disponible à l‘adresse http://www.audiovox.de (espace de
téléchargement du produit).
TABLE DE MATIÈRES
Consignes de sécurité
Consignes générales
Fonctionnalités
Accessoire optionnel
Commandes et voyants du panneau avant
Fonctionnement de la télécommande
Remplacement de la batterie de la télécommande
Démarrage rapide
Réglage du système
Fonctionnement du syntoniseur
Lecture de fichiers audio
Menu des commandes de l’égaliseur
Commandes de l’ipod®/iphone®
Utilisation Bluetooth
Commandes AV-In1/AV-In2
Commande de volant (SWC)
Fonctionnement de la caméra arrière
Dépannage
Spécifications
Soins et maintenance
90
91
91
92
93
94
96
99
100
103
107
110
116
118
120
124
125
126
127
131
132
CONSIGNES DE SÉCURITÉ
• Vous ne devez pas installer l'appareil à un endroit où la commande et l'utilisation de l'appareil
pourrait compromettre la sécurité.
• La sécurité routière est toujours la priorité absolue.
• Utilisez l'autoradio toujours de sorte à maîtriser votre véhicule quelle que soit la situation de la
circulation du moment.
• Au cas où vous avez des difficultés à lire l'affichage ou de commander l'autoradio, garez-vous
avant de procéder aux réglages.
• En tant que conducteur, vous ne devez utiliser aucune application qui pourrait détourner votre
attention du trafic (par ex. entrée de la destination pour le navigateur, visualisation d'images ou
de vidéos).
• Vous devez suivre les indications du navigateur dans le respect du code de la route (panneaux
routiers, panneaux de priorité, règles de priorité, etc.).
• Un volume élevé pour écouter de la musique peut entraîner des dommages auditifs.
• Vous devez éviter un volume trop élevé pour pouvoir entendre des avertissements acoustiques
(par ex. sirène de la police, pompiers).
• N'augmentez pas le volume lorsque l'autoradio est sur muet (par ex. pour sélectionner la
fonction BT).
• N'utilisez jamais la fonction vidéo de l'appareil lors de la conduite (à l'exception pour la marche
arrière) pour éviter tout accident. L'utilisation pendant la conduite est interdite par la loi.
• L'utilisation d'un fusible inapproprié peut endommager l'appareil ou déclencher un incendie.
• Ne pas démonter ou modifier l'appareil.
• Protégez l'appareil de l'humidité et de l'eau pour éviter tout risque d'électrocution ou d'incendie.
CONSIGNES GÉNÉRALES
• En cas de dysfonctionnement, veuillez lire les instructions du chapitre Dépannage. Au cas où la
panne n'y était pas décrite, pressez le bouton RESET à proximité du port USB pour réinitialiser
la réglage d'usine.
• Utilisez exclusivement des supports de données au format standard.
91
FONCTIONNALITÉS
Veuillez lire le mode d’emploi de ce produit avant de l’utiliser. La documentation offerte permet à
l’usager de profiter de toutes les fonctions de son nouveau récepteur Multimédia Mobile VXE 3010
de Audiovox. S’il vous plaît, lisez toutes les instructions avant de commencer l’installation, et
gardez ce manuel pour un usage ultérieur. Il est recommandé de faire installer le VXE 3010 de
Audiovox dans un établissement d’installation reconnu.
Lecteur DVD/CD
•
•
•
•
•
•
•
Formats de disque compatibles: DVD +/- R/ +/- RW (couche simple et double) et CD-R/-RW
Formats de média compatibles: CD-DA, MP3, WMA, VCD, SVCD, Xvid, AVI, MPEG 1/2
Rapport signal/bruit: >95 dBA
Portée dynamique: >95 dB
Réponse en fréquence: 20 Hz à 20 kHz, -3 dB
Séparation des canaux: > 60 dB à 1 kHz
Convertisseur numérique-analogique: Echantillonnage haute performance 24-bit / 192 kHz,
modulateur Sigma-Delta multibit
• Formats d‘image: cinéma, normal et désactivé (standby)
Vidéo
• Format: NTSC/PAL (détection automatique)
• Sortie: 1 Vp-p (75 ohms)
• Entrée: 1 Vp-p (75 ohms)
CD / MP3 / WMA
•
•
•
•
Compatible avec texte CD
Affichage de la photo album (compatible avec ID3-tag)
Recherche répertoire (MP3 / WMA seulement)
Lecture de CDs/ DVD+R/RWs personnalisés avec un maximum de 2000 fichiers MP3 et WMA
Radio FM (syntoniseur)
• RDS (Radio Data System): AF (fréquences alternatives), CT (Synchronisation de l‘heure), EON
(Enhanced Other Networks), PS (noms de la station), PTY (types de programme), RT (Texte
Radio), TA (annonces de circulation)
• Fourchette de syntonisation: 87,5 MHz – 107,9 MHz
• 18 stations préréglées
• Auto Stéréo/Mono
•Local/Distance
• Sensibilité mono (-30 dB): 9 dBf
• Seuil de sensibilité (-50 dB): 15 dBf
• Sélectivité de canal alterné: 70 dB
• Seuil de sensibilité à 1 kHz: 58 dB
• Réponse en fréquence: 30 Hz – 15 kHz, -3 dB
Radio AM (syntoniseur)
• Fourchette de syntonisation: 522 kHz – 1620 kHz
• 12 stations préréglées
92
Bluetooth®
• Mains libres avec microphone séparé
• Audio Streaming (A2DP/AVRCP)
• Module Bluetooth® avec profile AVRCP/A2DP
Écran
• Dimensions: 17,8 cm / (7”); écran tactile (touchscreen) LCD avec rétroéclairage DEL
• Type: Affichage à cristaux liquides (LCD) TFT haute définition
• Résolution: 1.152.000 sous-pixels, 800 (l) x 480 (h)
ACCESSOIRE OPTIONNEL
CAMÉRA ARRIÈRE Audiovox RVC1
Le VXE 3010 est « prêt pour la caméra » Audiovox RVC1. Avant d’accéder aux fonctionnalités de
la caméra, vous devez acquérir et installer une caméra de vidéo postérieure.
93
COMMANDES ET VOYANTS DU PANNEAU AVANT
FIGURE 1. Commandes et voyants du VXE 3010
Avis
Les graphiques de ce manuel sont référentiels, ils peuvent différer de l’appareil que vous
avez en main. Référez-vous à celui-ci en dernier ressort.
94
1.
outon SRC ( ) ON/OFF, (ALLUMER/ÉTEINDRE) et menu Source: appuyez sur la touche
B
pour allumer l’appareil. Quand il est allumé, une pression momentanée sur la touche [SRC]
fera apparaître le menu principal de la source sur l’écran tactile. Maintenez le bouton enfoncé
pendant deux secondes pour éteindre l’appareil.
2.
Bouton CODEUR ROTATIF: tournez le bouton pour régler le son de 0 à 50. Appuyez sur le
bouton pendant un instant pour assourdir la sortie audio. Appuyez à nouveau pour restaurer
le son.
Le volume sonore des annonces de circulation a été réglé à l'usine sur la valeur 20. Pour
modifier le volume sonore des annonces de circulation, tournez le codeur rotatif pendant une
annonce. L'appareil enregistrera automatiquement la valeur du volume actuelle.
3.
Touche REVERSE (RECUL) [
]: Appuyez sur
pour lancer la recherche en reculant. En
mode radio, appuyez sur
tpour chercher une station avec une fréquence inférieure.
4.
TOUCHE FORWARD (AVANCE) [
]: Appuyez sur cette touche pour avancer. Sous le
mode radio, appuyez pour chercher une station suivante.
5.
TÉLÉCAPTEUR IR: il sert à capter les signaux de la télécommande.
6.
Couvercle de l’interface USB: il couvre le connecteur de l’interface USB. Ouvrez pour
introduire une clé USB.
7.
Bouton RESET (remise à zéro): Appuyez sur ce bouton pour rétablir les paramètres du
système (sauf mot de passe) et pour corriger un arrêt du système ou toute autre opération
incorrecte. Utilisez la pointe d’un stylo pour activer le bouton.
8.
Entrée (A/V): pour connecter une unité A/V compatible.
9.
Bouton [OPEN/CLOSE] (OUVRIR/FERMER) L’ÉCRAN TFT: Appuyez sur ce bouton
pour déclencher le système mécanique automatique et mettre l’écran TFT en position de
visualisation. Appuyez à nouveau pour fermer le TFT. À écran ouvert, maintenez enfoncé le
bouton pour accéder au mode de réglage d’angle de visualisation, et tournez le bouton pour
régler. Maintenez pressé après le réglage pour sauvegarder cette position TFT ou laissez la
fonction de temps d’attente après 4 secondes.
10. Touche [DISP] (AFFICHAGE): Avec l’écran ouvert, pendant la lecture d’un DVD, appuyez
une fois pour voir l’information sur le temps, le titre, le chapitre ; appuyez deux fois pour
voir l’information sur l’audio, les sous-titres, l’angle et la vitesse de bits. Avec l’écran fermé,
appuyez pour voir l’information alternative de l’écran LCD.
11. Touche EJECT (ÉJECTER) [ ]: Appuyez sur cette touche pour éjecter un disque DVD/
CD/MP3. La lecture du disque s’interrompra, le disque sera éjecté et l’appareil se mettra en
mode radio. Si l’on ne retire pas le disque et on appuie à nouveau sur la touche, le disque
se remettra en marche. Si vous ne retirez pas le disque de la fente avant 10 secondes après
l’éjection, il se remettra en marche automatiquement pour éviter qu’il ne soit accidentellement
endommagé.
12. FENTE POUR LES DISQUES: les disques DVD/CD/MP3 sont acceptés. Si l’appareil est
allumé, la lecture commence quand le disque est inséré.
95
FONCTIONNEMENT DE LA TÉLÉCOMMANDE
Figure 2. Télécommande VXE 3010
96
Description fonctionnelle de la télécommande
1.
2.
3.
4.
5.
6.
7.
8.
9.
10.
11.
12.
13.
14.
15.
16.
Touche SOURCE (SRC): Appuyez sur cette touche pour changer et sélectionner parmi les
sources disponibles.(Radio/Disque/Bluetooth/USB/Bluetooth audio/SWC/AUX-1/AUX-2/
Caméra)
Touche EJECT (ÉJECTER ( ): Appuyez sur cette touche pour éjecter un disque DVD/
CD/MP3. La lecture du disque s’interrompra, le disque sera éjecté et l’appareil se mettra en
mode radio. Si l’on ne retire pas le disque et on appuie à nouveau sur la touche, le disque
se remettra en marche. Si vous ne retirez pas le disque de la fente avant 10 secondes après
l’éjection, il se remettra en marche automatiquement pour éviter qu’il ne soit accidentellement
endommagé.
Touche AUDIO: Appuyez sur cette touche pour afficher et choisir la langue de l’audio en
mode DVD. Chaque fois que vous appuyez sur la touche, la langue change. REMARQUE:
les langues audio varient d’un disque à l’autre.
Touches VOLUME (VOL + et VOL -): Appuyez sur ces touches pour augmenter ou diminuer
le son de la lecture.
Touche ZOOM: (pour regarder des fichiers vidéo/d’image)
Fichiers vidéo:
Appuyez sur la touche ZOOM
Une fois
2 fois
3 fois
4 fois
Lecteur de disques compacts
Il agrandit l’image à 125% de la taille d’origine
Il agrandit l’image à 150% de la taille d’origine
Il agrandit l’image à 200% de la taille d’origin
L’image revient à ses dimensions d’origine
Fichiers d’image:
Appuyez sur la touche ZOOM
Une fois
2 fois
3 fois
4 fois
Le lecteur de carte SD
Il agrandit l’image à 100% de la taille d’origine
Il agrandit l’image à 200% de la taille d’origine
Il agrandit l’image à 300% de la taille d’origine
L’image revient à ses dimensions d’origine
Touche BAND (STATION): Appuyez sur cette touche pour vous déplacer à travers les
stations préréglées, ou, quand vous êtes en mode disque, appuyez sur cette touche pour
choisir la vitesse de lecture (lente/rapide). Appuyez sur cette touche pour répondre à un
appel téléphonique à travers Bluetooth.
Touche [WIDE] (LARGEUR): change le mode d’affichage.
Touche [PRESET / ] (PRÉRÉGLAGE): Pour choisir une station de radio prédéfinie.
Touche EQUALIZER (ÉGALISEUR) (EQ): Appuyez sur cette touche pour accéder au menu
d’égaliseur sous tous les modes de lecture audio.
Touche GOTO: Appuyez sur cette touche pour afficher l’écran de recherche d’entrée directe
pendant la reproduction d’un disque.
Touche BLUETOOTH: Appuyez sur cette touche pour accéder à la fonction Bluetooth.
Touche [OPEN/CLOSE] (OUVRIR/FERMER): Appuyez sur cette touche pour ouvrir/fermer
l’écran TFT.
Touche [TILT / ]: Pour régler l’angle d’inclination de l’écran TFT.
Touche [RPT A-B]: Pour répéter l’intervalle A-B.
Touche [RPT]: Pour répéter la lecture.
Touche MUTE (MUET): Appuyez sur cette touche pour assourdir ou restaurer l’audio.
Touche POWER (
) (ALLUMER): Appuyez sur cette touche pour allumer ou éteindre
l’appareil.
97
17. Touche SUBTITLE (SOUS-TITRES): Appuyez sur cette touche pour afficher et choisir la
langue des sous-titres en mode DVD. Chaque fois que vous appuyez sur cette touche, la
langue des sous-titres change. REMARQUE: Le type et le nombre de langues pour les soustitres varient d’un disque à l’autre.
18. Touche ANGLE: Appuyez sur cette touche pour afficher et choisir différents angles de
caméra en mode DVD. Chaque fois que vous appuyez sur cette touche, l’angle change.
REMARQUE: Le nombre d’angles varie d’un disque à l’autre. Pas tous les disques n’offrent
cette option.
19. Touche MENU: Appuyez sur cette touche pour accéder au menu principal d’un DVD ou CD
pendant la lecture. Le disque reviendra à la lecture normale et le menu principal disparaîtra si
vous ne faites aucun choix au bout de 10 secondes. Cette touche sert aussi à choisir le mode
de photo d’un lecteur MP3.
20. Touche [TITLE] (TITRES): Sert à afficher le menu Titre d’un DVD.
21. Touche SETUP (PARAMÈTRES): Appuyez sur cette touche pour afficher le menu de
paramètres du système.
22. Touche FAST FORWARD (AVANCE RAPIDE) [
]: Appuyez sur cette touche pour
avancer la lecture du disque à une vitesse 2x, 4x, 8x ou 20x. Appuyez sur cette touche en
mode radio pour chercher des stations de radio disponibles, en augmentant la fréquence.
23. Touche NEXT FORWARD (PROCHAIN) ( ): Appuyez sur cette touche pour passer au
prochain chapitre, piste ou chanson pendant la lecture d’un disque. Appuyez sur cette touche
en mode radio pour chercher des stations disponibles en augmentant la fréquence.
24. Touche PLAY/PAUSE (LECTURE/PAUSE) (
): Appuyez sur cette touche pour mettre en
pause la lecture d’un disque. Appuyez à nouveau pour reprendre la lecture normalement.
25. Touche PREVIOUS (PRÉCÉDENT) ( ): Appuyez sur cette touche pour revenir au chapitre,
piste ou chanson précédente pendant la lecture d’un disque. Appuyez sur cette touche en
mode radio pour chercher les stations disponibles en augmentant la fréquence
26. Touche [PIC]: réglage de l’image. Appuyez sur cette touche pour régler brillance/contraste et
saturation.
27. Touche FAST REVERSE (RECUL RAPIDE) [
]: Appuyez sur cette touche pour reculer la
lecture du disque à une vitesse 2x, 4x, 8x ou 20x. Appuyez sur cette touche en mode radio
pour chercher des stations disponibles, en diminuant la fréquence.
28. Touche[ /
]: Pour arrêter la lecture ou raccrocher. Appuyez sur cette touche pour
déconnecter un appel actif sur Bluetooth.
29. Touche [DISP/CLEAR] (AFFICHER/EFFACER): Pour afficher ou effacer l’information.
30. Touches numériques (0-9): Appuyez sur ces touches pour accéder directement aux
chapitres ou pistes, pour faire des numéros de téléphone ou introduire des mots de passe.
31. Touche RANDOM (ALÉATOIRE) ( ): Appuyez sur cette touche pour que la lecture des
pistes ou chapitres soit faite dans un ordre aléatoire.
32. TOUCHE [INT]: Lecture de l’introduction.
98
Notes sur l’emploi de la télécommande
• Dirigez la télécommande vers le télécapteur de l’appareil.
• Changez la batterie de la télécommande ou insérez un isolateur de batterie si vous n’allez pas
l’utiliser pendant un mois ou plus.
• NE RANGEZ PAS la télécommande dans des lieux avec lumière solaire directe ou haute
température car elle pourrait ne plus fonctionner correctement.
• La batterie peut durer jusqu’à 6 mois dans des conditions normales. Si la télécommande ne
marche pas, veuillez changer la batterie.
• Utilisez seulement des batteries au lithium “CR2025” (3V) en forme de bouton.
• NE PAS recharger, démonter, chauffer ou exposer au feu la batterie.
• Placez la batterie dans la position correcte selon les pôles (+) et (-).
• Rangez la batterie hors de portée des enfants pour éviter les accidents
REMPLACEMENT DE LA BATTERIE DE LA TÉLÉCOMMANDE
Installation de la batterie
Utilisez seulement des batteries au lithium CR2025 (3V) en forme de bouton. Placez la batterie
sur le plateau dans la position correcte selon les pôles (+) et (-).
REMARQUE: Assurez-vous de bien insérer le côté positif de la batterie sous la languette de
métal du compartiment de la batterie.
Pour enlever la batterie
Faites glisser vers le dehors le plateau du compartiment de la batterie, qui se trouve en bas dans
la partie arrière de la télécommande.
Batterie au lithium CR2025 (3 V).
Côté positif vers le dehors
Languette de métal
Figure 3. Changement de la batterie de la télécommande VXE 3010.
99
GUIDE DE DÉMARRAGE RAPIDE
Allumer et éteindre l’appareil
Appuyez sur le bouton Power/Menu [
/ SRC ] du panneau avant, pour allumer l’appareil. Pour
l’éteindre, maintenez le bouton Power/Menu [
/ SRC ] du panneau avant, enfoncé pendant 2
secondes
Sélection d’une source audio/vidéo, Bluetooth, commande au volant ou
caméra arrière
Pour accéder à une source audio/vidéo:
1. Appuyez pendant un instant le bouton Power/Menu du panneau avant ou appuyez sur l’icône
de menu
se trouvant en haut à gauche sur l’écran, pour voir le menu principal.
Touche
Menu
Écran 1
Écran 2
Figure 4. Écran du menu principal VXE 3010
2. Appuyez sur l’icône de la source désirée sur l’un des deux écrans du menu principal. Écran
1 sur 2: radio, disque, Bluetooth (BT), USB.Appuyez sur la flèche (-->) du bas de l’écran pour
accéder à l’écran 2 sur 2. Bluetooth (Audio), commande au volant (SWC), AV-IN1, AV-IN2, ou
caméra.
Mute (muet)
Appuyez sur le bouton de volume du panneau avant ou appuyez la touche [MUTE] de la
télécommande pour assourdir le son de l’appareil.
100
Réglage du volume
Comment faire monter/baisser le son
Pour faire monter ou baisser le volume, tournez le codeur rotatif se trouvant sur le panneau avant.
Quand le niveau du volume parvient à « 0 » ou « 50 », un bip indique que les limites du réglage
sont atteintes. L’écran TFT montre le niveau de volume pendant 3 secondes
Bip de confirmation
Un bip confirme chaque choix de fonctions. Ce bip peut être désactivé à travers le menu de
paramètres.
Utilisation de l’écran TFT
Comment ouvrir/fermer l’écran.
Appuyez sur le bouton [OPEN] du panneau avant de la télécommande pour ouvrir ou fermer le
panneau d’affichage.
REMARQUE: ne jamais ouvrir manuellement le panneau d’affichage.
Comment changer l’angle d’inclination de l’écran.
Vues les caractéristiques inhérentes au LCD, vous obtiendrez différentes impressions de vision
selon l’angle observé. Il est possible de changer l’angle de cet appareil ; c’est-à-dire, on peut
choisir l’angle à partir duquel on obtiendra la meilleure vue. Maintenez enfoncé le bouton [OPEN]
pour accéder au réglage de l’angle de l’écran, et tournez pour régler. REMARQUE: Ne jamais
incliner manuellement l’écran.
Réinitialisation du système
Réinitialisation simple
Pour corriger une erreur du système ou toute opération incorrecte, utilisez la pointe d’un stylo
pour enfoncer et libérer le bouton de remise à zéro qui se trouve sous le bouton de contrôle du
panneau avant.
[RESET] Button
Figure 5. Bouton de remise à zéro du système
Réinitialisation totale
Appuyez sur l’icône de remise à zéro du système dans le troisième écran de paramètres. Après la
remise à zéro, l’appareil rétablit tous les paramètres par défaut venant d’usine.
REMARQUE: si vous remettez à zéro l’appareil pendant la lecture d’un DVD, l’appareil
reviendra au menu principal une fois la réinitialisation complétée
101
Changement du ratio d’aspect
Appuyez sur la touche [WIDE] de la télécommande pour régler le ratio d’aspect.
Réglages de l’image
1. Accédez au mode de réglage d’image en appuyant la touche [PIC] de la télécommande.
2. Choisissez l’élément à régler et appuyez sur les icônes de direction gauche ou droite de
l’interface usager[
]/[
] pour régler sa valeur.
3. Pour sortir du mode réglage d’image, appuyez à nouveau sur la touche [PIC] de la
télécommande ou bien arrêtez simplement de procéder à des réglages
Figure 6. Écran de réglage de l’image
Commandes de l’égaliseur
Égaliseur (EQ): le réglage peut se faire après avoir accédé à une des sources d’audio/vidéo
(disque, radio, USB, AV-IN1 ou AV-IN2). Appuyez sur l’icône de l’égaliseur pour afficher l’écran de
commande de l’égaliseur et choisir un niveau prédéfini d’audio (Pop/ Techno/ Rock/ Classique/
Jazz/Optimal ou Usager).Vous pouvez aussi régler les niveaux de balance et d’équilibre avant/
arrière du son ou activer ou désactiver l’option volume. Appuyez sur l’icône de retour pour revenir
à la source actuelle.
Lecture d’un disque
Pour commencer la lecture d’un disque audio/vidéo:
1. Appuyez sur le bouton Power/Volume/Mute, du panneau avant, pour allumer l’appareil.
2. Insérez un disque avec l’étiquette vers le haut et la lecture sera lancée automatiquement.
Inhibition du frein à main
Quand le fil rose de « stationnement » est raccordé au circuit de frein à main de la voiture, l’écran
TFT de l’avant affiche la vidéo quand le frein est mis.
102
RÉGLAGE DU SYSTÈME
1. Appuyez sur l’icône de menu
qui se trouve en haut à gauche de l’écran pour afficher le
menu principal.
2. Appuyez sur l’icône de paramètres [
] et le menu correspondant apparaîtra.
Figure 7. Écran du menu Paramètres
1. Appuyez sur [General] si nécessaire.
2. Appuyez pour surligner un réglage et afficher/choisir une option.
Réglages généraux
Options
Description
région de la radio
USA/Asie/Japon/
Europe/Eur LW/ OIRT
Choisissez l’option correspondant à votre
localisation
Local
Choisissez Local pour recevoir uniquement des
stations au signal extrêmement puissant.
portée de la radio
bip
étalonnage
Démostration
Distant
activer
Pour activer le bip. Chaque fois que vous
appuyez sur la touche, l’appareil émet un bip..
désactiver
Pour désactiver le bip..
lancer
Étalonnage de l’écran tactile.
activer
Pour activer le mode RetailDemo (Démo du
produit)..
désactiver
Pour désactiver le mode Retail Demo
3. Appuyez sur l’icône du menu
en haut à gauche de l’écran pour sortir.
103
Étalonnage
Pour étalonner l’écran tactile avec la fonction étalonnage.
Pour étalonner à nouveau l’écran tactile:
1. Choisissez l’option [calibration] (étalonnage) du menu de paramètres pour accéder.
2. Appuyez sur [Yes] (oui) pour accéder.
3. Appuyez et maintenez le milieu de [+] pendant 5 secondes, les symboles [+] bougeront
automatiquement.
4. Allez au milieu du [+], suivez le chemin comme indiqué sur la figure. Une fois que vous aurez
complété les pas 1 à 4, le système sortira automatiquement du mode étalonnage
Figure 8. Écran d’étalonnage
Réglages vidéo
1. Appuyez sur [Video]
2. Appuyez une option plusieurs fois pour sélectionner.
Réglages vidéo
Ratio d’aspect
Caméra arrière
Options
Complet
Normal
Miroir
Normal
Description
Pour régler le ratio d’aspect
Pour inverser l’image de la caméra, comme si on la
voyait à travers un rétroviseur.
3. Appuyez sur l’icône de retour pour sortir et revenir à l’écran précédent.
Réglage de l’heure
1. Appuyez sur [Temps] (heure).
2. Appuyez sur une option plusieurs fois pour sélectionner:
Réglage de l’heure
Options
Description
Date
année/mois/
jour
Style horaire
12 h/24 h
Heure
heure/min/
AM/PM
Appuyez sur [
] ou [
] pour régler l’année, le mois
et le jour.
Appuyez sur [12Hr] ou [24Hr] pour changer le style
horaire.
]o[
] pour régler l’heure et les
Appuyez sur [
minutes.
Appuyez sur [
]o[
] pour sélectionner AM/PM
(seulement pour 12 h).
3. Appuyez sur l’icône retour pour sortir et revenir à l’écran précédent.
104
Réglages audio
1. Appuyez sur [Audio].
2. Appuyez sur une option plusieurs fois pour sélectionner.
Réglages audio
Options
Description
Caisson d’extrêmes
gravesr
activer
Active le caisson d’extrêmes graves.
désactiver
Désactive le caisson d’extrêmes graves
80Hz
Choisissez une fréquence de croisement pour établir
une fréquence de coupure pour le LPF (filtre passebas) du caisson d’extrêmes graves.
Filtre du caisson
d’extrêmes graves
120Hz
160Hz
désactiver
Sonorité
accentuation de
graves
Choisissez seulement l’accentuation des fréquences
graves ou l’accentuation des graves et aigus..
Hi&Lo
400Hz
Centre de la
sonorité
800Hz
Choisissez la fréquence centrale de sonorité.
2.4KHz
3. Appuyez sur l’icône de retour pour sortir et revenir à l’écran précédent.
Réglage des langues
1. Appuyez sur [Language]
2. Appuyez plusieurs fois sur une option pour sélectionner.
Réglage des langues
Description
OSD
Pour choisir la langue d’affichage de l’écran.
audio du DVD
Pour choisir la langue de l’audio du DVD. Les options disponibles
dépendent du disque DVD.
sous-titres DVD
Pour choisir la langue des sous-titres du DVD. Les options
disponibles dépendent du disque DVD.
menu du DVD
Pour choisir la langue du menu du DVD. Les options disponibles
dépendent du disque DVD
3. Appuyez sur l’icône de retour pour sortir et revenir à l’écran précédent.
105
Réglage du Bluetooth
1. Appuyez sur [Bluetooth]
2. Appuyez plusieurs fois sur une option pour sélectionner.
Réglage du
Bluetooth
Options
Description
activer
Pour activer la fonction Bluetooth.
désactiver
Pour désactiver la fonction Bluetooth.
activer
Si le dispositif préalablement associé est dans le rang de
portée effective, l’appareil se connectera à nouveau avec le
dispositif, automatiquement.
désactiver
Pour reconnecter manuellement.
Réponse
automatique
activer
Pour répondre automatiquement à des appels du téléphone
associé.
désactiver
Pour répondre aux appels manuellement.
Code
d’association
Définissez un mot de passe pour associer l’unité à un autre dispositif
Bluetooth.
Bluetooth....,
Connexion
automatique
3. Appuyez sur l’icône de retour pour sortir et revenir à l’écran précédent
DVD
1. Appuyez sur [DVD]
2. Appuyez plusieurs fois sur une option pour sélectionner.
Options
Description
Réglages d’usine
Oui/Non
Réinitialiser au réglage d‘usine
Version du
logiciel
Affichage
uniquement
Affichage de la version du logiciel
3. Appuyez sur l’icône de retour pour sortir et revenir à l’écran précédent.
Réglage des paramètres de volume
Vous pouvez définir des niveaux de volume différents pour des sources différentes.
1. Appuyez sur l'icône [volume] pour visualiser et accéder au sous-menu de paramètres du
volume.
2. Appuyez sur la source que vous désirez régler.
3. Appuyez sur [
] ou [
] pour assigner une valeur de 0 à 12. Quand vous changez la source,
le volume augmente automatiquement.
4. Appuyez sur l'icône de retour pour sortir et revenir au menu de réglage de l’écran précédent.
106
FONCTIONNEMENT DU SYNTONISEUR
Sélectionnez la radio comme source de lecture
Ouvrez le menu de source et appuyez sur [Radio].
Sélection d’une bande radio
Appuyez sur la touche [BAND] de la télécommande et touchez l’icône sur l’interface d’usager
pour choisir une bande radio FM1, FM2, FM3, AM1 et AM2.
Figure 9. Écran radio
Syntoniser
Syntonisation automatique
Appuyez sur les touches [
]/[
de la télécommande ou appuyez sur les icônes
[
]/[
de l’interface usager pour chercher une station précédente ou postérieure.
Pour arrêter la recherche, répétez l’opération précédente ou appuyez sur d’autres touches de
fonction radio.
REMARQUE: quand une station est reçue, la recherche s’arrête et la station est jouée.
Syntonisation manuelle
Méthode 1:
Touchez et maintenez l’icône [
]/[
] pendant une seconde pour passer au mode de
syntonisation manuelle.Pendant la syntonisation manuelle, la fréquence changera un à un.
Appuyez sur l'icône [
]/[
]de l’interface d’usager pour syntoniser une station précédente ou
postérieure.
Au bout de 15 secondes environ, l'appareil revient automatiquement au mode de recherche
automatique. Vous pouvez également revenir à la recherche automatique en appuyant brièvement
la touche [Auto] puis la touche [Avance] ou [Recul].
Méthode 2:
1. Appuyez sur l'icône de clavier numérique [
]. Quand le clavier apparaît, toucher les chiffres
pour introduire la fréquence.
2. Appuyez sur [
] tpour effacer les chiffres un à un.
3. Appuyez sur [OK] pour accéder.
107
Station prédéfinie
L’appareil à 5 bandes, FM1, FM2, FM3, AM1, AM2, et chaque bande peut sauvegarder 6 stations;
l’appareil peut donc mettre en mémoire 30 stations au total.
Sauvegarde manuelle
1. Syntonisez la station que vous voulez mettre en mémoire.
2. Touchez et maintenez une des fréquences (1 à 6) pour sauvegarder la station choisie
Recherche automatique de stations
Appuyez sur l'icône de recherche [
] pour chercher des stations et sauvegarder
automatiquement les 6 stations les plus puissantes sur la bande actuelle.
Écouter une station
1. Choisissez une bande.
2. Appuyez un bouton prédéfini sur l’écran pour choisir la station correspondant sauvegardée.
Recherche de station de radio locale (LOC)
Quand la fonction Local est activée, l’appareil ne reprend que les stations de radio ayant un signal
fort. Pour activer la fonction Local sous le mode syntonisation AM/FM, appuyez sur [ ] à l’écran.
La fiche d’options apparaît. Appuyez sur l'icône [
]et choisissez Radio Local ou Distance.
Quand la fonction Local est activée, le voyant LOC s’allume en haut de l’écran. Quand la fonction
Distant est activée, le voyant DX s’allume en haut de l’écran.
Sélection EQ
Appuyez sur l'icône de l’égaliseur [
] et introduisez les paramètres de l’EQ..
RDS
Le RDS (Radio Data System, système de radiocommunication de données) transmet des
données à la radio. Ces données incluent des informations comme identification de la station,
artiste et titre de la chanson.
La disponibilité du service RDS change selon la zone. Veuillez noter que si le service RDS n’est
pas disponible dans votre région, le service suivant ne le sera pas non plus.
Régler les paramètres du RDS
1. Dans le menu Radio, appuyez sur [ ] et [Option]. Le menu Options s’affichera.
2. Appuyez sur l’option choisie pour changer les paramètres.
[RDS]: pour activer ou désactiver la fonction RDS.
[AF]: Activer ou désactiver la fonction AF
[EON]:Activer ou désactiver la fonction EON
[TA]: Activer ou désactiver la fonction TA
CT] pour activer ou désactiver la fonction de synchronisation « Clock time (heure de l’horloge).
[PTY]: pour montrer la liste de PTY (type de programme).
108
AF
L'appareil peut passer automatiquement à une fréquence alternative (AF) de la même station si la
qualité de la réception devient trop mauvaise. Appuyez sur l'icône ARRÊT/MARCHE pour activer
ou désactiver la sélection automatique de fréquences alternatives en mode réception RDS.
EON (Enhanced Other networks)
TA: Les annonces de circulation peuvent être écoutées via l'émetteur actuellement choisi ou par
des émetteurs d'autres réseaux.
AF: La liste des fréquences des stations RDS est élargie par les données EON.
EON étend l'utilisation des informations RDS. La liste AF des stations pré-réglées, y compris la
station écoutée, est actualisée en permanence. Lorsque vous réglez une station écoutée dans la
région où vous habitez, vous pouvez recevoir cette même station avec une fréquence alternative
ou tout autre station qui propose le même programme. EON cherche en continue les stations
locales TP (Traffic Program) pour les annonces de circulation.
TA
Appuyez sur l'icône TA MARCHE/ARRÊT pour activer ou désactiver la priorité des annonces de
circulation.
Volume TA
Le volume sonore des informations routières a été réglé à l'usine sur la valeur 20. Pour modifier
le volume sonore des annonces de circulation, tournez le codeur rotatif pendant une annonce.
L'appareil enregistrera automatiquement la valeur du volume actuelle.
CT (Heure de l’horloge)
Certaines stations transmettent l’heure et la date avec le signal RDS codé. L’heure de l’horloge se
règlera automatiquement quand la fonction « CT » est activée.
REMARQUE: Il est possible que les stations émettant près des zones horaires ne donnent
pas la bonne heure dans leur zone particulière. Dans ce cas, désactivez la fonction CT, et
réglez l’heure manuellement.
Fonction PTY
TY est l’abréviation de Program Type (type de programme), fonction affichant la catégorie de
P
programme de la station en cours (journal, sports, débat, etc.). Utilisez la barre de défilement pour
choisir plusieurs codes de catégorie.
Une fois que vous avez sélectionné un code de catégorie, les options de PTY s’afficheront à
l’écran.
Quand on touche une option PTY (par exemple, journal), le prochain PTY disponible est
recherché automatiquement, en augmentant la fréquence de syntonisation jusqu’à ce que le PTY
de la station suivante coïncide avec l’actuelle. Si aucun PTY n’est trouvé, l’appareil revient à la
fréquence d’origine.
109
LECTURE DE FICHIERS AUDIO
Types compatibles de disques audio
Le système peut lire les types de disque suivants:
DVD – DVD contenant audio ou vidéo.
Disques audio – CD audio contenant audio, vidéo ou fichiers d’image.
Disques MP3 – Un disque contenant audio, vidéo et fichiers d’image (par exemple, un CD-R
avec des fichiers MP3 téléchargés).
REMARQUE: Cet appareil est conçu pour la lecture de CD/DVD préenregistrés (originaux).
Il est possible que certains CD/DVD gravés ne puissent pas être lus à cause des différents
formats d’enregistrement.
Fonctionnement du DVD
Menu principal du DVD
REMARQUE: Si l’appareil est correctement installé, il ne sera pas possible de voir une
vidéo DVD sur l’écran TFT à moins que le frein à main soit mis. Si l’on essaye de lire un
DVD tant que la voiture est en marche, l’écran TFT affichera:
Attention !!!
Il est illégal de regarder une vidéo pendant qu’on conduit un véhicule motorisé. Mettez le
frein à main pour regarder la vidéo.
Sur l’écran du menu principal, appuyez sur l’icône de disque ou insérez un disque dans la
fente à disques, avec l’étiquette vers le haut. La lecture commence quand un disque est inséré
correctement.
Comment insérer un disque
Quand on insère un disque, l’appareil se met en mode [DISP] automatiquement.
Comment éjecter un disque
Appuyez sur la touche [
] du panneau avant ou de la télécommande pour éjecter le disque.
Commandes de l’écran tactile
Les parties tactiles primordiales pour la lecture d’un DVD sont décrites dans ce qui suit:
A: Revenir au menu principal
B: Type de disque
C: Voir l’heure
D: Lire une vidéo et afficher l’information de
lecture.
E: Afficher le menu de commande à l’écran
Figure 10.Surfaces de commandes de l’écran
110
Commandes de lecture
Pour accéder aux commandes à l’écran, touchez l’écran n’importe où, sauf le coin supérieur
gauche, et touchez à nouveau pour annuler l’affichage.
Connexion d’un dispositif USB
1. Ouvrez le couvercle USB
2. Introduisez le dispositif USB dans le connecteur USB. La lecture commencera
automatiquement.
REMARQUE:
1. S’il y a des fichiers audio compatibles dans la clé USB, le système accèdera au menu
fichier audio automatiquement. S’il n’y a pas de fichiers audio, mais il y a des fichiers
vidéo compatibles dans le dispositif USB, le système accèdera au menu fichier vidéo
automatiquement. S’il n’y a pas de fichiers audio ou vidéo, mais il y a des fichiers
d’images compatibles dans la clé USB, le système accèdera au menu de fichiers d’image
automatiquement. S’il n’y a pas de fichiers compatibles de audio/vidéo/image dans la mémoire
USB, l’écran affichera: There are no audio/video/picture files supported (il n’y a pas de
fichiersaudio/Vidéo/Image compatibles).
2. Pas tous les dispositifs USB ne sont compatibles avec l’appareil..
Lecture
Une fois que le disque ou dispositif USB a été inséré, la lecture commence automatiquement.
Pause
Pendant la lecture d’un fichier audio/vidéo, appuyez sur la touche [
] de la télécommande ou
ouvrez le menu d’icônes de l’écran, puis touchez l’icône [
]; appuyez sur la touche [
] une
fois de plus et continuez la lecture.
Arrêt
Pour les fichiers audio ou vidéo, appuyez sur la touche d’arrêt [ ■ ] de la télécommande ou ouvrez
le menu d’icônes de l’écran, puis touchez l’icône [ ■ ] pour arrêter. Appuyez sur la touche [
]
pour continuer à partir du point de pause.
TAppuyez à nouveau sur la touche [ ■ ] pour un arrêt complet, et appuyez sur la touche [ ■ ] de la
télécommande. Appuyez sur la touche [
] pour reprendre depuis le premier fichier.
Précédent/Suivant
Appuyez sur [
]/[
] à l’écran pour passer aux chapitres/pistes précédents/suivants.
Chercher un dossier
Pour contrôler les dossiers
Appuyez sur la touche [ ] pour ouvrir le menu.
1. Appuyez sur pour afficher tous les dossiers
disponibles.
2. Touchez un dossier, puis touchez le fichier souhaité.
3. Touchez à nouveau le fichier pour lancer la lecture.
111
Figure 11. Écran de dossiers
Pour les fichiers audio
1. Appuyez sur [
] pour afficher tous les dossiers audio disponibles.
2. Touchez un dossier, puis touchez le fichier souhaité.
3. Touchez à nouveau le fichier pour lancer la lecture.
Fichiers vidéo
1. Appuyez sur l’icône de vidéo [
] pour afficher tous les dossiers vidéo disponibles.
2. Touchez un dossier, puis touchez le fichier souhaité.
3. Touchez à nouveau le fichier pour lancer la lecture.
Fichiers image
1. Appuyez sur l’icône images [
] pour afficher tous les dossiers d’images disponibles
2. Touchez un dossier, puis touchez le fichier souhaité.
3. Touchez à nouveau le fichier pour lancer la lecture.
Répéter la lecture
Appuyez sur la touche [RPT] de la télécommande ou ouvrez le menu d’icônes de l’écran, puis
] pour changer les modes de répétition de la façon suivante:
touchez l'icône de répétition[
Figure 12. Mode répétition
Répéter A-B
Pendant la lecture d’un DVD ou VCD, il est possible de repasser le contenu entre les instants A et
B plusieurs fois:
Figure 13. Répétition A-B activée – désactivée
Lecture aléatoire
Vous pouvez effectuer la lecture des pistes/fichiers d’audio dans un ordre aléatoire. Pendant la
lecture d’un CD, appuyez répétitivement sur la touche [RDM] de la télécommande pour activer ou
désactiver la lecture aléatoire..
REMARQUE:
Quand l’option [Shuffle] est désactivée, l’appareil reprend la lecture à partir de la séquence
actuelle.
Fonction commande de lecture interactive
Cette fonction est disponible pour les disques VCD possédant la fonctionnalité de Commande de
Lecture (Ver. 2.0 ou plus). Appuyez sur la touche [MENU] de la télécommande ou ouvrez le menu
d’icônes de commandes de l’écran, puis appuyez plusieurs fois sur l'icône [
] pour activer cette
fonction.
REMARQUES:
1. Quand Playback Control (Commande de lecture interactive) est activé, la lecture revient à la
liste de chansons et commence à la première piste.
112
2. Quand Playback Control est activé, les fonctions d’avance rapide, de ralenti et de recherche de
piste précédente/suivante sont disponibles. Par contre la répétition et la recherche d’une piste
ou chapitre particuliers ne sont pas disponibles.
3. Les fonctions recherche, recherche de lecture ou lecture aléatoire désactivent
automatiquement la fonction de Commande de lecture
Sélection du mode audio
Pendant la lecture d’un VCD, l’usager peut choisir un mode audio (R/L/stéréo).
1. Pendant la lecture, toucher la moitié inférieure de l’écran pour afficher le menu à l’écran.
2. Appuyez sur l'icône ‘Next’ [ ] pour ouvrir le deuxième menu.
3. Appuyez sur l'icône audio [
] plusieurs fois jusqu’à choisir le mode souhaité.
Choisir la langue des sous-titres
Pour les disques DVD contenant deux langues de sous-titres ou plus.
1. Pendant la lecture, touchez l’écran pour afficher le menu à l’écran.
2. Appuyez sur l'icône Next (suivant) [ ] pour afficher le deuxième menu.
3. Appuyez sur l'icône langue[
] plusieurs fois pour choisir une langue. La langue choisie
s’affiche.
Changer l’angle d’affichage
Certains DVD contiennent des scènes alternatives, comme par exemple des scènes filmées sous
différents angles.
Pour ces DVD, il est possible de choisir une des scènes alternatives disponibles.
1. Pendant la lecture, touchez l’écran pour afficher le menu à l’écran.
2. Appuyez plusieurs fois sur l'icône Angle [
] de la télécommande. L’angle d’affichage change.
Paramètres vidéo
Appuyez sur l'icône Paramètres [ ] pour accéder au mode de Paramètres vidéo, appuyez sur
les icônes de direction vers la gauche ou la droite[
]/[
] pour régler l’effet souhaité. Vous
pouvez régler la brillance, le contraste et la saturation de la vidéo de 1 à 20.
Information de lecture
Touchez l’écran pendant la lecture d’un disque DVD ou VCD et l’information de lecture s’affichera
sur le haut de l’écran TFT.
Pour DVD:
Figure 14. Affichage de l’information du DVD.
1. Type de disque.
2. Revenir au menu principal
3. Information sur le titre du DVD. « 1/6 » indique que ce DVD contient 6 titres et que le titre
actuellement en lecture est le premier.
4. Information sur les chapitres du DVD. « 2/9 » indique que le titre actuel contient 9 chapitres et
que le chapitre en cours est le deuxième.
5. Affichage de l’heure.
113
Pour VCD:
Figure 15. Affichage de l’information sur le VCD
1. Type de disque.
2. Revenir au menu principal
3. Information sur la piste du VCD. « 1/16 » indique que ce VCD contient 16 titres et que la piste
en cours est le premier titre.
4. Affichage de l’heure
Temps écoulé
1. Temps écoulé de la piste en cours de lecture.
2. Temps total de la piste en cours de lecture.
Figure 16. Affichage du temps écoulé
Sélection directe de piste
Pour choisir directement une piste, appuyez sur l'icône [ ] des commandes à l’écran pour
afficher le menu de sélection directe. Accédez à la piste souhaitée avec le clavier numérique à
l’écran. Touchez le [OK] de la piste choisie.
Rotation d’images
1.Pendant la lecture d’images, touchez l’écran pour afficher le menu à l’écran.
2. Appuyez plusieurs fois sur l’icône de rotation [
] effectuer une rotation de l’image.
Zoom
L’usager peut faire un zoom sur les images pour les observer de plus près.
1.Pendant la lecture des images, touchez l’écran pour afficher le menu à l’écran.
2. Appuyez plusieurs fois sur [
] pour zoomer sur l’image.
Figure 17. Zoom
114
Information générale du disque
Propriétés du disque
Symbole
Propriétés du disque de 12 cm
Temps maximum de
lecture
Une face, couche simple (DVD-5)
Une face, double couche (DVD-9)
Deux faces, couche simple (DVD-10)
Deux faces, double couche (DVD-18)
(Méthode MPEG 2)
133 minutes
242 minutes
266 minutes
484 minutes
(Méthode MPEG 1)
74 minutes
74 minutes
Une face, couche simple (VCD)
Une face, couche simple
Symboles du disque
Symbole
Signification
Nombre de langues enregistrées. Le nombre dans l’icône indique le nombre de
langues du disque (maximum 8)..
Nombre de langues de sous-titres disponibles dans le disque (maximum 32)..
Nombres d’angles offerts (maximum 9).
Ratios d’aspect disponibles. « LB » provient de Letter Box et « PS » de Pan/
Scan. Dans l’exemple de gauche: la vidéo 16:9 peut être convertie à vidéo Letter
Box.
Indique le code de région où le disque peut être lu.
• Region 1: USA, Canada, Îles de l’Est du Pacifique.
• Region 2: Japon, Europe Occidentale, Europe du Nord, Égypte, Afrique du
Sud, Moyen-Orient.
• Region 3: Taiwan, Hong Kong, Corée du Sud, Thaïlande, Indonésie, Asie du
Sud-est.
• Region 4: Australie, Nouvelle Zélande, Amérique centrale et Amérique du
Sud, îles du Sud du Pacifique /Océanie.
• Region 5: Russie, Mongolie, Inde, Asie Centrale, Europa Orientale, Corée du
Nord, Afrique du Nord, Asie nord-occidentale.
• Region 6: Chine Continentale.
• ALL (TOUTES): toutes les régions
115
MENU DE COMMANDES DE L’ÉGALISEUR
Réglage des commandes de l’égaliseur
L’écran de réglage de l’égaliseur permet de régler facilement le système audio pour s’adapter aux
caractéristiques acoustiques de la voiture, en fonction du type de véhicule et des dimensions de
la cabine. Par exemple: le réglage adéquat des commandes audio peut améliorer la réponse de
fréquence des haut-parleurs.
Avec l’écran de réglage de l’égaliseur, il est possible de régler l’option niveaux de balance/
équilibreur et d’activer/désactiver la sonorité d’une source sélectionnée (disque, radio, USB, AVIN1, AV-IN2) d’audio ou vidéo.
Égaliseur (EQ)
Appuyez sur l’icône de l’égaliseur (EQ /
) pour afficher et sélectionner le niveau acoustique
prédéfini que vous désirez (Pop/Techno/Rock/Classique/jazz/Optimal ou Usager).
REMARQUE: l’égaliseur passera automatiquement à « Utilisateur » quand chaque fonction
audio est réglée.
Figure 18. Écran de l’égaliseur
L'égaliseur programmable permet de régler les graves, moyennes et aigus aussi bien pour le
volume que pour la fréquence et la valeur Q (bande passante du filtre).
Les valeurs sont les suivantes:
pour la plage des graves: pour les fréquences moyennes:
pour les plages aigües:
Fréquence: Valeur Q: Fréquence: Valeur Q: Fréquence:
116
60 / 80 / 100 / 200 kHz
1 / 1,25 / 1,5 / 2
0,5 / 1 / 1,5 / 2,5 kHz
0,5 / 0,75 / 1,0 / 1,25
10 / 12,5 / 15 / 17,5 kHz
Réglage de l’équilibreur et la balance
L’usager peut régler les paramètres d’atténuation avant / arrière, la balance gauche/droite et les
niveaux du caisson d’extrêmes graves.
1. Accédez au mode de paramètres de l’égaliseur
2. Appuyez sur l’icône [
] du menu d’interface EQ.
Figure 19. Écran de réglage de l’équilibreur et la balance
Balance
Cette fonctionnalité sert à équilibrer les niveaux de sortie audio entre les côtés gauche et droit de
la voiture. Appuyez sur les icônes ◄ ou ► pour régler la balance de -12 (gauche) à +12 (droite).
Le réglage peut être fait en touchant l’écran dans le carré pour bouger le rond bleu.
Équilibreur
Cette fonctionnalité sert à atténuer les niveaux de sortie audio à l’avant et l’arrière de la voiture.
Appuyez sur les icônes ◄ ou ► icons to change the fade control settings -12 (Rear) to +12
(Front). The setting pour régler la balance de -12 (arrière) à +12 (avant). Le réglage peut être fait
en touchant l’écran dans le carré pour bouger le rond bleu.
Sub (caisson d’extrêmes graves)
Cette fonctionnalité sert à réduire ou augmenter le son des sous-graves. Appuyez sur les icônes
◄ ou ► pour régler la balance de -12 à +12. Le réglage peut varier selon les paramètres d’entrée
de l’amplificateur de sous-graves.
Pour sortir de balance-équilibreur, appuyez sur l’icône de retour en haut à gauche de l’écran.
REMARQUE:
Le mode EQ passera automatiquement à « Utilisateur » quand on règlera la valeur de
fréquence sous tous les modes en plus de « User ».
117
COMMANDES DE L’iPod®/IPHONE®
Accéder au mode iPod®
L’usager peut contrôler un iPod®/iPhone® en utilisant l’écran tactile pour accéder aux albums,
chansons, vidéos, etc
REMARQUE: Pour une connectivité de base, l’iPod®/iPhone® doit être branché à l’appareil
par le câble adaptateur de l’iPod®/iPhone® disponible avec l’iPod®/iPhone® (disponible
aussi séparément). Pour la lecture de vidéo iPod®/iPhone®, employez un câble jLInk USB
équipé d’un connecteur de 3,5 mm AV. Assurez-vous de ce que votre iPod®/iPhone® ait la
dernière version du firmware de Apple pour éviter des problèmes de connectivité.
L’appareil passe automatiquement au mode iPod® quand un iPod®, un iPod® Touch ou iPhone®
est branché au connecteur USB du panneau avant. On peut aussi accéder à un iPod® depuis
l’écran de menu principal en touchant l’icône de iPod® (disponible seulement quand un iPod® ou
iPhone® est branché au connecteur USB du panneau avant).
Figure 20. Connexion de l’iPod®/iPhone®®
Menu principal de l’iPod®/iPhone®
Pour accéder au mode iPod®, appuyez sur [iPod], dans le menu principal, pour entrer sur le
menu de l’iPod®. Accédez au menu iPod à partir de ce menu. Appuyez sur p ouqpour parcourir le
menu..
3 4 5
1
2
Figure 21. iPod®/iPhone® Menu
1. Revenir au menu principal / 2. Liste de fichiers pour se déplacer vers le haut/vers le bas. 3.
Afficher les fichiers de musique / 4. Afficher les fichiers de vidéo / 5. Afficher les fichiers d’image
Conseil: Apple ne supporte pas la lecture vidéo et images des nouveaux appareils dotés de
la connexion Lightning. Ceci concerne entre autres les appareils Apple iPhone 5, iPhone
5s/5c, iPod touch 5G, iPod Nano 7G.
118
Pause de lecture
1. Appuyez sur l'icône de pause [ ] au bas de l’écran pour arrêter la lecture. « PAUSE » est
affiché sur l’écran, et l’icône Pause devient un icône de lecture [ ].
2.Appuyez sur l'icône de lecture [ ]pour reprendre la lecture.
Sélection d’une piste
Piste suivante
Appuyez sur l'icône avance [
] pour aller au début de la piste suivante.
Piste précédente
1. Appuyez sur l'icône recul [
] pour revenir au début de la piste actuelle.
2. Appuyez deux fois sur l'icône recul [
] pour revenir au début de la piste précédente
Avance rapide / recul rapide
Avance rapide
Appuyez et maintenez l’icône d’avance [
Recul rapide
Appuyez et maintenez l’icône de recul [
].pour avancer rapidement à une piste.
]pour revenir rapidement à une piste.
Figure 22. Commandes de lecture/pause et piste de l’iPod®/iPhone®
Répétition de la lecture
Cette fonctionnalité permet de répéter la lecture d’une piste plusieurs fois. Pour cela, appuyez
] et choisissez Repeat one (répéter une piste) ou Repeat all (répéter
sur l'icône de répétition [
toutes les pistes).
Lecture aléatoire
Cette fonction permet la lecture des pistes dans un ordre aléatoire. Pour cela, appuyez sur l'icône
aléatoire [
] et la lecture aléatoire commencera.
Figure 23. Commandes pour la répétition de la lecture et la lecture aléatoire de iPod®/iPhone®
119
UTILISATION BLUETOOTH®
ÉCRAN BLUETOOTH®
Bluetooth® et sa technologie, permettent de synchroniser et de transférer des informations
entre appareils, sans besoin de fil. Les possibilités audio de Bluetooth® permettent d’utiliser les
téléphones sans fil en tant que système portatif. Avant d’essayer d’utiliser les fonctions Bluetooth®
de l’appareil, veuillez vous assurer que votre téléphone sans fil supporte les fonctions Bluetooth.
Nous utilisons la dernière technologie Bluetooth® afin de vous offrir une meilleure connexion,
davantage de fonctions et un appariement plus facile ; mais tous les téléphones fonctionnent
différemment. Veuillez lire le manuel d’instructions de votre téléphone et vous familiariser avec
ses fonctions Bluetooth® disponibles. Toutes les fonctions ne fonctionneront pas avec tous les
téléphones.
REMARQUE:
La distance visuelle entre cet appareil et votre téléphone portable doit être inférieure ou égale à
2,4 mètres si vous voulez arriver à envoyer ou recevoir des informations ou signaux vocaux en
utilisant la technologie sans fil Bluetooth.
Veuillez vous rassurer que votre téléphone portatif soutient des fonctions Bluetooth® (profils
mains libres ou casque ou les deux). Adhérez aux consignes suivantes pour une opération
réussie:
• Avant d’utiliser les fonctions Bluetooth, vous devez apparier votre téléphone portatif à
l’installation de tête VXE 3010 (voir « Apparier le système Bluetooth® avec votre téléphone
portatif et l’installation de tête »). Pour assurer la meilleure réception pour l’appariment et
le rebranchement, assurez-vous que la pile du téléphone est chargée avant que vous ne
commenciez.
• Essayez de performer l’appariment dans quelques minutes après l’allumage du téléphone.
• Lorsque l’appareil a été apparié avec le téléphone, le numéro du modèle de l’appareil
« VXE 3010 », sera affiché au téléphone portatif.
• Pour avoir la meilleure performance, gardez toujours votre téléphone portatif dans 3 mètres de
l’installation de tête.
• Gardez toujours un chemin clair entre le téléphone portatif et l’installation de tête. Ne placez
jamais d’objert métallique ou autre obstacle entre le téléphone portatif et l’installation de tête.
• Certains téléphone portatifs (comme Sony Ericsson) peuvent avoir un choix « Power Saving
Mode ». VEUILLEZ NE PAS utilisez le mode d’économie de puissance avec le VXE 3010.
• Avant d’accepter ou faire un appel, assurez vous que la fonction Bluetooth® de votre téléphone
portatif est allumée.
• Pour assurer la meilleure qualité/performance de conversation, restez dans un mètre du
microphone lorsque vous parlez.
• Pour débrancher manuellement le téléphone mobile de l’unité de tête, appuyez sur l’icône en
forme de maillon de chaîne de l’interface utilisateur Bluetooth® (à côté du nom du téléphone
mobile). L’appareil Bluetooth® se déconnecte tout en restant apparié.
• À travers l’appareil, l’usager peut réaliser des appels téléphoniques avec des téléphones ayant
la technologie Bluetooth. L’usager peut aussi écouter de la musique à partir d’un dispositif
Bluetooth®.
Association des dispositifs avec Bluetooth®
Pour connecter le téléphone avec Bluetooth, vous devez associer le téléphone à l’appareil. Cela
se fait en une seule fois. L’usager peut associer jusqu’à 5 téléphones. L’usager peut chercher des
unités principales Bluetooth® à travers le téléphone cellulaire.
120
1. Activez la fonctionnalité Bluetooth® dans le dispositif.
2. Cherchez des dispositifs Bluetooth® avec le téléphone cellulaire.
3. Sélectionnez l’ID du dispositif Bluetooth®, « VXE 3010 », dans la liste d’association.
4. Introduisez le code d’accès prédéfini « 0000 »
REMARQUES:
•Le rayon d’action entre cet appareil et un dispositif Bluetooth® est d’environ 5 mètres.
• Avant de connecter un dispositif Bluetooth® à l’appareil, familiarisez-vous avec les capacités
du dispositif Bluetooth®.
• La compatibilité avec tous les dispositifs Bluetooth® n’est pas garantie.
• Tout obstacle entre cette unité et un dispositif Bluetooth® peut réduire le rayon d’action.
• Éloignez cet appareil de tout autre dispositif électronique pouvant provoquer une interférence.
Figure 24. Menu du Bluetooth®
Déconnexion d’un dispositif Bluetooth®
Pour déconnecter un dispositif, appuyez sur [disconnect] (déconnecter). La radio affichera alors
une liste de dispositifs associés. Si vous touchez l’icône “Plug” vert, un téléphone préalablement
associé à la radio BT se reconnectera. Si vous touchez l’icône “Wastebin” (corbeille) à côté du
nom d’un dispositif, vous annulez l’association du téléphone à la radio.
REMARQUES.
•Le dispositif se déconnectera s’il est déplacé au-delà du rayon d’action.
• Pour reconnecter le dispositif, replacez-le dans le rayon d’action.
• Si vous ne désirez pas reconnecter le dispositif automatiquement, appuyez sur [Options], puis
mettez [Auto connect] sur [OFF].
Pour plus d’information, veuillez consulter la section « Paramètres de Bluetooth®.
Figure 25. Écran d’options et clavier numérique du Bluetooth®
Pour faire un appel
1. Sélectionnez la fonctionnalité Bluetooth® dans le menu initial.
2. Dans la page d’options, consultez l’icône « phone Synch » et appuyez sur « Sync » pour
synchroniser le répertoire téléphonique avec le BT. Si vous avez beaucoup de contacts, cela
peut prendre 3 ou 4 minutes.
121
3. Cherchez le numéro de téléphone sur la liste suivante:
[Phone Book] (répertoire téléphonique)
[Call History] (historique d’appels)
[Missed calls] (appels manqués)
[Received calls] (appels reçus)
[Dialed calls] (numéros composés)
Ou bien utilisez directement le clavier numérique, puis appuyez sur [
] pour appeler.
Figure 26. Commandes du journal d’appels Bluetooth®
Recevoir un appel
BPar défaut, tous les appels entrants sont reçus automatiquement.
1. Si vous avez un appel entrant, l’écran affichera le message « incomming call… » (appel
entrant).
2. Toucher l’écran pour sélectionner [hang up] (raccrocher) ou [Answer] (répondre). Parlez par le
micro Bluetooth
.
Conseil
Vous pouvez recevoir les appels manuellement en mettant [Auto answer] sur [OFF].
Figure 27. Écran d'appel entrant Bluetooth®
Réglage des paramètres du Bluetooth
1. Dans le menu Bluetooth, appuyez sur [options]. Le menu d’options s’affichera
2. Touchez l’option choisie pour régler.
[Bluetooth]: Pour activer ou désactiver la fonctionnalité “Bluetooth”.
[Auto connect]: Pour activer ou désactiver la fonctionnalité “Auto Connect”.
[Auto answer]: Pour activer ou désactiver la fonctionnalité “Auto Answer”.
[Pairing Code]: Pour définir le code d’association.
[Phone sync]: Pour synchroniser le répertoire téléphonique, appuyez sur [OK] dans le sousmenu. La synchronisation peut prendre plusieurs minutes à charger sous les paramètres
initiaux.
122
REMARQUE:
Vous pouvez aussi régler les paramètres du Bluetooth® dans le menu « paramètres »..
Figure 28. Menu des paramètres du Bluetooth®
Fonctionnalité musique du Bluetooth®
Bluetooth® offre un profil avancé de distribution audio (A2DP) pour transmettre de la musique
à partir d’un téléphone cellulaire ou d’un lecteur multimédia portable (PMP), dénommé parfois
lecteur MP3. Le VXE 3010 permet de reproduire des fichiers audio à partir d’un téléphone
cellulaire ou d’un PMP à travers la connexion Bluetooth®.
REMARQUE: Veuillez sortir du mode A2DP avant de faire un appel téléphonique, car il
pourrait se produire des résultats inespérés selon le modèle de votre téléphone cellulaire.
AVRCP est l’abréviation anglaise de Profil de Télécommande d’Audio/Vidéo. Les téléphones
cellulaires compatibles avec cette fonctionnalité peuvent contrôler un lecteur audio à travers
Bluetooth.
Le VXE 3010 peut contrôler un lecteur audio Bluetooth® à travers le profil avancé de distribution
audio (A2DP) ou le Profil de Télécommande d’Audio/Vidéo (AVRCP). Les lecteurs audio
Bluetooth® (ou adaptateurs Bluetooth®) compatibles avec ces profils peuvent se connecter à
l’appareil.
Pendant qu’il écoute de la musique de n’importe quelle source, l’usager peut faire un appel
téléphonique en appuyant les touches numériques du téléphone cellulaire. L’appareil arrêtera de
jouer la musique et l’écran TFT affichera « Calling » (appel sortant) ; une fois l’appel reçu, la voix
sera transférée à l’appareil. Quand l’appel est fini, l’écran affiche le menu de lecture de musique.
Dans le cas d’un appel entrant, la musique s’arrêtera et l’écran affichera « incoming » (appel
entrant). Une fois l’appel terminé, l’écran affichera le menu de lecture de musique.
Figure 29. Menu audio du Bluetooth®
123
COMMANDES AV-IN1/AV-IN2
AV-In1
AV-IN1 desservit la lecture audio/vidéo à partir d’un dispositif périphérique connecté à l’appareil
avec un connecteur de 3,5 mm situé sur le panneau avant.
AV-In2
AAV-IN2 desservit la lecture audio/vidéo à partir d’un dispositif périphérique connecté à l’appareil
avec des connecteurs RCA situés à l’arrière de l’appareil.
Il est possible de connecter un dispositif périphérique d’audio/vidéo à l’appareil.
1. Branchez le dispositif périphérique avec un câble AV adéquat.
2. Touchez le coin supérieur gauche pour afficher le menu principal.
3. Appuyez sur [Aux 1]/[Aux 2] pour accéder à un dispositif périphérique.
REMARQUE: Le dispositif audio/vidéo doit être branché à l’appareil avec un câble
adaptateur audio/vidéo disponible séparément.
REMARQUE: Il ne sera possible de voir la vidéo que si le frein à main est mis. Le frein à
main doit être connecté pour que cet accessoire fonctionne.
1
2
3
4
Left Audio
Right Audio
Ground
Video
3.5 mm A/V Cable(not included)
Figure 30. Connexion de dispositifs périphériques
124
COMMANDE DE VOLANT (SWC - STEERING WHEEL
CONTROL)
(le cas échéant)
Le VXE 3010 est compatible avec les adaptateurs de commande de volant Dietz UNICO DUAL
PLUS avec câble, PAC (Pacific Accessory Corporation) SWI-PS et Metra ASWC. Une prise
femelle de 3,5 mm (étiquetée «SWC Interface»), à l’arrière de l’appareil, permet de connecter
aux adaptateurs. Cf. instructions livrées avec les adaptateurs pour de plus amples informations
d’installation.
1.Augmenter le son (+)
4. Chercher vers le haut
(suivant)
7. Préréglage(+)
10. Réponse
2. Baisser le son (-)
5.Chercher vers le bas
(précédant)
8. Préréglage(-)
11.BT terminer
3. Assourdir
6. Source
9. Bande
Pour accéder aux commandes SWC de programmation, appuyez sur l’icône du volant dans la
deuxième page du menu de source principal.
Figure 31. Écran de programmation de SWC
Programmation du SWC
Il est possible de programmer jusqu’à 11 fonctions du volant grâce à l’interface SWC intégrée. Il
est possible que toutes les fonctions ne soient pas compatibles dans certains véhicules.
1. Les fonctionnalités populaires du volant OE sont déjà prédéfinies à l’usine. Si votre véhicule
ne supporte pas exactement les mêmes fonctionnalités déjà prédéfinies, vous devrez effacer/
réinitialiser l’interface SWC et programmer les fonctions exactes de votre automobile. Pour
effacer/réinitialiser l’interface SWC, enfoncez « reset » et maintenez pendant 2 secondes.
2. Pour commencer à programmer l’interface SWC après l’avoir effacée/réinitialisée, tapez un
numéro 1 ~ 11, puis appuyez sur une fonction. La marque de vérification correspondant au
numéro et à la fonction devrait s’afficher. Continuez à programmer de la sorte jusqu’+à ce que
toutes les fonctionnalités de la commande du volant OE soient complètes.
REMARQUE: Les fonctions 1 ~ 11 doivent être assignées à une fonction du volant OE.
Par exemple, si le volant OE ne supporte pas le préréglage + et le préréglage - , ces
fonctions doivent être effacées/réinitialisées pour que le reste des fonctions marche
convenablement.
3. Pour « mémoriser » la programmation effectuée à l’étape 2 ci-dessus, appuyez sur « program »
(programmer). Il vous sera indiqué d’enfoncer chaque bouton du volant OE (pendant une
seconde) pour que l’appareil puisse ainsi apprendre la fonctionnalité correspondante.
4. Après cela l’apprentissage/programmation est terminée.
125
FONCTIONNEMENT DE LA CAMERA ARRIÈRE
Cette unité est « prête pour la caméra ». Avant d’accéder à toute fonction de la caméra, il est
nécessaire d’installer une caméra de marche arrière (p. ex. Audiovox RVC1, vendue séparément).
Quand la caméra est installée, une image postérieure de ce qui est derrière la voiture s’affichera
quand le véhicule fera marche arrière. Si la voiture n’est plus en marche arrière l’appareil
montrera l’écran précédent.
126
DÉPANNAGE
Problème
Cause
Mesure corrective
PROBLÈMES D’ORDRE GÉNÉRAL
L’appareil ne s’allume
pas
La télécommande ne
fonctionne pas
Sortie audio faible/nulle
Mauvaise qualité ou
distorsion du
L’appareil se réinitialise
tout seul lorsque le
contact est coupé
Fusible de radio brûlé
Installez un nouveau
fusible du calibre
approprié.
Fusible de batterie du véhicule brûlé.
Installez un nouveau
fusible du calibre
approprié.
Opération illégale.
Appuyez sur le bouton
RESET sur l’avant de
l’appareil.
Pile usée
Pile usée
Pile mal insérée.
Insérez la pile
correctement
Mauvais branchement de la sortie
audio.
Vérifiez le câblage et
corriger.
Volume trop faible.
Augmentez le volume.
Mauvais branchement de
«MUTE».
Révisez le schéma de
câblage et vérifiez le
branchement de «MUTE».
Haut-parleurs endommagés.
Remplacez les hautparleurs.
Balance du volume très altérée.
Réglez la balance du canal
en position.
Le câble du haut-parleur est en
contact avec une pièce métallique du
véhicule.
Isolez tous les
branchements de câble
des haut-parleurs.
Le disque utilisé est piraté.
Utilisez une copie
originale.
La puissance nominale du hautparleur n’est pas compatible avec
l’appareil.
Branchez les haut-parleurs
appropriés.
Court-circuit du haut-parleur.
Vérifiez le contact du hautparleur.
Mauvais branchement entre le câble
ACC et le positif de la batterie.
Vérifiez le câblage et
corrigez.
127
Problème
Cause
Mesure corrective
Mauvais branchement sur le câble
du frein à main.
Vérifiez le câblage et corrigez.
PRK SW est activé, le frein à main
n’est pas enclenché.
Garez le véhicule dans un
endroit approprié et enclenchez
le frein à main.
L´image clignote ou
des interférences
s´affichent á
l´ecran
Le DVD n’est pas compatible avec
les paramètres actuels du système
TV.
Mauvaise connexion du signal
vidéo.
Modifiez la configuration pour
accepter le disque.
Image allongée ou
mauvaise rapport
hauteur/largeur de
l’affichage
Mauvaise configuration du format
de l’image.
Corrigez les paramètres de
format d’image.
L’antenne automatique n’est pas
correctement déployée.
Branchez correctement le câble
de commande de l’antenne.
L’antenne automatique est mal
branchée.
Branchez correctement le câble
de commande de l’antenne.
La fonction LOCAL est activée.
Desactivez la fonction LOCAL.
MONITEUR TFT
Pas d’image
Vérifiez le câblage et
corrigez.
RADIO
Recherche de
station faible
DISQUE
Ne peut pas insérer Disque déjà à l’intérieur l’unité.
le disque
Ejectez le disque actuel et
insérez un nouveau.
Image floue,
déformée ou
foncée
Utilisez un disque original.
Le disque a été copié sans
autorisation légale.
128
Problème
Cause
Mesure corrective
Le disque ne joue pas
Le disque est voilé ou égratigné.
Utilisez un disque en bon état.
Disque est sale ou moite.
Nettoyez le disque ou le
remplacer.
La saisie laser est sale.
Nettoyez la saisie laser avec un
disque de
nettoyage.
Un disque non compatible est
utilisé.
Utilisez un disque compatible.
Le code régional du disque n’est
pas compatible avec l’appareil.
Utilisez un disque avec le code
régional approprié.
Le disque est inséré à l’envers.
Insérez le disque avec l’étiquette
sur le dessus.
La fonction PBC ne
peut pas être utilisée au
cours de la lecture de
VCD
La fonction PBC n’est pas
disponible sur le disque.
Aucune répétition ni
recherche au cours de la
lecture de VCD
La fonction PBC est activée.
Désactivez la fonction PBC.
Le disque est sale ou rayé.
Nettoyez le disque ou le
remplacer.
Le fichier est endommagé ou
l’enregistrement de mauvaise
qualité.
Recréez un disque avec de bons
fichiers.
MP3
Interruption durant la
lecture
129
MESSAGES D’ERREUR
Message affiché
Cause
Chargement
Lecture du disque en cours.
Aucun disque
Le disque est sale.
Nettoyez le disque avec un
tissu doux.
Le disque est inséré à
l’envers.
Insérez le disque avec
l’étiquette sur le dessus.
Il n’y a pas de disque dans le
compartiment.
Insérez un disque.
Le disque est sale.
Nettoyez le disque avec un
tissu doux.
Le disque est inséré à
l’envers.
Insérez le disque avec
l’étiquette sur le dessus.
Bad Disc (mauvais disque)
Mesure corrective
Unknown disc (disque
inconnu)
Le format du disque n’est pas
compatible avec
cet appareil.
Region Error (erreur région)
Le code régional du disque
n’est pas compatible
avec celui de l’appareil.
Error (erreur)
Opération du mécanisme
illégale.
130
Appuyez sur la touche
EJECT durant 5 secondes
pour réinitialiser le
mécanisme de chargement.
SPÉCIFICATIONS
Lecteur DVD/CD
Disques compatibles: DVD + R / RW (à couche simple et double) et CD-R/RW
Formats de supports compatibles: CD-DA, MP3, WMA, VCD, SVCD, Xvid, AVI, MPEG1 / 2
Rapport signal/bruit: > 95 dBA
Portée dynamique: >95 dB
Réponse en fréquence: 20 Hz à 20 kHz, -3 dB
Séparation des canaux: >60 dB à 1 kHz
Convertisseur numérique-analogique: Echantillonnage hautes performances 24-bit / 192 kHz ,
modulateur Sigma-Delta multibit
Vidéo
Format: NTSC, PAL (détection automatique)
Sortie: 1 Vp-p (75 ohms)
Entrée: 1 Vp-p (75 ohms)
Radio FM (syntoniseur)
Fourchette de syntonisation: 87,5 MHz - 107,9 MHz
Sensibilité mono (-30 dB): 9 dBf
Seuil de sensibilité (-50 dB): 15 dBf
Autre sélection de canal: 70 dB
Rapport signal/bruit à 1 kHz: 58 dB
Atténuation d’image: 80 dB
Séparation stéréo à 1 kHz: >30 dB
Réponse en fréquence: 30Hz – 15kHz, -3dB
Radio AM (syntoniseur)
Fourchette de syntonisation: 522 kHz - 1 620 kHz
Sensibilité (-20 dB): 15 uV
Rapport signal/bruit à 1 kHz: 50 dB
Atténuation d’image: 60 dB
Réponse en fréquence: 50 Hz – 2 kHz, -3 dB
Écran
Dimensions de l’écran: 17,8 cm/7 po (mesuré dans sa diagonale), écran large 16:9
Type d’écran: Affichage à cristaux liquides (lcd) TFT haute définition
Résolution: 336 960 sous-pixels, 1440 (large) x 234 (haut)
131
Généralités
Impédance de l’entrée auxiliaire: 10k
Source d’alimentation: 11 to 16VDC, mise à terre négative.
Alimentation de l’antenne (Bleue): 500mA max, protection de limitation de courant
Amplificateur à distance (Blue/White): 500mA max, protection de limitation de courant
Température de Service: -20C ~ 65C
Fusible: 15-amp, mini ATM type
Dimensions du Châssis DIN: 7” X 7” X 2” (178mm x 178mm x 50mm)
Puissance en sortie: 4 x 40 watts max.
Rapport signal - bruit: 70dBA en dessous de la référence (Référence: 1 Watt, 4-Ohms)
Réponse en Fréquence: 20 Hz - 20 kHz, -3dB. (Entrée auxiliaire utilisée comme référence
d’entrée)
Voltage de l’alimentation de référence: 14.4VDC
*Spécifications sujettes à modifications sans avis.
ENTRETIEN ET MAINTENANCE
1. Utilisez seulement un tissu siliconé propre et un détergent neutre pour nettoyer la façade ou le
moniteur. Un tissu rugueux et un détergent nonneutre (comme l’alcool) peuvent les rayer ou les
décolorer.
2. Ne pas utiliser d’eau ni de liquides de nettoyage sur l’appareil.
3. Si la température à l’intérieur du lecteur augmente trop, un circuit de protection arrête
automatiquement la lecture du disque. Dans ce cas, laisser le lecteur refroidir avant de le
réutiliser.
4. Ne jamais insérer autre chose qu’un disque compact de 12 cm de diamètre dans le lecteur
sous peine d’endommager le mécanisme avec desobjets étrangers.
5. Ne pas tenter d’utiliser des disques single de 8 cm dans ce lecteur, avec ou sans adaptateur,
sous peine d’endommager le lecteur et/ou le disque. Ce type de dommages n’est pas couvert
par la garantie du produit.
6. Le lecteur CD peut ne pas fonctionner correctement aux températures extrêmes. Dans ce
cas, laisser l’intérieur du véhicule retrouver une température normale de fonctionnement avant
d’utiliser le lecteur.
7. Lorsque le véhicule se réchauffe en hiver ou sous la pluie, de la condensation peut apparaître
sur l’écran LCD. Dans ce cas, il ne fonctionnerapas correctement tant que l’humidité ne se
sera pas évaporée.
8. Nous recommandons d’utiliser un disque de nettoyage plus souvent dans cet appareil que pour
les appareils ordinaires du domicile en raisondes conditions de fonctionnement du véhicule.
132
Wir gratulieren Ihnen! Durch Ihre kluge Wahl sind Sie Besitzer eines AUDIOVOX Mobile-Video-Produktes geworden.
AUDIOVOX Mobile-Video-Produkte erfreuen sich aufgrund der hohen Qualität eines ausgezeichneten Rufes weltweit. Dieser hohe
Qualitätsstandard ermöglicht es für AUDIOVOX Mobile-Video-Produkte 2 Jahre Garantie zu gewähren.
Die Produkte werden während des gesamten Fertigungsvorganges laufend kontrolliert und geprüft. Im Servicefall beachten Sie
bitte folgendes:
1. Die Garantiezeit beginnt mit dem Kauf des Produktes und gilt nur für den Erstbesitzer.
2. Während der Garantiezeit beseitigen wir etwaige Mängel, die nachweislich auf Material- oder Fabrikationsfehler beruhen, nach
unserer Wahl durch Austausch oder Nachbesserung der defekten Teile. Weitergehende Ansprüche, insbesondere auf Minderung,
Wandlung, Schadenersatz oder Folgeschäden sind ausgeschlossen. Die Garantiezeit wird von einer Garantieleistung durch uns
nicht berührt.
3. Am Produkt dürfen keine unsachgemäßen Eingriffe vorgenommen worden sein.
4. Bei Inanspruchnahme der Garantie wenden Sie sich bitte zunächst an Ihren Fachhändler. Sollte es sich als notwendig erweisen,
das Produkt an uns einzuschicken, so sorgen Sie bitte dafür, dass • das Produkt in einwandfreier Originalverpackung verschickt
wird, • die Kontrollkarte ausgefüllt dem Produkt beiliegt • die Kaufquittung beigefügt ist.
5. Von der Garantie ausgenommen sind: • Leuchtmittel • Verschleißteile • Transportschäden, sichtbar oder unsichtbar
(Reklamationen für solche Schäden müssen umgehend bei der Transportfirma, Bahn oder Post eingereicht werden. • Kratzer in
Metallteilen, Frontabdeckungen u.s.w. (Diese Defekte müssen innerhalb von 5 Tagen nach Kauf direkt bei Ihrem Händler reklamiert
werden. • Fehler, die durch fehlerhafte Aufstellung, falschen Anschluss, unsachgemäße Bedienung (siehe Bedienungsanleitung),
Beanspruchung oder äußere gewaltsame Einwirkung entstanden sind. • Unsachgemäß reparierte oder geänderte Geräte, die von
anderer Seite als von uns geöffnet wurden.
• Folgeschäden an fremden Geräten • Kostenerstattung bei Schadensbehebung durch Dritte ohne unser vorheriges
Einverständnis. • Batterien und Akkus.
Congratulations! You have made a wise selection in becoming the owner of a AUDIOVOX Mobile Video equipment. Due
to high quality AUDIOVOX Mobile Video products have earned an excellent reputation through the western world. And this high
quality standard enables us to grant a 2-years warranty for AUDIOVOX Mobile Video products.
The equipments are checked and tested continously during the entire production process. In case you have problems with your
AUDIOVOX HiFi equipment, kindly observe the following:
1. The guarantee period commences with the purchase of the component and is applicable only to the original owner.
2. During the guarantee period we will rectify any defects due to faulty material or workmanship by replacing or repairing the
defective part at our discretion. Further claims, and in particular those for price reduction, cancellation of sale, compensation
for damages or subsequential damages, are excluded. The guarantee period is not altered by the fact that we have carried out
guarantee work.
3. Unauthorized tampering with the equipment will invalidate this guarantee.
4. Consult your authorized dealer first, if guarantee service is needed. Should it prove necessary to return the component to the
factory, please insure that • the component is packed in original factory packing in good condition • the quality control card has
been filled out and enclosed with the component • your enclose your receipt as proof of purchase.
5. Excluded from the guarantee are: • Illuminates • Wear parts • Shipping damages, either readily apparent or concealed (claims for
such damages must be lodged immediately with forwarding agent, the railway express office or post office). • Scratches in cases,
metal components, front panels, etc. (You must notify your dealer directly of such defects within three days of purchase. • Defects
caused by incorrect installation or connection, by operation errors (see operating instructions), by overloading or by external force.
• Equipments which have been repaired incorrectly or modified or where the case has been opened by persons other than us. •
Consoquential damages to other equipments. • Reimbursement of cools, without our prior consent, when repairing damages by
third parties • Batteries and battery packs.
Toutes nos félicitations! Vouz avez bien choisi et êtes le propriétaire heureux d’un produit AUDIOVOX Mobile Video. Les
produits AUDIOVOX Mobile Video ont une excellente réputation pour leur bonne qualité. Pour cette raison, nous accordons 2 ans
de garantie sur tous les produits AUDIOVOX Mobile Video.
Les appareils sont soumis pendant toutes les opérations de fabrications à des contrôles et vérifications constants. Si, pourtant,
vous rencontrez des difficulés avec votre appareil AUDIOVOX veuillez tenir compte de ce qui suit:
1. La garantie débute avec l’achat de l’appareil et est valable uniquement pour le premier propriétaire.
2. Pendant la période de garantie nous réparons les dommages provenant des défauts de matériel ou de fabrication et nous
procédons, à notre guise, à l’échange ou à la réparation des pièces défectueuses.
3. Aucune réparation impropre ne doit avoir été effectuée à l’appareil.
4. Lors d’une demande de garantie, veuillez vous adresser en premier lieu à votre distributeur. Si ce dernier décide que l’appareil
doit nous être retourné, veuillez tenir compte que: • l’appareil soit expédié dans son ermballage d’origine, • la carte de contrôle
dûment remplie soit jointe, • le bon d’achat soit joint.
5. Ne sont pas compris dans la garantie: • Matériel d´eclairage • Pièces d’usure • Avaries de transport, visibles ou non (de telles
réclamations doivent être faites immédiatement auprès du transporteur, du chermin de fer ou de la poste). • Des rayures sur le
boîtier, pièces métalliques, couvercles etc. (ces dommages doivent être signalés directement à votre distributeur dans les trois
jours suivant l’achat). • Dommages résultant d’un raccordement incorrect, maniement incorrect (voir instructions de service),
surcharge ou application de force extérieure.
• Appareils réparés non conformément ou modifiés et qui ont été ouverts par une personne autre que nous. • Dommages ultérieurs
à d’autres appareils. • Remboursement des frais à des tiers ayant effectué les réparations sans notre accord préalable. • Accus et
batteries.
G arantiekarte
Warranty C ard
Typ/Type
Serien-Nr./Serial-No.
Name und Anschrift des Händlers /Stempel
Name and address of the dealer/stamp
Käufer/Customer
Name/Name
Straße/Street
PLZ, Ort/City
Land /Country
Kaufdatum/ buying date
Nur gültig in Verbindung mit Ihrer Kaufquittung!
No warranty without receipt!
Audiovox Audio Produkte GmbH
Lise-Meitner-Str. 9 • D-50259 Pulheim • Germany
Tel. +49 (0) 2234 807-0 • Fax +49 (0) 2234 807-399
www.audiovox.de
Irrtum und technische Ändeurngen vorbehalten./Errors and technical modifications reserved.
®