1
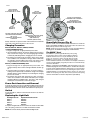
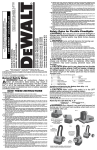
10. An extension cord must have adequate wire size (AWG or
American Wire Gauge) for safety. The smaller the gauge number of the wire, the greater the capacity of the cable, that is 16
gauge has more capacity than 18 gauge. When using more
than one extension to make up the total length, be sure each
individual extension contains at least the minimum wire size.
Flexible Floodlights
9.6, 12, 14.4, 18 Volt
DW913 (9.6 V), DW917 (12 V), DW918 (14.4 V),
DW919 (18 V)
– Use with DEWALT power packs and chargers (both sold
separately).
NOTE: Your DW913 flexible floodlight operates on a 9.6V power
pack (DW9061 or DW9062). Your DW917 flexible floodlight
operates on a 12V power pack (DW9071 or DW9072). Your DW918
flexible floodlight operates on a 14.4V power pack (DW9091). Your
DW919 flexible floodlight operates on a 18V power pack (DW9095
or DW9096). Power packs are sold separately.
WARNING: When using electric tools, basic safety precautions should always be followed to reduce risk of fire,
electric shock, and personal injury, including the following:
READ ALL INSTRUCTIONS
SAVE THESE INSTRUCTIONS
Safety Rules for Flexible Floodlights
WARNING: DO NOT OPERATE FLASHLIGHT or charger
NEAR FLAMMABLE LIQUIDS OR IN GASEOUS OR EXPLOSIVE
ATMOSPHERES. INTERNAL SPARKS MAY IGNITE FUMES. Do
not expose Flexible floodlight or charger to rain or damp areas.
WARNING: Lens and bulb become hot during use.
• During or immediately after use, don’t lay flexible floodlight
flat on lens surface.
• Don’t touch lens surface when bulb is lit or immediately after
use.
• Handle flexible floodlight with care around any flammable
surface.
• If bulb has been lit, let flexible floodlight cool for several minutes before changing bulb.
Safety Rules for Chargers
1. Before using charger, read all instructions and cautionary
markings on (1) charger, (2) battery pack, and (3) product
using battery pack.
2. DANGER: Electrocution hazard. 120 volts are present at
charging terminals. Do not probe with conductive objects.
3. If battery pack case is cracked or damaged, do not insert into
charger. Danger of electric shock or electrocution.
4. The charger and battery pack are specifically designed to work
together. DO NOT attempt to charge the battery pack with any
chargers other than the ones in this manual.
5. Do not expose charger to rain or snow.
6. To reduce risk of damage to electric plug and cord, pull by plug
rather than cord when disconnecting charger.
7. Make sure cord is located so that it will not be stepped on,
tripped over, or otherwise subjected to damage or stress.
8. An extension cord should not be used unless absolutely
necessary. Use of improper extension cord could result in risk
of fire, electric shock, or electrocution.
9. Two wire cords can be used with 2 or 3 wire extension cords.
Only round jacketed extension cords should be used, and we
recommend that they be listed by Underwriters Laboratories
(U.L.) (C.S.A. in Canada.) The letters WA on the cord jacket
indicate that the cord is suitable for outdoor use.
Recommended Minimum Wire Size for Extension Cords
Total Length of Cord
25 ft.
50 ft.
75 ft.
100 ft. 125 ft. 150 ft.
175 ft.
7.6 m 15.2 m
22.9 m 30.5 m 38.1 m 45.7 m 53.3 m
Wire Size
AWG
18
18
16
16
14
14
12
11. The charger is ventilated through slots in the top and the bottom of the housing. Do not place any object on top of the charger or place the charger on a soft surface that might block the
ventilation slots and result in excessive internal heat. Place the
charger in a position away from any heat source.
12. Do not operate charger with damaged cord or plug — have
them replaced immediately.
13. Do not operate charger if it has received a sharp blow, been
dropped, or otherwise damaged in any way; take it to an authorized DEWALT service center.
14. Do not disassemble charger; take it to an authorized DEWALT
service center when service or repair is required. Incorrect
reassembly may result in a risk of electric shock, electrocution
or fire.
15. To reduce risk of electric shock, unplug charger from outlet
before attempting any cleaning. Removing the battery pack will
not reduce this risk.
16. NEVER attempt to connect 2 chargers together.
17. DO NOT store or use the tool and battery pack in locations
where the temperature may reach or exceed 105°F (such as
outside sheds or metal buildings in summer).
18. The charger is designed to operate on standard household
electrical power (120 volts). Do not attempt to use it on any
other voltage!
Safety Rules for Batteries
1. Do not incinerate the battery pack even if it is severely damaged or is completely worn out. The battery pack can explode
in a fire.
2. A small leakage of liquid from the battery pack cells may occur
under extreme usage or temperature conditions. This does not
indicate a failure. However, if the outer seal is broken and this
leakage gets on your skin:
a. Wash quickly with soap and water.
b. Neutralize with a mild acid such as lemon juice or vinegar.
c. If battery liquid gets into your eyes, flush them with clean
water for a minimum of 10 minutes and seek immediate
medical attention. (Medical note: The liquid is 25-35%
solution of potassium hydroxide.)
3. Never attempt to open the battery pack for any reason. If the
plastic housing of the battery pack breaks or cracks, immediately discontinue use and do not recharge.
NOTE: Battery storage and carrying caps are
provided for use whenever the battery is out of the tool
or charger. Remove cap before placing battery in charger
or tool.
WARNING: Fire hazard. Do not store or carry battery so that
metal objects can contact exposed battery terminals. For
example, do not place battery in aprons, pockets, tool boxes, product kit boxes, drawers, etc., with loose nails, screws, keys, etc. without battery cap. Transporting batteries can possibly cause fires
if the battery terminals inadvertently come in contact with
conductive materials such as keys, coins, hand tools and the
like. The US Department of Transportation Hazardous Material
Regulations (HMR) actually prohibit transporting batteries in
commerce or on airplanes (i.e., packed in suitcases and carry-on
luggage) UNLESS they are properly protected from short circuits.
So when transporting individual batteries, make sure that the
FIG. 1
FIG. 2
LENS HOLDER
PORTE-LENTILLE
SUJETADOR DE LA LENTE
SWITCH
INTERRUPTEUR
INTERRUPTOR
SPARE BULB STORAGE
RANGEMENT DE L’AMPOULE
DE RECHANGE
COMPARTIMIENTO PARA
BOMBILLA DE REPUESTO
BULB
AMPOULE
BOMBILLA
BATTERY RELEASE BUTTON
BOUTON DE DÉGAGEMENT
DE LA PILE
BOTON DE LIBERACION DE
LA BATERIA
POWER PACK (NOT INCLUDED)
ENSEMBLE DE PILES
(NON COMPRIS)
BATERIA (NO INCLUIDA)
battery terminals are protected and well insulated from materials
that could contact them and cause a short circuit.
Charging Procedure
DW9104, DW9106, DW9107, DW9108, DW9109
(1 HOUR CHARGERS) ONLY
1. Plug the charger into an appropriate AC power outlet.
2. Insert the battery pack into the charger, making sure the pack is
fully seated in the charger. The red (charging) light will blink
continuously indicating that the charging process has started.
3. The battery pack will be fully charged in about 1 hour under
most conditions. The completion of charge will be indicated by
the red light remaining ON continuously. The pack is fully
charged and may be used at this time or left in the charger.
DW9115 (15 MINUTE CHARGER) ONLY
1. Plug the charger into an appropriate AC power outlet. The
charger will beep twice and the red light will blink and then go
off.
2. Insert the battery pack into the charger, as shown in Figure 1,
making sure the pack is fully seated in the charger. The red light
will blink and the charger will beep once indicating the charging
process has started.
3. The battery pack will be fully charged in less than 15 minutes
under most conditions. This will be indicated by the red light
remaining ON and 3 audible beeps. The pack is fully charged
and may be used at this time or left in the charger.
Spare Bulb Storage (Fig. 2)
To store a bulb, unscrew the lens holder and remove it. Inside the
body of the flexible floodlight is the storage socket. To remove the
bulb, pull it up and out of the storage area.
NOTE: Removing a pack from the charger and immediately
inserting it into the flexible floodlight may weaken bulb life.
The RBRC™ Seal
The RBRC™ (Rechargeable Battery Recycling
Corporation) Seal on the nickel-cadmium battery
indicates that the costs to recycle the battery at the
end of its useful life have already been paid by
DEWALT. In some areas, it is illegal to place spent
nickel-cadmium batteries in the trash or municipal solid waste
stream and the RBRC program provides an environmentally
conscious alternative.
RBRC in cooperation with DEWALT and other battery users, has
established programs in the United States to facilitate the collection
of spent nickel-cadmium batteries. Help protect our environment
and conserve natural resources by returning the spent nickelcadmium battery to an authorized service center or to your local
retailer for recycling. You may also contact your local recycling
center for information on where to drop off the spent battery.
Power Pack Insertion and Removal
To insert the power pack into your flexible floodlight, slide it into the
end of the light until it snaps into place. To remove the power pack,
depress the release buttons shown and withdraw the power pack.
Switch
To turn the light on, slide the switch forward. To turn it off, slide the
switch back.
Replacing the Light Bulb
Floodlight Cat. No
Replacement Bulb Cat. No.
DW913
DW9023
DW917
DW9043
DW918
DW9063
DW919
DW9083
To replace the light bulb, first unscrew the lens holder. Pull the bulb
out of the spring, and insert a new bulb. Reinstall lens holder.
NOTE: Do not look directly into the flexible floodlight beam.
DeWalt electric
Power tools