1
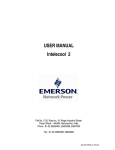
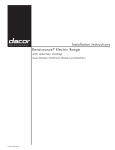
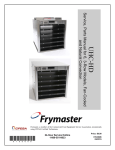
OWNERS MANUAL
Performance Series
Amplifiers and Cabinets
Welcome
Thank you and congratulations on your purchase of Epifani Performance Series
products. Welcome to our family!
Based in Brooklyn, New York, Epifani designs innovative products that inspire
musicians of all skills and styles to challenge their creative boundaries. Our
old-world craftsmanship and innovative design has changed the world of bass
amplifiers and cabinets by combining highly accurate sound, thundering low-end
response and lowered weight. Engineered for the rigors of the road, the demands
of the modern recording studio, and long, comfortable hours of playing, your
Epifani is designed to become a direct extension of your creativity and a fine
musical instrument that will provide many years of enjoyment and musical
performance. That’s why Epifani is the choice of the finest bass players in
music today.
Please follow these simple guidelines for the usage and care of Epifani amplifiers
and cabinets. Should you ever need service, you can feel confident that we put
as much pride in supporting our products as we do in their design and build.
We are always interested in your thoughts about Epifani and about your music.
Contact us with comments and suggestions on how we can best serve your
needs at www.epifani.com.
We hope you enjoy your Epifani purchase and... love the way you sound!
Thanks again,
Nick Epifani
2
Contents
AN INTRODUCTION TO PERFORMANCE SERIES ............................................4
Amplifiers ....................................................................................................4
Cabinets ......................................................................................................4
IMPORTANT SAFTEY INFORMATION .................................................................5
PS AMPLIFIER CONTROLS and FEATURES .........................................................6
Front Panel .................................................................................................6
Rear Panel ..................................................................................................7
PS AMPLIFIER OPERATION ................................................................................8
Connections ................................................................................................8
Powering Up ...............................................................................................9
Dialing in your Sound ..................................................................................9
PS CABINET CONTROLS and FEATURES .........................................................10
PS CABINET OPERATION ..................................................................................11
Connections ..............................................................................................11
Dialing in your Sound ..................................................................................11
TIPS & TROUBLESHOOTING ..........................................................................12
Amplifiers ..................................................................................................12
Cabinets ....................................................................................................13
AMPLIFIER SPECIFICATIONS ...........................................................................14
CABINET SPECIFICATIONS ..............................................................................15
3
Introduction
The Performance Series products were first introduced at the Winter NAMM
Show 2006 to critical acclaim. The line was updated in 2009.
The design goals for the line were to offer uncompromised sonic quality at an
affordable price. Utilizing many of the design elements found in the UL Series
line, the Performance Series maintains its own unique sound and look.
The Epifani design team employed all types of scientific disciplines in designing
the Performance Series products. Working together on the acoustical,
mechanical and electrical engineering aspects of the line, they focused on
creating an amplifier solution where the whole is greater than the sum of the
parts. All of the components are carefully selected to meet the strictest design
and manufacturing specifications.
While the Performance Series works wonderfully when mixed together with other
products, the Performance Series functions best as an integrated audio system
since its components were designed to interact with one another to ensure
optimum performance.
4
Important Safety Information
1. Read, follow and keep these instructions for the life of the product.
2. Do not use this apparatus near water.
3. Clean only with a dry cloth.
4. Do not block any ventilation openings. Install in accordance with all applicable manufacturer's
instructions.
5. Do not install near any heat sources such as radiators, heat registers, stoves, or other apparatus
that produce heat.
6. Do not defeat the safety purpose of the grounding type plug. A grounding type plug has two
blades and a third grounding prong which are all used for your safety.
7. Protect the power cable from being walked on or pinched particularly at the plugs or at the point
where they exit the device.
8. Unplug this apparatus during lightning storms or when unused for long periods of time.
9. Refer servicing to qualified service personnel. Servicing is required when
the apparatus has been damaged in any way, such as the power cable has been damaged or liquid
has been spilled, objects have fallen into the apparatus, the apparatus has been exposed to rain or
moisture, does not operate normally or if it has been dropped.
10. Damage requiring service: Unplug the apparatus from the wall outlet and refer servicing to
qualified service personnel under the following conditions.
a) When the power supply cord has been damaged.
b) If liquid has been spilled, or objects have fallen into the apparatus.
c) If the apparatus has been exposed to rain or moisture.
d) If the apparatus does not operate normally by following the operating instructions.
e) When the apparatus exhibits a distinct change in performance
f) If the apparatus has been dropped or damaged.
11. Adjust only those controls that are covered by the operating instructions as an improper
adjustment of other controls may result in damage and will often require extensive work by a
qualified technician to restore the apparatus to its normal operation.
12. Object and Liquid entry: Never push any foreign objects of any kind into the openings as they
may touch dangerous voltage points that could result in fire or electric shock. The apparatus shall
not be exposed to dripping or splashing and no objects filled with liquids such as a beverage should
come in contact with the unit.
IMPORTANT NOTE UPON RECEIPT OF THE PRODUCT:
Please inspect the shipping carton upon arrival - if the packaging seems damaged, please return
the item to the shipper.
IMPORTANT NOTE ON PRODUCT PACKAGING:
Your Epifani product was originally packaged in a specially designed carton and included special
packing materials. Please save these items. They should be used when shipping your product.
5
PS Amp Controls & Features
Front Panel
1
2
3
4
5
6
7
8
9
10
11
12
13
14
15
16
Note: All front panel controls and features are the same for the PS 1000 and the
PS 400.
1. 1/4” Phono Plug input – Connect your instrument’s cable jack here.
2. Passive/Active Selector – Designed to match the preamplifier to your
instrument. Generally, if your instrument uses any type of battery, it is active and
it will work best if you select the Active position on the PS amplifier.
3. Peak LED – Glows green and flashes periodically red to indicate when the
preamp is properly adjusted or glows steadily red to indicate that the preamp is
overdriven and clipping. If this occurs, turn the gain control down (see below).
4. Pre Amp Gain Knob – Adjusts the input signal to the appropriate level.
5. Bass Control – Adjusts the amount of low frequency.
6. Midrange Control – Adjusts the amount of midrange frequency.
7. Treble Control – Adjusts the amount of high frequency.
8. Treble Shift Selector – This feature “shifts” the Q point from 3KHz to 6KHz.
9. Mid Cut Selector – Engages the “Mid Cut” circuit.
10. Mid Cut Control LED – Glows red when Mid Cut control is engaged.
11. Mid Cut Control – Determines the amount of mids to be cut.
12. Mute – Mutes the entire amplifier.
13. Mute LED – Glows red when the Mute is engaged.
14. Master – Master volume.
15. Power – Turns the unit on or off.
16. Power LED – Glows green when the Power is on.
6
PS Amp Controls & Features
Rear Panel
1
2
3
4
5
6
7
8
9
10
11
12
13
14
15
1. AC Line-in - Firmly plug the supplied AC power cable into the socket
2. Fuse - replace with only the same fuse as indicated for your country
3. 120V/220V Power Selection Switch - Select 120V for use in the USA and
countries with 110V service. Select 220V for European use or countries with 220V.
Note, the fuse must be changed to match your electrical service.
4. Amp Out with “Speakon” connector – Connect your amplifier to the speaker cabinet using a Speakon cable. NEVER connect plus or minus to ground. Use Speakonto-Speakon for a better connection. If using a Speakon to 1⁄4” connection, turn
amplifier OFF before making connections. The PS 1000 has two Speakon
outputs. The PS 400 has one Speakon Output. Use minimum 4-ohm cabinets.
5. Bridging Switch (PS1000 only) – To access all 1000 watts of the PS 1000,
switch this button to Bridge Mode, and connect your cabinet to the indicated ‘A’
speaker input only. Your cabinet(s) must deliver a total minimum load of 8-ohms.
6. Pedal Control – Allows you to mute and engage the Mid-Cut features via the
optional foot switch. Uses a 1/4” TRS plug.
7. Effect Send – Use this jack to send a signal to your effects processing device.
8. Blend – This feature allows you to mix the dry signal with the effected signal.
When using a processor like a Graphic EQ or a Compressor/Limiter, turn the blend
all the way to right. This ensures that 100% of the signal will go to the processor.
When using Reverb, Delay or a Chorus/Flanger-type effect, rotate the knob to the
left to achieve the desired blend of effect to dry signal.
9. Return – Use this jack from your processor output.
10. Tuner Out – Connect a tuner via instrument cable and tune silently in mute mode.
11. Preamp Out – For bypassing the amp stage when using an alternate amplifier.
12. Pre/Post EQ – Selects direct output (DI) signal to come before or after EQ section.
13. Direct Out Level – Adjusts the signal coming from Direct Out. This is usually kept
at the twelve o'clock position. Adjust accordingly in conjunction with different
applications (recording, live, etc).
14. Direct Out (XLR) – Sends a balanced signal to the PA or a recording device.
15. Ground Lift – Disconnects chassis ground to reduce 60 cycle hum.
7
PS Amplifier Operation
Connections
1. Verify that the power switch at the front of the amplifier is in the OFF
position. Connect the AC cable to the back of the amplifier and to a wall outlet.
2. Connect the speaker using either the Speakon jacks on the rear panel. Make
sure that you are using an "unshielded" speaker cable and that the polarity of the
cable is correct. Do not use shielded instrument cable to connect speakers.
NEVER connect plus or minus to ground. We highly recommend the use of a
Speakon to Speakon cable connection. If using a Speakon to 1⁄4” connection, be
sure the connection from the amp to cabinet is made while the amplifier is OFF.
Speakon connection wiring from the Neutrik female out of the amp is +1 and -1.
When purchasing cables, make sure the pin connection inside the connector is
+1 and -1
3. Voltage selector to the proper voltage also need to be set up with proper
fuse follow instruction in the back of the amp.for different voltage use different
Fuse value.
3.
Now you can connect your instrument to the amplifier. Make certain that you
Powering Up
WARNING! BEFORE PLUGGING YOUR UNIT IN FOR THE FIRST
TIME READ THE FOLLOWING SECTION CAREFULLY.
AC outlet voltages vary from country to country. Make sure that
the voltage in your area meets the voltage requirements printed
on the amplifier (such as AC 230V 50 Hz or AC 120V 60Hz.)
Make sure that the Voltage Selector is set in the proper position
for your area. Failure to do so could will harm your amplifier and
void the warranty.
If you change the Voltage Selector to a different voltage, you
must also change the rear-panel fuse to the proper rating as
indicated on the back of the amplifier. Failure to do so could will
harm your amplifier and void the warranty.
If you are unsure of any part of these warnings, consult a
licensed electrician or contact us at Epifani.
8
PS Amplifier Operation
Dialing in your Sound
1. Before turning your amplifier on always set the MASTER volume control to the
zero position. This will prevent damage to your speakers in the event of a product
failure or faulty input signal.
2. Turn the amplifier on using the power switch located on the right side of the
amplifier’s front panel. The POWER indicator light on the front panel will illuminate in
green. Upon power-up, the MUTE feature will engage and its light will be illuminated
red. You will also see the PEAK light illuminate green.
3. Turn the volume controls on your instrument to their full, or loudest positions.
4. Set the PS amplifier EQ controls (bass, mid, and treble) to zero (twelve o’clock
position) and begin playing aggressively while turning up the Gain control. When the
LED light is green there is still potential to increase the Gain. When the light turns
red, your input is too hot and your signal will distort. For the cleanest sound, allow
the LED indicator to turn red intermittently while playing at the most aggressively.
5. Disengage the MUTE button. It’s light will turn off.
6. Turn the MASTER Volume Control clockwise to the desired listening volume. At
this point you should be hearing your instrument through the connected speakers.
7. By adjusting the EQ controls and utilizing the mid-cut features, the sound of your
instrument can be shaped in very subtle or very dynamic ways. Epifani pre-amps are
designed to act like the channel strip of a professional mixing console – a little EQ
goes a long way. In fact, many sound engineers start with the EQ in the flat position
and CUT frequencies to achieve the desired sound. They then add gain to make up
the loss of volume due to the reduction in EQ. Cutting back is typically preferred to
boosting. If you are dramatically boosting all of your EQ settings, you might want to
call your Epifani Dealer or us directly to discuss your setup.
8. The MID CUT level adjusts the amount of mid-range frequencies that will be
reduced when you engage the MID CUT switch either by pressing the switch on the
front panel or activating the switch via the footswitch. This feature actually gives you
an additional level of control as you change playing styles or when changing your
instrument. It’s almost like having a second channel.
Please consider that different acoustical environments can effect your sound
dramatically. Different positions on stage or whether your speakers are higher or
lower can change the sound you and the audience hear. You have the option to
change your position or use the EQ controls to accommodate different sounding
spaces. The Epifani EQ section is a powerful tool and with a bit of experimenting
you’ll find that almost any sound can be achieved.
9
PS Cabs Controls & Features
Rear Panel
1
2
Note: Some PS cabinet rear panel connectors may be different from what is
shown here. If any questions, call your dealer or Epifani directly.
1. Tweeter Level control – Adjusts the amount of high frequency sound coming
from the tweeter.
2. Speaker Input/Output connectors – Connect your amplifier to the speaker
cabinet using a Speakon or 1/4” ‘phone’ or ‘TS’ terminated cable. These greencolored connectors accept either Speakon jack as a normal Speakon connector,
or a 1/4” jack inserted at its center.
10
PS Cabinet Operation
Connections
1. Connect the speaker cabinet using either of the Speakon combo connectors on
the rear panel. Make sure that you are using a high-quality "unshielded" speaker
cable. NEVER connect plus or minus to ground. If using a Speakon to 1⁄4” connection, be sure the amplifier is OFF while plugging-in or unplugging a connection.
2. The two Input/Output connectors are wired in parallel, so you may plug into
either connector. Additionally, you may ‘daisy chain’ either connector to a second
speaker cabient using Speakon or 1/4” jacks. Take note of the rated impedance of
each cabinet and be sure to stay within your amplifier’s rated specifications.
PS Cabinet Operation
Dialing in your Sound
1. After connecting the speaker cabinets, set the MASTER volume control on your
amplifier to the zero position and turn your amplifier on. This will prevent damage to
your speakers in the event of a product failure or faulty input signal.
2. Turn the volume controls on your instrument to their full or loudest positions.
3. Set your amplifier EQ controls (bass, mid, and treble) to zero (twelve o’clock
position) and begin turning up the volume on your amplifier to your desired levels.
4. When adjusting the EQ controls on your amplifier, the sound of your instrument
can be shaped in subtle or dynamic ways. On a high-quality amplifier like an Epifani,
a little EQ goes a long way. In fact, many sound engineers start with the EQ in the
flat position and CUT frequencies to achieve the desired sound. They then add gain
to make up the loss of volume due to the reduction in EQ. Cutting back is typically
preferred to boosting. If you are dramatically boosting all of your EQ settings, you
might want to call your Epifani Dealer or us directly to discuss your setup.
11
PS Amplifier
Tips & Troubleshooting
Getting a proper gain adjustment is crucial to getting the most from your PS Amplifier. First, adjust the preamp controls – Gain, Bass, Mid, Treble, Mid Cut –
to the flat, or ‘noon’ setting. Play your instrument aggressively and raise the Gain
until the green Peak LED glows red. Now, turn the Gain back a little until you see
just an occasional red flicker when you are playing your most dynamically. This
will give you the right input level. Remember that if you boost some of the EQ frequencies – Bass, Mid, Treble – on your bass or on your amp, you may have to
readjust the Gain to get the proper level once again.
To keep your signal clean with an active bass instrument, boost your frequency
from one side only. For example, if you raise the bass on your instrument, leave
the bass on your amp ‘flat’, or vice versa. An active bass already has a preamp
inside. That means you are going from the preamp in your bass to another preamp in your amplifier head. By boosting the bass in both preamps, you’ll cause
distortion from overloading the signal.
If you want to hear more bass, deduct some of the mid frequency via the Mid Cut
on an Epifani amp and set the Mid Cut level to your liking, In this way, you can
even raise the volume without distortion and without straining your speakers from
over-excursions.
Bass sound changes a great deal from one room to another. If your speaker
cabinet is in the corner of a room, you will get a bass boost. If your speaker is
situated away from walls and corners, then less bass will be apparent.
Doubling amplifier power will not double the perceived loudness of a system.
A 200-watt amp does not sound twice as loud as a 100 watt amp). If you need
more volume, start by adding more cabinets.
Bass frequencies are hard to amplify and are demanding on loudspeakers. To
compete with a 100-watt guitar stack, you should use a PS head with two PS
cabinets.
TROUBLESHOOTING
Your Epifani products are built to exacting standards for years of trouble-free
service. If you encounter distorted sound or no sound at all, please re-read the
sections on “Connections”, “Powering Up” and “Dialing in Your Sound” on the
previous pages. If still in doubt, call us at Epifani and we’ll be glad to assist.
12
PS Cabinet
Tips & Troubleshooting
PS cabinets are equipped with Combo Neutrik Connectors. This means that you can
use a Speakon connector or a ¼” connector. How? In the center of the Speakon
connector you’ll find ¼” hole to insert a ¼” jack. For higher-power handling and more
secure connections, use Speakon-to-Speakon cables with a speaker wire of at least
16-gauge. A lower gauge number means thicker cabling, so a 14-gauge cable is
thicker in diameter and thus better than a 16-gauge cable. Thicker cabling means
better low-frequency transmission to the cabinets.
Pin connection inside the Speakon connector should be +1 and -1. Be sure to specify this configuration when buying your speaker cables. Although this is the most
common style, it is not the only style made.
The Input/Output connections in the back of your cabinets are wired in parallel. If you
daisy chain two 8-ohm cabinets, you will have a total impedance of 4 ohms. If your
amp minimum load is 4 ohms, it means that you can use two 8-ohm cabinets or a
single 4-ohm cabinet. In the PS1000, we have two 500-watt @4-ohm amplifiers. You
can use as many as a pair of 4x10 8 ohms cabinets for each of the amplifiers, for a
total of four 8-ohm cabinets. That would be four 4x10’s for a total of 16 10-inch
drivers. That’s enough sound to drive an arena! You could also drive a pair of 4-ohm
cabinets, one on each amplifier. In either event, be sure to wear proper ear
protection - the PS amplifiers are very loud, high-fidelity amplifiers. We want you to
have a very long and enjoyable music career, so please protect your ears when
performing at high volumes.
When using multiple cabinets, be sure they are all in “phase”. With a 9V battery (the
same battery used inside most active basses) you can test the polarity, or phase, of
your speakers to make sure all are working and moving in the right direction –
forward! Sometimes, when you daisy chain two cabinets, you will note a lack of bass
response. Typically, this means that one of the cabinets is out of phase and its
speakers are moving backward when they should be moving forward. If one cabinet
or one speaker is moving backwards when the other moves forward, they will cancel
each other out. You can readily notice this when a single cabinet has more bass and
better response then when two are connected. Here’s how to verify phase. Take a ¼”
cable. Insert one side into a cabinet and touch the other tip of the ¼” jack to the “+”
of a 9-volt battery and the shaft to the “-” of the battery. The connected speaker
should move forward when this connection is made. If it does, the cabinet is in
phase. If it moves backwards, you have a cabinet that’s wired out of phase. The
problem can be easily corrected by a speaker technician.
13
PS Amplifier
Specifications
PS 1000
CONFIGURATION
POWER RATING
INPUT IMPEDANCE
SPECS
FEATURES
DIMENSIONS
PS 400
CONFIGURATION
POWER RATING
INPUT IMPEDANCE
SPECS
FEATURES
DIMENSIONS
14
Single-channel preamp
Digital poweramp
Switch-mode power supply
500+500 watts into 4-ohms
1000 watts in bridged mode into 8 ohms
Passive 470k Ohms
Active 200k Ohms
Amplifier response: 20Hz – 25kHz
Signal-to-noise: 90dB
Passive/Active input select
Adjustable input gain with peak LED
3-band shelving EQ
Treble shift, Mid Cut level adjust
Mute and master volume
DI Out with adjustable level control
Pre and post EQ,
Ground lift
Tuner out
EFX Sends, returns and blend control
Speakon + 1/4" combo connectors
Rack-ready (2U)
3.5"h x 19"w x 11"d
13 lbs.
Single-channel preamp
Class-AB poweramp
Switch-mode power supply
400 watts into 4-ohms
Passive 470k Ohms
Active 200k Ohms
Amplifier response: 20Hz – 25kHz
Signal-to-noise: 90dB
Passive/Active input select
Adjustable input gain with peak LED
3-band shelving EQ
Treble shift, Mid Cut level adjust
Mute and master volume
DI Out with adjustable level control
Pre and post EQ,
Ground lift
Tuner out
EFX Sends, returns and blend control
Speakon + 1/4" combo connectors
Rack-ready (2U)
3.5"h x 19"w x 11"d
13 lbs.
PS Cabinet
Specifications
PS 410
CONFIGURATION
IMPEDANCE
POWER RATING
SPECS
HARDWARE
DIMENSIONS
PS 210
CONFIGURATION
IMPEDANCE
POWER RATING
SPECS
HARDWARE
DIMENSIONS
PS 115
CONFIGURATION
IMPEDANCE
POWER RATING
SPECS
HARDWARE
DIMENSIONS
PS 112
CONFIGURATION
IMPEDANCE
POWER RATING
SPECS
HARDWARE
DIMENSIONS
4 x 10" 200-watt Epifani ceramic drivers
1" compression tweeter with adjustable control
8 or 4-ohms
800-watts RMS, 1200-watt peak
Response 36Hz - 16kHz
Sensitivity 102dB (1W@1m)
2x Combination Speakon + 1/4" output connectors
Lite-Ply poplar plywood, with dado-joint construction
Road-ready carpet covering with high-impact locking corners
Steel recessed handles and an 18-gauge steel grill
28.5"h x 23"w x 18.5"d
78 lbs.
2 x 10" 200-watt Epifani ceramic drivers
1" compression tweeter with adjustable control
8 or 4-ohms
400-watts RMS, 600-watt peak
Response 40Hz - 16kHz
Sensitivity 99dB (1W@1m)
2x Combination Speakon + 1/4" output connectors
Lite-Ply poplar plywood, with dado-joint construction
Road-ready carpet covering with high-impact locking corners
Steel recessed handles and an 18-gauge steel grill
18.5"h x 23"w x 18.5"d
49 lbs.
1 x 15" 400-watt Epifani ceramic drivers
1" compression tweeter with adjustable control
8-ohms
400-watts RMS, 800-watt peak
Response 36Hz - 16kHz
Sensitivity 97dB (1W@1m)
2x Combination Speakon + 1/4" output connectors
Lite-Ply poplar plywood, with dado-joint construction
Road-ready carpet covering with high-impact locking corners
Steel recessed handles and an 18-gauge steel grill
21.5"h x 23"w x 18.5"d
55 lbs.
1 x 12" 300-watt Epifani ceramic drivers
1" compression tweeter with adjustable control
8-ohms
300-watts RMS, 600-watt peak
Response 45Hz - 16kHz
Sensitivity 98dB (1W@1m)
2x Combination Speakon + 1/4" output connectors
Lite-Ply poplar plywood, with dado-joint construction
Road-ready carpet covering with high-impact locking corners
Steel recessed handles and an 18-gauge steel grill
16.5"h x 19.5"w x 16.5"d
37 lbs.
15
68 34th Street, 2nd Floor
Brooklyn, NY 11232
Tel: 718.832.4664
Fax: 718.965.3770
[email protected]
www.epifani.com