1
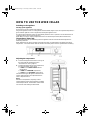
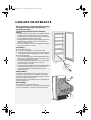
Instructions for use
WLMG 1010
Bauknecht AG, Industriestrasse 36, 5600 Lenzburg, www.bauknecht.ch
Verkauf
Kundendienst
Ersatzteile
Telefon 0848 801 002
Telefon 0848 801 001
Telefon 0848 801 005
Fax 0848 801 017
Fax 0848 801 003
Fax 0848 801 004
[email protected]
[email protected]
[email protected]
41133001GB.fm Page 12 Thursday, October 28, 2004 12:07 PM
INSTRUCTIONS FOR USE
BEFORE USING YOUR WINE CELLAR
SAFEGUARDING THE ENVIRONMENT
PRECAUTIONS AND GENERAL
RECOMMENDATIONS
INTRODUCTION TO WINE
HOW TO USE THE WINE CELLAR
CARE AND MAINTENANCE
TROUBLESHOOTING GUIDE
AFTER-SALES SERVICE
INSTALLATION
ELECTRICAL CONNECTION
12
41133001GB.fm Page 13 Thursday, October 28, 2004 12:07 PM
BEFORE USING YOUR WINE CELLAR
The appliance you have purchased is a wine cellar
(or wine-cooler), a professional product designed
exclusively for storing wine.
To get the most out of your new appliance,
read the user instructions thoroughly. They
describe the appliance in full and provide
useful wine storage tips.
Keep this handbook for future consultation.
1. After unpacking the appliance, make sure that
the door shuts properly.
Any damage must be reported to your dealer
within 24 hours after delivery of the appliance.
2. Wait at least two hours before connecting
the appliance to the power supply in order
to ensure the refrigerant circuit is fully
efficient.
3. Installation of the appliance and electrical
connections must be carried out by a qualified
electrician, in accordance with the
manufacturer's instructions and local
regulations.
SAFEGUARDING THE ENVIRONMENT
1. Packing
The packaging material is entirely recyclable, and
marked with the recycling symbol.
Follow local regulations for scrapping.
Keep the packaging materials (plastic bags,
polystyrene parts, etc.) out of reach of children, as
they are potentially dangerous.
2. Appliance
The appliance is made using recyclable materials.
Disposal must be carried out in accordance with
local environmental regulations for waste disposal.
Make the appliance unusable by cutting off the
power cord. The appliance must be delivered to an
authorised collection centre for the recovery of
refrigerant gas.
Information:
This appliance does not contain CFCs (replaced
with R134a) or HFCs (replaced with R600a Isobutane). For more information, refer to the
identification data plate affixed to the appliance.
13
41133001GB.fm Page 14 Thursday, October 28, 2004 12:07 PM
PRECAUTIONS AND GENERAL
RECOMMENDATIONS
• The wine cellar must be used solely and
exclusively for storing wine; do not place any
type of food inside it.
• Do not cover or obstruct the air vents of the
appliance.
• Do not allow children to play or hide inside the
appliance - risk of becoming trapped and
suffocating.
• Before servicing or cleaning the appliance, unplug
it from the mains or disconnect the electrical
power supply.
• The power cable may only be replaced by an
authorised person.
Information
Appliances with Isobutane (R600a)
Isobutane is a natural gas with low environmental
impact. Caution is required, however, since
isobutane is flammable. Therefore, it is essential to
ensure that refrigerant pipelines are not damaged.
Important:
• If a large number of bottles are placed in the
cellar at the one time, it may take a few days
before a constant temperature is reached.
• Important! Storage temperature must never
drop below +6 °C
• When in operation, water droplets and frost
form on the walls of the cellar. These are part of
normal operation. You don't have to remove the
frost or dry the water droplets. The rear wall is
defrosted automatically. The defrost water is
automatically routed to a drain outlet and into a
container from which it evaporates.
14
• The bottles can be neatly stored on the wooden
racks. Each rack should not be used to hold more
than 40 Kg.
Bottle arrangement tips
• Place the bottles in the middle of the rack.
• On closing the door, make sure the bottles don't
touch the glass.
• Important: spirits and liqueurs should be airtight
and stored in the upright position.
• Do not use the appliance to store explosive
substances.
• The temperature may vary in different areas
inside the appliance due to the circulating air:
it is colder closest to the rear wall and warmer
beside the glass door.
• Remove bottles from packaging, do not store
them inside crates or boxes.
• Maximum holding capacities for classic 0.75l
bordolese bottles are as follows: h 1400 mm
holds 111 bottles, h 1600 mm holds 131 bottles.
• Recommended holding capacities for classic 0.75
l Bordolese bottles are as follows: h 1400 mm
holds 88 bottles, h 1600 mm holds 101 bottles. In
any event, the h 1400 structure is capable of
holding up to 111 bottles and h 1600 up to 131
bottles (Bordolese bottles).
41133001GB.fm Page 15 Thursday, October 28, 2004 12:07 PM
INTRODUCTION TO WINE
Wine storage
A well-known characteristic of wine is that it can be
stored over time: in the correct location, white
wines can be stored for about two years after their
vintage although ideally they should be drunk within
one year. While light red wines can be stored for up
to two years, full-bodied reds will age well for 10
years and dessert wines even up to twenty years.
When you buy a bottle of wine, transfer it to your
wine cellar or other suitable place immediately.
There are three main factors that weigh on the
process from grape cultivation to harvesting and
fermentation: light, humidity and ambient
temperature. To ensure the taste of the wine
matures to its peak and the aroma remains
unaltered, it must be stored with the right
interaction of these three factors.
arranged at liberty by place of origin, type of wine,
area of production, winery or vintage, using the
catalogue labels provided if desired. Arranging the
bottles so that they can be easily identified and
selected prevents any accidental jolts which, like
vibrations, can unsettle sediments and alter the
visual appearance of the wine for some time.
Hence, try to move your bottles as little as possible,
allowing the wine to rest. Furthermore, don't push
the bottles so far back that they rest against the rear
wall of the cellar as this would not only interfere
with the automatic defrosting function, the water
droplets collected during defrosting could also ruin
the bottle labels.
Bottle racks must be made from wood as this
effectively absorbs any vibrations and keeps bottles
away from the wall transmitting heat or cold.
In addition, the bottles of wine must be stored away
from substances or places with strong odours which can
be easily absorbed by the wine. To this end, your new
appliance has an active carbon filter to absorb any
impurities in the air.
Temperature and humidity
Storage location
Not everyone has a basement suitable for use as a
cellar. Technology has only recently come up with an
effective substitute for a natural cellar. Your new wine
cellar is a special appliance designed specifically to hold
and store wines properly. Indeed, it should only be
used for your favourite bottles of wine, not for fruit,
vegetables and tins. In this way, you can store and age
any kind of wine properly even if you don't have a
natural wine cellar.
Temperature is a critical and vital factor during the
entire life cycle of wine; it determines how well the
wine develops when matured in the bottle. To
ensure optimal storage, the temperature must be
kept constant from 8 to 12 °C. Rapid, wide
temperature swings must be avoided: when the
temperature is too high, the liquids dilate
accelerating the ageing process whereas
excessively low temperatures (below 4 - 5 °C) can
cause the precipitation of tartrates; such an
imperfection would impair the pleasant appearance
of the wine. In the extreme event that the
temperature drops below 0 °C, the wine would
freeze causing the cork to explode.
Humidity is also crucial in optimal wine storage: dry
environments cause the cork to shrink whereas
overly damp locations cause mould and harmful
microorganisms to form. Humidity must be kept
between 50% - 70%.
The cork
This is an essential part of the bottle: the quality of the
cork, selected by the wine-maker, is very important in
the ageing process of the wine itself. The conditions of
the cork, including corks in bottled wine, depend solely
on the process and storage standards used by the
manufacturer or bottler.
How to store wine
When storing your wine bottles, one golden rule
not to be overlooked is that they must be laid
horizontally or at an angle to ensure the wine keeps
the cork wet. Some say that this causes the classic
smell of “cork” in wine. In actual fact, keeping the
cork in contact with the wine enhances its elasticity
thereby guaranteeing its continued effectiveness.
Another important factor in storing wine is how the
bottles are arranged: the bottles should be
15
41133001GB.fm Page 16 Thursday, October 28, 2004 12:07 PM
HOW TO USE THE WINE CELLAR
Switching on the appliance
Starting up the appliance
All controls are on the outside of the appliance.
Plug in the appliance to start it running and set the thermostat (Figure A1) to the required temperature; a
green indicator light will come on (Figure A2) showing the appliance is on.
An interior light (Figure B1) comes on automatically when the door is opened or can be switched on as
required from the control panel (Figure A3).
When faulty or broken, request a replacement from our authorized personnel (After-sales Service)
Thermometer (Figure B2):
A digital thermometer is provided along with the appliance and can be found inside the bag with the
advertising materials.
When attached to one of the wooden racks inside the cellar, the thermometer will display the interior
temperature. The thermometer itself has a button cell battery which must be replaced when necessary.
Adjusting the temperature
1. To ensure the appliance functions correctly, set
the thermostat as explained in section
“Introduction to wine” (page 15).
2. To adjust the temperature in the compartment,
turn the thermostat control knob:
• to MIN for the LEAST COLD internal
temperature;
• to MED for a MEDIUM temperature;
• to MAX for the COLDEST temperature.
Thermostat setting on z: appliance functions and
interior light have been interrupted but the the
cellar is still powered on.
Note:
Ambient air temperature, frequency of door
opening and the position of the appliance can affect
internal temperatures. These factors must be taken
into account when setting the thermostat.
16
41133001GB.fm Page 17 Thursday, October 28, 2004 12:07 PM
CARE AND MAINTENANCE
Before any cleaning or maintenance operation, unplug
the appliance from the mains or disconnect the
electrical power supply.
The wine cellar has a fully automatic defrosting
function.
• Droplets of water on the rear wall of the appliance indicate
that the periodic automatic defrost cycle is in progress.
The defrost water is automatically routed to a drain outlet
and into a container from which it evaporates.
• Clean the defrost water drain outlet regularly using the tool
supplied with the appliance in order to ensure defrost
water is removed correctly.
• Clean the condenser at the rear of the appliance regularly
with a vacuum cleaner or a brush.
If necessary...
1. Empty the wine cellar.
2. Disconnect the appliance from the power supply.
3. Leave the door partly open (approx. 3-4mm) to prevent
the formation of mould, unpleasant odours and oxidation.
4. Clean the appliance.
• Clean the inside regularly with a sponge dampened in warm
water and/or neutral detergent. Rinse and dry with a soft
cloth. Do not use abrasive products.
• Clean the outside with a damp cloth. Do not use abrasive
products, scourers, stain-removers (e.g. acetone,
trichloroethylene) or vinegar.
• Clean the outside of the glass with a standard glass-cleaning
detergent but with a damp cloth only on the inside to
prevent detergents from interfering with the proper
storage of the wine.
Active carbons
In addition to temperature, air quality is also vital in wine
storage. The active carbon filter is essential in filtering the
external air, thereby assuring an adequate supply of clean air,
free of dust and odours (Figure C1).
Replacement filters are available and can be requested from
the After-sales Service.
Rack cleaning
Use a damp cloth to clean the oak racks.
Be careful not to damage the rubber seal when removing the
rack from the appliance. To that end, open the door fully.
17
41133001GB.fm Page 18 Thursday, October 28, 2004 12:07 PM
TROUBLESHOOTING GUIDE
1. The appliance is not working.
•Is there a power failure?
•Is the plug properly inserted in the socket?
•Is the double-pole mains switch on?
•Has the fuse blown?
•Is the power cord damaged?
•Is the thermostat set to z (Stop)?
2. The internal temperature is not low
enough.
•Is the door shut properly?
•Are the bottles preventing the door from
closing properly?
•Is the appliance installed near a heat source?
•Is the thermostat setting correct?
•Are the air circulation vents blocked?
3. The temperature inside the wine
cellar is too low.
•Is the thermostat setting correct?
4. The appliance is excessively noisy.
•Has the appliance been installed correctly?
•Are the pipes at the back touching or
vibrating?
5. Water collects at the bottom of the
cellar.
•Is the defrost water drain blocked?
Notes:
Gurgling and hissing noises due to expansion
in the refrigerant circuit are normal.
AFTER-SALES SERVICE
Before contacting the After-sales Service:
1. check first if you can solve the problem by
yourself (see “Troubleshooting guide”).
2. Switch the appliance on again to see if the
problem recurs. If it does, disconnect the
appliance from the power supply and wait for
about an hour before switching it on again.
3. If the problem persists after this course of
action, contact After-sales Service.
Specify:
•the nature of the problem,
•the model,
•the Service number (the number after the
word SERVICE on the data plate on the inside
of the appliance),
•your full address,
•your telephone number and area code.
Note:
The direction of door opening can be changed.
If this operation is performed by After-sales
Service it is not covered by the warranty.
18
41133001GB.fm Page 19 Thursday, October 28, 2004 12:07 PM
INSTALLATION
• Install the appliance away from heat sources. Installation in a
hot environment, direct exposure to the sun or installation
near heat sources (heaters, radiators, cookers) will increase
power consumption and should therefore be avoided.
• If this is not possible, the following minimum distances must
be respected:
•30 cm from coal or paraffin stoves;
•3 cm from electric and/or gas stoves.
• Fit the spacers on the rear of the condenser at the back of the
appliance (see figure).
• To optimize appliance efficiency, leave a 5 cm gap above the
appliance and make sure that adjacent kitchen units are
sufficiently distanced to allow air circulation.
• Install the appliance in a dry, well-ventilated place, and ensure
it is level, using the front adjustment feet if necessary.
• Clean the interior.
• Fit the accessories.
Electrical Connection
• Electrical connections must be made in accordance
with local regulations.
• Voltage and power consumption are indicated on the rating
plate inside the appliance.
• Regulations require that the appliance is earthed.
The manufacturer declines all liability for injury to
persons or animals and for damage to property
resulting from failure to observe the above procedures
and reminders.
• If the plug and socket are not of the same type, have the
socket replaced by a qualified electrician.
• Do not use extension leads or adapters.
Disconnecting the appliance
It must be possible to disconnect the appliance by unplugging it
or by means of a two-pole switch fitted upline of the socket.
19
41133001GB.fm Page 20 Thursday, October 28, 2004 12:07 PM
ELECTRICAL CONNECTION
For Great Britain only
Warning - this appliance must be earthed
Fuse replacement
If the mains lead of this appliance is fitted with a
BS 1363A 13amp fused plug, to change a fuse in this type
of plug use an A.S.T.A. approved fuse to BS 1362 type and
proceed as follows:
1. Remove the fuse cover (A) and fuse (B).
2. Fit replacement 13A fuse into fuse cover.
3. Refit both into plug.
Important:
The fuse cover must be refitted when changing a fuse and
if the fuse cover is lost the plug must not be used until a
correct replacement is fitted.
Correct replacement are identified by the colour insert or
the colour embossed in words on the base of the plug.
Replacement fuse covers are available from your local
electrical store.
For the Republic of Ireland only
The information given in respect of Great Britain will
frequently apply, but a third type of plug and socket is also
used, the 2-pin, side earth type.
Socket outlet / plug (valid for both countries)
If the fitted plug is not suitable for your socket outlet,
Please contact Whirlpool Service for further instruction.
Please do not attempt to change plug yourself. This
procedure needs to be carried out by a qualified Whirlpool
technician in compliance with the manufactures
instructions and current standard safety regulations.
20