1
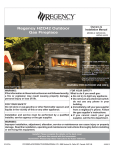
Regency Plateau™ PTO30 / PTO60
Outdoor Decorative Gas Appliance
Owners &
Installation Manual
Models: PTO30-NG / PTO30-LP
PTO60-NG / PTO60-LP
WARNING: FOR OUTDOOR USE ONLY
www.regency-fire.com
WARNING:
If the information in these instructions
are not followed exactly, a fire
or explosion may result causing
property damage, personal injury or
loss of life.
WARNING:
Improper installation, adjustment,
alteration, service or maintenance
can cause injury or property damage.
Read the installation, operating and
maintenance instructions thoroughly
before installing or servicing this
equipment.
WARNING - FOR YOUR SAFETY
What to do if you smell gas:
•Shut off gas to the appliance.
•Do not try to light any appliance.
•Extinguish any open flame.
•If odour continues, keep away from the appliance and immediately call your gas supplier or fire department.
•Do not touch any electrical switch: do not use any phone
in your building.
•Immediately call your gas supplier from a neighbour's
phone.
•Follow the gas supplier's instructions.
•If you cannot reach your gas supplier, call the fire
department.
Installation and service must be
WARNING:
Do
not store or use gasoline or other flammable vapours
performed by a qualified installer,
service agency or the gas supplier. and liquids in the vicinity of this or any other appliance.
Tested by:
Installer: Please complete the details on the back cover
and leave this manual with the homeowner.
Homeowner: Please keep these instructions for future reference.
918-990a
FPI FIREPLACE PRODUCTS INTERNATIONAL LTD. 6988 Venture St., Delta, BC Canada, V4G 1H4
07/19/11
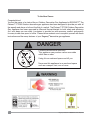
To the New Owner:
Congratulations!
You are the owner of a state-of-the-art Outdoor Decorative Gas Appliance by REGENCY®. The
Plateau™ PTO30 Outdoor decorative gas appliance has been designed to provide you with all
the warmth and charm of a fire at the flick of a switch. The Plateau™ PTO30 Outdoor Decorative
Gas Appliance has been approved by Warnock Hersey/Intertek for both safety and efficiency.
As it also bears our own mark, it promises to provide you with economy, comfort and security
for many trouble free years to follow. Please take a moment now to acquaint yourself with these
instructions and the many features of your Regency® decorative gas appliance.
DANGER
CARBON MONOXIDE HAZARD
This appliance can produce carbon monoxide
which has no odor.
X
Using it in an enclosed space can kill you.
X
X
Never use this appliance in an enclosed space
such as a camper, tent, car or home.
2
Regency Plateau™ PTO30 Outdoor Gas Fireplace
TABLE OF CONTENTS
SAFETY LABEL
OPERATING INSTRUCTIONS
Copy of Safety Decal .....................................................4
Operating Instructions .................................................24
Lighting Procedure ......................................................24
Shutdown Procedure ...................................................24
First Fire ......................................................................24
Copy of Lighting Plate Instructions ..............................25
DIMENSIONS
PTO30 finished table top and Unit Dimensions .............5
PTO60 Unit Dimensions ................................................6
MAINTENANCE
INSTALLATION
Maintenance Instructions.............................................26
Valve assembly replacement .......................................27
Important Message ......................................................7
Before You Start ............................................................7
General Safety Information............................................7
Installation Checklist .....................................................8
Locating Your Outdoor decorative gas appliance ..........8
Minimum Clearances to combustibles ...........................9
Inner Framing dimensions (required) ..........................10
Finishing ......................................................................10
High Elevation ............................................................. 11
Gas Line Installation .................................................... 11
Pilot Adjustment ........................................................... 11
Gas Pipe Pressure Testing .......................................... 11
886 S.I.T. Valve Description......................................... 11
Aeration Adjustment .................................................... 11
PTO30 wall switch installation .....................................12
PTO60 wall switch installation .....................................13
Drain Installation (Recommended) ..............................14
Wiring Diagram ............................................................15
PTO60 assembly .........................................................16
PTO30 table top Installation ........................................17
PTO60 table top Installation ........................................18
Glass crystal installation on burner..............................19
Volcanic stone installation on burner ..........................20
Optional Log Set Installation........................................21
Optional glass surround Installation ............................23
Regency Plateau™ PTO30 Outdoor Gas Fireplace
PARTS
Parts ............................................................................28
WARRANTY
Limited Warranty: ......................................................31
3
For the State of Massachusetts, installation and
repair must be done by a plumber or gas fitter
licensed in the Commonwealth of Massachusetts.
For the State of Massachusetts, flexible connectors shall not exceed 36 inches in length.
For the State of Massachusetts, the appliances
individual manual shut-off must be a t-handle
type valve.
4
14”
5"
3.5"
1.6"
#25
50,000
30,000
0-4500
WC/C.E.
WC/C.E.
WC/C.E.
WC/C.E.
DMS
Btu/h
Btu/h
ft/pi
(14.65 kW)
(8.79 kW)
(0-1372 m)
(3.49 kPa)
(1.25 kPa)
(0.87kPa)
(0.40 kPa)
Pression d'allimentation maximum
Pression d'allimentation minimum
Pression à la tubulure d'échappement élevée
Pression à la tubulure d'échappement basse
Grandeur de l'injecteur
Débit Calorifique maximum selon
Débit Calorifique minimum selon
l'altitude
Maximum supply pressure
Minimum supply pressure
Manifold pressure high
Manifold pressure low
Orifice size
Maximum input
Minumum input
Altitude
14"
11”
10”
6.4"
#45
49,000
38,000
0-4500
WC/C.E. (3.49 kPa)
WC/C.E. (2.74 kPa)
WC/C.E. (2.49 kPa)
WC/C.E. (1.59 kPa)
DMS
Btu/h
(14.36 kW)
Btu/h
(11.13 kW)
ft/pi
(0-1372 m)
Pression d'allimentation maximum
Pression d'allimentation minimum
Pression à la tubulure d'échappement élevée
Pression à la tubulure d'échappement basse
Grandeur de l'injecteur
Débit Calorifique maximum selon
Débit Calorifique minimum selon
l'altitude
ÉQUIPÉ A L'UISINE POUR GAZ PROPANE
CONCU POUR ETRE POELE: Modéle PTO30-LP
DO NOT REMOVE THIS LABEL / NE PAS ENLEVER CETTE ÉTIQUETTE
PROPANE GAS: Model PTO30-LP
D
B
Back Wall
A 17” (432mm)
Side Wall
B 17” (432mm)
Ceiling
C 45” (1143mm)
Unit Base
D 1” (25mm)
Made in Canada/ Fabrique au Canada
A
C
Minimum Clearances to Combustibles /
Degagement Minimum De Materiaux Combustibles
IF STORED INDOORS, DETACH AND LEAVE CYLINDER OUTDOORS / SI VOUS LE GARDER À L'INTÉRIEUR, DETACHER LE CYLINDRE ET LAISSER À L'EXTÉRIEUR
PTO30-LP
918-989
The installation must conform with local codes or, in the absence of local codes, with CAN/CSA-B149.1, Natural Gas and Propane Installation Code or ANSI Z223.1/NFPA 54. The appliance, when installed, must be electrically grounded in accordance with local codes or, in the absence of
local codes, with the Canadian Electrical Code, CSA C22.1 or with the National Electrical Code, ANSI/NFPA 70. This appliance is only for use with the type of gas indicated on the rating plate . See owner's manual for details.
FPI Fireplace Products International Ltd.
L'installation doit être conforme aux codes locaux ou, en l'absence de codes locaux, avec CAN/CSA-B149.1, gaz naturel et du propane ou du Code d'installation au ANSI Z223.1/NFPA 54.
6988 Venture St.
L'appareil, une fois installé, doit être connecté électriquement à la terre conformément aux codes locaux ou, en l'absence de codes locaux, avec le Code canadien de l'électricité, CSA C22.1 ou avec le National Electrical Code, ANSI / NFPA 70.
Delta, BC, Canada V4G 1H4
.
Cet appareil est à utiliser uniquement avec le type de gaz indiqué sur la plaque signalétique. Voir le manuel du propriétaire pour les détails.
NOT FOR USE WITH SOLID FUELS. /
PTO30-NG
NE PAS UTILISER AVEC DES COMBUSTIBLES SOLIDE.
FOR OUTDOOR USE ONLY / POUR USAGE EXTÉRIEUR SEULEMENT
Maximum supply pressure
Minimum supply pressure
Manifold pressure high
Manifold pressure low
Orifice size
Maximum input
Minumum input
Altitude
APPAREIL FONCTIONNANT AU NATURAL GAS
CONCU POUR ETRE POELE: Modéle PTO30-NG
Serial No./ No de serie
382
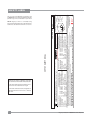
NOTE: Regency® units are constantly being
improved. Check the label on the unit and if there is
a difference, the label on the unit is the correct one.
NATURAL GAS: Model PTO30-NG
4001172
382
Duplicate S/N
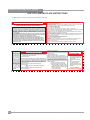
This is a copy of the label that accompanies each
PTO30 Outdoor decorative gas appliance. We have
printed a copy of the contents here for your review.
Listed: OUTDOOR DECORATIVE GAS APPLIANCE / EXTÉRIEUR DÉCORATIFS APPAREIL À GAZ
Certified for/Certifiée pour: CANADA and U.S.A.
Tested to: ANSI Z21.97-2010 (US) / CR97-003 (CAN) / CAN / CGA-2.17-M91
COPY OF SAFETY DECAL
SAFETY LABEL
Regency Plateau™ PTO30 Outdoor Gas Fireplace
DIMENSIONS
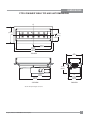
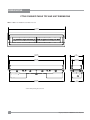
PTO30 FINISHED TABLE TOP AND UNIT DIMENSIONS
CL
17”
(432mm)
CL
CL
12-13/16”
(352mm)
6”
(152mm)
CL
18-9/16”
(470mm)
37-15/16”
(963mm)
41-1/2”
(1054mm)
TOP VIEW
17”
(432mm)
10-3/16”
(258mm)
33-7/16”
(848mm)
20-1/4”
(514mm)
SIDE VIEW
12”
(305mm)
14-3/16”
(359mm)
END VIEW
* Shown with optional glass surround.
Regency Plateau™ PTO30 Outdoor Gas Fireplace
5
DIMENSIONS
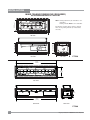
PTO60 FINISHED TABLE TOP AND UNIT DIMENSIONS
NOTE: PTO60 is two PTO30 units assembled end to end.
71-13/16"
(1821mm)
71-13/16"
(1821mm)
15"
(432mm)
68-3/16"
(1731mm)
12-13/16"
(325mm)
68-5/16"
(1734mm)
15"
(381mm)
* Shown with optional glass surround.
6
Regency Plateau™ PTO30 Outdoor Gas Fireplace
INSTALLATION
IMPORTANT MESSAGE
SAVE THESE
INSTRUCTIONS
The PTO30 Outdoor Decorative Gas Appliance must
be installed in accordance with these instructions.
Carefully read all the instructions in this manual
first. Consult the "authority having jurisdiction" to
determine the need for a permit prior to starting the
installation. It is the responsibility of the installer to
ensure this decorative gas appliance is installed in
compliance with manufacturers instructions and all
applicable codes.
BEFORE YOU START
Safe installation and operation of this appliance
requires common sense, however, we are required
by the Canadian Safety Standards and ANSI
Standards to make you aware of the following:
INSTALLATION AND REPAIR SHOULD
BE DONE BY AN AUTHORIZED
SERVICE PERSON. THE APPLIANCE
SHOULD BE INSPECTED BEFORE
USE AND AT LEAST ANNUALLY BY A
PROFESSIONAL SERVICE PERSON.
MORE FREQUENT CLEANING MAY
BE REQUIRED DUE TO EXCESSIVE
LINT FROM CARPETING, BEDDING
MATERIAL, ETC. IT IS IMPERATIVETHAT
CONTROL COMPARTMENTS, BURNERS
AND CIRCULATING AIR PASSAGEWAYS
OF THE APPLIANCE BE KEPT CLEAN.
ANY GUARD OR OTHER PROTECTIVE
DEVICE REMOVED FOR SERVICING
THE APPLIANCE MUST BE REPLACED
PRIORTO OPERATINGTHE APPLIANCE
WARNING: FAILURE TO INSTALL THIS
APPLIANCE CORRECTLY WILL VOID
YOUR WARRANTY AND MAY CAUSE A
SERIOUS FIRE.
CHILDREN AND ADULTS SHOULD BE
ALERTED TO THE HAZARDS OF HIGH
SURFACE TEMPERATURES, ESPECIALLY THE DECORATIVE GAS APPLIANCE GLASS AND FACEPLATE, AND
SHOULD STAY AWAY TO AVOID BURNS
OR CLOTHING IGNITION.
THIS APPLIANCE SHALL BE USED
ONLY OUTDOORS IN A WELL-VENTILATED SPACE AND SHALL NOT BE
USED IN A BUILDING, GARAGE OR ANY
OTHER ENCLOSED AREA.
Regency Plateau™ PTO30 Outdoor Gas Fireplace
DO NOT USE THIS APPLIANCE IF
ANY PART HAS BEEN UNDER WATER.
IMMEDIATELY CALL A QUALIFIED
SERVICE TECHNICIAN TO INSPECT
THE APPLIANCE AND TO REPLACE
ANY PART OF THE CONTROL SYSTEM
AND ANY GAS CONTROL WHICH HAS
BEEN UNDER WATER.
CLOTHING OR OTHER FLAMMABLE
MATERIAL SHOULD NOT BE PLACED
ON OR NEAR THE APPLIANCE.
SOLID FUELS SHALL NOT BE BURNED
IN THIS APPLIANCE.
YOUNG CHILDREN SHOULD BE CAREFULLY SUPERVISED WHEN THEY ARE
IN THE SAME AREA AS THE APPLIANCE. TODDLERS, YOUNG CHILDREN
AND OTHERS MAY BE SUSCEPTIBLE
TO ACCIDENTAL CONTACT BURNS. A
PHYSICAL BARRIERS IS RECOMMENDED IF THERE ARE AT RISK INDIVIDUAL
IN THE HOUSE. TO RESTRICT ACCESS
TO A DECORATIVE GAS APPLIANCE
OR STOVE, INSTALL AN ADJUSTABLE
SAFETY GATE TO KEEP TODDLERS,
YOUNG CHILDREN AND OTHER AT RISK
INDIVIDUALS OUT OF THE ROOM AND
AWAY FROM HOT SURFACES.
DO NOT SIT OR STAND ON DECORATIVE
GAS APPLIANCE.
GENERAL SAFETY
INFORMATION
1) The installation must conform with local
codes or, in the absence of local codes, with
CAN/CSA-B149.1, Natural Gas and Propane
Installation Code or CAN/CSA-B149.2, Propane
installation code the Natural Gas Fuel Code,
ANSI Z223.1/NFPA 54.
4) To prevent injury, do not allow anyone who
is unfamiliar with the operation to use the
decorative gas appliance.
5) Wear gloves and safety glasses for protection
while doing required maintenance.
6) Maximum gas inlet pressure = 1/2 psig.
7) Under no circumstances should this appliance
be modified. Parts that have to be removed for
servicing should be replaced prior to operating
this appliance.
8) Installation and any repairs to this appliance
should be done by a qualified service person.
A professional service person should be called
to inspect this appliance annually. Make it a
practice to have all of your gas appliances
checked annually.
9) Under no circumstances should any solid fuels
(wood, paper, cardboard, coal, etc.) be burned
in this appliance.
10) The appliance and its individual shutoff valve
must be disconnected from the gas supply
piping system during any pressure testing of
that system at test pressures in excess of 1/2
psi (3.5kPa).
The appliance must be isolated from the gas
supply piping system by closing its individual
manual shutoff valve during any pressure testing
of the gas supply piping system at test pressures
equal to or less than 1/2 psi (3.5 kPa).
11) The appliance area must be kept clear and
free of combustible materials, (gases and other
flammable vapours and liquids).
It is highly recommended to protect the
interior from moisture (rain, snow). Cover
the enclosure opening when not in use. This
decorative gas appliance is only for use
with the type of gas indicated on the rating
plate. This decorative gas appliance is not
convertible for use with other gases, unless a
certified kit is used.
12) Stainless Steel/ Sunset Bronze Weather
Cover must be removed when burner is in
operation.
13) When not using appliance for extended periods
of time - turn off gas supply and install Stainless
Steel Weather Cover.
2) See general construction and assembly
instructions.The appliance should be enclosed.
3) Inspect the burner before each use of the
appliance for blockage and any signs of
deterioration
Emissions from burning wood or gas could
contain chemicals known to the State of
California to cause cancer, birth defects or
other reproductive harm.
7
INSTALLATION
INSTALLATION
CHECKLIST
1) Locate appliance:
a) Refer to "Locating Your Outdoor decorative
gas appliance" section
b) Clearances to Combustibles (Refer to
"Clearances" section)
c) Framing & Finishing Requirements (Refer
to "Framing & Finishing" section)
2) Drain Installation (recommended).
3) Install ON/OFF switch - ensure it is in the OFF
position.
LOCATING YOUR
OUTDOOR DECORATIVE GAS APPLIANCE
1) When selecting a location for your decorative gas appliance, ensure that the clearances are met.
2) This appliance must be installed in an open-air situation with natural ventilation, without stagnant
areas, where gas leakage and products of combustion are rapidly dispersed by wind and natural
convection.
3) Certain materials or items, when placed under or near the appliance, will be subjected to radiant
heat and could become damaged.
4) Typically an outdoor space is not enclosed but, any enclosure in which the appliance is used shall
comply with one of the following:
An enclosure with walls on all sides, but at least one permanent opening at ground level and no
overhead cover.
4) Make gas connections - test for leaks.
5) Install 4 "AA" batteries into each battery pack.
This unit will not operate without AA batteries
in place.
6) Install standard and optional features. Refer to
the following sections:
a.
b.
c.
d.
e.
f.
Tabletop Installation
Glass Crystals
Volcanic Stone Installation (optional)
Log Installation (optional)
Glass Surround Installation (optional)
Weather Cover Installation
Within a partial enclosure that includes an overhead cover and no more that two walls.
7) Final check.
This includes:
1) Clocking the appliance to ensure the correct
firing rate (rate noted on label), after burning
appliance for 15 minutes.
2) If required, adjusting the primary air to ensure
that the flame does not carbon. First allow the
unit to burn for 15-20 min. to stabilize.
CAUTION: Any alteration to the product that
causes sooting or carboning that results in damage is not the responsibility of the manufacturer.
Within a partial enclosure that includes an overhead cover and more than two walls, the following
shall apply:
•
At least 25% of the total wall area is completely open, and
•
At least 30% of the remaining wall area is open and unrestricted
30% or more in total of the remaining wall
area is open and unrestricted.
Open side at least 25% of total wall area
8
Regency Plateau™ PTO30 Outdoor Gas Fireplace
INSTALLATION
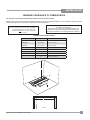
MINIMUM CLEARANCES TO COMBUSTIBLES
The clearances listed below are Minimum distances unless otherwise stated:
A major cause of fires is failure to maintain required clearances (air space) to combustible materials. It is of the greatest importance that this
decorative gas appliance be installed only in accordance with these instructions.
WARNING
Fire hazard is an extreme risk
if these clearances (air space) to combustible materials are not
adhered to. It is of greatest importance that this decorative gas
appliance be installed only in accordance with these instructions.
Caution Requirements
The top, back and sides of the decorative gas appliance
are defined by standoffs. The metal ends of the
standoff may NOT be recessed into combustible
construction.
PTO30 Clearance Requirements
Clearance:
Dimension
A: Back wall
17" (432mm)
Burner to back wall
B: Sidewall
17" (432mm)
Burner to sidewall
C: Ceiling
45" (1143mm)
Burner to Ceiling
D: Unit Base
Measured From:
1"(25mm)
Unit Base to Combustible
E: Alcove Width PTO30
84"(2134mm)
Wall to Wall (Minimum)
E: Alcove Width PTO60
100" (2540mm)
Wall to Wall (Minimum)
F: Alcove Depth
60" (1524mm)
Front to Back Wall (Maximum)
Notes:
0"
No Hearth Required
C
B
A
D
E
F
Alcove
Regency Plateau™ PTO30 Outdoor Gas Fireplace
9
INSTALLATION
INNER FRAMING DIMENSIONS (REQUIRED)
NOTE:FRAMING MATERIAL NOT SUPPLIED
15”(381mm)
NOTE: Framing materials may be combustible or noncombustible.
Finishing materials MUST be non-combustible.
Consideration should be given to weather / elements
when choosing framing materials (ie. treated lumber,
steel stud).
38-1/2”(978mm)
1”(25mm)
38-1/2”(978mm)
SIDE VIEW
10-1/2”(267mm)
10-1/2”(267mm)
TOP VIEW
15”(381mm)
END VIEW
PTO30
68-1/2"
(1740mm)
15"
(381mm)
TOP VIEW
10-1/2""
(267mm)
68-1/2"
(1740mm)
SIDE VIEW
15"
(381mm)
END VIEW
PTO60
10
Regency Plateau™ PTO30 Outdoor Gas Fireplace
INSTALLATION
FINISHING
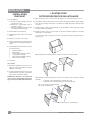
Side nailing brackets are adjustable for material from a minimum of 1/2"
thick up to a maximum of 1" thick.
MATERIALS EXCEEDING 1"
If using a material thicker than 1" on the top facing - the table top opening
must be maintained at 17-1/4" x 41-3/4" to allow for the proper fit.
Cutaway
17-1/4”
Burner Opening
Cutaway
41-3/4”
Table Top
Nailing brackets
Determine total thickness of top facing and adjust nailing brackets.
Top facing material is to be brought to unit edge for finished look.
Top = 1/2" thick material
Middle = 3/4" thick material
Bottom = 1" thick material
Nailing bracket
Regency Plateau™ PTO30 Outdoor Gas Fireplace
11
INSTALLATION
PTO30-NG SYSTEM DATA
Max. Supply Pressure
14" WC (3.49 kpa)
Min. Supply Pressure
5" WC (1.25 kpa)
Manifold Pressure
3.5" WC (0.87 kpa)
Manifold Pressure -Low
1.6" WC (0.40 kpa)
Orifice Size
#25 DMS
Minimum Input
30,000 Btu/h
(8.79 kW)
Maximum Input
50,000 Btu/h
(14.65 kW) 3
886 S.I.T. VALVE
DESCRIPTION
PILOT ADJUSTMENT
Periodically check the pilot flames. Correct flame
pattern has two strong blue flames: 1 flowing
around the flame sensor and 1 flowing across
the burner (it does not have to be touching the
burner).
Burner
1)
2)
3)
4)
5)
6)
7)
Manual high/low adjustment
Pilot adjustment
Outlet Pressure Tap
Inlet Pressure Tap
Pilot Outlet
Main Gas Outlet
Main Gas Inlet
Flame Sensor
PTO30-LP SYSTEM DATA
Max. Supply Pressure
14" WC (3.49 kpa)
Min. Supply Pressure
11" WC (2.73 kpa)
Manifold Pressure
10" WC (2.49 kpa)
Manifold Pressure-Low
6.4" WC (1.59 kpa)
Orifice Size
#45 DMS
Minimum Input
38,000 Btu/h
(11.13 kW)
Maximum Input
49,000 Btu/h
(14.36 kW)
NOTE:
The PTO60 has a combined min. input of 60,000
Btu - NG/ 76,000 Btu - LP and max. input of
100,000 Btu - NG / 98,000 Btu - LP.
Care should be taken when sizing the gas pipe
due to the extremely high Btu of this unit.
HIGH ELEVATION
This unit is approved for altitude 0 to 4500 ft. (CAN/
CGA 2.17-M91).
GAS LINE
INSTALLATION
Since some municipalities have additional local
codes it is always best to consult with your local
authorities and the CAN/CGA B149 installation
code.
For USA installations follow local codes and/or the
current National Fuel Gas Code, ANSI Z223.1.
When using copper or flex connectors use only
approved fittings. Always provide a union so that
gas lines can be easily disconnected for servicing.
Flare nuts for copper lines and flex connectors are
usually considered to meet this requirement.
NOTE: A shutoff / dante valve should be supplied in or near the unit (or as per local codes)
for ease of servicing this appliance.
IMPORTANT: Always check for gas leaks with
a soap and water solution or gas leak detector.
Do not use open flame for leak testing.
12
Pilot
Ignitor
3
4
Note: If you have an incorrect flame pattern,
contact your Regency® dealer for further
instructions.
Incorrect flame pattern will have small, probably
yellow flames, not coming into proper contact
with the rear burner or flame sensor.
2
1
GAS PIPE PRESSURE
TESTING
The appliance must be isolated from the gas supply piping system by closing its individual manual
shut-off valve during any pressure testing of the
gas supply piping system at test pressures equal
to or less than 1/2 psig. (3.45 kPa). Disconnect
piping from valve at pressures over 1/2 psig.
7
The manifold pressure is controlled by a regulator
built into the gas control, and should be checked
at the pressure test point.
Note: To properly check gas pressure, both
inlet and manifold pressures should be
checked using the valve pressure ports
on the valve.
1) Make sure the valve is in the "OFF" position.
2) Loosen the "IN" and/or "OUT" pressure tap(s),
turning counterclockwise with a
1/8" wide flat screwdriver.
5
6
AERATION ADJUSTMENT
3) Attach manometer to "IN" and/or "OUT" pressure
tap(s) using a 5/16" ID hose.
The burner aeration is factory set but may need
adjusting due to either the local gas supply or
altitude. Open the air shutter for a blue flame or
close for a more yellow flame.
4) Light the pilot and turn the valve to "ON" position.
Minimum Air Shutter Opening:
5) The pressure check should be carried out with
the unit burning and the setting should be within
the limits specified on the safety label.
Fully Closed
1/2"
6) When finished reading manometer, turn off the
gas valve, disconnect the hose and tighten the
screw (clockwise) with a 1/8" flat screwdriver.
Note: Screw should be snug, but do not over
tighten.
NG
LP
Note: Any damage due to carboning resulting
from improperly setting the aeration
controls is NOT covered under warranty.
Regency Plateau™ PTO30 Outdoor Gas Fireplace
INSTALLATION
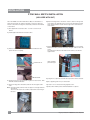
PTO30 WALL SWITCH INSTALLATION
(INCLUDED WITH UNIT)
The unit comes with low voltage wire and a battery extension wire installed.
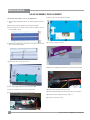
1) Run supplied wire to desired location - to a max. of 9 feet.
6) Install supplied 4-AA batteries into the battery holder. Using velcro install
battery holder to the backside of the battery compartment door. Connect
battery terminal.
2) Install supplied electrical box in desired location.
7) Using silicone, completely seal strain relief to protect from water or moisture.
3) Remove center knock out from electrical box and install strain relief
(strain relief nut not required).
8) Place supplied gasket on top of electrical box.
9) Fasten cover to electrical box using supplied screws.
10) Place switch in OFF position until final installation is complete.
Center knock out
Strain Relief
4) Route low voltage wire and battery extension wire through the strain
relief.
5) Connect low voltage wire to supplied switch, fasten switch to right side of
electrical box (polarity not important).
Regency Plateau™ PTO30 Outdoor Gas Fireplace
13
INSTALLATION
PTO60 WALL SWITCH INSTALLATION
(INCLUDED WITH UNIT)
Note: The PTO60 comes with 2-wall switches. Only one wall switch is required. The 2nd switch can either be discarded or saved as a spare part.
The unit comes with low voltage wire and a battery extension wire installed
on each burner.
6) Attach low voltage wires to the switch - ensure to attach on the right side
of the switch. This will make it easier to remove the 2nd battery terminal
when replacing batteries. Fasten switch to right side of electrical box as
shown below.
1) Run supplied wire to desired location - to a max. of 9 feet for both
burners.
2) Install supplied electrical box in desired location.
3) Remove center knock out from electrical box and install strain relief
(strain relief nut not required).
Center knock out
7) Install 4- AA batteries into each battery terminal. Ensure correct polarity.
Slide the first battery terminal all the way to the right - until it is next to the
switch.
The 2nd battery terminal can be attached to the battery cover with the
supplied velcro.
Slide 1st battery
pack to the right.
Strain Relief
8) Using silicone, completely seal strain relief to protect from water or moisture.
4) Connect both sets of low voltage wires together from each burner - white
with white and black with black.
5) Route low voltage wires and battery extension wire through the strain
relief.
Note: Ensure the battery extension wires are approx. 8" in length inside the
electrical box.
This excess will ensure ease of battery replacement and servicing in
the future.
14
9) Place supplied gasket on top of electrical box.
10) Fasten cover to electrical box using supplied screws.
11) Place switch in OFF position until final installation is complete.
Regency Plateau™ PTO30 Outdoor Gas Fireplace
INSTALLATION
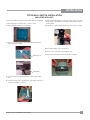
PTO30 DRAIN INSTALLATION (RECOMMENDED)
Although this decorative gas appliance is designed to operate outdoors safely, rain and other sources of moisture may enter the burner area, which will
cause water to collect inside the base of the unit.
To prevent excessive water collection, the installer should provide a way to drain the water from the base of the unit by building or installing a
water collector before positioning the decorative gas appliance in its location.
INSTALLATION INSTRUCTIONS
1)
Remove 2 screws to remove the bracket from the bottom of the burner - this will allow access to the drain hole at the base of the unit.
2)
On the exposed drain hole (see location below), install a PVC 3/4" threaded coupling reducer going from the top of the pan, down through the hole.
Apply a silicone-based sealant around the base and threads before installation. Cut notches into the top of the coupling reducer to prevent water
pooling.
3)
Holding the reducer coupling with a wrench, thread a 90° PVC elbow (from the underside of the unit) to the reducer until it is tight to the metal.
4)
Reinstall bracket from Step 1.
Note: To assure proper drainage, that decorative gas appliance must be installed on a leveled surface
5)
Add additional piping to route the drain to an appropriate location.
NOTE: Install a drain on both burners on the PTO60.
View from underside of burner.
Threaded
Reducer
(PVC)
Cut notches into the top
of the coupling reducer to
prevent water pooling.
Threaded
Elbow
@ 90°
(PVC)
Reducer and elbow can be purchased from your local
hardware store.
Regency Plateau™ PTO30 Outdoor Gas Fireplace
15
INSTALLATION
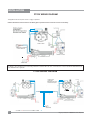
PTO30 WIRING DIAGRAM
This appliance does not require a 120V A.C. supply for operation.
NOTE: 4 AA batteries must be installed in the battery pack to operate the burner switch. Do not use a 9 volt battery.
0.886.001
Proflame Valve
Standard Main On/Off Switch
or Optional Wall Switch
The appliance, when installed, must be electrically grounded in accordance with local codes, or in the absence of local codes with the National Electrical
Code, ANSI/NFPA 70, if applicable.
PTO60 WIRING DIAGRAM
ON/OFF Switch
16
Regency Plateau™ PTO30 Outdoor Gas Fireplace
INSTALLATION
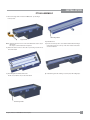
PTO60 ASSEMBLY
1 Remove the large stand off from both PTO30 units - by removing 2
screws per side.
Bend flange till flat
Large standoff
4) Reinstall burner.
Note: Removing a burner from one of the units will make it easier to stack
the burners.
This step is recommended - but not required.
5) Line the two units up end to end. Stack the flattened burner flanges
(from previous step) one over top of the other. Create a flat surface
across both burners.
2) Remove the burner from one of the units - by removing 4 screws in locations shown below.
3) Bend flange 90º downward until it is flat.
Do this on each burner only on end shown below.
6) Install units together into framing. Secure in place with nailing strips.
Bend flange till flat
Regency Plateau™ PTO30 Outdoor Gas Fireplace
17
INSTALLATION
PTO30 TABLE TOP INSTALLATION
Before installation,stainless steel must be handled and cleaned as per instructions noted below:
Stainless Steel Table Top
• Stainless table top must be inspected for scratches and dimples prior to installation. All claims to be recorded at this time.
Claims for damage after installation will not receive consideration.
• To protect the finish during installation and handling - cotton gloves MUST be worn at all times while handling the panels (even when
removing protective coating).
•Stainless table top will discolor a little during normal operation.
This is normal and should not be considered a defect.
*
All hand and finger marks MUST be cleaned off with a soft cloth and a stainless steel cleaner. Most stainless steel cleaners leave a film/
residue on the surface of the panels. Use an ammonia based cleaner (ie. glass cleaner) to remove this film before applying heat to the unit.
Failure to do this will result in burn stains on table top which you will be unable to remove.
Not protected by product warranty.
NOTE: These instructions apply to both the stainless steel and sunset
bronze table tops.
3) To remove - reverse steps.
Note: Instructions below shown with the Plateau Series coffee table base.
1) Place table top over completed unit.
Final Install
2) Place end caps over pilot and opposite end to complete installation.
End Caps
18
Regency Plateau™ PTO30 Outdoor Gas Fireplace
INSTALLATION
PTO60 TABLE TOP INSTALLATION
Before installation,stainless steel must be handled and cleaned as per instructions noted below:
Stainless Steel Table Top
• Stainless table top must be inspected for scratches and dimples prior to installation. All claims to be recorded at this time.
Claims for damage after installation will not receive consideration.
• To protect the finish during installation and handling - cotton gloves MUST be worn at all times while handling the panels (even when
removing protective coating).
•Stainless table top will discolor a little during normal operation.
This is normal and should not be considered a defect.
All hand and finger marks MUST be cleaned off with a soft cloth and a stainless steel cleaner. Most stainless steel cleaners leave a film/
*residue
on the surface of the panels. Use an ammonia based cleaner (ie. glass cleaner) to remove this film before applying heat to the unit.
Failure to do this will result in burn stains on table top which you will be unable to remove.
Not protected by product warranty.
4) To remove - reverse steps 3-2.
1) Remove knockouts from both ends of unit with pliers as shown below.
Final Install
2) Place table top over completed unit.
Note: Unit shown below is not completed
3) Place end caps over both pilots at either end to complete installation.
Note: 2 caps remain - these may be discarded or kept as spare parts.
End Cap
Regency Plateau™ PTO30 Outdoor Gas Fireplace
19
INSTALLATION
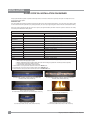
GLASS CRYSTAL INSTALLATION ON BURNER
Evenly spread the Glass Crystals or optional Ceramic Spa Stones over the burner. Ensure the crystals (or stones) do not overlap too much as
this will effect the flame pattern.
IMPORTANT NOTE:
Only the supplied approved Glass Crystals and Ceramic Spa Stones are to be used with these fireplaces. Use of any other type of glass crystals
or stones can alter the unit's performance, any damage caused by the use of any unapproved glass or stones will not be covered under warranty.
When using Ceramic Spa Stones DO NOT cover burner ports or pilot light that lead to pilot flame. Ensure the crystals or stones do not overlap
excessively as this will effect the flame pattern.
BURNER PACKAGES
Unit
*Glass Crystals
HZ54E / HZ54EPV
3 lbs
1 lb Glass + 2 packages (140 spa stones)
Ceramic Spa Stones
HZ42 / HZ42E
2 lbs
1 lb Glass + 1 package (70 spa stones)
HZ42ST / HZ42STE
HZ42STEPV
2 lbs
1 lb Glass + 1 package (70 spa stones)
HZ30E **
1 lb
1 lb Glass + 1 package (70 spa stones)**
HZI234E ***
3/4 lb
3/4 lb Glass + 1 package 70 spa stones)***
HZI390E/ HZI390EB *
7 lbs [4lbs burner+3lbs firebox]
2 lb Glass + 1 package (70 spa stones)
HZO42/HZO42 (AUS)
3 lbs
Not Approved
L676S
1 lb
1 package = (70 spa stones)
P33S/P33SE ****
1 lbs
1 package = (70 spa stones)****
PTO30 */ Plateau Series
10 lbs
Not Approved
PTO60
20 lbs
Not Approved
U32S / U32SE
1 lb
1 package = (70 spa stones)
E33S
1 lb
1 package = (70 spa stones)
NOTE: * Glass Crystals are available in 1lb and 5lb bags. All units come standard with Cobalt Blue glass crystals except:
* HZO42 comes with Copper glass crystals.
* HZI390E, HZI390EB, PTO30, PTO60 & Plateau Series do NOT include glass crystals with units. Must purchase separately.
• 1 Ceramic Spa stone package contains 70 stones.
• 1 Ceramic Garden stone package contains 50 stones.
** Recommended - use only 40 of the 70 ceramic stones on the HZ30E burner.
*** Recommended - use only 24 of the 70 ceramic stones on the HZI234E burner.
**** Recommended - use only 50 of the 70 ceramic stones on the P33S/P33SE burner.
Glass Crystals shown on Burner
For Units HZ54E, HZ54EPV, HZ42ST, HZ42STE, HZ42STEPV,
HZI234E, HZ42E, HZ42, HZ30E only
Glass Crystals shown on Burner
For Units HZO42, HZO42 (AUS) PTO30, PTO60 Plateau Series only
Glass Crystals shown on Burner
For units P33S, P33SE, L676S, U32S, U32SE, E33S only
20
Optional Ceramic Spa Stones + Glass Crystals shown on burner.
For Units HZ54E, HZ54EPV, HZ42ST, HZ42STE, HZ42STEPV,
HZI234E, HZ42, HZ42E, HZ30E only
Glass Crystals (7 lbs) shown on Burner and Firebox Floor
For Units HZI390E, HZI390EB only
Optional Ceramic Spa Stones shown on burner.
For units P33S,P33SE L676S, U32S, U32SE, E33S only
Regency Plateau™ PTO30 Outdoor Gas Fireplace
INSTALLATION
VOLCANIC STONE INSTALLATION ON BURNER
Evenly spread the glass crystals and volcanic stones over the burner. Ensure the stones do not overlap too much as this will effect the flame
pattern.
IMPORTANT NOTE:
Only the supplied approved Volcanic Stones are to be used with these fireplaces. Use of any other type of stones can alter the unit's performance,
any damage caused by the use of any unapproved glass or stones will not be covered under warranty.
When using Volcanic Stones DO NOT cover burner ports or pilot light that lead to pilot flame. Ensure the stones do not overlap excessively as this
will effect the flame pattern.
OUTDOOR VOLCANIC STONE BURNER PACKAGES
Unit
Volcanic Stones
Ivory/Tan
HZO42/HZO42 (AUS)
35 stones w/3lbs glass
Volcanic Stones
Slate/Grey
35 volcanic stones w/3lbs glass
PTO30 */ Plateau Series 50 stones w/5lbs glass
50 volcanic stones w/5lbs glass
PTO60
100 stones w/10lbs glass
100 stones w/10lbs glass
NOTE: * Basalt Volcanic stones are measured by weight not quantity. Each bag contains 15lbs of stones, however the exact quantity and
size will vary.
Size varies between 2" - 3".
Volcanic Stones + Glass Crystals
For the PTO30, PTO60
& Plateau Series only
Volcanic Stones Ivory /Tan + Glass Crystals
For the HZO42 & HZO42AUS
only
Volcanic Stones Slate /Grey + Glass Crystals
For the HZO42 & HZO42AUS
only
Regency Plateau™ PTO30 Outdoor Gas Fireplace
21
INSTALLATION
OPTIONAL LOG SET INSTALLATION
NOTE: PTO60 requires 2 log sets.
Read the instructions below carefully and refer to the
images. If the logs are broken do not use the unit until
they are replaced.
Broken logs can interfere with pilot operation.
A
D
Improper positioning of the logs may create carbon build-up
and can alter the unit's performance which is not covered
under warranty.
B
Log kit # 326-930 contains the following pieces:
Description
Log A
Log B
Log C
Log D
Log E
Log F
E
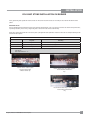
C
F
Diagram 1
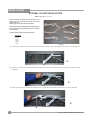
1) Install log A as shown below. Orient the log in the same way and in a similar location on the right side of the burner as shown in Diagram 2.
A
Diagram 2
2) Install log D on the burner as shown below. Orient the log in the same way and in a similar location on the right side of the burner as shown
in Diagram 3.
D
Diagram 3
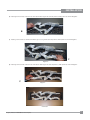
3) Install log E on the burner as shown below. Orient log E across log D in the same way and in a similar position as shown in Diagram 4.
D
E
22
Diagram 4
Regency Plateau™ PTO30 Outdoor Gas Fireplace
INSTALLATION
4) Install log B on the left side of the burner as shown below. Orient log B in the same way and in a similar position as shown in Diagram 5.
B
Diagram 5
5) Install log F on the burner as shown below. Orient log F across log A in the same way and in a similar position as shown in Diagram 6.
F
Diagram 6
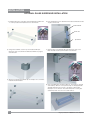
6) Install log C on the left side of the burner as shown below. Orient log C in the same way and in a similar position as shown in Diagram 7.
C
Diagram 7
Final Install
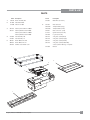
Regency Plateau™ PTO30 Outdoor Gas Fireplace
23
INSTALLATION
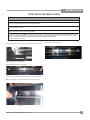
OPTIONAL GLASS SURROUND INSTALLATION
1) Assemble the 4 pieces of the glass surround and fasten together with
4 corner top brackets and nylon fasteners as shown below.
4) Use supplied spacer tool to determine where the bottom bracket should
be place and secured.
Bottom Bracket
Spacer tool
Nylon fasteners
Top Bracket
2) Using a flat screwdriver, secure 4 top corner brackets with nylon
fasteners in each corner, bracket should be flush with the top of glass
as shown below.
5) Secure bottom corner brackets with nylon fasteners in each corner.
Glass should be raised up 3/4" in bracket as shown below.
Insert nylon fastener
here.
Nylon fasteners
3) After the 4 top bracket are installed -flip over and place on a soft surface.
Install the 4 bottom brackets.
3/4"
6) Place assembled glass surround on table top - ensure glass is centered
on the table top. Once in correct position, lift up one end, apply double
sided tape that has been cut to size, to the bottom of the brackets.
Repeat process on other end. Press down firmly from to secure glass
surround in position. Use care not to scratch surfaces.
24
Regency Plateau™ PTO30 Outdoor Gas Fireplace
OPERATING INSTRUCTIONS
INSTALLATION
OPERATING
INSTRUCTIONS
1) Read and understand these instructions before
operating this appliance.
2) Check to see that all wiring is correct and
enclosed to prevent possible shock.
3) Check to ensure there are no gas leaks.
4) Verify log placement. If the pilot cannot be
seen when lighting the unit, the logs have
been incorrectly positioned.
FIRST FIRE
The first fire in your decorative gas appliance is part
of the paint curing process. To ensure that the paint
is properly cured, it is recommended that you burn
your decorative gas appliance for at least one (1)
hours the first time you use it
.
When first operated, the unit will release an odour
caused by the curing of the paint, the burning off of
any oils remaining from manufacturing.
DO NOT ATTEMPT TO CLEAN THE
GLASS WHILE IT IS HOT.
5) The unit should never be turned off, and on
again without a minimum of a 60 second wait.
LIGHTING PROCEDURE
1) Turn on ON/OFF switch.
2) After approximately 4 seconds the spark ignition system will spark for 60 seconds to light
the main burner.
3) The unit will turn on.
Note: The first try for ignition will last approximately
60 seconds. If there is no flame ignition (rectification) the board will stop sparking for approximately 35 seconds. After wait time , the board
will start second try for ignition by sparking for
approximately 60 seconds . If there is still no
positive ignition the board will go into lock out.
The system will need to be reset as follows:
a) Turn the system off using ON/OFF switch.
b) After approximately 2 seconds turn on ON/
OFF switch.
c) Unit will repeat step 2.
SHUTDOWN
PROCEDURE
1) Turn ON/OFF switch.
2) If service is to be performed - you must disconnect power to the unit, by removing the battery
pack.
Regency Plateau™ PTO30 Outdoor Gas Fireplace
25
OPERATING INSTRUCTIONS
COPY OF LIGHTING PLATE INSTRUCTIONS
The lighting plate is located on the underside of the table top on the unit.
FOR YOUR SAFETY READ BEFORE LIGHTING
This appliance must be installed in accordance with local codes, if any;
if none, follow the National Fuel Gas Code, ANSI Z223.1/NFPA 54, or
Natural Gas and Propane Installation Codes, CSA B149.1.
WARNING: If you do not follow these instructions exactly, a fire or
explosion may result causing property damage, personal injury or
loss of life. Improper installation, adjustment, alteration, service or
maintenance can cause injury or property damage. Refer to the owner’s
information manual provided with this appliance. For assistance or
additional information consult a qualified installer, service agency
or gas supplier.
AVERTISSEMENT. Quiconque ne respecte pas à la lettre les instructions
dans la présente notice risquede déclencher un incendie ou une explosion
entraînant des dommages, des blessures ou la mort.
Une installation, d'ajustement, de modification, de service ou
d'entretien peut provoquer des blessures ou des dommages matériels. Reportez-vous au manuel du propriétaire de l'information fournie
avec cet appareil. Pour obtenir de l'aide ou des informations supplémentaires consulter un installateur qualifié, une agence de service ou
fournisseur de gaz.
CAUTION:
Hot while in
operation. Do not
touch. Severe
Burns may result.
Due to high surface
temperatures
s.k e e p c h i l d r e n ,
clothing
and
furniture, gasoline
and other liquids
having flammable
vapors away. Keep
burner and control
compartment clean.
See installation
and operating
instructions
accompanying
appliance.
A) This appliance is equipped with an ignition device which automatically lights the pilot.
Do not try to light the pilot by hand.
B) BEFORE OPERATING smell all around the appliance area for gas. Be sure to smell next to
the floor because some gas is heavier than air and will settle on the floor.
t
WHAT TO DO IF YOU SMELL GAS
- Do not try to light any appliance.
- Do not touch any electric switch, do not use any phone in your building.
t
- Immediately call your gas supplier from a neighbours phone. Follow the gas supplier’s instructions.
- If you cannot reach your gas supplier, call the fire department.
A) Cet appareil est muni d’un dispositif d’allumage qui allume automatiquement la veilleuse.
f
Ne tentez pas d’allumer la veilleuse manuellement.
B) AVANT DE FAIRE FONCTIONNER, reniflez tout autour de l’appareil pour déceler une odeur
de gaz. Reniflez près du plancher, car certains gaz sont pluslourds que l’air et peuvent
v
s’accumuler au niveau du sol.
QUE FAIRE SI VOUS SENTEZ UNE ODEUR DE GAZ :
• Ne pas tenter d’allumer d’appareil
• Ne touchez à aucun interrupteur; ne pas vous servir des téléphones se trouvant dans le
bâtiment.
• Appelez immédiatement votre fournisseur de gaz depuis un voisin. Suivez les
instructions du fournisseur.
• Si vous ne pouvez rejoindre le fournisseur, appelez le service des incendies
1) Appuyez le bouton ON / OFF
2) Attendre 4 secondes. Le système d’allumage produira
des étincelles pendant 60 secondes afin d’amorcer le
brûleur principal.
1) Turn on ON/OFF switch
2) After approximately 4 seconds the spark ignition system will spark 3) Les flammes s’allumeront.
Remarque : Au premier allumage, le système tente
for 60 seconds to light the main burner.
d’allumer les flammes pendant 60 secondes. Si l’essai est
3) The unit will turn on.
infructueux, le système fait une pause de 35 secondes.
Note: The first attempt to ignition will last approximately 60 seconds. C’est ce qu'on appelle l'étape de rectification. Ce délai
If there is no flame ignition (rectification) the board will stop sparking écoulé, le système tente à nouveau d'allumer les flammes
for approximately 35 seconds. After this wait time, the board will start en produisant des étincelles pendant 60 secondes. Si les
flammes ne s’allument toujours pas, le système se met
a second try for ignition by sparking for approximately 60 seconds.
If there is still no positive ignition after the second attempt the board en mode verrouillage.
Il faut alors le réinitialiser en suivant les
will go into lock out.
étapes ci-dessous (pour le déverrouiller) :
The system will need to be reset as follows (after going
a) Attendre 5 minutes et éteindre l’appareil en
into lock out mode):
réglant l’interrupteur à la position « OFF »;
a) Wait 5 minutes - turn the system off using ON/OFF
b) Attendre 2 secondes et rallumer le système
switch.
à l’aide de l’interrupteur.
b) After approximately 2 seconds turn on ON/OFF switch.
c) L'unité répétera l'étape 2.
c) Unit will repeat step 2.
LIGHTING INSTRUCTIONS
TO TURN OFF
GAS APPLIANCE
STOP! Read the safety information on this label.
1)
2)
Turn off ON/OFF switch
If service is to be performed you must disconnect power to
the unit, from the battery pack,
refer to manual
1)
Appuyez sur le bouton ON /
OFF
Si le service est effectuée,
vous devez débrancher
l'appareil, du bloc-piles, voir le
manuel d'instruction pour plus
de détails.
2)
DO NOT REMOVE
THIS INSTRUCTION PLATE
918-892a
26
Regency Plateau™ PTO30 Outdoor Gas Fireplace
MAINTENANCE
MAINTENANCE INSTRUCTIONS
1) Always turn off the gas valve and unplug the batteries before cleaning. For relighting, refer to lighting instructions. Keep the burner and control compartment
clean by brushing and vacuuming at least once a year. When cleaning the logs, use a soft clean paint brush as the logs are fragile and easily damaged.
2) Clean off leaves etc. before burning.
3) Clean appliance with a damp cloth (never when unit is hot). Never use an abrasive cleaner. The glass should be cleaned with a outdoor decorative gas
appliance glass cleaner.
4) Hand and finger marks should be cleaned off with a soft cloth and a stainless steel cleaner. Most stainless steel cleaners leave a film/
residue on the surface of the panels. Use an ammonia based cleaner (ie. glass cleaner) to remove this film before applying heat to the unit.
Failure to do this will result in burn stains on panels which you will be unable to remove.
5) The heater is finished in a heat resistant paint and should only be refinished with heat resistant paint. Regency® uses StoveBright Paint - Metallic Black
#6309.
6) Make a periodic check of burner for proper position and condition. Visually check the flame of the burner periodically, making sure the flames are steady;
not lifting or floating. If there is a problem, call a qualified service person.
7) Do not use this appliance if the valve and/or electronic components have been or are submerged under water. Immediately call a qualified service technician
to inspect the appliance and to replace any part of the control system and any gas control which has been under water. This is not covered under the
terms of the warranty policy.
8) Verify operation after servicing.
Regency Plateau™ PTO30 Outdoor Gas Fireplace
27
MAINTENANCE
VALVE ASSEMBLY REPLACEMENT
Turn the unit off and allow to cool to room temperature.
9) Remove 10 screws securing valve assembly.
1) Remove table top by lifting up and off, use caution if glass surround is in
place.
2) Remove glass crystals, garden stones and logset, if installed.
3) Locate and remove 2 screws at each end of burner assembly - see locations in Diagram 1 below.
10) Lift valve assembly up and out.
4) Slide burner forward (if pilot is on the left) off of the burner orifice and lift
up to remove burner assembly.
5) Remove 6 screws on valve access cover.
11) Remove both yellow/green ground wires from valve and valve bracket.
6) Turn off gas supply and remove flex connection at valve.
7) Remove orange EV1 wire connected to the gas valve.
12) Replace valve assembly gasket if necessary.
8) Remove green EV2 wire connected to the gas valve.
13) Rotate HI/LO modulationg valve all the way to the left for HI position.
14) Install new valve assembly and reverse steps 11-1.
15) Test gas connections for leaks.
28
Regency Plateau™ PTO30 Outdoor Gas Fireplace
PARTS LIST
PARTS
Description
Part #
Description
1.
376-525
Part #
Burner Assembly NG
910-363
Wall switch (not shown)
2.
911-004
Valve NG SIT 886
911-005
Valve LP SIT 886
376-932
Glass Surround
940-374/P
Tempered Glass (large)
3.
6.
376-916
Table top -Sunset Bronze PTO30
940-375/P
Tempered Glass (small)
376-917
Table top-Stainless Steel PTO30
376-027
Glass connectors (each)
Table top -Sunset Bronze PTO60
911-012
Ignition Board (not shown)
Table top-Stainless Steel PTO60
326-930
Log Set (not shown)
Pilot Assembly - NG
946-775
*Fire glass crystals (Black)
4.
911-006
911-007
Pilot Assembly - LP
946-776
*Fire glass crystals (Copper)
5.
904-951
Burner Orifice #25 - NG
946-777
*Fire glass crystals (Starfire)
904-655
Burner Orifice #45 - LP
946-778
*Fire glass crystals (Colbalt Blue)
376-028
Stainless steel weather cover
* Glass crystals in 5lb bags - 2 required
918-990
Manual
6
3
5
4
2
1
Regency Plateau™ PTO30 Outdoor Gas Fireplace
29
NOTES
30
Regency Plateau™ PTO30 Outdoor Gas Fireplace
WARRANTY
Regency® Fireplace Products are designed with reliability and simplicity in mind. In addition, our internal Quality Assurance Team carefully inspects each unit thoroughly
before it leaves our facility. FPI Fireplace Products International Ltd. is pleased to extend this limited warranty to the original purchaser of a Regency® Product. This warranty
is not transferable.
Limited Warranty:
The gas valve, burner tube, pilot assembly, flame sensor, electrode, control modules, switches and wiring for battery compartment are all covered for (2) two years on parts and (1) one year
on subsidized* labor only against defect in manufacture, from date of purchase.
Ceramic logs, volcanic stones, glass crystals, and tempered glass wind shield carry a (1) one year warranty against manufacturing defect, on parts, with no labor allowance, from date of
purchase.
Special finishes such as stainless steel components are not covered against environmental damage including corrosion, misuse, cleaning or handling issues that cause discoloration. To
receive consideration any damage claim against stainless steel components must be submitted at the time of installation. Damage from abrasive cleaners and discolouration to stainless
components caused by heat, are not covered under warranty. Damage reported after installation will not be covered.
Repair/replacement parts purchased by the consumer from FPI after the original coverage has expired on the unit will carry a 90 day warranty, valid only with a receipt. Any item shown to
be defective will be repaired or replaced at our discretion. No labor coverage is included with these parts.
Conditions:
Any part or parts of this unit which in our judgement show evidence of such defects will be repaired or replaced at FPI's option, through an accredited distributor or agent provided that the
defective part be returned to the distributor or agent Transportation Prepaid, if requested.
It is the general practice of FPI to charge for larger, higher priced replacement parts and issue credit once the replaced component has been returned to FPI and evaluated for manufacturer
defect.
The authorized selling dealer is responsible for all in-field service work carried out on your Regency® product. FPI will not be liable for results or costs of workmanship from unauthorized
service persons or dealers.
At all times FPI reserves the right to inspect product in the field which is claimed to be defective.
All claims must be submitted to FPI by authorized selling dealers. It is essential that all submitted claims provide all of the necessary information including customer name, purchase date,
serial #, type of unit, problem, and part or parts requested, without this information the warranty will be invalid.
Exclusions:
Batteries are not covered under warranty policy.
At no time will FPI be liable for any consequential damages which exceed the purchase price of the unit. FPI has no obligation to enhance or modify any unit once manufactured. ie. as
products evolve, field modifications or upgrades will not be performed.
FPI will not be liable for travel costs for service work.
Installation and environmental problems are not the responsibility of the manufacturer and therefore are not covered under the terms of this warranty policy.
Any unit which shows signs of neglect or misuse is not covered under the terms of this warranty policy.
The warranty will not extend to any part which has been tampered with or altered in any way, or in our judgment has been subject to misuse, improper installation, negligence or problems
caused by environmental or geographical conditions, inadequate ventilation.
Freight damage to stoves and replacement parts is not covered by warranty and is subject to a claim against the freight carrier by the dealer.
FPI will not be liable for acts of God, or acts of terrorism, which cause malfunction of the appliance.
Malfunction | damage of this appliance due to mother nature (wind, rain, snow, etc.) is not covered under the terms of the warranty policy.
Performance problems due to operator error will not be covered by this warranty policy.
Products made or provided by other manufacturers and used in conjunction with the operation of this appliance without prior authorization from FPI, may create a danger and nullify your
warranty on this product.
Any alteration to the unit which causes sooting or carboning that results in damage to the interior / exterior facia is not the responsibility of FPI.
* Subsidy according to job scale as predetermined by FPI.
Regency Plateau™ PTO30 Outdoor Gas Fireplace
31
Register your Regency® warranty online
www.regency-fire.com
Reasons to register your product online today!
• View and modify a list of all your registered products.
• Request automatic email notification of new product updates.
• Stay informed about the current promotions, events, and special
offers on related products.
Installer: Please complete the following information
Dealer Name & Address: ______________________________________________
___________________________________________________________________
Installer: ___________________________________________________________
Phone #: ___________________________________________________________
Date Installed: ______________________________________________________
Serial No.: __________________________________________________________
Regency, Regency Plateau are trademarks of FPI Fireplace Products International Ltd.
© Copyright 2011, FPI Fireplace Products International Ltd. All rights reserved.
Printed in Canada