1
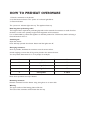
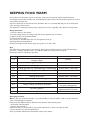
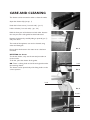
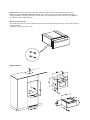
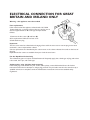
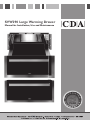
SVW290 Large Warming Drawer
Manual for Installation, Use and Maintenance
CONTROL PANEL
1. Push button setting selector
2. Temperature indicators
3. Power on light
4. Maximum temperature indicator
5. Warning Light (On/Off)
THE WARMING DRAWER
You can use the warming drawer to preheat dishes or to keep food warm.
The “power on” indicator light flashes when the appliance is switched on and the drawer is open.
It will light up when the drawer is closed. The appliance will only heat if the drawer is closed correctly.
Changing temperature:
The temperature can be set between 30°C and 70°C.
To switch temperature, simply push the settings selector button. The temperature will change with each
touch.
Switching the appliance on:
To switch the appliance on, just push the selector button.
Note: the indicator lights for the different temperatures are activated only when the drawer is open.
When the drawer is closed, the “power on” indicator light on the panel is visible through the external lens.
4
HOW TO PREHEAT OVENWARE
1. Place the ovenware in the drawer.
2. Set the function selector. The “power on” indicator light flashes.
3. Close the drawer.
The “power on” indicator light turns up. The appliance heats up.
How long does preheating take?
The length of time required for preheating depends on the material the ovenware is made of and its
thickness, as well as the quantity, height and arrangement of the ovenware.
It is recommended to preheat the appliance to the Max position for 5-10 minutes, before selecting a
function between 4-5 or 6.
Switching off
Open the drawer.
Press and keep pressed the selector button until the lights turn off.
Arranging ovenware:
As far as possible, distribute the ovenware over the entire surface.
A load weighing no more than 25 kg can be placed in the warmer drawer.
You can preheat dinnerware for 6 or 12 people, for example.
12
dinner plates
ø 24cm
12
soup bowls
ø 10cm
1
serving dish
ø 19cm
1
serving dish
ø 17cm
2
meat plates
ø 32cm
Note: these quantities are only indicative.
Removing ovenware
Remove ovenware from the drawer using oven gloves or an oven cloth.
Warning
The upper surface of the heating plate will be hot.
The base of the ovenware will be hotter than the top.
5
KEEPING FOOD WARM
Do not place hot saucepans or pans on the glass surface of the warming drawer immediately after
removing them from the hot hob. This could damage the glass surface. Do not fill the ovenware to such an
extent that food spills over.
Cover the food with a heat-resistant lid or aluminum foil. It is recommended that you do not keep food
warm for longer than an hour.
The appliance is suitable for keeping meat, poultry, fish, sauces, vegetables, side dishes and soups warm.
Using the drawer
1. Place the dishes in the drawer.
2. Set the setting selector to setting 5 and preheat the appliance for 15 minutes.
3. Add the food to the preheated dishes.
4. Close the drawer again.
The “power on” indicator light turns on; the appliance heats up.
Switching off the warming drawer.
Remove the food from the drawer using oven gloves or an oven cloth.
Uses
The table shows various uses for the warming drawer. Set the function selector to the desired setting.
There are 7 settings available: from 1 to 6 and then MAX (as in the picture on page 8).
Preheat the dishes as indicated in the table.
Setting
Defrost
1/2
Food
Delicate deep-frozen food e.g. cream cakes, butter,
sausages, cheese
Allowing yeast dough to rise
3/4
Deep-frozen food e.g. meat, cakes, bread
Defrost
3/4
Keeping eggs warm e.g. hard-boiled eggs, scrambled eggs
Preheat dishes, cover food
3/4
Keeping bread warm
Preheat dishes, cover food
5/6
Keeping food warm
Preheat dishes, cover food
5/6
Keeping drinks warm
Preheat dishes, cover drink
5/6
Warming flat dough-based foods e.g. pancakes
Preheat dishes, cover food
5/6
Warming dry cakes e.g. crumble cakes
5/6
Melting cooking chocolate or chocolate
5/6
Dissolving gelatine
Preheat dishes, cover food
Preheat dishes, break up food
into small coating pieces
Do not cover,
approximately 25 minutes
Max
Preheating of dishes
1/2
Note
Cover
Arranging the food
Note: in the case of almost all foods, it is recommended to cover the food in order to reduce moisture
which could damage the appliance.
Please note that different factors determine the duration of the warming time:
- the quantity of food loaded;
- the type of food loaded;
Please note that it is not possible to give precise information on how to arrange the food.
It can be varied to suit personal preferences.
As far as possible distribute the food dishes evenly in the drawer.
6
CARE AND CLEANING
The drawer can be removed in order to clean the inside.
Open the drawer fully (see pic. 1)
Undo the 2 front screws (1 on each side) - (pic. 2)
Pic. 1
Lift the 2 hooks (1 on each side) - (pic. 3-4)
Hold the front part of the drawer on both sides, because
the rear part of the side guides has been lubricated.
Remove the drawer by carefully lifting it upwards (pic. 5)
and put it down.
The inside of the appliance can now be cleaned, using
water and detergent.
Pic. 2
Do not place the drawer in the water once it has been
removed.
REFITTING the drawer
To refit the drawer, carry out the removal procedure in
reverse order.
To do this, place the drawer of the guides.
hook
NB: There is a fixing hook on the left and right side under
the warming drawer.
The drawer can be opened only if the fixing hook is in the
correct position.
Pic. 3
hook
Pic. 4
drawer
side guide
Pic. 5
7
SAFEGUARDING THE ENVIRONMENT
Disposal of packing material
• The packing material is 100% recyclable and is
marked with the recycle symbol
.
• The various parts of the packing must be
disposed of in compliance with local regulations;
do not disperse in the environment.
Disposal of old electrical appliances
• This appliance is marked in compliance with
European Directive 2002/96/EC, Waste
Electrical and Electronic Equipment (WEEE).
By ensuring correct disposal of the product, the
user can help prevent potentially negative
consequences for the environment and the health
of persons.
The symbol
on the product or on the
accompanying documentation indicates that it
should not be treated as domestic waste but must
be taken to an appropriate collection centre for
the recycling of electrical and electronic
equipment.
Scrap the appliance in accordance with local
regulations on waste disposal.
For further information regarding the treatment,
recovery and recycling of this appliance, contact
the competent local office, the domestic waste
collection service or the shop where you
purchased the product.
IMPORTANT NOTES
Important:
• The warming drawer must not be used by
young children or the infirm without supervision.
• Make sure children do not play with the appliance.
• The accessible parts of the warming drawer may
become hot during use; keep children away
from the appliance.
• Do not use abrasive materials or substances to
clean the GLASS as they may damage it.
• The appliance becomes very hot during use. Be
careful not to touch the heating elements inside
the warming drawer.
• The warming drawer is only intended for
domestic use, for heating food or dishes
(depending on the model). Other uses are not
allowed. The Manufacturer declines any liability
for improper use or incorrect setting of the
controls.
• Any repairs or adjustments must be carried out
exclusively by a qualified technician.
• Make sure the appliance is securely fixed to the
cabinet with the special screws supplied.
• Do not expose the warming drawer to the
atmospheric agents.
• Do not rest or sit on the drawer when open, as
this will damage the telescopic slides.
• The max. load capacity of the drawer is 25kg.
• Do not cover the bottom of the warming
drawer with aluminium foil or other
objects.
4
• The drawer seals must be kept clean to ensure
that it closes properly.
• Never pour water directly in warming drawer.
• Acidic fruit juices can leave permanent stains and
'etch' into the drawer vitroceramic surfaces. It is
strongly advisable to clean the warming drawer
before reusing it.
• To avoid scratching, do not drag dishes on the
bottom of the warming drawer.
• Never warm food and beverages directly on the
vitroceramic bottom of the drawer (depending
on the model). Use suitable containers or
crockery.
• If the vitroceramic surface breaks or cracks due
to a violent impact (falling objects, etc.), do not
use it; immediately contact the Customer Care
Centre.
• Residual condensation could eventually damage
the warming drawer and surrounding cabinets. It
is advisable to:
- cover food;
- wipe the drawer dry after the drawer has
cooled down.
• Do not touch the warming drawer whilst wet,
or with wet hands, or use it when barefoot.
• Do not pull the appliance or the power cable to
unplug it.
• Do not allow children to touch:
- the controls and the warming drawer in
general, especially during use and immediately
afterwards, to avoid injury;
- packing materials (bags, polystyrene, metal
parts, etc.);
- the warming drawer if it is to be scrapped.
• Make sure the electrical cables of other
appliances used near the warming drawer do
not touch hot parts.
• Do not keep plastic or flammable objects in the
warming drawer.
When operating the appliance these objects
could melt or catch fire.
• Use the special oven gloves to remove hot
dishes and heated food (depending on the
model).
• Pressing the On button switches on the warmer
drawer heating; risk of burns.
• Never insert objects (e.g. screwdrivers, sharp
objects, papers, etc.) in the heating element and
fan protection grill openings.
• This appliance is not intended for use by persons
(including children) with reduced physical,
sensor or mental capabilities or lack of
experience and knowledge unless they have
been given initial supervision or instruction
concerning use of the appliance by a person
responsible for their safety.
BEFORE USING THE WARMING DRAWER
When using the appliance for the first time, clean it as follows:
- clean the surface with a damp cloth, then dry.
- Preheat the empty drawer for at least 2 hours: turn the temperature knob to the max. position or
select max. temperature, in order to eliminate any manufacturing residuals (grease, oil or resins) which
could cause unpleasant odours during cooking. As some of these odours can be unpleasant we advise
that the kitchen is well ventilated during this procedure. After carrying out this simple operation, the
appliance will be ready for first use.
Before using the appliance, remove:
- stickers on the front and warming drawer door, except the rating plate;
- cardboard protection and protective plastic film from all the aesthetic parts, if present, and from the
front panel controls and other parts of the warming drawer;
- any stickers from the accessories if present.
FITTING THE APPLIANCE
Safety instructions for drawer installation
IMPORTANT: The drawer must be installed into cabinetry, complying with the following
instructions. Do not connect the appliances to the electrical supply until they have been
correctly installed into cabinetry.
Spacers: fix the drawer as shown in figures 1
Before connecting the appliance to the power supply, compare the connection data (voltage and
frequency) given on the dataplate with that of the electrical mains.
The data must match, otherwise the appliance could become damaged.
In case of doubts, contact a qualified technician.
Make sure the socket can be easily accessed even after the appliance has been fitted.
The dish warmer can only be fitted in combination with other appliances not weighing more than 40 kg
and provided with adequate cooling ventilation.
Otherwise, the right to the warranty is invalidated, since correct use cannot be guaranteed.
For combined appliance installation comply with the instructions given in the relevant use and installation
handbook.
Fitting and installation of this appliance must only be carried out by qualified personnel who guarantee that
the requirements for safe use are met.
5
Important: above the drawer, it is possible to fit the coffee machine, the combined oven or the
traditional oven (MAXIMUM WEIGHT 40 KG). Their sizes must be as shown in the following figure.
During installation, carefully follow the instructions in the manuals of the coffee machine, the combined
microwave and/or traditional oven.
Recess measurements
The dimensions of the recess are obtained from the size of the dish warmer plus the size of the appliance
combined with it.
All measurements are given in mm.
Height 290 mm
6
ELECTRICAL CONNECTION
Contact a qualified technician to carry out
the appliance electrical connection.
Important: Before connecting the drawer to the
domestic power supply to check its operation,
always make sure the drawer power cable is
correctly fitted and NOT squashed or caught
under or behind the drawer or a combined
appliance.
Important: Power cable replacement must be
made with a cable having the same characteristics
as that supplied by the Manufacturer (type
H05RRF, 3x1 mm2 or higher) and carried out by
the After-Sales Service or a qualified technician.
Before connecting the appliance to the power
supply, make sure that the technical specifications
(voltage: V and frequency: Hz) given on the rating
plate match those of the power mains.
In case of doubt, contact a qualified technician.
If the plug is removed from the power cable,
contact a qualified technician for fitting and
connecting the appliance. Contact an electrician
aware of the local regulations and the electricity
company's regulations, ensuring that the work is
carried out in compliance with the same.
Important: Make sure the appliance is connected
to an approved earth wire, to guarantee electrical
safety. If necessary, have the system checked by a
specialised technician.
The Manufacturer declines any liability for injury
and damage due to the lack or interruption of the
earth wire.
Important: the earth connection is
compulsory by law.
If the appliance is connected to the power supply
by means of an extension cord, make sure the
cord and connection are insulated against
moisture.
The appliance is designed to be used only when
correctly fitted.
Never open the appliance casing. In case of contact
with live wires or if the electrical and mechanical
structure of the appliance is modified, an appliance
fault may occur when it is used.
If the installation, maintenance or repair works are
not carried out correctly, there may be risks for
the user. The Manufacturer declines any liability for
damage or injury in such cases.
During the warranty period, repairs must only be
carried out by the authorised technical service,
otherwise the warranty right is lost.
Installation, repair and cleaning operations must
only be carried out after ensuring that the
appliance is disconnected from the power supply.
The appliance is disconnected from the power
supply in the following cases:
- the electrical system main switch is turned off.
- The safety switch is turned off.
- The appliance is unplugged.
Grip the plug and not power cable to unplug the
appliance.
It is advisable to connect the appliance to the
power supply by means of a socket;
this will facilitate technical assistance operations, if
necessary.
Ensure that the socket is accessible even once the
appliance has been fitted.
If connection is not made by means of an electrical
socket, contact an electrician aware of the local
regulations and the electricity company's
regulations,
ensuring that the work is carried out in compliance
with the same.
If the socket is no longer accessible after fitting the
appliance or if a fixed connection is provided for, a
separation device for each pole must be arranged
by the installer.
Switches with contact opening of at least 3mm are
valid separation devices.
The specifications necessary for connection are
given on the dataplate. These specifications must
match those of the power supply.
The Manufacturer declines any liability for
injury or damage due to incorrect installation,
improper, wrong and unreasonable use of the
appliance.
The manufacturer also declines any liability
for damage (e.g. electric shock) caused by the
lack of, or interruption of the earth wire.
After installation, all the parts of the appliance must
be insulated, to prevent accidents during
operation.
7
CARE AND CLEANING
Important: never use high pressure water or
steam cleaners.
Also, do not use: detergents containing soda,
acids or chlorides, abrasive detergents (in powder
or lotion), abrasive sponges (e.g. steel wool) or
sponges containing residuals of abrasive
detergents, descaling detergents, dishwasher
detergents, oven sprays.
Warming drawer exterior
• Clean with a damp cloth. If it is very dirty, add a
few drops of dish washing detergent to the
water. Dry with a dry cloth.
• Do not use corrosive or abrasive detergents, as
they can create dull areas.
If any of these products accidentally comes into
contact with the warming drawer, immediately
clean the appliance with a damp cloth.
• Slight colour differences on the front of the
appliance are due to the use of different
materials, such as glass, plastic and metal.
Front panel
• Use a mild detergent and a soft window cleaning
cloth or a microfibre cloth that does not leave
fibres on the surface. Wipe horizontally, without
pressing.
• Do not use corrosive products, hard sponges or
rough cloths for cleaning. Clean the aluminium
surfaces with a dry cloth.
Antislip drawer base (depending on the model)
• The antislip drawer base can be pulled out to
clean the bottom of the drawer. The base can
be washed by hand with hot water and a mild
detergent. Dry thoroughly.
Refit the antislip base in the drawer only when
completely dry.
Drawer base
It is advisable to clean the bottom of the drawer
after every use, making sure to allow it to cool. In
this way grime will not accumulate and cleaning is
easier.
• Use a clean cloth, absorbent paper and dish
hand-wash detergent, or specific products for
cleaning the vitroceramic top.
• Remove stubborn cooking grime with specific
products.
• Remove any food residuals left on the
vitroceramic top; do not leave to harden.
• Foods with a high sugar-content (coffee, fruit
juice, jam, etc.) that have boiled over or any
sugar stains due to cooking must be immediately
removed.
• Do not use abrasive products, bleach, oven
cleaning sprays or steel wool.
It is advisable to periodically treat the vitroceramic
with the special waxes available on the market.
TROUBLESHOOTING GUIDE
If the dishes or food (depending on the model) are not warm enough, make sure:
• the appliance is on
• the right temperature has been set
• the heat openings are not covered by large dishes or soup-plates
• the dishes have been warmed for a long enough time.
Different factors affect the warming time, e.g.:
- the material and thickness of the dishes, the load amount and its arrangement, temperature setting.
- Optimum dish warming times are subjective. Therefore we suggest that trials are conducted with your
crockery to discover these timings.
8
AFTER-SALES SERVICE
Before calling the CDA Customer Care:
1. Try to solve the problem on your own,
according to the points described in
"Troubleshooting Guide".
2. Switch the appliance off and then on again it to
see if the problem has been eliminated.
For the following problems, contact the CDA
Customer Care.
If the dishes are not warmed, make sure:
• the main power switch is on;
• the power cable is not disconnected or
damaged.
If the dishes become too hot:
• the temperature controller may be faulty.
The On/Off switch does not light up when the
appliance is switched on:
• the switch control light is faulty.
If the fault persists after the above checks,
contact the CDA Customer Care.
Always specify:
• a brief description of the fault;
• the type and exact model of the warming
drawer;
• the Service number (number after the word
Service on the rating plate), located on the outer
right edge of the drawer slide. The service
number is also indicated on the guarantee
booklet;
• your full address;
• your telephone number.
If any repairs are required, contact an the CDA
Customer Care (to guarantee the use of original
spare parts and correct repair).
Failure to comply with these instructions may
compromise the safety and quality of the
product.
DECLARATION OF CONFORMITY
• This drawer is designed to come into
contact with food products and complies
with European Directive 89/109/EEC.
• This appliance is designed for use only as an
appliance for warming or keeping cooked
food or dishes warm.
Any other use (e.g. for room heating) is
considered improper and therefore
potentially dangerous.
• This appliance has been designed,
manufactured and marketed in compliance
with:
- the safety requirements of "Low Voltage"
Directive 73/23/EEC;
- the protection requirements of "EMC"
Directive 89/336/EEC;
- the requirements of Directive 93/68/EEC.
9
ELECTRICAL CONNECTION FOR GREAT
BRITAIN AND IRELAND ONLY
Warning - this appliance must be earthed
Fuse replacement
If the mains lead of this appliance is fitted with a BS 1363A
13amp fused plug, to change a fuse in this type of plug use an
A.S.T.A. approved fuse to BS 1362 type and proceed as
follows:
1. Remove the fuse cover (A) and fuse (B).
2. Fit replacement 13A fuse into fuse cover.
3. Refit both into plug.
Important:
The fuse cover must be refitted when changing a fuse and if the fuse cover is lost the plug must not be
used until a correct replacement is fitted.
Correct replacement are identified by the colour insert or the colour embossed in words on the base of
the plug.
Replacement fuse covers are available from your local electrical store.
For the Republic of Ireland only
The information given in respect of Great Britain will frequently apply, but a third type of plug and socket
is also used, the 2-pin, side earth type.
Socket outlet / plug (valid for both countries)
If the fitted plug is not suitable for your socket outlet, please contact KitchenAid Service for further
instruction. Please do not attempt to change plug yourself. This procedure needs to be carried out by a
qualified technician in compliance with the manufactures instructions and current standard safety
regulations.
10