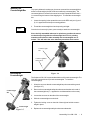
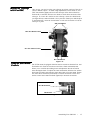
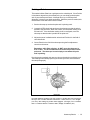
1
CELESTRON CI-700 / CM-1100 / CM-1400
INSTRUCTION MANUAL
Models #91525 / #11055 / #11065
T h e C e l e s t r o n C M- 1 1 00/1400
Copyright © 1998
Celestron International
2835 Columbia Street
Torrance, CA 90503
(310) 328-9560
No part of this manual may be reproduced in any form or by any means, electronic or mechanical, including photocopying, recording, or by any information storage and retrieval system, without written permission from Celestron International.
Celestron International provides this manual “as is” without warranty of any kind, either expressed or implied, including
but not limited to the implied warranties of merchantability and fitness for a particular purpose. Celestron may make
modifications to this manual and/or the products described herein at any time without notice or obligation.
ii • Table of Contents
TABLE
OF
CONTENTS
▲ INTRODUCTION ..................................................................................................................................
How to Use this Manual .....................................................................................................................
A Word of Caution .............................................................................................................................
The Schmidt-Cassegrain Optical System ..........................................................................................
1
2
2
3
▲ ASSEMBLING YOUR CELESTRON CM-1100 ...................................................................................... 4
Unpacking Your Celestron CM-1100 .................................................................................................. 4
Setting Up the Tripod ......................................................................................................................... 6
Attaching the Center Leg Brace ........................................................................................................ 7
Attaching the Central Column ............................................................................................................ 7
Attaching the Equatorial Mount .......................................................................................................... 8
Installing the Counterweight Bar ........................................................................................................ 9
Installing the Counterweight ............................................................................................................... 9
Attaching the Celestron CM-1100 to the Mount ................................................................................ 10
Attaching the Visual Back ................................................................................................................11
Installing the Star Diagonal ...............................................................................................................11
Installing the Eyepiece .....................................................................................................................12
Installing the Finder .......................................................................................................................... 13
Installing the Polar Axis Finder .........................................................................................................14
Moving the Telescope in R.A. and DEC ............................................................................................ 15
Using the Slow Motion Controls ........................................................................................................ 15
Adjusting the Mount .........................................................................................................................16
Balancing the Mount in R.A. .............................................................................................................17
Balancing the Mount in DEC .............................................................................................................18
Transporting Your Celestron CM-1100 ..............................................................................................19
Storing Your Celestron CM-1100 ......................................................................................................19
Technical Specifications ...................................................................................................................20
▲ TELESCOPE BASICS .........................................................................................................................22
Image Orientation ............................................................................................................................. 22
Focusing ..........................................................................................................................................23
General Photography Hints ...............................................................................................................24
Aligning the Finder ............................................................................................................................24
Your First Look .................................................................................................................................25
Daytime Observing .....................................................................................................................25
Nighttime Observing ...................................................................................................................26
Calculating Magnification ..................................................................................................................27
Determining Field of View ................................................................................................................. 27
▲ ASTRONOMY BASICS ....................................................................................................................... 28
The Celestial Coordinate System ......................................................................................................28
Motion of the Stars ...........................................................................................................................29
Polar Alignment ................................................................................................................................ 30
Finding the Pole ...............................................................................................................................31
Latitude Scales .......................................................................................................................... 32
Pointing at Polaris ......................................................................................................................33
The Polar Axis Finder ................................................................................................................. 34
Declination Drift .......................................................................................................................... 35
Aligning the Setting Circles .............................................................................................................36
Table of Contents • iii
▲ USING THE DRIVE ............................................................................................................................. 37
Powering Up the Drive ......................................................................................................................37
Guide Speed ....................................................................................................................................38
Tracking Rate Selection.................................................................................................................... 38
BC -Backlash Correction ..................................................................................................................39
Periodic Error Correction ..................................................................................................................39
HC/CCD ...........................................................................................................................................40
12 V DC ...........................................................................................................................................40
Northern/Southern Hemisphere Operation ......................................................................................... 41
Using the Hand Controller ................................................................................................................. 41
R.A./DEC Reverse ............................................................................................................................42
Autoguiding ...................................................................................................................................... 42
▲ CELESTIAL OBSERVING ...................................................................................................................43
Observing the Moon .......................................................................................................................... 43
Observing the Planets ......................................................................................................................43
Observing the Sun ............................................................................................................................44
Observing Deep-Sky Objects ............................................................................................................45
Using the Setting Circles ........................................................................................................... 45
Star Hopping ..............................................................................................................................46
Viewing Conditions ...........................................................................................................................48
Transparency ............................................................................................................................. 48
Sky Illumination .........................................................................................................................48
Seeing .......................................................................................................................................48
▲ CELESTIAL PHOTOGRAPHY .............................................................................................................50
Short Exposure Prime Focus ........................................................................................................... 51
Piggyback ........................................................................................................................................53
Eyepiece Projection .........................................................................................................................55
Long Exposure Prime Focus ............................................................................................................57
CCD Imaging ....................................................................................................................................59
Description of F-Numbers ............................................................................................................60
Fastar Configuration ...................................................................................................................60
Imaging at f/2.1 .......................................................................................................................... 61
Imaging at f/7 ............................................................................................................................. 61
Imaging at f/11 ...........................................................................................................................61
Imaging at f/22 ...........................................................................................................................62
▲ TELESCOPE MAINTENANCE .............................................................................................................63
Care and Cleaning of the Optics .......................................................................................................63
Collimation .......................................................................................................................................63
▲ OPTIONAL ACCESSORIES ................................................................................................................66
▲ THE MESSIER CATALOG ..................................................................................................................70
▲ LIST OF BRIGHT STARS ...................................................................................................................73
▲ FOR FURTHER READING ...................................................................................................................74
iv • Table of Contents
I N T R O D U C T I O N
Welcome to the Celestron world of amateur astronomy! For more than a
quarter of a century, Celestron has provided amateur astronomers with the
tools needed to explore the universe. The Celestron CM-1100 and CM-1400
continues in this proud tradition combining large aperture optics with ease of
use and portability. With a mirror diameter of 11 inches, your Celestron CM1100 has a light gathering power of 1,593 times that of the unaided human eye,
and the CM-1400 has a light gathering power of 2,581 times that of the unaided
human eye. Yet despite their large apertures, the Celestron CM-1100 and CM1400 optical systems are extremely compact and portable because they utilize
the Schmidt-Cassegrain design. This means you can take your Celestron CM1100 or CM-1400 to the mountains or desert or wherever you observe.
The Celestron CM-1100 and CM-1400 are made of the highest quality materials
to ensure stability and durability. All this adds up to telescopes that will give
you a lifetime of pleasure with a minimal amount of maintenance. And, your
Celestron CM-1100 and CM-1400 are versatile — they grow as your interest
in astronomy grows.
Your Celestron CM-1100 and CM-1400, are not limited to astronomical viewing
alone. They can also be used for terrestrial viewing to study the world around
you. All you need to do is take the time to familiarize yourself with your
Celestron telescope and its operation.
NOTE
The CM-1100 and CM-1400 share the same mount and are basically the
same with the exception of the larger aperture of the 14". So, this
manual will basically discuss the CM-1100 but will discuss the CM-1400
when there are differences. Users of the CI-700 mount by itself will find
complete assembly and operation instructions in the "AssemblingYour
CM-1100" and "Using the Drive" sections of this manual.
Introduction
•
1
How to Use This
Manual
This manual is designed to instruct you in the proper use of your Celestron
CM-1100 telescope. The instructions are for assembly, initial use, long term
operation, and maintenance. There are seven major sections to the manual.
The first section covers the proper procedure for setting up your Celestron CM1100 telescope. This includes setting up the tripod, attaching the telescope to
the mount, balancing the telescope, etc.
The second section deals with the basics of telescope use. Topics include
focusing, aligning the finder, and taking your first look. The third section
deals with the basics of astronomy which includes the celestial coordinate
system, the motion of the stars, and polar alignment. The fourth section deals
with celestial observing covering visual observations of the planets and deepsky objects. Using both the setting circles and star hopping are discussed.
The fifth section covers celestial photography working from the easiest to the
most difficult. The last major section is on telescope maintenance, specifically
on cleaning and collimation. Keeping your CM-1100 in proper collimation
is the single most important thing you can do to ensure it performs well.
In addition to the major sections mentioned previously, there is a list of optional
accessories for your Celestron CM-1100 that include a brief description of its
purpose. This is the section to consult when you’ve mastered the basics and
are ready for new, more challenging observations. The final part of this manual
contains a list of objects that can be observed through your Celestron CM-1100
telescope. Included are the coordinates for each object, its brightness, and a
code which indicates what type of an object it is. In addition, there is a list of
bright stars used for aligning the setting circles.
Read the assembly instructions through completely before you attempt to set
up your Celestron CM-1100 telescope. Then, once you’ve set up your
Celestron CM-1100, read the section on “Telescope Basics” before you take it
outside and use it. This will ensure that you are familiar with your telescope
before you try to use it under a dark sky. Since it will take a few observing
sessions to familiarize yourself with your Celestron CM-1100, you should keep
this manual handy until you have fully mastered your telescope’s operation.
After that, save the manual for future reference.
A Word of Caution
WARNING !
Your Celestron CM-1100 is designed to give you hours of fun and rewarding
observations. There are, however, a few things to consider before using your
telescope that will ensure your safety and protect your equipment.
NEVER LOOK DIRECTLY AT THE SUN WITH THE NAKED EYE OR WITH A
TELESCOPE. PERMANENT AND IRREVERSIBLE EYE DAMAGE MAY
RESULT.
NEVER USE YOUR TELESCOPE TO PROJECT AN IMAGE OF THE SUN
ONTO ANY SURFACE. INTERNAL HEAT BUILD-UP CAN DAMAGE THE
TELESCOPE AND/OR ANY ACCESSORIES ATTACHED TO IT.
NEVER USE AN EYEPIECE SOLAR FILTER OR A HERSCHEL WEDGE.
INTERNAL HEAT BUILD-UP INSIDE THE TELESCOPE CAN CAUSE THESE
DEVICES TO CRACK OR BREAK, ALLOWING UNFILTERED SUNLIGHT TO
PASS THROUGH TO THE EYE.
NEVER LEAVE THE TELESCOPE UNSUPERVISED, EITHER WHEN CHIL-
2
•
Introduction
DREN ARE PRESENT OR ADULTS WHO MAY NOT BE FAMILIAR WITH
THE CORRECT OPERATING PROCEDURES OF YOUR TELESCOPE.
NEVER POINT YOUR TELESCOPE AT THE SUN UNLESS YOU HAVE THE
PROPER SOLAR FILTER. WHEN USING YOUR TELESCOPE WITH THE
CORRECT SOLAR FILTER, ALWAYS COVER THE FINDER. ALTHOUGH
SMALL IN APERTURE, THIS INSTRUMENT HAS ENOUGH LIGHT GATHERING POWER TO CAUSE PERMANENT AND IRREVERSIBLE EYE DAMAGE.
IN ADDITION, THE IMAGE PROJECTED BY THE FINDER IS HOT ENOUGH
TO BURN SKIN OR CLOTHING.
The Schmidt-Cassegrain A telescope is nothing more than an instrument that collects and focuses light.
The nature of the optical design determines how the light is focused. Some
Optical System
telescopes, known as refractors, use lenses while others, known as reflectors,
use mirrors. The Schmidt-Cassegrain optical (or Schmidt-Cass for short)
system uses a combination of mirrors and lenses and is referred to as a
compound or catadioptric telescope. This unique design offers large diameter
optics while maintaining very short tube lengths, making them extremely
portable. This makes them extremely popular among amateur astronomers.
The Schmidt-Cassegrain system consists of a zero power corrector plate, a
spherical primary mirror, and a secondary mirror. Once light rays enter the
optical system, they travel the length of the optical tube three times.
Inside the optical tube you will notice a black tube (not illustrated) that extends
out from the center hole in the primary mirror. This is the primary baffle tube
which prevents stray light from passing through to the eyepiece or camera
without striking the primary or secondary mirrors.
Figure 1-1
This cross-sectional diagram shows the light path of the Schmidt-Cassegrain optical
system. Note that the light rays travel the length of the telescope tube three times,
making this a compact optical design. Note that the curve of the corrector plate is
greatly exaggerated.
Introduction
•
3
A S S E M B L I N G
Y O U R
C M - 1 1 0 0
This section covers the assembly instructions for your Celestron CM-1100
telescope. The Celestron CM-1100 should be set up indoors the first time so
that it is easy to identify the various parts and familiarize yourself with the
correct assembly procedure before attempting it outdoors.
The Celestron CM-1100 is a standard 11" Schmidt-Cassegrain telescope on a
heavy-duty German equatorial mount. The Celestron CM-1100 comes standard with Starbright ™ enhanced multilayer aluminum coatings on the primary
and secondary mirrors for increased reflectivity. Also, the corrector plate is
fully coated to allow maximum light transmission. The Celestron CM-1100 is
shipped in six boxes. One contains the telescope and is accompanied by a
box that contains most of the standard accessories, which are:
• 26mm Plössl Ocular 1-1/4"
• Visual Back 1-1/4" (2" Visual Back on the CM-1400)
• Star Diagonal 1-1/4" (2" Mirror Diagonal for the CM-1400)
• 9x50mm Finderscope with Bracket
• Car Battery Adapter
• Lens Cap
In separate boxes are the following:
• Optical Tube Assembly
• Equatorial Mount and Counterweight Bar
• Tripod
• Central Column, Electronics Module, Polar Axis Finder and Hand Control
• One 23 Pound Counterweight (The CM-1400 come with two 25 lb.
counterweights)
• Accessories for Optical Tube
Included is all the hardware needed to assemble the telescope.
Use the diagram on the following page (see Figure 2-1) to familiarize yourself
with the various parts of your Celestron CM-1100 telescope.
Unpacking Your
Celestron CM-1100
Remove all the pieces from their respective boxes and place on a flat, clear
work area. A large floor space is ideal. When setting up your Celestron CM1100) you must start with the tripod and work up from there. These instructions are laid out in the order each task must be performed.
4
•
Assembling Your CM-1100
1
16
2
15
3
14
4
13
12
5
11
6
10
7
9
8
CM-1100
Figure 2-1
1.
2.
3.
4.
5.
6.
7.
8.
Optical Tube
Finderscope
Star Diagonal
Eyepiece
Polar Axis Finderscope
Drive Control Electronics
Hand Control
Tripod
9. Center Leg Brace
10. Counterweight
11. Counterweight Bar
12. R.A. Clutch Knob
13. DEC Clutch Knob
14. Mounting Platform Clamp Knob
15. Dovetail Slidebar
16. Objective Lens Cover
Assembling Your CM-1100
•
5
Setting Up the Tripod
The tripod legs attach to a central column which together form the tripod to
which the equatorial mount attaches. The tripod comes with two leg support
brackets; a collapsible one that is already attached to the lower legs and a
removable one that must be attached. To set up the tripod:
1. Stand the tripod vertically on a level surface, with the feet facing down (See
Figure 2-2).
2. Grab the lower portion of two of the tripod legs and lift them slightly off the
ground so that the tripod is resting on the third leg.
3. Extend the tripod legs by pulling the tripod legs apart until the collapsible
leg bracket is fully extended. (See Figure 2-3)
Before the tripod is ready to support the equatorial head and optical tube the
center leg support brace must first be installed.
Figure 2-2
6
•
Assembling Your CM-1100
Figure 2-3
Attaching the Center
Leg Brace
For maximum rigidity, the CI 700 tripod has a center leg brace that installs on
to the threaded rod below the tripod head. This brace fits snugly against the
tripod legs, increasing stability while reducing vibration and flexure. To attach
the center leg brace:
1
Unscrew the tension knob from the threaded rod beneath the tripod
head.
2
Place the center leg brace onto the threaded rod so that the cup on
the end of each bracket contours to the curve of the tripod legs.
3
Rotate the tension knob back on the threaded rod until the brace is
very snug against each tripod leg.
Central Column
Electronics Console
Center Leg Brace
Figure 2-4
Attaching the Central
Column
Before the equatorial mount head can be installed, the central column with
the electronics module must be attached to the tripod. To attach the central
column:
1
Position the central column so that the electronics module is right
side up (see Figure 2-4).
2
Place the lower end of the central column over the tripod head.
3
Rotate the column until the three holes line up with the threaded
holes on the side of the tripod head. The electronics console should
be positioned directly between two of the tripod leg hinges to provide
easy access to it even when the counterweight bar and
counterweight(s) are attached.
4
Insert the three 3/8-16 button head cap screws provided through the
holes in the central column and into the tripod head.
5
Tighten the screws to hold the column securely in place.
Assembling Your CM-1100
•
7
Attaching the
Equatorial Mount
After the tripod is set up, you are ready to attach the equatorial mount. The
equatorial mount is the platform to which the telescope attaches and allows
you to move the telescope in right acsension and declination. The mount is
also adjustable so you can orient the axis of rotation so that it is parallel with
the Earth’s axis of rotation (see the section on “Polar Alignment”). To attach
the equatorial mount to the tripod:
1. Insert the base of the equatorial mount into the top of the central column.
2. Rotate the equatorial mount on the central column until the holes in the
mount line up with those in the central column and the dec opening (where
the counterweight shaft will go) is positioned directly over one of the tripod
legs.
3. Insert the three remaining 3/8-16 cap screws and washers provided through
the holes in the central pier and into the equatorial mount (see Figure 2-5).
4. Tighten the screws to hold the equatorial mount in place.
Counterweight
Shaft Opening
Equatorial Mount
Central Column
Figure 2-5
8
•
Assembling Your CM-1100
Installing the
Counterweight Bar
To properly balance the telescope, the mount comes with a counterweight bar
and one counterweight (the CM-1400 comes with two counterweights). The
counterweight bar is located in the same box as the Equatorial Mount Head —
in a cutout along the bottom of the shipping box. To install the counterweight
bar:
1. Locate the opening in the equatorial mount on the DEC axis (see figure 26). It is opposite the telescope mounting platform.
2. Thread the counterweight bar into the opening until tight.
HINT
Once the bar is securely in place you are ready to attach the counterweight.
Since the fully assembled telescope is quite heavy, position the mount
so that the tripod leg with the counterweight bar over it is pointing
towards north before the tube assembly and counterweights are attached. This will make the polar alignment procedure much easier.
Counterweight
Bar
Counterweight Bar
Safety Screw
Figure 2-5
Installing the
Counterweight
Figure 2-6
The Celestron CM-1100 comes standard with one 23 pound counterweight. The
CM-1400 comes with two 25 pound counterweights. To install the
counterweight(s):
1. Orient the mount so that the counterweight bar points toward the ground
(see figure 2-7).
2. Remove the counterweight safety thumbscrew and washer on the end of
the counterweight bar (i.e., opposite the end that attaches to the mount).
Counterweight
Bar
3. Loosen the set screw on the side of the counterweight.
4. Slide the counterweight onto the shaft.
5. Tighten the locking screw on the side of the weight to hold the counterweight in place.
Counterweight
6. Replace the counterweight safety thumbscrew and washer.
Figure 2-7
Assembling Your CM-1100
•
9
Attaching the Optical
Tube to the Mount
The telescope attaches to the mount via a dovetail slide bar which is mounted
along the bottom of the telescope. Before you attach the optical tube, make
sure that the declination and right ascension clutch knobs are tight. This will
ensure that the mount does not move suddenly while attaching the telescope.
To mount the telescope tube:
1
Loosen the knobs on the side of the telescope mounting platform. This
allows you to slide the dovetail bar on the telescope onto the mount.
2
Slide the dovetail bar on the telescope tube into the mounting platform of
the mount. Slide the telescope so that the back of the dovetail bar is
almost flush with the back of the mounting platform.
3
Tighten the locking knobs on the side of the mounting platform to hold the
telescope in place.
4
Slide the dovetail slide bar safety clamp down the front end of the slide bar
until it touches the mounting platform. This clamp is designed to keep the
telescope from sliding off the mount in case the knobs on the side of the
platform comes loose. It is best to wait until the telescope is balanced in
R.A. and DEC before attaching the safety clamp (see "Balancing the
Mount in DEC" later in this section).
Optical Tube
Dovetail Slide Bar
Mounting Platform
Mounting Platform
Locking Knobs
Figure 2-8
10
•
Assembling Your CM-1100
Attaching the Visual
Back
The visual back is the accessory that allows you to attach all visual accessories to the telescope. To attach the visual back:
1. Remove the plastic cover on the rear cell.
2. Place the knurled slip ring on the visual back over the threads on the rear
cell.
3. Hold the visual back with the set screw in a convenient position and rotate
the knurled slip ring clockwise until tight.
Once this is done, you are ready to attach other accessories, such as eyepieces, diagonal prisms, etc.
If you want to remove the visual back, rotate the slip ring counterclockwise until
it separates from the rear cell.
Installing the Star
Diagonal
The star diagonal is a prism that diverts the light at a right angle to the light
path of the telescope. This allows you to observe in positions that are physically more comfortable than if you looked straight through. To attach the star
diagonal: NOTE: The CM-1400 uses a 2" mirror diagonal.
1. Turn the set screw on the visual back until its tip no longer extends into
(i.e., obstructs) the inner diameter of the visual back.
2. Slide the chrome portion of the star diagonal into the visual back.
3. Tighten the set screw on the visual back to hold the star diagonal in place.
If you wish to change the orientation of the star diagonal, loosen the set screw
on the visual back until the star diagonal rotates freely. Rotate the diagonal to
the desired position and tighten the set screw.
Figure 2-9
Assembling Your CM-1100
•
11
Installing the Eyepiece
The eyepiece, or ocular, is an optical element that magnifies the image
focused by the telescope. The ocular(s) fit into either the visual back directly,
the star diagonal, or the Erect Image Diagonal (purchased separately). To
install an ocular:
1. Loosen the set screw on the star diagonal until the tip no longer extends
into the inner diameter of the eyepiece end of the diagonal.
2. Slide the chrome portion of the eyepiece into the star diagonal.
3. Tighten the set screw on the star diagonal to hold the eyepiece in place.
To remove the eyepiece, loosen the set screw on the star diagonal and slide
the eyepiece out. You can replace it with another ocular (purchased separately).
NOTE: The 2" mirror diagonal has a 1 1/4" eyepiece adapter to use 1 1/4"
eyepieces. You may remove the adapter to use 2" eyepieces.
Eyepieces are commonly referred to by focal length and barrel diameter. The
focal length of each eyepiece is printed on the eyepiece barrel. The longer the
focal length (i.e., the larger the number) the lower the eyepiece power and the
shorter the focal length (i.e., the smaller the number) the higher the magnification. Generally, you will use low-to-moderate power when viewing. For more
information on how to determine power, see the section on “Calculating
Magnification.”
Figure 2-10
12
•
Assembling Your CM-1100
Installing the Finder
The CM-1100 telescope come with a 9x50 finderscope used to help you locate
and center objects in the main field of your telescope. To accomplish this, the
finder has a built-in cross-hair reticle that shows the optical center of the
finderscope.
Start by removing the finder and hardware from the plastic wrapper. Included
are the following:
• 9x50mm Finder
• Finder Bracket
• Rubber O-ring
• Three Nylon Tipped Thumbscrews (10-24x1/2")
• Two Allen Head Screws (8-32x1/2")
To install the finder:
1. Attach the bracket to the optical tube. To do this, place the curved portion
of the bracket with the slot over the two holes in the rear cell. The bracket
should be oriented so that the rings that hold the finder are over the
telescope tube, not the rear cell (see Figure 2-1). Start threading the
screws in by hand and tighten fully with an Allen wrench.
2. Partially thread-in the three nylon-tipped thumbscrews that hold the finder
in place inside the bracket. Tighten the screws until the nylon heads are
flush with the inner diameter of the bracket ring. Do NOT thread them in
completely or they will interfere with the placement of the finder. (Having
the screws in place when the finder is installed will be easier than trying to
insert the screws after the finder has been installed.)
3. Slide the rubber O-ring over the back of the finder (it will NOT fit over the
objective end of the finder). It may need to be stretched a little. Once on
the main body of the finder, slide it up about one inch from the end of the
finder.
4. Rotate the finder until one cross hair is parallel to the R.A. axis and the
other is parallel to the DEC axis.
5. Slide the eyepiece end of the finder into the front of the bracket.
6. Slightly tighten the three nylon tipped thumbscrews on the front ring of the
bracket to hold the finder in place.
7. Once on, push the finder back until the O-ring is snug inside the back ring
of the finder bracket.
8. Hand tighten the three nylon tipped thumbscrews until snug.
Assembling Your CM-1100
•
13
Installing the Polar
Finder
To aid in polar aligning the mount, your telescope comes standard with a Polar
Housing Finder. It installs directly on top of the polar housing of the mount. To
install the Polar Finder:
1. Locate the Polar Finder assembly. The Polar Finder assembly consists
of the polar finder, mounting bracket and knurled mounting screw (see
Figure 2.11).
2. Place the Polar Finder Assembly on top of the polar axis housing so that
the mounting stop on the metal bracket sits flush against the rear of the
polar housing.
3. Secure the Polar Finder Assembly to the mount by threading the Knurled
Mounting Screw into the threaded hole on top of the Polar Housing.
The Polar Axis Finder is now installed and ready to use. To learn how to polar
align the mount using the Polar Axis Finder, refer to the Astronomy Basics
section of the manual.
Nylon Tension Screw
Finderscope Bracket Assembly
Polar Finderscope
Knurled Mounting Screw
Mounting Stop
Polar Axis Housing
Figure 2-11
14
•
Assembling Your CM-1100
Moving the Telescope
in R.A. and DEC
Once set up, you need to point your telescope at various portions of the sky to
observe different objects. To make rough adjustments, loosen the R.A. and
DEC clutch knobs slightly and move the telescope in the desired direction.
Both the R.A. and DEC axis have two knobs to clutch down each axis of the
telescope. To loosen the clutches on the telescope, rotate the clutch knobs
(see figure below) counterclockwise. Once your have found your desired object
in the finderscope, rotate the clutch knobs on each axis clockwise to lock the
telescope in place.
DEC Clutch Knobs
DEC Slow Motion Control
R.A. Slow Motion Control
Using the Slow Motion
Controls
R.A. Clutch Knobs
Figure 2-12
The CI 700 mount is equipped with slow motion controls on both the R.A. and
Declination axis. Each slow motion control has a clutch mechanism that
allows you to override the tracking motor and adjust the amount of tension
when turning the knob. To adjust the clutch mechanism, hold the slow motion
knob with one hand, and rotate the clutch wheel with your other hand. Rotate
the clutch wheel clockwise (downward) to increase the tension on the slow
motion control and counterclockwise (upward) to decrease the tension.
Slow Motion Knob
Clutch Wheel
Figure 2-13
Assembling Your CM-1100
•
15
Adjusting the Mount
In order for the clock drive to track accurately, the telescope’s axis of rotation
must be parallel to the Earth’s axis of rotation, a process known as polar
alignment. Polar alignment is achieved NOT by moving the telescope in R.A.
or DEC, but by adjusting the mount vertically, which is called altitude, and
horizontally, which is called azimuth. This section simply covers the correct
movement of the telescope during the polar alignment process. The actual
process of polar alignment, that is making the telescope’s axis of rotation
parallel to the Earth’s, is described later in this manual in the section on “Polar
Alignment.”
To adjust the mount in altitude:
1. Locate the altitude adjustment bolt just above the tripod column (see
figure 2-14).
2. Using the 7/32" Allen wrench provided, turn the altitude adjustment bolt
until the mount is at the right elevation.
The total altitude range is from 13° to 65°. With the 23 lb counterweight
attached to the counterweight shaft, the equatorial head can go as low as 20°
without hitting the tripod leg.
To adjust the mount in azimuth:
1. Locate the azimuth adjustment bolt on the flat portion of the tripod column.
2. Loosen the two azimuth lock knobs located on the top of the tripod
column.
3. Turn the azimuth adjustment bolt with the 7/32" Allen wrench until the
polar axis is pointing in the right direction.
4. Tighten the azimuth lock knobs to hold the mount in place.
The mount can be moved ± 7° in azimuth using these bolts.
Keep in mind that adjusting the mount is done during the polar alignment
process only. Once polar aligned, the mount must NOT be moved. Pointing
the telescope is done by moving the mount in right ascension and declination,
as described earlier in this manual. Once the appropriate adjustments have
been made and you are aligned on the celestial pole, turn the clock drive on
and the telescope will track.
Azimuth Lock Screws
Altitude Adjustment Bolt
Azimuth Adjustment Bolt
Bubble Level
Figure 2-14
16
•
Assembling Your CM-1100
Balancing the
Mount in R.A.
To eliminate undue stress on the mount, the telescope should be properly
balanced around the polar axis. Proper balancing is crucial for accurate
tracking. To balance the mount:
1. Verify that the telescope securing knobs on the telescope mounting
platform are tight.
2. Loosen the R.A. clutch knobs and position the telescope off to one side of
the mount. The counterweight bar will extend horizontally on the opposite
side of the mount.
3. Release the telescope — GRADUALLY — to see which way the telescope
“rolls.”
4. Loosen the set screws on the side of the counterweight so it can be moved
the length of the counterweight bar.
5. Move the counterweight to a point where it balances the telescope (i.e.,
the telescope remains stationary when the R.A. clutch knobs are loose).
6. Tighten the set screw on the counterweight to hold it in place.
While the above instructions describe a perfect balance arrangement, there
should be a SLIGHT imbalance to ensure the best possible tracking. When
the scope is on the west side of the mount the counterweight should be
slightly imbalanced to the counterweight bar side. And when the tube is on the
east side of the mount there should be a slight imbalance toward the telescope
side. This is done so that the worm gear is pushing against a slight load. The
amount of the imbalance is very slight. When taking astrophotographs,
this balance process can be done for the specific area at which the telescope
is pointing to further optimize tracking accuracy.
Figure 2-15
With the standard accessories attached, the counterweight should be at the far end of
the counterweight bar.
Assembling Your CM-1100
•
17
Balancing the Mount
in DEC
Although the telescope does not track in declination, the telescope should also
be balanced in this axis to prevent any sudden motions when the DEC clutch
knob is loose. To balance the telescope in DEC:
1. Loosen the R.A. clutch knobs and rotate the telescope so that it is on one
side of the mount (i.e., as described in the previous section on “Balancing
the Mount in R.A.”).
2. Tighten the R.A. clutch knobs to hold the telescope in place.
3. Loosen the DEC clutch knobs and rotate the telescope until the tube is
parallel to the ground.
4. Release the tube — GRADUALLY — to see which way it rotates around
the declination axis. DO NOT LET GO OF THE TELESCOPE TUBE
COMPLETELY!
5. Slightly loosen the knobs that holds the telescope to the mounting
platform and slide the telescope either forward or backward until it remains
stationary when the DEC clutch is loose. Do NOT let go of the telescope tube while the knob on the mounting platform is loose.
6. Tighten the knobs on the telescope mounting platform to hold the telescope in place.
Once the telescope is balanced in declination, slide the dovetail bar safety
clamp down the front of the telescope's slide bar until it touches the mounting
platform and tighten the locking bolt (see Figure 2-16). This not only acts as a
safety in case the mounting platform knobs are loosened, but will also allow
you to put the tube on the mount in the exact same position each time for
perfect balance.
Like R.A. balance, these are general balance instructions and will reduce
undue stress on the mount. When taking astrophotographs, this balance
process should be done for the specific area at which the telescope is pointing.
Dovetail Slide Bar
Safety Clamp
Dovetail Slide Bar
Figure 2-16
With the standard accessories attached, the end of the dovetail bar should be almost
flush with the end of the telescope mounting platform..
18
•
Assembling Your CM-1100
Transporting Your
Celestron CM-1100
Because of the Celestron CM-1100's size and weight, you should ALWAYS
remove the telescope from the mount when moving the telescope. To do so:
1. Take the telescope off of the mount and return it to its shipping box.
2. Remove the counterweight from the counterweight bar.
3. Remove the counterweight bar from the mount.
4. Remove the finderscope from the optical tube.
5. Take the equatorial mount off of the central column.
6. Remove the center leg brace from the tripod.
7. Collapse the tripod legs inward, towards each other.
The telescope is now broken down into enough pieces to be easily transported.
Storing Your Celestron
CM-1100
When not in use, your Celestron CM-1100 can be left fully assembled and set
up. However, all lens and eyepiece covers should be put back in place. This
will reduce the amount of dust build-up on all optical surfaces and reduce the
number of times you need to clean the instrument. You may want to return
everything to its original shipping container and store it there. If this is the
case, all optical surfaces should still be covered to prevent dust accumulation.
If you are in the field, and plan on being there for a few days, use a plastic tarp
to cover the telescope and mount.
Assembling Your CM-1100
•
19
Technical
Specifications
Below is pertinent technical information on your Celestron CM-1100 telescope that you
may find useful.
OPTICAL TUBE:
Optical System:
Aperture:
Focal Length:
F/ratio:
Highest Useful Power Magnification:
Lowest Useful Power Magnification:
Resolution (arc seconds):
Photographic Resolution:
Light Gathering Power:
Limiting Visual Magnitude:
Near Focus
with eyepiece:
with camera:
Optical Tube Length:
Weight
Optical Tube:
CM-1100
Schmidt-Cassegrain
11" (279mm)
2800mm (110.2")
f/10
660x
42x
0.41
200 lines/mm
1593x
14.7
CM-1400
Schmidt-Cassegrain
14" (356mm)
3910mm (153.9")
f/11
840x
50x
0.33
182 lines/mm
2581x
15.3
60'
60'
25"
175'
225'
32"
27.5 lbs.
45 lbs.
DEC AXIS:
•
All machined stainless steel and aluminum
•
5.625 diameter precision bronze worm gear, 180 tooth. AGMA quality 10.
•
.4375 diameter precision 303 stainless steel worm. AGMA quality 10. Dual
bearing supported.
•
One inch diameter solid shaft, centerless ground
•
Two 2” preloaded Tapper Roller Bearings, pre-loading the shaft.
•
Bearing preload is independent of clutch tension.
•
Slip Clutch-Variable friction two knob adjustment
•
5.25” laser engraved setting circle, 1 degree increments.
•
182 oz/in Stepper Motor - .50 arc second steps
•
Removable stainless steel counterweight shaft
•
Dovetail saddle plate – allowing for interchanging of any tube assembly
•
Instrument Weight of 60 Lbs
POLAR AXIS:
•
All machined stainless steel and aluminum
•
5.625 diameter precision bronze worm gear, 180 tooth. AGMA quality 10.
•
.4375 diameter precision 303 stainless steel worm. AGMA quality 10. Dual
bearing supported.
•
One inch diameter solid shaft, centerless ground
•
Two 2” preloaded Tapper Roller Bearings, pre-loading the shaft.
•
Bearing preload is independent of clutch tension.
•
Slip Clutch-Variable friction two knob adjustment
•
5.25” driven laser engraved setting circle, 5 minute increments
(Northern Hemisphere only)
•
182 oz/in Stepper Motor - .50 arc second steps
•
Latitude adjustment 20 to 65 degrees with counterweights. Total travel is 13 to
65 degrees.
•
Azimuth adjustment, bi-directional +/- 7 degrees
20
•
Assembling Your CM-1100
TRIPOD:
• All machined aluminum
• Semi-pier Tripod Design
• Fixed hieght Tripod with dual leg support
• Tripod legs are 48.5" long
• Tripod hieght is 49" high (fully extended with column attached)
• Tripod weight approximately 20 pounds
• Weight of equatorial head 31 pounds
CONTROL SYSTEM:
• Diamond push button pattern
• Hand Control: Reversible R.A. and DEC, Autoguider ready (use an
autoguider and the hand control at the same time)
• Two photo guide rates: .3x, and .5x sidereal
• Three slew rates: 8x, 16x, and 20x (double button hand control, see
chapter on Hand Control use)
• Quartz tracking rates; Sidereal, Solar, Lunar, King
• Periodic Error Correction (PEC)
• Accepts Auto-Guider Systems
• Northern and Southern Hemisphere operation
• Backlash compensation for declination axis.
• 12 Volt DC - 500 MA power use
Note:
All specifications are stated for the Celestron CM telescopes using the
standard accessories. Also, these specifications are approximate and subject
to change without notice.
Assembling Your CM-1100
•
21
T E L E S C O P E
B A S I C S
Once your telescope is fully assembled, you are ready for your first look. This
section deals with some of the basics of telescope operation.
Image Orientation
The image orientation changes depending on how the eyepiece is inserted into
the telescope. When using the star diagonal, the image is right-side-up, but
reversed from left-to-right (i.e., reverted). If inserting the eyepiece directly into
the visual back (i.e., without the star diagonal), the image is upside-down and
reversed from left-to-right (i.e., inverted). This is normal for the SchmidtCassegrain design and applies to the telescope’s finder as well.
Figure 3-1
These simplified drawings of the planet Jupiter illustrate the different image orientations obtained when using various viewing configurations.
22
•
Telescope Basics
Focusing
The Celestron CM-1100 focusing mechanism controls the primary mirror which
is mounted on a ring which slides back and forth on the primary baffle tube.
The focusing knob, which moves the primary mirror, is on the rear cell of the
telescope just right of the star diagonal and eyepiece. Turn the focusing knob
until the image is sharp. If the knob will not turn, it has reached the end of its
travel on the focusing mechanism. Turn the knob in the opposite direction until
the image is sharp. Once an image is in focus, turn the knob clockwise to
focus on a closer object and counterclockwise for a more distant object. A
single turn of the focusing knob moves the primary mirror only slightly. Therefore, it will take many turns (about 40) to go from close focus (approximately
65 feet) to infinity.
Figure 3-2
The decal on the end of the
focus knob shows the correct
rotational direction for
focusing the CM-1100.
For critical focusing, both visually and photographically, turn the focus knob
counterclockwise until the image is sharp. Turning the focusing knob in this
direction pushes the primary mirror forward, or against the pull of gravity, which
minimizes any mirror shift.
When working with any optical instrument, there are a few things to remember
to ensure you get the best possible image.
• Never look through window glass. Glass found in household windows is
optically imperfect, and as a result, may vary in thickness from one part of a
window to the next. This inconsistency can and will affect the ability to
focus your telescope. In most cases you will not be able to achieve a truly
sharp image. In some cases, you may actually see a double image.
• Never look across or over objects that are producing heat waves. This
includes asphalt parking lots on hot summer days or building rooftops.
• Hazy skies, fog, and mist can also make it difficult to focus when viewing
terrestrially. The amount of detail seen under these conditions is greatly
reduced. Also, when photographing under these conditions, the processed
film may come out a little grainier than normal with lower contrast.
• When using your telescope as a telephoto lens, the split screen or microprism focuser of the 35mm SLR camera may “black out.” This is common
with all long focal length lenses. If this happens, use the ground glass
portion of your focusing screen. To achieve a very sharp focus you may
consider using a focusing magnifier. (These are readily available from your
local camera store.)
• If you wear corrective lenses (specifically glasses), you may want to remove
them when observing with an eyepiece attached to the telescope. When
using a camera, however, you should always wear corrective lenses to
ensure the sharpest possible focus. If you have astigmatism, corrective
lenses must be worn at all times.
Telescope Basics • 23
General Photography
Hints
Your Celestron CM-1100 can be used for both terrestrial and astronomical
photography. Your Celestron CM-1100 has a fixed aperture and, as a result, a
fixed f/ratio. To properly expose your subjects photographically you need to
set your shutter speed accordingly. Most 35mm single lens reflex (SLR)
cameras offer through-the-lens metering which lets you know if your picture is
under or overexposed. This is more of a consideration when doing terrestrial
photography, where exposure times are measured in fractions of a second. In
astrophotography, the exposures are much longer, requiring that you use the
“B” setting on your camera. The actual exposure time is determined by how
long you keep the shutter open.
To reduce vibration when tripping the shutter, use a cable release. Releasing
the shutter manually can cause vibration, something that produces blurred
photos. A cable release will keep your hands clear of the camera and telescope, thus reducing the possibility of shaking the telescope. Mechanical
shutter releases can be used, though air type releases are best.
Aligning the Finder
The Celestron CM-1100 comes with an 9x50mm finder which helps in aiming
the main telescope at distant objects that are hard to find in the narrow field of
the telescope. The first number used to describe the finder is the power while
the second number is the diameter of the objective lens in millimeters. This
means the 9x50 finder is 9 power and has a 50mm objective lens. Incidentally,
power is always compared to the unaided human eye. So a 9 power finder
magnifies images nine times more than the human eye.
To make the alignment process a little easier, you should perform this task in
the daytime when it is easier to locate objects in the telescope without the
finder. To align the finder:
1. Choose a conspicuous object that is in excess of one mile away. This will
eliminate any possible parallax effect.
2. Point your telescope at the object you selected and center it in the main
optics of the telescope.
3. Check the finder to see where it is located in the field of view.
4. Adjust the screws on the finder bracket, tightening one while loosening
another, until the cross hairs are centered on the target.
Figure 3-3
TOP: The image as seen
through the telescope. BOTTOM: The image as seen
through the finder.
24
•
Telescope Basics
5. Tighten each set screw a quarter of a turn to ensure that they will not
come loose easily.
Your First Look
With the telescope fully assembled and all the accessories attached, you are
ready for your first look. Your first look should be done in the daytime when it
is easier to locate the locking clutches. This will help to familiarize you with
your telescope, thus making it easier to use at night.
Daytime Observing
As mentioned in the introduction, your Celestron CM-1100 telescope works
well as a terrestrial spotting scope. When not used to examine objects in the
night sky, it can be used to study objects here on Earth.
WARNING !
NEVER POINT YOUR TELESCOPE AT THE SUN UNLESS YOU HAVE THE
PROPER SOLAR FILTER. PERMANENT AND IRREVERSIBLE EYE DAMAGE MAY RESULT AS WELL AS DAMAGE TO YOUR TELESCOPE. ALSO,
NEVER LEAVE YOUR TELESCOPE UNATTENDED DURING A DAYTIME
OBSERVING SESSION, ESPECIALLY WHEN CHILDREN ARE PRESENT.
1. Find a distant object that is fairly bright.
2. Insert a low power eyepiece (one with a large focal length) into the telescope.
3. Adjust the R.A. and DEC clutch knobs if needed and point the telescope in
the direction of the object you selected.
4. Locate the object in your finder.
5. Move the telescope — by hand — until the object is centered in the finder.
6. Look through the main optics and the object will be there (if you aligned
the finder first).
Try using different optional eyepieces to see how the field changes with various
magnifications.
Telescope Basics • 25
Nighttime Observing
Looking at objects in the sky is quite different than looking at objects on Earth.
For one, many objects seen in the daytime are easy to see with the naked eye
and can be located in the telescope by using landmarks. In the night sky
many objects are not visible to the naked eye. To make things easier, you are
better off starting with a bright object like the Moon or one of the planets.
1. Orient the telescope so that the polar axis is pointing as close to true
north as possible. You can use a landmark that you know faces north to
get you in the general direction.
2. Adjust the tripod legs until the mount is level.
3. Adjust the mount until the latitude indicator points to the latitude of the site
from which you are observing.
4. Insert a low power eyepiece (i.e., one with a large focal length) into the
telescope to give you the widest field possible.
5. Turn the clock drive on.
6. Loosen the right ascension and declination clutch knobs and point the
telescope at the desired target. The Moon or one of the brighter planets is
an ideal first target.
7. Locate the object in the finder, center it, and then look through the telescope.
8. Turn the focus knob until the image is sharp.
9. Take your time and study your subject. If observing the Moon, look for
small details in the craters.
That’s all there is to using your Celestron CM-1100. However, don’t limit your
view of an object to a single eyepiece. After a few minutes, try using a different
optional eyepiece, a more powerful one. This gives you an idea of how the field
of view changes. Center your target and focus. Once again, if observing the
Moon you will be looking at a few craters at the same time.
NOTE:
26
•
Telescope Basics
If not using the clock drive, the stars will appear to drift out of the field of view.
This is due to the Earth’s rotation. In fact, anything in the sky, day or night,
will drift out unless the telescope has been polar aligned and the clock drive is
running. There is more on this in the section on “Polar Alignment.”
Calculating
Magnification
You can change the power of your Celestron CM-1100 telescope just by
changing the eyepiece (ocular). To determine the magnification of your
Celestron CM-1100, simply divide the focal length of the telescope by the focal
length of the eyepiece used. In equation format, the formula looks like this:
Focal Length of Telescope (mm)
Magnification = ————————————————
Focal Length of Eyepiece (mm)
Let’s say, for example, that you are using the standard 26mm eyepiece. To
determine the magnification you simply divide the focal length of your Celestron
CM-1100 (2800mm) by the focal length of the eyepiece (26mm). Dividing 2800
by 26 yields a magnification of 108 power.
Although the power is variable, each instrument — under average skies — has
a limit to the highest useful magnification. The general rule is that 60 power
can be used for every inch of aperture. For example, the Celestron CM-1100 is
11" in diameter. Multiplying 11 by 60 gives a maximum useful magnification of
660 power. Although this is the maximum useful magnification, most observing is done in the range of 20 to 35 power for every inch of aperture which is
220 to 385 times for the CM-1100.
Determining Field of
View
Determining the field of view is important if you want to get an idea of the
angular size of the object you are observing. To calculate the actual field of
view, divide the apparent field of the eyepiece (supplied by the eyepiece
manufacturer) by the magnification. In equation format, the formula looks like
this:
Apparent Field of Eyepiece
True Field = ———————————————
Magnification
As you can see, before determining the field of view, you must figure the
magnification. Using the example in the previous section, we can determine
the field of view using the same 26mm eyepiece. The 26mm Plössl eyepiece
has an apparent field of view of 50°. Divide the 50° by the magnification, which
is 108 power. This yields an actual field of .46°, or about one half of a degree.
To convert degrees to feet at 1,000 yards, which is more useful for terrestrial
observing, simply multiply by 52.5. Continuing with our example, multiply the
angular field .46° by 52.5. This produces a linear field width of 24.2 feet at a
distance of one thousand yards.
The apparent field of each eyepiece that Celestron manufactures is found in the
Celestron Accessory Catalog (#93685).
Telescope Basics • 27
A S T R O N O M Y
B A S I C S
The following section deals with observational astronomy in general. It includes information on the night sky, polar alignment, and using your telescope
for astronomical observing.
The Celestial Coordinate In order to help find objects in the sky, astronomers use a celestial coordinate
system which is similar to our geographical coordinate system here on Earth.
System
The celestial coordinate system has poles, lines of longitude and latitude, and
an equator. For the most part, these remain fixed against the background
stars.
The celestial equator runs 360 degrees around the Earth and separates the
northern celestial hemisphere from the southern. Like the Earth’s equator, it
bears a reading of zero degrees. On Earth this would be latitude. However, in
the sky this is referred to as declination, or DEC for short. Lines of declination
are named for their angular distance above and below the celestial equator.
The lines are broken down into degrees, minutes and seconds of arc. Declinations south of the equator carry a minus sign (-) in front of the coordinate and
those north of the celestial equator are either blank (i.e., no designation) or
preceded by a plus sign (+).
The celestial equivalent of longitude is called Right Ascension, or R.A. for
short. Like the Earth’s lines of longitude, they run from pole to pole and are
evenly spaced 15 degrees apart. Although the longitude lines are separated by
an angular distance, they are also a measure of time. Each line of longitude is
one hour apart from the next. Since the Earth rotates once every 24 hours,
there are 24 lines total. As a result, the R.A. coordinates are marked off in
units of time. It begins with an arbitrary point in the constellation of Pisces
designated as 0 hours, 0 minutes, 0 seconds. All other points are designated
by how far (i.e., how long) they lag behind this coordinate after it passes
overhead moving towards the west.
Your Celestron CM-1100 telescope comes equipped with setting circles that
translate the celestial coordinates into a precise location for the telescope to
point. The setting circles will not work properly until you have polar aligned the
telescope and aligned the R.A. setting circle.
Figure 4-1
The celestial sphere seen from the outside showing R.A. and DEC.
28
•
Astronomy Basics
Motion of the Stars
The daily motion of the Sun across the sky is familiar to even the most casual
observer. This daily trek is not the Sun moving as early astronomers thought,
but the result of the Earth’s rotation. The Earth’s rotation also causes the
stars to do the same, scribing out a large circle as the Earth completes one
rotation. The size of that circular path a star follows depends on where it is in
the sky. Stars near the celestial equator form the largest circles rising in the
east and setting in the west. Moving toward the north celestial pole, the point
around which the stars in the northern hemisphere appear to rotate, these
circles become smaller. Stars in the mid-celestial latitudes rise in the northeast and set in the northwest. Stars at high celestial latitudes are always
above the horizon, and are said to be circumpolar because they never rise and
never set. You will never see the stars complete one circle because the
sunlight during the day washes out the starlight. However, part of this circular
motion of stars in this region of the sky can be seen by setting up a camera on
a tripod and opening the shutter for a couple hours. The processed film will
reveal semicircles that revolve around the pole. (This description of stellar
motion also applies to the southern hemisphere except all stars south of the
celestial equator move around the south celestial pole.)
Figure 4-2
All stars appear to rotate around the celestial poles. However, the appearance of this
motion varies depending on where you are looking in the sky. Near the north celestial
pole the stars scribe out recognizable circles centered on the pole (1). Stars near the
celestial equator also follow circular paths around the pole. But, the complete path is
interrupted by the horizon. These appear to rise in the east and set in the west (2).
Looking toward the opposite pole, stars curve or arc in the opposite direction scribing a
circle around the opposite pole (3).
Astronomy Basics
•
29
Polar Alignment
In order for the telescope to track the stars, you must meet two criteria. First,
you need a drive motor that moves at the same rate as the stars. The
Celestron CM-1100 comes standard with a built-in drive motor designed
specifically for this purpose. The second thing you need is to set the
telescope’s axis of rotation so that it tracks in the right direction. Since the
motion of the stars across the sky is caused by the Earth’s rotation about its
axis, the telescope’s axis must be made parallel to the Earth’s.
Polar alignment is the process by which the telescope’s axis of rotation (called
the polar axis) is aligned (made parallel) with the Earth’s axis of rotation. Once
aligned, a telescope with a clock drive will track the stars as they move across
the sky. The result is that objects observed through the telescope appear
stationary (i.e., they will not drift out of the field of view). If not using the clock
drive, all objects in the sky (day or night) will slowly drift out of the field. This
motion is caused by the Earth’s rotation. Even if you are not using the clock
drive, polar alignment is still desirable since it will reduce the number of
corrections needed to follow an object and limit all corrections to one axis
(R.A.). There are several methods of polar alignment, all of which work on a
similar principle, but performed somewhat differently. Each method is considered separately, beginning with the easier methods and working to the more
difficult.
Although there are several methods mentioned here, you will never use all of
them during one particular observing session. Instead, you may use only one
if it is a casual observing session. Or, you may use two methods, one for
rough alignment followed by a more accurate method if you plan on doing
astrophotography.
Definition:
The polar axis is the axis around which the telescope rotates when moved in
right ascension. This axis points the same direction even when the telescope
moves in right ascension.
Figure 4-3
30
•
Astronomy Basics
Finding the Pole
In each hemisphere, there is a point in the sky around which all the other stars
appear to rotate. These points are called the celestial poles and are named for
the hemisphere in which they reside. For example, in the northern hemisphere
all stars move around the north celestial pole. When the telescope’s polar axis
is pointed at the celestial pole, it is parallel to the Earth’s rotational axis.
Spring
Winter
Summer
Fall
Figure 4-4
The position of the Big
Dipper changes throughout the year and throughout the night.
Definition:
Many of the methods of polar alignment require that you know how to find the
celestial pole by identifying stars in the area. For those in the northern
hemisphere, finding the celestial pole is not too difficult. Fortunately, we have
a naked eye star less than a degree away. This star, Polaris, is the end star
in the handle of the Little Dipper. Since the Little Dipper (technically called
Ursa Minor) is not one of the brightest constellations in the sky, it may be
difficult to locate from urban areas. If this is the case, use the two end stars in
the bowl of the Big Dipper (the pointer stars). Draw an imaginary line through
them toward the Little Dipper. They point to Polaris. The position of the Big
Dipper changes during the year and throughout the course of the night. When
the Big Dipper is low in the sky (i.e., near the horizon), it may be difficult to
locate.
Observers in the southern hemisphere are not as fortunate as those in the
northern hemisphere. The stars around the south celestial pole are not nearly
as bright as those around the north. The closest star that is relatively bright is
Sigma Octantis. This star is just within naked eye limit (magnitude 5.5) and
lies about 59 arc minutes from the pole. For more information about stars
around the south celestial pole, please consult a star atlas.
The north celestial pole is the point in the northern hemisphere around which
all stars appear to rotate. The counterpart in the southern hemisphere is
referred to as the south celestial pole.
Figure 4-5
The two stars in the front of the bowl of the Big Dipper point to Polaris which is less
than one degree from the true (north) celestial pole. Cassiopeia, the “W” shaped
constellation is on the opposite side of the pole from the Big Dipper. The North
Celestial Pole (N.C.P.) is marked by the “+” sign.
Astronomy Basics
•
31
Latitude Scales
Latitude Scale
Altitude Adjustment Knob
The easiest way to polar align a telescope is with a latitude scale. Unlike
other methods that require you to find the celestial pole by identifying certain
stars near it, this method works off of a known constant to determine how high
the polar axis should be pointed. The Celestron CM-1100 mount can be
adjusted from 13 to 65 degrees (see figure 4-6).
The constant, mentioned above, is a relationship between your latitude and the
angular distance the celestial pole is above the northern (or southern) horizon;
The angular distance from the northern horizon to the north celestial pole is
always equal to your latitude. To illustrate this, imagine that you are standing
on the north pole, latitude +90°. The north celestial pole, which has a declination of +90°, would be directly overhead (i.e., 90 above the horizon). Now, let’s
say that you move one degree south — your latitude is now +89° and the
celestial pole is no longer directly overhead. It has moved one degree closer
toward the northern horizon. This means the pole is now 89° above the
northern horizon. If you move one degree further south, the same thing
happens again. You would have to travel 70 miles north or south to change
your latitude by one degree. As you can see from this example, the distance
from the northern horizon to the celestial pole is always equal to your latitude.
Figure 4-6
The altitude scale allows for
settings between 13 and 65
degrees.
If you are observing from Los Angeles, which has a latitude of 34°, then the
celestial pole is 34° above the northern horizon. All a latitude scale does then
is to point the polar axis of the telescope at the right elevation above the
northern (or southern) horizon. To align your telescope:
1. Make sure the polar axis of the mount is pointing due north. Use a
landmark that you know faces north.
2. Level the tripod. There is a bubble level built into the mount for this
purpose.
NOTE:
Leveling the tripod is only necessary if using this method of polar
alignment. Perfect polar alignment is still possible using other
methods described later in this manual without leveling the tripod.
3. Adjust the mount in altitude until the latitude indicator points to your
latitude. Moving the mount affects the angle the polar axis is pointing. For
specific information on adjusting the equatorial mount, please see the
section “Adjusting the Mount.”
This method can be done in daylight, thus eliminating the need to fumble
around in the dark. Although this method does NOT put you directly on the
pole, it will limit the number of corrections you will make when tracking an
object. It will also be accurate enough for short exposure prime focus planetary photography (a couple of seconds) and short exposure piggyback
astrophotography (a couple of minutes).
32
•
Astronomy Basics
Pointing at Polaris
This method utilizes Polaris as a guidepost to the celestial pole. Since Polaris
is less than a degree from the celestial pole, you can simply point the polar
axis of your telescope at Polaris. Although this is by no means perfect
alignment, it does get you within one degree. Unlike the previous method, this
must be done in the dark when Polaris is visible.
1. Set the telescope up so that the polar axis is pointing north.
2. Loosen the DEC clutch knob and move the telescope so that the tube is
parallel to the polar axis. When this is done, the declination setting circle
will read +90°. If the declination setting circle is not aligned, move the
telescope so that the tube is parallel to the polar axis.
3. Adjust the mount in altitude and/or azimuth until Polaris is in the field of
view of the finder.
4. Center Polaris in the field of the telescope using the fine adjustment
controls on the mount.
Remember, while Polar aligning, do NOT move the telescope in
R.A. or DEC. You do not want to move the telescope itself, but the
polar axis. The telescope is used simply to see where the polar
axis is pointing.
Like the previous method, this gets you close to the pole but not directly on it.
The following methods help improve your accuracy for more serious observations and photography.
Figure 4-7
One might think that pointing at the pole produces a parallax effect, thus skewing the
telescope’s axis of rotation with that of the Earth’s. Polaris, however, is over 50 light
years away, thus making any parallax effect negligible. (One light year is 6.4 trillion
miles. To find the distance to Polaris in miles, multiply 6.4 trillion by 50!)
Astronomy Basics
•
33
The Polar Axis Finder
The Polar Axis Finder is designed to minimize polar alignment time while
maintaining maximum accuracy. The installation of this accessory is described in the section on “Installing the Polar Axis Finder.”
Here’s how to use it:
1. Wait until it is dark enough to see Polaris with the unaided eye.
2. Place Polaris in the center of the crosshairs of the polar axis finder by
adjusting the mounts latitude and azimuth controls (see figure 2-14 on
page 16).
3. Rotate the polar scope until the small circle (located along the inner ring of
the reticle) is positioned towards the celestial pole (see Figures 4-8 and 49). You may need to loosen the nylon tension screws on the polar finder
bracket.
Remember that the north celestial pole is located by moving away from Polaris
in the direction of the last star (Alkaid) in the handle of the Big Dipper .
4. Adjust the mount in altitude and azimuth until Polaris is in the small circle
indicating the celestial pole.
When finished, the mount is accurately polar aligned.
Put Polaris Here
Figure 4-8
Figure 4-9
In this example the North Celestial Pole (NCP) is located approximately in the "11 O'clock" position relative to Polaris
(Figure 4-9). Therefore, the polar finder reticle must be rotated to match the view as seen through the polar axis finder
(Figure 4-8). Now, simply adjust the telescope's latitude and azimuth controls until Polaris is positioned in the small
circle.
34
•
Astronomy Basics
Declination Drift
This method of polar alignment allows you to get the most accurate alignment
on the celestial pole and is required if you want to do long exposure deep-sky
astrophotography through the telescope. The declination drift method requires
that you monitor the drift of selected guide stars. The drift of each guide star
tells you how far away the polar axis is pointing from the true celestial pole and
in what direction. Although declination drift is quite simple and straightforward, it requires a great deal of time and patience to complete when first
attempted. The declination drift method should be done after any one of the
previously mentioned methods has been completed.
To perform the declination drift method you need to choose two bright stars.
One should be near the eastern horizon and one due south near the meridian.
Both stars should be near the celestial equator (i.e., 0° declination). You will
monitor the drift of each star one at a time and in declination only. While
monitoring a star on the meridian, any misalignment in the east-west direction
will be revealed. While monitoring a star near the east/west horizon, any
misalignment in the north-south direction will be revealed. As for hardware,
you will need an illuminated reticle ocular to help you recognize any drift. For
very close alignment, a Barlow lens is also recommended since it increases
the magnification and reveals any drift faster.
When looking due south with the scope on the side of the mount, insert the
diagonal so it points straight up. Insert a cross hair ocular and align the cross
hairs to be parallel to declination and right ascension motion. Use ± 16x guide
setting to check parallelism.
First choose your star near where the celestial equator and the meridian meet.
The star should be approximately ±1/2 hour of the meridian and ±5 degrees of
the celestial equator. Center the star in the field of your telescope and monitor
the drift in declination.
• If the star drifts south, the polar axis is too far east.
• If the star drifts north, the polar axis is too far west.
Make the appropriate adjustments to the polar axis to eliminate any drift.
Once you have managed to eliminate all drift, move to the star near the eastern
horizon. The star should be 20 degrees above the horizon and ± 5 degrees of
the celestial equator.
• If the star drifts south, the polar axis is too low.
• If the star drifts north, the polar axis is too high.
Once again, make the appropriate adjustments to the polar axis to eliminate
any drift. Unfortunately, the latter adjustments interact with the prior adjustments ever so slightly. So, repeat the process again to improve the accuracy
checking both axes for minimal drift. Once the drift has been eliminated, the
telescope is very accurately aligned. You will now be able to do prime focus
deep-sky astrophotography for long periods.
NOTE:
If the eastern horizon is blocked, you may choose a star near the western
horizon. However, you will have to reverse the polar high/low error directions. If
using this method in the southern hemisphere, the procedure is the same as
described above. However, the direction of drift is reversed.
Astronomy Basics
•
35
Aligning the R.A.
Setting Circle
Before you can use the setting circles to find objects in the sky, you need to
align both the R.A. and DEC setting circles. In order to align the setting circle,
you need to know the names of a few of the brightest stars in the sky. If you
don’t, they can be learned by using the Celestron Sky Maps (#93722) or
consulting a current astronomy magazine. To align the R.A. setting circle:
1. Locate a bright star near the celestial equator. The farther you are from
the celestial pole, the better your reading of the R.A. setting circle. The
star you choose to align the setting circle with should be a bright one
whose coordinates are known and easy to look up. (For a list of bright
stars to align the R.A. setting circle, see the list at the back of this
manual.)
2. Center the star in the finder.
3. Center the star in the field of the telescope.
4. Start the clock drive so that the mount tracks the star.
5. Look up the coordinates of the star. You can consult a star catalog or use
the list at the end of this manual.
6. Rotate the circle until the proper coordinates line up with the R.A. indicator. The R.A. setting circle should rotate freely. The R.A. setting circle
has a marker every four minutes with each hour labeled (see figure 4-10).
The R.A. setting circle is now aligned and ready to use. The R.A. setting
circle is clutched to the R.A. gear rotation. As long as the R.A. drive is
operating, the circle does not need to be reset once indexed to the correct
coordinate (i.e., once aligned). If the drive is ever turned off, then the R.A.
setting circle must be reset once activated. While the R.A. setting circle
tracks with the drive motor, it does not move when slewing the telescope.
Figure 4-10
Setting the DEC
Circle
36
•
Astronomy Basics
The declination setting circle is fixed in place and cannot be moved be hand.
Once the mount is polar aligned with the DEC circle reading 90°, simply move
the telescope in declination until the desired coordinance are reached.
U S I N G
T H E
D R I V E
The drive system uses a 5.625 diameter bronze gear with 180 teeth for incredibly accurate tracking. One of the most unique features of the drive is the
Periodic Error Correction (PEC) function. This feature allows the drive system
to “learn” the characteristics of the worm gear, and as a result, improve the
tracking accuracy even more. This typically reduces the periodic error to 30
percent or less of the original error. The amount of improvement varies depending on guiding skill, atmospheric stability, the characteristics of the worm gear,
and the accuracy of polar alignment.
Following is a brief discussion of each feature.
Powering Up the
Drive
In order to activate the drive, you must first plug it into an external power
source. To supply power to your Celestron CM-1100, plug your Car Battery
Adapter or optional AC Adapter into the outlet on the electronic console
labeled “12 VDC.” Then, plug the other end of the adapter into the appropriate
power source (i.e., either AC or DC depending on the adapter used).
Next, plug the R.A. and DEC cables into the electronic box. The DEC cable
has a modular phone jack connector on each end. Plug one end into the DEC
Motor receptacle on the electronics console and the other end into the declination motor. The R.A. cable has a modular phone jack connector at one end
and a 5-pin connector at the other end. Attach the 5-pin connector over the 5
pins at the top of the electronics module (labled R.A. Motor), and then plug the
phone jack connector into the R.A. motor.
Once plugged into the proper power source, activate the drive by placing the
ON/OFF switch in the “ON” position. Once activated, the drive begins tracking
at sidereal rate, the default tracking rate. The LED next to the sidereal rate
icon will illuminate.
Figure 5-1
The CI-700 electronic console.
Using the Drive
•
37
Guide Speed
This function allows you to select the speed at which the motor moves when
corrections are made via the hand controller. Once the drive is activated, the
default setting is .3 times sidereal rate. Press the Speed button to change the
guiding rate. The selections are .3x, .5x, 8x, and 16x sidereal rate.
For guiding, use either the .3x or .5x setting. These two rates allow optimal
use with autoguiders. The faster settings — 8x and 16x — are perfect for
positioning objects within the field of view.
Figure 5-2
The telescope can also move at 20x speed WITHOUT changing any of the
guide settings. To control the telecope at 20x speed, press the button that
corresponds to the direction you want to move the telescope. While holding
the button down, press the opposite directional button. For example, if you
want to move the telescope west, hold the west button down and then press
the east button. Conversely, if you want to move the telescope east, hold the
east button down and then press the west button. This “fast-set” function also
works in declination. It should be noted that the R.A. setting circle does not
remain calibrated when using any of the slewing rates.
NOTE: If the 20x speed is not functioning (but all other speeds do), it is
probably due to low voltage from your power source.
Tracking Rate Selection The drive has four basic rates: sidereal, solar, lunar and King (which is a
modified sidereal rate that takes into account atmospheric refraction). While
solar and lunar rates are obvious, sidereal and King rates require a little more
explaining. Sidereal rate is based on a single rotation of the Earth which takes
1,436.5 minutes. An astronomer by the name of King discovered that atmospheric refraction affects the apparent motion of objects across the sky. The
King rate takes into account this refraction caused by the Earth’s atmosphere
and is recommended for deep-sky astrophotography. For deep-sky observing,
either King or sidereal rate is fine.
Each of the tracking rates is represented by an icon. Sidereal rate is represented by a star ( ), solar rate by a sun ( ), lunar rate by a crescent moon
( ) and King rate by a crown ( ) . Next to each icon is an LED to indicate
which rate has been selected. Once the power has been turned on, the drive
tracks at sidereal rate, the default tracking rate. To change the tracking rate,
press the “TRACK RATE” button. Pressing the button once changes the drive
rate once. The rates are selected sequentially from bottom-to-top as listed
above.
Figure 5-3
Note that the PEC function does NOT have to be activated for the drive to work.
However, once PEC is activated, the drive rate is locked on the one selected.
You can not change rates until PEC is turned off.
38
•
Using the Drive
BC — Backlash
Correction
RATE
The BC (Backlash Correction) function allows you to eliminate the backlash in
the DEC motor when changing directions (i.e., from north to south or vice
versa). Here’s how it works. Each time you change the direction of the
telescope in declination, the motor speeds up momentarily to take up any
slack. The Tracking Rate and Guide Speed displays are used to regulate the
"aggressiveness" of the backlash compensation. The best setting is determined by looking through the eyepiece while changing the direction of the DEC
motor and then moving through the BC button settings until the backlash has
been eliminated.
To activate this function, press the BC button. Once activated, the .3x guide
speed and sidereal tracking LED will flash rapidly. Use the east and west (left
and right) buttons on the hand control to change the backlash compensation
speed. Press the right hand control button and the next guide speed light (.5x)
will illuminate. When the hand control button is pressed four times, the next
Figure 5-4—The guide rate and tracking rate light (
) will illuminate. Continue pressing the hand control
tracking rate lights are used to
buttons until the desired compensation speed is reached or until you reach the
indicate the amount of
backlash correction.
highest setting (16x and
). Once the desired level is set, press the BC
button again to activate backlash correction. The BC must be reset each time
you power up the drive.
Periodic Error Correction
(PEC)
Definition:
Periodic Error Correction, or PEC for short, is a system that improves the
tracking accuracy of the drive. PEC is designed to improve photographic
quality by reducing the amplitude of the worm errors. Using the PEC function
is a two-step process. First, you must guide for at least eight minutes —
keeping the guide star centered on the cross hairs of your optional guiding
eyepiece — during which time the system records the corrections you make.
(It takes the worm gear eight minutes to make one complete revolution, hence
the need to guide for eight minutes). The second step is to play back the
corrections you made during the recording phase. The microcomputer inside
the electronic console does this automatically after one revolution of the worm
gear.
Periodic error is a slight oscillation in right ascension caused by imperfections
in all drive gears. The cycle of the periodic error is equal to the rotation of the
[worm] gear, in this case eight minutes. All telescope drives with gears have
some periodic error. The periodic error of your Celestron CM-1100 is very
slight to begin with.
Keep in mind, this feature is for advanced astrophotographers and requires
careful guiding. Here’s how to use the PEC function most effectively.
1. Find a bright star relatively close to the object you want to photograph.
2. Insert a high power eyepiece with illuminated cross hairs into your telescope. Orient the guiding eyepiece cross hairs so that one is parallel to
the declination axis while the other is parallel to the R.A. axis.
3. Center the guide star on the illuminated cross hairs, focus the telescope,
and study the periodic movement.
4. Take a few minutes to practice guiding. This will help you familiarize
yourself with the periodic error of the drive and the operation of the hand
control box.
Using the Drive
•
39
5. Press the “PEC” button once to activate the mode. The LED will flash
once a second for 5 seconds indicating you have five seconds to get back
to the eyepiece and begin guiding before it begins recording. The .3x
guiding rate is best for this function.
NOTE:
The star should stay centered on the cross hairs for a few seconds
without using the hand controller before activating the PEC function.
6. Guide for eight minutes. Try not to overshoot corrections in right ascension. Ignore drift in declination. During the record phase, the LED flashes
a little faster.
After eight minutes, the system begins to play back the corrections made
during the first eight minutes. When playing back, the LED stays on without
blinking.
NOTE:
If you press the PEC button while it is in playback mode, you will lose the
previously recorded information. Also, the fast slew functions are locked while
the PEC function is activated. This eliminates the possibility of shifting the
focus or moving the telescope suddenly during an exposure.
The fast-set function is locked while the PEC function is activated. This
eliminates the possibility of moving the telescope suddenly during an exposure.
Once you have used the PEC function for awhile you may mistake its operation for the way the drive normally operates. The best way to see how well the
PEC function works is to turn it off. PEC results improve with practice and
patience.
HC/CCD
12 V DC
40
•
Using the Drive
This outlet accepts the hand controller needed for guiding and moving the
telescope. This outlet uses a modular phone-type jack. Push the connector
on the cable into the outlet until the plastic tab clicks. To remove the cable,
squeeze the plastic tab and pull away from the outlet.
This outlet is used to supply power to the telescope. Your Celestron CM-1100
comes standard with a Car Battery Adapter. To install the adapter, plug the
connector into the electronic console first, then the power source (automobile
cigarette lighter receptacle).
Northern/Southern
Hemisphere Operation
When using your Celestron CM-1100 in the southern hemisphere, there is a
need to reverse the motors. Changing from northern hemisphere to southern
hemisphere requires changing the polarity of the drive motor by changing the
settings of the dip switches on the electronics board. To do this:
1. Remove the cover of the electronic console by removing the four screws
(one in each corner).
2. Remove the two screws (one directly above the DEC motor jack and the
other next to the On/Off indicator light) that attach the cover to the electronics board where the dip switches are located.
3. Locate the dip switches on the electronics board as shown on figure 5-5.
4. For operation in the southern hemisphere, set switch 4 to the OFF or down
position (see Figure 5-6).
The direction of the drive motor is now reversed and will work in the southern
hemisphere. If going from the southern hemisphere to the northern hemisphere, simply change the switch back to the ON or up position.
Figure 5-5
Figure 5-6
The Hand Controller
The hand controller allows you to move the telescope in R.A. and DEC using
the corresponding motors. This includes fine corrections for guided astrophotography and minor adjustments for centering objects in the field of view.
The buttons on the hand controller are intentionally labeled in a rather vague
manner. This is due to the fact that the direction of motion of the mount varies
depending on how the telescope is oriented. Furthermore, these buttons are
user definable to eliminate confusion when guiding. (For more information, see
the section on “R.A./DEC Reverse.”)
Once again, to move the telescope at the 20x speed WITHOUT changing the
guide setting, press the button that corresponds to the direction you want to
move the telescope. While holding the button down, press the opposite
directional button. For example, if you want to move the telescope west, hold
the west button down and then press the east button. Conversely, if you want
to move the telescope east, hold the east button down then press the west
button. The fast-set function also works in declination.
Using the Drive
•
41
R.A./DEC Reverse
As mentioned previously, the direction a particular button moves the mount
varies depending on the telescope’s orientation (i.e., whether it’s on the east or
west side of the mount). This can create confusion when guiding if you change
the telescope’s orientation during a given photographic session. To compensate for this, the direction of the R.A. and DEC buttons are changeable. To
reverse the direction of either the R.A. and/or DEC buttons, change the switch
setting of the appropriate axis (see Figure 5-7).
Reverse switches
Guiding Buttons
Figure 5-7
Autoguiding
On the top side of the hand controller you will find a phone jack outlet designated for use with an autoguider. Most CCD autoguiders will require a cable
that attaches the autoguider to your telescope's drive controller via the hand
controller outlet, rendering the hand controller inoperable. By plugging the
autoguider cable directly into the hand controller, you have the ability to
override the autoguider and make manual corrections with the hand controller
buttons.
42
•
Using the Drive
C E L E S T I A L
O B S E R V I N G
With your telescope set up, you are ready to use it for observing. This section
covers visual observing of both solar system and deep-sky objects.
Observing the Moon
In the night sky, the Moon is a prime target for your first look because it is
extremely bright and easy to find. Often, it is a temptation to look at the Moon
when it is full. At this time, the face we see is fully illuminated and its light can
be overpowering. In addition, little or no contrast can be seen during this
phase.
One of the best times to observe the Moon is during its partial phases (around
the time of first or third quarter). Long shadows reveal a great amount of detail
on the lunar surface. At low power you will be able to see most of the lunar
disk at one time. The optional Reducer/Corrector lens allows for breathtaking
views of the entire lunar disk when used with a low power eyepiece. Change to
higher power (magnification) to focus in on a smaller area. Keep in mind that if
you are not using the clock drive, the rotation of the Earth will cause the Moon
to drift out of your field of view. You will have to manually adjust the telescope
to keep the Moon centered. This effect is more noticeable at higher power. If
you are using the clock drive and have polar aligned, the Moon will remain
centered if using the lunar tracking rate. Consult your local newspaper or a
current astronomy magazine to find out when the Moon will be visible.
LUNAR OBSERVING HINTS
Observing the Planets
•
To ensure accurate tracking, be sure to select the lunar tracking rate.
•
Try using eyepiece filters to increase contrast and bring out more detail on
the lunar surface.
Other easy targets in the night sky include the five naked eye planets. You
can see Venus go through its lunar-like phases. Mars can reveal a host of
surface detail and one, if not both, of its polar caps. You will be able to see
the cloud belts of Jupiter and the great Red Spot (if it is visible at the time you
are observing). In addition, you will also be able to see the moons of Jupiter as
they orbit this gas giant. Saturn, with its beautiful rings, is easily visible at
moderate power. All you need to know is where to look. Most astronomy
publications tell where the planets can be found in the sky each month.
King or sidereal rates work best for tracking the planets.
Figure 6-1
This scanned drawing of
Jupiter provides a good
representation of what you
can expect to see with
moderate magnification
during good seeing conditions.
Celestial Observing
•
43
Observing the Sun
WARNING:
Although overlooked by many amateur astronomers, solar observation is both
rewarding and fun. However, because the Sun is so bright, special precautions
must be taken when observing our star so as not to damage your eyes or your
telescope.
Never project an image of the Sun through the telescope. Because of
the folded optical design, tremendous heat buildup will result inside the
optical tube. This can damage the telescope and/or any accessories
attached to the telescope.
For safe solar viewing, use a solar filter. These filters reduce the intensity of
the Sun’s light, making it safe to view. With these filters you can see sunspots as they move across the solar disk and faculae, which are bright
patches seen near the Sun’s edge. Be sure to cover the lens of the finder
or completely remove the finder when observing the Sun. This will
ensure that the finder itself is not damaged and that no one looks
through it inadvertently.
SOLAR OBSERVING HINTS
44
•
Celestial Observing
•
The best time for observing the Sun is in the early morning or late afternoon when the air is cooler.
•
To locate the Sun without a finder, watch the shadow of the optical telescope tube until it forms a circular shadow.
•
To ensure accurate tracking, be sure to select the solar tracking rate.
Observing Deep-Sky
Objects
Deep-sky objects are simply those objects outside the boundaries of our solar
system. They include star clusters, planetary nebulae, diffuse nebulae, double
stars, and other galaxies outside our own Milky Way. The Celestron Sky
Maps (#93722) can help you locate the brightest deep-sky objects. You can
use your setting circles or “star hop” to an object from an area with which you
are familiar.
Most deep-sky objects have a large angular size. Therefore, low-to-moderate
power is all you need to see them. Visually, they are too faint to reveal any
color seen in long exposure photographs. Instead, they have a black and white
appearance. And, because of their low surface brightness, they should be
observed from a dark sky location. Light pollution around large urban areas
washes out most nebulae making them difficult, if not impossible, to observe.
Light Pollution Reduction filters help reduce the background sky increasing
contrast.
Using Your Setting Circles
Once the setting circles are aligned you can use them to find any object with
known coordinates.
1. Select an object to observe. Use a seasonal star chart or planisphere to
make sure the object you chose is above the horizon. As you become
more familiar with the night sky, this will no longer be necessary.
2. Look up the coordinates in an atlas or reference book.
3. Move the telescope in declination until the indicator is pointing at the
correct declination coordinate.
6
4. Move the telescope in R.A. until the indicator points to the correct coordinate (do NOT move the R.A. circle). The telescope will track in R.A. as
long as the clock drive is operating.
7
5. Look through the finder to see if you have located the object.
6. Center the object in the finder.
50
60
70
80
Figure 6-2
The R.A. setting circle (top) and
the DEC circle (bottom).
7. Look in the main optics using a low power eyepiece; the object should be
there.
8. Repeat the process for each object observed throughout the observing
session.
You may not be able to see fainter objects in the finder. When this happens,
gradually sweep the telescope around until the object is visible.
The declination setting circle is scaled in degrees while the R.A. setting circle
is incremented in minutes with a marker every five minutes (see figure 6-2). As
a result, the setting circles will get you close to your target, but not directly on
it. Also, the accuracy of your polar alignment will also affect how accurately
your setting circles read. It should be noted that the R.A. setting circle does
not remain calibrated when using any of the slewing rates.
At the end of this manual there is a list of deep-sky objects well within reach of
your Celestron CM-1100 telescope.
Celestial Observing
•
45
Star Hopping
Another way to find deep-sky objects is by star hopping. Star hopping is done
by using bright stars to “guide” you to an object. Here are the directions for
two popular objects.
The Andromeda Galaxy, M31, is an easy target. To find M31:
1. Locate the constellation of Pegasus, a large square visible in the fall and
winter months.
2. Start at the star in the northeast corner. The star is Alpha (α)
Andromedae.
3. Move northeast approximately 7°. There you will find two stars of equal
brightness — Delta (δ) and Pi (π) Andromedae — about 3° apart.
4. Continue in the same direction another 8°. There you will find two stars —
Beta (β) and Mu (µ) Andromedae — about 3° apart.
5. Move 3° northwest — the same distance between the two stars — to the
Andromeda galaxy. It is easily visible in the finder.
Figure 6-3
Star hopping to the Andromeda Galaxy is a snap to find since all the stars needed to do
so are visible to the naked eye. Note that the scale for this star chart is different from
the one on the following page which shows the constellation Lyra.
46
•
Celestial Observing
Star hopping may take some getting used to since you can see more stars
through the finder than you can see with the naked eye. And, some objects
are not visible in the finder. One such object is M57, the famed Ring Nebula.
Here’s how to find it:
1. Find the constellation of Lyra, a small parallelogram visible in the summer
and fall months. Lyra is easy to pick out because it contains the bright
star Vega.
2. Start at the star Vega — Alpha (α) Lyrae — and move a few degrees
southeast to find the parallelogram. The four stars that make up this
geometric shape are all similar in brightness making them easy to see.
3. Locate the two southernmost stars that make up the parallelogram —
Beta (β) and Gamma (γ) Lyrae.
4. Point the finder half way between these two stars.
5. Move about 1/2° toward Beta (β) Lyrae, but remaining on a line that
connects the two stars.
6. Look through the telescope and the Ring Nebula should be in the telescope. Its angular size is quite small and, therefore, not visible in the
finder.
Because the Ring Nebula is rather faint, you may need to use averted vision to
see it. Averted vision is the act of looking slightly away from the object you are
observing. So, if you are observing the Ring Nebula, center it in the field of
view and then look off toward the side. In this manner, light from the object is
falling on the black and white sensitive rods as opposed to the color sensitive
cones. These two examples should give you an idea of how to star hop to
deep-sky objects. To use this method on other objects, consult any of the star
atlases and star hop to the object of your choice using naked eye stars.
Figure 6-4
Although the Ring Nebula lies
between two naked eye stars, it
may take a little time to locate
since it is not visible in the
finder. Note that the scale for
this star chart is different from
the one on the previous page
which shows several constellations including Pegasus,
Triangulum, and Andromeda.
Celestial Observing
•
47
Viewing Conditions
Viewing conditions affect what you can see through your CM-1100 telescope
during an observing session. Conditions include transparency, sky illumination, and seeing. Understanding viewing conditions and the effect they have on
observing will help you get the most out of your CM-1100 telescope.
Transparency
Transparency is the clarity of the atmosphere and is affected by clouds,
moisture, and other airborne particles. Thick cumulus clouds are completely
opaque while cirrus clouds can be thin, allowing the light from the brightest
stars through. Hazy skies absorb more light than clear skies making fainter
objects harder to see and reducing contrast on brighter objects. Aerosols
ejected into the upper atmosphere from volcanic eruptions also affect transparency. Ideal conditions are when the night sky is inky black.
Sky Illumination
General sky brightening caused by the Moon, aurorae, natural airglow, and
light pollution greatly affect transparency. While not a problem for the brighter
stars and planets, bright skies reduce the contrast of extended nebulae
making them difficult, if not impossible, to see. To maximize your observing,
limit deep-sky viewing to moonless nights far from the light polluted skies found
around major urban areas. You can, on the other hand, observe planets and
stars from light polluted areas or when the Moon is out.
Seeing Conditions
Seeing conditions refer to the stability of the atmosphere and directly effects
the clarity of star images and the amount of fine detail seen in extended
objects. The air in our atmosphere acts as a lens which bends and distorts
incoming light rays. The amount of bending depends on air density. Varying
temperature layers have different densities and therefore bend light differently.
Light rays from the same object arrive slightly displaced creating an imperfect
or smeared image. These atmospheric disturbances vary from time-to-time
and place-to-place. The size of the air parcels compared to your aperture
determines the “seeing” quality. Under good seeing conditions, fine detail is
visible on the brighter planets like Jupiter and Mars, and stars are pinpoint
images. Under poor seeing conditions, images are blurred and stars appear as
blobs. Seeing conditions are rated on a five-point scale where one is the worst
and five is the best (see figure 6-5). Seeing conditions can be classified in one
of three categories.
Type 1 seeing conditions are characterized by rapid changes in the image
seen through the telescope. Extended objects, like the Moon, appear to
shimmer while point sources (i.e., stars) appear double. Type 1 seeing is
caused by currents within or very close to the telescope tube. These currents
could be caused by a telescope that has not reached thermal equilibrium with
the outdoor surroundings, heat waves from people standing near the telescope,
or heated dew caps. To avoid the problems associated with Type 1 seeing,
allow your telescope at least 45 minutes to reach thermal equilibrium. Once
adjusted to the outdoor temperature, don’t touch the telescope tube with your
hands. If observing with others, make sure no one stands in front of or directly
below the telescope tube.
48
•
Celestial Observing
Type 2 seeing conditions do move as quickly as Type 1, though the image is
quite blurry. Fine detail is lost and the contrast is low for extended objects.
Stars are spread out and not sharp. The source of Type 2 seeing is the lower
atmosphere, most likely heat waves from the ground or buildings. To avoid the
problems associated with Type 2 seeing, select a good observing site. Specifically, avoid sites that overlook asphalt parking lots or ploughed fields. Stay
away from valleys and shorelines. Look for broad hilltops or open grassy
fields. Stable thermal conditions found near lakes and atmospheric inversions
also tend to produce good seeing. If you can’t get a better location, wait until
the early morning hours when the surroundings are uniformly cool and the
seeing is generally better.
Type 3 seeing conditions are characterized by fast ripples, but sharp images.
In extended objects fine detail is visible, but the image shifts around the field.
Stars are crisp points, but they shift small distances rapidly around the field.
The cause of Type 3 seeing is turbulence in the upper atmosphere which
means the observer has less control over it. However, the effects of Type 3
seeing are generally less pronounced that the other two types. You can never
really avoid Type 3 seeing. Your best bet is to wait until moments of steadiness. If the seeing is extremely bad, pack up and wait for a better night.
The conditions described here apply to both visual and photographic observations.
Figure 6-5
Seeing conditions directly affect image quality. These drawings represent a point
source (i.e., star) under bad seeing conditions (left) to excellent conditions (right).
Most often, seeing conditions produce images that lie some where between these two
extremes.
Celestial Observing
•
49
C E L E S T I A L
P H O T O G R A P H Y
After looking at the night sky for awhile you may want to try photographing it.
Several forms of celestial photography are possible with your Celestron CM1100 telescope. The most common forms of celestial photography, in order of
difficulty are; short exposure prime focus, piggyback, eyepiece projection, and
long exposure deep-sky. Each of these is discussed in moderate detail with
enough information to get you started. Topics include the accessories required
and some simple techniques. More information is available in some of the
publications listed at the end of this manual.
In addition to the specific accessories required for each type of celestial
photography, there is the need for a camera — but not just any camera. The
camera does not need many of the features offered on today’s state-of-the-art
equipment. For example, you don’t need auto focus capability or mirror lockup. Here are the mandatory features a camera needs for celestial photography. First, a ‘B’ setting which allows for time exposures. This excludes point
and shoot cameras and limits the selection to SLR cameras, the most common type of 35mm camera on the market today.
Second, the ‘B’ or manual setting should not run off the battery. Many new
electronic cameras use the battery to keep the shutter open during time
exposures. Once the batteries are drained, usually after a few minutes, the
shutter closes, whether you were finished with the exposure or not. Look for a
camera that has a manual shutter when operating in the time exposure mode.
Olympus, Nikon, Minolta, Pentax and others have made such camera bodies.
The camera should have interchangeable lenses so you can attach it to the
telescope and so you can use a variety of lenses for piggyback photography. If
you can’t find a new camera, you can purchase a used camera body that is
not 100-percent functional. The light meter does not have to be operational
since you will be determining the exposure length manually.
A cable release is needed with a locking function to hold the shutter open while
you do other things. Mechanical and air releases are available.
Is unguided astrophotography possible? Yes and no. For solar (filtered), lunar,
and piggyback (up to 200mm telephotos), the answer is yes. However, even
with PEC, off-axis guiding is still mandatory for long exposure, deep-sky
astrophotography. The Reducer/Corrector lens reduces exposure times
making the task of guiding a little easier.
50
•
Celestial Photography
Short Exposure
Prime Focus
Short exposure prime focus photography is the best way to begin recording
celestial objects. It is done with the camera attached to the telescope without
an eyepiece or camera lens in place. To attach your camera you need the
Celestron T-Adapter (#93633-A) and a T-Ring for your specific camera (i.e.,
Minolta, Nikon, Pentax, etc.). The T-Ring replaces the 35mm SLR camera’s
normal lens. Prime focus photography allows you to capture the majority of
the solar disk (if using the proper filter) as well as the Moon. To attach your
camera to your CM-1100:
1. Remove all visual accessories.
2. Thread the T-Ring onto the T-Adapter.
3. Mount your camera body onto the T-Ring the same as you would any other
lens.
4. Thread the T-Adapter onto the back of the Celestron CM-1100 while
holding the camera in the desired orientation (either vertical or horizontal).
With your camera attached to the telescope, you are ready for prime focus
photography. Start with an easy object like the Moon. Here’s how to do it:
1. Load your camera with film that has a moderate-to-fast speed (i.e., ISO
rating). Faster films are more desirable when the Moon is a crescent.
When the Moon is near full, and at its brightest, slower films are more
desirable. Here are some film recommendations:
•
•
•
•
T-Max 100
T-Max 400
Any 100 to 400 ISO color slide film
Fuji Super HG 400
2. Center the Moon in the field of your CM-1100
3. Focus the telescope by turning the focus knob until the image is sharp.
4. Set the shutter speed to the appropriate setting (see the table below).
5. Trip the shutter using a cable release.
6. Advance the film and repeat the process.
Lunar Phase
ISO 50
ISO 100
ISO 200
ISO 400
Crescent
1/2
1/4
1/8
1/15
Quarter
1/15
1/30
1/60
1/125
Full
1/30
1/60
1/125
1/125
Table 7-1
Above is a listing of recommended exposure times when photographing the
Moon at the prime focus of your Celestron CM-1100 telescope.
Celestial Photography
•
51
The exposure times listed here should be used as a starting point. Always
make exposures that are longer and shorter than the recommended time.
Also, try bracketing your exposures, taking a few photos at each shutter
speed. This will ensure that you will get a good photo.
Keep accurate records of your exposures. This information is useful if you
want to repeat your results or if you want to submit some of your photos to
various astronomy magazines for possible publication!
This same technique is used for photographing the Sun with the proper solar
filter.
52
•
Celestial Photography
Piggyback
The easiest way to enter the realm of deep-sky, long exposure astrophotography is via the piggyback method. Piggyback photography is done with a
camera and its normal lens riding on top of the telescope. Through piggyback
photography you can capture entire constellations and record large scale
nebulae that are too big for prime focus photography. Because you are
photographing with a low power lens and guiding with a high power telescope,
the margin for error is very large. Small mistakes made while guiding the
telescope will not show up on film. Use the optional piggyback mount to attach
the camera to the telescope.
As with any form of deep-sky photography, you must be at a dark sky observing site. Light pollution around major urban areas washes out the faint light of
deep-sky objects.
1. Polar align the telescope (using one of the methods described earlier) and
start the clock drive.
2. Load your camera with slide film, ISO 100 or faster, or print film, ISO 400
or faster!
3. Set the f/ratio of your camera lens so that it is a half stop to one full stop
down from completely open.
4. Set the shutter speed to the “B” setting and focus lens to infinity setting.
5. Locate the area of the sky that you want to photograph and move the
telescope so that it points in that direction.
6. Find a suitable guide star in the telescope field. This is relatively easy
since you can search a wide area without affecting the area covered by
your camera lens. If you do not have an illuminated cross hair eyepiece for
guiding, simply defocus your guide star until it fills most of the field of view.
This makes it easy to detect any drift.
7. Release the shutter using a cable release.
8. Monitor your guide star for the duration of the exposure. Make all corrections using the hand controller.
9. Close the camera’s shutter.
As for lenses, get good ones that produce sharp images near the edge of the
field. Generally, stay away from generic lenses. The lenses should have a
resolving power of 40 lines per millimeter. A good focal length range is 35 to
100mm for lenses designed for 35mm cameras.
Celestial Photography
•
53
The exposure time depends on the film being used. However, five minutes is
usually a good starting point. With slower films, like 100 ISO, you can expose
as long as 45 minutes. With faster films, like 1600 ISO, you really shouldn’t
expose more than 5 to 10 minutes. When getting started, use fast films to
record as much detail in the shortest possible time. Here are proven recommendations:
•
•
•
•
•
•
Ektar 1000 (color print)
Konica 3200 (color print)
Fujichrome 1600D (color slide)
3M 1000 (color slide)
T-Max 3200 (black and white print)
T-Max 400 (black and white print)
As you perfect your technique, try specialized films (i.e., specially designed
and/or treated) for this type of astrophotography. Here are some popular
choices:
•
•
•
•
Ektar 125 (color print)
Fujichrome 100D (color slide)
Tech Pan, gas hypered (black and white print)
T-Max 400 (black and white print)
As with all forms of photography, keep accurate records of your work. This
information can be used later if you want to reproduce certain results or if you
want to submit photos for possible publication.
Once you have mastered piggyback photography with wide angle and normal
lenses, try longer focal length lenses. The longer the focal length, the more
accurate your guiding must be. You can continue to increase the focal length
of the lens until you are ready for prime focus photography with your Celestron
CM-1100
54
•
Celestial Photography
Eyepiece Projection
This form of celestial photography is designed for objects with small angular
sizes, primarily the Moon and planets. Planets, although physically quite
large, appear small in angular size because of their great distances. Moderate
to high magnification is, therefore, required to make the image large enough to
see any detail. Unfortunately, the camera/telescope combination alone does
not provide enough magnification to produce a usable image size on film. In
order to get the image large enough, you must attach your camera to the
telescope with the eyepiece in place. To do so, you need two additional
accessories; a Deluxe Tele-Extender (#93643), which attaches onto the visual
back, and a T-ring for your particular camera make (i.e., Minolta, Nikon,
Pentax, etc.).
Because of the high magnifications during eyepiece projection, the field of view
is quite small which makes it difficult to find and center objects. To make the
job a little easier, align the finder as accurately as possible. This allows you to
get the object in the field based on the finder view alone.
Another problem introduced by the high magnification is vibration. Simply
tripping the shutter — even with a cable release — produces enough vibration
to smear the image. To get around this, use the camera’s self-timer if the
exposure time is less than one second — a common occurrence when
photographing the Moon. For exposures over one second, use the “hat trick.”
This technique incorporates a hand-held black card placed over the aperture of
the telescope to act as a shutter. The card prevents light from entering the
telescope while the shutter is released. Once the shutter has been released
and the vibration has diminished (a few seconds), move the black card out of
the way to expose the film. After the exposure is complete, place the card
over the front of the telescope and close the shutter. Advance the film and
you’re ready for your next shot. Keep in mind that the card should be held a
few inches in front of the telescope, and not touching it. It is easier if you use
two people for this process; one to release the camera shutter and one to hold
the card. Here’s the process for making the exposure.
1. Find and center the desired target in the viewfinder of your camera.
2. Turn the focus knob until the image is as sharp as possible.
3. Place the black card over the front of the telescope.
4. Release the shutter using a cable release.
5. Wait for the vibration caused by releasing the shutter to diminish. Also,
wait for a moment of good seeing.
6. Remove the black card from in front of the telescope for the duration of the
exposure (see accompanying table).
7. Replace the black card over the front of the telescope.
8. Close the camera’s shutter.
Advance the film and your ready for your next exposure. Don’t forget to take
photos of varying duration and keep accurate records of what you have done.
Record the date, telescope, exposure duration, eyepiece, f/ratio, film, and
some comments on the seeing conditions.
Celestial Photography
•
55
The following table lists exposures for eyepiece projection with a 10mm
eyepiece. All exposure times are listed in seconds or fractions of a second.
Planet
ISO 50
ISO 100
ISO 200
ISO 400
Moon
4
2
1
1/2
Mercury
16
8
4
2
Venus
1/2
1/4
1/8
1/15
Mars
16
8
4
2
Jupiter
8
4
2
1
Saturn
16
8
4
2
Table 7-2
The exposure times listed here should be used as a starting point. Always
make exposures that are longer and shorter than the recommended time.
Also, try bracketing your exposures, taking a few photos at each shutter
speed. This will ensure that you will get a good photo. It is not uncommon to
go through an entire roll of 36 exposures and have only one shot turn out good.
Don’t expect to record more detail than you can see visually in the eyepiece at
the time you are photographing.
Once you have mastered the technique, experiment with different films,
different focal length eyepieces, and even different filters.
56
•
Celestial Photography
Long Exposure
Prime Focus
This is the last form of celestial photography to be attempted after others have
been mastered. It is intended primarily for deep-sky objects, that is objects
outside our solar system which includes star clusters, nebulae, and galaxies.
While it may seem that high magnification is required for these objects, just
the opposite is true. Most of these objects cover large angular areas and fit
nicely into the prime focus field of your Celestron CM-1100 telescope. The
brightness of these objects, however, requires long exposure times and, as a
result, are rather difficult.
There are several techniques for this type of photography, and the one chosen
will determine the standard accessories needed. If, for example, you use a
separate guidescope, the camera attaches to the telescope with a T-Adapter
(#93633-A) and a T-Ring for your specific camera. However, the best method
for long exposure deep-sky astrophotography is with an off-axis guider. This
devise allows you to photograph through the telescope and guide simultaneously. Celestron offers a very special and advanced off-axis guider, called
the Radial Guider (#94176). In addition, you will need a T-Ring to attach your
camera to the Radial Guider.
Other equipment needs include a guiding eyepiece. Unlike piggyback photography which allows for fairly loose guiding, prime focus requires meticulous
guiding for long periods. To accomplish this you need a guiding ocular with an
illuminated reticle to monitor your guide star. For this purpose, Celestron
offers the Micro Guide Eyepiece (#94171). Here is a brief summary of the
technique.
1. Polar align the telescope using the declination drift method.
2. Remove all visual accessories.
3. Thread the Radial Guider onto your Celestron CM-1100.
4. Thread the T-Ring onto the Radial Guider.
5. Mount your camera body onto the T-Ring the same as you would any other
lens.
6. Set the shutter speed to the “B” setting.
7. Focus the telescope on a star.
8. Center your subject in the field of your camera.
9. Find a suitable guide star in the telescope field. This can be the most time
consuming process.
10. Open the shutter using a cable release.
11. Monitor your guide star for the duration of the exposure.
12. Close the camera’s shutter.
Celestial Photography
•
57
When getting started, use fast films to record as much detail in the shortest
possible time. Here are proven recommendations:
•
•
•
•
•
•
Ektar 1000 (color print)
Konica 3200 (color print)
Fujichrome 1600D (color slide)
3M 1000 (color slide)
T-Max 3200 (black and white print)
T-Max 400 (black and white print)
As you perfect your technique, try specialized films (i.e., specially designed
and/or treated) for this type of astrophotography. Here are some popular
choices:
•
•
•
•
Ektar 125 (color print)
Fujichrome 100D (color slide)
Tech Pan, gas hypered (black and white print)
T-Max 400 (black and white print)
There is no exposure determination table to help you get started. The best
way to determine exposure length is look at previously published photos to see
what film/exposure combination was used. Or take unguided sample photos of
various parts of the sky while the drive is running. Take exposures of various
lengths to determine the best exposure time.
58
•
Celestial Photography
CCD IMAGING
Fastar Lens Assembly Option – Using your CM-1400 telescope at f/2.1 with
optional PixCel CCD Camera
Only the CM-1400 is equipped with a removable secondary mirror that allows
you to convert your f/11 telescope into an f/2.1 imaging system capable of
exposure times 25 times shorter than those needed with a f/11 system! Used with
Celestron’s PixCel CCD System, objects will be easily found due to the wide .36°
by .27° field of view provided. With the optional Fastar lens assembly you can
easily convert your Fastar compatible telescope to f/2.1 prime focus use in a matter
of seconds. Your telescope can now be used in many different f-number’s for CCD
imaging. It can be used at f/2.1 (with optional Fastar Lens Assembly), f/7 (with the
optional Reducer/Corrector), f/11, and f/22 (with the optional 2x barlow) making it
the most versatile imaging system available today. This makes the system ideal
for imaging deep-sky objects as well as planetary detail. The key to the Fastar’s
versatility is the variety of different F-numbers in which it can be used. Described
below is the significance of each F-number and the type of object best suited to
that kind of imaging.
Secondary
Mirror
Secondary
Mirror
Retaining Ring
Corrector Plate
Secondary
Mirror Mount
Handle
Figure 7-1
The above figure shows how the secondary mirror is removed when using the
optional PixCel CCD camera at f/2.1 and the Fastar Lens Assembly (#94181).
Warning: The secondary mirror should never be removed unless installing the
optional Fastar Lens Assembly. Adjustments to collimation can easily be
made by turning the screws on the top of the secondary mirror mount without
ever having to remove the secondary mirror (see Telescope Maintenance
section of this manual).
Celestial Photography
•
59
Description of
F-numbers
The F/# stands for the ratio between the focal length and the diameter of the
light gathering element. A C14 optical tube has a focal length of 154 inches
and a diameter of 14 inches. This makes the system an f/11, (focal length
divided by diameter). When the secondary is removed and the CCD is placed
at the Fastar position, the system becomes f/2.1, this is unique to Celestron
telescopes (see figures below).
Fastar Lens Assembly
PixCel 237 CCD Camera
Figure 7-2 -- Light path at f/11 focus
Figure 7-3 -- Light path at Fastar f/2.1 focus
The key factors for good CCD imaging are; exposure time, field-of-view, image
size, and pixel resolution. As the F/# goes down (or gets faster), the exposure
times needed decreases, the field-of-view-increases, but the image scale of the
object gets smaller. What is the difference between f/2.1 and f/11? F/2.1 has
1/5 the focal length of f/11. That makes the exposure time needed about 25
times shorter than at f/11, the field of view 5 times larger and the object size
1/5 compared to that of f/11. (see Table below)
Standard Cassegrain
With Reducer/Corrector
Accessory
With Fastar Lens
Accessory
Focal Length & Speed
154"(3910mm) @ f/11
98" (2488mm) @ f/7
29.4" (747mm) @ f/2.1
PixCel 237 F.O.V.
4.1 x 3.2 (arc min)
6.5 x 5 (arc min)
22 x 17 (arc min)
Table 7-3
Fastar Configuration
60
•
Celestial Photography
The following is a brief description of the advantages of imaging at each fnumber configuration and the proper equipment needed to use the telescope in
any of its many settings. Refer to Figure 7-6 for a more detailed description of
the accessories offered for each configuration.
Imaging at f/2.1
As stated above, the exposure times are much shorter at f/2.1 than at f/7 or
f/11. The field-of-view is wider, so it is easier to find and center objects. Also
with a wider field-of-view you can fit larger objects (such as M51, The Whirlpool
Galaxy) in the frame. Typical exposure times can be 20-30 seconds for many
objects. With the Track and Accumulate function on the PixCel software (see
the PixCel Operating Manual for more details about its software features), the
camera can shoot and stack several images automatically without ever having
to guide the exposure. Under dark skies you can get an excellent image of the
Dumbbell Nebula (M27) with only a few 30 second exposures (see figure 7-4
below). The spiral arms of the Whirlpool galaxy (Figure 7-5) can be captured
with a 30 second exposure and can be improved upon dramatically if several
30-60 second exposures are added together using the Track and Accumulate™ feature.
Figure 7-4 M27 -- The Dumbbell Nebula
4 exposures of 30 seconds each!
Figure 7-5 M51 -- The Whirlpool Nebula
9 exposures of 60 seconds each.
When imaging some objects like planetary nebula (for example M57, the Ring
Nebula) and small galaxies (M104, the Sombrero Galaxy), larger image scale
is needed to resolve finer detail. These objects are better shot at f/7 or even f/
11.
Imaging at f/7
Medium size to small galaxies -f/7 imaging gives you finer resolution then at f/2.1, but the slower f-number will
usually require you to guide the image while you are taking longer exposures.
Guiding can be accomplished by using an optional Radial Guider or a piggyback
guidescope. The exposure times are about 10 times longer but the results can be
worth the extra effort. There are some objects that are small enough and bright
enough that they work great at f/7. M104 (the Sombrero Galaxy) can be imaged
under dark skies with a series of short exposures using Track and Accumulate.
Ten exposures at 15 seconds each will yield a nice image and is short enough that
you may not need to guide the exposure at all. For f/7 imaging the optional
Reducer/Corrector is needed. (See Optional Accessory section at the end of this
manual).
Imaging at f/11
Lunar or small planetary nebulae-f/11 imaging is more challenging for long exposure, deep-sky imaging. Guiding
needs to be very accurate and the exposure times need to be much longer,
about 25 times longer than f/2.1. There are only a select few objects that
work well at f/11. The moon images fine because it is so bright, but planets
are still a bit small and should be shot at f/22. The Ring nebula is a good
candidate because it is small and bright. The Ring Nebula (M57) can be
imaged in about 30-50 seconds at f/11. The longer the exposure the better.
Celestial Photography
•
61
Imaging at f/22
Planetary or Lunar-f/20 is a great way to image the planets and features on the moon. With the
PixCel CCD camera and optional Color Filter Wheel, it is easy to take tri-color
images of planets also. When imaging the planets, very short exposures are
needed. Many cameras have trouble taking images under .1 seconds. The
PixCel camera can image at .01 seconds exposures due to the design of the
CCD array. The exposure lengths range from .03 to .1 seconds on planetary
images. Focus is critical as is good atmospheric conditions. Generally you
will take one image after another until one looks good (see AutoGrab feature in
the PixCel Operating Manual). This is due to the atmospheric “seeing” conditions. For every 10 exposures you might save 1. To image at f/22 you need to
purchase a 2x Barlow and a T-adapter or Radial Guider.
20
10
23
14
16
24
15
13
19
22
21
20
12
10
18
1
11
19
9
17
2
3
4
5
6
8
3
7
9
10
1
2
3
4
5
6
7
8
9
10
11
12
62
•
Figure 7-6 -- This diagram shows the many accessories that can be used with the Fastar compatible
CM-14 telescope in its various optical configurations.
Optical Tube Assembly
Secondary Mirror
Secondary Mirror Retaining Ring
Fastar Lens Spacer
Fastar Spacer Retaining Ring
Fastar Lens Assembly
Tricolor Spacer Ring
Fastar 14 T-Adapter
IR Cutoff Filter
PixCel CCD Camera
Reducer/Corrector f/6.3
T-Adapter
Celestial Photography
13
14
15
16
17
18
19
20
21
22
23
24
Radial Guider
Microguide Eyepiece
Illuminator (Microguide Eyepiece only)
Pulstar Illuminator
Visual Back 1 ¼”
Star Diagonal
2X Barlow Lens
Cross Hair Eyepiece
26mm Plossl Eyepiece
T-Ring
T - 1 1/4" Adapter
35mm SLR Camera
T E L E S C O P E
M A I N T E N A N C E
While your CM-1100 telescope requires little maintenance, there are a few
things to remember that will ensure your telescope performs at its best.
Care and Cleaning
of the Optics
Occasionally, dust and/or moisture may build up on the corrector plate of your
telescope. Special care should be taken when cleaning any instrument so as
not to damage the optics.
If dust has built up on the corrector plate, remove it with a brush (made of
camel’s hair) or a can of pressurized air. Spray at an angle to the lens for
approximately two to four seconds. Then, use an optical cleaning solution and
white tissue paper to remove any remaining debris. Apply the solution to the
tissue and then apply the tissue paper to the lens. Low pressure strokes
should go from the center of the corrector to the outer portion. Do NOT rub in
circles!
You can use a commercially made lens cleaner or mix your own. A good
cleaning solution is isopropyl alcohol mixed with distilled water. The solution
should be 60% isopropyl alcohol and 40% distilled water. Or, liquid dish soap
diluted with water (a couple of drops per one quart of water) can be used.
Occasionally, you may experience dew build-up on the corrector plate of your
telescope during an observing session. If you want to continue observing, the
dew must be removed, either with a hair dryer or by pointing the telescope at
the ground until the dew has evaporated.
If moisture condenses on the inside of the corrector, remove the accessories
from the rear cell of the telescope. Place the telescope in a dust-free environment and point it down. This will remove the moisture from the telescope tube.
To minimize the need to clean your telescope, replace all lens covers once you
have finished using it. Since the rear cell is NOT sealed, the cover should be
placed over the opening when not in use. This will prevent contaminants from
entering the optical tube.
Internal adjustments and cleaning should be done only by the Celestron repair
department. If your telescope is in need of internal cleaning, please call the
factory for a return authorization number and price quote.
Collimation
The optical performance of your Celestron CM-1100 telescope is directly
related to its collimation, that is the alignment of its optical system. Your
Celestron CM-1100 was collimated at the factory after it was completely
assembled. However, if the telescope is dropped or jarred severely during
transport, it may have to be collimated. The only optical element that may
need to be adjusted, or is possible, is the tilt of the secondary mirror.
To check the collimation of your telescope you will need a light source. A
bright star near the zenith is ideal since there is a minimal amount of atmo-
Telescope Maintenance
•
63
spheric distortion. Turn your telescope drive on so that you won’t have to
manually track the star. Or, if your are not using the clock drive, use Polaris.
Its position relative to the celestial pole means that it moves very little thus
eliminating the need to manually track it.
Before you begin the collimation process, be sure that your telescope is in
thermal equilibrium with the surroundings. Allow 45 minutes for the telescope
to reach equilibrium if you move it between large temperature extremes.
To verify collimation, view a star near the zenith. Use a medium to high power
ocular — 12mm to 6mm focal length. It is important to center a star in the
center of the field to judge collimation. Slowly cross in and out of focus and
judge the symmetry of the star. If you see a systematic skewing of the star to
one side, then recollimation is needed.
Figure 8-1 -- Even though the star pattern appears the same on both sides of focus,
they are asymmetric. The dark obstruction is skewed off to the left side of the
diffraction pattern indicating poor collimation.
To accomplish this, you need to tighten the secondary collimation screw(s)
that move the star across the field toward the direction of the skewed light.
These screws are located in the secondary mirror holder. Make only a small
1/6 to 1/8 field correction and recenter the star by moving the scope before
making any improvements or before making further adjustments.
To make collimation a simple procedure, follow these easy steps:
64
•
1
While looking through a medium to high power eyepiece, de-focus a
bright star until a ring pattern with a dark shadow appears (see figure
8-1). Center the de-focused star and notice in which direction the
central shadow is skewed.
2
Place your finger (or the finger of a friend) along the edge of the front
cell of the telescope, pointing towards the collimation screws. the
shadow of your finger should be visible when looking into the eyepiece.
Rotate your finger around the tube edge until its shadow is seen
closest to the narrowest portion of the rings (ie. the same direction in
which the central shadow is skewed).
3
Locate the collimation screw closest to where your finger is positioned. This will be the collimation screw you will need to adjust first.
(If your finger is positioned exactly between two of the collimation
screws, then you will need to adjust the screw opposite where your
finger is located).
4
Use the slow motion controls to move the de-focused star image to the
edge of the field of view, in the same direction that the central obstruction of the star image is skewed.
Telescope Maintenance
5
While looking through the eyepiece, use a screwdriver to turn the
collimation screw you located in step 2 and 3. Usually a tenth of a
turn is enough to notice a change in collimation. If the star image
moves out of the field of view in the direction that the central shadow is
skewed, than you are turning the collimation screw the wrong way.
Turn the screw in the opposite direction, so that the star image is
moving towards the center of the field of view.
If while turning you notice that the screws get very loose, than simply tighten
the other two screws by the same amount. Conversely, if the collimation
screw gets too tight, then loosen the other two screws by the same amount.
6
Once the star image is in the center of the field of view, check to see if
the rings are concentric. If the central obstruction is still skewed in
the same direction, then continue turning the screw(s) in the same
direction. If you find that the ring pattern is skewed in a different
direction, than simply repeat steps 2 through 6 as described above for
the new direction.
Perfect collimation will yield a star or planetary image very symmetrical just
inside and outside of focus. In addition, perfect collimation delivers the optimal
optical performance specifications that your telescope is built to achieve.
If seeing (i.e., air steadiness) is turbulent, collimation is difficult to judge. Wait
until a better night if it is turbulent or aim to a steadier part of the sky. A
steadier part of the sky is judged by steady versus twinkling stars.
Figure 8-2
A collimated telescope
should appear symmetrical
with the central obstruction
centered in the star's
diffraction pattern.
Telescope Maintenance
•
65
O P T I O N A L
A C C E S S O R I E S
The following is a partial list of optional accessories available for your Celestron
CM-1100/1400. You will find that additional accessories enhance your viewing
pleasure and expand the usefulness of your telescope. For ease of reference,
all the accessories are listed in alphabetical order.
AC Adapter - 110V - 60Hz (#18770) - The AC Adapter allows you to run your
CM telescope off of AC rather than the standard DC battery.
Advanced Astro Master (#93900) - This unique accessory contains a data
base of more than 10,000 objects! Included are the Messier catalog, NGC
catalog, IC catalog, portions of the ESO catalog, portions of the UGC catalog,
special non-stellar catalog which contains objects not found in any of the other
catalogs, a star catalog containing 241 interesting double and multiple stars,
and a user definable catalog that allows you to enter 25 of your favorite objects.
And, scrolling information cross references Sky Atlas 2000.0 or Uranometria .
Unlike other digital setting circles, which require the use of a clock drive, the
Advanced Astro Master can be used with or without a clock drive. All you have
to do is align on any two of the 28 navigational alignment stars in the Advanced
Astro Master’s data base and you are ready to observe. Once aligned, the
system keeps track of where it is pointed. And, the Advanced Astro Master
has an RS-232 port for complete interface to your personal computer. The RS232 cable (#93921) is available. The encoder installation kit for the CI-700
mount is #93908.
Barlow Lenses - A Barlow lens is a negative lens that increases the focal
length of a telescope. Used with any eyepiece, it doubles the magnification of
that eyepiece. Celestron offers two Barlow lenses in the 1-1/4" size. The 2x
Ultima Barlow (#93506) is a compact triplet design that is fully multicoated for
maximum light transmission and parfocal when used with the Ultima eyepieces. It works very well with all Celestron eyepieces. The latest Barlow to
be added to Celestron’s product line (#93507) is a low profile achromatic
design. It weighs just 4 oz. and it is under 3" in length.
Counterweight - 11 lbs. - Extra counterweights (#94195) may be necessary
when using heavy accessories.
2” Mirror Diagonal (#93519) -For the CM-1100 (Standard on CM-1400). Like
the l-l/4" Prism Star Diagonals, the 2" Mirror Diagonal allows you to use 2"
eyepieces with your Celestron telescope. These larger eyepieces offer wider
fields and better eye relief for greater viewing comfort. This accessory is NOT
recommended for use with the Reducer/Corrector Lens.
Erect Image Diagonal (#94112-A) - For daytime terrestrial viewing the Erect
Image Diagonal produces images through your Schmidt-Cassegrain telescope
that match what you see with the unaided eye. This accessory uses an Amici
66
• Optional Accessories
prism arrangement that, in addition to producing correctly oriented images,
allows you to look into the telescope at a 45° angle, a desirable arrangement
for terrestrial viewing.
Eyepiece Filters - To enhance your visual observations of planetary objects,
Celestron offers a wide range of colored filters that thread into the 1-1/4"
oculars. Available are: #12 Deep Yellow, #21 Orange, #25 Red, #58 Green,
#80A Light Blue, #96 Neutral Density (25% T, and 13% T) and Polarizing
filters. These and other filters are also sold in sets.
Eyepieces - Like telescopes, eyepieces come in a variety of designs. And,
with the advent of different eyepieces, Celestron also has a variety of designs
each with its own advantages and disadvantages. For the 1-1 /4" barrel
diameter there are four different eyepiece designs available.
•SMA - The SMA design is an improved version of the Kellner eyepiece.
SMA’s are very good, economical, general purpose eyepieces. Available in
focal lengths of 6mm, 10mm, 12mm, and 25mm.
•Plossl - Plossl eyepieces have a 4-element lens designed for low-to-high
power observing. The Plossls offer razor sharp views across the entire field,
even at the edges! In the 1-1 /4" barrel diameter, they are available in the
following focal lengths: 6.3mm, 7.5mm, 10mm, 12.5mm, 17mm, 20mm,
26mm, 32mm, and 40mm.
•Ultima - Ultima is not really a design, but a trade name for our 5-element,
wide field eyepieces. In the 1-1/4" barrel diameter, they are available in the
following focal lengths: 5mm, 7.5mm, 12.5mm, 18mm, 24mm, 30mm, 35mm,
and 42mm. These eyepieces are all parfocal. The 35mm Ultima gives the
widest possible field of view with a 1-1 /4" diagonal and is ideal for use with the
Reducer/Corrector.
•Lanthanum Eyepieces (LV Series) - Lanthanum is a unique rare earth glass
used in one of the field lenses of this new eyepiece. The Lanthanum glass
reduces aberrations to a minimum. All are fully multicoated and have an
astounding 20mm of eye relief—perfect for eyeglass wearers! In the 1-1/4"
barrel diameter, they are available in the following focal lengths: 2.5mm, 4mm,
5mm, 6mm, 9mm, 10mm, 12mm, 15mm, 20mm and 25mm. Also available is
an LV Zoom Eyepiece with the focal length range of 8 to 24 mm.
In addition to the previously mentioned, there is also a deluxe compact zoom
ocular (#93306) that has a variable focal length of 6.5 to 18mm.
Finderscopes - Finderscopes are used to help you locate objects in the main
telescope. The larger the finderscope, the more you will see, making it easier
to locate objects. One option for finders is the illuminated Polaris 7x50 Finder
(#93785-8P). It comes with the bracket, finderscope, and illuminator. There is
also a Quick Release Finder bracket (#51149-A) which allows you to easily
remove and replace the finderscope without losing alignment. The Quick
Release Bracket is only available for the 9x50 and 7x50 Finderscopes.
Another tool for finding objects in the sky is the Star Pointer (#51630). The
Star Pointer is different from a finderscope in that you can use both eyes when
pointing the telescope at an object. A partially reflective surface projects the
image of an LED illuminated pinpoint into the line of sight. Just align the
illuminated pinpoint with the object you are interested in and the object will be
Optional Accessories
•
67
in the main telescope.
Flashlight (#93592) - The LED flashlight uses a red LED to allow reading star
maps without ruining your night vision. The LED flashlight is small, only 6
inches long, and weighs in at a mere 3 ounces.
Flashlight, Night Vision (#93588) - Celestron’s premium model for astronomy, using two red LEDs to preserve night vision. The brightness is
adjustable and it operates on a single 9 Volt battery.
Light Pollution Reduction (LPR) Filters - These filters are designed to
enhance your views of deep-sky astronomical objects when viewed from urban
areas. LPR Filters selectively reduce the transmission of certain wavelengths
of light, specifically those produced by artificial lights. This includes mercury
and high and low pressure sodium vapor lights. In addition, they also block
unwanted natural light (sky glow) caused by neutral oxygen emission in our
atmosphere. Celestron offers a model for 1-l/4" eyepieces (#94126A) and a
model that attaches to the rear cell ahead of the star diagonal and visual back
(#94127A).
Micro Guide Eyepiece (#94171) - This multipurpose illuminated 12.5mm
reticle can be used for guiding deep-sky astrophotos, measuring position
angles, angular separations, and more. The laser etched reticle provides razor
sharp lines and the variable brightness illuminator is completely cordless.
Piggyback Mount (#93598) - The best way to enter the realm of deep-sky
photography is via the piggyback method. Piggyback photography allows you
to record constellations and large scale nebulae that don’t fit in the field of your
telescope. The piggyback mount allows you to attach a camera to the top of
the telescope. This way, the camera can photograph with its normal or wide
angle lens while you guide through the telescope. The piggyback mount
attaches to the rear cell of the telescope next to the finder.
Polarizing Filter Set (#93608) - The polarizing filter set limits the transmission of light to a specific plane, thus increasing contrast between various
objects. This is used primarily for terrestrial, lunar, and planetary observing.
Radial Guider (#94176) - The Celestron Radial Guider is specifically designed
for use in prime focus, deep-sky astrophotography and takes the place of the
T-Adapter. This device allows you to photograph and guide simultaneously
through the optical tube assembly of your telescope. This type of guiding
produces the best results since what you see through the guiding eyepiece is
exactly reproduced on the processed film. The Radial guider is a “T”-shaped
assembly that attaches to the rear cell of the telescope. As light from the
telescope enters the guider, most passes straight through to the camera. A
small portion, however, is diverted by a prism at an adjustable angle up to the
guiding eyepiece. This guider has two features not found on other off-axis
guiders; first, the prism and eyepiece housing rotate independently of the
camera orientation making the acquisition of a guide star quite easy. Second,
the prism angle is tunable allowing you to look at guide stars on-axis. This
accessory works especially well with the Reducer/Corrector.
Reducer/Corrector (#94175) - This lens reduces the focal length of the
telescope by 37%, making your CM-1100 a l,764mm f/6.3 instrument. In
addition, this unique lens also corrects inherent aberrations to produce crisp
images all the way across the field. It also increases the field of view significantly and is ideal for wide-field, deep-sky viewing. It is perfect for beginning
68
• Optional Accessories
prime focus long-exposure astrophotography. It makes guiding easier and
exposures shorter.
Sky Maps (#93722) - When learning the night sky, the Celestron Sky Maps
offer the ideal solution. The maps include all the constellations and brighter
deep-sky objects. The maps are printed on a heavy stock paper that is
moisture-resistant. On the front cover is a rotating planisphere which indicates
when specific constellations are visible.
Skylight Filter (#93621) - The Skylight Filter is used on Celestron SchmidtCassegrain telescopes as a dust seal. The filter threads onto the rear cell of
your telescope. All other accessories, both visual and photographic, thread
onto the Skylight Filter. Although it does cut down on a portion of the incoming light, it is a very small amount. It should be noted, that most Barlow lenses
can NOT be inserted into the visual back when the skylight filter is attached.
T-Adapter (#93633-A) - A T-Adapter (with T-Ring) allows you to attach your
camera to the prime focus of a Celestron Schmidt-Cassegrain telescope. This
is used for terrestrial photography and short exposure lunar and filtered solar
photography. It can be used for long exposure deep-sky photography if you
use a separate guidescope.
T-C Adapter (#93636) - This adapter allows you to couple a video or movie
camera to a telescope. The camera must have a removable lens with a
standard “C” thread. The T-C adapter threads into the camera and then onto
the T-Adapter.
T-Ring - The T-Ring couples your camera body to the T-Adapter, Radial Guider
Body, or Tele-Extender. This accessory is mandatory if you want to do astrophotography through the telescope. Each camera make (i.e., Minolta, Nikon,
etc.) has its own unique mount and therefore, its own T-Ring.
Tele-Extender, Deluxe (#93643) - The tele-extender is a hollow tube that
allows you to attach a camera to the telescope when the eyepiece is installed.
This accessory is used for eyepiece projection photography which allows you
to capture very high power views of the Sun, Moon, and planets on film. The
tele-extender fits over the eyepiece onto the visual back and works with
eyepieces that have large housings, like the Celestron Ultima series.
A full description of all Celestron accessories can be found in the
Celestron Accessory Catalog (#93685).
Optional Accessories
•
69
THE MESSIER CATALOG
The Messier Catalog, compiled by Charles Messier, was the first extensive listing of star clusters and nebulae.
Messier’s primary observational purpose was to discover comets. He compiled this list so that others searching
for comets would not be confused by these objects. His list still remains popular today because all of these
objects are easily visible in amateur telescopes.
M#
NGC#
Const.
R.A.
HMS
DEC
°‘
Mag
Type
Proper Name
M1
M2
M3
M4
M5
NGC 1952
NGC 7089
NGC 5272
NGC 6121
NGC 5904
Tau
Aqr
CVn
Sco
Ser
5 34.5
21 33.5
13 42.2
16 23.6
15 18.5
22 01
-00 49
28 23
-26 32
2 05
8.4
6.5
6.4
5.9
5.8
P. Neb.
Gl. Cl.
Gl. Cl.
Gl. Cl.
Gl. Cl.
Crab Nebula
M6
M7
M8
M9
M10
NGC 6405
NGC 6475
NGC 6523
NGC 6333
NGC 6254
Sco
Sco
Sgr
Oph
Oph
17 40.0
17 54.0
18 03.7
17 19.2
16 57.2
-32 13
-34 49
-24 23
-18 31
-4 06
4.2
3.3
5.8
7.9
6.6
Op. Cl.
Op. Cl.
D. Neb.
Gl. Cl.
Gl. Cl.
Butterfly Cluster
M11
M12
M13
M14
M15
NGC 6705
NGC 6218
NGC 6205
NGC 6402
NGC 7078
Sct
Oph
Her
Oph
Peg
18 51.1
16 47.2
16 41.7
17 37.6
21 30.0
-6 16
-1 57
36 28
-3 15
12 10
5.8
6.6
5.9
7.6
6.4
Op. Cl.
Gl. Cl.
Gl. Cl.
Gl. Cl.
Gl. Cl.
M16
M17
M18
M19
M20
NGC 6611
NGC 6618
NGC 6613
NGC 6273
NGC 6514
Ser
Sgr
Sgr
Oph
Sgr
18 18.9
18 20.8
18 19.9
17 02.6
18 02.4
-13 47
-16 11
-17 08
-26 16
-23 02
6.0
7.0
6.9
7.2
8.5
D. Neb.
D. Neb.
Op. Cl.
Gl. Cl.
D. Neb.
M21
M22
M23
M24
M25
NGC 6531
NGC 6656
NGC 6494
NGC 6603
IC 4725
Sgr
Sgr
Sgr
Sgr
Sgr
18 04.7
18 36.4
17 56.9
18 16.4
18 31.7
-22 30
-23 54
-19 01
-18 29
-19 15
5.9
5.1
5.5
4.5
4.6
Op. Cl.
Gl. Cl.
Op. Cl.
Op. Cl.
Op. Cl.
M26
M27
M28
M29
M30
NGC 6694
NGC 6853
NGC 6626
NGC 6913
NGC 7099
Sct
Vul
Sgr
Cyg
Cap
18 45.2
19 59.6
18 24.6
20 23.0
21 40.4
-9 24
22 43
-24 52
38 32
-23 11
8.0
8.1
6.9
6.6
7.5
Op. Cl.
P. Neb.
Gl. Cl.
Op. Cl.
Gl. Cl.
M31
M32
M33
M34
M35
NGC 224
NGC 221
NGC 598
NGC 1039
NGC 2168
And
And
Tri
Per
Gem
0 42.7
0 42.7
1 33.8
2 42.0
6 08.8
41 16
40 52
30 39
42 47
24 20
3.4
8.2
5.7
5.2
5.1
Sp. Gx.
El. Gx.
Sp. Gx.
Op. Cl.
Op. Cl.
70
•
The Messier Catalog
Lagoon Nebula
Wild Duck Cluster
Hercules Cluster
Eagle Nebula
Omega Nebula
Trifid Nebula
Dumbbell Nebula
Andromeda Galaxy
Pinwheel Galaxy
M#
NGC#
Const.
R.A.
HMS
DEC
°‘
Mag
Type
M36
M37
M38
M39
M40
NGC 1960
NGC 2099
NGC 1912
NGC 7092
Aur
Aur
Aur
Cyg
UMa
5 36.3
5 52.0
5 28.7
21 32.3
12 22.2
34 08
32 33
35 50
48 26
58 05
6.0
5.6
6.4
4.6
8.0
Op. Cl.
Op. Cl.
Op. Cl.
Op. Cl.
dbl
M41
M42
M43
M44
M45
NGC 2287
NGC 1976
NGC 1982
NGC 2632
CMa
Ori
Ori
Cnc
Tau
6 47.0
5 35.3
5 35.5
8 40.0
3 47.5
-20 44
-5 27
-5 16
19 59
24 07
4.5
4.0
9.0
3.1
1.2
Op. Cl.
D. Neb.
D. Neb.
Op. Cl.
Op. Cl.
M46
M47
M48
M49
M50
NGC 2437
NGC 2422
NGC 2548
NGC 4472
NGC 2323
Pup
Pup
Hya
Vir
Mon
7 41.8
7 36.6
8 13.8
12 29.8
7 03.0
-14 49
-14 30
-5 48
8 00
-8 20
6.1
4.4
5.8
8.4
5.9
Op. Cl.
Op. Cl.
Op. Cl.
El. Gx.
Op. Cl.
M51
M52
M53
M54
M55
NGC 5194-5
NGC 7654
NGC 5024
NGC 6715
NGC 6809
CVn
Cas
Com
Sgr
Sgr
13 29.9
23 24.2
13 12.9
18 55.1
19 40 .0
47 12
61 35
18 10
-30 29
-30 58
8.1
6.9
7.7
7.7
7.0
Sp. Gx.
Op. Gx.
Gl. Cl.
Gl. Cl.
Gl. Cl.
M56
M57
M58
M59
M60
NGC 6779
NGC 6720
NGC 4579
NGC 4621
NGC 4649
Lyr
Lyr
Vir
Vir
Vir
19 16.6
18 53.6
12 37.7
12 42.0
12 43.7
30 11
33 02
11 49
11 39
11 33
8.2
9.0
9.8
9.8
8.8
Gl. Cl.
P. Neb.
Sp. Gx.
El. Gx.
El. Gx.
M61
M62
M63
M64
M65
NGC 4303
NGC 6266
NGC 5055
NGC 4826
NGC 3623
Vir
Oph
CVn
Com
Leo
12 21.9
17 01.2
13 15.8
12 56.7
11 18.9
4 28
-30 07
42 02
21 41
13 05
9.7
6.6
8.6
8.5
9.3
Sp. Gx.
Gl. Cl.
Sp. Gx.
Sp. Gx.
Sp. Gx.
M66
M67
M68
M69
M70
NGC 3627
NGC 2682
NGC 4590
NGC 6637
NGC 6681
Leo
Cnc
Hya
Sgr
Sgr
11 20.3
8 50.3
12 39.5
18 31.4
18 43.2
12 59
11 49
-26 45
-32 21
-32 18
9.0
6.9
8.2
7.7
8.1
Sp. Gx.
Op. Cl.
Gl. Cl.
Gl. Cl.
Gl. Cl.
M71
M72
M73
M74
M75
NGC 6838
NGC 6981
NGC 6994
NGC 628
NGC 6864
Sge
Aqr
Aqr
Psc
Sgr
19 53.7
20 53.5
20 58.0
1 36.7
20 06.1
18 47
-12 32
-12 38
15 47
-21 55
8.3
9.4
9.2
8.6
Gl. Cl.
Gl. Cl.
ast
S
Gl Cl.
M76
M77
M78
M79
M80
NGC 650-1
NGC 1068
NGC 2068
NGC 1904
NGC 6093
Per
Cet
Ori
Lep
Sco
1 42.2
2 42.7
5 46.7
5 24.2
16 17.0
51 34
0 01
0 03
-24 33
-22 59
11.5
8.8
8.0
8.0
7.2
P. Neb.
Sp. Gx.
D. Neb.
Gl. Cl.
Gl. Cl.
Proper Name
Great Orion Nebula
Beehive Cluster
Pleiades
Whirlpool Galaxy
Ring Nebula
Sunflower Galaxy
Black Eye Galaxy
Leo’s Triplet
Leo’s Triplet
Cork Nebula
The Messier Catalog
•
71
M#
NGC#
Const.
R.A.
HMS
DEC
°‘
Mag
Type
Proper Name
M81
M82
M83
M84
M85
NGC 3031
NGC 3034
NGC 5236
NGC 4374
NGC 4382
UMa
UMa
Hya
Vir
Com
9 55.8
9 56.2
13 37.7
12 25.1
12 25.4
69 04
69 41
-29 52
12 53
18 11
6.8
8.4
7.6
9.3
9.2
Sp. Gx.
Ir. Gx.
Sp. Gx.
El. Gx.
El. Gx.
Bodes Nebula
M86
M87
M88
M89
M90
NGC 4406
NGC 4486
NGC 4501
NGC 4552
NGC 4569
Vir
Vir
Com
Vir
Vir
12 26.2
12 30.8
12 32.0
12 35.7
12 36.8
12 57
12 24
14 25
12 33
13 10
9.2
8.6
9.5
9.8
9.5
El. Gx.
El. Gx.
Sp. Gx.
El. Gx.
Sp. Gx.
M91
M92
M93
M94
M95
NGC 4548
NGC 6341
NGC 2447
NGC 4736
NGC 3351
Com
Her
Pup
CVn
Leo
12 35.4
17 17.1
7 44.6
12 50.9
10 44.0
14 30
43 08
-23 52
41 07
11 42
10.2
6.5
6.2
8.1
9.7
Sp. Gx.
Gl. Cl.
Op. Cl.
Sp. Gx.
Sp. Gx.
M96
M97
M98
M99
M100
NGC 3368
NGC 3587
NGC 4192
NGC 4254
NGC 4321
Leo
UMa
Com
Com
Com
10 46.8
11 14.9
12 13.8
12 18.8
12 22.9
11 49
55 01
14 54
14 25
15 49
9.2
11.2
10.1
9.8
9.4
Sp. Gx.
P. Neb.
Sp. Gx.
Sp. Gx.
Sp. Gx.
M101
M102
M103
M104
M105
NGC 5457
NGC 5457
NGC 581
NGC 4594
NGC 3379
UMa
UMa
Cas
Vir
Leo
14 03.2
14 03.2
1 33.1
12 40.0
10 47.9
54 21
54 21
60 42
-11 37
12 35
7.7
7.7
7.4
8.3
9.3
Sp. Gx.
dup
Op. Cl.
Sp. Gx.
El. Gx..
M106
M107
M108
M109
M110
NGC 4258
NGC 6171
NGC 3556
NGC 3992
NGC 205
CVn
Oph
UMa
UMa
And
12 19.0
16 32.5
11 11.6
11 57.7
0 40.3
47 18
-13 03
55 40
53 23
41 41
8.3
8.1
10.0
9.8
8.0
Sp. Gx.
Gl. Cl.
Sp. Gx.
Sp. Gx.
El. Gx.
Virgo A
Owl Nebula
Pin Wheel Nebula
Sombrero Galaxy
Object Abbreviations:
• Sp. Gx. ................ Spiral Galaxy
• El. Gx. ................. Elliptical Galaxy
• Ir. Gx. ................... Irregular Galaxy
• Op. Cl. ................. Open Cluster
• Gl. Cl. .................. Globular Cluster
• D. Neb.................. Diffuse Nebula
• P. Neb.................. Planetary Nebula
NOTE:
72
•
All coordinates for the objects in the Messier catalog are listed in epoch 2000.00.
The Messier Catalog
LIST OF BRIGHT STARS
The following is a list of bright stars that can be used to align the R.A. setting circle. All coordinates are in
epoch 2000.0.
Star Name
Constellation
Epoch 2000.0
R.A.
DEC
HMS
°‘“
Magnitude
Sirius
Canopus
Arcturus
Rigel Kent.
Vega
CMa
Car
Boo
Cen
Lyr
06
06
14
14
18
45 09
23 57
15 40
39 37
36 56
-16
-52
+19
-60
+38
42 58
41 44
10 57
50 02
47 01
-1.47
-0.72
-0.72
+0.01
+0.04
Capella
Rigel
Procyon
Betelgeuse
Achernar
Aur
Ori
CMi
Ori
Eri
05
05
07
05
01
16 41
14 32
38 18
55 10
37 43
+45
-08
+05
+07
-57
59 53
12 06
13 30
24 26
14 12
+0.05
+0.14
+0.37
+0.41
+0.60
Hadar
Altair
Aldebaran
Spica
Antares
Cen
Aqi
Tau
Vir
Sco
14
19
04
13
16
03 49
50 47
35 55
25 12
29 24
-60
+08
+16
-11
-26
22 22
52 06
30 33
09 41
25 55
+0.63
+0.77
+0.86
+0.91
+0.92
Fomalhaut
Pollux
Deneb
Beta Crucis
Regulus
PsA
Gem
Cyg
Cru
Leo
22
07
20
12
10
57 39
45 19
41 26
47 43
08 22
-29
+28
+45
-59
+11
37 20
01 34
16 49
41 19
58 02
+1.15
+1.16
+1.28
+1.28
+1.36
List of Bright Stars
•
73
FOR FURTHER READING
The following is a list of astronomy books that will further enhance your understanding of the night sky. The
books are broken down by classification for easy reference.
Astronomy Texts
Astronomy Now ......................................................................................... Pasachoff & Kutner
Cambridge Atlas Of Astronomy ................................................................. Audouze & Israel
McGraw-Hill Encyclopedia Of Astronomy .................................................. Parker
Astronomy-The Evolving Universe ............................................................... Zeilik
Atlases
Atlas Of Deep Sky Splendors .................................................................... Vehrenberg
Sky Atlas 2000.0 ....................................................................................... Tirion
Sky Catalog 2000.0 Vol 1 & 2 .................................................................... Hirshfeld & Sinnott
Uranometria Vol. 1 & 2 .............................................................................. Tirion, Rappaport, Lovi
Magnitude 6 Star Atlas .............................................................................. Dickinson, Costanzo, Chaple
NGC 2000.0 ............................................................................................... Sinnott
General Observational Astronomy
The Cambridge Astronomy Guide .............................................................. Liller & Mayer
A Complete Manual Of Amateur Astronomy .............................................. Sherrod
The Guide To Amateur Astronomy ............................................................. Newton & Teece
Visual Observation
Observational Astronomy For Amateurs ..................................................... Sidgwick
Astronomical Calendar ............................................................................... Ottewell
Burnham’s Celestial Handbook Vols. 1, 2 & 3............................................ Burnham
The Planet Jupiter ...................................................................................... Peek
Field Guide To The Stars & Planets ........................................................... Menzel & Pasachoff
Observe Comets ........................................................................................ Edberg & Levy
Astrophotography
Skyshooting .............................................................................................. Mayall & Mayall
Astrophotography A Step-by-Step Approach .............................................. Little
Astrophotography For The Amateur ........................................................... Covington
Astrophotography ...................................................................................... Gordon
Astrophotography II .................................................................................... Martinez
A Manual Of Celestial Photography ........................................................... King
Manual Of Advanced Celestial Photography ............................................... Wallis & Provin
Colours Of The Stars ................................................................................. Malin & Muirden
CELESTRON ONE YEAR WARRANTY
A.
Celestron International (CI) warrants this telescope to be free from defects in materials and workmanship for one year. CI will repair or
replace such product or part thereof which, upon inspection by CI, is found to be defective in materials or workmanship. As a condition
to the obligation of CI to repair or replace such product, the product must be returned to CI together with proof-of-purchase satisfactory
to CI.
B.
The Proper Return Authorization Number must be obtained from CI in advance of return. Call Celestron at (310) 328-9560 to receive the
number to be displayed on the outside of your shipping container.
All returns must be accompanied by a written statement setting forth the name, address, and daytime telephone number of the owner,
together with a brief description of any claimed defects. Parts or product for which replacement is made shall become the property of CI.
The customer shall be responsible for all costs of transportation and insurance, both to and from the factory of CI, and shall
be required to prepay such costs.
CI shall use reasonable efforts to repair or replace any telescope covered by this warranty within thirty days of receipt. In the event repair
or replacement shall require more than thirty days, CI shall notify the customer accordingly. CI reserves the right to replace any product
which has been discontinued from its product line with a new product of comparable value and function.
This warranty shall be void and of no force of effect in the event a covered product has been modified in design or function,
or subjected to abuse, misuse, mishandling or unauthorized repair. Further, product malfunction or deterioration due to
normal wear is not covered by this warranty.
CI DISCLAIMS ANY WARRANTIES, EXPRESS OR IMPLIED, WHETHER OF MERCHANTABILITY OF FITNESS FOR A PARTICULAR USE, EXCEPT AS EXPRESSLY SET FORTH HEREIN.
THE SOLE OBLIGATION OF CI UNDER THIS LIMITED WARRANTY SHALL BE TO REPAIR OR REPLACE THE COVERED
PRODUCT, IN ACCORDANCE WITH THE TERMS SET FORTH HEREIN. CI EXPRESSLY DISCLAIMS ANY LOST PROFITS,
GENERAL, SPECIAL, INDIRECT OR CONSEQUENTIAL DAMAGES WHICH MAY RESULT FROM BREACH OF ANY WARRANTY, OR ARISING OUT OF THE USE OR INABILITY TO USE ANY CI PRODUCT. ANY WARRANTIES WHICH ARE IMPLIED
AND WHICH CANNOT BE DISCLAIMED SHALL BE LIMITED IN DURATION TO A TERM OF ONE YEAR FROM THE DATE OF
ORIGINAL RETAIL PURCHASE.
Some states do not allow the exclusion or limitation of incidental or consequential damages or limitation on how long an implied warranty
lasts, so the above limitations and exclusions may not apply to you.
This warranty gives you specific legal rights, and you may also have other rights which vary from state to state.
CI reserves the right to modify or discontinue, without prior notice to you, any model or style telescope.
If warranty problems arise, or if you need assistance in using your telescope contact:
Celestron International
Customer Service Department
2835 Columbia Street
Torrance, CA 90503
Tel. (310) 328-9560
Fax. (310) 212-5835
Monday-Friday 8AM-4PM PST
This warranty supersedes all other product warranties.
0698
NOTE:
This warranty is valid to U.S.A. and Canadian customers who have purchased this product from an Authorized CI
Dealer in the U.S.A. or Canada. Warranty outside the U.S.A. and Canada is valid only to customers who purchased
from a CI International Distributor or Authorized CI Dealer in the specific country and please contact them for
any warranty service.
Celestron International
2835 Columbia Street
Torrance, CA 90503
Tel: 310-328-9560
Fax: 310-212-5835
Web site: http://www.celestron.com
Copyright 1998 Celestron International
All right reserved
(Products or instructions may change
without notice or obligation).
Item #11055-INST
07-98
Price $10.00