1
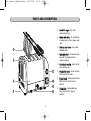
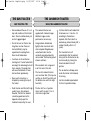
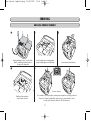
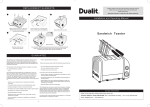
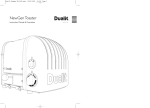
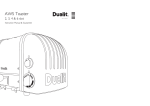
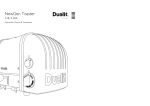
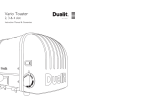
Bun toaster template.qxp
14/03/2007
10:08
Page 1
G U A R A N T E E
A N D
I N S T R U C T I O N S
F O R
THE
AND
DUALIT
SANDWICH
BUN
TOASTERS
Bun toaster template.qxp
14/03/2007
10:08
Page 2
Bun toaster template.qxp
14/03/2007
10:08
Page 3
CONTENTS
INTRODUCTION..............................
SAFETY PRECAUTIONS.....................
BOX CONTENTS..............................
BEFORE FIRST USE............................
PARTS & CONTROLS .......................
4/5
5
5
6
THE BUN TOASTER..........................
7/8
4
USING THE BUN TOASTER
BUN TOASTING TIPS
THE SANDWICH TOASTER...............
8/9
USING THE SANDWICH TOASTER
SANDWICH TOASTING TIPS
SERVICING....................................... 9 - 11
CLEANING & MAINTENANCE
GUARANTEE
REPLACING ELEMENTS
3
Bun toaster template.qxp
14/03/2007
10:08
Page 4
BUN & SANDWICH TOASTER
SAFETY PRECAUTIONS
INTRODUCTION
The perfect way to make toasted
sandwiches or buns. The Dualit
toaster range is compact, convenient
and specially designed for the job in
hand. Before using your Dualit
toaster for the first time please read
these instructions carefully so that
you obtain the best possible results.
IMPORTANT
SAFEGUARDS
PLEASE READ ALL THE
INSTRUCTIONS BEFORE
USING THE TOASTER
KEEP ALL INSTRUCTIONS
FOR FUTURE REFERENCE
•
WARNING: This appliance must
be earthed
•
We recommend that the toaster is
plugged into a socket that has no
other appliance connected to it.
Failure to do this may cause an
•
overload, trip a circuit breaker or
blow a fuse. Preferably the socket
outlet should be protected by a
Residual Current Device (RCD).
•
Before plugging in, check that the
voltage on the rating label is the
same as the mains supply.
•
To protect against electric shock,
do not Immerse any part of this
product inwater or other liquid.
•
•
•
•
Unplug from outlet when not in
use and before cleaning. Allow to
•
cool before putting on or taking
off parts.
4
Do not operate the appliance with
a damaged cord or plug. Do not
allow cable to touch hot surfaces,
or to hang over edge of a table or
counter top.
When in use a fire may occur if
the toaster is covered or touching
flammable material.
Bread may burn. Therefore
toasters must not be used near or
below curtains or other
combustible materials.
Do not attempt to dislodge bread
items when the toaster is plugged
in.
When toasting do not leave
appliance unattended.
This appliance is not intended for
use by young children or infirm
persons without supervision.
Bun toaster template.qxp
14/03/2007
SAFETY PRECAUTIONS
•
•
•
•
•
•
•
10:08
Page 5
BOX CONTENTS
Young children should be
Unpack the shipping container.
supervised to ensure that they do
Remove all visible packaging material.
not play with this appliance.
Before using the toaster, check the
Do not use outdoors.
following items are in the box:
Do not store in an appliance
• The toaster
garage.
• Crumb tray
With continuous use parts of the
• Recipe booklet (Sandwich
toaster may get hot.
toaster only)
NOTE: Any plug cut from power
supply cord should be disposed of • Sandwich cages. 2 with 2 slot
and 4 with 4 slot (sandwich
immediately. Inserting any cut off
toaster only)
Plug into a 13A socket-outlet is
hazardous.
• This manual - Keep safe for future
reference.
Never use the plug without the
fuse cover fitted. Ensure
If any damage is discovered or any of
replacement fuse is the same
the parts are missing contact the
current value as original.
place of purchase or Dualit customer
care line on 01293 652 500 for
Replacement fuses are available
further information.
from Dualit and should be ASTA
approved to BS 1362.
SAVE THESE
INSTRUCTIONS
5
BEFORE FIRST USE
Read this manual fully to get the best
out of your toaster.
CONDITIONING ELEMENTS
•
Your Dualit toaster has patented
ProHeat elements.
•
To condition the elements before
toasting for the first time, preheat
an empty toaster with all slots
turned on for three minutes.
Slight smoking may occur, this is
perfectly safe.
•
When the toaster is used there
may be a slight popping crinkling
sound, this is due to heat
expansion of the element surface
and is NOT a fault.
ADJUSTABLE FOOT
•
Your toaster is fitted with one
adjustable rear foot which may
be hand turned, to raise or lower
the toaster, to compensate for
uneven work surfaces.
Bun toaster template.qxp
14/03/2007
10:08
Page 6
PARTS AND DESCRIPTION
1. Sandwich cages (only with
sandwich toaster).
2. 28mm wide slots - Fit sandwiches
or large buns in these super wide
slots.
1
3. Stainless steel cover - easy clean
durable cover.
2
4. Adjustable foot - can be rasied or
lowered to compensate for
uneven surfaces.
5. Slot selector switch - select which
slots will heat up.
5
6
3
7
4
8
6
6. Mechanical timer - on/off control
with countdown timer.
7. Ejector knob - Manualy eject buns
from the slots (only on Bun
toaster).
8. Crumb tray - Removable easy
clean tray catches drips of
crumbs.
Bun toaster template.qxp
14/03/2007
10:08
Page 7
THE BUN TOASTER
USING THE BUN TOASTER
•
•
Select the number of slots to be
activated using the slot selector
switch. Lift the round black
Ejector Knob to the up position.
Starting from left to right, insert
buns into all slots brought into
operation by the selector switch.
Turn the Time Switch Knob clock
wise to the required number on
the dial.
•
•
After the toaster has warmed up,
reduce the toasting time to give
consistent results.
•
As soon as the Time Switch is
rotated the automatic timing will
start and the red neon light will
illuminate.
1.5 = Lightly browned toast
2.0 = Medium toast
2.5 = Well done toast.
When the toaster is cold and
being used for the first time set
the timer Knob to 2.5
because the metal body will
absorb some heat.
•
•
If using brown bread or other
items, cooking times may vary.
•
The Dualit toaster can
•
accommodate large buns upto
115mm diameter and 28mm
thick. However, if the bun
protrudes out of the top of the
•
toaster, you can turn the bun
upside down midway through the
toasting process.
•
Press down on the round Ejector
Knob and the bun will push up
ready for serving.
•
To reheat recently toasted buns
set timer to approx 1 setting.
•
To toast frozen buns increase
toasting time by 1 setting
CAUTION: Heating up a slot that has
not been loaded with bread may
damage the elements and cause
uneven toasting. Do not use the
toaster if the crumb tray or base plate
The timer will click off from 0.5 to are missing or are incorrectly fitted.
0 position with a clicking sound,
the neon light & elements will
switch off automatically.
The timer can be rotated off at
any time during the toasting
process by manually rotating the
timer knob to the 0 position.
The toasted item will not pop up,
but will keep warm inside the
toaster.
7
Bun toaster template.qxp
14/03/2007
10:08
Page 8
THE BUN TOASTER
THE SANDWICH TOASTER
BUN TOASTING TIPS
USING THE SANDWICH TOASTER
•
We recommend the use of 1 or 2 •
days old, medium or thick sliced
buns. Slices should be cleanly cut
and not ragged edged.
The sandwich toasters are
supplied with Sandwich cages.
Additional cages can be
purchased as an accessory.
•
Do not force in too thick or too
long items as when these are
toasted, difficulty may be
experienced in ejecting them.
Never insert broken buns.
Using medium sliced bread,
lightly butter one side of each
slice and place filling between
un-buttered sides. Use the
sandwich cage recipe book for
various ideas. Pre-sliced or grated
cheeses work best.
•
•
•
•
Insert buns in all switched on
toasting slots. If some heated slots
are empty the remaining slots will •
toast unevenly. The empty slots
will cause the elements to over
•
heat and burn prematurely.
Never use the toaster as a
hotplate by covering the top of
the toaster.
Dualit toasters are fitted with high •
quality, heavy duty elements.
However, the life of an element
cannot be guaranteed as this
depends entirely upon the
treatment received by the user.
•
Set timer dial for each loaded slot
to between no. 2.5 and no. 3.5
according to the darkness
required. After the toaster has
warmed up, reduce time by half a
number (Usually after 2 or 3
cycles).
•
The timer dial turns off
automatically after the selected
time cycle has finished or can be
reset manually by turning the
timer knob back to the off
position.
Place sandwich into a cage and
insert into one of the slots.
•
The two slot sandwich toaster
uses two timer dials. (The top one
switches on the left hand slot and
•
the bottom one switch the right
hand slot).
The four slot has a 3 position
rotary switch to select 1,2 or 4
slots and a single timer.
8
The sandwiches will keep warm
inside the toaster until removed
for serving.
See the included recipe booklet
for lots of inspirational ideas.
Bun toaster template.qxp
14/03/2007
10:08
Page 9
SANDWICH TOASTER
SERVICING
SANDWICH TOASTING TIPS
CLEANING AND MAINTENANCE
unplug the toaster when not in use.
•
Always lightly butter the OUTER
sides of the sandwich as this will
make the filling hotter.
•
We recommend the use of 1 or 2
day old bread. Slices should be
cleanly cut & not ragged edged.
•
Very thinly sliced bread may
produce uneven toasting.
•
Do not force in thick slices of
bread as you may experience
difficulty in ejecting them. Never
insert broken pieces of bread.
•
If heated slots are left empty the
adjacent slots will toast unevenly.
Cleaning and maintaining your
toaster on a regular basis will keep it
shining and prolong the life of your
machine.
•
IMPORTANT: Always unplug the
toaster and allow to cool down
before performing any cleaning.
•
Remove crumb tray & clean daily.
•
Crumbs should be carefully
brushed off the elements (using
only a soft brush), the toaster
turned upside down and shaken
out.
•
Never insert a fork or other sharp
instrument to remove torn pieces
of bread as the heating elements
may be damaged.
CAUTION: Heating up slots that have
not been loaded with bread may
damage the elements and will cause
•
uneven toasting. Do not use the
toaster if the crumb tray or base
plate are missing or are incorrectly
fitted and never cover the top of the
toaster or use as a hot plate. Always
Use a microfiber or damp cloth to
wipe off the outside surfaces of
the toaster. Do not use any
cleaner on the end castings, wipe
9
and dry.
•
A stainless steel polish can
be used to restore shine but
this must not an aggressive
cleaner or contain ammonia and
should only be used on the
stainless steel cover.
•
This appliance must not be
immersed in water or cleaned
with a water jet.
•
Sandwich cages are dishwasher
safe or can be washed in warm
soapy water. Do not use abrasive
cleaners.
•
Empty the crumb tray on a daily
basis, do not allow crumbs to
build up.
Bun toaster template.qxp
14/03/2007
10:08
Page 10
SERVICING
GUARANTEE
In the unlikely event of the toaster
failing within 2 year or your
heating elements within 5 years from
date of purchase, Dualit will repair or
replace it free of charge, provided:
•
you have not misused, neglected
or damaged the part;
•
the appliance has not been
modified;
•
a receipt is supplied showing
where and when the toaster
was purchased.
REPLACING PROHEAT ELEMENTS
Spares for your Dualit toasters are
available by mail order, call us on
01293 652 500 for more details.
•
Servicing must only be carried
out by Dualit authorised service
agent or a competent electrician.
•
For your own protection only use
original Dualit spares in your
toaster.
•
This guarantee does not affect the
purchaser’s statutory rights.
Further advice on using your Dualit
toaster, or other products in the
Dualit range, is available from:
Dualit customer care line on
+44(0)1293 652 500
Alternatively e-mail Dualit on
[email protected] or www.dualit.com
•
•
When replacing Pro Heat
elements, only use genuine Dualit
•
elements (stamped "DUALIT") the
safety and the performance of the
toaster cannot be guaranteed if
inferior elements are used. Fitting
of non Dualit parts will also
invalidate the guarantee.
•
A. Disconnect toaster from mains.
•
B. Remove the crumb tray.
•
C. Unscrew feet and remove base
•
D. Loosen the two nuts and slide
back element retaining strip.
10
•
E. Note the position of the
connecting links and wires, then
unscrew nuts which secure them
to the broken element, bend back
the connecting links, pull out the
old element and slide in the new
element. Fasten connecting links
back to their original position by
tightening the nuts.
F. Slide back element retaining
strip and tighten nuts.
G. Make sure that you have the
high wattage elements marked
'CENTRE" or low wattage
elements marked "END". Different
toasters have different element
configurations, if you are unsure
please call the dualit helpline on
01263 652 500
H. Refit base plate, feet and
crumb tray.
Bun toaster template.qxp
14/03/2007
10:08
Page 11
SERVICING
REPLACING PROHEAT ELEMENTS
1
2
6M
M
3
6MM
Unplug and place toaster on a soft cloth.
Remove crumb tray and unscrew feet
to remove the base plate
4
Loosen locking nuts on retaining plate
using a 6.5mm spanner and slide back
5
Unscrew brass links and wires.
DUALIT
2-END
Remove element.
Bend brass links and wires
away from the element
To re-assemble, reverse procedure ensuring wires and parts are correctly positioned.
Ensure new element is marked the same as the one removed and is seated
correctly in the channels either side. PAT test before use.
11
Bun toaster template.qxp
14/03/2007
10:08
Page 12
DUALIT LIMITED COUNTY OAK WAY CRAWLEY WEST SUSSEX RH11 7ST
T E L E P H O N E : + 4 4 ( 0 ) 1293 652 500 F A C S I M I L E : + 4 4 ( 0 ) 1 2 9 3 6 5 2 5 5 5
EMAIL: [email protected] WEB: www.dualit.com
02/07