1
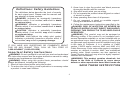
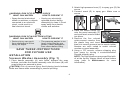
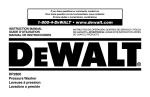
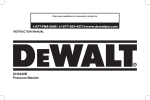
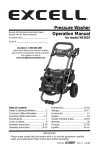
If you have questions or comments, contact us.
Pour toute question ou tout commentaire, nous contacter.
Si tiene dudas o comentarios, contáctenos.
1-800-4-DEWALT • www.dewalt.com
INSTRUCTION MANUAL
GUIDE D'UTILISATION
MANUAL DE INSTRUCCIONES
DP3750
Pressure Washer
Laveuse à pression
Lavadora a presión
INSTRUCTIVO DE OPERACIÓN, CENTROS DE SERVICIO Y PÓLIZA
DE GARANTÍA. ADVERTENCIA: LÉASE ESTE INSTRUCTIVO ANTES
DE USAR EL PRODUCTO.
FIG. 1
English
DP3750 PRESSURE WASHER
C
P
I. Engine dipstick/oil plug
J. High-pressure pump
K. Engine
L. Choke control
M. Starter grip
N. Fuel valve lever
O. Engine switch
P. Gas cap
Q. Throttle control lever
A. Handle assemble
B. Frame
C. High-pressure hose
D. Spray gun
E. Quick-connect
spray wand
F. Panel assembly
G. Nozzle holder
H. High-pressure pump
dipstick/oil plug
F
G
D
A
K
Q
H
L
N
M
E
J
ENGINE
Refer to the engine instruction manual for location
and operation of other engine controls.
O
B
Pump Specifications
I
GENERAL TX1510G
Oil: Use DP70
Oil Capacity: 14 oz. (414 ml)
Specifications
MODEL
WEIGHT
HEIGHT
WIDTH
LENGTH
PSI MAX*
OPERATING
PSI
GPM MAX*
OPERATING
GPM
ENGINE
DP3750
135 lbs
29"
24"
40"
3750
3375
4.0
3.6
Honda 13 Hp
GX390
* Water flow and maximum pressure ratings determined in accordance with PWMA standard PW101.
2
Definitions: Safety Guidelines
The definitions below describe the level of severity
for each signal word. Please read the manual and
pay attention to these symbols.
DANGER: Indicates an imminently hazardous
situation which, if not avoided, will result in death
or serious injury.
WARNING: Indicates a potentially hazardous
situation which, if not avoided, could result in death
or serious injury.
CAUTION: Indicates a potentially hazardous
situation which, if not avoided, may result in minor
or moderate injury.
CAUTION: Used without the safety alert symbol
indicates a potentially hazardous situation which, if
not avoided, may result in property damage.
IF YOU HAVE ANY QUESTIONS OR COMMENTS ABOUT
THIS OR ANY DEWALT TOOL, CALL US TOLL FREE AT:
1-800-4-DEWALT (1-800-433-9258)
Important Safety Instructions
WARNING: Do not operate this unit until you read and understand
this instruction manual and the engine instruction manual for safety,
operation and maintenance instructions.
WARNING: When using this product basic precautions should
always be followed, including the following:
1. Read all instructions before using the product.
2. To reduce the risk of injury, close supervision is necessary when
a product is used near children.
SAVE THESE INSTRUCTIONS
3
English
3. Know how to stop the product and bleed pressures quickly. Be
thoroughly familiar with the controls.
4. Stay alert–watch what you are doing.
5. Do not operate the product when fatigued or under the influence
of alcohol or drugs.
6. Keep operating area clear of all persons.
7. Do not overreach or stand on unstable support. Keep good
footing and balance at all times.
8. Follow the maintenance instructions specified in the manual.
DANGER: RISK OF INJECTION OR SEVERE INJURY. KEEP
CLEAR OF NOZZLE. DO NOT DIRECT DISCHARGE STREAM AT
PERSONS. THIS PRODUCT IS TO BE USED ONLY BY TRAINED
OPERATORS.
WARNING: This product may not be equipped with a sparkarresting muffler. If the product is not equipped and will be used
around flammable materials or on land covered with materials such
as agricultural crops, forest, brush, grass or other similar items, then
an approved spark arrester must be installed and is legally required
in the state of California. It is a violation of California statutes
section 130050 and/or sections 4442 and 4443 of the California
Public Resources Code, unless the engine is equipped with a spark
arrester, as defined in section 4442, and maintained in effective
working order. Spark arresters are also required on some U.S.
Forest Service land and may also be legally required under other
statutes and ordinances.
WARNING: This product contains chemicals, including lead,
known to the State of California to cause cancer, and birth
defects or other reproductive harm. Wash hands after handling.
English
• Muffler exhaust heat can
damage painted surfaces,
melt any material sensitive
to heat (such as siding,
plastic, rubber, vinyl or the
pressure hose, itself), and
damage live plants.
DANGER: RISK OF EXPLOSION OR FIRE
WHAT CAN HAPPEN
HOW TO PREVENT IT
• Shut off engine and allow
• Spilled gasoline and it’s
it to cool before adding fuel
vapors can become ignited
to the tank.
from cigarette sparks,
electrical arcing, exhaust
• Use care in filling tank to
gases and hot engine
avoid spilling fuel. Move prescomponents such as
sure washer away
the muffler.
from fueling area before
starting engine.
• Heat will expand fuel in the
tank which could result in
spillage and possible fire
explosion.
• Keep maximum fuel level
1/2" (12.7 mm) below
bottom of filler neck
to allow for expansion.
• Operating the pressure
washer in an explosive
environment could
result in a fire.
• Operate and fuel equipment
in well-ventilated areas free
from obstructions. Equip
areas with fire extinguisher
suitable for gasoline fires.
• Materials placed against or
near the pressure washer
can interfere with its proper
ventilation features causing
overheating and possible
ignition of the materials.
• Never operate pressure
washer in an area containing
dry brush or weeds.
• Always keep pressure washer
a minimum of 4' (1.2 m) away
from surfaces (such as
houses, automobiles or
live plants) that could be
damaged from muffler
exhaust heat.
• Improperly stored fuel could • Store fuel in an OSHAlead to accidental ignition.
approved container, in a
Fuel improperly secured
secure location away from
could get into the hands of
work area.
children or other unqualified
persons.
• Do not spray flammable
• Use of acids, toxic or
liquids.
corrosive chemicals,
poisons, insecticides, or any
kind of flammable solvent
with this product could result
in serious injury or death.
DANGER: RISK TO BREATHING (ASPHYXIATION)
WHAT CAN HAPPEN
HOW TO PREVENT IT
• Breathing exhaust fumes
• Operate pressure washer in
will cause serious injury
a well-ventilated area. Avoid
or death! Engine exhaust
enclosed areas such as
contains carbon monoxide,
garages, basements, etc.
an odorless and deadly gas. • Never operate unit in a
location occupied by
humans or animals.
4
RISK TO BREATHING (ASPHYXIATION) CONTINUED
• Use only cleaning fluids
specifically recommended
for high-pressure washers.
Follow manufacturers
recommendations. Do not
use chlorine bleach or any
other corrosive compound.
DANGER: RISK OF FLUID INJECTION AND LACERATION
WHAT CAN HAPPEN
• Injuries can result if system
pressure is not reduced
before attempting
maintenance or
disassembly.
HOW TO PREVENT IT
• Your pressure washer
• Inspect the high-pressure
operates at fluid pressures
hose regularly. Replace
and velocities high enough to
the hose immediately if it is
penetrate human and
damaged, worn, has melted
animal flesh, which could
from contacting the engine,
result in amputation or
or shows any signs of cracks,
other serious injury. Leaks
bubbles, pinholes, or other
caused by loose fittings or
leakage. Never grasp a
worn or damaged hoses can
high-pressure hose that
result in injection injuries.
is leaking or damaged.
DO NOT TREAT FLUID
• Never touch, grasp or attempt
INJECTION AS
to cover a pinhole or similar
A SIMPLE CUT! See a
water leak on the highphysician immediately!
pressure hose. The stream
of water IS under high
pressure and WILL
penetrate skin.
• Never place hands in front
of nozzle.
5
• To relieve system pressure,
shut off engine, turn off water
supply and pull gun trigger
until water stops flowing.
• Use only accessories rated
equal to or higher than the
rating of the pressure washer.
English
• Some cleaning fluids
contain substances which
could cause injury to skin,
eyes or lungs.
• Direct spray away from self
and others.
• Make sure hose and fittings
are tightened and in good
condition. Never hold onto
the hose or fittings during
operation.
• Do not allow hose to contact
muffler.
• Never attach or remove wand
or hose fittings while system
is pressurized.
English
DANGER: RISK OF INJURY FROM SPRAY
WHAT CAN HAPPEN
HOW TO PREVENT IT
• High-velocity fluid spray
• Always wear ANSI-approved
can cause objects to break,
Z87.1 safety glasses. Wear
propelling particles at high
protective clothing to protect
speed.
against accidental spraying.
• Never point wand at or spray
people or animals.
• Light or unsecured objects
can become hazardous
projectiles.
DANGER: RISK OF UNSAFE OPERATION
• Always secure trigger lock
when wand is not in service
to prevent accidental
operation.
• Never permanently secure
trigger in pull-back (open)
position.
6
WHAT CAN HAPPEN
HOW TO PREVENT IT
• Unsafe operation of your
pressure washer could lead
to serious injury or death to
you or others.
• Do not use chlorine
bleach or any other
corrosive compound.
• Become familiar with the
operation and controls of
the pressure washer.
• Keep operating area clear
of all persons, pets and
obstacles.
• Do not operate the product
when fatigued or under the
influence of alcohol or drugs.
Stay alert at all times.
• Never defeat the safety
features of this product.
• Do not operate machine
with missing, broken or
unauthorized parts.
• Never leave wand
unattended while unit
is running.
• If engine does not start after
two pulls, squeeze trigger
of gun to relieve pump
pressure. Pull starter cord
slowly until resistance is felt.
Then pull cord rapidly to
avoid kickback and prevent
hand or arm injury.
• The spray gun/wand is
a powerful cleaning tool
that could look like a toy
to a child.
• Keep children away from the
pressure washer at all times.
• Reactive force of spray
will cause gun/wand to
kickback, and could cause
the operator to slip or fall
or misdirect the spray.
Improper control of gun/
wand can result in
injuries to self and
others.
• Do not overreach or stand
on an unstable support.
• Do not use pressure washer
while standing on a ladder.
• Grip gun/wand firmly with
both hands. Expect the
gun to kickback when
triggered.
DANGER: RISK OF INJURY OR PROPERTY DAMAGE WHEN
TRANSPORTING OR STORING
WHAT CAN HAPPEN
• Fuel or oil can leak or spill
and could result in fire or
breathing hazard. Serious
injury or death can result.
Fuel or oil leaks will damage
carpet, paint or other
surfaces in vehicles
or trailers.
7
HOW TO PREVENT IT
• If pressure washer is
equipped with a fuel shut-off
valve, turn the valve to the
OFF position before transporting to avoid fuel leaks. If pressure washer is not equipped
with a fuel shut-off valve, drain
the fuel from tank before transporting. Only transport fuel in
an OSHA-approved container.
Always place pressure washer
on a protective mat when
transporting to protect against
damage to vehicle from leaks.
Remove pressure washer
from vehicle immediately upon
arrival at your destination.
English
• If proper starting procedure
is not followed, engine can
kickback causing serious
hand and arm injury.
English
WARNING: RISK OF BURSTING
WHAT CAN HAPPEN
• Over inflation of tires could
result in serious injury and
property damage.
WARNING: RISK OF HOT SURFACES
HOW TO PREVENT IT
• Use a tire pressure gauge
to check the tires pressure
before each use and while
inflating tires; see the tire sidewall for the correct tire pressure.
NOTE: Air tanks,
compressors and similar
equipment used to inflate
tires can fill small tires similar
to these very rapidly. Adjust
pressure regulator on air
supply to no more than the
rating of the tire pressure.
Add air in small increments
and frequently use the tire
gauge to prevent over
inflation.
WHAT CAN HAPPEN
HOW TO PREVENT IT
• Contact with hot surfaces,
such as engines exhaust
components, could result in
serious burn.
• During operation, touch
only the control surfaces
of the pressure washer.
Keep children away from
the pressure washer at all
times. They may not be able
to recognize the hazards of
this product.
WARNING: RISK OF CHEMICAL BURN
WHAT CAN HAPPEN
HOW TO PREVENT IT
• Use of acids, toxic or
• Do not use acids, gasoline,
corrosive chemicals, poisons,
kerosene, or any other
insecticides, or any kind of
flammable materials in this
flammable solvent with this
product. Use only household
product could result in seridetergents, cleaners and
ous injury or death.
degreasers recommended
for use in pressure washers.
• Wear protective clothing
to protect eyes and skin
from contact with sprayed
materials.
8
WARNING: RISK OF ELECTRICAL SHOCK
WHAT CAN HAPPEN
HOW TO PREVENT IT
• Unplug any electrically
• Spray directed at electrical
outlets or switches, or objects
operated product before
connected to an electrical
attempting to clean it. Direct
circuit, could result in a
spray away from electric
fatal electrical shock.
outlets and switches.
4. Place the nozzle holder (G)
onto the panel assembly (F)
and push each nozzle holder
into place.
5. Remove the five colored
quick-connect nozzles from
the plastic bag and insert
them into correct grommet on the nozzle holder.
Nozzles are color coded to match colored
nozzles on panel assembly.
6. Using a 7/8" wrench, remove shipping plug
from pump by turning it counterclockwise.
Discard shipping plug.
NOTE: The high-pressure pump was filled with
oil at the factory. Always check oil level before
using (refer to Maintenance for more
information).
WARNING: RISK OF INJURY FROM LIFTING
WHAT CAN HAPPEN
HOW TO PREVENT IT
• Serious injury can result
• The pressure washer is too
from attempting to lift too
heavy to be lifted by one
heavy an object.
person. Obtain assistance
from others before lifting.
SAVE THESE INSTRUCTIONS
FOR FUTURE USE
INSTALLATION
Pressure Washer Assembly (Fig. 1)
1. Place handle assembly (A) onto frame, depress the snap
buttons, and slide the handle assembly onto the frame (B) until
snap buttons are secured in place.
CAUTION: Risk of personal injury. Avoid placing hands between
handle and frame when assembling to prevent pinching.
9
English
2. Attach high-pressure hose (C) to spray gun (D). Make sure it is
secure.
3. Connect wand (E) to spray gun. Make sure connection is
secure.
English
7. Remove dipstick/oil plug (H) from plastic bag and
install into pump, tighten securely.
H
NOTE: The shipping plug must be removed and
replaced with the dipstick/oil plug before operating pressure washer.
WARNING: Risk of bursting. Use a tire pressure
gauge to check the tires pressure before each use and while inflating
tires; see the tire sidewall for the correct tire pressure.
NOTE: Air tanks, compressors and similar equipment used to
inflate tires can fill small tires similar to these very rapidly. Adjust
pressure regulator on air supply to no more than the rating of the
tire pressure. Add air in small increments and frequently use the
tire gauge to prevent over inflation.
Spray Wand Nozzles (Fig. 1)
The nozzles for the spray wand are stored in the nozzle holder (G) on
the panel assembly (F). Colors on the panel identify nozzle location
and spray pattern. Refer to the following chart to choose the correct
nozzle for the job to be performed.
Nozzle Color
Spray Pattern
powerful
pinpoint for
very intense
cleaning
metal or
concrete;
DO NOT use
on wood
15˚
intense
cleaning of
small areas
metal, concrete
or wood
25˚
intense
cleaning of
larger areas
metal, concrete
or wood
40˚
covers wide
areas of
cleaning
metal, concrete,
wood or vinyl
low pressure
applies cleaning metal, concrete,
solutions
wood or vinyl
Yellow
The pressure setting is preset at the factory to achieve optimum pressure and cleaning. To lower the pressure, follow these instructions.
1. Back away from the surface to be cleaned. The further away you
are, the less the pressure will be on the surface to be cleaned.
2. Change to the 40˚ nozzle (white). This nozzle delivers a less
powerful stream of water and a wider spray pattern. Refer to
Spray Wand Nozzles.
3. Adjust the pressure regulator on the
pump. Turn the pressure regulator knob (R)
R
counterclockwise to lower pressure. Once
you have finished using your pressure washer, return the pressure regulator to its original position by turning it clockwise.
CAUTION: Do not try to turn pressure regulator knob past the built-in stop or damage to the
pump will result.
Green
White
Black
10
Surfaces*
0˚
Red
OPERATION
Pressure Adjustments
Uses
CHANGING NOZZLES ON SPRAY WAND
DANGER: Risk of fluid injection. Do not direct discharge stream
toward persons, unprotected skin, eyes or any pets or animals.
Serious injury will occur.
WARNING: Flying objects could cause risk of serious injury. DO
NOT attempt to change nozzles while pressure washer is running.
Turn engine off before changing nozzles.
1. Pull quick-connect coupler back and insert
nozzle.
2. Release quick-connect coupler and
twist nozzle to make sure it is secure in
coupler.
WARNING: Flying object could cause risk
of serious injury. Ensure nozzle is completely
inserted in quick-connect socket and quickconnect snap ring is fully engaged (forward)
before squeezing gun trigger.
Starting
WARNING: To reduce the risk of injury, read the pressure washer
instruction manual and the engine instruction manual before starting
pressure washer.
DANGER: Risk of fluid injection and laceration. When using the highpressure setting, DO NOT allow the high-pressure spray to come in
contact with unprotected skin, eyes, or with any pets or animals. Serious
injury will occur.
• Your washer operates at fluid pressures and velocities high
enough to penetrate human and animal flesh, which could result
in amputation or other serious injury. Leaks caused by loose fittings or worn or damaged hoses can result in injection injuries.
DO NOT TREAT FLUID INJECTION AS A SIMPLE CUT! See a
physician immediately!
Chemicals and Cleaning Solvents
Applying chemicals or cleaning solvents is a low-pressure operation.
NOTE: Use only soaps and chemicals designed for pressure washer
use. Do not use bleach.
11
English
TO APPLY CHEMICALS AND SOLVENTS
1. Press chemical hose (S) onto barbed
S
fitting located near high pressure hose
connection of pump as shown.
2. Place the other end of chemical hose
with filter on it into the container holding
chemical/cleaning solution.
NOTE: For every 7 gallons of water
pumped 1 gallon of chemical/cleaning solution will be used.
3. Install low-pressure (black) nozzle into quick connect fitting of spray
wand, refer Spray Wand Nozzles.
4. After use of chemicals, place chemical hose into container of clean
water and draw clean water through chemical injection system
to rinse system thoroughly. If chemicals remain in the pump it
could be damaged. Pumps damaged due to chemicals will not be
covered under warranty.
NOTE: Chemicals and soaps will not siphon when spray wand is in the
high-pressure setting.
* CAUTION: The high-pressure spray from your pressure washer
is capable of causing damage to surfaces such as wood, glass,
automobile paint, auto striping and trim, delicate objects such
as flowers and shrubs. Before spraying, check the item to
be cleaned to assure yourself that it is strong enough to resist
damage from the force of spray.
English
2. Check engine oil level. Refer to the engine instruction manual for
correct procedure.
3. Connect the water hose to the water source. Turn the water source
on to remove all air from the hose. When a steady stream of water
is present, turn the water source off.
4. Verify the filter screen (U) is in water inlet of pump.
The cone side faces out.
5. Connect the cold water source (V) to pump inlet.
NOTE: Water source must provide a minimum of
U
5 gallons per minute at 20 PSI.
6. Connect high-pressure hose (C) to pump
C
outlet.
7. If applying a chemical or cleaning solution,
refer to Chemicals and Cleaning
Solvents.
8. Turn the water source on.
CAUTION: Risk of property damage. Failure
V
to do so could cause damage to the pump.
9. Remove all air from the pump and high pressure hose by depressing trigger until a steady stream of water is present.
10. Start engine. Refer to the engine instruction manual for correct
procedure.
WARNING: Risk of unsafe operation. If engine does not start
after two pulls, squeeze trigger of gun to relieve pump pressure. Pull
starter cord slowly until resistance is felt. Then pull cord rapidly to
avoid kickback and prevent hand or arm injury.
11. Depress trigger on gun to start water flow.
WARNING: Risk of unsafe operation. Stand on a stable
surface and grip gun/wand firmly with both hands. Expect the gun to
kickback when triggered.
12. Release trigger to stop water flow.
WARNING: Risk of fire, asphyxiation and burning. NEVER fill fuel
tank when engine is running or hot. Do not smoke when filling fuel tank.
• NEVER fill fuel tank completely. Fill tank to 1/2" (12.7 mm) below
bottom of filler neck to provide space for fuel expansion. Wipe any
fuel spillage from engine and equipment before starting engine.
• NEVER run engine indoors or in enclosed, poorly ventilated
areas. Engine exhaust contains carbon monoxide, an odorless
and deadly gas.
• DO NOT let hoses come in contact with very hot engine
muffler during or immediately after use of your pressure
washer. Damage to hoses from contact with hot engine
surfaces will NOT be covered by warranty.
CAUTION: NEVER pull water supply hose to move pressure washer.
This could damage hose and/or pump inlet.
• DO NOT use hot water, use cold water only.
• NEVER turn water supply off while pressure washer engine is
running or damage to pump will result.
• DO NOT stop spraying water for more than two
T
minutes at a time. Pump operates in bypass
mode when spray gun trigger is not pressed.
When the temperature inside the pump rises
too high the thermal relief valve (T) will open
and release a gush of water in an effort to lower
the temperature inside the pump. The thermal
relief valve will then close. If pump is left in bypass mode for
more than two minutes internal components of the pump can
be damaged.
START-UP PROCEDURE
1. In a well-ventilated outdoor area, add fresh, high-quality, unleaded
gasoline with a pump octane rating of 86 or higher. Do not overfill.
Wipe up spilled fuel before starting the engine. Refer to engine
instruction manual for correct procedure.
12
If the pressure washer is used in unusual conditions, such as high
temperatures or dusty conditions, more frequent maintenance
checks will be required.
W
Engine
Consult the engine instruction manual for the manufacturer's recommendations for any and all maintenance.
NOTE: The pressure washer frame is equipped with an oil drain
hole to help make changing the engine oil easier.
Shutting Down
1. If chemicals were applied, place the chemical hose into a
container of clean water and draw clean water through chemical
injection system to rinse system thoroughly.
CAUTION: Risk of property damage Failure to do so could cause
damage to the pump.
2. Turn engine off. Refer to the engine instruction manual.
CAUTION: Risk of property damage. NEVER turn water supply off
while pressure washer engine is running or damage to pump will
result.
3. Turn water source off.
4. Pull trigger on spray gun to relieve any water pressure in hose or
spray gun.
5. Refer to Storage for proper storage procedures.
Pump
NOTE: The pump was filled with oil at the factory.
1. Change pump oil after the first 10 hours of operation and every
250 hours thereafter.
TO CHECK OIL
1. The oil level should come to the dot in the middle of the sight
glass (X).
HOW TO CHANGE
H
PUMP OIL
1. Loosen pump dipstick/oil
plug (H).
X
2. Place a container under
the oil drain plug (Y).
3. Remove pump oil drain
plug.
Y
4. After oil is drained, replace
oil drain plug. Tighten securely.
5. Remove pump dipstick/oil plug and fill with 14 oz. (414 ml) of
DP70 pump oil. If DP70 is not available use 30W non-detergent
oil.
6. Replace pump dipstick/oil plug and tighten securely.
MAINTENANCE
WARNING: Risk of burning. When performing maintenance, you
may be exposed to hot surfaces, water pressure or moving parts that
can cause serious injury or death.
WARNING: Risk of fire. Always disconnect, spark plug wire, let the
engine cool and release all water pressure before performing any
maintenance or repair. The engine contains flammable fuel. Do not
smoke or work near open flames while performing maintenance.
To ensure efficient operation and longer life of your pressure washer,
a routine maintenance schedule should be prepared and followed.
13
English
DANGER: Risk of injury from spray. Engage the
trigger lock (W) when gun is not in use to prevent
accidental spraying.
13. Adjust spray for the task being performed by
changing quick connect nozzle. Refer to Spray
Wand Nozzles.
3. Reinsert filter into water inlet of pump. Cone
side faces out.
NOTE: Do not operate pressure washer without
filter properly installed.
English
Nozzle Cleaning
If the nozzle becomes clogged with foreign materials, such as dirt,
excessive pressure may develop. If the nozzle becomes partially
clogged or restricted, the pump pressure will pulsate. Clean the
nozzle immediately using the nozzle kit supplied and the following
instructions:
1. Shut off the pressure washer and turn off the water supply.
2. Pull trigger on gun handle to relieve any water pressure.
3. Disconnect the spray wand from the gun.
Z
4. Remove the high-pressure nozzle from
the spray wand. Remove any obstructions
with the nozzle cleaning tool (Z) provided
and back flush with clean water.
5. Direct water supply into spray wand to
back flush loosened particles for 30
seconds.
6. Reassemble the nozzle to the wand.
7. Reconnect spray wand to gun then turn on water supply.
8. Start pressure washer and place spray wand into high pressure
setting to test.
U
To Remove Tires
1. Using a 1/8" hex head wrench loosen set
screw in hub collar.
2. Slide hub collar from axle and remove the
tire.
STORAGE
Engine
Consult the engine instruction manual for the manufacturer's
recommendations for storage.
Pump
The manufacturer recommends using a pump protector/winterizer,
such as DP80 when storing the unit for more than 30 days and/or
when freezing temperatures are expected. DP80 is availabe at the
store where the pressure washer was purchased. If a pump protector/
winterizer is not available, RV antifreeze or windshield washer fluid
needs to be run through the pump as outlined in the steps below.
NOTE: Using a pump protector/ winterizer, RV antifreeze or windshield washer fluid is to provide proper lubrication to the internal
seals of the pump regardless of temperature or environment.
1. Obtain a funnel, 6 oz. of RV antifreeze or windshield washer
fluid, and 16–36" of garden hose with a male hose connector
attached to one end.
To Clean the Water Inlet Filter
This filter screen (U) should be checked periodically and cleaned if
necessary.
1. Remove the filter screen (U) by grasping the
end and removing it from water inlet of
U
pump.
2. Clean filter by flushing it with water on both
sides.
14
CAUTION: Risk of property damage. Use only RV antifreeze. Any
other antifreeze is corrosive and can damage pump.
2. Disconnect spark plug wire.
3. Connect length of garden hose to water inlet of pump.
4. Add RV antifreeze or windshield
washer fluid to hose as shown.
5. Pull engine starter rope slowly
several times until antifreeze/
washer fluid comes out of highpressure hose connection of
pump.
6. Remove garden hose from
water inlet of pump.
7. Reconnect spark plug wire.
ACCESSORIES
SERVICE INFORMATION
Please have the following information available for all service calls:
Model Number ____________ Serial Number ___________
Date and Place of Purchase ____________________________
Pressure Washer
Repairs
1. Drain all water from highpressure hose, coil it and store it
in cradle of the pressure washer
handle.
2. With nozzle pointed down and
the spray gun and wand in a
vertical position, squeeze trigger
to drain all water from spray gun
and wand. Store in gun holder.
3. Store chemical hose so it is protected from damage.
4. If space is needed, handles may be removed and attached as
shown.
CAUTION: Risk of personal injury. Avoid placing hands between
handle and frame when assembling to prevent pinching.
To assure product SAFETY and RELIABILITY, repairs, maintenance
and adjustment should be performed by a DEWALT factory service
center, a DEWALT authorized service center or other qualified
service personnel. Always use identical replacement parts.
Limited Warranty
DEWALT pressure washers are warranted for one year from the
date of purchase. DEWALT will repair, without charge, any defects
due to faulty materials or workmanship. For further detail of
warranty coverage and warranty repair information, visit
www.dewalt.com or call 1-800-4-DEWALT (1-800-433-9258). This
warranty does not apply to accessories or damage caused where
repairs have been made or attempted by others. This warranty gives
you specific legal rights and you may have other rights which vary in
certain states or provinces. The product’s engine is covered by the
engine manufacturer’s warranty.
15
English
Recommended accessories for use with your tool are available for
purchase from your local dealer or authorized service center. If you
need assistance in locating any accessory for your tool, please contact DEWALT Industrial Tool Co., 701 East Joppa Road, Baltimore,
MD 21286, call 1-800-4-DEWALT (1-800-433-9258) or visit our website www.dewalt.com.
CAUTION: The use of any other accessory not recommended for
use with this tool could be hazardous. Use only accessories rated
equal to or higher than the rating of the pressure washer.
English
LATIN AMERICA: This warranty does not apply to products sold in
Latin America. For products sold in Latin America, see country specific warranty information contained either in the packaging, call the
local company or see website for warranty information.
RECONDITIONED PRODUCT: Reconditioned product is covered
under the 1 Year Free Service Warranty. The 90 Day Money Back
Guarantee and the Three Year Limited Warranty do not apply to
reconditioned product.
FREE WARNING LABEL REPLACEMENT: If your warning labels
become illegible or are missing, call 1-800-4-DEWALT for a free
replacement.
16
Glossary
Chemical hose: Feeds cleaning agents into the pump to mix with the water. Refer to Chemicals
and Cleaning Solvents.
Chemical injection system: Mixes cleaners or cleaning solvents with water to improve cleaning
effectiveness.
Choke control: Opens and closes carburetor choke valve.
CU: Cleaning Units. GPM multiplied by PSI. (GPM x PSI = CU)
Fuel valve lever: Opens/closes connection between fuel tank and carburetor.
GPM: Gallons Per Minute. The unit of measure for the flow rate of water.
PSI: Pounds per Square Inch. The unit of measure for water pressure. Also used for air pressure,
hydraulic pressure, etc.
Quick-connect spray wand: Allows the user to quickly change out high-pressure nozzles. Refer
to Spray Wand Nozzles.
Thermal relief valve: When the temperature inside the pump rises too high the valve will open and
release a gush of water in an effort to lower the temperature inside the pump. The valve will
then close.
Water supply: All pressure washers must have a source of water. The minimum requirements for a
water supply are 20 PSI and 5 gallons per minute.
17
English
Bypass mode: Allows water to re-circulate within pump when the gun trigger is not pulled.
English
Troubleshooting Guide
This section provides a list of the more frequently encountered malfunctions, their causes and corrective actions. The
operator or maintenance personnel can perform some corrective actions, and others may require the assistance of a
qualified DEWALT technician or your dealer.
Problem
Code
Engine will not start ......................................................................................................1, 2, 3, 4, 5, 6, 7, 8
(refer to the engine's instruction manual for further engine troubleshooting)
No or low pressure (initial use) .....................................................................................9, 10, 11, 12, 13, 14, 15, 16
Will not draw chemicals .................................................................................................16, 17, 18, 19, 20, 21
No or low pressure (after period of normal use)...........................................................22, 23, 24
Water leaking at gun/spray wand connection ...............................................................25, 26
Water leaking at pump ..................................................................................................25, 26, 27, 28
Oil leaking at pump........................................................................................................29, 30, 31, 32, 33, 34, 35
Pump Pulsates ..............................................................................................................12
18
Troubleshooting Codes
CODE
POSSIBLE SOLUTION
No fuel.
Add fuel.
2
Low oil.
Add required amount of oil.
3
Pressure builds up after two pulls on the recoil starter or after
initial use.
Squeeze gun trigger to relieve pressure.
4
Choke lever in the NO CHOKE position.
Move choke to the CHOKE position.
5
Spark plug wire not attached.
Attach spark plug wire.
6
Engine ON/OFF switch in OFF position.
Place engine ON/OFF switch in ON position.
7
Choke lever in the CHOKE position on a hot engine or an engine
that has been exposed to thermal heat for a long period of time.
Move choke to the NO CHOKE position.
8
Fuel valve closed.
Move the fuel valve lever to the OPEN position.
9
Spray wand not in high pressure.
See Spray Wand Nozzles under Operation.
10
Low water supply.
Water supply must be at least 5 GPM @ 20 PSI.
11
Leak at high-pressure hose fitting.
Repair leak. Apply sealant tape if necessary.
12
Nozzle obstructed.
See Nozzle Cleaning under Maintenance.
13
Water filter screen clogged.
Remove and clean filter.
14
Air in hose.
Turn off the engine, then the water source. Disconnect the
water source from the pump inlet and turn the water source
on to remove all air from the hose. When there is a steady
stream of water present, turn water source off. Reconnect
water source to pump inlet and turn on water source. Squeeze
trigger to remove remaining air.
15
Choke lever in the CHOKE position.
Move choke to the NO CHOKE position.
16
High-pressure hose is too long.
Use high-pressure hose under 100 feet (30.48 m). Lengthen water
supply hose instead of high-pressure hose.
19
English
POSSIBLE CAUSE
1
(Troubleshooting Codes cont.)
English
CODE
POSSIBLE CAUSE
POSSIBLE SOLUTION
17
Spray wand not in low pressure.
See Spray Wand Nozzles under Operation.
18
Chemical filter clogged.
Clean filter.
19
Chemical screen not in cleaning solution.
Make sure end of chemical hose is fully submerged into cleaning
solution.
20
Chemical too thick.
Dilute chemical. Chemical should be the same consistency as water.
21
Worn seal or packing.
Have parts cleaned or replaced by authorized service center.
22
Chemical build up in chemical injector.
Have replaced by an authorized service center.
23
Worn or obstructed valves.
Have replaced by authorized service center.
24
Worn unloader piston.
Have replaced by authorized service center.
25
Worn or broken o-ring.
Check and replace.
26
Loose hose connection.
Tighten.
27
Piston packings worn.
Have replaced by authorized service center.
28
Pump head or tubes damaged from freezing.
Have replaced by authorized service center.
29
Oil seals worn.
Have replaced by authorized service center
30
Loose drain plug.
Tighten.
31
Worn drain plug o-ring
Check and replace.
32
Worn fill plug o-ring.
Check and replace.
33
Pump overfilled.
Check for correct amount.
34
Incorrect oil used.
Drain and fill with correct amount and type of oil.
35
Vent plug is clogged.
Clean vent plug; blow air through it to remove any blockage. If
problem persists, replace plug.
20
CÓDIGO
CAUSA POSIBLE
SOLUCIÓN POSIBLE
33
Bomba llena en exceso.
Verifique la cantidad correcta.
34
Aceite incorrecto.
Drene y llene con la cantidad y el tipo correctos de aceite.
35
Tapón de goma obstruido.
Limpie el orificio de ventilación. Elimine la obstrucción con presión
de aire. Si el problema persiste, cambie el tapón.
Español
63
DEWALT Industrial Tool Co., 701 Joppa Road, Baltimore, MD 21286
Copyright © 2005 DEWALT
DP3750
Form No. A13885
(NOV05)
The following are trademarks for one or more DEWALT power tools: the yellow and black color scheme; the “D” shaped air intake grill; the
array of pyramids on the handgrip; the kit box configuration; and the array of lozenge-shaped humps on the surface of the tool.