1
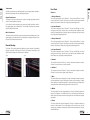
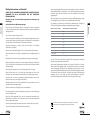
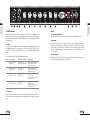
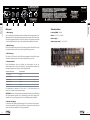
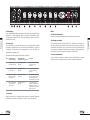
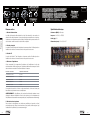
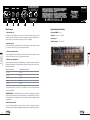
Owner’s Manual HAND-CRAFTED TONE 1 Designed and Engineered by Blackstar Amplification UK IMPORTANT SAFETY INSTRUCTIONS 1. Read these instructions. USA / Canada 2. Keep these instructions. 3. Heed all warnings. 4. Follow all instructions. 5. Do not use this apparatus near water. 6. Clean only with dry cloth. 7. Do not block any ventilation openings. 8. Install in accordance with the manufacturer’s instructions. 9. Do not install near any heat sources such as radiators, heat registers, stoves, or other apparatus (including amplifiers) that produce heat. 10. Do not defeat the safety purpose of the polarized or grounding-type plug. A polarized plug has two blades with one wider than the other. A grounding type plug has two blades and a third grounding prong. The wide blade or the third prong are provided for your safety. If the provided plug does not fit into your outlet, consult an electrician for replacement of the obsolete outlet. 11. Protect the power cord from being walked on or pinched particularly at plugs, convenience receptacles, and the point where they exit from the apparatus. 12. Only use attachments/accessories specified by the manufacturer. 13. Unplug this apparatus during lightning storms or when unused for long periods of time. 14. Refer all servicing to qualified service personnel. Servicing is required when the apparatus has been damaged in any way, such as the power-supply cord or plug is damaged, liquid has been spilled or objects have fallen into the apparatus, the apparatus has been exposed to rain or moisture, does not operate normally, or has been dropped. “TO COMPLETELY DISCONNECT THIS APPARATUS FROM THE AC MAINS, DISCONNECT THE POWER SUPPLY CORD PLUG FROM THE AC RECEPTACLE”. “WARNING: TO REDUCE THE RISK OF FIRE OR ELECTRIC SHOCK, DO NOT EXPOSE THIS APPARATUS TO RAIN OR MOISTURE AND OBJECTS FILLED WITH LIQUIDS, SUCH AS VASES, SHOULD NOT BE PLACED ON THIS APPARATUS”. This symbol is intended to alert the user to the presence of important operation and maintenance (servicing) instructions in the literature accompanying the appliance. This symbol is intended to alert the user to the presence of uninsulated “dangerous voltage” within the product’s enclosure that may be of sufficient magnitude to constitute a risk of electric shock to persons. 3 Warning! If the product does not operate normally, when the operating instructions are followed, then refer the product to a qualified service engineer. English READ THE FOLLOWING INFORMATION INSTRUCTIONS FOR FUTURE REFERENCE! CAREFULLY. SAVE English Important safety information! ALL Follow all warnings and instructions marked on the product! The U.S. Government´s Occupational Safety and Health Administration (OSHA) has specified the following permissible noise level exposures: Duration Per Day In Hours Sound Level dBA, Slow Response 8 90 6 92 4 95 3 97 2 100 1½ 102 Unauthorised modification of this equipment is expressly forbidden by Blackstar Amplification Ltd. 1 105 ½ 110 Never push objects of any kind into ventilation slots on the equipment casing. ¼ or less 115 Danger! High internal operating voltages Do not open the equipment case. There are no user serviceable parts in this equipment. Refer all servicing to qualified service personnel. Clean only with a dry cloth. Condensation can form on the inside of an amplifier if it is moved from a cold environment to a warmer location. Before switching the unit on, it is recommended that the unit be allowed to reach room temperature. Do not expose this apparatus to rain, liquids or moisture of any type. Follow all warnings and instructions marked on the product! Do not place this product on an unstable trolley, stand or table. The product may fall, causing serious damage to the product or to persons! Do not cover or block ventilation slots or openings. This product should not be placed near a source of heat such as a stove, radiator, or another heat producing amplifier. Use only the supplied power cord which is compatible with the mains voltage supply in your area. According to OSHA, any exposure in excess of the above permissible limits could result in some hearing loss. Ear plug protectors in the ear canals or over the ears must be worn when operating this amplification system in order to prevent a permanent hearing loss if exposure is in excess of the limits as set forth above. To ensure against potentially dangerous exposure to high sound pressure levels, it is recommended that all persons exposed to equipment capable of producing high sound pressure levels such as this amplification system be protected by hearing protectors while this unit is in operation. Power supply cords should always be handled carefully and should be replaced if damaged in any way. Never break off the earth (ground) pin on the power supply cord. The power supply cord should be unplugged when the unit is to be unused for long periods of time. Before the unit is switched on, the loudspeaker should be connected as described in the handbook using the lead recommended by the manufacturer. Always replace damaged fuses with the correct rating and type. Never disconnect the protective mains earth connection. High loudspeaker levels can cause permanent hearing damage. You should therefore avoid the direct vicinity of loudspeakers operating at high levels. Wear hearing protection if continuously exposed to high levels. 4 All electrical and electronic products should be disposed of separately from the municipal waste stream via designated collection facilities appointed by the government or the local authorities. 5 English Technical Information Thank you for purchasing this Blackstar Artisan 100 handwired head. Power Amplifier The Artisan 100 is the result of countless hours of painstaking Research and Development by our world class design team. Based in Northampton (UK), the Blackstar team are all experienced musicians themselves and the sole aim of the development process is to provide guitarists with products which are the ultimate tools for self expression. The Artisan 100 power amplifier uses four EL34 power pentode valves in Class AB bias. The EL34s used are graded in terms of quiescent operating point and transconductance giving excellent hum performance and dynamic feel. Realising the skills and expertise of over thirty years of valve guitar amplifier design experience, the Artisan 100 represents a new level in handwired design, tone and build quality. All Blackstar products are subject to extensive laboratory and road testing to ensure they are truly uncompromising in terms of reliability, quality and above all TONE! The Voice control is unique in the way it alters the power amplifier damping and gain in conjunction with the preamplifier tone response, giving an unparalleled degree of flexibility. In keeping with classic 100W designs the power supply rectification is based on silicon diodes, giving increased reliability at this higher power rating. This form of rectification yields a punchy and extremely dynamic response. If you like what you hear and want to find out more about the Blackstar range of products please visit our website at www.blackstaramps.com. With an amplifier that is built to last, reliability of the electronics circuitry is essential and therefore all the other power amplifier components are also over-specified for the best possible reliability. Thanks! Preamplifier The Blackstar Team Channel 1 Features The Artisan 100 is a truly unique and versatile amplifier. The classic EL34 / 100W design of this amplifier is deceptively simple in operation and yet highly flexible in functionality and tone. The traditional control layout is hugely enhanced by the addition of the unique Voice control. By altering both preamplifier and power amplifier characteristics, the 4-position Voice control will take the player on a journey through the evolution of classic guitar amplifier tone, from the earliest American designs through to the British amplifier invasion of the late ’60s. The Artisan Series of handwired amplifiers represents the absolute highest standard of craftsmanship and boutique tone. With the emphasis on simplicity and sonic purity, every feature has been refined to provide the artist with the widest range of reference vintage tones. This is achieved by the design of electronic circuits that work in harmony with the finest components and materials available. The Artisan 100 is built to last a lifetime and effortlessly combines vintage style and rugged, road tested reliability. The point-to-point tag board construction, welded steel chassis and finger-jointed birch-ply cabinet are complemented by beautiful vintage red Tolex and etched aluminium front panel. English Introduction Hi/Lo inputs provide perfect matching either directly to the guitar (high sensitivity) or for connection to higher output effects pedals (low sensitivity). This channel reflects classic American 100W designs. A more subtle treble emphasis keeps the shimmering brightness without the crunchiness of Channel 2. Channel 2 Hi/Lo inputs provide perfect matching either directly to the guitar (high sensitivity) or for connection to higher output effects pedals (low sensitivity). This channel is based on a classic ’60s British 100 Watt head. The preamplifier voicing has been carefully tuned to be bright, but not harsh. This is similar to amplifiers of this era with their Normal and Bright Channels blended. Equalisation The tone controls (Bass, Middle, Treble and Presence) are based on a classic American/British passive tone control network and are shared by both channels. The beauty of this type of network is its interactive operation which yields a very musical response. Voice Control The four way Voice control is unique in its operation. Rather than operating only as a preamplifier tone control shift, it also controls the power amplifier damping and gain. In this way it allows the amplifier to chart the evolution of 100W guitar amplifier design. The Voice control greatly increases the overall flexibility of the amplifier. Each of the Voice positions reflects the sonic signature of a different classic 100W design. In this way the Artisan 100 could be considered to be four highly refined amplifiers in one box. 6 7 English Front Panel All Artisan transformers are traditionally made from the highest grade materials to Blackstar’s demanding sonic and reliability specifications. Channel 1 1. Hi Input Channel I Output Transformers The design of the output transformers is critical to ensuring highly responsive feel and a full, natural frequency response. This is the high sensitivity input of Channel 1. This input has 6dB more (i.e. twice as much) gain as the Lo Input. Use this input if you wish to achieve power amplifier break-up and overdrive. Always use a high quality screened guitar lead. All the Artisan output transformers are constructed using laminations made of the highest grade, grain oriented steel. This minimises core losses and ensures optimum fidelity and dynamics. 2. Lo Input Channel I Mains Transformer The Artisan mains transformers are also constructed using laminations made of the highest grade, grain oriented steel. This minimises stray magnetic fields which can be a source of unwanted noise and hum. This is the low sensitivity input of Channel 1. This input has 6dB less (i.e. half as much) gain as the Hi Input. Use this input if you wish the power amplifier to remain clean (this is especially useful if the guitar used has high output pick-ups). Always use a high quality screened guitar lead. 3. Hi Input Channel II This is the high sensitivity input of Channel 2. This input has 6dB more (i.e. twice as much) gain as the Lo Input. Use this input if you wish to achieve power amplifier break-up and overdrive. Always use a high quality screened guitar lead. Channel Blending The Artisan 100’s topology allows the blending of the two channels. By paralleling the guitar connection to the inputs of Channel 1 and Channel 2 (see Figure 1 and Figure 2 below) endless tonal variations can be explored. Figure 1 English Transformers Figure 2 4. Lo Input Channel II This is the low sensitivity input of Channel 2. This input has 6dB less (i.e. half as much) gain as the Hi Input. Use this input if you wish the power amplifier to remain clean. Always use a high quality screened guitar lead. 5. Volume I This controls the volume of Channel 1, turning it clockwise increases the volume. Channel 1 is voiced to have a ‘normal’ response. 6. Volume II This controls the volume of Channel 2. Turning it clockwise increases the volume. Channel 2 is voiced to have a glassy ‘bright’ response. 7. Bass This control affects the low frequencies. Turning it clockwise increases the amount of bass present and the sound will become warmer and full sounding. At higher volume settings it is sometimes beneficial to reduce the setting of the bass control to keep the power amplifier sounding tight when it starts to crunch. 8. Middle This control affects the mid-range frequencies. Turning it clockwise increases the amount of mid present. If the middle control is at a low setting with the bass and treble controls set towards a maximum setting then the tone will be more scooped and modern. 9. Treble This control affects the high-end frequencies. Turning it clockwise increases the amount of treble present. At low treble setting the tone will be warm and full sounding. As the treble is increased notes will become more defined and ring with a bell-like definition. 8 9 I II English 0 I 1 2 10 0 10 0 10 0 10 0 2 3 4 10 0 10 VOLUME I VOLUME II BASS MIDDLE TREBLE VOICE PRESENCE 5 6 7 8 9 10 11 STANDBY POWER ON ON 13 14 English 1 II 3 4 10. Voice Master The 4-position Voice control operates as a preamplifier tone control shift, while also controlling the power amplifier damping and gain. In this way it allows the amplifier to follow the evolution of 100W guitar amplifier design. 12. Power Indicator Light The four modes are described in the table below. 13. Standby Mode ToneControlCharacter PowerAmplifierCharacter Description 1 Early ’50s American Amp Hi Damping / Lo Gain Bright and clean. The tone is like an early American amp 2 Late ’50s American Amp Hi Damping / Lo Gain Bright and clean. The tone is more full like a later American amp 3 Early ’60s British 100 Watt head Medium Damping / Medium Gain More power amp gain so the tone is more crunchy. The tone is like an early 100 Watt head 4 Late ’60s British 100 Watt head Lo Damping / Higher Gain Power amplifier gain is at a maximum so the amplifier is really crunchy. The tone is like a later 100 Watt head 12 The power indicator will light when the amplifier is switched on. This switch applies the H.T. (High Tension) voltage required to produce sound. Always turn this switch on at least 30 seconds after the Power switch (14) and off at least 30 seconds before the Power switch. During short breaks in playing use just this switch to turn ‘off’ and ‘on’ the amplifier’s output. 14. Power This switch is used to turn the amplifier on and off. You should always turn this switch on before turning on the Standby switch (13). 11. Presence This control operates on the power amplifier and adds higher frequencies that enable the guitar to ‘cut through’ at higher volumes. 10 11 English English 1 2 3 4 5 Rear Panel Technical Specification 1. Mains Input Power (RMS): 100 Watts The supplied detachable mains lead is connected here. The lead should only be connected to a power outlet that is compatible with the voltage, power and frequency requirements stated on the rear panel. If in doubt get advice from a qualified technician. Valves: 4 x EL34, 3 x ECC83 Weight (kg): 23 Dimensions (mm): 741 x 300 x 227 2. Mains Fuse The value of the Mains Fuse is specified on the rear panel. Never use a fuse of the incorrect value or attempt to bypass it. 3. H.T. Fuse The value of the H.T. Fuse is specified on the rear panel. Never use a fuse of the incorrect value or attempt to bypass it. 4. Impedance Selector This control matches the amplifier’s impedance to that of the connected speakers. Always ensure that the selected impedance matches that of the speaker cabinets connected. See table below. Cabinets Connected Impedance Selected 1 x 16 Ohm cabinet 16 Ohms 2 x 16 Ohm cabinets 8 Ohms 1 x 8 Ohm cabinet 8 Ohms 2 x 8 Ohm cabinets 4 Ohms 1 x 4 Ohm cabinet 4 Ohms A speaker cabinet of less than 4 Ohms, or 2 x 4 Ohm cabinets, should not be used together with this amplifier. WARNING: The amplifier must always be completely powered down before adjusting the setting of the Impedance Selector. Failure to do this, or to correctly match the impedance of the amplifier and speakers, will damage the amplifier. 5. Speaker Outputs There are two parallel speaker outputs for connecting external speaker cabinet(s). When connecting speakers always ensure that the Impedance Selector (4) is set correctly. 12 13 Wichtige Informationen zur Sicherheit! LESEN SIE DIE FOLGENDEN INFORMATIONEN SORGFÄLTIG DURCH. BEWAHREN SIE ALLE ANLEITUNGEN FÜR DIE ZUKÜNFTIGE BEZUGNAHME AUF Befolgen Sie alle auf dem Produkt ausgewiesenen Warnungen und Anleitungen! Öffnen Sie nicht das Gehäuse des Geräts. Es befinden sich keine vom Anwender zu wartende Teile in diesem Gerät. Überlassen Sie alle Servicearbeiten qualifiziertem Wartungspersonal. Wenn das Produkt nicht normal funktioniert, während die Betriebsanleitung befolgt wird, übergeben Sie das Produkt an einen qualifizierten Servicetechniker. Die Verwaltung zur Gesundheit und Sicherheit am Arbeitsplatz der US-Regierung (OSHA) hat die folgenden zulässigen Lärmpegelbelastungen festgelegt: Dauer pro Tag in Stunden Lärmpegel dBA, Langsame Reaktion 8 90 6 92 4 95 3 97 2 100 Unerlaubte Änderungen an diesem Gerät sind ausdrücklich von Blackstar Amplification Ltd verboten. 1½ 102 1 105 Stecken Sie niemals Objekte jeglicher Art in die Lüftungsschlitze des Gehäuses. ½ 110 Setzen Sie dieses Gerät nicht Regen, Flüssigkeiten oder Feuchtigkeit jeglicher Art aus. ¼ oder weniger 115 Befolgen Sie alle auf dem Produkt ausgewiesenen Warnungen und Anleitungen! Laut der OSHA kann jede Belastung oberhalb der oben genannten zulässigen Grenzwerte zu gewissen Hörverlusten führen. Nur mit einem trockenen Lappen reinigen Auf der Innenseite eines Verstärkers kann sich Kondensationsnässe bilden, wenn er von einer kalten Umgebung an einen wärmeren Ort bewegt wird. Es wird empfohlen, dass das Gerät vor dem Einschalten Zimmertemperatur erreicht. Platzieren Sie dieses Produkt nicht auf einem instabilen Rollwagen, Ständer oder Tisch. Das Produkt kann herunterfallen und dem Produkt oder Personen ernsthaften Schaden zufügen! Blockieren oder verdecken Sie nicht die Lüftungsschlitze oder -öffnungen. Dieses Produkt sollte nicht in der Nähe einer Wärmequelle wie einem Ofen, Heizkörper oder einem anderen Hitze entwickelnden Verstärker platziert werden. Verwenden Sie nur das zum Lieferumfang gehörende Netzkabel, das mit der Netzstromversorgung in Ihrer Region kompatibel ist. Deutsch Deutsch Gefahr! Hohe interne Betriebsspannungen Hohe Lautsprecherpegel können permanente Hörschäden verursachen. Sie sollten daher die direkte Nähe zu Lautsprechern, die auf hohen Pegeln betrieben werden, vermeiden. Tragen Sie einen Hörschutz, wenn Sie kontinuierlich hohen Pegeln ausgesetzt sind. Wenn dieses Verstärkersystem betrieben wird, müssen Ohrschützer im Ohrkanal oder über den Ohren getragen werden, um permanenten Hörverlust zu vermeiden, wenn die Belastung oberhalb der oben festgelegten Grenzwerte liegt. Um sich gegen potenziell gefährliche Belastungen durch hohe Schalldruckpegel zu schützen, wird empfohlen, dass alle Personen, die Geräten wie diesem Verstärkersystem ausgesetzt sind, die in der Lage sind, hohe Schalldruckpegel zu entwickeln, während des Betriebs dieses Geräts durch Ohrschützer geschützt werden. Netzkabel müssen stets mit Vorsicht gehandhabt und ersetzt werden, wenn sie in irgendeiner Weise beschädigt werden. Brechen Sie niemals den Erdungsstift (Erde) am Netzkabel ab. Das Netzkabel sollte aus der Steckdose gezogen werden, wenn das Gerät längere Zeit nicht verwendet wird. Bevor das Gerät eingeschaltet wird, muss der Lautsprecher entsprechend der Beschreibung im Handbuch unter Verwendung des vom Hersteller empfohlenen Kabels angeschlossen werden. Ersetzen Sie beschädigte Sicherungen stets mit der korrekten Spannung und Art. Alle Elektro- und Elektronik-Altgeräte müssen getrennt vom Hausmüll über dafür staatlich vorgesehenen Stelen entsorgt werden. Trennen Sie niemals die schützende Netz/Erde-Verbindung. 14 15 Einleitung Technische Informationen Vielen Dank, dass Sie sich zum Kauf dieses handverdrahteten Blackstar Artisan 100 Topteils entschieden haben. Endstufe Gestützt auf über dreißigjährige Fachkompetenz und Erfahrung im Röhrenverstärkerbau, erreicht das Artisan 100 Topteil ein neues Niveau für handverdrahtete Gitarrenverstärker betreffend Design, Klang und Fertigungsqualität. Alle Blackstar-Produkte werden umfangreichen Labor- und Praxistests unterzogen, um einen kompromisslos hohen Standard in punkto Verlässlichkeit, Qualität und vor allem SOUND zu gewährleisten! Wenn Ihnen gefällt was Sie hören und Sie weitere Informationen zur BlackstarProduktpalette wünschen, besuchen Sie uns bitte im Internet: www.blackstaramps. com. Vielen Dank! Das Blackstar-Team Features Der Artisan 100 ist ein ganz besonderer, vielseitiger Amp. Dieser Verstärker im klassischen EL34 / 100W Design ist erstaunlich einfach zu bedienen und dabei extrem flexibel in Funktionalität und Sound. Die traditionelle Anordnung der Bedienelemente wird enorm durch die einmalige Voice-Regelung aufgewertet. Durch Veränderung der Vorstufen- und Endstufencharakteristika begleitet sie den Nutzer auf eine Zeitreise zu den klassischen Gitarrenverstärker-Sounds, angefangen von den frühen amerikanischen Modellen bis hin zur britischen „Amp-Invasion“ Ende der 1960-er Jahre. Die handverdrahtete Artisan-Serie genügt absolut höchsten Maßstäben in Sachen handwerkliches Können und „Boutique“-Klang. Unter der Betonung von Einfachheit und akustischer Reinheit sind die einzelnen Features in einem Maß verfeinert worden, das dem Künstler ein maximales Spektrum an Referenz-Vintageklängen bietet. Dies wird durch eine Elektronikschaltung erreicht, die perfekt mit den edelsten zur Verfügung stehenden Komponenten und Materialien harmoniert. Der Artisan 100 hält ein Leben lang und vereint mühelos Vintage-Sounds mit Strapazierfähigkeit und praxiserprobter Zuverlässigkeit. Die Bauweise in Punktzu-Punkt-Verdrahtung, das geschweißte Stahlgehäuse und die keilgezinkte Box aus Birkensperrholz werden ergänzt durch einen wunderschönen Tolexbezug in Vintagerot und eine Frontplatte aus geätztem Aluminium. 16 Die Artisan 100 Endstufe nutzt vier EL34-Pentodenröhren in Class AB-Bias. Ruhestrom-Arbeitspunkt und Steilheit der verwendeten EL34 Röhren sind optimal auf eine Brummreduzierung und hervorragende Dynamik abgestimmt. Die Voice-Regelung ist insofern ganz speziell, als dass sie die Endstufendämpfung und -verstärkung zusammen mit dem Vorstufenklangbereich verändert und so ein unglaublich hohes Maß an Flexibilität bietet. Im Einklang mit den klassischen 100W Designs basiert die Gleichrichtung auf Siliziumdioden, die bei dieser höheren Leistung bessere Funktionssicherheit gewährleisten. Diese Form der Gleichrichtung sorgt für ein ausdrucksstarkes und extrem dynamisches Ansprechverhalten. Deutsch Deutsch Der Artisan 100 ist das Ergebnis zahlloser Stunden akribischer Forschungs- und Entwicklungsarbeit unserer erstklassigen Konstruktionsabteilung. Die Mitglieder des im britischen Northampton ansässigen Blackstar-Teams sind selbst erfahrene Musiker, die gemeinsam ein Ziel verfolgen: Gitarristen Produkte für die ultimativen Selbstverwirklichung in Sachen Sound zu bieten. Bei einem auf lange Lebensdauer ausgelegten Amp muss die Elektronikschaltung zuverlässig funktionieren und daher sind all die anderen Endstufenkomponenten im Interesse optimaler Ausfallsicherheit ebenfalls überdimensioniertt. Vorverstärker Kanal 1 Hi/Lo-Eingänge bieten eine perfekte Abstimmung, entweder direkt zur Gitarre (hohe Empfindlichkeit) oder für den Anschluss von leistungsstärkeren Effektpedalne (niedrige Empfindlichkeit). Dieser Kanal spiegelt das klassische amerikanische 100W-Design wider. Eine subtilere Betonung der Trebles wahrt die schimmernden Höhen ohne den Crunchsound von Kanal 2 zu spitz klingen zu lassen. Kanal 2 Hi/Lo-Eingänge bieten eine perfekte Abstimmung, entweder direkt zur Gitarre (hohe Empfindlichkeit) oder für den Anschluss von leistungsstärkeren Effektpedale (niedrige Empfindlichkeit). Dieser Kanal basiert auf den klassischen britischen 100-Watt-Tops der 60-er Jahre des 20. Jahrhunderts. Das Vorstufen-Voicing wurde sorgfältig auf klare jedoch nicht zu harsche Höhen abgestimmt. Dieses Klangverhalten ähnelt den Amps dieser Ära mit ihren gemischten Normal- und Bright-Kanälen. Klangregelung (EQ) Die Klangregelung – Bass, Mitten, Höhen (Trebles) und Presence – basiert auf einer amerikanisch/britisch passiven Klangregelungsschaltung und wird von beiden Kanälen gemeinsam genutzt. Der Vorteil dieser Art von Schaltung ist ihr interaktiver Betrieb mit höchst musikalischer Dynamik. Voice-Regelung Die 4-Stufen-Voiceregelung ist einzigartig in ihrer Bedienung. Denn sie funktioniert nicht lediglich als Vorverstärker-Klangregelungsumschalter, sondern regelt daneben auch Dämpfung und Gain der Endstufe. Damit erlaubt sie dem Verstärker, der Entwicklung des 100 W-Gitarrenverstärkerdesigns zu folgen. 17 Die Voiceregelung erweitert die Gesamtflexibilität des Verstärkers beträchtlich. Die einzelnen Voice-Stufen reflektieren das jeweils charakteristische akustische Merkmal verschiedener klassischer 100 W-Designs. Insofern verkörpert der Artisan 100 vier hochentwickelte Verstärker in einem Gehäuse. Frontplatte Transformatoren Dies ist der Eingang mit hoher Empfindlichkeit von Kanal 1. Dieser Eingang hat 6 dB mehr Gain als der Lo-Eingang (also doppelt soviel). Benutzen Sie diesen Eingang, wenn Sie eine Übersteuerung des Verstärkers wünschen. Verwenden Sie stets ein hochwertiges abgeschirmtes Gitarrenkabel. 2. Lo Input Kanal I Ausgangstransformator Das Design des Ausgangstrafos spielt für höchstes Ansprechverhalten und einen vollen, natürlichen Frequenzbereich eine wesentliche Rolle. Alle Artisan-Ausgangstrafos werden aus Kernblech auf der Basis von hochwertigstem kornorientiertem Stahl gefertigt. Dies minimiert Kernverluste und gewährleistet eine optimale Klangtreue und Dynamik. Netztransformator Artisan-Netztransformatoren werden ebenfalls aus Kernblech auf der Basis von hochwertigstem kornorientiertem Stahl gefertigt. Dies trägt zur Minimierung von Streumagnetfeldern bei, die zu unerwünschtem Rauschen und Brummen führen können. Kanalmischung Die Topologie des Artisan 100 ermöglicht die Mischung der beiden Kanäle. Durch den parallelen Anschluss der Gitarre zu den Eingängen von Kanal 1 und 2 (siehe Abb. 1 und Abb. 2 unten) kann mit zahllosen Tonvarianten experimentiert werden. Abb. 1 1. Hi Input Kanal I Abb. 2 Dies ist der Eingang mit geringer Empfindlichkeit von Kanal 1. Dieser Eingang hat 6 dB weniger Gain als der Hi-Eingang (also halb soviel). Benutzen Sie diesen Eingang, wenn der Sound klar bleiben soll (dies ist besonders hilfreich, wenn die Gitarre leistungsstarke Tonabnehmer hat). Verwenden Sie stets ein hochwertiges abgeschirmtes Gitarrenkabel. Deutsch Deutsch Alle Artisan-Transformatoren werden traditionell aus hochwertigsten Materialien nach den anspruchsvollen Vorgaben von Blackwell in Bezug auf Akustik und Funktionssicherheit gefertigt. Kanal 1 3. Hi Input Kanal II Dies ist der Eingang mit hoher Empfindlichkeit von Kanal 2. Dieser Eingang hat 6 dB mehr Gain als der Lo-Eingang (also doppelt soviel). Benutzen Sie diesen Eingang, wenn Sie einen verzerrten Sound wünschen. Verwenden Sie stets ein hochwertiges abgeschirmtes Gitarrenkabel. 4. Lo Input Kanal II Dies ist der Eingang mit geringer Empfindlichkeit von Kanal 2. Dieser Eingang hat 6 dB weniger Gain als der Hi-Eingang (also halb soviel). Benutzen Sie diesen Eingang, wenn der Sound klar bleiben soll (dies ist besonders hilfreich, wenn die Gitarre leistungsstarke Tonabnehmer hat). Verwenden Sie stets ein hochwertiges abgeschirmtes Gitarrenkabel. 5. Volume I Hiermit wird die Lautstärke von Kanal 1 geregelt, durch Drehen in Uhrzeigerrichtung erhöht sich die Lautstärke. Kanal 1 ist auf ‚normale‘ Ansprache ausgelegt. 6. Volume II Hiermit wird die Lautstärke von Kanal 2 geregelt, durch Drehen in Uhrzeigerrichtung erhöht sich die Lautstärke. Kanal 2 ist auf glasklare höhenbetonte Ansprache ausgelegt. 7. Bass (Tiefen) Dieser Regler steuert die niedrigen Frequenzen. Durch Drehen im Uhrzeigersinn wird der Tiefenanteil verstärkt und der Klang wird wärmer und voller. Bei höheren Lautstärken ist es zuweilen angebracht, die Bässe herunterzuregeln, damit die Endstufe beim Einsetzen von Crunch weiterhin definiert klingt. 8. Middle (Mitten) Hiermit werden die mittleren Frequenzbereiche gesteuert. Durch Drehen in Uhrzeigerrichtung verstärkt sich der Mittenanteil. Wenn der Mittenregler niedrig und Bass- und Trebleregler hoch eingestellt sind, erhält man einen modernen ‚scooped‘ Sound. 18 19 I II 1 0 I Deutsch 2 0 10 0 10 0 10 0 3 4 10 0 10 VOLUME I VOLUME II BASS MIDDLE TREBLE VOICE PRESENCE 5 6 7 8 9 10 11 STANDBY POWER ON ON 13 14 II 3 4 9. Treble (Höhen) Master Dieser Regler steuert die hohen Frequenzen. Durch Drehen in Uhrzeigerrichtung verstärkt sich der Höhenanteil. Niedrig eingestellte Höhen ergeben einen warmen, vollen Klang. Mit Aufdrehen der Höhen erhalten die Noten einen stärker definierten, glockigen Klang. 12. Netz-Kontrollleuchte 10. Voice Der 4-Stufen-Voice-Regler funktioniert als Vorverstärker-Klangregelungsumschalter und regelt daneben auch Dämpfung und Gain der Endstufe. Damit kann der Verstärker der Entwicklungsgeschichte des 100 W-Gitarrenverstärkerdesigns folgen. 12 Deutsch 1 10 2 Das Netzkontrolllicht beginnt zu leuchten, wenn der Amp eingeschaltet wird. 13. Standby Über diesen Regler wird die Hochspannung (HT) zur Klangerzeugung geliefert. Schalten Sie den Regler immer mindestens 30 Sekunden später an als den An/ Aus-Schalter (14) und mindestens 30 Sekunden eher aus als den An/Aus-Schalter. Bei kurzen Spielpausen nutzen Sie nur diesen Regler, um den Verstärker ‚aus‘ und ‚an‘ zu schalten. 14. Netzschalter Die vier Modi werden in folgender Tabelle beschrieben: Modus Soundcharakter Endstufen-Charakteristik Beschreibung 1 Amerikanischer Amp der frühen 50er Hohe Dämpfung / Geringer Gain (Verstärkung) Bright und Clean. Der Sound entspricht dem eines frühen amerikanischen Amps 2 Amerikanischer Amp der späten 50er Hohe Dämpfung / Geringer Gain Bright und Clean. Vollerer Klang, mehr wie ein späterer amerikanischer Amp 3 Britisches 100 WattTopteil der frühen 60er Mittlere Dämpfung / Mittlerer Gain Mehr Endstufen-Gain – Crunch-Sound. Klangsimulierung eines frühen 100 Watt-Topteils 4 Britisches 100 WattTopteil der späten 60er Geringere Dämpfung / Höherer Gain Maximaler Endstufen-Gain, also sehr crunchy. Klangsimulierung eines späten 100 Watt-Topteils Mit diesem Schalter wird der Amp ein- und ausgeschaltet. Schalten Sie ihn stets ein, ehe Sie den Standby-Regler (13) anschalten. 11. Presence Dieser Regler der Endstufe erweitert den höheren Frequenzbereich, sodass sich die Gitarre bei größeren Lautstärken im Frequenzspektrum einer Band durchsetzen kann. 20 21 2 3 4 5 Rückwand Technische Daten 1. Netzeingang Leistung (RMS): 100 Watt Das im Lieferumfang enthaltene abnehmbare Netzkabel wird hier angeschlossen. Das Netzkabel sollte nur an eine Netzsteckdose angeschlossen werden, die mit den auf der Rückwand angegebenen Werten für Spannung, Leistung und Frequenzen kompatibel ist. Im Zweifelsfall wenden Sie sich an einen entsprechend qualifizierten Fachmann. Röhren: 4 x EL34, 3 x ECC83 Deutsch Deutsch 1 Gewicht (kg): 23 Abmessungen (mm): 741 x 300 x 227 2. Netzsicherung Der Wert der Netzsicherung ist auf der Rückwand angegeben. Niemals Sicherungen mit falschem Wert benutzen, niemals eine Bypassschaltung versuchen. 3. HT-Sicherung Der Wert der HT-Sicherung ist auf der Rückwand angegeben. Niemals Sicherungen mit falschem Wert benutzen, niemals eine Bypassschaltung versuchen. 4. Impedanzwähler Dieses Bedienelement dient zum Abgleich der Amp-Impedanz mit der der angeschlossenen Box. Achten Sie stets darauf, dass die gewählte Impedanz der der angeschlossenen Box entspricht, siehe folgende Tabelle: Angeschlossene Boxen Impedanzwahl 1 x 16 Ohm Box 16 Ohm 2 x 16 Ohm Boxen 8 Ohm 1 x 8 Ohm Box 8 Ohm 2 x 8 Ohm Boxen 4 Ohm 1 x 4 Ohm Box 4 Ohm Eine Speakerbox mit weniger als 4 Ohm oder 2 x 4 Ohm Boxen sollten nicht zusammen mit diesem Amp verwendet werden. ACHTUNG: Der Amp muss stets vollkommen ausgeschaltet sein, ehe die Einstellung des Impedanzwählers geändert wird. Nichtbeachtung oder falscher Abgleich der Impedanz von Amp und Lautsprechern führt zur Beschädigung des Verstärkers. 5. Speaker-Ausgänge Es existieren zwei parallele Speakerausgänge für den Anschluss (einer) externen/ externer Lautsprecherbox(en). Beim Anschluss von Lautsprechern achten Sie stets darauf, dass der Impedanzwähler (4) richtig eingestellt ist. 22 23 Consignes de sécurité importantes ! LISEZ LES INFORMATIONS SUIVANTES ATTENTIVEMENT. CONSERVEZ TOUTES LES CONSIGNES POUR RÉFÉRENCE ULTÉRIEURE ! Respectez tous les avertissements et toutes les consignes figurant sur le produit ! Danger ! Hautes tensions internes. N’ouvrez pas le boîtier de l’appareil. Cet appareil ne possède aucune pièce sur laquelle l’utilisateur puisse intervenir. Confiez toutes les réparations à un réparateur qualifié. Nettoyez l’appareil avec un chiffon sec uniquement. La modification non autorisée de cet appareil est expressément interdite par Blackstar Amplification plc. N’introduisez jamais d’objets dans les fentes de ventilation du boîtier de l’appareil. N’exposez pas cet appareil à la pluie, à des liquides ni à aucune forme d’humidité. Si le produit ne fonctionne pas normalement alors que vous respectez la notice d’emploi, confiez-le à un réparateur qualifié. La loi américaine sur la santé et la sécurité du travail indique la durée d’exposition autorisée à différents niveaux sonores : Durée par jour en heures Niveau sonore (dBA), réponse lente 8 90 6 92 4 95 3 97 2 100 1½ 102 1 105 ½ 110 ¼ ou moins de 115 Français Français Il est possible que de la condensation se forme à l’intérieur d’un amplificateur s’il est transféré d’un environnement froid à un endroit plus chaud. Il est conseillé d’attendre que l’appareil ait atteint la température ambiante avant de l’allumer. À des niveaux élevés, le volume des enceintes peut causer des pertes auditives définitives. Par conséquent, évitez de rester à proximité des enceintes lorsque le volume est élevé. Portez des protecteurs d’oreilles en cas d’exposition continue à des niveaux sonores élevés. Respectez tous les avertissements et toutes les consignes figurant sur le produit ! Ne placez pas ce produit sur un chariot, un guéridon ou une table instable. Il pourrait tomber et ce faisant sérieusement s’endommager ou causer des blessures ! D’après cette loi, toute exposition d’une durée supérieure aux limites autorisées cidessus peut entraîner une perte auditive. Ne couvrez pas les fentes de ventilation ni les ouvertures et ne les obstruez pas non plus. Des protecteurs d’oreilles doivent être portés dans le canal auditif ou sur l’oreille lors de l’utilisation de ce système d’amplification afin d’éviter toute perte auditive permanente si l’exposition dépasse les limites susmentionnées. Afin d’éviter toute exposition potentiellement dangereuse à des niveaux de pression acoustique élevés, il est conseillé que toutes les personnes exposées à des appareils capables de produire des niveaux de pression acoustique élevés tels que ce système d’amplification utilisent des protecteurs d’oreilles lors de l’utilisation de l’appareil. Évitez de placer ce produit près d’une source de chaleur telle qu’un poêle, un radiateur ou un autre amplificateur produisant de la chaleur. Utilisez uniquement le cordon d’alimentation fourni car il est compatible avec la tension de l’alimentation générale de votre secteur. Manipulez toujours les cordons d’alimentation avec le plus grand soin. Remplacezles s’ils sont endommagés. Ne détachez jamais la prise de terre du cordon d’alimentation. Débranchez le cordon d’alimentation en cas d’inutilisation prolongée de l’appareil. Avant d’allumer l’appareil, branchez l’enceinte de la manière décrite dans la notice d’emploi à l’aide du cordon recommandé par le fabricant. Remplacez toujours les fusibles endommagés par des fusibles du type et du calibre appropriés. Ne débranchez jamais la connexion à la terre de protection. Les éléments électriques et électroniques doivent être jetés séparément, dans les vide-ordures prévus à cet effet par votre municipalité. 24 25 Introduction Informations techniques Merci d’avoir acheté cette tête d’ampli câblée main Artisan 100 de Blackstar. Amplificateur de puissance L’Artisan 100 est le fruit du travail acharné et soigné en Recherche et Développement de notre équipe de conception professionnelle. Installée à Northampton (R.-U.), l’équipe Blackstar est composée de musiciens expérimentés. Le seul et unique objectif du développement consiste à offrir aux guitaristes des produits qui leur permettront d’exprimer tout leur talent. L’amplificateur de puissance Artisan 100 utilise quatre pentodes EL34 en polarisation de Classe AB. Les EL34 utilisés sont classés en termes de point de repos et de transconductance, générant une excellente performance de ronflement et une sensation dynamique. Fruit des compétences et d’une expertise de plus de trente ans en conception d’amplificateurs de guitare à lampes, l’Artisan 100 représente un nouveau niveau de conception du câblage à la main, de la sonorité et de la qualité de construction. Tous les produits Blackstar sont soumis à de vastes essais en laboratoire et sur le terrain pour s’assurer de leur intransigeante en termes de fiabilité, de qualité et surtout de SONORITÉ ! Français Merci L’équipe Blackstar En conservant une conception 100W classique, la rectification de l’alimentation repose sur des diodes au silicium, ce qui renforce la fiabilité à cette puissance élevée. Cette forme de rectification engendre une réponse frappante et extrêmement dynamique. Avec un amplificateur conçu pour durer, la fiabilité des circuits électroniques est essentielle. Par conséquent, le reste des composants de l’amplificateur de puissance présentent également des spécifications supérieures à la moyenne pour assurer la meilleure fiabilité possible. Français Si vous appréciez cette proposition et que vous désirez obtenir des informations supplémentaires sur la gamme de produits Blackstar, veuillez visiter notre site Internet www.blackstaramps.com. Le contrôle de la voix est unique du fait qu’il modifie l’amortissement et le gain de l’amplificateur, conjointement à la réponse sonore du préamplificateur, apportant un niveau de flexibilité inégalé. Préamplificateur Canal 1 Caractéristiques Les entrées Hi/Lo s’adaptent parfaitement à une guitare (haute sensibilité) ou à des pédales d’effets de sortie plus importants (faible sensibilité). L’Artisan 100 est un amplificateur flexible réellement unique. La conception classique EL34 / 100W de cet amplificateur est d’une simplicité d’utilisation étonnante et bénéficie d’une haute flexibilité en matière de fonctionnalité et de sonorité. Ce canal reflète la conception 100W américaine classique. Une accentuation plus subtile des aigus maintient la clarté chatoyante sans craquement du Canal 2. La disposition traditionnelle des commandes est rehaussée par l’ajout d’une commande Voix unique. En modifiant les caractéristiques à la fois du préamplificateur et de l’amplificateur de puissance, la commande Voix à 4 positions transportera le guitariste dans un voyage sur l’évolution de la tonalité des amplificateurs, des tous premiers concepts américains à l’invasion britannique de la fin des années 60. Canal 2 La série d’amplificateurs câblés main Artisan représente le niveau de dextérité et de sonorité le plus élevé. En mettant l’accent sur la simplicité et la pureté sonore, chaque fonction a été affinée pour que l’artiste dispose de la gamme de sonorités de référence la plus vaste. Pour ce faire, les circuits électroniques sont conçus en harmonie avec les composants et les matériaux les plus élaborés. L’Artisan 100 est conçu pour durer toute une vie et associe sans effort un style classique à une fiabilité robuste et éprouvée sur le terrain. La construction du circuit point à point, le châssis soudé en acier et le caisson en contreplaqué fixé par aboutage sont rehaussés par un magnifique tolex rouge sophistiqué et un panneau avant en aluminium décapé. 26 Les entrées Hi/Lo s’adaptent parfaitement à une guitare (haute sensibilité) ou à des pédales d’effets de sortie plus importants (faible sensibilité). Ce canal s’appuie sur une tête d’ampli 100W britannique des années 60. L’harmonisation du préamplificateur a été réglée avec précaution pour être claire et non dure, ce qui est similaire aux amplificateurs de cette époque avec le mélange des canaux Normal et Clair. Egalisation Les commandes de tonalité (basse, intermédiaire, aigus et présence) s’appuient sur un réseau de contrôle américain/britannique de tonalité passive et sont partagées par les deux canaux. Son fonctionnement interactif qui génère une magnifique réponse musicale est la beauté de ce type de réseau. Commande Voix La commande Voix à quatre voies est unique de par son fonctionnement. Au lieu d’opérer uniquement comme un changement de contrôle de tonalité du préamplificateur, elle commande également l’amortissement et le gain de l’amplificateur de puissance. Ainsi, l’amplificateur peut suivre l’évolution des amplificateurs de guitares 100W. 27 La commande Voix augmente fortement la flexibilité globale de l’amplificateur. Chaque position Voix reflète la signature sonore d’une conception 100W classique et différente. Ainsi, l’Artisan 100 peut être considéré comme représentant quatre amplificateurs hautement perfectionnés. Panneau avant Transformateurs Il s’agit de l’entrée à haute sensibilité du Canal 1. Cette entrée a un gain de 6dB supérieurs à l’entrée Lo (à savoir deux fois plus). Utilisez cette entrée si vous désirez obtenir un bris de son et un overdrive de l’amplificateur de puissance. Utilisez toujours un câble de guitare blindé de haute qualité. Tous les transformateurs Artisan sont fabriqués traditionnellement avec les meilleurs matériaux qui sont conformes aux spécifications exigeantes de Blackstar en matière d’acoustique et de fiabilité. 1. Canal I Entrée Hi 2. Canal I Entrée Lo Transformateurs de sortie La conception des transformateurs de sortie est essentielle pour assurer une réactivité de haute qualité et une distorsion de fréquence totalement naturelle. Transformateur d’alimentation Les transformateurs d’alimentation Artisan sont également conçus avec des feuilles d’acier haut de gamme à grains orientés, ce qui minime les champs magnétiques rayonnés, sources de bruits et de ronflements gênants. Il s’agit de l’entrée à faible sensibilité du Canal 1. Cette entrée a un gain de 6dB inférieurs à l’entrée Hi (à savoir deux fois moins). Utilisez cette entrée si vous désirez que l’amplificateur de puissance reste clair (ce qui est particulièrement utile si la guitare utilisée est équipée de micros à niveau de sortie élevé). Utilisez toujours un câble de guitare blindé de haute qualité. 3. Canal II Entrée Hi Il s’agit de l’entrée à haute sensibilité du Canal 2. Cette entrée a un gain de 6dB supérieurs à l’entrée Lo (à savoir deux fois plus). Utilisez cette entrée si vous désirez obtenir un bris de son et un overdrive de l’amplificateur de puissance. Utilisez toujours un câble de guitare blindé de haute qualité. Français Tous les transformateurs de sortie Artisan sont conçus avec des feuilles d’acier haut de gamme à grains orientés, ce qui minimise les pertes totales et assure une fidélité et une dynamique optimales. Français Canal 1 4. Canal II Entrée Lo Mélange des canaux La topologie de l’Artisan 100 permet de mélanger les deux canaux. En branchant en parallèle la connexion de la guitare aux entrées du Canal 1 et du Canal 2 (voir Figures 1 et 2 ci-dessous), vous pouvez explorer des variations sonores sans fin. Figure 1 Figure 2 Il s’agit de l’entrée à faible sensibilité du Canal 2. Cette entrée a un gain de 6dB inférieurs à l’entrée Hi (à savoir deux fois moins). Utilisez cette entrée si vous désirez que l’amplificateur de puissance reste clair. Utilisez toujours un câble de guitare blindé de haute qualité. 5. Volume I Cette commande contrôle le volume du Canal 1. En sens horaire, le volume augmente. Le Canal 1 est réglé pour avoir une réponse « normale ». 6. Volume II Cette commande contrôle le volume du Canal 2. En sens horaire, le volume augmente. Le Canal 2 est réglé pour avoir une réponse « claire ». 7. Bass (graves) Cette commande affecte les basses fréquences. En sens horaire, la quantité de graves augmente, et le son devient plus chaleureux et plein. A un volume supérieur, il est parfois utile de réduire le réglage des graves pour conserver une tonalité serrée de l’amplificateur de puissance quand il commence à craquer. 8. Middle (moyenne) Cette commande affecte les fréquences moyennes. En sens horaire, la quantité d’intermédiaires augmente. Si la commande des intermédiaires est sur un réglage faible alors que la commande des graves et des aigus est sur un réglage maximum, alors la tonalité sera plus exclusive et moderne. 28 29 I II 1 0 I 2 0 10 0 10 0 10 0 3 4 10 0 10 VOLUME I VOLUME II BASS MIDDLE TREBLE VOICE PRESENCE 5 6 7 8 9 10 11 STANDBY POWER ON ON 13 14 II 3 4 12 9. Treble (aigus) Maître Cette commande affecte les hautes fréquences. En sens horaire, la quantité d’aigus augmente. A un faible réglage des aigus, la tonalité est chaleureuse et pleine. En augmentant les aigus, les notes sont mieux définies et résonnent comme le tintement d’une cloche. 12. Témoin d’alimentation 10. Voice (voix) Ce commutateur applique la haute tension (HT) nécessaire à la production du son. Activez toujours ce commutateur 30 secondes au moins après l’activation du commutateur d’alimentation (14) et 30 secondes au moins avant la désactivation du commutateur d’alimentation. Pendant les courtes pauses, utilisez simplement ce commutateur pour activer ou désactiver la sortie de l’amplificateur. La commande Voix à 4 positions fonctionne comme un changement de contrôle de tonalité du préamplificateur tout en contrôlant l’amortissement et le gain de l’amplificateur de puissance. Ainsi, l’amplificateur peut suivre l’évolution des amplificateurs de guitares 100W. Le témoin d’alimentation s’allume quand l’amplificateur est sous tension. 13. Standby (en attente) Les quatre modes sont décrits dans le tableau ci-dessous. 14. Power (alimentation) Mode Caractéristique du contrôledetonalité Caractéristique de l’amplificateurdepuissance Description Ce commutateur est utilisé pour allumer et éteindre l’amplificateur. Vous devez toujours activer ce commutateur avant d’activer le commutateur Standby (13). 1 Ampli américain du début des années 50 Amortissement élevé / gain faible Clair. Ce son est semblable aux premiers amplis américains 2 Ampli américain de la fin des années 50 Amortissement élevé / gain faible Clair. Ce son est plus plein comme un ancien ampli américain 3 Tête d’ampli 100 Watt britannique du début des années 60 Amortissement moyen / gain moyen Gain supérieur. Le son est donc plus craquant. Le son est semblable à une des premières têtes d’ampli 100W 4 Tête d’ampli 100 Watt britannique de la fin des années 60 Amortissement faible / gain élevé Le gain de l’ampli est au maximum. L’ampli est donc réellement craquant. Le son est semblable à une ancienne tête d’ampli 100W Français Français 1 10 2 11. Présence Cette commande joue sur l’amplificateur de puissance et ajoute des fréquences plus élevées qui permettent à la guitare de « creuser » à des volumes élevés. 30 31 2 3 4 5 Panneau arrière Spécification technique 1. Entrée d’alimentation Puissance (RMS) : 100 watts Le câble d’alimentation débrochable fourni doit être branché à cette entrée. Le câble doit être relié uniquement à une prise électrique compatible avec la tension, la puissance et la fréquence requises, telles qu’indiquées sur le panneau arrière. En cas de doute, veuillez consulter un technicien compétent. Lampes : 4 x EL34, 3 x ECC83 2. Fusible principal La valeur du fusible principal est indiquée sur le panneau arrière. N’utilisez jamais un fusible dont la valeur est incorrecte et ne tentez pas de le contourner. Poids (kg) : 23 Dimensions (mm) : 741 x 300 x 227 Français Français 1 3. Fusible HT La valeur du fusible HT est indiquée sur le panneau arrière. N’utilisez jamais un fusible dont la valeur est incorrecte et ne tentez pas de le contourner. 4. Sélecteur d’impédance Cette commande fait correspondre l’impédance de l’amplificateur à celle des enceintes reliées. Vérifiez toujours que l’impédance sélectionnée correspond à celle des enceintes connectées. Consultez le tableau ci-dessous. Enceintes connectées Impédance sélectionnée 1 enceinte de 16 ohms 16 ohms 2 enceintes de 16 ohms 8 ohms 1 enceinte de 8 ohms 8 ohms 2 enceintes de 8 ohms 4 ohms 1 enceinte de 4 ohms 4 ohms Une enceinte de moins de 4 ohms ou deux enceintes de 4 ohms ne doivent pas être utilisées conjointement avec cet amplificateur. AVERTISSEMENT : l’amplificateur doit toujours être désactivé totalement avant d’ajuster le sélecteur d’impédance. Dans le cas contraire ou si les impédances de l’amplificateur et des enceintes ne correspondent pas, l’amplificateur sera endommagé. 5. Sorties des haut-parleurs Deux sorties de haut-parleurs sont reliées en parallèle pour brancher un (des) enceinte(s) externe(s). Quand vous branchez un haut-parleur, vérifiez toujours que le sélecteur d’impédance (4) est correctement réglé. 32 33 ¡AVISO! Importante Información de seguridad LEA LAS SIGUIENTE INFORMACIÓN DETENIDAMENTE Y CONSERVE LAS INSTRUCCIONES PARA FUTURAS CONSULTAS. SIGA TODOS LOS AVISOS E INSTRUCCIONES MARCACADAS EN LOS PRODUCTOS. PELIGRO! Alto voltaje interno. NO ABRA LA TAPA DEL EQUIPO. NO HAY PARTES UTILIZABLES PARA OTROS FINES EN ESTE EQUIPO. REMITA CUALQUIER ANOMALÍA AL SERVICIO TÉCNICO CUALIFICADO. UTILICE TRAPOS SECOS PARA LIMPIAR. SE PUEDE FORMAR CONDENSACIÓN DENTRO DEL AMPLIFICADOR SI ESTE SE HA MOVIDO DE UN LUGAR FRIO A OTRO MÁS CALIDO. EN EL CASO DE QUE SE MOVIERA EL AMPLIFICADOR DE UN SITIO MÁS FRIO A OTRO MÁS CALIDO O A LA INVERSA, DEJE UN RATO EL AMPLIFICADOR SIN ENCENDER PARA QUE ESTE ALCANCE LA TEMPERATURA MEDIA DEL NUEVO LUGAR. DAÑADOS POR OTROS DE NUNCA DESCONECTE EL PROTECTOR DE LA TOMA DE TIERRA. LA POTENCIA DE SONIDO DE LOS ALTAVOCES CUANDO LOS NIVELES SON ALTOS PUEDEN CAUSAR UN DAÑO PERMANENTE. USTED DEBERÁ POR TANTO EVITAR LA EXPOSICIÓN DIRECTA A LOS ALTAVOCES CUANDO ESTOS ESTÉN OPERANDO A UN NIVEL ALTO. PONGASE PROTECTORES DE OIDOS SI DEBE DE ESTAR CONTINUAMENTE EXPUESTO. SI EL PRODUCTO NO FUNCIONARA UNA VEZ SEGUIDAS TODAS LAS INSTRUCCIONES, REMÍTALO AUN SERVICIO TÉCNICO CUALIFICADO. LA OFICINA AMERICANA DE PROTECCIÓN DE LA SALUD HA ESPECIFICADO LOS SIGUIENTES NIVELES ADMISIBLES DE EXPOSICIÓN DE RUIDO. 8 90 6 92 4 95 3 97 NO EXPONGA LOS EQUIPOS A LA LLUVIA, LIQUIDOS O HUMEDAD DE CUALQUIER TIPO. 2 100 1½ 102 SIGA TODOS LOS AVISOS E INSTRUCCIONES MARCADAS EN EL PRODUCTO. 1 105 NO PONGA LOS EQUIPOS EN CARRETILLAS INESTABLES O MESAS NORMALES. EL EQUIPO PUEDE CAER CAUSANDOSE SERIOS DAÑOS ASÍ COMO A PERSONAS. ½ 110 ¼ ó menos 115 NO CUBRA O BLOQUEE LOS AGUJEROS DE APERTURA Y VENTILACIÓN. CUALQUIER EXPOSICIÓN POR ENCIMA DE LOS LIMITES MENCIONADOS PUEDEN PROVOCAR PERDIDAS AUDITIVAS. ESTE PRODUCTO NO DEBE SER PUESTO CERCA DE UNA FUENTE DE CALOR COMO PUEDE SER UN RADIADOR, ESTUFA O CUALQUIER PRODUCTOR O AMPLIFICADOR DE CALOR. USE SOLO LA FUENTE DE ALIMENTACIÓN QUE SEA COMPATIBLE CON LOS VOLTAJES UTILIZADOS EN EL ARE EN DONDE ESTÉ. LA FUENTE DE ALIMENTACIÓN DEBE DE SER MANEJADA CON CUIDADO Y DEBE DE SER REMPLAZADA EN CASO DE CUALQUIER DAÑO. NUNCA ROMPA LA TOMA DE TIERRA SOBRE EL CABLE DE CORRIENTE. EL CABLE DE CORRIENTE DEBERÁ DE SER DESCONECTADO CUANDO LA UNIDAD NO VAYA A SER USADA DURANTE UN TIEMPO. Español NIVEL DE SONIDO DBA BAJA RESPUESTA NUNCA APOYE OBJETOS EN NINGUNO DE LOS AGUJEROS DE VENTILACIÓN LOCALIZADOS EN LAS TAPAS DEL EQUIPO. Español REEMPLAZE SIEMPRE LOS FUSIBLES CARACTERISTICAS IDENTICAS. DURACIÓN POR DIA Y HORAS LAS MODIFICACIONES NO AUTORIZADAS ESTÁN EXPRESAMENTE PROHIBIDAS POR BLACKSTAR AMPLIFICATIO LTD. 34 ANTES DE ENCENDER UN CABEZAL, LA PANTALLA DEBERA ESTAR CONECTADA COMO SE DESCRIBE EN EL LIBRO DE INSTRUCCIONES UTILIZANDO LOS CONDUCTORES RECOMENDADOS POR EL FABRICANTE. LOS TAPONES PROTECTORES DEBEN DE SER UTILIZADOS CUANDO SE OPERE ESTE SISTEMA DE AMPLIFICACIÓN PARA PREVENIR DE UNA PERMANENTE PERDIDA DE OIDO SI LA EXPOSICIÓN ES EXCESIVA O ESTÁ POR ENCIMA DE LOS LIMITES DESCRITOS ARRIBA. PARA PREVENIR CONTRA UNA EXPOSICIÓN PELIGROSA A ALTOS NIVELES DE SONIDO SE RECOMIENDA A TODAS LAS PERSONAS QUE PUEDAN ESTAR EXPUESTAS A NIVELES PRODUCIDOS POR UN SISTEMA DE AMPLIFICACIÓN COMO ESTE QUE PROTEJAN SUS OIDOS MIENTRAS LA UNIDAD ESTÁ EN FUNCIONAMIENTO. Todos los aparatos eléctricos o electrónicos se deben desechar de forma distinta del servicio municipal de recogida de basura, a través de puntos de recogida designados por el gobierno o las autoridades locales. 35 Introducción Información Técnica Gracias por adquirir este cabezal Blackstar Artisan 100 montado a mano. Etapa de potencia Artisan 100 es el resultado de incontables horas de cuidadosa investigación y desarrollo a cargo de nuestro equipo de diseño. Con base en Northampton (UK), El equipo de Blackstar está enteramente formado por músicos experimentados y el objetivo del proceso de desarrollo consiste en dotar a los guitarristas de productos que supongan lo último en herramientas para la expresión personal. El amplificador de potencia de Artisan 100 usa cuatro válvulas EL34 en clase AB. Las valvulas EL34 están graduadas en reposo ofreciedo de este modo un excelente equilibrio entre reuido “hum” y una respuesta dinámica. Materializando las habilidades y maestría adquiridos a lo largo de 30 años de experiencia en el diseño de amplificadores de guitarra a válvulas, Artisan 100 supone un nuevo nivel en diseño artesanal, sonido y calidad de construcción. Todos los productos Blackstar están sujetos a intensos test de laboratorio y en condiciones naturales para asegurar que son verdaderamente inflexibles en términos de fiabilidad, calidad y sobre todo SONIDO! Si te gusta lo que escuchas y quieres encontrar más información sobre los productos Blackstar visita nuestra página web www.blackstaramps.com. Gracias! El Equipo Blackstar El control Voice es único ya que altera la ganancia y el rendimiento del amplificador de potencia en conjunción con la respuesta tonal del preamplificador, ofreciendo un alto grado de flexibilidad. Basado en el diseño clásico de los amplificadores 100W, la rectificación de potencia está basada en diodos de silicona, aumentando la fiabilidad para este alto nivel de potencia. Esta forma de rectificación produce una respuesta extremadamente dinámica y con “punch”. En un amplificador construido teniendo en cuenta hasta el último detalle, la fiabilidad de los circuitos electrónicos es esencial y por lo tanto el resto de componentes del amplificador de potencia han sido igualmente seleccionados para obtener la mayor fiabilidad posible. Preamplificador Canal 1 Español Artisan 100 es un amplificador realmente único y versátil. El clásico diseño EL34/100W de este amplificador es muy sencillo de manejo pero muy flexible en funcionalidad y sonido. Alterando las características tanto del preamplificador como del amplificador de potencia, el control Voice de 4 posiciones llevará al músico en un viaje por la evolución de los sonidos clásicos de amplificador de guitarra, desde los primeros diseños americanos hasta la invasión de los amplificadores británicos de finales de los 60. La serie Artisan de amplificadores montados a mano supone el nivel más alto en sonido artesanal y de boutique. Con el énfasis puesto en la simplicidad y en la pureza del sonido, cada característica ha sido refinada para dotar al artista con la más amplia gama de sonidos vintage. Esto se logra mediante el diseño de circuitos electrónicos que trabajan en armonía con los mejores componentes y materiales del mercado. Artisan 100 está construido para durar toda una vida y combina sin esfuerzo el estilo vintage con una robustez probada en condiciones naturales de directo. Al panel ensamblado punto por punto, el chasis de acero soldado y la carcasa de capas de abedul se le suma un maravilloso tolex vintage de color rojo y un panel frontal de aluminio. Las entradas Hi/Lo permiten una respuesta perfecta tanto conectando directamente la guitarra (alta sensibilidad) como conectando a un pedal de efectos con alta salida (sensibilidad baja) Este canal emula los clásicos diseños 100W americanos. Un sutil énfasis en agudos proporciona un brillo sin el “crunch” del canal 2. Español Características Canal 2 Las entradas Hi/Lo permiten una respuesta perfecta tanto conectando directamente la guitarra (alta sensibilidad) como conectando a un pedal de efectos con alta salida (sensibilidad baja) Este canal se basa en un clásico cabezal 100W británico de los años 60. El preamplificador ha sido cuidadosamente ajustado para ser brillante sin ser áspero. Esto es similar a los amplificadores de aquella época con los canales Normal y Bright mezclados. Ecualización Los controles de tono (Bajos, Medios, Agudos y Presencia) están basados en un clásico diseño de control pasivo de tono americano/británico y son compartidos por ambos canales. La belleza de este tipo de diseño reside en su interactividad la cual produce una respuesta muy musical. Control Voice El control Voice con sus cuatro opciones es único en su forma de operar. Más que funcionar únicamente como un control de tono del preamplificador, opera también controlando el rendimiento del amplificador de potencia y la ganancia. En este 36 37 sentido permite rememorar la evolución de de los diseños de de los amplificadores de guitarra de 100W. El control Voice aumenta enormemente la gran flexibilidad de este amplificador. Cada una de las posiciones del control Voice refleja la identidad sonora de un clásico diseño 100W diferente. Desde este punto de vista se podría considerar al Artisan 100 como cuatro amplificadores altamente refinados en uno sólo. Transformadores Todos los transformadores Artisan están fabricados tradicionalmente con los mejores materiales siguiendo las especificaciones de Blackstar en cuanto a sonido y fiabilidad. Transformadores de salida El diseño de los transformadores de salida es crítico a la hora de asegurar una sensación de respuesta natural y óptima en todas las frecuencias. Todos los transformadores de salida Artisan están construidos con laminaciones del mejor acero. Esto asegura una fidelidad y dinámica óptimas. Transformadores de red Mezclador de canales Artisan 100 permite mezclar los dos canales. Conectando en paralelo la guitarra a las entradas del canal 1 y canal 2 (ver dibujo 1 y dibujo 2) se pueden explorar infinitas variaciones tonales. Figure 1 Figure 2 1. Entrada Hi, Canal I Es la entrada de alta sensibilidad del canal I. Esta entrada tiene 6dB más (el doble que muchos) de ganancia que la entrada Lo. Usa esta entrada si quieres conseguir sonidos rasgados y saturados. Usa siempre un cable de guitarra de maya de alta calidad. 2. Entrada Lo, Canal I Es la entrada de baja sensibilidad del canal I. Esta entrada tiene 6dB menos (la mitad que muchos) de ganancia que la entrada Hi. Usa esta entrada si quieres conseguir sonidos limpios (especialmente útil si tu guitarra tiene pastillas con mucha salida). Usa siempre un cable de guitarra de maya de alta calidad. 3. Entrada Hi, Canal II Es la entrada de alta sensibilidad del canal II. Esta entrada tiene 6dB más (el doble que muchos) de ganancia que la entrada Lo. Usa esta entrada si quieres conseguir sonidos rasgados y saturados. Usa siempre un cable de guitarra de maya de alta calidad. 4. Entrada Lo, Canal II Es la entrada de baja sensibilidad del canal II. Esta entrada tiene 6dB menos (la mitad que muchos) de ganancia que la entrada Hi. Usa esta entrada si quieres conseguir sonidos limpios (especialmente útil si tu guitarra tiene pastillas con mucha salida). Usa siempre un cable de guitarra de maya de alta calidad. 5. Volumen I Español Español Los transformadores de red Artisan también están construidos con laminaciones del mejor acero. Esto minimiza el efecto de campos magnéticos que puedan ser una fuente de ruido o zumbidos no deseados. Panel frontal Controla el volumen del Canal I, girando en el sentido de las agujas del reloj aumenta el volumen. El canal 1 está pensado para tener una respuesta “normal”. 6. Volumen II Controla el volumen del Canal II, girando en el sentido de las agujas del reloj aumenta el volumen. El canal 2 está pensado para tener una respuesta brillante y cristalina. 7. Graves Este control afecta a las frecuencias graves. Girando en el sentido de las agujas del reloj aumenta la presencia de graves y el sonido se vuelve más calido y con más cuerpo. A altos niveles de volumen a veces resulta mejor reducir el nivel de graves para que el amplificador de potencia siga sonando enérgicamente cuando empieza a “rasgar”. 8. Medios Este control afecta a las frecuencias medias. Girando en el sentido de las agujas del reloj aumenta la presencia de medios. Si los medios están a un nivel bajo y los bajos y agudos a niveles altos se obtiene un sonido más hueco y moderno. 38 39 I II 1 0 I 1 2 10 0 10 0 10 0 0 3 4 10 0 10 VOLUME I VOLUME II BASS MIDDLE TREBLE VOICE PRESENCE 5 6 7 8 9 10 11 STANDBY POWER ON ON 13 14 II 3 4 12 9. Agudos Master Este control afecta a las frecuencias altas. Girando en el sentido de las agujas del reloj aumenta la presencia de agudos. A niveles bajos de agudos el sonido es calido y lleno. A medida que se aumentan los agudos las notas se vuelven más definidas y con un sonido acampanado. 12. Luz indicadora de corriente 10. Voice Este interruptor aplica el voltaje de alta tensión requerido para producir sonido. Enciende siempre este interruptor al menos 30 segundos después que el interruptor de potencia (14) y apágalo al menos 30 segundos antes que el interruptor de potencia. Cuando estés tiempos cortos sin tocar utiliza este interruptor para apagar y encender la salida del amplificador. El control Voice de cuatro opciones funciona como un control de tono del preamplificador y a la vez controla el rendimiento del amplificador de potencia y la ganancia. En este sentido permite rememorar la evolución de de los diseños de de los amplificadores de guitarra de 100W. La luz indicadora se enciende cuando el amplificador está encendido. 13. Stand by Las cuatro posiciones se describen en el siguiente cuadro: 14. Potencia Posición Tipodesonido Amplificador de potencia Descripción Este interruptor se utiliza para encender y apagar el amplificador. Deberías encender siempre este interruptor antes de encender el interruptor Standby (13). 1 Amplificador americano de primeros de los 50 Alto rendimiento/ baja ganancia Brillante y limpio. El sonido es como el de los primeros amplificadores americanos 2 Amplificador americano de finales de los 50 Alto rendimiento/ baja ganancia Brillante y limpio. El sonido tiene más cuerpo que el de los amplificadores americanos más tardíos 3 Cabezal 100W británico de primeros de los 60 Rendimiento medio/ ganancia media Más ganancia y más “crunch”. El sonido es como el de los primeros cabezales 100W británicos 4 Cabezal 100W británico Bajo rendimiento/ alta ganancia Ganancia máxima por lo de finales de los 60 que el amplificador es realmente “crunch”. El sonido es como el de los últimos cabezales 100W británicos. Español Español 10 2 11. Presencia Este control opera en el amplificador de potencia y añade frecuencias altas que permiten guitarras cortantes a altos niveles de volumen. 40 41 1 2 3 4 5 Panel trasero Especificaciones técnicas 1. Entrada de red Potencia (RMS): 100 W El cable de red suministrado se conecta aquí. El cable sólo ha de conectarse a una fuente de energía compatible con el voltaje, potencia y frecuencia indicados en el panel trasero. En caso de duda consulte a un técnico cualificado. Válvulas: 4 x EL34, 3 x ECC83 Peso (Kg.): 23 Medidas (mm): 741 x 300 x 227 2. Fusible de red. El valor del fusible de red se especifica en el panel trasero. Nunca utilices un fusible cuyo valor no sea el correcto y nunca intentes puentearlo. 3. Fusible de alta tensión Español 4. Selector de impedancia Este control alinea la impedancia del amplificador con la de las pantallas conectadas. Asegúrate siempre que la impedancia seleccionada es la correcta en función de las pantallas conectadas. Pantallas conectadas Impedancia seleccionada 1 x 16 ohm 16 ohms 2 x 16 ohm 8 ohms 1 x 8 ohm 8 ohms 2 x 8 ohm 4 ohms 1 x 4 ohm 4 ohms Español El valor del fusible de red se especifica en el panel trasero. Nunca utilices un fusible cuyo valor no sea el correcto y nunca intentes puentearlo. Una pantalla de menos de 4 ohms, o 2 pantallas de 4 ohms no deberían usarse con este amplificador ADVERTENCIA: El amplificador debe estar siempre completamente apagado antes de ajustar el selector de nivel de impedancia. El incumplimiento de esto o la incorrecta selección de impedancia en función de las pantallas empleadas dañará al amplificador. 5. Salida de altavoces Hay dos salidas paralelas de altavoces para conectar a pantalla(s) externa(s). Cuando conecte los altavoces asegúrese de seleccionar la impedancia correcta (4). 42 43 Japanese Japanese 45 44 ߪߓߦ ߪߓߦ ࠹ࠢ࠾ࠞ࡞ࠗࡦࡈࠜࡔ࡚ࠪࡦ ࠹ࠢ࠾ࠞ࡞ࠗࡦࡈࠜࡔ࡚ࠪࡦ ࡉ࠶ࠢࠬ࠲㧙 $NCEMUVCT␠̌#TVKUCPࡂࡦ࠼ࡢࠗࡗ㧙࠼ࡋ࠶࠼̍ࠍ߅⾈ߍߚߛ߈⺈ޔ ࡉ࠶ࠢࠬ࠲㧙 $NCEMUVCT␠̌#TVKUCPࡂࡦ࠼ࡢࠗࡗ㧙࠼ࡋ࠶࠼̍ࠍ߅⾈ߍߚߛ߈⺈ޔ ߦࠅ߇ߣ߁ߏߑ߹ߔޕ ߦࠅ߇ߣ߁ߏߑ߹ߔޕ ࡄࡢࠕࡦࡊㇱ ࡄࡢࠕࡦࡊㇱ #TVKUCPߪᑷ␠㧔⧷࿖ࡁࠬࡂࡦࡊ࠻ࡦᚲ㧕ࡢ㧙࡞࠼ࠢࠬߩࠛࡦࠫ࠾ࠕ࠴ࡓߦࠃࠆ⤘ޔᄢ #TVKUCPߪᑷ␠㧔⧷࿖ࡁࠬࡂࡦࡊ࠻ࡦᚲ㧕ࡢ㧙࡞࠼ࠢࠬߩࠛࡦࠫ࠾ࠕ࠴ࡓߦࠃࠆ⤘ޔᄢ ߥ㐿⊒ᦼ㑆ߣߩߐߞޔᅷදࠍ⸵ߐߧ⎇ⓥ⸳⸘ߩᧃߦቢᚑߚߒ߹ߒߚޕ ߥ㐿⊒ᦼ㑆ߣߩߐߞޔᅷදࠍ⸵ߐߧ⎇ⓥ⸳⸘ߩᧃߦቢᚑߚߒ߹ߒߚޕ ࡉ࠶ࠢࠬ࠲㐿⊒࠴ࡓߪ⚻ߩߡߒߣࡦࡖࠪࠫࡘࡒ߇ࠄ⥄ޔ㛎ࠍ߽ߜࡈࡄ࠻ࠬࡌߩ࠻ࠬ࠲ࠡޔ ࡉ࠶ࠢࠬ࠲㐿⊒࠴ࡓߪ⚻ߩߡߒߣࡦࡖࠪࠫࡘࡒ߇ࠄ⥄ޔ㛎ࠍ߽ߜࡈࡄ࠻ࠬࡌߩ࠻ࠬ࠲ࠡޔ ࠜࡑࡦࠬࠍታߔࠆߚߩ̌ⓥᭂߩࠡ࠲࠷࡞̍ࠍឭଏߔࠆߎߣࠍ໑৻ߩ⋡⊛ߣߒߡ߹ߔޕ ࠜࡑࡦࠬࠍታߔࠆߚߩ̌ⓥᭂߩࠡ࠲࠷࡞̍ࠍឭଏߔࠆߎߣࠍ໑৻ߩ⋡⊛ߣߒߡ߹ߔޕ ࠛࡦࠫ࠾ࠕߚߜߩ㧟㧜ᐕએߦࠊߚࠆ⌀ⓨ▤ࠕࡦࡊ⸳⸘ߩࠬࠠ࡞ߣኾ㐷⍮⼂ߣ⚻㛎ߦࠃࠅޔ#TVKUCP ࠛࡦࠫ࠾ࠕߚߜߩ㧟㧜ᐕએߦࠊߚࠆ⌀ⓨ▤ࠕࡦࡊ⸳⸘ߩࠬࠠ࡞ߣኾ㐷⍮⼂ߣ⚻㛎ߦࠃࠅޔ#TVKUCP ߪߣ࠼ࡦ࠙ࠨߩ࡞ࡌߥߡߟ߆ޔߡ߅ߦࡊࡦࠕ࠼ࡗࠗࡢ࠼ࡦࡂޔຠ⾰ࠍ ߪߣ࠼ࡦ࠙ࠨߩ࡞ࡌߥߡߟ߆ޔߡ߅ߦࡊࡦࠕ࠼ࡗࠗࡢ࠼ࡦࡂޔຠ⾰ࠍ 8QKEG ࡏࠗࠬࠦࡦ࠻ࡠ࡞ߪߥࠢ࠾࡙ޔേࠍߒ߹ߔࠍ࠲ࠢࡖࠠࡦ࠻ߩࡊࡦࠕࡊޕᄌൻ 8QKEG ࡏࠗࠬࠦࡦ࠻ࡠ࡞ߪߥࠢ࠾࡙ޔേࠍߒ߹ߔࠍ࠲ࠢࡖࠠࡦ࠻ߩࡊࡦࠕࡊޕᄌൻ ߐߖࠆߛߌߢߥߊޔߒ࡞ࡠ࠻ࡦࠦࠍࡦࠗࠥࠣࡦࡇࡦ࠳ߩࡊࡦࠕࡢࡄޔ㘃߹ࠇߥ㖸ࠅߩ⥄↱ᐲ ߐߖࠆߛߌߢߥߊޔߒ࡞ࡠ࠻ࡦࠦࠍࡦࠗࠥࠣࡦࡇࡦ࠳ߩࡊࡦࠕࡢࡄޔ㘃߹ࠇߥ㖸ࠅߩ⥄↱ᐲ ࠍ#TVKUCPߦਈ߃ߡ߹ߔޕ ࠍ#TVKUCPߦਈ߃ߡ߹ߔޕ 9ࡋ࠶࠼ߩવ⛔⊛⸳⸘ߦၮߠ߈ޔ㔚Ḯᢛᵹ࿁〝ߪࠪࠦࡦ࠳ࠗࠝ࠼ߢⴕߞߡ߹ߔޕ 9ࡋ࠶࠼ߩવ⛔⊛⸳⸘ߦၮߠ߈ޔ㔚Ḯᢛᵹ࿁〝ߪࠪࠦࡦ࠳ࠗࠝ࠼ߢⴕߞߡ߹ߔޕ ߎࠇߦࠃࠅߩߎޔᢛᵹ࿁〝ߪޔ㜞ജ⁁ᘒߦ߅ߡߩା㗬ᕈ߇ะߒߩ࠴ࡦࡄߦࠄߐޔലߚࠗ࠳ޔ ߎࠇߦࠃࠅߩߎޔᢛᵹ࿁〝ߪޔ㜞ജ⁁ᘒߦ߅ߡߩା㗬ᕈ߇ะߒߩ࠴ࡦࡄߦࠄߐޔലߚࠗ࠳ޔ ࠽ࡒ࠶ࠢࠬࡐࡦࠬߦఝࠇߚࠨ࠙ࡦ࠼ࠍࠅߒ߹ߔޕ ࠽ࡒ࠶ࠢࠬࡐࡦࠬߦఝࠇߚࠨ࠙ࡦ࠼ࠍࠅߒ߹ߔޕ ߔߴߡߩࡉ࠶ࠢࠬ࠲ຠߪޔຠ⾰ߡ߅ߦࠖ࠹ࠝࠢ࠼ࡦ࠙ࠨߌࠊࠅߣޔᅷදࠍߒߥߚ ߔߴߡߩࡉ࠶ࠢࠬ࠲ຠߪޔຠ⾰ߡ߅ߦࠖ࠹ࠝࠢ࠼ࡦ࠙ࠨߌࠊࠅߣޔᅷදࠍߒߥߚ ޔᄙߊߩᬌᩏᯏ㑐ߢߩ⹜㛎࠻ࠬ࠹࠼ࡠ߮ࠃ߅ޔ㧔ታ࠹ࠬ࠻㧕ࠍⴕߥߞߡ߹ߔޓޕ ޔᄙߊߩᬌᩏᯏ㑐ߢߩ⹜㛎࠻ࠬ࠹࠼ࡠ߮ࠃ߅ޔ㧔ታ࠹ࠬ࠻㧕ࠍⴕߥߞߡ߹ߔޓޕ ఝࠇߚ⠴ਭᕈߩߚߦޔ㔚᳇࿁〝ߩା㗬ᕈߪਇนᰳߢߔߚߩߘޕ#TVKUCPߢߪࡊࡦࠕࡢࡄޔ ఝࠇߚ⠴ਭᕈߩߚߦޔ㔚᳇࿁〝ߩା㗬ᕈߪਇนᰳߢߔߚߩߘޕ#TVKUCPߢߪࡊࡦࠕࡢࡄޔ ޔ㔚Ḯㇱߩߔߴߡߩㇱຠߦࡂࠗࠬࡍ࠶ࠢߥ߽ߩࠍ↪ߒߡ߅ࠅޔน⢻ߥ㒢ࠅߩା㗬ᕈࠍታߒ߹ߔޕ ޔ㔚Ḯㇱߩߔߴߡߩㇱຠߦࡂࠗࠬࡍ࠶ࠢߥ߽ߩࠍ↪ߒߡ߅ࠅޔน⢻ߥ㒢ࠅߩା㗬ᕈࠍታߒ߹ߔޕ ߐࠄߦઁߩࡉ࠶ࠢࠬ࠲ຠߦ㑐ߒߡ⥝߇ࠆ႐วߪࠗࡦ࠲ࡀ࠶࠻ߩࠨࠗ࠻ߦ ߐࠄߦઁߩࡉ࠶ࠢࠬ࠲ຠߦ㑐ߒߡ⥝߇ࠆ႐วߪࠗࡦ࠲ࡀ࠶࠻ߩࠨࠗ࠻ߦ ࡊࠕࡦࡊㇱ ࡊࠕࡦࡊㇱ ߗ߭ࠄߒߡߊߛߐޓޕ74.YYYDNCEMUVCTCORUEQO ߗ߭ࠄߒߡߊߛߐޓޕ74.YYYDNCEMUVCTCORUEQO %JCPPGN ࠴ࡖࡦࡀ࡞㧝 %JCPPGN ࠴ࡖࡦࡀ࡞㧝 ࡉ࠶ࠢࠬ࠲࠴ࡓࠃࠅᗵ⻢ࠍߎߡ ࡉ࠶ࠢࠬ࠲࠴ࡓࠃࠅᗵ⻢ࠍߎߡ *K.QY㧞ߟߩജࠫࡖ࠶ࠢࠍ߃ߡ߅ࠅ⋥ࠍ࠲ࠡޔធធ⛯ߔࠆ႐ว㧔*K+PRWV߳ធ⛯㧕ߪߚ߹ޔ *K.QY㧞ߟߩജࠫࡖ࠶ࠢࠍ߃ߡ߅ࠅ⋥ࠍ࠲ࠡޔធធ⛯ߔࠆ႐ว㧔*K+PRWV߳ធ⛯㧕ߪߚ߹ޔ ࠛࡈࠚࠢ࠲ߥߤߩ㜞ജࡌ࡞ߩ߽ߩࠍធ⛯ߔࠆ႐ว .QY+PRWV߳ធ⛯ߩߤߜࠄߦ߽ࡌࠬ࠻ࡑ ࠛࡈࠚࠢ࠲ߥߤߩ㜞ജࡌ࡞ߩ߽ߩࠍធ⛯ߔࠆ႐ว .QY+PRWV߳ធ⛯ߩߤߜࠄߦ߽ࡌࠬ࠻ࡑ ࠶࠴ߐߖࠆߎߣ߇ߢ߈߹ߔޕ ࠶࠴ߐߖࠆߎߣ߇ߢ߈߹ߔޕ #TVKUCPߪޔ㕖Ᏹߦ࡙࠾ࠢߢᄙ↪ㅜߥࠕࡦࡊࡋ࠶࠼ߢߔޕ #TVKUCPߪޔ㕖Ᏹߦ࡙࠾ࠢߢᄙ↪ㅜߥࠕࡦࡊࡋ࠶࠼ߢߔޕ ߎߩࠢࠪ࠶ࠢࠬ࠲ࠗ࡞ߩ'.㧔㧡ᭂ⌀ⓨ▤㧕ࠍߞߚ9ࠕࡦࡊࡋ࠶࠼ߪ㕖Ᏹߦࠪࡦࡊ࡞ߥᠲ♽ ߎߩࠢࠪ࠶ࠢࠬ࠲ࠗ࡞ߩ'.㧔㧡ᭂ⌀ⓨ▤㧕ࠍߞߚ9ࠕࡦࡊࡋ࠶࠼ߪ㕖Ᏹߦࠪࡦࡊ࡞ߥᠲ♽ ࠍᜬߜߥ߇ࠄ߽ޔߩᐢࠨ࠙ࡦ࠼ࠠࡖࠢ࠲ߣᯏ⢻ࠍߨ߃ߡ߹ߔޕ ࠍᜬߜߥ߇ࠄ߽ޔߩᐢࠨ࠙ࡦ࠼ࠠࡖࠢ࠲ߣᯏ⢻ࠍߨ߃ߡ߹ߔޕ ࠻࠺࡚ࠖࠪ࠽࡞ߥᠲ♽ߦޔᣂߚߦߥࠢ࠾࡙ޔ81+%'㧔ࡏࠗࠬ㧕ࠦࡦ࠻ࡠ࡞ࠍട߃ࠆߎߣߦࠃ ࠻࠺࡚ࠖࠪ࠽࡞ߥᠲ♽ߦޔᣂߚߦߥࠢ࠾࡙ޔ81+%'㧔ࡏࠗࠬ㧕ࠦࡦ࠻ࡠ࡞ࠍട߃ࠆߎߣߦࠃ ߞߡޔᄢ߈ߥㅴൻࠍᨐߚߒߡ߹ߔޕ㧠ࡐ࡚ࠫࠪࡦߩ81+%'ࠦࡦ࠻ࡠ࡞ߪࠕࡢࡄߣࡊࡦࠕࡊޔ ߞߡޔᄢ߈ߥㅴൻࠍᨐߚߒߡ߹ߔޕ㧠ࡐ࡚ࠫࠪࡦߩ81+%'ࠦࡦ࠻ࡠ࡞ߪࠕࡢࡄߣࡊࡦࠕࡊޔ ࡦࡊߩਔᣇߩࠨ࠙ࡦ࠼ࠠࡖࠢ࠲ࠍಾࠅᦧ߃ࠆߎߣߦࠃࠅ߽ᦨޔೋᦼߩ☨࿖ࠕࡦࡊ߆ࠄޔᐕઍᓟ ࡦࡊߩਔᣇߩࠨ࠙ࡦ࠼ࠠࡖࠢ࠲ࠍಾࠅᦧ߃ࠆߎߣߦࠃࠅ߽ᦨޔೋᦼߩ☨࿖ࠕࡦࡊ߆ࠄޔᐕઍᓟ ඨߩ⧷࿖ࠕࡦࡊ߹ߢߩࠨ࠙ࡦ࠼ߩㅴൻࠍታ㛎ߢ߈ࠆߢߒࠂ߁ޕ ඨߩ⧷࿖ࠕࡦࡊ߹ߢߩࠨ࠙ࡦ࠼ߩㅴൻࠍታ㛎ߢ߈ࠆߢߒࠂ߁ޕ #TVKUCPࡂࡦ࠼ࡢࠗࡗ࠼ࠕࡦࡊࠪ࠭ߪ⛘ޔኻ⊛ߥຠ⾰ߦߎߛࠊࠆ⡯ੱ᳇⾰ߣࡉ࠹ࠖ࠶ࠢ࠻ࡦ #TVKUCPࡂࡦ࠼ࡢࠗࡗ࠼ࠕࡦࡊࠪ࠭ߪ⛘ޔኻ⊛ߥຠ⾰ߦߎߛࠊࠆ⡯ੱ᳇⾰ߣࡉ࠹ࠖ࠶ࠢ࠻ࡦ ߩ⽎ᓽߣ߽߃߹ߔޕ ߩ⽎ᓽߣ߽߃߹ߔޕ ߔߴߡߩᯏ⢻ߪ̌◲ᤃߐߣࡇࡘࠕߥ㖸̍ߩ㊀ⷐᕈࠍ߽ߞߡߒ߷ࠅߎ߹ࠇ⋡ޔᮡߣߒߚᐢࡦࠫ ߔߴߡߩᯏ⢻ߪ̌◲ᤃߐߣࡇࡘࠕߥ㖸̍ߩ㊀ⷐᕈࠍ߽ߞߡߒ߷ࠅߎ߹ࠇ⋡ޔᮡߣߒߚᐢࡦࠫ ࠍ߽ߟࡆࡦ࠹ࠫࠨ࠙ࡦ࠼ࠍࠕ࠴ࠬ࠻ߦឭଏߒ߹ߔޕ ࠍ߽ߟࡆࡦ࠹ࠫࠨ࠙ࡦ࠼ࠍࠕ࠴ࠬ࠻ߦឭଏߒ߹ߔޕ ෩ㆬߐࠇߚㇱຠߣ᧚ᢱߩ⺞ࠍᦨᄢ㒢ߦᒁ߈ߔ㔚᳇⊛⸳⸘ߦࠃࠅߎࠇࠄߪ㆐ᚑߐࠇ߹ߒߚޕ ෩ㆬߐࠇߚㇱຠߣ᧚ᢱߩ⺞ࠍᦨᄢ㒢ߦᒁ߈ߔ㔚᳇⊛⸳⸘ߦࠃࠅߎࠇࠄߪ㆐ᚑߐࠇ߹ߒߚޕ ࡊࡦ࠻ၮ᧼ࠍࠊߥ࠲ࠣࡏ࠼᭴ㅧޔṁធߐࠇߚࠪࡖࠪ࠻ࡦ࡚ࠗࠫࠟࡦࠖࡈޔᎿᴺߢࠄࠇ ࡊࡦ࠻ၮ᧼ࠍࠊߥ࠲ࠣࡏ࠼᭴ㅧޔṁធߐࠇߚࠪࡖࠪ࠻ࡦ࡚ࠗࠫࠟࡦࠖࡈޔᎿᴺߢࠄࠇ ߚࡃ࠴ࡊࠗ࠙࠶࠼ࠠࡖࡆࡀ࠶࠻ࠣࡦ࠴࠶ࠛޔࡃࠞࠩ࡞࠾ࡆߩ࠼࠶ࠫ࠹ࡦࡆߒ⟤ޔ ߚࡃ࠴ࡊࠗ࠙࠶࠼ࠠࡖࡆࡀ࠶࠻ࠣࡦ࠴࠶ࠛޔࡃࠞࠩ࡞࠾ࡆߩ࠼࠶ࠫ࠹ࡦࡆߒ⟤ޔ ಣℂߐࠇߚᠲࡄࡀ࡞ޕ#TVKUCPߪࡆࡦ࠹ࠫࠬ࠲ࠗ࡞ߩ⟤ߒߐߣਂᄦߐߣޔᄙߊߩ⹜㛎ߦၮߠ ಣℂߐࠇߚᠲࡄࡀ࡞ޕ#TVKUCPߪࡆࡦ࠹ࠫࠬ࠲ࠗ࡞ߩ⟤ߒߐߣਂᄦߐߣޔᄙߊߩ⹜㛎ߦၮߠ ߊା㗬ᕈࠍⲢวߐߖߚ㐳ຠኼࠍࠆⓥᭂߩࡕ࠺࡞ߣߒߡߐࠇ߹ߒߚޕ ߊା㗬ᕈࠍⲢวߐߖߚ㐳ຠኼࠍࠆⓥᭂߩࡕ࠺࡞ߣߒߡߐࠇ߹ߒߚޕ ࠴ࡖࡦࡀ࡞㧝ߪࠢࠪ࠶ࠢߥ☨࿖ࡢ࠶࠻ࠕࡦࡊߩᓇ㗀ࠍฃߌߡ߹ߔޕ ࠴ࡖࡦࡀ࡞㧝ߪࠢࠪ࠶ࠢߥ☨࿖ࡢ࠶࠻ࠕࡦࡊߩᓇ㗀ࠍฃߌߡ߹ߔޕ ࠃࠅᓸᅱߥ㜞㖸ߩᡷ⦟ߪ࡞ࡀࡦࡖ࠴ޔ㧞ߩࠢࡦ࠴ࠨ࠙ࡦ࠼ߦߪߥࠠࠠߒߚࠆࠨ࠙ࡦ࠼ࠍ ࠃࠅᓸᅱߥ㜞㖸ߩᡷ⦟ߪ࡞ࡀࡦࡖ࠴ޔ㧞ߩࠢࡦ࠴ࠨ࠙ࡦ࠼ߦߪߥࠠࠠߒߚࠆࠨ࠙ࡦ࠼ࠍ ታߒ߹ߔޕ ታߒ߹ߔޕ %JCPPGN㧔࠴ࡖࡦࡀ࡞㧞㧕 %JCPPGN㧔࠴ࡖࡦࡀ࡞㧞㧕 *K.QY㧞ߟߩജࠫࡖ࠶ࠢࠍ߃ߡ߅ࠅ⋥ࠍ࠲ࠡޔធធ⛯ߔࠆ႐ว㧔*K+PRWV߳ធ⛯㧕ߪߚ߹ޔ *K.QY㧞ߟߩജࠫࡖ࠶ࠢࠍ߃ߡ߅ࠅ⋥ࠍ࠲ࠡޔធធ⛯ߔࠆ႐ว㧔*K+PRWV߳ធ⛯㧕ߪߚ߹ޔ ࠛࡈࠚࠢ࠲ߥߤߩ㜞ജࡌ࡞ߩ߽ߩࠍធ⛯ߔࠆ႐ว .QY+PRWV߳ធ⛯ߩߤߜࠄߦ߽ࡌࠬ࠻ࡑ ࠛࡈࠚࠢ࠲ߥߤߩ㜞ജࡌ࡞ߩ߽ߩࠍធ⛯ߔࠆ႐ว .QY+PRWV߳ធ⛯ߩߤߜࠄߦ߽ࡌࠬ࠻ࡑ ࠶࠴ߐߖࠆߎߣ߇ߢ߈߹ߔ⧷ߪߢ࡞ࡀࡦࡖ࠴ޕ࿖ࡆࡦ࠹ࠫࠕࡦࡊࠨ࠙ࡦ࠼ࠍᓧࠆߎߣ߇ߢ߈ޔ ࠶࠴ߐߖࠆߎߣ߇ߢ߈߹ߔ⧷ߪߢ࡞ࡀࡦࡖ࠴ޕ࿖ࡆࡦ࠹ࠫࠕࡦࡊࠨ࠙ࡦ࠼ࠍᓧࠆߎߣ߇ߢ߈ޔ ᐕઍߩ⧷࿖ࡢ࠶࠻ࠕࡦࡊࠍၮᧄߦߒߡ߹ߔࡦࠖࡈߥࠫࠗࡁޔߪ࠼ࡦ࠙ࠨࡊࡦࠕࡊޕ ᐕઍߩ⧷࿖ࡢ࠶࠻ࠕࡦࡊࠍၮᧄߦߒߡ߹ߔࡦࠖࡈߥࠫࠗࡁޔߪ࠼ࡦ࠙ࠨࡊࡦࠕࡊޕ ࠣߦߥࠄߥࠃ߁⚦ޔᔃߩᵈᗧࠍߪࠄߥ߇ࠄߦ࠼ࡦ࠙ࠨߥ࠻ࠗࡉࠅࠃޔߍߡ߹ߔࠨߩߎޕ ࠣߦߥࠄߥࠃ߁⚦ޔᔃߩᵈᗧࠍߪࠄߥ߇ࠄߦ࠼ࡦ࠙ࠨߥ࠻ࠗࡉࠅࠃޔߍߡ߹ߔࠨߩߎޕ ࠙ࡦ࠼ߪᤨߩߎߤ߁ࠂߜޔઍߩࠕࡦࡊߩࡉࠗ࠻࠴ࡖࡦࡀ࡞ߣࡁࡑ࡞࠴ࡖࡦࡀ࡞ࠍࡉࡦ࠼ߒߚࠨ ࠙ࡦ࠼ߪᤨߩߎߤ߁ࠂߜޔઍߩࠕࡦࡊߩࡉࠗ࠻࠴ࡖࡦࡀ࡞ߣࡁࡑ࡞࠴ࡖࡦࡀ࡞ࠍࡉࡦ࠼ߒߚࠨ ࠙ࡦ࠼ߦߥࠆࠃ߁࠴ࡘࡦߒߡࠅ߹ߔޕ ࠙ࡦ࠼ߦߥࠆࠃ߁࠴ࡘࡦߒߡࠅ߹ߔޕ Japanese ਥߥ․ᓽ ਥߥ․ᓽ Japanese '.ߩ↪ߪޔભᱛേ㗔ၞߣ⋧ࠦࡦ࠳ࠢ࠲ࡦࠬߦఝࠇࠍ࠭ࠗࡁࡓࡂޔシᷫߒޔఝࠇߚ࠳ࠗ࠽ࡒ࠶ '.ߩ↪ߪޔભᱛേ㗔ၞߣ⋧ࠦࡦ࠳ࠢ࠲ࡦࠬߦఝࠇࠍ࠭ࠗࡁࡓࡂޔシᷫߒޔఝࠇߚ࠳ࠗ࠽ࡒ࠶ ࠢࠬࡐࡦࠬࠍታߒ߹ߔޕ ࠢࠬࡐࡦࠬࠍታߒ߹ߔޕ ታߒߡ߹ߔޕ ታߒߡ߹ߔޕ 㧔ᵈ㉼㧕ࡂࡦ࠼ࡢࠗࡗ࠼ࠕࡦࡊߣߪ㧦⌀ⓨ▤ޔߕࠄࠊ߆߆ߦ࡞࠲ࠫ࠺ޔ࠲ࠬࠫ࠻ޔ߶ߣࠎߤ 㧔ᵈ㉼㧕ࡂࡦ࠼ࡢࠗࡗ࠼ࠕࡦࡊߣߪ㧦⌀ⓨ▤ޔߕࠄࠊ߆߆ߦ࡞࠲ࠫ࠺ޔ࠲ࠬࠫ࠻ޔ߶ߣࠎߤ ߩࠡ࠲ࠕࡦࡊ߇ࡊࡦ࠻ၮ᧼ߣ߁߽ߩࠍㇱຠߩធ⛯ߩߚߦ↪ߒޔᯏ᪾ߦࠃࠆࡂࡦ࠳ઃߌࠍⴕ ߩࠡ࠲ࠕࡦࡊ߇ࡊࡦ࠻ၮ᧼ߣ߁߽ߩࠍㇱຠߩធ⛯ߩߚߦ↪ߒޔᯏ᪾ߦࠃࠆࡂࡦ࠳ઃߌࠍⴕ ߞߡ߹ߔߦࠇߎޕኻߒߡ࠻ࡦࡊޔߪࡊࡦࠕ࠼ࡗࠗࡢ࠼ࡦࡂޔၮ᧼ࠍ↪ߒߥߢߩࡗࠗࡢޔ ߞߡ߹ߔߦࠇߎޕኻߒߡ࠻ࡦࡊޔߪࡊࡦࠕ࠼ࡗࠗࡢ࠼ࡦࡂޔၮ᧼ࠍ↪ߒߥߢߩࡗࠗࡢޔ ߺߢㇱຠࠍធ⛯ߒ࠳ࡦࡂޔઃߌ߽ᾫ✵ߒߚᬺຬߦࠃࠅޔᚻᬺߢⴕࠊࠇ߹ߔ࠭ࠗࡁࠅࠃߦࠄࠇߎޕ ߺߢㇱຠࠍធ⛯ߒ࠳ࡦࡂޔઃߌ߽ᾫ✵ߒߚᬺຬߦࠃࠅޔᚻᬺߢⴕࠊࠇ߹ߔ࠭ࠗࡁࠅࠃߦࠄࠇߎޕ ޔାภߩ㊰ࠅߥߤࠍᄢߦシᷫߒޔ㕖Ᏹߦ㜞ࠢࠝ࠹ࠖߩࠨ࠙ࡦ࠼ࠍታߒ߹ߔޕ ޔାภߩ㊰ࠅߥߤࠍᄢߦシᷫߒޔ㕖Ᏹߦ㜞ࠢࠝ࠹ࠖߩࠨ࠙ࡦ࠼ࠍታߒ߹ߔޕ 46 #TVKUCPߩࡄࡢࠕࡦࡊߪࠬࠢޔ#$േߔࠆ㧠ᧄߩᭂ⌀ⓨ▤'.ߢ᭴ᚑߐࠇ߹ߔޕ #TVKUCPߩࡄࡢࠕࡦࡊߪࠬࠢޔ#$േߔࠆ㧠ᧄߩᭂ⌀ⓨ▤'.ߢ᭴ᚑߐࠇ߹ߔޕ $CUU㧔ࡌࠬ㧕/KFFNG㧔ࡒ࠼࡞㧕6TGDNG㧔࠻ࡉ࡞㧕2TGUGPEG㧔ࡊࡦࠬ㧕 $CUU㧔ࡌࠬ㧕/KFFNG㧔ࡒ࠼࡞㧕6TGDNG㧔࠻ࡉ࡞㧕2TGUGPEG㧔ࡊࡦࠬ㧕 ࠻ࡦࠦࡦ࠻ࡠ࡞ㇱߪ⧷ߩࡊࠗ࠲ࠢ࠶ࠪࠢޔ࿖☨࿖ࠕࡦࡊߩࡄ࠶ࠪࡉ࠲ࠗࡊߩ࿁〝ࠍၮᧄߣߒ ࠻ࡦࠦࡦ࠻ࡠ࡞ㇱߪ⧷ߩࡊࠗ࠲ࠢ࠶ࠪࠢޔ࿖☨࿖ࠕࡦࡊߩࡄ࠶ࠪࡉ࠲ࠗࡊߩ࿁〝ࠍၮᧄߣߒ ߡ߅ࠅޔ㧝㧘㧞ߩਔᣇߩ࠴ࡖࡦࡀ࡞ߢߔࠆ࿁〝ߦߥߞߡ߹ߔޕ ߡ߅ࠅޔ㧝㧘㧞ߩਔᣇߩ࠴ࡖࡦࡀ࡞ߢߔࠆ࿁〝ߦߥߞߡ߹ߔޕ ߎߩࡄ࠶ࠪࡉ࠲ࠗࡊߩ࠻ࡦࠦࡦ࠻ࡠ࡞ߩߔ߫ࠄߒߐߪߩߺ߹ߟߩࠇߙࠇߘޔേߩ⋧㑐ଥ߇㕖 ߎߩࡄ࠶ࠪࡉ࠲ࠗࡊߩ࠻ࡦࠦࡦ࠻ࡠ࡞ߩߔ߫ࠄߒߐߪߩߺ߹ߟߩࠇߙࠇߘޔേߩ⋧㑐ଥ߇㕖 Ᏹߦ㖸ᭉ⊛ߢࠆߣ߁ὐߢߔޕ Ᏹߦ㖸ᭉ⊛ߢࠆߣ߁ὐߢߔޕ 8QKEG%QPVTQN ࡏࠗࠬࠦࡦ࠻ࡠ࡞ 8QKEG%QPVTQN ࡏࠗࠬࠦࡦ࠻ࡠ࡞ 㧠ࡐ࡚ࠫࠪࡦߩ8QKEGߟ߹ߺߪޔ㕖Ᏹߦ࡙࠾ࠢߥേࠍߒ߹ߔ࡞ࡠ࠻ࡦࠦࡦ࠻ߩࡊࡦࠕࡊޕ 㧠ࡐ࡚ࠫࠪࡦߩ8QKEGߟ߹ߺߪޔ㕖Ᏹߦ࡙࠾ࠢߥേࠍߒ߹ߔ࡞ࡠ࠻ࡦࠦࡦ࠻ߩࡊࡦࠕࡊޕ ߩಾࠅᦧ߃㧔ࠪࡈ࠻㧕ߛߌߢߥߊࠣࡦࡇࡦ࠳ߩࡊࡦࠕࡢࡄޔ㧔ᷫ㧕ߣࠥࠗࡦ㧔Ⴧ㧕ࠍࠦࡦ࠻ࡠ ߩಾࠅᦧ߃㧔ࠪࡈ࠻㧕ߛߌߢߥߊࠣࡦࡇࡦ࠳ߩࡊࡦࠕࡢࡄޔ㧔ᷫ㧕ߣࠥࠗࡦ㧔Ⴧ㧕ࠍࠦࡦ࠻ࡠ ࡞ߒߡࠆߣ⸒߃߹ߔޕㆊߩࡢ࠶࠻ࠕࡦࡊߩㅴൻㆊ⒟ߦ߅ߌࠆߘࠇߙࠇߩࠨ࠙ࡦ࠼ࠍߩߎޔ ࡞ߒߡࠆߣ⸒߃߹ߔޕㆊߩࡢ࠶࠻ࠕࡦࡊߩㅴൻㆊ⒟ߦ߅ߌࠆߘࠇߙࠇߩࠨ࠙ࡦ࠼ࠍߩߎޔ ߟ߹ߺߢㆬᛯߒߡߊߥࠎߘޔേߦߥߞߡ߹ߔߩߎޕ8QKEGࠦࡦ࠻ࡠ࡞ߦࠃߞߡ#TVKUCP ߟ߹ߺߢㆬᛯߒߡߊߥࠎߘޔേߦߥߞߡ߹ߔߩߎޕ8QKEGࠦࡦ࠻ࡠ࡞ߦࠃߞߡ#TVKUCP ߪޔ㕖Ᏹߦ㜞⥄↱ᐲࠍ߽ߞߚࠕࡦࡊߦ߇ߞߡ߹ߔޕ ߪޔ㕖Ᏹߦ㜞⥄↱ᐲࠍ߽ߞߚࠕࡦࡊߦ߇ߞߡ߹ߔޕ ߘࠇߪޔ㕖Ᏹߦ⁁ᘒ߇ࡆࡦ࠹ࠫࠕࡦࡊ㧠⒳߇߭ߣߟߩࠕࡦࡊߦߞߡࠆ߇ߣߎ߁⸒߃ߐߣޔ ߘࠇߪޔ㕖Ᏹߦ⁁ᘒ߇ࡆࡦ࠹ࠫࠕࡦࡊ㧠⒳߇߭ߣߟߩࠕࡦࡊߦߞߡࠆ߇ߣߎ߁⸒߃ߐߣޔ น⢻ߢߒࠂ߁ޕ น⢻ߢߒࠂ߁ޕ 47 ࠻ࡦࠬࡈࠜࡑ ࠻ࡦࠬࡈࠜࡑ ࡈࡠࡦ࠻ࡄࡀ࡞ ࡈࡠࡦ࠻ࡄࡀ࡞ ߔߴߡߩ#TVKUCPࠪ࠭ߩࠕࡦࡊߢߪޔ$NCEMUVCT␠ߩⷐ᳞ߦࠃࠆା㗬ᕈ߇㜞ࠬࡍ࠶ࠢࠍ߽ߜޔ ߔߴߡߩ#TVKUCPࠪ࠭ߩࠕࡦࡊߢߪޔ$NCEMUVCT␠ߩⷐ᳞ߦࠃࠆା㗬ᕈ߇㜞ࠬࡍ࠶ࠢࠍ߽ߜޔ ࡂࠗࠣ࠼ߩ᧚ᢱࠍ↪ޔવ⛔⊛ᚻᴺߢ↢↥ߐࠇߚ࠻ࡦࠬࡈࠜࡑࠍ↪ߒߡ߹ߔޕ ࡂࠗࠣ࠼ߩ᧚ᢱࠍ↪ޔવ⛔⊛ᚻᴺߢ↢↥ߐࠇߚ࠻ࡦࠬࡈࠜࡑࠍ↪ߒߡ߹ߔޕ Channel Channel I/II㧔࠴ࡖࡦࡀ࡞㧝/㧞㧕 I/II㧔࠴ࡖࡦࡀ࡞㧝/㧞㧕 1. 1. HiHi Input Input Channel Channel I (࠴ࡖࡦࡀ࡞㧝)࠻࠶ࡊࡦࠗࠗࡂޓ I (࠴ࡖࡦࡀ࡞㧝)࠻࠶ࡊࡦࠗࠗࡂޓ ജ࠻ࡦࠬ ജ࠻ࡦࠬ ࠕ࠙࠻ࡊ࠶࠻࠻ࡦࠬࡈࠜࡑߩ⸳⸘ߪޔఝࠇߚࠬࡐࡦࠬߣ⥄ὼߥᵄᢙ․ߩታߩߚߦ㕖Ᏹߦ ࠕ࠙࠻ࡊ࠶࠻࠻ࡦࠬࡈࠜࡑߩ⸳⸘ߪޔఝࠇߚࠬࡐࡦࠬߣ⥄ὼߥᵄᢙ․ߩታߩߚߦ㕖Ᏹߦ ㊀ⷐߢߔޕ ㊀ⷐߢߔޕ ࠴ࡖࡦࡀ࡞㧝ߩࡂࠗࠥࠗࡦജߢߔߦ࠻࠶ࡊࡦࠗࡠޕᲧߴ⚂㧞ߩࠥࠗࡦߩჇ࿁〝ࠍౝ⬿ߒߡ ࠴ࡖࡦࡀ࡞㧝ߩࡂࠗࠥࠗࡦജߢߔߦ࠻࠶ࡊࡦࠗࡠޕᲧߴ⚂㧞ߩࠥࠗࡦߩჇ࿁〝ࠍౝ⬿ߒߡ ߹ߔࡢࡄޕ㧙ࠕࡦࡊࠍࡈ࡞ߦ࠼ࠗࡉߒߚ႐วߦߪߐߛߊ↪ߏࠍ࡞ࡀࡦࡖ࠴ߩߎޔ ߹ߔࡢࡄޕ㧙ࠕࡦࡊࠍࡈ࡞ߦ࠼ࠗࡉߒߚ႐วߦߪߐߛߊ↪ߏࠍ࡞ࡀࡦࡖ࠴ߩߎޔ 2. 2. LoLo Input Input Channel Channel I (࠴ࡖࡦࡀ࡞㧝)࠻࠶ࡊࡦࠗࡠޓ I (࠴ࡖࡦࡀ࡞㧝)࠻࠶ࡊࡦࠗࡠޓ ߔߴߡߩ#TVKUCPࠕࡦࡊߩࠕ࠙࠻ࡊ࠻࠻ࡦࠬࡈࠜࡑߩࡒࡀ࠻ㇱߪࡂࠗࠣ࠼ߩ৻ᣇะᕈࠤ ߔߴߡߩ#TVKUCPࠕࡦࡊߩࠕ࠙࠻ࡊ࠻࠻ࡦࠬࡈࠜࡑߩࡒࡀ࠻ㇱߪࡂࠗࠣ࠼ߩ৻ᣇะᕈࠤ ࠗ⚛㍑᧼߆ࠄࠄࠇߡ߹ߔᦨࠍࠬࡠߩࠕࠦߪࠇߎޕዊ㒢ߦ߅ߐ߃ޔఝࠇߚේ㖸ౣᕈߣ࠳ࠗ࠽ࡒ࠶ ࠗ⚛㍑᧼߆ࠄࠄࠇߡ߹ߔᦨࠍࠬࡠߩࠕࠦߪࠇߎޕዊ㒢ߦ߅ߐ߃ޔఝࠇߚේ㖸ౣᕈߣ࠳ࠗ࠽ࡒ࠶ ࠢࠬࠍታߒ߹ߔޕ ࠢࠬࠍታߒ߹ߔޕ ࠢࡦߥ࠹ࠗࠬ࠻ࠍ᳞ߡࠆ႐วߦߪߩߎޔജࠍߏ↪ߊߛߐޕ ࠢࡦߥ࠹ࠗࠬ࠻ࠍ᳞ߡࠆ႐วߦߪߩߎޔജࠍߏ↪ߊߛߐޕ ߹ߚޔജߩᄢ߈ߥࡇ࠶ࠢࠕ࠶ࡊߩߟߚࠡ࠲ࠍ↪ߔࠆ႐วߦ߽ߎߩജࠍ↪ߔࠆߎߣࠍ߅൘ ߹ߚޔജߩᄢ߈ߥࡇ࠶ࠢࠕ࠶ࡊߩߟߚࠡ࠲ࠍ↪ߔࠆ႐วߦ߽ߎߩജࠍ↪ߔࠆߎߣࠍ߅൘ ߚߒ߹ߔޕ ߚߒ߹ߔޕ 㔚Ḯ࠻ࡦࠬ 㔚Ḯ࠻ࡦࠬ ߔߴߡߩ#TVKUCPࠕࡦࡊߩࡔࠗࡦ࠻ࡦࠬࡈࠜࡑ߽ห᭽ߦ࠻ࡀࡒޔㇱߪࡂࠗࠣ࠼ߩ৻ᣇะ ߔߴߡߩ#TVKUCPࠕࡦࡊߩࡔࠗࡦ࠻ࡦࠬࡈࠜࡑ߽ห᭽ߦ࠻ࡀࡒޔㇱߪࡂࠗࠣ࠼ߩ৻ᣇะ ᕈࠤࠗ⚛㍑᧼߆ࠄࠄࠇߡ߹ߔ࠭ࠗࡁߩߤߥࡓࡂޔߡߞࠃߦࠇߎޕరߣߥࠆṳࠇ⏛᧤ࠍᦨዊ㒢ߦᛥ ᕈࠤࠗ⚛㍑᧼߆ࠄࠄࠇߡ߹ߔ࠭ࠗࡁߩߤߥࡓࡂޔߡߞࠃߦࠇߎޕరߣߥࠆṳࠇ⏛᧤ࠍᦨዊ㒢ߦᛥ ߃ࠆߎߣ߇ߢ߈߹ߔޕ ߃ࠆߎߣ߇ߢ߈߹ߔޕ 3. 3. HiHi Input Input Channel Channel II (࠴ࡖࡦࡀ࡞㧞)࠻࠶ࡊࡦࠗࠗࡂޓ II (࠴ࡖࡦࡀ࡞㧞)࠻࠶ࡊࡦࠗࠗࡂޓ ࠴ࡖࡦࡀ࡞ࡉࡦ࠼㧔࠴ࡖࡦࡀ࡞࡞ࡄޓធ⛯㧕 ࠴ࡖࡦࡀ࡞ࡉࡦ࠼㧔࠴ࡖࡦࡀ࡞࡞ࡄޓធ⛯㧕 4. 4. LoLo Input Input Channel Channel II (࠴ࡖࡦࡀ࡞㧞)࠻࠶ࡊࡦࠗࡠޓ II (࠴ࡖࡦࡀ࡞㧞)࠻࠶ࡊࡦࠗࡠޓ #TVKUCPߢߪ࠴ࡖࡦࡀ࡞㧝㧘㧞ࠍਗធ⛯⁁ᘒߦߒޕߔ߹߈ߢ߇ߣߎࠆߔ↪ߡߒ࠼ࡦࡉޔ #TVKUCPߢߪ࠴ࡖࡦࡀ࡞㧝㧘㧞ࠍਗធ⛯⁁ᘒߦߒޕߔ߹߈ߢ߇ߣߎࠆߔ↪ߡߒ࠼ࡦࡉޔ ࠴ࡖࡦࡀ࡞㧞ߩࡠࠥࠗࡦജߢߔߩࡦࠗࠥࠗࡂޕඨಽߩࠥࠗࡦߩჇ࿁〝ࠍ߽ߜ߹ߔޕ ࠴ࡖࡦࡀ࡞㧞ߩࡠࠥࠗࡦജߢߔߩࡦࠗࠥࠗࡂޕඨಽߩࠥࠗࡦߩჇ࿁〝ࠍ߽ߜ߹ߔޕ ߎߩࡉࡦ࠼ߦࠃࠅή㒢ߩࠨ࠙ࡦ࠼ࡃ࡚ࠛࠪࡦࠍᓧࠆߎߣ߇ߢ߈߹ߔ ߎߩࡉࡦ࠼ߦࠃࠅή㒢ߩࠨ࠙ࡦ࠼ࡃ࡚ࠛࠪࡦࠍᓧࠆߎߣ߇ߢ߈߹ߔ ࠢࡦߥ࠹ࠗࠬ࠻ࠍ᳞ߡࠆ႐วߦߪߩߎޔജࠍ↪ߊߛߐޕ ࠢࡦߥ࠹ࠗࠬ࠻ࠍ᳞ߡࠆ႐วߦߪߩߎޔജࠍ↪ߊߛߐޕ ࿑㧝㧘㧞ߪ࡞ࡀࡦࡖ࠴ޔ㧝㧘㧞ࠍਗធ⛯ߒࡉࡦ࠼ࠍⴕ߁ߚߩធ⛯ߢߔޕ ࿑㧝㧘㧞ߪ࡞ࡀࡦࡖ࠴ޔ㧝㧘㧞ࠍਗធ⛯ߒࡉࡦ࠼ࠍⴕ߁ߚߩធ⛯ߢߔޕ ࿑㧝ߢߪ࡞ࡀࡦࡖ࠴ޔ㧝ߩ.Q+PRWVߦࠡ࠲ࠍធ⛯ߒ࡞ࡀࡦࡖ࠴ޔ㧝ߩ*K+PRWVߣ࠴ࡖࡦࡀ࡞㧞ߩ ࿑㧝ߢߪ࡞ࡀࡦࡖ࠴ޔ㧝ߩ.Q+PRWVߦࠡ࠲ࠍធ⛯ߒ࡞ࡀࡦࡖ࠴ޔ㧝ߩ*K+PRWVߣ࠴ࡖࡦࡀ࡞㧞ߩ .Q+PRWVࠍ⍴ߩࠤࡉ࡞㧔ࡄ࠶࠴ࠤࡉ࡞㧕ߢធ⛯ߒ߹ߔ࡞ࡀࡦࡖ࠴ޔߢࠇߎޕ㧝㧘㧞ߪਗߦ .Q+PRWVࠍ⍴ߩࠤࡉ࡞㧔ࡄ࠶࠴ࠤࡉ࡞㧕ߢធ⛯ߒ߹ߔ࡞ࡀࡦࡖ࠴ޔߢࠇߎޕ㧝㧘㧞ߪਗߦ ធ⛯ߐࠇ࠼ࡦࡉޔ㧔ട▚㧕ߐࠇߚାภ߇ࡄࡢࠕࡦࡊߦㅍࠄࠇ߹ߔޕ࿑㧞ߩធ⛯ߢ߽ห᭽ߦਗ ធ⛯ߐࠇ࠼ࡦࡉޔ㧔ട▚㧕ߐࠇߚାภ߇ࡄࡢࠕࡦࡊߦㅍࠄࠇ߹ߔޕ࿑㧞ߩធ⛯ߢ߽ห᭽ߦਗ ធ⛯ߦߥࠅ߇࠼ࡦࡉ࡞ࡀࡦࡖ࠴ޔน⢻ߢߔޕ ធ⛯ߦߥࠅ߇࠼ࡦࡉ࡞ࡀࡦࡖ࠴ޔน⢻ߢߔޕ 5. 5. Volume Volume I (࠴ࡖࡦࡀ࡞㧝)ࡓࡘࡏޓ I (࠴ࡖࡦࡀ࡞㧝)ࡓࡘࡏޓ ࠴ࡖࡦࡀ࡞㧝ߩ㖸㊂ࠍࠦࡦ࠻ࡠ࡞ߒ߹ߔ࡞ࡀࡦࡖ࠴ޕ㧝ߪ⥄ὼߥᵄᢙ․ᕈࠍᜬߞߚࠊࠁࠆ ࠴ࡖࡦࡀ࡞㧝ߩ㖸㊂ࠍࠦࡦ࠻ࡠ࡞ߒ߹ߔ࡞ࡀࡦࡖ࠴ޕ㧝ߪ⥄ὼߥᵄᢙ․ᕈࠍᜬߞߚࠊࠁࠆ “Normal “Normal 㧔ࡁࡑ࡞㧕”࠴ࡖࡦࡀ࡞ߢߔޕ 㧔ࡁࡑ࡞㧕”࠴ࡖࡦࡀ࡞ߢߔޕ 6. 6. Volume Volume II (࠴ࡖࡦࡀ࡞㧞)ࡓࡘࡏޓ II (࠴ࡖࡦࡀ࡞㧞)ࡓࡘࡏޓ ࿑㧞 ࿑㧞 ࠴ࡖࡦࡀ࡞㧞ߩ㖸㊂ࠍࠦࡦ࠻ࡠ࡞ߒ߹ߔ࡞ࡀࡦࡖ࠴ޕ㧞ߪ⦣߿߆ߢࠆࠨ࠙ࡦ࠼ࠍᜬߟࠁࠊޔ ࠴ࡖࡦࡀ࡞㧞ߩ㖸㊂ࠍࠦࡦ࠻ࡠ࡞ߒ߹ߔ࡞ࡀࡦࡖ࠴ޕ㧞ߪ⦣߿߆ߢࠆࠨ࠙ࡦ࠼ࠍᜬߟࠁࠊޔ ࠆ“Bright ࠆ“Bright 㧔ࡉࠗ࠻㧕”࠴ࡖࡦࡀ࡞ߢߔޕ 㧔ࡉࠗ࠻㧕”࠴ࡖࡦࡀ࡞ߢߔޕ 7. 7. Bass Bass 㧔ࡌࠬ㧕 㧔ࡌࠬ㧕 ૐ㖸ၞߩ㖸⦡ࠍ⺞ᢛߒ߹ߔߣࠆߍࠍߺ߹ߟߩߎޕૐၞ߇ᒝ⺞ߐࠇ߹ߔޕ ૐ㖸ၞߩ㖸⦡ࠍ⺞ᢛߒ߹ߔߣࠆߍࠍߺ߹ߟߩߎޕૐၞ߇ᒝ⺞ߐࠇ߹ߔޕ Japanese ࿑㧝 ࿑㧝 ࠴ࡖࡦࡀ࡞㧞ߩࡂࠗࠥࠗࡦജߢߔߦ࠻࠶ࡊࡦࠗࡠޕᲧߴ⚂㧞ߩࠥࠗࡦߩჇ࿁〝ࠍౝ⬿ߒߡ ࠴ࡖࡦࡀ࡞㧞ߩࡂࠗࠥࠗࡦജߢߔߦ࠻࠶ࡊࡦࠗࡠޕᲧߴ⚂㧞ߩࠥࠗࡦߩჇ࿁〝ࠍౝ⬿ߒߡ ߹ߔࡢࡄޕ㧙ࠕࡦࡊࠍࡈ࡞ߦ࠼ࠗࡉߒߚ႐วߦߪߐߛߊ↪ߏࠍ࡞ࡀࡦࡖ࠴ߩߎޔ ߹ߔࡢࡄޕ㧙ࠕࡦࡊࠍࡈ࡞ߦ࠼ࠗࡉߒߚ႐วߦߪߐߛߊ↪ߏࠍ࡞ࡀࡦࡖ࠴ߩߎޔ ߹ߚޔജߩᄢ߈ߥࡇ࠶ࠢࠕ࠶ࡊߩߟߚࠡ࠲ࠍ↪ߔࠆ႐วߦ߽ߎߩജࠍ↪ߔࠆߎߣࠍ߅൘ ߹ߚޔജߩᄢ߈ߥࡇ࠶ࠢࠕ࠶ࡊߩߟߚࠡ࠲ࠍ↪ߔࠆ႐วߦ߽ߎߩജࠍ↪ߔࠆߎߣࠍ߅൘ ߚߒ߹ߔޕᏱߦ㜞ຠ⾰ߩࠡ࠲↪ࠪ࡞࠼ࠤࡉ࡞ࠍߏ↪ߊߛߐ ߚߒ߹ߔޕᏱߦ㜞ຠ⾰ߩࠡ࠲↪ࠪ࡞࠼ࠤࡉ࡞ࠍߏ↪ߊߛߐ ࡄ࡞ធ⛯ߩߚߩࡄ࠶࠴ࡦࠣ㧔ធ⛯㧕㧦 ࡄ࡞ធ⛯ߩߚߩࡄ࠶࠴ࡦࠣ㧔ធ⛯㧕㧦 Japanese ࠴ࡖࡦࡀ࡞㧝ߩࡠࠥࠗࡦജߢߔߩࡦࠗࠥࠗࡂޕඨಽߩࠥࠗࡦߩჇ࿁〝ࠍᜬߜ߹ߔޕ ࠴ࡖࡦࡀ࡞㧝ߩࡠࠥࠗࡦജߢߔߩࡦࠗࠥࠗࡂޕඨಽߩࠥࠗࡦߩჇ࿁〝ࠍᜬߜ߹ߔޕ 㕖Ᏹߦ㖸㊂߇ᄢ߈ߊ⁁ࠆߡߒࡉࠗ࠼ࡃࠝ߇ࡊࡦࠕࡢࡄޔᘒߢߪߍࠅ߹ࠍߺ߹ߟߩߎޔ 㕖Ᏹߦ㖸㊂߇ᄢ߈ߊ⁁ࠆߡߒࡉࠗ࠼ࡃࠝ߇ࡊࡦࠕࡢࡄޔᘒߢߪߍࠅ߹ࠍߺ߹ߟߩߎޔ ߥ߶߁߇ࠍ࠼ࡦ࠙ࠨࡓ࠻ࡏߥ࠻ࠗ࠲ߡߞ߃߆ޔᓧࠄࠇࠆߎߣ߇ࠅ߹ߔߩߢᵈᗧߒߡߊߛߐޕ ߥ߶߁߇ࠍ࠼ࡦ࠙ࠨࡓ࠻ࡏߥ࠻ࠗ࠲ߡߞ߃߆ޔᓧࠄࠇࠆߎߣ߇ࠅ߹ߔߩߢᵈᗧߒߡߊߛߐޕ 8. 8. Middle Middle 㧔ࡒ࠼࡞㧕 㧔ࡒ࠼࡞㧕 ਛ㖸ၞߩ㖸⦡ࠍ⺞ᢛߒ߹ߔߣࠆߍࠍߺ߹ߟߩߎޕਛၞ߇ᒝ⺞ߐࠇ߹ߔޕ ਛ㖸ၞߩ㖸⦡ࠍ⺞ᢛߒ߹ߔߣࠆߍࠍߺ߹ߟߩߎޕਛၞ߇ᒝ⺞ߐࠇ߹ߔޕ ߎߩߟ߹ߺߩ୯ࠍዊߐߊߒޔBASSߣTREBLEߟ߹ߺࠍߍ᳇ߦߔࠆߣࡕ࠳ࡦߥࡂ࠼ࡠ࠶ࠢ߿ࡋࡆ ߎߩߟ߹ߺߩ୯ࠍዊߐߊߒޔBASSߣTREBLEߟ߹ߺࠍߍ᳇ߦߔࠆߣࡕ࠳ࡦߥࡂ࠼ࡠ࠶ࠢ߿ࡋࡆ ࡔ࠲࡞ߦㆡߒߚޕߔ߹ࠅߥߦ࠼ࡦ࠙ࠨ”ࡖࠪࡦ࠼“ࠆࠁࠊޔ ࡔ࠲࡞ߦㆡߒߚޕߔ߹ࠅߥߦ࠼ࡦ࠙ࠨ”ࡖࠪࡦ࠼“ࠆࠁࠊޔ 9. 9. Treble Treble 㧔࠻ࡉ࡞㧕 㧔࠻ࡉ࡞㧕 㜞㖸ၞߩ㖸⦡ࠍ⺞ᢛߒ߹ߔࠍߺ߹ߟߩߎޕߍߡߊߣ㜞ၞ߇ᒝ⺞ߐࠇ߹ߔޕ 㜞㖸ၞߩ㖸⦡ࠍ⺞ᢛߒ߹ߔࠍߺ߹ߟߩߎޕߍߡߊߣ㜞ၞ߇ᒝ⺞ߐࠇ߹ߔޕ ߎߩߟ߹ߺߩ୯߇ዊߐߣ߈ߪࠅࠃޔߣߊߡߍࠍߺ߹ߟޔࠅߥߦ࠼ࡦ࠙ࠨߥࡓࠜ࠙ޔᵞ✵ߐࠇ ߎߩߟ߹ߺߩ୯߇ዊߐߣ߈ߪࠅࠃޔߣߊߡߍࠍߺ߹ߟޔࠅߥߦ࠼ࡦ࠙ࠨߥࡓࠜ࠙ޔᵞ✵ߐࠇ ߚࡌ࡞ߩࠃ߁ߥ߈ࠄ߮߿߆ߥࠨ࠙ࡦ࠼ߦߥࠅ߹ߔޕ ߚࡌ࡞ߩࠃ߁ߥ߈ࠄ߮߿߆ߥࠨ࠙ࡦ࠼ߦߥࠅ߹ߔޕ 48 49 I II 1 0 I 1 2 10 0 10 0 10 0 10 0 2 3 10 4 0 10 VOLUME I VOLUME II BASS MIDDLE TREBLE VOICE PRESENCE 5 6 7 8 9 10 11 STANDBY POWER ON ON 13 14 II 3 4 Voice 㧔ࡏࠗࠬ㧕 10.10. Voice 㧔ࡏࠗࠬ㧕 12 㔚Ḯㇱജࠦࡦ࠻ࡠ࡞ㇱ 㔚Ḯㇱജࠦࡦ࠻ࡠ࡞ㇱ 㧠ࡐ࡚ࠫࠪࡦߩࡏࠗࠬߟ߹ߺߪ࡞ࡠ࠻ࡦࠦࡦ࠻ߩࡊࡦࠕࡊޔേ߈ᣇࠍࠪࡈ࠻ߐߖ߹ߔޕ 㧠ࡐ࡚ࠫࠪࡦߩࡏࠗࠬߟ߹ߺߪ࡞ࡠ࠻ࡦࠦࡦ࠻ߩࡊࡦࠕࡊޔേ߈ᣇࠍࠪࡈ࠻ߐߖ߹ߔޕ ৻ᣇޔߢߩߔ߹ߒ࡞ࡠ࠻ࡦ߽ࠦࡦࠗࠥߣࠣࡦࡇࡦ࠳ߩࡊࡦࠕࡢࡄޔਅ⸥ߩࠃ߁ߥࡊࡦࠕޔᱧผ ৻ᣇޔߢߩߔ߹ߒ࡞ࡠ࠻ࡦ߽ࠦࡦࠗࠥߣࠣࡦࡇࡦ࠳ߩࡊࡦࠕࡢࡄޔਅ⸥ߩࠃ߁ߥࡊࡦࠕޔᱧผ ߩࠈࠈߥࠨ࠙ࡦ࠼ߦಾࠅᦧ߃ߡ↪ߔࠆߎߣ߇ߢ߈߹ߔޕ ߩࠈࠈߥࠨ࠙ࡦ࠼ߦಾࠅᦧ߃ߡ↪ߔࠆߎߣ߇ߢ߈߹ߔޕ 12.12. ࡄࡢࠗࡦࠫࠤ࠲ࡊࡦޓ ࡄࡢࠗࡦࠫࠤ࠲ࡊࡦޓ 㔚ḮࠍONߔࠆߣ߇ࡊࡦߩߎޔὐἮߒ߹ߔ 㔚ḮࠍONߔࠆߣ߇ࡊࡦߩߎޔὐἮߒ߹ߔ 13.13. Standby Standby (ࠬ࠲ࡦࡃࠗ)࠴࠶ࠗࠬޓ (ࠬ࠲ࡦࡃࠗ)࠴࠶ࠗࠬޓ Mode ࠻ࡦࠦࡦ࠻ࡠ࡞ ࠻ࡦࠦࡦ࠻ࡠ࡞ Mode ࡄࡢࠕࡦࡊࠨ࠙ࡦ࠼ ࡄࡢࠕࡦࡊࠨ࠙ࡦ࠼ ⸃⺑ ⸃⺑ 11 50ᐕઍೋᦼ☨࿖ࠕࡦࡊ ࡂࠗ࠳ࡦࡇࡦࠣ ࡂࠗ࠳ࡦࡇࡦࠣ 50ᐕઍೋᦼ☨࿖ࠕࡦࡊ ࡉࠗ࠻ߢࠢࡦߥ☨࿖ೋᦼ ࡉࠗ࠻ߢࠢࡦߥ☨࿖ೋᦼ ߎߩࠬࠗ࠶࠴ߪ⌀ޔⓨ▤࿁〝ߩࡂࠗ࠹ࡦ࡚ࠪࡦ㔚ߩON/OFFࠍࠦࡦ࠻ࡠ࡞ߒ߹ߔ࠴࠶ࠗࠬߩߎޕ ߎߩࠬࠗ࠶࠴ߪ⌀ޔⓨ▤࿁〝ߩࡂࠗ࠹ࡦ࡚ࠪࡦ㔚ߩON/OFFࠍࠦࡦ࠻ࡠ࡞ߒ߹ߔ࠴࠶ࠗࠬߩߎޕ ߇ONߦߥߞߡߥߣࠨ࠙ࡦ࠼ߪജߐࠇ߹ߖࠎޕ ߇ONߦߥߞߡߥߣࠨ࠙ࡦ࠼ߪജߐࠇ߹ߖࠎޕ ࠲ࠗࡊ ࠲ࠗࡊ ဳࠕࡦࡊࠨ࠙ࡦ࠼ ဳࠕࡦࡊࠨ࠙ࡦ࠼ 㔚ḮࠍON,OFFߔࠆ㓙ߪᔅߕਅ⸥ߩࠃ߁ߥ㗅ߢⴕߞߡߊߛߐ 㔚ḮࠍON,OFFߔࠆ㓙ߪᔅߕਅ⸥ߩࠃ߁ߥ㗅ߢⴕߞߡߊߛߐ 22 50ᐕઍᓟᦼ☨࿖ࠕࡦࡊ ࡂࠗ࠳ࡦࡇࡦࠣ ࡂࠗ࠳ࡦࡇࡦࠣ 50ᐕઍᓟᦼ☨࿖ࠕࡦࡊ ࡉࠗ࠻ߢࠢࡦߥ☨࿖ᓟᦼ ࡉࠗ࠻ߢࠢࡦߥ☨࿖ᓟᦼ 㔚Ḯ㧻㧺ᤨ 㔚Ḯ㧻㧺ᤨ㧦㧼㧻㨃㧱㧾ࠬࠗ࠶࠴㧻㧺 㧦㧼㧻㨃㧱㧾ࠬࠗ࠶࠴㧻㧺 ---> ---> 30⑽ᓟޓ---> 30⑽ᓟޓ---> 㧿㨀㧭㧺㧰㧮㨅ࠬࠗ࠶࠴㧻㧺 㧿㨀㧭㧺㧰㧮㨅ࠬࠗ࠶࠴㧻㧺 ࠲ࠗࡊ ࠲ࠗࡊ / ࡠࠥࠗࡦ / ࡠࠥࠗࡦ ဳࠕࡦࡊࠨ࠙ࡦ࠼ ဳࠕࡦࡊࠨ࠙ࡦ࠼ 㔚Ḯ㧻㧲㧲ᤨ: 㔚Ḯ㧻㧲㧲ᤨ: 㧿㨀㧭㧺㧰㧮㨅ࠬࠗ࠶࠴㧻㧲㧲 㧿㨀㧭㧺㧰㧮㨅ࠬࠗ࠶࠴㧻㧲㧲 ---> ---> 30⑽ᓟ 30⑽ᓟ---> ---> 㧼㧻㨃㧱㧾ࠬࠗ࠶࠴㧻㧲㧲 㧼㧻㨃㧱㧾ࠬࠗ࠶࠴㧻㧲㧲 60ᐕઍೋᦼဳ⧷࿖100W 60ᐕઍೋᦼဳ⧷࿖100W ࡒ࠺ࠖࠕࡓ࠳ࡦࡇࡦࠣ/ࡒ࠺ ࠃࠅࡄࡢࠕࡦࡊ߇࠼ࠗࡉߔ ࠃࠅࡄࡢࠕࡦࡊ߇࠼ࠗࡉߔ ࡒ࠺ࠖࠕࡓ࠳ࡦࡇࡦࠣ/ࡒ࠺ ࡋ࠶࠼࠲ࠗࡊ ࡋ࠶࠼࠲ࠗࡊ ࠖࠕࡓࠥࠗࡦ ࠖࠕࡓࠥࠗࡦ 44 60ᐕઍᓟဳ⧷࿖100Wࡋ 60ᐕઍᓟဳ⧷࿖100Wࡋ ࡠ࠳ࡦࡇࡦࠣ/ࡠࠥࠗࡦ㕖Ᏹߦࡂࠗࠥࠗࡦߥᓟᦼဳ 㕖Ᏹߦࡂࠗࠥࠗࡦߥᓟᦼဳ ࡠ࠳ࡦࡇࡦࠣ/ࡠࠥࠗࡦ 33 ࠶࠼࠲ࠗࡊ ࠶࠼࠲ࠗࡊ / ࡠࠥࠗࡦ / ࡠࠥࠗࡦ ࠆೋᦼဳ100Wࡋ࠶࠼ࠨ࠙ࡦ࠼ ࠆೋᦼဳ100Wࡋ࠶࠼ࠨ࠙ࡦ࠼ ߹ߚߚߒߣߞࠂߜޔભᙑᤨ㑆ߥߤߢࠕࡦࡊࠍ৻ᤨ⊛ߦOFFߒߚ႐วߪߩߎޔSTANDBY ߹ߚߚߒߣߞࠂߜޔભᙑᤨ㑆ߥߤߢࠕࡦࡊࠍ৻ᤨ⊛ߦOFFߒߚ႐วߪߩߎޔSTANDBY ࠬࠗ࠶࠴ߩ ࠬࠗ࠶࠴ߩ ߺOFFߦߒߡߊߛߐ ߺOFFߦߒߡߊߛߐ 100Wࡋ࠶࠼ࠨ࠙ࡦ࠼ 100Wࡋ࠶࠼ࠨ࠙ࡦ࠼ 14.14. Power Power (ࡄࡢࠬࠗ࠶࠴) (ࡄࡢࠬࠗ࠶࠴) Presence 㧔ࡊࡦࠬ㧕 11.11. Presence 㧔ࡊࡦࠬ㧕 Japanese 50 Japanese ࡊࡦࠬߪࡊࡦࠕࡢࡄޔㇱߦ߅ߡ㜞㖸ၞࠍჇߐߖ߹ߔޕ㕖Ᏹߦ㖸ᢙ߇ᄙ႐วߢߪࡦࡃޔ ࡊࡦࠬߪࡊࡦࠕࡢࡄޔㇱߦ߅ߡ㜞㖸ၞࠍჇߐߖ߹ߔޕ㕖Ᏹߦ㖸ᢙ߇ᄙ႐วߢߪࡦࡃޔ ࠼ߩਛߢࠡ࠲ߩ㖸߇ၒ߽ࠇߡߒ߹ࠊߥ“ޓࠆࠁࠊޔᛮߌ߇”ࠨ࠙ࡦ࠼ࠍᓧࠆߎߣ߇ߢ߈߹ ࠼ߩਛߢࠡ࠲ߩ㖸߇ၒ߽ࠇߡߒ߹ࠊߥ“ޓࠆࠁࠊޔᛮߌ߇”ࠨ࠙ࡦ࠼ࠍᓧࠆߎߣ߇ߢ߈߹ ߔޕ ߔޕ ࠕࡦࡊߩ㔚ḮࠍON/OFFߒ߹ߔޕᔅߕSTAND ࠕࡦࡊߩ㔚ḮࠍON/OFFߒ߹ߔޕᔅߕSTAND BY(ࠬ࠲ࡦࡃࠗ)ࠬࠗ࠶࠴ࠃࠅవߦߎߩࠬࠗ࠶࠴ࠍONߦߒ BY(ࠬ࠲ࡦࡃࠗ)ࠬࠗ࠶࠴ࠃࠅవߦߎߩࠬࠗ࠶࠴ࠍONߦߒ ߡߊߛߐ ߡߊߛߐ 51 1 2 3 4 5 ࠕࡄࡀ࡞ ࠬࡍ࠶ࠢ ജࡄࡢ 4/5ࡢ࠶࠻ 1. 㔚Ḯജ ⌀ⓨ▤Z'.Z'%% หᪿߐࠇߡࠆ㔚Ḯࠦ࠼ࠍធ⛯ߒ߹ߔޕ㔚Ḯߪࠕࡄࡀ࡞ߦ⸥タߐࠇߡࠆ㔚ޔᵄᢙߩ߽ߩએᄖ ߪ↪ߒߥߢߊߛߐ⇼ޕ߇ࠆߣ߈ߦߪޔᱜⷙߩࠨࡆࠬᛛⴚ⠪ߩᜰ␜ࠍฃߌߡߊߛߐޕ ㊀㊂ MI ኸᴺ 9Z*Z&OOZZ 2. Main Fuse (ࡔࠗࡦࡅࡘ࠭) 㔚Ḯ࿁〝↪ߩࡅࡘ࠭ߢߔߩ࠭ࡘࡅޕ୯ߪࠕࡄࡀ࡞ߦ⸥タߐࠇߡ߹ߔޕ୯߇ߜ߇߁ࡅࡘ࠭ࠍ ↪ߒߚࠅ࠭ࡘࡅޔએᄖߩ߽ߩߢ࡚ࠪ࠻ߐߖߚࠅߒߥߢߊߛߐޕ឵ߪᱜⷙߩࠨࡆࠬᛛⴚ⠪ߦ ଐ㗬ߒߡߊߛߐޕ 3. H.T Fuse (ࡂࠗ࠹ࡦ࡚ࠪ)࠭ࡘࡅޓ ⌀ⓨ▤ߩࡂࠗ࠹ࡦ࡚ࠪࡦ㔚↪ߩࡅࡘ࠭ߢߔߩ࠭ࡘࡅޕ୯ߪࠕࡄࡀ࡞ߦ⸥タߐࠇߡ߹ߔޕ୯߇ ߜ߇߁ࡅࡘ࠭ࠍ↪ߒߚࠅ࠭ࡘࡅޔએᄖߩ߽ߩߢ࡚ࠪ࠻ߐߖߚࠅߒߥߢߊߛߐޕ឵ߪᱜⷙ ߩࠨࡆࠬᛛⴚ⠪ߦଐ㗬ߒߡߊߛߐޕ 4. Impedance Selector (ࠗࡦࡇ࠳ࡦࠬ)࠴࠶ࠗࠬޓ࠻ࠢޓ ធ⛯ߐࠇߚࠬࡇࠞߩࠗࡦࡇ࠳ࡦࠬࡑ࠶࠴ࡦࠣࠍⴕ߹ߔޕ ធ⛯ߔࠆࠬࡇࠞࠠࡖࡆࡀ࠶࠻ߩࠗࡦࡇ࠳ࡦࠬ ࠗࡦࡇ࠳ࡦࠬࠢ࠻ 16 ࠝࡓ ࠠࡖࡆࡀ࠶࠻ޓ㨤㧝บ 16 Ohms 16 ࠝࡓ ࠠࡖࡆࡀ࠶࠻ޓ㨤㧞บ 8 Ohms 8 ࠝࡓ ࠠࡖࡆࡀ࠶࠻ޓ㨤㧝บ 8 Ohms 8 ࠝࡓ ࠠࡖࡆࡀ࠶࠻ޓ㨤㧞บ 4 Ohms 4 ࠝࡓ ࠠࡖࡆࡀ࠶࠻ޓ㨤㧝บ 4 Ohms Japanese Japanese ࠬࡇࠞࠍធ⛯ߔࠆߣ߈ߦߪޔᔅߕᱜߒࠗࡦࡇ࠳ࡦࠬࠍㆬᛯߒߡߊߛߐޕ ࠝࡓᧂḩߩࠬࡇࠞߩធ⛯߿ߩࠞࡇࠬࡓࠝޔ㧞ធ⛯ߪߢ߈߹ߖࠎޕ ᵈᗧ㧍 ᄖㇱࠬࡇࠞߩធ⛯ߪ࠻ࠢߩࠬࡦ࠳ࡇࡦࠗ߮ࠃ߅ޔᔅߕࠕࡦࡊߩ㔚Ḯࠍಾߞߚ⁁ᘒߢⴕߞߡߊ ߛߐޕ㔚Ḯࠍࠇߚ߹߹ࠗࡦࡇ࠳ࡦࠬಾࠅᦧ߃ࠍⴕ߁ߣߩࠞࡇࠬޔ⎕៊ߩේ࿃ߦߥࠅ߹ߔޕ 5RGCMGT1WVRWVU㧔ࠬࡇࠞജ㧕 㧞ߟߩਗធ⛯ߐࠇߚࠬࡇࠞജ┵ሶߢߔޕᄖㇱࠬࡇࠞࠍߎߎߦធ⛯ߒ߹ߔޕ ࠬࡇࠞ㧔ࠠࡖࡆࡀ࠶࠻㧕ࠍធ⛯ߔࠆߣ߈ߪޔᔅߕᱜߒࠗࡦࡇ࠳ࡦࠬࠍㆬᛯߒߡߊߛߐޕ 52 53 Français Français Español Español Deutsch Deutsch Japanese Japanese English English 55 54 HBK-1008 08/07 Blackstar Amplification Ltd, Beckett House, 14 Billing Road, Northampton, NN1 5AW, UK For the latest information go to: www.blackstaramps.com Whilst the information contained herein is correct at the time of publication, due to our policy of constant improvement 1 and development, Blackstar Amplification Ltd reserves the right to alter specifications without prior notice.