1
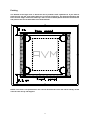
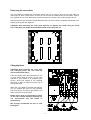
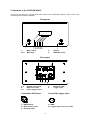
Power Amplifier OVATION MA8.2
Operating Instructions
AVM GmbH, Daimlerstrasse 8, D-76316 Malsch, Germany
Dear Customer,
Thank you for the trust you have shown in us with the purchase of this mono power amplifier.
You have acquired a versatile hi-fi component with absolutely excellent sound qualities.
It is understandable that you would immediately like to start listening to the music. Despite this
we advise you to display some patience, you will see that this will stand you in good stead.
Before you take this equipment into use for the first time you should thoroughly read this
operating manual. This will ensure that the equipment can be optimally used to give you a
great deal of untroubled pleasure.
We have made every effort to include in this manual all the necessary information to provide
assistance with the operation of the equipment. Please contact us in writing or by telephone if
you have further questions, the answers to which are not to be found in this manual. We will
make every effort to provide assistance.
Declaration of conformity (for EC only)
We herewith confirm, that the unit to which this manual belongs fulfills the EC rules necessary
to obtain the sign
. The necessary measurements were taken with positive results.
AVM Audio Video Manuafaktur GmbH, Daimlerstraße 8, D-76316 Malsch, Germany
Website: www.avm-audio.com, e-mail: [email protected].
Index
ITEM
Prolog, Certificate of Conformity
Packing
Removing the cover plate
Changing fuses
1. Technical specialties in short
2. Operation of the the OVATION MA8.2
2.1 Placement of the unit / cooling
2.2 Power supply / IMPORTANT NOTES
2.3 First steps, switching on and off
2.4 Connection of the pre amplifier
2.5 Connection of the loudspeakers
2.6 DISPLAY mode
3. Menu system
3.1 Operating the menu system
3.2 SET OPERATING MODE
3.3 SET DISPLAY MODE
3.4 SET BRIGHTNESS
3.5 SET LOAD IMPEDANCE
4. Care of the casing
5. If at first you don’t succeed...
6. Conditions of warranty (Europe only)
7. Technical Information
PAGE
2
3
4
4
5
6
7
7
8
8
9
9
10
10
10
10
10
10
11
11
13
14
2
Packing
The bottom of the flight case in which the unit is packed is NOT symmetrical. If you want to
pack the unit into the case please take care of correct positioning. The distances between the
holes and the edges of the case differ by 5 mm. In case of doubt please measure the distances
and position the unit as described in the sketch below.
NOTE: if the unit is not positioned in the correct direction the cover will not fit exactly. In this
case turn the unit by 180 degrees.
3
Removing the cover plate
The cover plate is screwed from the bottom side of the unit. To open it, put the unit to the edge of a
desk (right up, NOT upside down!) so that you can access the marked holes in the bottom. Insert a
long (at least 25 cm) 3 mm Inbus-driver and unscrew the four screws. The screws will then fall out.
After that insert a long stick (about 3mm diametre) into one of the holes in the bottom and lift the cover
plate by pushing the stick against it.
CAUTION: when mounting the cover plate again do not tighten the screws using too much
force. Oherways you might have difficulties whith unscrewing later on.
Changing fuses
CAUTION: Before opening the cover plate
and changing fuses the unit must be
disconnected from mains.
If the unit doesn't react when switched on, one
or more fuses might be blown. In this case
address to your dealer or a qualified repair
service. Show this manual to the repairing
technician in order to make him know how to
change the fuses.
When the cover plate is removed (see above),
you can localize the fuses on the processor
pcb according to the sketch right beside. The
fuses are all 20 mm glass types.
Blown fuses must be exchanged by types
of the same current handling capacity (for
115 Volt-versions use the values in
parentheses).
We strongly recommend the use of slow
blow types.
4
1. Technical Specialties of the OVATION MA8.2 in short
The OVATION MA8.2 delivers nearly any desired power level even into critical loudspeakers without
loss of control. Far over 1000 Watts into 4 Ohms are surely sufficient for reproduction of any kind of
music even when listening at original sound levels. Nevertheless this amplifier can also play at
moderate levels without loosing precision or missing even finest details.
The OVATION MA8.2 has been developed to satisfy even highest demands on reproduction of music.
Forget about noise and distortion and enjoy it's warm and powerful music reproduction - regardless
which loudspeaker You use. It's excellent musical quality comes together with a very worthy finish:
The case is totally made of aluminum
The power supply consists of two toroidal power transformers (2 x 1000VA) with extremely low stray
fields. The energy for the power amplifiers is bffered by two 200.000 µF Capacitor banks. The power
amplifier itself is a balanced construction. That means two amplifiers in bridge connection. Each of the
power amps has it's own transformers and capacitor bank. The amplifiers use 24 output-FETs each
and thus are able to deliver over 180 amperes - if needed.
The input circuitry is also a balanced construction and offers RCA-Cinch
and as well balanced XLR (Neutrik) inputs.
The speaker terminals are naturally in bi-wiring configuration.
Besides that a brilliant blue VF display informs the listener about the actual power (power bar) and the
peak power (numeric). It is also useful to make settings via the intuitive menu system: Configuring the
display (power bar & value display, peak power only and display off), setting the display brightness,
setting the operating mode (permanent, trigger, auto, remote from preamp) and setting the actual
speaker impedance (8, 4, 2 Ohms).
5
2. Operation of the OVATION MA8.2
In the text you will find a number behind the names of the individual controls. These refer to the
numbering of the following drawings:
Front panel
1:
3a-e:
Mains switch
Menu keys
2:
4:
Display
DISPLAY switch
Rear panel
5, 6:
8:
10:
Speaker connectors
RCA-Cinch input
Power supply socket
7:
9:
Balanced input
Trigger input
Connection XLR-input
Connection trigger input
1 = GND (Shield)
2 = Non inverting input
3 = Inverting input
a = GND
b = Trigger signal (+2V up to +24V)
6
2.1 Placement of the unit / cooling
The OVATION MA8.2 can warm up considerably - depending on the required output power. It is
therefore very important that air circulation is possible to both the sides and underside of the unit and
that heated air can vent upwards. This will allow good heat dispersion. Locate the unit in such a way,
that a minimum of 10 cm free space is maintained around the unit to any other equipment or walls. If
the unit is placed on a carpet you should ensure that the feet do not sink into the pile (if necessary
place blocks underneath) and that air vents are not sealed by the pile of the carpet. Please also
ensure the unit is protected from direct sunlight.
NOTES: It should also be remembered that heat sensitive objects such as candles, plastics,
records or CD’s may be damaged by the generated heat. The installed transformers emit
magnetic stray fields. To prevent interference you should under no circumstances place the
unit either directly on or near the pre amplifier or record player.
Great care should be taken to ensure that small children do not burn themselves by
accidentally touching the Mono amp. The casing does not feel extremely hot to adults but
small children generally react more sensitively.
2.2 Power supply
IMPORTANT NOTES
Each OVATION MA8.2 has a maximum power consumption of 3500 VA. Peak currents from
mains can reach values of far over 10 Amperes. Therefore standard power cables (with 10
Amperes allowable current) cannot be used. The power cord that is supplied with the unit has a
rating of 16 Amperes. If you wish to exchange it by another cable, make sure that this is
suitable for minimum 16 Amperes and that the plug connected to the mono fits well.
If you use the OVATION MA8.2 in 115V-VERSION: The minimum allowable speaker impedance
is 4 Ohms. Speakers with values below that can cause the OVATION MA8.2 to draw too much
current from mains. This can blow the fuses inside the unit or the fuse of your wall outlet.
Connect the power cable of each OVATION MA8.2 to a separate wall outlet. Do NOT use a
multiple outlet strip. This will lead to poor performance at high listening levels and can cause
damage to the outlet strip.
If the OVATION MA8.2 is in stand-by mode, the device is not completely separated from the
mains supply. To protect your unit from damage during a thunderstorm or prolonged absence,
it is recommended that you switch it off by pressing the mains switch or disconnect the mains
plug (10).
7
2.3 First steps, switching on and off
Right after arrival in your home the OVATION MA8.2 might be cold (depending on the weather
outside during transport). In this case we recommend that after unpacking and placing it in
your room you let it "acclimatize" without mains connection for at least one hour .
Connect the power supply socket (10) with a suitable power cord to the mains and set the mains
switch (1) to on (push once). The unit performs a self test while the AMP logo scrolls into the display
(2). After a few seconds the unit will switch on *). The mains switch has a fluorescent ring around.
While the unit is operating this ring will light up in bright blue. When the unit is switched to stand by
(see 3.2 SET OPERATING MODE) the ring will be dimmed but still softly lit.
During this procedure you will hear clicks in short succession from the switching relays of the driver
stage and supply unit. When this initial check is passed, switch off the amp at the mains switch (1,
push once). Now the unit is ready to be connected to your hi fi set.
*) Depending on previous settings it might be that the amp goes to standby after the initial self test.
This is the case if previously one of the operating modes "auto", "remote" or "trigger" was selected. In
this case press the button 3c in the middle under the display and select "permanent" using button 3d.
Then press button 3c again to exit the menu.
2.4 Connection of the pre amplifier
Audio Signal
Your OVATION MA8.2 is equipped with both an RCA-cinch and XLR input socket (7, 8) which can be
used as desired. Merely connect the pre amplifier with the relevant cable.
Trigger Signal
If you use the AMP pre mk2 as preamplifier the trigger Signal is sent trough the AF cable with no
additional connection necessary. If you use other preamplifiers that are equipped with trigger outputs
then connect the trigger input of the mono (9) via a suitable cable to the preamp's trigger output.
2.5 Connection of the loudspeakers
IMPORTANT NOTES
The OVATION MA8.2 has balanced speaker outputs. That means that not only the red marked
plus connectors (6) but also the minus connectors (5) conduct signal voltage. Do not connect
any of the terminals to case or input ground. This can damage your amplifier or the rest of your
hi fi set.
The OVATION MA8.2 is a very powerful amplifier. It can deliver up to 120 Volts peak to the
loudspeaker. So do not touch the speaker connectors while the unit operates. If you want to
change or reconnect speaker cables we recommend that you switch the unit off before doing
that. Keep little children or pets away from the speaker cables and connectors while the
OVATION MA8.2 is operating.
The OVATION MA8.2 is equipped with 2 pairs of output clips so that bi-wiring connection of the
loudspeakers is possible without any problems. Only use loudspeaker cable of good quality and with
sufficient diameter to connect your loudspeaker to the output clips (5, 6). Take care of the correct
polarity when connecting. The red marked output clip (6) must be connected to the red loudspeaker
clip or marked with a plus sign. Right and left channels must be the same polarity.
8
If you are using banana plugs secure the outer parts of the sockets (by clockwise turning) before
inserting the pin. This will prevent rattling. On delivery you may find that plastic plugs cover the 4mm
holes of the loudspeaker clips. These can be removed with a thin screwdriver.
To be able to fully appreciate the tonal qualities of the mono amp you should place the unit as close as
possible to the loudspeaker. In this way extremely short paths between the power amplifier and the
loudspeaker, for the transport of electrical power, is achieved.
There are loudspeakers that react through a short cable with tense, although weak, bass tones. This
results from long cables being used during the development of these loudspeakers. You might say the
cable is a component of the frequency-dividing network and therefore responsible for the tone. This
type of loudspeaker is best operated through long cables. In case of doubt ask your dealer.
2.6 DISPLAY mode
If you the display disturbs you while listening to music, you can switch it off by pressing the DISPLAY
button (4).
9
3. Menu system
3.1 Operating the menu system
The settings for customizing your OVATION MA8.2 are
done via the menu system. The menu system works while
the unit is on as well as in stand by mode.
To access the menu just press the knob (3c) in the middle
under the display (2). The display shows now the SET
OPERATING MODE menu. The actual setting has a
frame around. The setting can be changed by pressing
the <VALUE> knobs (3d, 3e). Changing to other menus is
done by pressing the <ITEM> knobs (3a, 3b). Just press
the EXIT knob (3c) to leave the menu and store the
settings. If no knob is pressed for longer than 10 seconds
the unit will exit the menu automatically.
3.2 SET OPERATING MODE
•
•
•
•
permanent: When switched on using the mains switch (1) the unit will operate permanently until it
is switched off.
remote: In this mode the unit is controlled via inaudible digital signals sent over the AF cable. It
will switch to operate and to stand by synchronously with the preamplifier. Also the dimming of the
display will be performed according to the setting on the preamp. This mode makes sense, if you
use a AMP pre mk2 as preamplifier.
trigger: Switching to operate and to stand by is controlled via the trigger input (9).
auto: The OVATION MA8.2 switches on automatically as soon as the pre amplifier delivers
musical signals and to stand by when the pre amplifier has not delivered a signal for more than 5
to 10 minutes.
3.3 SET DISPLAY MODE
•
•
•
bar & value: While operating a bar informs you about the actual output level. The peak output
power is displayed numerically. If demanded output power exceeds the maximum the display will
show "CLIP" to indicate this. In this case we recommend to reduce the volume in order not to
damage the tweeters.
value: The peak output power is displayed numerically. If demanded output power exceeds the
maximum the display will show "CLIP" to indicate this. In this case we recommend to reduce the
volume in order not to damage the tweeters.
dis off: The display is dark and shows only "MENU".
3.4 SET BRIGHTNESS
•
Selects the display brightness (100%, 60%, 30%).
REMARK: The display brightness can also be remote controlled, see 3.2 SET OPERATING
MODE / remote.
3.5 SET LOAD IMPEDANCE
•
To obtain correct values in the power display it is necessary to select the speaker impedance (2,
4, 8 Ohms) according to your speakers. This setting is only for calibrating the power display and
has no influence on the amplifier itself.
10
4. Care of the casing
The surface and printed text on the casing is largely scratch resistant. The casing may be cleaned with
a mild soap solution or spirit based glass cleaner (use economically) and a soft lint free cloth.
NOTE
Care should be taken during cleaning to ensure that no liquids can ingress into the casing. It is
advised for safety reasons to remove the power cable from the electrical supply before
cleaning the casing with a damp cloth. Do not use solvents or abrasives for cleaning. This
could damage the surface.
5. If at first you don’t succeed...
Some suspected defects of the equipment are very often found to have been caused by faulty
operation. Before you consult us please check the functioning of your mono amp according to the
following checklist:
Unit is ON, but display shows nothing
•
Switch the display mode from "off" to a different setting. (see 2.6 and 3.3 DISPLAY MODE)
Unit is ON, but loudspeakers remain inoperative
•
Test initially whether the pre-amplifier and the selected signal source are operating correctly. This
is best achieved by checking the functioning of the pre-amplifier with head phones. Remember to
remove the head phones jack after use, otherwise the pre-amplifier will not emit a signal.
•
Ensure that there are no breaks or short circuits in the signal cable between the mono amp and
the pre-amplifier.
•
Test the connecting cable between the Mono amp and the loudspeaker for a short circuit or break.
Unit does not switch from STAND BY to OPERATE or switches while listening to music from
OPERATE to STAND BY.
•
This can happen when the OVATION MA8.2 is operated in "auto" mode and you are listening at
low levels. Then the incoming Voltage from the preamp is too low to trigger the auto-circuit. In this
case we recommend to switch the unit to "permanent" mode or to use of a trigger cable (see 3.2
OPERATING MODE).
•
If the unit is operated in "trigger" mode please check the trigger cables between preamp and the
OVATION MA8.2 and ensure that there are no breaks or short circuits in the cable.
The unit is operated in "remote" mode without using a suitable preamp (AMP pre mk2). Choose an
different operating mode (see 3.2 OPERATING MODE).
11
After switching off the pre-amplifier the amp does not automatically switch to STAND BY (after
approx. 5-10 min.) although the "auto" mode is selected.
•
Check whether a low humming or chirping noise is heard from the loudspeakers after switching off
the pre-amplifier. If this is so then scattering emissions within the cable are interfering with the
automatic switch-on circuitry. This is interpreting the interference as a music signal and reacts by
not switching off the amp. Remedy: Place your cable so that no further interference is
experienced. With balanced XLR cables this fault can also arise from an error in the pin setting.
Humming during music reproduction
•
This is mostly caused by a ground loop through the aerial amplifier or postal cabling. Check if the
humming stops following removal of the aerial cable from the tuner (and, if connected, the TV set
and video recorder). If this is successful then fit a sheath current filter to the aerial cables of these
receivers. (Your dealer will supply).
•
The shield of the AF-cable is interrupted, the cinch connector has poor ground contact (carefully
bend). The use of a symmetrical cable with wrong setting.
The display shows "OVERHEAT" and the unit switches off
•
Switch mains off and let the OVATION MA8.2 cool down for 15 minutes. Make sure that the unit is
placed according to the tips in chapter 2.1 Placement of the unit / cooling.
•
Make sure that there is no short circuit in the loudspeaker cables.
•
Check if one of your loudspeakers is defective.
The display shows "OVERLOAD" and the unit switches off
•
Switch mains off, fix failure and switch on again.
•
Make sure that there is no short circuit in the loudspeaker cables.
•
Check if one of your loudspeakers is defective.
The display shows "INTERNAL FAILURE or DC on input" and the unit switches off
•
Check if your preamplifier outputs excessive DC Voltage. (Some tube amps do so for a short time
after switching on).
•
The OVATION MA8.2 has been overdriven by excessive listening levels and switches off to
protect itself and the loudspeakers. Switch mains off and after one minute on again. Reduce the
listening level.
12
6. Conditions of warranty (Europe only)
If despite expectations a defect occurs that cannot be repaired by yourself or your dealer, we
undertake the repair of your unit free of charge for up to five years from date of purchase. The
warranty covers the costs of material and working time, transport costs are to be borne by the owner.
Provisions for this warranty are:
•
The unit must have been purchased from an AMP-authorized dealer. Equipment from other
sources will not be repaired, not even at charge.
•
The warranty registration card, together with a copy of the bill of sale, must be received by us
within four weeks of the date of purchase.
•
The defect must not have been caused by improper handling or misuse.
•
Return the unit to us only in its original packing. If this is not possible we are entitled to refuse
acceptance. We will not assume responsibility for transport damage under any circumstances.
•
If you no longer possess the original pack contact your dealer. We will also provide packaging
upon request. For this service however we will levy an adequate charge.
•
A short description of the defect is to be included with the returned unit.
•
In cases of doubt we reserve the right to request a copy of the bill of sale.
•
We also reserve the right to levy a handling charge for items returned without good or valid
reason, or if the unit proves to be not defective.
NOTE
If you are returning the unit from a country other than Germany you should ensure that correct
export documents are obtained. We cannot accept any charges for costs arising from improper
or incomplete export documentation.
If you have purchased your unit from a dealer outside Germany please refer to him or the
relevant importing firm to process the warranty.
13
7. Technical Information
Sensitivity Cinch:
Sensitivity XLR:
Gain
2.1 V / 10 kOhms (1000 W / 4 Ohms)
2.1 V / 20 kOhms (1000 W / 4 Ohms)
30 dB
Output Power into 8 Ohms:
Output Power into 4 Ohms:
Output Power into 2 Ohms:
>600 Watts
>1200 Watts
>1800 Watts
Intermodulation 25 W / 4 Ohms:
THD at 25 W / 4 Ohms:
Transient intermodulation (TIM):
Signal-to-noise-ratio (SNR) 25 W / 4 Ohms:
Frequency response:
Load band width 25 W / 4 Ohms:
Rise time at 4 Ohms:
Slew rate:
< 0.01%
< 0.005%
not measurable
> 100 dB(A)
0.3 Hz - >400 kHz
0.3 Hz - >400 kHz
1 µs
> 200 V / µs
Damping factor (8 Ohms):
> 400
Power supply:
Operation without signal:
Stand by:
Dimensions (L x W x H):
Weight:
230 V or 115 V / 50/60 Hz / 3500 VA max
150 VA
<1 VA
420 mm x 432 mm x 253 mm
42 kg
Issued October 2013
We reserve the right to amend technical details and fittings in case of product improvements
14