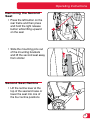
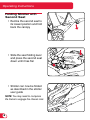
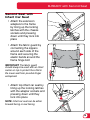
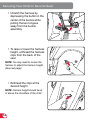
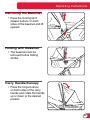
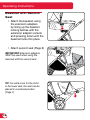
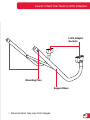
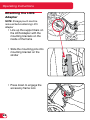
1
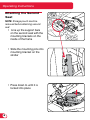
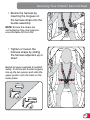
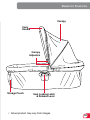
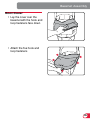
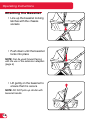
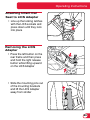
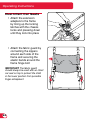
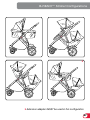
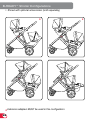
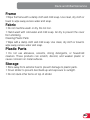
B-READY™
Accessories User Guide
IMPORTANT: To ensure your child is as safe as possible, read all
instructions thoroughly before using these accessories. Store this
manual for future reference.
Table of Contents
Warnings. . . . . . . . . . . . . . . . . . . . . . . . . . . . . . . . . . . . . . . . . . . . . . . . . . . 2
B-READY Second Seat . . . . . . . . . . . . . . . . . . . . . . . . . . . . . . . . 4
Features . . . . . . . . . . . . . . . . . . . . . . . . . . . . . . . . . . . . . . . . . . . . . . . . . . . 5
Operating Instructions
Attaching the Second Seat . . . . . . . . . . . . . . . . . . . . . . . . . . . . . . . . . . . . . 6
Removing the Second Seat. . . . . . . . . . . . . . . . . . . . . . . . . . . . . . . . . . . . . 7
Second Seat Recline. . . . . . . . . . . . . . . . . . . . . . . . . . . . . . . . . . . . . . . . . . 7
Folding the Stroller with Second Seat. . . . . . . . . . . . . . . . . . . . . . . . . . . . . 8
Second Seat with Infant Car Seat. . . . . . . . . . . . . . . . . . . . . . . . . . . . . . . . 9
Securing Your Child. . . . . . . . . . . . . . . . . . . . . . . . . . . . . . . . . . . . . . . . . 10
Britax Bassinet. . . . . . . . . . . . . . . . . . . . . . . . . . . . . . . . . . . . . 12
Features . . . . . . . . . . . . . . . . . . . . . . . . . . . . . . . . . . . . . . . . . . . . . . . . . . 11
Bassinet Assembly. . . . . . . . . . . . . . . . . . . . . . . . . . . . . . . . . . . . . . . . . . 14
Operating Instructions
Attaching the Bassinet. . . . . . . . . . . . . . . . . . . . . . . . . . . . . . . . . . . . . . . . 16
Removing the Bassinet . . . . . . . . . . . . . . . . . . . . . . . . . . . . . . . . . . . . . . . 17
Folding with Bassinet. . . . . . . . . . . . . . . . . . . . . . . . . . . . . . . . . . . . . . . . . 17
Carry Handle/Canopy . . . . . . . . . . . . . . . . . . . . . . . . . . . . . . . . . . . . . . . . 17
Bassinet with Second Seat . . . . . . . . . . . . . . . . . . . . . . . . . . . . . . . . . . . . 18
Britax Lower Infant Car Seat (LICS) Adapter . . . . . . . . . . . . . 20
Features . . . . . . . . . . . . . . . . . . . . . . . . . . . . . . . . . . . . . . . . . . . . . . . . . . 21
Operating Instructions
Attaching the LICS Adapter. . . . . . . . . . . . . . . . . . . . . . . . . . . . . . . . . . . . 22
Attaching Infant Car Seat to LICS Adapter . . . . . . . . . . . . . . . . . . . . . . . . 23
Removing the LICS Adapter . . . . . . . . . . . . . . . . . . . . . . . . . . . . . . . . . . . 23
Dual Infant Car Seats. . . . . . . . . . . . . . . . . . . . . . . . . . . . . . . . . . . . . . . . . 24
Important Reminders. . . . . . . . . . . . . . . . . . . . . . . . . . . . . . . . . . . . . . . . . 25
B-READY Stroller Configurations. . . . . . . . . . . . . . . . . . . . . . . . . . . . . . . 26
Care and Maintenance. . . . . . . . . . . . . . . . . . . . . . . . . . . . . . . . . . . . . . . 29
Warranty. . . . . . . . . . . . . . . . . . . . . . . . . . . . . . . . . . . . . . . . . . . . . . . . . . 30
©2010 Britax Child Safety, Inc. All rights reserved. Printed in USA P388100_R5:07.10
This product and its components are subject to change without notice.
WARNING!
Section Title
DEATH or SERIOUS INJURY can occur:
General Warnings
• NEVER leave child unattended.
• Avoid serious injury from falling or sliding out. Always use harness to
secure child.
• DO NOT use stroller for an infant younger than 6 months without an
infant carrier or bassinet.
• DO NOT hang or place items on the stroller handle or frame. They
may cause the stroller to become unstable.
• Children must always be restrained to prevent standing or falling out
of stroller.
• DO NOT allow children to climb on or play with the stroller.
• Never use stroller on stairs or escalators.
• To avoid entrapment or pinching, DO NOT fold or unfold stroller when
child is in or near stroller.
• Only use accessories and replacement parts approved by Britax Child
Safety, Inc.
• Read and understand these instructions before using this product. To
ensure proper use, store this user guide in a convenient place so it
can be consulted often. Failure to follow all warnings and instructions
could result in serious injury or death.
• Extension adapters are for use with an infant car seat or bassinet in
the rear-facing position ONLY.
• When using an infant car seat with this product, refer to the product’s
user guide for maximum weights and other instructions.
• Do not exceed the manufacturer’s maximum weight limit when using
an infant car seat with this product.
Second Seat Warnings
• DO NOT use extension adapters with the top seat.
• Maximum weight for second seat is 35 lbs (15.9 kg).
• Never place heavy items in the underseat storage basket while a child
is occupying the second seat.
• DO NOT allow child to climb into the second seat unassisted. Stroller
could become unstable and tip.
2
Section Title
Bassinet Warnings
SUFFOCATION HAZARD:
• Infants can suffocate between added padding or soft bedding and the
side of the bassinet.
• NEVER add a mattress, pillow comforter or padding. Use ONLY the
pad provided by BRITAX.
• Bassinet can roll over on soft surfaces and suffocate child. ONLY
place bassinet on firm, stable surface.
To reduce the risk of SIDS, Pediatricians recommend healthy infants
be placed on their backs to sleep, unless otherwise advised by your
Physician.
FALL HAZARD:
• DO NOT use this product when the infant begins to push up on hands
and knees or has reached manufacturer’s recommended maximum
weight of 20 lbs (9.1 kg).
• NEVER place bassinet near edges of counter tops, tables or other
elevated surface. The infants movement can cause the bassinet to
shift and move.
• DO NOT use the bassinet to transport an infant in a motor vehicle.
This bassinet is NOT a child restraint.
• Use of bassinet cover is recommended for the added safety of your
child.
• DO NOT overload the bassinet storage pouch. Maximum weight is 1
lb (0.45 kg).
Lower Infant Car Seat (LICS) Adapter Warnings
• Ensure that the LICS Adapter is secured before connecting an infant
car seat.
• In dual infant car seat mode, the child in the lower infant car seat
MUST be removed first to avoid tipping.
• To avoid tipping always remove child in lower seat first. Never use
without primary seat installed and occupied.
3
B-READY™
2nd Seat
Second Seat Features
Recline Lever
Canopy
Harness &
Buckle
Mounting
Pins
Seat Folding
Lever
Support Bars
• Actual product may vary from images.
5
Operating Instructions
Attaching the Second
Seat
NOTE: Storage pouch must be
removed before attaching second
seat
• Line up the support bars
on the second seat with the
mounting brackets on the
inside of the frame
• Slide the mounting pins into
mounting bracket on the
stroller
• Press down to until it is
locked into place
6
Operating Instructions
Removing the Second
Seat
• Press the left button on the
rear frame and then press
and hold the right release
button while lifting upward
on the seat
• Slide the mounting pins out
of the mounting brackets
and lift the second seat away
from stroller
Second Seat Recline
• Lift the recline lever at the
top of the seat and raise or
lower the seat into one of
the four recline positions
7
Operating Instructions
Folding Stroller with
Second Seat
• Recline the second seat to
its lowest position and fold
back the canopy
• Slide the seat folding lever
and press the second seat
down until it lies flat
• Stroller can now be folded
as described in the stroller
user guide
NOTE: You may need to compress
the frame to engage the chassis lock
8
B-READY with Second Seat
Second Seat with
Infant Car Seat
• Attach the extension
adapters to the frame
by lining up the locking
latches with the chassis
sockets and pressing
down until they lock into
place
• Attach the fabric guard by
connecting the zippers
around each side of the
frame and securing the
elastic bands around the
frame hinge bolt
IMPORTANT: The fabric guard
should always be used with an infant
carrier on top to protect the child in
the lower seat from possible finger
entrapment
• Attach top infant car seat by
lining up the locking latches
with the adapter sockets and
pressing down until they
lock into place
NOTE: Infant car seat can be either
forward facing or rear facing
9
Securing Your Child In Second Seat
• Unlatch the harness by
depressing the button in the
center of the buckle while
pulling the two tongues
away from the buckle
assembly
• To raise or lower the harness
height, unthread the harness
clips from the back of the
seat
NOTE: You may need to loosen the
harness to adjust the harness height
(See next page)
• Rethread the clips at the
desired height
NOTE: Harness height should be at
or above the shoulders of the child
10
Securing Your Child In Second Seat
• Buckle the harness by
inserting the tongues on
the harness straps into the
buckle assembly
NOTE: Ensure the straps are
not twisted as they may become
uncomfortable for the child
• Tighten or loosen the
harness straps by sliding
the harness adjusters up or
down
Buckle tongues separate for added
safety. To reconnect buckle tongues,
line up the two pieces and slide the
upper portion onto the track on the
lower piece
11
B-READY™
Bassinet
Bassinet Features
Canopy
Carry
Handle
Canopy
Adjusters
Storage Pouch
Seat Locking Latch
& Release Lever
• Actual product may vary from images.
13
Bassinet Assembly
• Pull the frame supports
outward by the tabs until
they lock under all four clips
• Place the bassinet bedding
into the bassinet and pull the
elastic over the ends
• Connect the hook and loop
fasteners around the carry
handle hinge
14
Bassinet Assembly
Boot Cover
• Lay the cover over the
bassinet with the hook and
loop fasteners face down
• Attach the five hook and
loop fasteners
15
Operating Instructions
Attaching the Bassinet
• Line up the bassinet locking
latches with the chassis
sockets
• Push down until the bassinet
locks into place
NOTE: Can be used forward facing
with the use of the extension adapters
(page 9)
• Lift gently on the bassinet to
ensure that it is secure
NOTE: DO NOT pick up stroller with
bassinet handle
16
Operating Instructions
Removing the Bassinet
• Press the locking latch
release buttons on both
sides of the bassinet and lift
upward
Folding with Bassinet
• The bassinet must be
removed before folding
stroller
Carry Handle/Canopy
• Press the hinge buttons
on both sides of the carry
handle and rotate the handle
up or down to the desired
position
17
Operating Instructions
Bassinet with Second
Seat
• Attach the bassinet using
the extension adapters
by lining up the bassinet
locking latches with the
extension adapter sockets
and pressing down until the
bassinet locks into place
• Attach second seat (Page 6)
IMPORTANT: Extension adapters
MUST be used when using the
bassinet with the second seat
TIP: For extra room for the child
in the lower seat, the seat can be
placed in a reclined position
(Page 7)
18
19
B-READY™
Lower Infant Car Seat (LICS)
Adapter
Lower Infant Car Seat (LICS) Adapter
LICS Adapter
Sockets
Mounting Pins
Support Bars
• Actual product may vary from images.
21
Operating Instructions
Attaching the LICS
Adapter
NOTE: Storage pouch must be
removed before attaching LICS
Adapter
• Line up the support bars on
the LICS Adapter with the
mounting brackets on the
inside of the frame
• Slide the mounting pins into
mounting bracket on the
stroller
• Press down to engage the
accessory frame lock
22
Operating Instructions
Attaching Infant Car
Seat to LICS Adapter
• Line up the locking latches
with the LICS sockets and
press down until they lock
into place
Removing the LICS
Adapter
• Press the left button on the
rear frame and then press
and hold the right release
button while lifting upward
on the LICS Adapter
• Slide the mounting pins out
of the mounting brackets
and lift the LICS Adapter
away from stroller
23
Operating Instructions
Dual Infant Car Seats
• Attach the extension
adapters to the frame
by lining up the locking
latches with the chassis
locks and pressing down
until they lock into place
• Attach the fabric guard by
connecting the zippers
around each side of the
frame and securing the
elastic bands around the
frame hinge bolt
IMPORTANT: The fabric guard
should always be used with an infant
car seat on top to protect the child
in the lower position from possible
finger entrapment
24
Operating Instructions
• Attach top infant car seat by
lining up the locking latches
with the adapter sockets and
pressing down until they
lock into place
• Attach the lower infant
car seat by lining up the
locking latches with the LICS
sockets and press down
until they lock into place
IMPORTANT: Top and lower infant car
seats can be either forward or rear
facing
Important Reminders
• DO NOT use extension adapters with the top seat. They are
only for use with the bassinet or infant car seat.
• The infant car seat in the lower position must always be
removed first prior to child or infant car seat in the top position
• The fabric guard should always be used with an infant car
seat on top to protect the child in the lower seat from possible
finger entrapment
25
B-READY™ Stroller Configurations
• Shown with optional accessories (sold separately)
26
B-READY™ Stroller Configurations
*
* Extension adapters MUST be used in this configuration
27
B-READY™ Stroller Configurations
• Shown with optional accessories (sold separately)
*
* Extension adapters MUST be used in this configuration
28
*
Care and Maintenance
Frame
• Wipe the frame with a damp cloth and mild soap. Use clean, dry cloth or
towel to wipe away excess water and soap.
Fabric
• Do not machine wash or dry. Do not iron.
• Hand wash with cold water and mild soap. Air dry to prevent the cover
from shrinking.
Cleaning Plastic Parts:
• Wipe with a damp cloth and mild soap. Use clean, dry cloth or towel to
wipe away excess water and soap.
Plastic Parts
• Do not use abrasives, solvents, strong detergents, or household
cleaners. These products can scratch, discolor, and weaken plastic or
cause corrosion on metal surfaces.
Storage
• Store away from extreme heat to prevent damage to plastic parts.
• Cover stroller to prevent dust build-up and exposure to sunlight.
• Do not stack other items on top of stroller.
29
Warranty
This product is distributed by Britax Child Safety, Inc. Britax Child Safety, Inc. (“Britax”) warrants
this product to the original retail purchaser as follows:
Limited Two-Year Warranty
This product is warranted against defective materials or workmanship for two years from
the date of original purchase. Proof of purchase is required. Your exclusive remedy for
this warranty is that Britax will, at its option, provide repair or replacement components to
the original purchaser for this product or replace the product. Britax reserves the right to
discontinue or change fabrics, parts, models or products, or to make substitutions. Labor and
shipping costs for returns are not included.
To make a claim under this Warranty, you must contact Britax Customer Services Department
at 1-888-4BRITAX or write to 13501 South Ridge Drive, Charlotte, NC 28273. Proof of
purchase is required.
PLEASE COMPLETE AND MAIL THE REGISTRATION CARD WITHIN 30 DAYS OF PURCHASE,
OR VISIT WWW.BRITAXUSA.COM/REGISTRATION.
Warranty Limitations
This warranty does not include damages which arise from negligence, misuse, salt corrosion,
or use not in accordance with the user guide.
The use of non-Britax Child Safety, Inc. accessories is not approved by Britax. The use of
unapproved accessories could cause this product to become damaged or dangerous. Their
use automatically voids the Britax warranty.
Limitations of Damages
The warranty and remedies as set forth above are exclusive and in lieu of all others, oral or
written, express or implied. In no event will Britax or the retailer selling this product be liable
for any damages, including incidental or consequential damages, arising out of the use or
inability to use this product.
Limitations of Warranties and Other Warranty Terms and State Law Rights
Any implied warranties, including implied warranties of merchantability and fitness for a
particular purpose, shall be limited to the duration and terms of the express written warranty.
Some states do not allow limitations on how long an implied warranty lasts or the exclusion or
limitation of incidental or consequential damages, so the above limitations may not apply to
you. This warranty gives you specific legal rights, and you may have other rights, which vary
from state to state. Neither Britax, nor the retailer selling this product, authorizes any person to
create for it any other warranty, obligation, or liability in connection with this product.
30
Notes
31
Notes
32
Visit our website at www.Britax.com for more information.
Britax Child Safety, Inc.
13501 South Ridge Drive
Charlotte, NC 28273
USA
A Britax Childcare Group
Limited company
Tel. : 1-888-427-4829
www.Britax.com