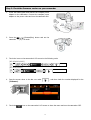
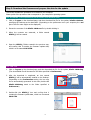
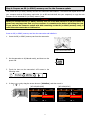
1
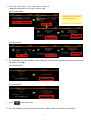
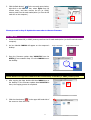
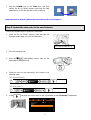
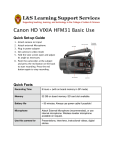
Canon Digital Video Camcorder Firmware Update Procedure
VIXIA HF M30
VIXIA HF M31
VIXIA HF M300
LEGRIA
LEGRIA
LEGRIA
LEGRIA
HF
HF
HF
HF
M31
M36
M300
M306
Firmware is software installed to control the equipment. Using the firmware, the camcorder can perform many
operations, such as shooting or processing the image. The following is an explanation of how to download the
data for the new firmware, save it to your computer's hard disk, copy it to an SD (or SDHC) memory card, and
update your camcorder to the new firmware.
Please note that, to perform this update you will need the following, in addition to a computer:
a commercially
available SD memory card or SDHC memory card (32 MB or more), and a commercially available SD memory
card reader or an SD card slot built into the computer. Please have these items ready in advance.
Make sure you have read the precautions and procedures below carefully before updating the firmware.
IMPORTANT: Observe the following precautions when updating the firmware
When updating the firmware, make sure to use a battery pack and power the camcorder using the
supplied compact power adapter.
Before updating the firmware, initialize the SD (or SDHC) memory card in the camcorder. When you
initialize the SD (or SDHC) memory card, any data written on it will be erased, so please be sure to
save a copy of any important data on your computer or somewhere other than the card, prior to
initializing it.
While updating the firmware, make absolutely sure not to turn the camcorder off or to operate its
buttons or controls. Doing so could cause camcorder malfunctions.
After the firmware update is completed, all of the camcorder settings are reset to their default
values.
After the firmware update is completed, it is not possible to revert back to a previous version.
If the firmware update does not finish normally, or if the camcorder no longer starts normally, please
contact our camera repair center.
1
The firmware update for the HF M30/M31/M36/M300/M306 is performed as follows.
Step 1: Make Preparations
Explains the equipment required for the firmware update.
Step 2: Check the firmware version on your camcorder
Explains the steps for checking the firmware version on your camcorder.
Step 3: Download the firmware and prepare the data for the update
Explains the steps for downloading the new firmware for your camcorder.
Step 4: Prepare an SD (or SDHC) memory card for the firmware update
Explains the steps for copying the new firmware you downloaded to an SD (or SDHC) memory card.
Step 5: Update the camcorder to the new firmware
Explains the steps for updating the camcorder to the new firmware.
Step 1: Make Preparations
The following items are required for this firmware update.
1.
Camcorder
VIXIA HF M30/M31/M300, LEGRIA HF M36/M306
2.
Computer
OS: Computer with either Windows or Mac OS X(*)
3.
SD memory card reader
SD memory card reader (commercially available) or a computer with an SD card
slot
A 32 MB or higher-capacity SD memory card or SDHC memory card (both
4.
SD memory car
commercially available)
* If using an SDHC memory card, the memory card reader or memory card slot
on the computer (previous item) must support SDHC memory cards.
The battery pack (BP-808) that comes with the digital camcorder.
5.
Battery pack
The compact power adapter (CA-570) and power cord that come with the digital
camcorder
6.
(*)
Compact power adapter
OS Requirements: Windows® 7, Windows Vista™ (Service Pack 1 or 2), Windows® XP (Service Pack 3), or Mac OS X (10.4-10.6)
Customers who do not have items 2, 3, or 4 above are advised to contact our customer support center.
2
Step 2: Check the firmware version on your camcorder
1.
Insert the battery pack and connect the compact power
adapter to the camcorder. Connect the compact power
adapter to the power outlet and turn the camcorder ON.
2.
Press the
(Camera/Play) button and set the
camcorder to playback mode.
3.
Touch the icons on the camcorder's LCD screen in the following order.
[HF M30/M31/M36]
[HF M300/M306]
4.
Drag the screen down to the last row under
[Firmware].
5.
Touch the
, and then check the number displayed for the
icon on the camcorder's LCD screen to close the menu and turn the camcorder OFF.
3
Step 3: Download the firmware and prepare the data for the update
This section explains the operations to be made on your computer.
Please perform the procedure that corresponds to your computer's operating system.
For Windows
(These explanations use the screens from Windows Vista.)
1. Click on I agree on the download page, and then download the file for the update, hfm31-1010.exe,
specifying the Desktop as the destination. (Depending on the preferences set in your computer, the .exe
part of the file name might not be displayed.)
2. Extract the contents of the hfm31-1010.exe file by double-clicking it.
3. When the contents are extracted, a folder named
HFM31_f will be created.
4. Open the HFM31_f folder created in the previous step,
and confirm that it contains the firmware update data,
which is a file named VGC6.FIM.
For Mac OS
1. Click on I agree on the download page, and then download the file for the update, hfm31-1020.dmg.
(The downloaded file will be saved to the folder specified in Preferences.)
2. After the download is completed, an icon named
HFM31_f will be automatically created on the Desktop.
(Depending on the Preferences setting, the icon may
not be automatically generated. In this case, double-click
hfm31-1020.dmg saved to the folder specified in
Preferences.)
3. Double-click the HFM31_f icon and confirm that it
contains the firmware update data, which is a file named
VGC6.FIM.
4
Double-click
Step 4: Prepare an SD (or SDHC) memory card for the firmware update
First, insert an SD (or SDHC) memory card into the camcorder and initialize it. This section will explain how to use
your computer and an SD memory card writer (or an SD card slot built into your computer) to copy the new
firmware to the initialized SD (or SDHC) memory card.
Caution
When you initialize the SD (or SDHC) memory card, all of the data saved on it will be erased, so
please save any important data on your computer or somewhere else before initializing the card.
If you perform the firmware update with data remaining on the SD (or SDHC) memory card), it
could cause the camcorder to malfunction.
Insert an SD (or SDHC) memory card into the camcorder and initialize it.
1. Insert the SD (or SDHC) memory card into the camcorder.
Insert with the label side up.
2. Set the camcorder to M (Manual mode), and then turn the
power ON.
3. Touch the icons on the camcorder's LCD screen in the
following order.
4. In the
tab, drag the screen down to [Initialize], and then touch it.
[HF M30/M31/M36]
[HF M300/M306]
5
5. Touch the LCD screen in the order shown below to
completely initialize the SD (or SDHC) memory card.
[HF M30/M31/M36]
Confirm that an SD memory
card is displayed here.
[HF M300/M306]
6. The initialization will start, and after a short while, the process will be completed and the following screen
will appear. Touch OK.
[HF M30/M31/M36]
[HF M300/M306]
7. Touch
to close the menu.
8. Turn the camcorder off, and then remove the SD (or SDHC) memory card from the camcorder.
6
Next you will use a computer to copy the firmware to the SD (or SDHC) memory card that was
completely initialized in the camcorder. Please perform the procedure that corresponds to your
computer's operating system (Windows or Mac OS).
For Windows (These explanations use the screens from Windows Vista.)
1. Insert the initialized SD (or SDHC) memory card into the
SD card reader/writer (or the SD card slot on the
computer).
Depending on the settings of your OS, a dialog box for
either Auto Play or a Removable Disk may appear. If
that happens, click the Close button [x] in the upper
right-hand corner of the dialog box.
2. If you click on the Computer icon (or My Computer in
Windows XP), a removable disk icon labeled CANON
appears.
Depending on your computer, the SD (or SDHC) memory card
may appear as shown below.
3. Drag the firmware update data VGC6.FIM from the
HFM31_f folder created in Step 3-4 to the CANON icon.
Caution
Please be sure to copy the firmware to the root directory of the SD (or SDHC) memory card.
1. After copying the data, double-click the CANON icon, and
if the firmware update data VGC6.FIM is there, the
copying process is completed.
7
2. Click the Back button [
] in the currently open window,
right-click on the CANON icon, select Eject from the
context menu, and then remove the SD (or SDHC)
memory card from the card reader/writer (or from the SD
card slot on the computer).
Right-click
Please proceed to Step 5: Update the camcorder to the new firmware.
For Mac OS
1. Insert the initialized SD (or SDHC) memory card into the SD card reader/writer (or the SD card slot on the
computer).
2. An icon labeled CANON will appear on the computer's
desktop.
Using a card reader
Using a built-in card slot
3. Drag the firmware update data VGC6.FIM from the
HFM31_f icon created in Step 3-3 to the CANON icon on
the desktop.
Caution
Please be sure to copy the firmware to the root directory of the SD (or SDHC) memory card.
1. After copying the data, double-click the CANON icon on
the desktop. If the firmware update data VGC6.FIM is
there, the copying process is completed.
2. Click the close button [
] in the upper left-hand side of
the screen to close the folder.
8
3. Drag the CANON icon to the Trash icon, and then
remove the SD (or SDHC) memory card from the card
reader/writer (or the SD card slot on the computer).
Please proceed to Step 5: Update the camcorder to the new firmware.
Step 5: Update the camcorder to the new firmware
This section explains how to operate the camcorder.
1. Insert the SD (or SDHC) memory card that has the
firmware update data on it into the camcorder.
Insert with the label side up.
2. Turn the camcorder ON.
3. Press the
(Camera/Play) button and set the
camcorder to playback mode.
4. Touch the icons on the camcorder's LCD screen in the
following order.
[HF M30/M31/M36]
[HF M300/M306]
5. In the
tab, drag the screen down to the very bottom so that [Firmware] is displayed.
9
6. Touch the [Firmware] version number to display the firmware update confirmation screen. Touch [OK] to
start the f irmware update. After a short while, the f irmware will be overwritten with the new
version. (The update takes approximately 4 minutes.)
[1.0.0.0 -> 1.0.2.0]
[1.0.1.0 -> 1.0.2.0]
Caution
The firmware update takes approximately four minutes to complete. During this time, please do
not turn off the camcorder or operate any of its controls. Doing so could cause camcorder
malfunctions.
7. After the update ends, the camcorder will automatically restart, and a screen that shows the
new f irmware version will appear for about four seconds.
Firmware updated
Version 1.0.2.0
8. All of the settings will be reset, and the time and date screen will appear. Please set the date and time.
9. Please operate the camcorder as described in Step 2, “Check the firmware version on your
camcorder”, to confirm that the firmware version has changed.
10. Turn off the camcorder, and then remove the SD (or SDHC) memory card.
11. This completes the firmware update.
Caution
After the firmware update is completed, make sure to follow Step 4-1 to 4-7 to completely
initialize the SD (or SDHC) memory card that was used to copy the firmware before using the
memory card. Also, please delete the firmware you downloaded from your computer.
10