1
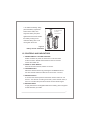
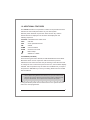
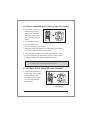
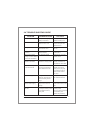
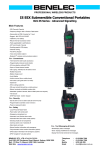
HT446
V04/06
PMR446 submersible transceiver
OWNERS MANUAL
SCMB
Submersible
Dependable
Tough
CE COMPLIANCE STATEMENT
The HT446 transceiver displays "CE" on the serial number label,
indicating its compliance with the essential requirements of the EEC directive
for Electromagnetic Compatibility.
DECLARATION OF CONFORMITY
We Entel UK Limited,
OF:
4 Elstree Gate, Elstree Way
Borehamwood, Herts
WD6 1JD
United Kingdom
Declare under our sole responsibility that the product:HT446 series UHF PMR446 handheld transceiver
Serial Number
To which this declaration relates, is in accordance with directive 95/5/EC and
conforms to the following standard or other nominative documents:EN 300 296 (March 2001) EN 301 489-1 V1.5.1:2003, EN 60065:2002
Following provisions of the R&TTE directive.
M. Austin.
Quality Manager
2
INDEX
1.1 INTRODUCTION
04
1.2 GENERAL FEATURES
04
1.3 PACKING LIST
04
1.4 OPTIONAL ACCESSORIES
05
1.4.1 ATTACHING AUDIO ACCESSORIES
06
1.5 CONTROLS AND INDICATORS
07
1.6 LCD INDICATORS
09
1.7 RECEPTION
10
1.8 TRANSMISSION
10
1.9 ADDITIONAL FEATURES
11
1.10 VOICE OPERATED TRANSMIT (VOX)
12
1.11 SIMPLE MODE (B version)
15
2.0 INCLUDED TRICKLE CHARGER model CCA230
16
2.1 OPTIONAL CHARGER model CSA640E
16
2.2 BATTERY INDICATOR
17
2.3 BATTERY SAFETY
18
2.4 TROUBLE SHOOTING GUIDE
19
2.5 SPECIFICATION (General, receive and transmit)
20
2.6 NOTES
22
3
1.1 INTRODUCTION
The Entel HT446 is a professional PMR446 handheld transceiver that
operates on the licence exempt UHF band. The HT446 has 8 radio
channels (maximum available on PMR446). To minimise interference
each channel may be used with any of 38 CTCSS or 83 DCS tones.
This makes over 900 channel combinations available to the user.
1.2 GENERAL FEATURES
1. Heavy duty, commercial grade construction
2. Submersible to 1 metre (IP67)
3. Lithium-Ion battery technology
4. 24 hour battery endurance (5%TX/5%RX/90%STDBY)
5. VOX (Voice operated transmit) - 9 levels
6. Battery indicator, with battery low warning bleep
7. Call feature with 20 different alert tones
8. Vibrate
9. Squelch adjustment (used to increase range or remove interference)
10. Voice scrambler. (Not available in some countries)
1.3 PACKING LIST
The supplied package:
HT446
HT446 PMR446 transceiver
CNB640E
1800mAh rechargeable lithium-Ion battery pack
CCA230
Drop in 6 hour trickle charger, 230v
CBH640
Spring loaded belt clip
CCA12
12v charger lead
Carry strap
Owner's manual
4
1.4 OPTIONAL ACCESSORIES
The HT446 is supported by a wide range of essential accessories.
For an up to date list visit our web site at www.entel.co.uk
CSA640E
CSB640E
CCA230
CCA12
Single pod intelligent rapid charger, 110/230v operation
Six pod intelligent rapid charger, 110/230v operation
230v drop in trickle charger. (Also available as 110v - CCA110)
12v drop in trickle charger
CNB640E
7.4V 1800mAh rechargeable lithium-Ion battery pack, with rear clip
CMP640
CMP1/640
Submersible, noise cancelling speaker microphone (heavy duty)
Compact speaker microphone with earpiece jack
EA15/640
EA12/640
EPT40/640
Covert style ear/microphone with transparent acoustic tube/ PTT
D Shaped ear microphone with in-line PTT
Bone conductive earpiece microphone
CHP1/640
CHP640HD
CHP640HS
CHP640D
Single earpiece lightweight headset with in-line PTT (vox)
Heavy duty double ear defender for hardhat with PTT (vox)
Heavy duty single ear defender for hardhat and PTT (vox)
Heavy duty double ear defender with headband and PTT (vox)
CXR5/640
CXR16/640
Skull microphone (vox)
Throat microphone (vox)
CFC640
CLC640
CLC940
Soft, real leather case with carry strap - blue, red or yelllow
Heavy duty transparent case with carry strap
Heavy duty leather case with carry strap
EHP640
CBH640
Covert style earpiece
Spring loaded rear clip
Accessories suitable for vox operation have been marked (vox)
5
1.4.1 ATTACHING AUDIO ACCESSORIES
Locate accessory connector cover marked "ACC". Lift cover and
rotate (screw) the connector clockwise.
Note: The accessory socket is waterproof
without the ACC cover in place. However,
when not using an audio accessory we
strongly advise keeping the ACC cover
firmly pressed in its recess to prevent
foreign objects from getting into the socket.
SCMB
Figure 1. Attaching the accessory connector prior to use
Preparation prior to use
1. Attaching the belt clip. Align the belt clip with the plastic slots on the
rear of the battery pack. Slide the belt clip onto the battery pack, pushing
firmly until a click is heard.
2. BATTERY REMOVAL / ATTACHMENT
1. Turn the transceiver off.
2. Using a coin, rotate the battery screw anti-clockwise 2 or 3 turns.
**Ensure that you do not hold the battery pack when
unscrewing the release screw!
6
3. To attach the battery: firstly,
place the battery against the
bottom of the radio, then
hinge the battery into place
To remove rotate
the screw
anti-clockwise
against the transceiver. Rotate
the battery locking screw
clockwise taking care not to
over tighten the screw.
Figure 2.
Battery removal / Attachment
1.5 CONTROLS AND INDICATORS
1. POWER SWITCH / VOLUME CONTROL
Rotate clockwise to power the transceiver on and increase
received volume. Rotate anticlockwise to reduce received
volume and switch off.
2. PUSH TO TALK SWITCH
Press and hold to transmit, release to receive.
3. UP/DOWN button
Select the desired channel by pressing the UP/DOWN buttons.
For fast channel selection hold down for more than 1 second.
4. MONITOR button
To monitor the channel press and hold the monitor button for one
second . You will hear a rushing noise & any other channel users, to
return to normal mode press and hold the monitor button again.
5. BATTERY PACK
A high performance rechargeable lithium-lon battery pack is supplied
as standard with your radio.
7
ACCESSORY CONNECTOR
POWER SWITCH
LAMP/LOCK
MON
PTT
SCMB
UP/DOWN
Enter
BATTERY PACK
Figure 3. CONTROLS & INDICATORS
8
6. ENTER BUTTON
Used to save your settings.
7. ACCESSORY CONNECTOR
Allows you to connect any Entel approved audio accessory to your HT446
radio.
8. LAMP/LOCK BUTTON
Used to illuminate display and lock/unlock keypad.
1.6 LCD INDICATORS
SCMB
Figure 4. LCD indications
CHANNEL DISPLAY
The far right (largest) number indicates the operating channel (1-8).
Appears when the key bleep sound is turned on.
CTC/DCS
Indicates if CTCSS or DCS interference suppression tones are enabled.
The CTCSS or DCS tone number is indicated in the botom left of the LCD.
SCAN
VOX
Appears when scan is activated.
Voice operated mode enabled.
The keypad is locked.
The status of the lithium-lon battery of your transceiver is continually
monitored and displayed for your convenience and safety.
VIB
Indicates vibrate mode enabled, the transceiver will Vibrate during the
initial call.
SCMB
Scrambler enabled. Feature only available in certain countries
CALL
Call alert feature. You may select one of 20 individual call tones.
1.7 RECEPTION
1. Turn the transceiver on by rotating the volume control in a clockwise
direction. A power on tone is generated after 1 second to indicate the
transceiver has passed its self-diagnostic test. Select the desired
receive volume level by further rotating the control clockwise.
After power on, the transceiver will always default to the last channel
selected.
2. Select the desired channel using the [UP/DOWN] buttons.
3. When receiving a signal the LED indicator illuminates green.
1.8 TRANSMISSION
1. Perform steps 1 through 3 of RECEPTION.
2. Before transmitting, monitor the channel and make sure it is clear.
3. When receiving a signal, wait until the signal stops before transmitting.
The transceiver cannot transmit and receive simultaneously.
4. Press the [PTT] (push-to-talk) switch to begin your transmission.
To confirm transmission in progress the LED illuminates RED.
5. Holding the transceiver 2 inches from your mouth speak slowly and
clearly into the microphone.
6. When the transmission is finished, release the [PTT] switch.
10
1.9 ADDITIONAL FEATURES
The HT446 transceiver incorporates a number of unique features which
will enhance the overall performance of your radio system.
With the power switched on press the "FCN" function key until the
desired function is displayed. The functions are displayed in the
following sequence:
CTC/DCS CTCSS/DCS sub audio tones
CALL
Call alert
VOX
Voice operated transmit
VIB
Vibrate
SCMB
Voice Scrambler
SCAN
Channel scan mode
Button bleep
SL
SQUELCH LEVEL.
CTCSS/DCS (CTC/DCS)
There are two types of tone offered; CTCSS abbreviated CTC and DCS.
Both these tones work in conjunction with the channel to prevent
interference from other users who may be working on the same channel.
To change the CTC or DCS tone press "FCN" once, the CTC/DCS display
will flash. Use the up/down keys to select the CTC/DCS tone you require
and press the "ENTER" key to save your setting. DCS tones are located
after CTCSS 38.
Note : If two groups are communicating within range of each other using the same
channel, despite using different tone codes only one group can use the same
channel at any one time. When the channel is being used by a different group
the green LED will flash, but no speech will be heard from the speaker.
If using this feature please ensure that all users in the system have the
same tone code programmed.
11
CALL
The call alert feature allows you to send one of 20 distinctive alert tones to
another user in your system.
To enable the CALL feature press "FCN" twice. CALL will flash on the
LCD. As default it is switched off. To switch this feature on press either
the UP or DOWN channel button to scroll through the alert tones.
Once you select your alert tone press the ENTER key to save.
From the front keypad each time you wish to send the CALL tone simply
press the CALL button.
1.10 Voice operated transmit (VOX)
In VOX mode the transceiver will react to your voice and transmit
automatically without you having to press the PTT button.
There is always a slight delay for the electronic switching, therefore starting
a transmission with an exaggerated length, throwaway, first word is
recommended e.g. "H-e-l-l-o Charlie One do you receive, over".
To enable the VOX feature press the "FCN" button three times.
VOX will flash on the LCD display. As default it is switched off.
To switch this feature on press either the UP or down button to scroll
through the levels. When the desired level is selected press the ENTER button
to confirm. Level 9 is the most sensitive setting and should be
used in low ambient noise environments. Level 1 is least sensitive
and should be used in a high ambient noise environment.
Once this feature is enabled in the menu you can turn it on and off by
pressing the VOX button located on the front panel. If you press and
hold this button you can change the levels.
Note : to get optimum performance from the VOX feature you should use a noise
cancelling headset or earpiece microphone (see accessory options marked VOX)
12
VIBRATE (VIB)
There may be occasions where you would want the HT446 to vibrate
on receipt of a valid call, or indeed set it up to vibrate in addition to an
audible alert. To enable the vibrate feature press "FCN" key four times.
VIB and OF (OFF) are displayed on the LCD. This indicates vibrate is
switched to off. To switch on press either the UP or DOWN channel
buttons then press ENTER to save your setting.
Voice scrambler (SCMB)
To avoid the potential eavesdropping of other users, HT446 offers a
built in voice scrambler. Press "FCN" five times, select ON or OF (OFF)
and then press "ENTER" to save the setting.
*Due to local regulation, in some countries the scrambler feature may
not be available, please check with your dealer prior to purchase.
SCAN
Scanning allows you to efficiently monitor radio activity. To enable
SCAN press the "FCN" button six times. SCAN is displayed on the LCD.
As default it is switched off. Press the UP or DOWN buttons to switch on.
1 is normal channel scan 2 is CTCSS/DCS scan. To start scanning,
momentarily press the scan button.
Channel Scan (1)
All channels will be scanned in sequence. If a signal is received the HT446
will stop on the channel. If you wish to skip active channels press
either the UP or DOWN keys to resume scanning.
Alternatively, press the PTT to reply. If you have programmed any
tone codes then the scan will look for those specific tones only.
CTCSS/DCS Scan (2)
If you selected CTCSS/DCS scan in scan setup then the HT446 will scan
the selected channel for any activity on all the CTCSS/DCS tones.
13
With the exception of PTT each time a you press any of HT446 buttons
a single beep tone is emitted. This can be disabled should you wish.
To disable the beep tone press "FCN" button seven times.
As default this feature is set to ON. By pressing the UP or DOWN button
you can tun this feature ON or OFF. Press the enter key to store the setting.
SQUELCH LEVEL (SL)
A squelch circuit allows muting of undesired noise while receiving no
signal, and emits audio when receiving signal. If operating HT446
directly next to machinery or computer equipment you may get squelch
breakthrough. Either move away from the equipment, or change the
squelch level to a lower setting.
Note : If using CTCSS or DCS on your HT446 you will not get squelch breakthrough.
To change the squelch level press "FCN" eight times. As default the
squelch level is set to 5. It can be increased or decreaed by pressing
the UP or DOWN buttons.
Press the ENTER button to confirm your setting.
A key lock feature is available should you wish to lock the keypad.
Located under the PTT button there is a X button. Holding this button
for just over a second locks the front keypad. When locked the only
button that continues to operate is the PTT button. To release the lock
simply press the X button.
14
Lamp X
A momentary press of the X button will illuminate the LCD for
approximately 3 seconds.
Monitor button <>
The monitor button defeats any CTCSS or DCS tone programmed into
your HT446. In addition to radio etiquette the monitor facility is used to
listen to weak signals.
1.11 SIMPLE MODE
We understand that some users would find the commercial grade,
submersible construction of HT446 appealing but prefer not to have the
feature rich options offered by the HT446.
For these users you can set operation mode "B". The "B" version allows you
to enable or disable any of the key features, and fix CTCSS/DCS tones per
channel.
To access B version
1. Hold down the ENTER and UP buttons whilst turning the radio on.
Select version B using the UP or DOWN button. Press ENTER
to confirm.
2. Then hold down CALL and VOX and switch radio on. From here you
can enable or disable any of the features, you can also set the CTCSS
or DCS tone per channel. Once finished switch the radio off and on.
Those features selected will be fixed. Should you wish to change any
of the features fixed simply follow step 2 again.
Should you wish to return to mode A you need to follow step 1 to
and select mode A.
In B version, you are able to disable the monitor button. If you press the
"FNC" 9 times, the "nn" symbol is displayed. You can then select this feature
on or off.
15
2.0 TRICKLE CHARGER model CCA230 (CCA110 for 110VAC)
1. Connect the CWC640 AC
adaptor to the CCA230
charger pod. The LED
SCMB
status light will illuminate
green indicating ready for
charge.
2. Turn the transceiver off.
DC12V
Figure 5. CCA230 Charger pod
3. Insert the battery pack
into the CCA230 pod, either with or
without the transceiver attached. The LED status light changes
from green to RED and trickle charge begins.
4. A fully discharged battery pack will take approximately 6 hours
to charge, depending on the remaining power condition. When
charge is complete, the LED status light turns green.
Note : The CWC640 AC adaptor can be replaced by the included CMC640
12v charger cable. Charge time remains at 6 hours.
2.1 OPTIONAL RAPID CHARGER model CSA640E
1. Connect the CSA640E to a
mains supply (110 to 230V).
When switching on, the
SCMB
LED flashes orange briefly
to confirm self-diagnostic
test complete.
110-230VAC
Figure 5-1. OPTIONAL CSA640E
Rapid charger
16
2.1 CSA640E RAPID CHARGER Continued:
2. Turn the transceiver off.
3. Insert the battery pack into the CSA640E charger, either with
or without the transceiver attached. The LED will illuminate red
to indicate rapid charge in progress.
4. Charge time for a fully discharged battery pack will take up to
120 minutes. On completion the LED turns green.
2.2 BATTERY INDICATOR
For your safety and convenience your transceiver continually
monitors the battery pack and gives an indication on the LCD:
3 Segments : 24 hours remaining
2 Segments : 1 hour remaining
1 Segment : 30 mins remaining
Figure 6. Battery Indicator
17
2.3 BATTERY SAFETY
The battery pack of your transceiver contains lithium-Ion cells.
This type of battery stores a charge powerful enough to be dangerous
if misused or abused, especially when removed from the transceiver.
Please observe the following precautions:
DO NOT SHORT BATTERY PACK TERMINALS
Shorting the terminals that power the transceiver can cause sparks,
severe over heating, burns, and battery cell damage. If the short is of
sufficient duration, it is possible to melt the battery components.
Do not place a loose battery pack on or near a metal surface or objects
such as paper clips, keys, tools etc.
When the battery pack is installed on the transceiver, the terminals
that transfer current to the transceiver are not exposed.
The terminals that are exposed on the battery pack when it is mounted
on the transceiver are charging terminals only and do not constitute a
hazard.
DO NOT INCINERATE
Do not dispose of your CNB640 battery in a fire or incinerator.
The heat of fire may cause battery cells to explode and/or release
dangerous gases.
DISPOSE OF BATTERY PACKS PROPERLY
Lithium-Ion battery packs must be recycled or disposed of properly.
For requirements in your area, check with the dealer from whom you
purchased your transceiver.
18
2.4 TROUBLE SHOOTING GUIDE
PROBLEM
Radio will not power on
Radio will not talk with others
PROBABLE CAUSE
SOLUTION
Battery needs charging
Recharge battery pack
Battery is exhausted
Replace the battery pack
Radios may be on different
Check that all radios in same
channel or tone code
group are using the same
Sharing same channel and
Select a different channel
tones as other users
and tone
channel and tone
Hearing others conversations
Control buttons not
Keylock activated
Turn keylock off
functioning
Mode B Selected
Enable mode A
Radio transmits without
Vox has been enabled
Press assigned vox button
pressing PTT button. Buttons
to switch vox off
seem to work intermittently
Unintelligible Audio signal
Voice scrambler not
Ensure scrambler either
received or transmitted
enabled on receiving HT446
enabled or disabled to be
compatible with other radios
Status LED flashes green
The channel is active but
Press monitor button to
but no audio received
your radio is programmed
establish if the channel
with a different tone code
activity is from your group.
If so change tone code to
match the other radios in
your group
Limited Talk Range
Using the radio in a vehicle,
Where possible use your
basement, steel structure or
radio outside these areas
concrete building reduces
range
LED on charger does not
Defective battery
Contact your dealer
illuminate when charging
Dirty Terminal contact on
Clean contacts with dry clean
charger
cloth
Accessory does not work
Accessory plug not seating
Check connection into
with radio
correctly in accessory socket
accessory socket
Incompatible accessory
Ensure only genuine approved
being used
Entel accessory used
Replace faulty accessory
19
2.5 SPECIFICATION (General, receive and transmit)
Performance specifications are nominal, unless otherwise indicated,
and are subject to change without notice.
GENERAL
Number of Channels
Frequency Range
8ch
446.00625MHz ~ 446.09375MHz
Channel Spacing
12.5KHz
Channel Increments
6.25KHz
Size (WxDxH)
59 x 33 x 130mm
Weight (With Battery and Antenna)
Battery Voltage
296g
7.4V, Nominal
Current Drain
Squelched
60mA, Max.
Rated Audio
160mA, Max.
Transmit-0.5Watt
350mA, Max.
Antenna impedance
50 ohms
Speaker impedance
Frequency Stability
Operation Temperature
20
8 ohms
2.5ppm Max.
-20
to +55
RECEIVER
Sensitivity (12dB SINAD)
Squelch Sensitivity
>0.35uV Max.
>User adjustable
Adjacent Channel Selectivity (ETS)-Wide Band
70dB Min.
Spurious Rejection (ETS)
70dB Min.
Intermodulation (ETS)
65dB Min.
Hum and Noise Ratio
40dB Min.
Rated Audio Output at 5% T.H.D.(1KHz)
500mW Typical
TRANSMITTER
RF Output Power-(ERP)
Spurious/Harmonic Emissions
500mW
-36dBm<1GHz
-30dBm>1GHz
Modulation- Narrow Band
FM Hum and Noise
Audio Distortion
Adjacent Channel Power-Lo Power
2.5KHz
38dB Typical
5% Max.
60dB
21
2.6 NOTES
Use this page to record important information, such as the serial
number of your HT446 transceiver, and any of the frequencies
and sub-tones programmed by your dealer.
22
23
<Intended Country of Use>
□ GER
□ NED
□ ITA
□ NOR
□ AUT
□ BEL
□ GRE
□ SUI
□ GBR
□ LUX
□ SWE
□ CZ
□ IRL
□ ESP
□ DEN
□ FRA
□ POR
□ FIN
Registered Community Design Application 000044375
U.S. Design Patent Pending No. 29/183,829
Copyright and Unregistered Design Right Entel UK 2003.
All rights reserved
Copyright Entel UK Ltd, London