1
FOREWORD
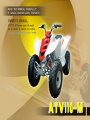
Thanks for purchasing ATV110-M. This manual includes important safety information. It
provides information about special techniques and skills necessary to ride this vehicle. It also
includes the details to operate and necessary maintenance procedure to perform safely.
IMPORTANT SAFETY MESSAGE:
●
PAY ATTENTION TO THE CAUTION AND WARNING LABELS ON THIS ATV.
●
READ THIS MANUAL BEFORE OPERATING THIS ATV. MAKE SURE YOU UNDERSTAND
ALL INSTRUCTION. ALSO KEEP ALL INFORMATION IN MIND WHILE OPERATING THIS
ATV.
●
ANYONE UNDER AGE 16 SHOULD NEVER BE ALLOWED TO OPERATE ATV110-M.
●
KEEP THIS MANUAL IN THE WATERPROOF PLACTIC BAG AND STORED IN THE COMPARTMENT PROVIDED BY YOU ATV.
●
FAILURE TO FOLLOW THE WARNINGS CONTAINED IN THIS MANUAL CAN RESULT IN
SERIOUS INJURY OR DEATH.
●
NEVER CARRY A PASSENGER ON THIS ATV.
1
IMPORTANT NOTICE TO PARENTS AND ADULTS
●
THIS ATV IS NOT A TOY.
●
YOU SHOULD UNDERSTAND THE INSTRUCTIONS AND WARNINGS IN THIS MANUAL
BEFORE YOU LET YOUR CHILD RIDE THIS ATV. THEN BE SURE YOUR CHILD UNDERSTANDS AND WILL FOLLOW THEM.
●
THIS ATV SHOULD ONLY BE OPERATED UNDER THE DIRECT SUPERVISION OF AN
ADULT.
●
NEVER EXCEED YOUR RIDING CAPABILITIES.
●
●
●
●
●
THIS ATV CAN BE HAZARDOUS TO OPERATE, AVOID EXCESSIVE SPEED, PAVED
SURFACES, SHARP TURNS, AND UNEVEN TERRAIN.
ADULTS SHOULD ADJUST THE THROTTLE FOR SLOWER SPEEDS.
NEVER RIDE THIS ATV DURING LOW LIGHT CONDITIONS.
CHILDREN DIFFER IN SKILLS. SOME CHILDREN MAY NOT BE ABLE TO OPERATE AN
ATV SAFETY. PARENTS SHOULD PERMIT CONTINUED USE ONLY IF THEY DETERMINE THAT THE CHILD HAS THE ABILITY TO OPERATE THE ATV SAFETY.
IF YOUR CHILD IS INEXPERIENCED IN RIDING ATV, HE OR SHE SHOULD TAKE A TRAINING COURSE BEFORE OPERATING THIS ATV.
2
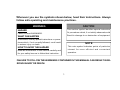
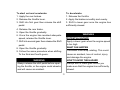
Whenever you see the symbols shown below, heed their instructions. Always
follow safe operating and maintenance practices.
WARNING
CAUTION
This caution symbol identifies special instruction
HAZARD
Or procedures which, if not strictly observed,could
Failure to heed WARNINGS.
Result in damage to or destruction of equipment.
WHAT CAN HAPPEN
W ARNINGS identify special instructions or procedures which, if not correctly followed, could result
NOTE
in serious injury or death.
This note symbol indicates points of particular
HOW TO AVOID THE HAZARD
in terest f or m ore eff icient and convenient
Read all WARNINGS in this manual carefully and
operation.
for your safety be sure to follow their instruction.
FAILURE TO FOLLOW THE WARNINGS CONTAINED IN THIS MANUAL CAN RESULT IN SERIOUS INJURY OR DEATH.
3
IMPORTANT NOTICE
Off-road vehicle riding is a wonderful sport, and we hope you will enjoy it to the fullest.
This vehicle is designed and manufactured for off-road use only. It is illegal and unsafe to
operate this vehicle on any public road, street and highway.
This vehicle complies with all applicable off-road noise and spark arrester laws and regulations in effect at the time of manufacture. Please check your local riding laws and regulations
before operating this vehicle.
Read this manual carefully and completely before starting your new ATV
It contains important safety information. Never operate this ATV without proper instruction.
Beginner should take a training course before operating this vehicle.
Never allow a child under the age 16 to operate this ATV. Use of this ATV by children under
16 years of age can lead to severe injury of death of the child. Even youths starting at age 16
may not have the skills, abilities, or judgment needed to operate this ATV safety. Therefore
youths starting at age 16 should have adult supervision even after they attend a training course.
To protect your safety, make sure you use your vehicle legally, show concern for the environment,
and respect the rights of other people.
4
WARNING
Indicate a potential hazard that could result in personal injury or death.
TABLE OF CONTENTS
FORWORD ................................................... 1
PRE-OPERATION INSPECTION ................ 27
IMPORTANT NOTICE ................................... 4
OPERATION ................................................. 32
SAFETY INFORMATION .............................. 6
RIDING YOUR ATV ...................................... 35
LOCATION OF THE WARNING AND
PERIODIC MAINTENANCE AND
SPECIFICATION LABELS ........................... 13
ADJUSTENT ................................................. 43
VEHICLE IDENTIFICATION .......................... 17
CLEAN AND STORAGE .............................. 51
CONTROL FUNCTONS ................................ 18
SPECIFICATIONS ........................................ 53
5
SAFETY INFORMATION
AN ATV IS NOT A TOY AND CAN BE HAZARDOUS TO OPERATE. An ATV handles differently from other vehicles including motorcycle and cars. A collision or rollover can occur quickly,
even during routine maneuvers such as turning and driving on hills or over obstacles, if you fail
to take proper precautions.
SEVERE INJURY OR DEATH can result if you do not follow these instructions:
●
●
●
Read this manual and all labels carefully and follow the operating procedures described.
Never operate an ATV without proper instruction. Take a training course. Beginners should
receive training from a certified instructor.
Always follow the age recommendation:
-A child under 6 years old should never operate an ATV with engine size greater than
50 c.c.
-A child under 12 years old should never operate an ATV with engine size greater than
70 c.c.
-A child under 16 years old should never operate an ATV with engine size greater than
90 c.c.
6
●
●
●
●
●
●
●
●
●
●
Never allow a child under age 16 to operate ATV without adult supervision, and never allow
continued use of an ATV by a child if he or she does not have the abilities to operate it
safely.
Never carry a passenger on an ATV.
Never operate an ATV on any public road, street or highway, even a dirt or gravel one.
Never consume alcohol or drugs before or while operating this ATV.
Never operate an ATV without wearing an approved motorcycle helmet that fits properly.
You should also wear eye protection (face shield or goggles), gloves, bots, long-sleeved
shirt or jacket, and long pants.
Always avoid operating an ATV on any paved surfaces, including driveways, sidewalks,
streets and parking lots.
Always go slowly and be extra careful when operating on unfamiliar terrain. Always be alert
to changing terrain conditions when operating the ATV.
Always follow proper procedures for turning as described in this manual. Practice turning at
low speeds before attempting to turn at faster speeds. Do not turn at excessive speed.
Never operate on excessively rough, slippery or loose terrain until you have learned and
practiced the skill necessary to control the ATV on such terrain. Always be especially cautious on these kinds of terrain.
Always keep both hands on the handlebars and both feet on the footrests of the ATV during
7
operation.
●
Always inspect your ATV each time you use it to make sure it is in safe operating condition.
Always follow the inspection and maintenance procedures and schedules described in this
manual.
●
Never attempt wheelies, jumps, or other stunts.
●
Never operate at speeds too fast for your skills or the conditions. Always go at a speed that
is proper for the terrain, visibility and operating conditions, and your experience.
●
Never exceed the stated load capacity for an ATV. Cargo should be properly distributed
and securely attached. Reduce speed and follow instructions in this manual for carrying
cargo or pulling a trailer. Allow greater distance for braking.
●
Never modify an ATV through improper installation or use of accessories.
●
Never operate the ATV on hills too steep for the ATV or for your abilities. Practice on
smaller hills before attempting larger hills.
●
Always follow proper procedures for climbing hills as described in this manual. Check the
terrain carefully before you start up any hill. Never climb hills with excessively slippery or
loose surfaces. Shift your weight forward. Never open the throttle suddenly or make sudden gear changes. Never go over the top of a hill at high speed.
●
Always use the size and type tires specified in this manual. Always maintain proper tire
pressure as described in this manual.
8
●
●
●
●
●
Never attempt to operate over large obstacles, such as large rocks or fallen trees. Always
follow proper procedures when operating over obstacles as described in this manual.
Always use proper procedures if you stall or roll backwards when climbing a hill. To avoid
stalling, use proper gear and maintain a steady speed when climbing a hill. If you stall or roll
backwards, follow the special procedure for braking described in this manual. Dismount on
the uphill side or to a side if pointed straight uphill. Turn the ATV around and remount,
follow the procedure described in this manual.
Always be careful when skidding or sliding. Learn to safety control skidding or sliding by
practicing at low speeds and on level, smooth terrain. On extremely slippery surface, such
as ice, go slowly and be very cautious in order to reduce the chance of skidding or sliding
out of control.
Never operate an ATV in fast flowing water or in water deeper than the recommended in this
manual. Remember that wet brakes may have reduced stopping ability. Test your brakes
after leaving water. If necessary, apply them several times to let friction dry out the linings.
Always follow proper procedures for going down hills and for braking on hills as described
in this manual. Check the terrain carefully before you start down any hill. Shift your weight
backward. Never go down a hill at high speed. Avoid going down a hill at an angle that will
cause the ATV to lean sharply to one side. Go straight down the hill where possible.
9
●
●
Always follow proper procedures for crossing the side of a hill as described in this manual.
Avoid hills with excessively slippery or loose surface. Shift your weight to the uphill side of
the ATV. Never attempt to turn the ATV around on any hill until you have mastered the
turning technique described in this manual on level ground. Avoid crossing the side of a
steep hill if possible.
Always check for obstacles before operating in a new area.
10
WARNING
POTENTIAL HAZARD
Improper handling of gasoline.
WHAT CAN HAPPEN
Gasoline can catch and you could be
burned.
HOW TO AVOID THE HAZARD
Always shut down the engine while refueling.
Do not refuel immediately after the engine
has been running and is still very hot. Do
not spill gasoline on the exhaust muffler/pipe
or engine when refueling. Never refuel while
smoking, or while in the vicinity of sparks,
open flames, or other sources of ignition
such as the pilot lights of clothes dryers or
water heaters
W hen transporting the ATV in another
vehicle, make sure it is placed upright and
its fuel cock is in the “OFF” position.
Otherwise, gasoline may leak out from the
fuel tank or carburetor.
WHAT CAN HAPPEN
Gasoline is poisonous and can cause
injuries.
HOW TO AVOID HAZARD
If you swallow some gasoline or breathe a
lot of gasoline vapor, or get some gasoline
into your eyes, see your doctor right away.
If gasoline spills on your skin, wash with
water and soap immediately. If gasoline spills
on your clothes, change your clothes
immediately.
11
WARNING
POTENTIAL HAZARD
Starting or running the engine in a closed
area.
WHAT CAN HAPPEN
Exhaust smokes are poisonous and may
cause people unconsciousness and death
within a short time.
HOW TO AVOID THE HAZARD
Always start and operate your ATV in an
area with adequate ventilation
12
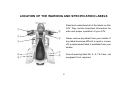
LOCATION OF THE WARNING AND SPECIFICATION LABELS
②
Read and understand all of the labels on this
ATV. They contain important information for
safe and proper operation of your ATV.
④
Never remove any labels from your vehicle. If
①
③
⑤
⑥
⑧
any label becomes difficult to read or comes
off, a replacement label is available from your
dealer.
⑦
⑨
French warning label No. 2, 4, 7 & 9 are not
equipped if not required.
13
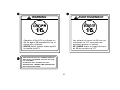
①
②
AVERTISSEMENT
WARNING
Les enfants de moins de 16 ans qui
conduisent ce VTT encourent des
accidents graves ou mortels.
NE JAMAIS laisser un enfant de moins
de 16 ans conduire ce VTT.
Operation of this ATV by children under the age of 16 increases the risk of
severe injury of death.
NEVER permit children under age 16
to operate this ATV.
⑤
THIS VEHICLE IS AN ALL-TERRAIN VEHICLE
AND IS NOT INTENDED FOR USE ON PUBLIC HIGHWAYS.
CE VEHICUL EST UN VEHICLE TOUT
TERRAIN DONT L USAGE N EST PAS DESTINE
AUX VOIES PUBLIQUES.
14
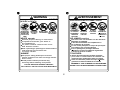
③
④
WARNING
AVERTISSEMENT
Lutilisation incorrecte du VTT peut resulter en
BLESSURES GRAVES ou MEME LA MORT.
Improper AT V use can result in SEVERE
INJURY or DEATH.
ALWAYS USE
AN APPROVED
HELMET AND
PROTECTIVE
GEAR
NEVER USE
ON PUBLIC
ROADS
TOUJOURS PORTER NE JAMAIS
UN CASQUE ET UTILISER SUR
DES VETEMENTS DES ROUTES
DE SECURITE
PUBLIQUES
APPROUVES
NEVER CARRY NEVER USE
PASSENGERS WITH DRUGS
OR ALCOHOL
NEVER operate:
NE JAMAIS conduire:
●
●
without proper training or instruction.
● at speeds too fast for your skills or
the condictions.
● on public roads-a collision can occur
with another vehicle.
●
with a passenger-passengers affect balance
and steering and increase risk
of lo sing con trol.
NE JAMAIS
ACCEPTER DE
PASSAGER
NE JAMAIS
CONDUIRE SOUS
L INFLUENCE DE
STUPEFIANTS OU
D ALCOOL
sans avoir recu une formation ou des directives
adequates au prealable.
● a des vitesses excedant vos competences ou
● les conditions de conduite.
● sur les routes publiques-au risque de provoquer
une collision avec un autre vehicule.
●
avec un passager-les passagers affectent
l equilibre et la manoeuvrabilite et augmentent
le risque de perte de controle.
ALWAYS:
TOUJOURS:
use proper riding techniques to avoid
vehicle overturns on hills and rough terrain
and in turns.
●
avoid paved surfaces-pavement may
seriously affect handling and control.
●
●
●
utiliser des techniques de conduite acceptees
pour eviter le renversement du vehicule sur
collines,terrains accidentes et dans les virages.
eviter les chaussees pavees-au risque d affecter
gravement la manoeuvrabllite et le controle.
REPERER ET LIRE LE MANUEL DU PROPRIETAIRE.
SUIVRE TOUS LES AVERTISSEMENTS ET DIRECTIVES.
LOCATE AND READ OWNER’S MANUAL.
FOLLOW ALL INSTRUCTIONS AND WARNINGS.
15
⑥
⑦
AVERTISSEMENT
WARNING
UNE PRESSION DE GONFLAGE DE PNEU INCORRECTE OU UNE
SURCHARGE PEUVENT ENTRAINER LA PERTE DE CONTROLE.
UNE PERTE DE CONTROLE PEUT ENTRAINER DE SERIEUSES
BLESSURES OU LA MORT.
IMPROPER TIRE PRESSURE OR OVERLOADING CAN
CAUSE LOSS OF CONTROL.
LOSS OF CONTROL CAN RESULT IN SEVERE
INJURY OR DEATH.
OPERATING TIRE PRESSURE:Set with tires cold
3
● Recom mended :FRONT: 20kPa, {0.20 kgf/cm }, 2.9psi
REAR : 20kPa, {0.20 kgf/cm 3 }, 2.9psi
● Minim um
:FRONT: 17kPa, {0.17 kgf/cm 3}, 2.5psi
REAR : 17kPa, {0.17 kgf/cm 3 }, 2.5psi
● Never set tire pressure below m inim um .
It could cause the tire to dislodge from the rim .
LOADING
● Maxim um Vehicle load:95kg,(209lbs).
Includes weight of operator, cargo and accessories.
PRESSION DE SERVICE DES PNEUS:Regler avec des pneus froids
● recommandee: AVANT
: 20kPa,{0.20 kgf/cm 3},2.9psi
ARRIERE : 20kPa,{0.20 kgf/cm 3 },2.9psi
● Minimum
: AVANT : 17kPa,{0.17 kgf/cm 3},2.5psi
ARRIERE : 17kPa,{0.17 kgf/cm 3 },2.5psi
● Ne jamais
regler la pression de gonflage de pneu en dessous de la
valeur minimum.Cela pourrait faire se deloger le pneu de la jante.
CHARGEMENT
● Charge Maximum du vehicule:95kg,(209lbs)
Comprend poids de I operateur,chargement et accessoires.
⑧
⑨
AVERTISSEMENT
WARNING
NEVER ride as a
passenger.
NE JAMAIS prendre
de pa ss ager.
Les passagers risquent
de faire perdre le
controle et d entraIner
des BLESSURES GRAVES
ou meme la MORT.
Passengers can cause
a loss of control,
resulting in SEVERE
INJURYorDEATH.
16
VEHICLE IDENTIFICATION
Identification number records
Record the vehicle identification number and
engine number in the follow spaces provided
for assistance when ordering spare parts from
your dealer or for reference in case the ATV
is stolen.
Vehicle identification number
The vehicle identification number is stamped
into the frame. This vehicle identification number is used to identify your ATV.
1. Vehicle Identification Number:
2. Engine Number
17
CONTROL FUNCTIONS
WARNING
Indicates a potential hazard that could result in serious injury or death.
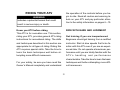
Main switch
Functions of the respective switch positions
are as follows:
ON:
The engine can be started only at this position
OFF:
All electrical circuits are switched off. The key
can be removed in this position.
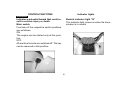
Indicator lights
Neutral indicator light “N”
This indicator light comes on when the transmission is in neutral.
18
Handlebar Switches
Placed in left handlebar:
1. Headlight switch (Blue button)
2. Engine stop switch (Red button)
3. Start switch (Yellow button)
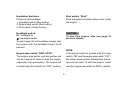
Start switch “Start”
Push this switch to let the starter motor crank
the engine.
Headlight switch:
HL: Headlight on
●: Headlight switch:
To gain longer life of the battery, always start
the engine with the headlight switch at off
position
CAUTION:
To start the engine, also see page 32
formore details.
NOTE:
If the starter switch is pushed with the main
switch “ON” and the engine stop switch “OFF”,
the starter motor will be activated but the engine will not start. To start the engine, make
sure the engine stop switch at “RUN” position.
Engine stop switch “ENG. STOP”
The engine stop switch controls ignition and
can be used at all times to stop the engine,
especially in an emergency. The engine will
not start when this switch is in “OFF” position.
19
Throttle lever
Accelerate: Press the throttle level.
Decelerate: Release the throttle level. The
spring of the level will return to the position
prior pressing and the engine will return to
an idle. Before starting the engine, check the
Throttle level to make sure it is operating
WARNING
POTENTIAL HAZARD
Malfunction of throttle.
WHAT CAN HAPPEN
The throttle level could be hard to operate,
cause it difficult to speed up or slow down
when you need to. This could cause an
accident.
HOW TO AVOID THE HAZARD
Always check the operation of the throttle
level before you start the engine. If it does
work smoothly, check for the reason. Correct the problem before riding this ATV. Consult your dealer if you cannot find or Solve
the problem by yourself.
Smoothly. Make sure it return to idle position
As soon as the level is released.
20
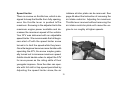
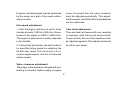
Speed limiter
There is a screw on throttle box, which is designed to keep the throttle from fully opening,
even the throttle lever is pushed toThe
maximum. Screwing in the adjuster limits the
maximum engine power available and decreases the maximum speed of the vehicle.
Your ATV was delivered with an adjustable
speed limiter. We recommends that all beginners start off with the speed limiter screw
turned in to limit the speed while they learn.
Once the beginner becomes more familiar with
operating the ATV, the screw maybe gradually turned out to increase maximum speed.
Adults should decide when to adjust the ATV
for more power as the riding skills of their
youngster improve. Once the rider can operate with full skill at top speed permitted by
intakere strictor plate can be removed. See
page 46 about the Instruction of removing the
air Intake restrictor. Adjusting for maximum
Throttle lever moment without removing the
air intake restrictor plate will cause the engine to run roughly at higher speeds.
Adjusting the speed limiter alone,the air
21
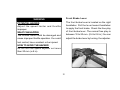
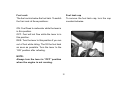
Front Brake Lever
The front brake lever is located on the right
handlebar. Pull the lever toward handlebar
to apply the front brake. Check the free play
of front brake lever. The normal free play is
between 10 to 20 mm. (0.4 to 0.8 in.) You can
adjust the brake lever by turning the adjuster.
WARNING
POTENTIAL HAZARD
Adjust the speed limiter and throttle
improper.
WHAT CAN HAPPEN
The throttle cable could be damaged and
cause improper throttle operation. You could
lost control, have accident or be injured.
HOW TO AVOID THE HAZARD
Do not turn the speed adjuster out more
than 20 mm (o.8 in).
22
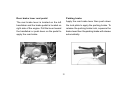
Parking brake
Apply the rear brake lever then push down
the lock plate to apply the parking brake. To
release the parking brake lock, squeeze the
brake lever then the parking brake will release
automatically.
Rear brake lever and pedal
The rear brake lever is located on the left
handlebar and the brake pedal is located on
right side of the engine. Pull the lever toward
the handlebar or push down on the pedal to
apply the rear brake.
23
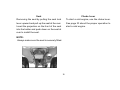
Gear shift pedal
This ATV is equipped with a semi-automatic
4-speed transmission. The gear shift pedal
is located on the left side of engine. Push
down the gear shift pedal to change the gears
as 3 → 2 → 1 → N → R. Move the pedal
upward to change the gears as R → N → 1
→ 2 → 3. Shut off the throttle completely
when performing gear shift or it will damage
the engine.
WARNING
POTENTIAL HAZARD
Operate the parking brake improperly.
WHAT CAN HAPPEN
The ATV could start moving unexpectedly if
the parking brake is not applied before starting the engine. This could cause loss of control or a collision.
If you ride the ATV without releasing the
parking brake, it could cause the brake overheat to lose braking performance and cause
an accident.
HOW TO AVOID THE HAZARD
● Always set the parking brake before starting the engine.
● Always make sure to release the parking
brake before you start to ride.
● Do not change the gear to Reverse before the ATV stops completely.
24
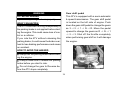
Fuel cock
The fuel cock is below the fuel tank. To switch
the fuel cock at three positions:
Fuel tank cap
To remove the fuel tank cap, turn the cap
counterclockwise.
ON: Fuel flows to carburetor while the lever is
in this position.
OFF: Fuel will not flow while the lever is in
this position.
RES: Turn the lever to this position if you run
out of fuel while riding. The fill the fuel tank
as soon as possible. Turn the lever to the
“ON” position after refueling.
NOTE:
Always turn the lever in “OFF” position
when the engine is not running.
25
Seat
Removing the seat by pulling the seat lock
lever upward and pull up the seat at the rear.
Insert the projection on the front of the seat
into the holder and push down on the seat at
rear to install the seat.
Choke lever
To start a cold engine, use the choke lever.
See page 33 about the proper operation to
start a cold engine.
NOTE:
Always make sure the seat is securely fitted.
26
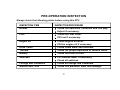
PRE-OPERATION INSPECTION
Always check the following points before using this ATV:
INSPECTION ITEM
Brakes
Fuel
Engine oil
INSPECTION PROCEDURE
● Check the operation, condition and free play.
● Adjust if necessary.
● Check the fuel Level.
● Fill fuel if necessary.
●
●
Drive Chain
Throttle
Battery
Switches
●
●
●
●
●
Fittings and Fasteners
Wheels and Tires
●
●
Check engine oil level.
Fill the engine oil if necessary
Check chain slack and lubricate.
Check for proper operation of throttle cable.
Check the level of fluid.
Fill distilled water if necessary.
Check all switches
Check all fittings and Fasteners.
Check tire pressure, wear and damage.
27
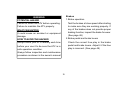
Brakes
1.Brake operation
Test the brakes at slow speed after starting
to make sure they are working properly. If
any of the brakes does not provide proper
braking function, inspect the brake for wear.
(See page 48)
2.Brake pedal and brake levers
WARNING
POTENTIAL HAZARD
Failure to check the ATV before operating.
Failure to maintain the ATV properly.
WHAT CAN HAPPEN
It could cause an accident or equipment
damage.
HOW TO AVOID THE HAZARD
Always check your ATV carefully each time
before your use it to be sure the ATV is in
safe operation condition.
Always follow inspection and maintenance
procedure as shown in the owner’s manual
Check the correct free play in the brake
pedal and brake levers. Adjust it if the free
play is incorrect. (See page 48)
28
Fuel
Always fill regular unleaded gasoline to your
ATV. Do not use leaded gasoline, it will cause
damage to internal engine parts.
If knocking or pinging occurs, use a different
brand of gasoline or premium unleaded fuel.
WARNING
POTENTIAL HAZARD
Improperly operating brakes while riding.
WHAT CAN HAPPEN
The braking ability could lose and cause an
accident
HOW TO AVOID THE HAZARD
Always check the brakes every time before
you start to ride. Do not ride the ATV if you
find there is any problem with the brakes.
Find your dealer to inspect it if you cannot
correct the problem by yourself according
to the adjustment procedures provided in
this manual.
WARNING
Do not overfill the fuel tank. Be careful not
to spill fuel, especially on the engine or exhaust pipe. Make sure the fuel tank cap is
closed securely.
Do not refuel right after the engine has been
running and is still very hot.
29
correctly. It must open smoothly and return
back to idle position when released.
Battery
Check fluid level and fill as necessary. Always
use only distilled water to refill it. (See page
50)
Engine Oil
Always fill engine oil according to ambient
temperature recommended as follows:
Ambient temperature / Recommended oil:
5℃ ~45℃ (40oF~120oF) / SAE20W40
-10℃ ~35℃ (10oF~100oF) / SAE10W30
-20℃ ~0℃ (0oF~30o F) / SAE 5W30
Make sure the engine oil is at specified level.
Add oil as necessary. (See page 44)
Switches
Check the operation of engine stop switch,
starter switch, main switch and fuel cock. Repair as necessary for proper operation.
Drive chain
1. Regularly lubricate the drive chain with an
approved chain lube.
2. The chain should have 6-12mm deflection.
If the chain needs adjustment, use the
proceduce on page 45.
Fittings and Fasteners
Always check the tightness of chassis before riding this ATV. Take the ATV to your
dealer or refer to this manual for Correct tightening torque.
Throttle lever
Check the throttle lever and see it operates
30
Tires
The tire gauge is equipped with this ATV and
located in the tool bag under the seat. Measure tire pressure by the tire gauge and set
the front and rear tires pressure to 20kPa
(2.9psi)
2. Always use size 19 × 7-8 as front tires.
3. Always use size 18 × 8-8 as rear tires.
4. When the tire groove decreases to 3 mm
(0.12 in) due to wear, replace the tire.
WARNING
POTENTIAL HAZARD
Operating this ATV with Improper tires, or
with improper or uneven tire pressure.
WHAT CAN HAPPEN
Operating this ATV with Improper tires, or
with improper or uneven tire pressure could
cause loss of control and an accident.
HOW TO AVOID THE HAZZARD
1. Always set the front and rear tires pressure to be 20kPa (2.9psi).
31
Starting a cold engine
1.Set the parking brake.
2.Turn the fuel cock to “ON”
3.Turn the engine stop switch to “RUN”
4.Turn the main switch to “ON”
5.Shift the transmission gear to neutral.
6.Push down the choke lever to the end.
7.Complete close the throttle lever.
8.Push the start switch to crank the engine
9.Pull up the chock lever to the middle position (warming up position.)until the engine
runs then release the start button. If the en
gine fails to start, release the start button,
then push it again. Each cranking should
not be more than 10 seconds.
10.Keep warming up the engine for 5 min.then
pull up the choke lever to top.
OPERATION
WARNING
Indicates a potential hazard that could result in serious injury or death
WARNING
POTENTIAL HAZARD
Operating ATV without being familiar with
all controls.
WHAT CAN HAPPEN
Loss of control, which could cause an
accident or injury.
HOW TO AVOID THE HAZARD
Read this manual carefully. If you don’t
understand any control or function, ask
your dealer.
32
To start out and accelerate:
1. Apply the rear brakes.
2. Release the throttle lever.
3. Shift into first gear then release the shift
pedal.
4. Release the rear brake.
5. Open the throttle gradually.
6. Once the engine has reached adequate
speed, release the throttle lever.
7. Shift into second gear then release the Shift
pedal.
8. Open the throttle gradually.
9. Follow the same procedure when shifting
To the third and fourth gears.
To decelerate:
1. Release the throttle.
2. Apply the brakes smoothly and evenly.
3. Shift to lower gear once the engine has
sufficiently slowed.
WARNING
POTENTIAL HAZARD
Apply a lower gear when the engine speed
is too high.
WHAT CAN HAPPEN
The wheel could stop rotating. This could
cause an accident, loss of control, injury
and damage the engine.
HOW TO AVOID THE HAZARD
Always shift to lower gear before you
make sure that the engine has sufficiently
slowed.
WARNING
Always release the shift pedal before opening the throttle, or the engine could wheelie
and will cause an accident.
33
Engine break-in
The most important period in the life of your
engine is between 0 and 20 hours. Please
read the following information very carefully.
● Do not put an excessive load on the ATV
for first several hours of running.
● Never continuous operation above half
throttle.
● Cool off the engine for ten minutes after
every hour of operation.
● Vary the speed of the engine from time to
time.
Loading
This ATV is not designed to carry any cargo
or tow a trailer. Never exceed the maximum
loading capacity as 100 kg (220 lb) which includi ng the to tal w eig h t of ride r and
accessories. Always choose the accessories
that is equivalent in design and quality.
WARNING
Overloading this ATV or carrying or towing
cargo could cause changes in vehicle
handling which could lead to an accident.
Never exceed the stated loading capacity
for this ATV.
Parking
When parking, stop the engine and shift into
neutral. Turn the fuel cock to “OFF” position
and apply the parking brake. Never parking
on hills or other inclines.
34
the operation of the controls before you begin to ride. Read all caution and warning labels on your ATV and pay particular attention to the safety information on pages 6 ~10.
RIDING YOUR ATV
WARNING
Indicates a potential hazard that could
result in serious injury or death.
Know you ATV before riding
This ATV is for recreation use. This section,
riding your ATV, provides general ATV riding
instructions for recreational riding. The skills
RIDE WITH GARE AND JUDGMENT
and techniques described in this section are
appropriate for all types of riding. Riding this
ATV requires special skills. Take the time to
learn the basic techniques well before attempting more difficult maneuvers.
instructor. Start at slow speeds first to be familiar with this ATV even if you are an experienced rider. Do not operate at maximum performance until you are totally familiar with the
AT V ’ s h a n d l i n g a n d p e r f o r m a n c e
characteristics. Take the time to learn the basic
techniques well before attempting more difficult maneuvers
Get training if you are inexperienced.
Beginners should get training from a certified
For your safety, be sure you have read this
Owner’s Manual completely and understand
35
Never allow children under 16 years old
to ride this ATV.
A child under 16 should never operate an ATV
with engine size greater than 90c.c.
Do not operate after consuming alcohol
or drugs.
Operator’s performance capability is reduced
by the influence of alcohol or drugs.
This ATV is designed to carry the operator only, Never carry a passenger.
The long seat is to allow the operator to shift
position as needed during operation. It is not
a design for carrying passenger.
Pre-operation checks
Always perform the pre-operation checks
listed on the page 27 before riding for safety
and proper care of your ATV.
During operation
Always keep your feet on the footboards during operation. Otherwise your feet may contact the wheel and could cause injury. Avoid
wheelies and jumping. You may loose control
of the ATV or overturn.
Apparel
Always wear an approved motorcycle helmet
that fits properly. You should also wear eye
protection (face shield or goggles), gloves,
boots, long-sleeve jacket and long pants.
36
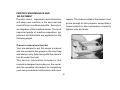
Exhaust system
The exhaust system on the ATV is very hot
during and following operation. Never touch
the exhaust system. Park the ATV in a place
where pedestrians or children are not likely
to touch it.
When riding in an area where you might
not easily be seen, mount a caution flag on
the ATV.
● Do not ride on private property without
getting permission. Do not ride in areas
posted “ No Trespassing”.
● Select a large, flat area off-road to become
familiar with your ATV. Make sure that this area
is free of obstacles and other riders. You
should practice control of the brake, throttle,
gear shifting and turning techniques in the
area before trying more difficult terrain.
● Set the parking brake and follow the instruction on page 32 to start the engine. Once
it has warmed up you are ready to begin riding
your ATV. As you get on the ATV, be sure not
to accidentally move the shift pedal. Don’t
touch the engine and exhaust pipe.
●
Be careful where you ride
● This ATV is designed for off-road use only.
Riding on paved surfaces can cause loss of
control. Do not ride on any public road, street,
or highway. Riding on public roads can result
in collisions with other vehicles.
● Know the terrain where you ride. Ride cautiously in unfamiliar areas. Stay alert for roots,
holes or rocks in the terrain, and other hidden hazards which may cause the ATV to
upset.
37
Turning you ATV
To achieve maximum traction while riding offRoad, the two rear wheels are mounted solidly on one axle and turn together at the same
speed. Therefore, unless the wheel on the
inside of the turn is allowed to slip or lose some
traction, the ATV will resist turning. A special
turning technique must be used to allow the
ATV to make turns quickly and easily. It is
essential that this skill be learned first at low
speed.
Climbing uphill
Use proper riding skill to avoid vehicle overturns on hills. Be sure that you can maneuver your ATV well on flat ground before attempting any incline and then practice riding
first on gentle slopes. Try more difficult climbs
cases avoid inclines with slippery or loose
surfaces, or obstacles that might cause you
to loose control. It is important when you climbing a hill to make sure that your weight is transferred forward on the ATV. This can be accomplished by leaning forward and, on
steeper inclines, standing on the footboards
and leaning forward over the handlebars.
If you are climbing a hill and you find that you
have not properly judged your ability to make
it to the top, you should turn the ATV
aroundwhile you still have forward motion
(provided you have the room to do so) and
descend the hill.
If your ATV has stalled or stopped and you
believe you can continue up the hill, restart
carefully to make sure you do not lift the front
wheels which could cause you to loose
only after you have learned more skills. In all
control. If you are unable to continue up the
38
hill, dismount the ATV on the uphill side. Physically turn the ATV around and then go down
hill.
If you start to roll backwards, DO NOT use
the rear brake to stop or try to put the ATV in
g e ar. Th e ATV co uld e as il y ti p ov er
backwards. Instead, dismount the ATV immediately on the uphill side.
adversely affected by these surfaces. Wrong
braking may also cause a loss of traction If
possible, ride your ATV straight downhill.
Avoid sharp angles which could cause the ATV
to tip or roll over. Carefully choose your path
and ride no faster than you will be able to
react to obstacles which may appear.
Riding downhill
When riding your ATV downhill, shift your
weight as far to the rear and uphill side of the
ATV as possible. Move back on the seat and
sit with your arms straight. Choose a low gear
which will allow the engine compression to do
most of the braking for you. Wrong braking
may lead to a loss of traction. Use caution
while descending a hill with loose or slippery
Crossing a slope
Crossing a sloping surface on your ATV requires you to properly position your weight to
keep proper balance. Make sure that you
have learned the basic riding skills on flat
ground before attempting to traverse a sloping surface. Avoid slopes with slippery surfaces or rough terrain that may disturb your
balance.
As you travel across a slope, lean your body
surfaces. Braking ability and traction may be
in the uphill direction. It may be necessary to
39
correct the steering when riding on loose surfaces by pointing the front wheels slightly
uphill. When riding on slopes be sure not to
make sharp turns either up or down hill.
If your ATV does begin to tip over, gradually
steer in the downhill direction of there are no
obstacles in your path. As you regain proper
balance, gradually steer again in the direction you wish to travel.
Test your brakes after leaving the water. Do
not continue to ride your ATV without verifying that you have regained proper braking
ability.
Riding over rough terrain
Riding over rough terrain should be done with
caution. Look out for obstacles which could
cause damage to the ATV or could lead to an
upset or accident. Be sure to keep your feet
firmly fixed on the footboards at all times.
Avoid jumping the ATV as loss of control and
damage to the ATV may result
Crossing through shallow water
The ATV can be used to cross slow moving,
shallow water of up to a maximum of 20cm
(7.9 inches) in depth. Before entering the
water, choose your path cautiously. Enter
where there is no sharp drop off, and avoid
rocks or other obstacles which may be slippery or upset the ATV. Ride slowly and
Sliding and skidding
Care should be used when riding on loose or
slippery surfaces since the ATV may slide. If
unexpected and uncorrected, sliding could
Carefully.
cause an accident.
40
To reduce the possibility for the front wheels
to slide in loose or slippery conditions, putting your weight over the front wheels will
sometimes help.
If the rear wheels of your ATV start to slide
sideways, control can usually be regained (if
there is place to do so) by steering in the direction of the slide. Applying the brakes or
accelerating is not recommended until you
have corrected the slide.
With practice, over a period of time, skill at
controlled sliding can be improved. The terrain should be chosen carefully before attempting such maneuvers, since both stability and control are reduced. Bear in mind that
sliding maneuvers should always be avoided
on extremely slippery surfaces such as ice,
since all control may be lost.
This section is designed to be a reference
guide only. Make sure to read each section
on riding techniques completely.
What to do … ?
● If your ATV doesn’t turn when you want it
to: Bring the ATV to a stop and practice the
turning maneuvers again. Be sure you are
positioning your weight on the footboard to
the outside of the turn. Put your weight over
the front wheels for better control. (See page
39.)
● If your ATV begins to tip while turning: Lean
more into the turn to regain balance. If
necessary, gradually release the throttle and/
or steer to the outside of the turn. (See
page39.)
● If your ATV can’t make it up a hill you are
trying to climb: Turn the ATV around if you
What to do of if …
still have forward. If not, stop, dismount on
41
the uphill side of the ATV and physically turn
the ATV around. If the ATV starts to slip backwards DO NOT USE THE REAR BRAKE-the
ATV may tip over on top of you. Dismount the
ATV on the uphill side. (See pages 39 ~ 40)
● If your ATV is crossing a sloping surface:
Be sure to ride with your weight positioned
towards the uphill side of the ATV to keep
proper balance. If the ATV starts to tip, steer
down the hill (if there are no obstacles in your
way) to get balance again. If you discover that
the ATV is going to tip over, dismount on the
uphill side. (See 40~ 41)
● If your ATV meets shallow water: Ride
slowly and carefully through slow moving
water, watching for obstacles. Be sure to let
water drain from the ATV and CHECK YOUR
BRAKES FOR PROPER OPERATION when
to ride your ATV until you have regained adequate braking ability. (See page 41)
● If your ATV starts to slide sideways:
Steer in the direction of the slide if you have
the place. Applying the brakes or accelerating is not recommended until you have corrected the slide. (See pages 41 ~ 42)
you come out of the water. Do not continue
42
PERIODIC MAINTENANCE AND
ADJUSTMENT
Periodic check , adjustment and lubrication
will keep your machine in the securest and
most efficient condition possible. Security is
an obligation of the machine owner. The most
important points of machine inspection, adjustment and lubrication are explained on the
following pages.
repairs. The tools provided in the Owner’s tool
kit are enough for this purpose, except that a
torque wrench is also necessary to correctly
tighten nuts and bolts.
Owner’s manual and tool kit
Your are advised to put this owner’s manual
and low-pressure tire gauge in the vinyl bag
and always carry them along with the owner’s
tool kit under the seat.
The service information included in this
manual is designed to provide you, the owner,
with the essential information for completing
your own preventive maintenance and minor
43
3. Place an container under the engine.
4. Remove the dipstick and drain bolt to drain
the oil
5. Check the O-ring and replace if damaged.
6.Install the drain bolt and tig hten to
specification.
7. Fill the engine with oil and equip the
dipstick.
8. Warm up the engine for several minutes at
Engine oil
Engine oil level measurement
1.Place the ATV on a level surface.
2.Warm up the engine for several minutes and
stop it.
3. Remove the dipstick and wipe it off with a
clean rag. Insert the dipstick in the filler
holewithout screwing it in.
4. Remove the dipstick and check the oil
level.
5. The oil level should be between the maximum and minimum marks. If the level is low,
add oil to raise it to the proper level.
idle speed. Inspect oil leakage while warming
up.
Drive chain
Drive chain inspection
1. Place the ATV on a level sarface.
2. Check the amount of chain slack by moving the vehicle slightly forward to gain slack
at the top side of the chain.
Engine oil replacement
1. Place the ATV on a level position.
2. Warm up the engine for several minutes
and stop it.
3. The chain should have 6-12mm deflection.
44
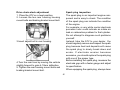
Drive chain slack adjustment
1. Place the ATV on a level position.
2. Loosen the two rear housing housing
mount bolts and braking bracket mount bolt.
Spark plug inspection
The spark plug is an important engine component and is easy to check. The condition
of the spark plug can indicate the condition
of the engine.
For example, a very white center electrode
porcelain color could indicate an intake air
leak or carburetion problem for that cylinder.
Do not attempt to diagnose such problems
yourself.
Instead, take the ATV to your dealer. You
should regularly remove and inspect the spark
plug because heat and deposits will cause
the spark plug to slowly break down and
erod e. If e lectrod e eros ion b ec om es
excessive, you should replace the spark plug
with one of the proper type.
Before installing the spark plug, measure the
electrode gap with a feeler gauge and adjust
to specification.
When equipping the spark plug, always clean
3.Insert adjust bolt in rear housing.
4.Turn the rear tires by moving the vehicle
slightly forword to gain 6-12mm deflection.
5. Tighten the rear housing mount bolts and
braking bracket mount bolt.
45
filter oil is not useful, SAE 10W30 motor oil
may be used.
7. Equip the air filter element, the air filter case
cover and the front cover.
the gasket surface and use a new gasket.
W ipe off any grime from the threads and
tighten to the specified torque.
Air filter cleaning
1. Remove the front cover by removing the
screws.
2. Remove the air filter case cover by unhooking the fasteners.
3. Remove the air filter element by unhooking the fastener.
4. Wash the air filter element gently but totally in solvent.
5. Press the excess solvent out of the air filter element and let it dry.
6. Check the air filter element. If damaged,
replace it.
6. Apply foam air filter oil or other quality foam
Air intake restrictor plate removal
To get full engine performance ability, removing the air intake restrictor plate is required.
1. Remove the air filter element. (See Air filter cleaning for removal and installation
procedures.)
2. Remove the air intake restrictor plate.
3. Equip the air filter element.
Carburetor adjustment
The carburetor is a principal part of the engine and requires very complex adjustment.
Most adjusting should be left to your dealer
who is professional and experienced on this.
air filter oil to the air filter element. If foam air
46
However, the idling speed may be performed
by the owner as a part of the usual maintenance routine.
noise. To prevent this, the valve clearance
must be adjusted periodically. This adjustment however, should be left to a professional
service technician.
Idle speed adjustment
1. Start the engine and warm it up for a few
minutes at nearly 1,000 to 2,000 r/min. Sometimes rev the engine to 4,000 to 5,000 r/min.
The engine is earm when it quickly responds
to the throttle.
2. Connect the tachometer and set the idle to
he specified idling speed by adjusting the
throttle stop screw. Turn the screw in to increase engine speed, and out to decrease
engine speed.
Cam chain adjustment
The cam chain will loosen with use, resulting
in improper valve timing and engine noise.
To prevent this, the cam chain tensioner must
be adjusted regularly. This adjustment should
be left to your dealer.
Valve clearance adjustment
The proper valve clearance changes with use,
leading to incorrect fuel/air supply or engine
47
Front brake shoe inspection
A wear indicator is provided on each brake.
The indicators allow inspecting of brake shoe
wear without disassembling the brake. Apply
the brake and check the position of the
indicator. If the indicator reaches the wear limit
line, ask your dealer to replace the shoes as
a set.
4. Tighten the lower locknut.
5. While applying the front brake, turn out the
upper adjusting bolt until the upper and lower
cable lengths are equal. The cable joint will
become vertical.
6. Tighten the upper locknut.
Rear brake lever and pedal adjustment
1. Brake lever free play adjustment
a. Release the brake cable locknut.
b. Turn the adjusting bolt at the brake
lever until brake lever free play is 5~8 Mm
(0.20~0.30 in).
c. Tighten the locknut.
2. Brake pedal free play adjustment
a. Turn the brake rod adjusting nut at the
right of the engine until brake pedal free play
is 20~30 mm (0.8~1.2 in).
Front brake lever free play adjustment
The front brake lever free play should be adjusted to 10~12 mm (0.4~0.5 in) at the brake
lever pivot. If the free play is improper, adjust
as follows:
1. Release the upper locknut and fully turn in
the adjusting bolt.
2. Release the lower locknut.
3. Turn the lower adjusting bolt specified free
free play is obtained.
48
Clutch adjustment
1. Remove the rubber cap.
2. Release the locknut.
3. Slowly turn the adjusting bolt clockwise until resistance is f elt. Then turn it 1/8
counterclockwise.
4. Tighten the locknut to the specified torque.
5. Equip the rubber cap safely.
Wheel removal
1. Raise the wheel by placing a suitable stand
under the frame.
2. Remove the bolts from the wheel.
3. Remove the wheel assembly
Wheel installation
When installing the wheel, reverse the removal procedure.
Tighten the wheel bolts to the specified
torques.
Cable inspection and lubrication
Lubricate the inner cables and the cable ends.
If the cables do not operate evenly, ask your
dealer to replace them.
49
Battery
Inspect the level of the battery fluid and see if
the terminals are tight. Add distilled water if
the fluid level is low.
5. If the battery is to be stored for a longer
period than the above, check the specific
gravity at least once a month and recharge
the battery when it is too low.
6. Always make sure the connections are right
when putting the battery back in the machine.
Make sure the breather hose is properly connected and is not damaged or obstructed.
Replenishing the battery fluid
A poorly maintained battery will corrode and
discharge quickly. The battery fluid should be
checked at least once a month.
1. The level should be between the upper and
lower lever marks. Use only distilled water if
refilling is necessary.
2. Disconnect the negative (-) lead.
3. Disconnect the positive (+) lead and remove the battery.
4. When the machine is not to be used for a
month or longer, remove the battery and put
it in a cool, dark place. Thoroughly recharge
Fuse replacement
1. The fuse case is placed under the seat.
2. If the fuse is blown, turn off the main switch
and equip a new fuse of the specified
amperage. Then turn on the switches. If the
fuse immediately blows again, consult your
dealer.
the battery before reusing.
50
CLEANING AND STORAGE
Cleaning
Frequent, thorough cleaning of your machine
will not only enhance its appearance but will
improve its general performance and extend
the useful life of many components.
1. Before cleaning the machine.
a. Block off the end of the exhaust pipe to
prevent water entry. A plastic bag and strong
4. Once the majority of the dirt has been
hosed off, wash all surfaces with warm water
and mild, detergent-type soap. An old toothbrush or bottle brush is handy for hard-toget-at places.
5. Rinse the machine off immediately with
clean water and dry all surfaces w ith a
rubber band may be used.
b. Assure the spark plug and all filler caps
are correctly installed.
2. If the engine case is extremely greasy, apply degreaser with a paintbrush. Do not apply degreaser to the wheel axles.
3. Rinse the dirt and degreaser off with a
garden hose. Use only sufficient pressure to
chamois, clean towel or cloth.
6. Clean the seat with a vinyl upholstery
cleaner to keep the cover pliable and glossy.
7. Automotive type wax may be applied to all
pained and chrome plated surfaces. Avoid
combination cleaner-waxes. Many contain
abrasives which may mar the paint or protective finish. When finished, start the engine
do the job.
and let it idle for several minutes.
51
Storage
Long term storage (60 days or more) of your
machine will request some protective procedures to guard against deterioration. After
completely cleaning the machine, prepare for
storage as follows:
1. Fill the fuel tank with fresh fuel
2. Remove the spark plug, pour about one
tablespoon of SAE 10W30 or 20W40 motor
oil in the spark plug hole and reinstall the
spark plug. Ground the spark plug wire and
turn the engine over several times to coat the
cylinder wall with oil.
3. Lubricate all control cables.
4.Block up the frame to raise all wheels off
the ground.
5. Tie a plastic bag over the exhaust pipe outlet to prevent moisture from entering.
coat all exposed metal surfaces with a light
film of oil. Do not apply oil to any rubber parts
or the seat cover.
7. Remove the battery and charge it. Store it
in a dry place and recharge it once a month.
Do not store the battery in an extremely warm
or cold place (less than 0℃ (30o F) or more
than 30℃ (90oF).
6. If storing in a damp or salty atmosphere,
52
SPECIFICATION
Model
Dimension:
Overall length
Overall width
Overall height
Seat height
Wheel base
ATV110-M
1484 mm
865 mm
953 mm
660 mm
1024 mm
108 mm
1650 mm
124 kg (273 lbs)
Min. ground clearance
Minimum turning radius
Dry weight:
Engine:
Type
Cylinder arrangement
Displacement
Bore × Stroke
Compression ratio
Air cooled, 4-stroke,3speeds/reverse
Single cylinder
107 cm 3
52.4 × 49.5 mm
9.1 : 1
Starting system
Electric starter
53
Lugrication systems:
Wet sump
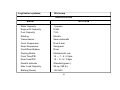
SPECIFICATION
Model
ATV110-M
Rider Capacity
1 person
Engine Oil Capacity
0.95L
Fuel Capacity
7.8 L
Starting
Electric
Transmission
Semi-automatic
Front Suspension
Dual A-arm
Rear Suspension
Swing arm
Front/Rear Brakes
Drum
Parking Brake
Mechanical Lock
Front Tires/PSI
19 × 7 - 8 / 2.9psi
Rear Tires/PSI
18 × 8 - 8 / 2.9psi
Neutral Indicator
Standard(green)
Max. Load Capacity
90 kg (198 lb)
Battery(Green)
12V-9Ah
54