1
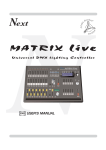
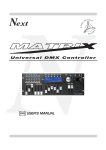
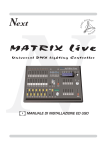
wysiwyg Release 24 Release Notes Version 1 Thank you for installing the Release 24 of wysiwyg. These release notes provide information about documentation and known issues. Getting started with wysiwyg R24 ........................................................................... 3 Documentation sources .................................................................................... 3 Sample files ............................................................................................... 3 Template files ............................................................................................ 3 Useful information ............................................................................................. 3 wysiwyg compatibility with Vivien-Virtual Event Designer ........................................... 3 Vivien file version compatibility ....................................................................... 4 Hard drive compatibility ................................................................................... 4 Video card compatibility ................................................................................... 4 New features in wysiwyg R24 ................................................................................ 4 Enhancements to existing wysiwyg features ............................................................. 12 Resolved Issues in wysiwyg R24 ............................................................................ 13 New Library items in wysiwyg R24 ........................................................................ 13 New Automated Fixtures ................................................................................. 13 New LED Fixtures .......................................................................................... 14 New Accessory ............................................................................................. 15 New Consoles .............................................................................................. 15 New Truss .................................................................................................. 15 New Projectors ............................................................................................ 17 New Gobos ................................................................................................. 17 New Lamps ................................................................................................. 21 Library Modifications ........................................................................................ 22 Updated/Corrected Fixtures ............................................................................ 22 Known Issues .................................................................................................. 23 Contacting Technical Support .............................................................................. 27 Copyright Information ....................................................................................... 28 Page 1 of 28 © CAST Group of Companies Inc., 2009. All rights reserved. Page 2 of 28 © CAST Group of Companies Inc., 2009. All rights reserved. Getting started with wysiwyg R24 To help you get started using wysiwyg, various resources are available for your use. Documentation sources Documentation sources are available in several locations for your convenience: • • On your Windows computer, click Start > Programs > wysiwyg shortcut menu (once wysiwyg has been installed) All wysiwyg documentation is available for download from the CAST web site: http://www.cast-soft.com/cast/software/support.jsp?PID=5022 Sources include: • Reference Guide • Quick Start Guide • Quick Start Tutorial • Release Notes Sample files Sample wysiwyg files are provided with the installation for you to use as examples or references. There are sample AutoCAD files, report heading files, as well as several files from various disciplines. These files can be found in the \Samples folder where you installed wysiwyg (for example, C:\Program Files\WYSIWYG\Samples). Template files Sample template files are provided with the installation for you to use as desired. There are several basic templates such as plot, studio, and theatre files. These files can be found in the Templates folder where you installed wysiwyg (for example, C:\Program Files\WYSIWYG\Templates). Useful information wysiwyg compatibility with Vivien-Virtual Event Designer Are you a Lighting Designer who manages venue layouts, produces events, or liaises with event planners/designers or service providers? wysiwyg is compatible with Vivien-Virtual Event Designer, CAST Software’s award-winning special events planning and design software tool. You can create your shows in wysiwyg and then open the files in Vivien to make use of its automated Wizards for adding event items, such as seating areas, tables, and chairs. Page 3 of 28 © CAST Group of Companies Inc., 2009. All rights reserved. You can use Vivien–Virtual Event Designer to increase your planning efficiency. Vivien is the sales, planning, design, and production tool designed for the meeting and special events industry. LDs can use it for creating quick concepts to demonstrate their ideas. As wysiwyg deals with the stage, Vivien deals with the venue. Both wysiwyg and Vivien: • • • • • • Feature simplified CAD tools to plot or lay out floor spaces or lighting plans Deliver photorealistic renderings of these drawings Contain 1000s of library objects designed for the industry Share the same reliable, robust base code Deliver eye-popping visuals Provide wizards for common tasks Vivien file version compatibility Due the differing release schedules of Vivien and wysiwyg, Vivien 2.0 is only directly compatible with wysiwyg R22. Therefore, a Vivien 2.0 file will open in R24, but files drawn in R24 for use in Vivien 2.0 must be saved as a Vivien 2.0 file (File > Save As). It is highly recommended that wysiwyg users save their work as an R24 file first and then save them in the Vivien 2.0 format for transfer. Hard drive compatibility Due to restrictions in file name length, you cannot install wysiwyg on a FAT32-formatted hard drive. Instead, you must install the product on an NTFS-formatted hard drive. For details, see http://www.cast-soft.com/cast/software/downloads.jsp?PID=5021&DID=4077. Video card compatibility To display our beam simulation in the Shaded views, the video card requirements have changed as of Release 22. Our simulation feature takes advantage of advanced graphical technologies available only in OpenGL 2.0. As a result, your computer must have a video card that supports OpenGL 2.0 to run this latest version of wysiwyg with its enhanced features. If you do not have this type of card, a warning will appear and the Enhanced Simulation option will not be available. New features in wysiwyg R24 In addition to numerous library updates, Release 24 includes the following new features: Improved visualization in Shaded view Release 24 marks the third phase of the visualization project started in R22. It includes the following enhancements: • New LED Simulation Subsystem: R24 will feature a brand new method of simulating LED light sources in Shaded views that works “behind-the-scenes” to more-efficiently (and correctly) simulate LED fixtures and LED walls. With previous versions of wysiwyg, inserting a large number of LED fixtures in your file caused serious performance issues. With R24, however, you will be able to use as many of these fixtures as you need without worrying about performance—at least until you reach your video card limits! To take advantage of this Page 4 of 28 © CAST Group of Companies Inc., 2009. All rights reserved. subsystem, the following updated or new LED fixtures are included in R24. Note that the other LED fixtures in the Library have not yet been updated and thus will not be able to make use of the new LED Simulation Subsystem. Manufacturer Anolis Chauvet Chroma Q Color Kinetics Fixture Name Arcline 12 Arcline 24 Arcline 36 Arcline Optic 12 Arcline Optic 18 Arcline Optic 24 Arcline Optic 36 Arcline18 ColorPalette Color Block Color Block 2 ColorBlaze 48 ColorBlaze 72 Elation Professional OctoStrip Element Labs Versa Tile A2 10x10 Versa Tile S2 10x10 Versa Tile S2 5x5 Versa Tile S2 5x5 Versa Tile X3 1x10 Versa Tile X3 1x2 Versa Tile X3 1x3 Versa Tile X3 1x5 ELP 60 Powerstick ELP 80 Powerstick Ion 1.2m Ion 1.8m Ion 2,4m Showgun Showpix StageBar 54L StageBar 54S EvenLED ChromaStrip X3 TC (all lengths) X7 11" X7 12" Square X7 24" X7 48" Focon GLP High End Martin Pulsar Selador Notes New Fixture Beta only New Fixture New Fixture Page 5 of 28 © CAST Group of Companies Inc., 2009. All rights reserved. Manufacturer Thomas Traxon Fixture Name X7 7" X7 72" PixelLine 1044 PixelLine 110 Classic Mirror Mirror 64XPL Wash Mirror XB Tile Tile 64XPL Matrix Tile 64XPL Wash Tile XB Notes • Environmental Lighting / Time of Day Simulation: Just as you can simulate outdoor lighting when setting up your renderings in the Render Wizard, you can now achieve the same effect in the Shaded view for all events that take place outside. Simply use the Outdoor Lighting tab of the Shaded view’s View Options window to choose the date, time of day, and sky condition (cloudy or clear). The Shaded view adjusts accordingly, in real time. • Color Temperature and Footprint Intensity Falloff features for Enhanced Beams: One of several new options available on the Shaded view’s View Options tab, this feature visually enhances beams and footprints by adding color temperature and inverse square law calculations to them. This option is turned off by default, but you can enable it by clicking the Color Temperature & Footprint Intensity Falloff check box on the View Options tab. For beams, the color temperature calculations take into account both the type of bulb used in the fixture and its wattage. For example, the beam of a fixture with an arc bulb displays with a blue tint, while the beam of a fixture with a tungsten bulb displays with a yellow tint. Likewise, the beam from a fixture using a 1000W bulb will be brighter than the same fixture using a 500W bulb, but, naturally, not twice as bright. In the graphic below, note the difference in appearance of each of the beams: as the wattage increases, the beam appears brighter, and as the bulb differs, so does the tint of the beam. Page 6 of 28 © CAST Group of Companies Inc., 2009. All rights reserved. The footprint intensity falloff/inverse square law calculations apply to beam footprints, providing a realistic intensity falloff that is proportional to the beam angle and distance from source to target. For example, the footprint of a fixture lighting a flat surface 20’ away appears much brighter than if the same fixture were lighting the same flat surface at 30’. Similarly, for zoom fixtures, the intensity of the footprint is automatically adjusted when the beam angle is changed (by zooming in or out). Page 7 of 28 © CAST Group of Companies Inc., 2009. All rights reserved. In the graphic below, note the difference in appearance of each of the footprints: as the beam gets narrower, the footprint appears brighter. • New View Options - Performance Category: In R24, you now have the option of showing footprints and shadows in the Shaded view for one or more of the following four object types: o o o o Hang Structures: This option controls whether hang structures like pipes, truss and booms will cast shadows and receive footprints in the Shaded view. It is extremely useful for checking effects or looks such as truss warmers. Fixture Bodies: This option controls whether the bodies of fixtures will cast shadows and receive footprints. This feature is useful when checking to see if certain fixtures are blocking the beams of other fixtures. Line/Circle/Arc/Spline: Select this option if you want such objects to cast shadows and received footprints in the Shaded view—typically, you would not; otherwise, leave it disabled. Outside Venue: This option controls whether a beam footprint is shown on a Venue wall when the camera is positioned outside the venue. It is recommended that you leave this option disabled, unless you need to see how footprints and/or shadows appear on such walls/surfaces. Note: Remember that enabling any of these four options will cause performance to decrease. • New View Options - View Styles Category: To give you even more control when setting up your shows, you now have the option of enabling the following view styles in the Shaded view. Note that all of these options are turned off by default. To turn them on, simply click the applicable box on the View Options tab. Page 8 of 28 © CAST Group of Companies Inc., 2009. All rights reserved. • o Object Bounding Boxes: Select this option to show green bounding boxes around all objects in the scene. This view style was designed to be used in conjunction with the new Consolidated Mesh feature (see details below) and enables you to visually analyze an object’s complexity. o Disabled Textures: Select this option to hide (not remove!) all textures used in a scene. This option is useful when verifying why a particular texture doesn’t seem to sit properly on an object and you want to check the underlying geometry for anomalies. Note that disabling textures has a negligible effect on Shaded view performance. o Wireframe Geometry: Select this option to display all objects in a scene (except beams) as wireframe outlines instead of solids. This feature helps you analyze the complexity of a scene so you can alter objects as necessary to speed up rendering times and minimize file size. For example, when you see complex objects in your file (those shown with a high-density wireframe) optimize them by reducing their polygon counts, either with the new Consolidated Mesh feature or by re-importing a less complex version. o View Statistics: enabling this view style will not modify the look of the scene, but instead will present information about the scene in the upper-left corner of the Shaded View. The following statistics are displayed: FPS: this field provides information about the framerate (frames per second) achieved when the Shaded View is changing as fixtures are being affected by changing the view using the mouse, by changing Looks in Design mode, or by incoming DMX in Live mode. Please note that when the Shaded View is static (i.e. most of the time), the FPS field will display “n/a”. Number of Objects: this field provides information about the total number of visible objects. The calculation is based on what Layers and/or Scenes are enabled. Number of Beams: this field provides information about the total number of fixtures in the scene. View Complexity: this field tells the user how complex the current scene is. The four complexity levels—low, medium, high and very high—are meant to help the user understand how complex the current scene is. When the complexity level appears as high or very high, the user should (strongly) consider optimizing the file. For example, the Consolidate Mesh tool can be used to reduce the number of polygons in a highly-detailed model. Smoothing of Library Objects (People, Mannequins) and 3D Primitives: Gone are those jagged jaw lines in the Shaded view! In R24, the people, mannequins, and 3D primitives (cones, cylinders, and spheres) will all appear smoother in the Shaded view. Take a look for yourself. These screenshots show the difference between R23 and R24. Page 9 of 28 © CAST Group of Companies Inc., 2009. All rights reserved. R23 Image R24 Image New Features • Searchable Library Browser: Ever find yourself clicking through hundreds of Library files in search of a fixture or that perfect item for your file? In R24 you can now save time by using our handy, new Search feature. In the Library browser, simply click the category tab that you’re interested in, and then type the object name (or part of it) in the Search box at the top of the browser panel. All objects that match your query are shown. Note that on the Library tab, you have to select the folder in which your object is stored before you search. For example, if you are searching for a drum kit, highlight the Objects folder before typing the word “drum” in the Search box. • Texture Wrapping Around 3D Surfaces (Spheres, Cylinders, and Cones): Just as you can apply a texture to one or more sides of a Riser, in R24 you can now wrap textures around Spheres, Cylinders, and Cones. Note that in the object’s Properties, only the Tile option applies with this feature, not Stretch. Even so, when you apply a texture to one of these objects, by default it will completely wrap around it. If you change the tile size, it will scale Page 10 of 28 © CAST Group of Companies Inc., 2009. All rights reserved. the texture up or down accordingly; reverting back to the original tile values will return to the default view. • TrueType Fonts in CAD, New Plots, and Fixture Symbols: In R24, you can choose from any font installed on your computer when drawing or modifying text labels in CAD mode and New Plots. On the new Font Styles tab of the User Options window, you can specify the font that you would like to appear globally in all new text labels, New Plots, and fixture layout labels. Note that when you change the font globally, it does not affect existing labels in your file, only new ones that you draw. To change existing labels, you must do so individually through the label Properties window. • Ruler Toggle: The Ruler tool that was introduced in R23 provides a handy point of reference in CAD Wireframe views, enabling you to measure the objects that you are drawing and get an accurate idea of the distances between items in your plot. In R24, there's a new button on the CAD Options toolbar that toggles the Rulers on and off as you draw. • Consolidated Mesh: This new feature helps increase performance in Shaded views by enabling you to consolidate complex objects comprising multiple polygons/”sub-objects” into objects that behave as a single entity. Consolidating meshes is essentially the same as creating new (custom) Library Items. However, while both methods make wysiwyg “see” the object as a single entity, when you use the Consolidate Mesh command, you don’t actually create a new Library Item, so your file size remains almost the same. To determine which objects in your scene should be consolidated, we recommend that you enable the new Object Bounding Box feature on the View Options tab. Objects which appear with a high number of bounding boxes are all candidates for consolidation. Note: If you consolidate an object to which a texture has been applied, the texture may not behave correctly because the object’s underlying geometry will be different. To maintain proper texturing AND have the file perform well for pre-visualization, we recommend that you create a copy of the final file. Optimize the copy, and then use the optimized file for pre-programming purposes and the original file for screenshots and/or renderings. • LED Wizard: The new LED Wizard replaces the LES Wizard and will use point sources of light (LEDs) instead of Light Emitting Surfaces to simulate LED walls. This new Wizard is dramatically more efficient than the LES model, with tests showing over 65,000 LEDs (that’s a matrix of 256 x 256) simulating colour changes in real time with almost no impact on performance! • Dongle Re-Authorization: This new initiative will help safeguard your dongle, ensuring that if it is lost, stolen, or found by someone else, the new user will only be able to work with it until the re-authorization date, but never beyond. Re-authorization will require that you “re-authorize” your dongle once a year by logging into the wysiwyg Member’s site, noting your Dongle Re-authorization Code, and then applying this code to your dongle. • Dongle Leasing: Starting with Release 24, you will be able to lease dongles on a yearly basis. Leased dongles will carry the same privileges as purchased ones (i.e., software updates, library updates, and technical support). However, unlike purchased dongles, once the lease is over, wysiwyg will no longer run with that dongle, giving you the choice of renewing the lease or purchasing the dongle. Full details and pricing for Dongle Leasing are available on the wysiwyg web site (www.wysiwygsuite.com). Page 11 of 28 © CAST Group of Companies Inc., 2009. All rights reserved. • Support for SketchUp 7.0: Release 24 supports the import of SketchUp 7.0 files. • CITP Multimedia Protocol: wysiwyg R24 supports the multimedia/video functionality of the CITP protocol. wysiwyg can stream in video from a media server on your network that supports CITP. For more information on the CITP protocol, see http://www.capturesweden.com/Portals/0/Downloads/CITP%20Specification.pdf. Enhancements to existing wysiwyg features Release 24 includes the following enhancements to existing features: • Riser tool (Interactive mode): The riser tool has been modified so that when drawing a riser in Interactive mode, you can define the second point of the riser in any direction, and no longer just in the top-right direction. • CAD Fixture Selection menu: The Fixture Selection menu, which traditionally has been available from the Design and Live mode wireframe views, is now also available in CAD mode wireframe views. When drawing in CAD mode, right-click in your wireframe view and use the Select All, or Select <by fixture> options. • Rotation (around insertion point of object): Rotating an object around its insertion point is now simpler. When wysiwyg asks you to define the point of rotation, just press ENTER and the rotation point will automatically be set to the insertion point. All other rotation functionality remains unchanged. The same applies to moving objects. • Tooltip information: The tooltips of all objects have been enhanced to display more information. The amount of information displayed varies between objects. For fixtures, the fixture information displayed is defined by the settings in User Options > Show Details. • Shaded View Options editable text boxes: The text boxes in the View Options and Environment tabs of the Shaded View are now editable, offering an alternative to the slider controls. • Region Profiles now active: When you set the region profile to Europe/Asia, the units (and rulers) in your file now automatically change to Metric values. Once this option is set in the Application Options (General tab), all new files will open in Metric units. Page 12 of 28 © CAST Group of Companies Inc., 2009. All rights reserved. Resolved Issues in wysiwyg R24 1. When drawing a surface, a line indicating the segment between the first point and the second point was not displayed until the third point was drawn. This has been corrected so that a line segment appears connecting the cursor’s location and the first point of the surface. 2. Conventional fixtures holding two gobos do not simulate properly with Enhanced Beams. When placing two gobos in a gobo holder accessory for a conventional fixture (for example, ETC Source 4), the projected footprint was not displaying the correct additive gobo pattern. This has now been fixed. 3. Floorplan images were not scaling correctly when imported into wysiwyg’s CAD Wireframe plan views. Sometimes when importing an image of a venue floorplan, the scale of the image was incorrect, leading to inaccurate drawings. The scaled image now appears properly. 4. The Windows VISTA Aero theme was causing redrawing issues in the Quad view’s Shaded view. When working in Quad view on a Windows Vista computer with the Aero theme turned ON, the Shaded view would appear all white, or sometimes would not display the view properly. This issue has been resolved. New Library items in wysiwyg R24 Many new and updated library items are available in the R24 (55 new Fixtures, 49 new Truss, 166 new Gobos, and 6 new Bulbs). New Automated Fixtures Manufacturer Model Alpha One Falcon Beam 7-8kw Falcon Flower 7-8kw Auto Searchlights Auto 5‐7kw Chauvet Q-Spot 575 DTS XM1200 XR9 Spot XR8 Spot XR8 Wash XR 700 Wash XR5 Spot Page 13 of 28 © CAST Group of Companies Inc., 2009. All rights reserved. Manufacturer Model XR5 Wash XR300 Laser JB Lighting VaryLED A7 Zoom Martin MAC TW1 Wash 80V MAC 301 Wash MAC 2000 Wash XB MAC 2000E Perform II MAC 2000E Profile II MAC2000M Profile II MAC 575 Krypton MAC III PRG Bad Boy Vari-Lite 3500 Wash FX New LED Fixtures Manufacturer Model Chauvet Colorado 6 Chroma Q Color Block 2 Color Punch Color Split DTS FOS 100 Full Color FOS 100 RGBA FOS 100 White FOS 33 Full Color FOS 33 RGBA FOS 33 White Delta 7 Full Color R Delta 7 RGB R Delta 7 White R Delta R TriLED RGB Delta R TriLED W Page 14 of 28 © CAST Group of Companies Inc., 2009. All rights reserved. Manufacturer Model Delta 7 Full Color B Delta 7 RGB B Delta 7 White B Delta B TriLED RGB Delta B TriLED W Titan Full Color Titan RGBA Titan White KM Station Marble KM LED48-SP Pulsar ChromaStrip X3 300mm TC ChromaStrip X3 600mm TC ChromaStrip X3 900mm TC ChromaStrip X3 1200mm TC Thomas Pixel Par 90 New Accessory Manufacturer Model Mole Richardson 6-Light MaxiCoop Skirt New Consoles Manufacturer Model Compulite Dlite Rave New Truss Manufacturer Series Component Eurotruss FD34 10M, 8 Segment Circle Generic 0.25m Pipe Pipe 0.5m Pipe Pipe 1m Pipe Pipe Page 15 of 28 © CAST Group of Companies Inc., 2009. All rights reserved. Manufacturer Series Component 1.5m Pipe Pipe 2m Pipe Pipe 2.5m Pipe Pipe 3m Pipe Pipe 3.5m Pipe Pipe 4m Pipe Pipe 4.5m Pipe Pipe 5m pipe Pipe 5.5m Pipe Pipe 6m Pipe Pipe 6in Pipe Pipe 1ft Pipe Pipe 2ft Pipe Pipe 3ft Pipe Pipe 4ft Pipe Pipe 5ft Pipe Pipe 6ft Pipe Pipe 7ft Pipe Pipe 8ft Pipe Pipe 9ft Pipe Pipe 10ft Pipe Pipe 11ft Pipe Pipe 12ft Pipe Pipe 13ft Pipe Pipe 14ft Pipe Pipe 15ft Pipe Pipe 16ft Pipe Pipe 17ft Pipe Pipe 18ft Pipe Pipe 19ft Pipe Pipe 20ft Pipe Pipe T Corner Pipe Pipe Corner Page 16 of 28 © CAST Group of Companies Inc., 2009. All rights reserved. Manufacturer Series Component 30deg Pipe Pipe Corner 45deg Pipe Pipe Corner 60deg Pipe Pipe Corner 90deg Pipe Pipe Corner 120deg Pipe Pipe Corner 135deg Pipe Pipe Corner Pipe 6-Way Corner Pipe Corner Litec QX30 QX30 5° Corner Milos QTV QTV645 Prolyte H30V 0.75m H30V Circle R1125-24 H30V Circle R1145-16 CCS6-651 Coupler Manufacturer Model Type PG Lights Chinese PG Projector Christie Digital DS+10K-M Video Projector New Projectors New Gobos Manufacturer Name Chauvet BlueOrange Quad Colour Q Spot FG1 Q Spot FG2 Q Spot FG3 Q Spot FG4 Q Spot FG5 Q Spot FG6 Q Spot FG7 Q Spot FG8 Q Spot FG9 Q Spot RG1 Q Spot RG2 Page 17 of 28 © CAST Group of Companies Inc., 2009. All rights reserved. Manufacturer Name Q Spot RG3 Q Spot RG4 Q Spot RG5 Q Spot RG6 Q Spot X1 Q Spot X2 Q Spot X3 Q Spot X4 Q Spot X5 DTS DTS LMS-1 DTS LMS-1 Inverted DTS LMS-2 DTS LMS-2 Inverted DTS LMS-3 DTS LMS-3 Inverted DTS LMS-4 DTS LMS-4 Inverted DTS LMS-5 DTS LMS-5 Inverted DTS LMS-6 DTS LMS-6 Inverted DTS LMS-7 DTS LMS-7 Inverted DTS LMS-8 DTS LMS-8 Inverted DTS LMS-9 DTS LMS-9 Inverted DTS LMS-10 DTS LMS-10 Inverted DTS LMS-12 DTS LMS-12 Inverted DTS LMS-13 DTS LMS-13 Inverted DTS LMS-14 DTS LMS-14 Inverted DTS LMS-15 DTS LMS-15 Inverted Page 18 of 28 © CAST Group of Companies Inc., 2009. All rights reserved. Manufacturer Name DTS LMS-16 DTS LMS-16 Inverted DTS LMS-17 DTS LMS-17 Inverted DTS LMS-18 DTS LMS-18 Inverted DTS LMS-19 DTS LMS-19 Inverted DTS LMS-20 DTS LMS-20 Inverted DTS LMS-21 DTS LMS-21 Inverted DTS LMS-22 DTS LMS-22 Inverted DTS LMS-23 DTS LMS-23 Inverted DTS LMS-24 DTS LMS-24 Inverted DTS LMS-25 DTS LMS-25 Inverted DTS LMS-26 DTS LMS-26 Inverted DTS LMS-27 DTS LMS-27 Inverted DTS LMS-28 DTS LMS-28 Inverted DTS LMS-29 DTS LMS-29 Inverted DTS LMS-30 DTS LMS-30 Inverted DTS LMS-31 DTS LMS-31 Inverted DTS LMS-32 DTS LMS-32 Inverted DTS LMS-33 DTS LMS-33 Inverted DTS LMS-34 Page 19 of 28 © CAST Group of Companies Inc., 2009. All rights reserved. Manufacturer Name DTS LMS-34 Inverted DTS LMS-35 DTS LMS-35 Inverted DTS LMS-36 DTS LMS-36 Inverted DTS LMS-38 DTS LMS-38 Inverted DTS LMS-39 DTS LMS-39 Inverted DTS LMS-40 DTS LMS-40 Inverted DTS LMS-41 DTS LMS-41 Inverted DTS LMS-42 DTS LMS-42 Inverted DTS LMS-43 DTS LMS-43 Inverted DTS LMS-44 DTS LMS-44 Inverted DTS LMS-45 DTS LMS-45 Inverted DTS LMS-46 DTS LMS-46 Inverted DTS LMS-47 DTS LMS-47 Inverted DTS LMS-48 DTS LMS-48 Inverted DTS LMS-49 DTS LMS-49 Inverted DTS LMS-51 DTS LMS-51 Inverted DTS LMS-52 DTS LMS-52 Inverted DTS LMS-53 DTS LMS-53 Inverted DTS LMS-54 DTS LMS-54 Inverted Page 20 of 28 © CAST Group of Companies Inc., 2009. All rights reserved. Manufacturer Name DTS LMS-55 DTS LMS-55 Inverted DTS LMS-56 DTS LMS-56 Inverted DTS LMS-57 DTS LMS-57 Inverted DTS LMS-58 DTS LMS-58 Inverted DTS LMS-59 DTS LMS-59 Inverted DTS LMS-60 DTS LMS-60 Inverted DTS LMS-61 DTS LMS-61 Inverted DTS LMS-62 DTS LMS-62 Inverted DTS LMS-63 DTS LMS-63 Inverted DTS LMS-64 DTS LMS-64 Inverted DTS LMS-65 DTS LMS-65 Inverted DTS LMS-66 DTS LMS-66 Inverted DTS LMS-Logo DTS LMS-Logo Inverted System 18:14 Mask 14:18 Mask New Lamps Manufacturer Series Base Type Generic Laser 300mw DSPP Green Laser Sylvania Xstage 2000W OFR SFaX27-9.5 Xstage 3000W OFR SFaX27-9.5 Xstage 4000W OFR SFaX27-9.5 Xstage 7000W OFR SFaX28-27 XBO 7000 W/HS OFR SFaX30-9.5 Page 21 of 28 © CAST Group of Companies Inc., 2009. All rights reserved. Library Modifications Updated/Corrected Fixtures Manufacturer Fixture Comment Alpha One Falcon Beam 3kw Removed horizontal lines from Plan Symbol, Updated Shutter channel. Falcon Flower 3kw Updated Shutter Channel Chauvet Colorado 3 Added Mode 1 channel precedence Color Kinetics ColorBlaze 48 All LEDs working in Design Mode. Elation Professional OctoStrip Added 3 Channel RGB Only mode. Element Labs VersaTubes (All lengths) Improved efficiency Eurolite LEDPAR Added x Mode. Generic PAR 64 Corrected USITT Standard Lens Symbols PAR 64 Stubbi Corrected USITT Standard Lens Symbols PAR 56 Corrected USITT Standard Lens Symbols PAR 46 Corrected USITT Standard Lens Symbols PAR 38 Corrected USITT Standard Lens Symbols Generic/Lee Lighting Half Dino 12-Circuit Blinder Corrected Patch Assignments Mole Richardson 6-Light MaxiCoop CAD Plan Symbol now focused down Selador X7 48" Centered Fixture on Insertion point X7 11" New DMX Protocol Option X7 12" New DMX Protocol Option X7 24" New DMX Protocol Option X7 48" New DMX Protocol Option X7 72" New DMX Protocol Option VL 3500 Wash Corrected Stock Colours Varilite Page 22 of 28 © CAST Group of Companies Inc., 2009. All rights reserved. Known Issues 1. Users whose computers contain certain ATI video cards have reported seeing artifacts in the wysiwyg Shaded View. This problem is linked to Radeon x1300–x1950 video cards, although other cards may also cause this issue. As a workaround, update your video drivers. If this does not fix the issue, deactivate Smoke in the View Options window of the Shaded View. If you still cannot resolve the issue, please contact CAST Software Technical Support. 2. The Add/Remove Accessory menu is not available when you select a fixture that is attached to a moving hang structure. When you hang a fixture on a pipe or truss that is attached to a movement axis, and then you right-click on the fixture to add an accessory to it, the Add/Remove Accessory menu item does not appear. Workaround: You can add accessories to the fixture by using its Properties page, and remove accessories by using DATA mode. Alternately, you can temporarily detach the hang structure from the movement axis, add/remove the accessories, and then reattach the hang structure to the axis. 3. You cannot perform a second Merge operation on a merged item that has been mirrored. After mirroring an object that was originally created through a merge operation, you cannot reliably perform another merge procedure on this object. Workaround: It is recommended that you perform all Merge operations on these objects before you mirror them. 4. Single-sided surfaces that have Light Emission enabled "glow" on both sides when rendered. When you assign light emission to a single-sided surface, and then render it with Radiosity turned on, the surface appears to glow on both sides. Workaround: When using a light-emitting surface, create a second surface (with no light emission) of the same size and place it just behind the light-emitting surface, 1 or 2 millimeters away. This will mask the second light-emitting side in your rendering. 5. When you hang automated fixtures on moving hang structures, they do not focus properly. When you hang an automated fixture on a moving hang structure (for example, a pipe or truss that is attached to a linear or rotational motion axis), and then you move the hang structure, the fixture's beam is not redirected to its original Focus Position. Instead, it maintains the same pan and tilt angle, thereby missing the focus position and hitting a different location in your drawing. Workaround: When working with automated fixtures on moving hang structures, do not use focus positions. Instead, focus the beams manually. Page 23 of 28 © CAST Group of Companies Inc., 2009. All rights reserved. 6. Fixtures hung on rotated truss do not hang properly. If you rotate a piece of truss while inserting it (right-click and select Truss Rotate Left or Truss Rotate Right), and then attach subsequent pieces of non-rotated truss to it, all fixtures that are hung from these subsequent pieces of truss point in odd directions, with some pointing up and some down. 7. For fixtures with multiple circuit types you cannot manually select which type to display in DATA mode. Regardless of the number of circuit types associated with a particular fixture and the Regional Settings that you choose for your file, there is no way to select which circuit type to show in DATA mode; instead, the program will always show the first circuit type listed. 8. After saving your wysiwyg file directly to a Network Attached Storage (NAS) device, you may have trouble opening the file. After saving your wysiwyg file directly to an NAS device, in some cases you cannot open the file. Workaround: Since networks can sometimes fail, it is always a good idea to work on files that are kept on your local hard drive rather than on a network computer/storage device. Before you begin working on the wysiwyg file, copy it to your local drive and open it from there; once you are finished working on it, save the file on your local hard drive and then move it back to your NAS device. 9. When you uninstall and reinstall the wysiwyg Server for Release 24, the network version of wysiwyg (Network, Learn, CSP, or AWT) does not function properly. When you install wysiwyg Release 24 the program installs updated Sentinel Drivers that make it unnecessary to subsequently install the wysiwyg Server (for the network versions of wysiwyg). However, if you install wysiwyg Release 24 and the wysiwyg Server, and then subsequently uninstall and reinstall the wysiwyg Server, the program will not function properly. In this case, perform the following workaround: 1) Click Start > Control Panel > Add or Remove Programs. 2) From the list of programs, click Remove beside the following programs, and then follow the steps to remove them from your computer: • all listed versions of the Sentinel Drivers • the wysiwyg Server 3) Restart your computer. 4) When these programs are removed, reinstall the Sentinel Drivers by double-clicking the file Sentinel.exe located in the following folder: C:\Program Files\WYSIWYG\Bin\Sentinel where C: is the drive on which you installed wysiwyg. 10. Software utilities used for cleaning temporary files sometimes interfere with wysiwyg’s ability to save a file. While working on a wysiwyg file, you discover that you cannot save it, even if you try to save it under a different file name. When trying to save the file, you might receive an error message Page 24 of 28 © CAST Group of Companies Inc., 2009. All rights reserved. saying there is not enough disk space available (even though the problem is unrelated to disk space). Eventually, you have to close the file, losing all renderings that you have saved internally and, potentially, all your work. Explanation: wysiwyg stores some internal file data as temp files in the Windows temp directory. If you delete these temp files while your wysiwyg file is open (either manually or automatically by running a temp directory cleaning program, such as Window Washer), this internal data will be lost and wysiwyg will be unable to save the file. Solution: While working in wysiwyg, you should not manually delete any of the files in the Windows temp directory, nor should you use an automated program, such as Window Washer, to do so. Workaround: If you receive a "cannot save" error, you can still save your drawing by copying the entire contents and pasting them into a blank wysiwyg document. Save the document with a new file name. Note that you will still lose files that are saved internally, such as any renderings or images stored with the original file (unless you had exported them from the PRES mode > Images tab). You will also lose all shortcuts created in the file (with the exception of patch universes and images), including library, navigation, view and render shortcuts, as well as custom reports, worksheet, layouts, new plots, keys, legends, palettes, concepts and looks. Patch universes are copied and pasted together with the fixtures in the file. 11. Transparent surfaces that touch non-transparent objects are not transparent in the rendered image. To ensure that transparent surfaces touching non-transparent objects are completely invisible in renderings requires a slight workaround. When placing the transparent surface or object in your drawing, ensure that a miniscule space exists between it and any non-transparent objects in your drawing (this space can be as small as you like). For example, if you are placing a transparent surface on a floor, nudge the surface just above the floor. When you render the image, the surface will be invisible. 12. There is a lag in Shaded view when watching moving scenery. When using moving fixtures (for example, the MAC 500) with the moving scenery feature, you may sometimes notice a lag in Shaded view if the beam simulation quality is set to Light Up. To avoid seeing this lag, set the beam simulation quality to Regular as it offers better visualization and performance. 13. Saving a file that contains custom library objects as a previous release of wysiwyg causes a crash when opening the file When you are working in a wysiwyg Release 19 file that contains custom library objects and you save the file as version Release 15 or earlier, the program crashes when you open the file in that previous release. To avoid this issue, you have two options: Page 25 of 28 © CAST Group of Companies Inc., 2009. All rights reserved. or • Remove the custom library objects before saving the file as a previous release • when working with a file that has custom library objects in it, only save it as Release 16 or greater. 14. wysiwyg Learn Clients freeze when an application on the machine that is running the Learn Server fully utilizes the CPU (when it stays at 100%). To avoid this problem, change the priority of the Sentinel Protection Server (spnsrvnt.exe) to High (for network dongle). In the Windows Task Manager, switch to the Processes tab, right-click on spnsrvnt.exe, select Set Priority, and then choose High as the new priority for this process." 15. wysiwyg does not detect the appropriate size of color frame for fixtures that have interchangeable lenses. wysiwyg is not yet able to distinguish the lens from the body of certain fixtures that have interchangeable lenses, such as the ETC Source 4, the Altman Shakespeare, and so on. In some cases, therefore, it allows you to use the incorrect size of color frame for the current lens. For example, a Source 4 fixture with a 26° lens uses a 6.25-inch color frame, but wysiwyg also allows you to use both a 12-inch and a 14-inch frame (the frames used by 10° and 5° lenses respectively). To avoid this issue, ensure that you know the appropriate color frame for each lens that you are using. Select a color frame from the accessories tab of the library browser and insert it into the fixture(s). Then open the properties of the color frame and select a color to apply to that accessory. 16. Empty layers may not be removable. You cannot delete layers in wysiwyg unless they are free of all objects. However, in some cases, you may not be able to delete some layers even if all objects have been removed in CAD mode. At all times, however, you can rename layers. These “non-removable” layers are not harmful and can be renamed and/or re-used. 17. Deleted Presentation items are still available in Layouts. Removing a new plot, image, report, worksheet, key, legend, or spreadsheet from its respective shortcut bar using Undo does not remove it from the list of items available for insertion in Layouts. Such items are named “new view” in their respective list and can be added to the layout but may cause wysiwyg to crash. 18. Positional link not broken for grouped objects in a New Plots view. Performing a Move or Rotate command on a set of grouped objects in a New Plots view does not properly break the positional link. If you try to restore the positional link for these objects, they will return to the position they were in immediately before the positional link was broken, not the position they are currently in CAD mode. They will move to the correct position if the objects in CAD mode are ungrouped and regrouped. Page 26 of 28 © CAST Group of Companies Inc., 2009. All rights reserved. 19. Positional link not broken for grouped hang structures in a New Plots view. Performing a Move, Rotate, or Rotate Position command on a set of grouped hang structures (such as a truss) in a New Plots view does not properly break the positional link. If you Move or Rotate the hang structures in CAD mode, the hang structures in the New Plots view will change their position as well. They will not be moved if you ungroup the hang structures before moving or rotating them, then regroup them when the operation is finished. 20. Problems connecting to WYG-it 2s. Some users have experienced problems connecting to WYG-it 2s after uninstalling and installing the same or a different version of wysiwyg. As a workaround to this problem, it is recommended that you follow the steps below when either installing a new version of wysiwyg (other than when using the In-Place update) or reinstalling the same version of wysiwyg: 1) Uninstall WYG-It 2 drivers. 2) Uninstall wysiwyg. 3) Remove any “WYSIWYGx” folders located in the \Program Files folder where you originally uninstalled WYSIWYG. 4) Install different (or same) version of wysiwyg. 5) Install WYG-It 2 drivers. 21. Fixture lens shapes are mismatched. Some rectangular-shaped fixtures may display a circular or oval lens in Shaded views. If you encounter any fixtures displaying incorrect lens shapes, please contact the CAST Software Library Department at [email protected]. Contacting Technical Support Please read the online documentation and visit the www.cast-soft.com Web site before contacting Technical Support. You can contact Technical Support at the following location: Note: For all Console Edition users, please contact your console manufacturer for first-line support on all related technical questions. CAST Software Technical Support 35 Ripley Avenue, Unit 1 Toronto, ON Canada M6S 3P2 Phone: +1.877.989.2278 Fax: +1.416.597.9594 E-mail: [email protected] Web site: www.CAST-soft.com Page 27 of 28 © CAST Group of Companies Inc., 2009. All rights reserved. United Kingdom A.C. Lighting Ltd. Technical Sales & Support Centauri House Hillbottom Road High Wycombe Bucks, UK HP12 4HQ Phone: +44 (0)1494 446000 Fax: +44 (0)1494 461024 E-mail: [email protected] Website: www.aclighting.com Germany ARCUS GmbH Obermeiers Feld 2-4 33104 Paderborn, Germany Phone: +49 (0) 5254 93069 0 Fax: +49 (0) 5254 93069 29 E-mail: [email protected] Website: www.arcus-lighting.com Japan Theater Engineering Phone: +81 (0) 3 3706 5611 Fax: +81 (0) 3 3706 6766 Email: [email protected] Website: www.thea-eng.co.jp Copyright Information © CAST Group of Companies Inc., 2009. All rights reserved. 35 Ripley Avenue, Suite 1 Toronto, Ontario Canada M6S 3P2 "wysiwyg" and “CAST Software” are registered trademarks of CAST Group of Companies Incorporated. Other brands or products are the trademarks or registered trademarks of their respective holders and should be treated as such. Page 28 of 28 © CAST Group of Companies Inc., 2009. All rights reserved.