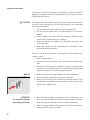
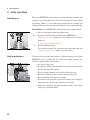
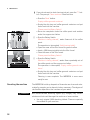
1
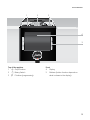
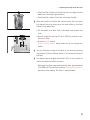
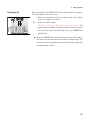
IMPRESSA J9 One Touch TFT Instructions for Use KE For your safety: read and understand manual before use. Table of contents Your IMPRESSA J9 One Touch TFT IMPORTANT SAFEGUARDS 4 Control elements 8 1 Preparing and using for the first time 10 JURA on the Internet.....................................................................................................................................10 Setting up the machine...............................................................................................................................10 Filling the water tank....................................................................................................................................10 Filling the bean container............................................................................................................................10 First-time use..................................................................................................................................................11 Inserting and activating the filter...............................................................................................................12 Determining and adjusting the water hardness......................................................................................14 Adjusting the grinder...................................................................................................................................15 2 Preparation 16 Ways of preparing a beverage....................................................................................................................16 Espresso and coffee......................................................................................................................................17 Preparing two specialty coffees..................................................................................................................17 Latte macchiato, cappuccino......................................................................................................................18 Warm milk and milk foam...........................................................................................................................19 Ground coffee................................................................................................................................................19 Permanently setting the amount of water for the cup size.................................................................20 Hot water........................................................................................................................................................21 3 Daily operation 22 Switching on................................................................................................................................................. 22 Daily maintenance....................................................................................................................................... 22 Switching off................................................................................................................................................. 23 4 Permanent settings in programming mode 24 Product settings...........................................................................................................................................25 Maintenance settings.................................................................................................................................. 27 Energy-saving mode...................................................................................................................................28 Automatic switch-off...................................................................................................................................29 Unit for amount of water............................................................................................................................29 Restore factory settings..............................................................................................................................30 Language........................................................................................................................................................31 Color scheme.................................................................................................................................................31 Viewing information.................................................................................................................................... 32 2 Table of contents 5 Maintenance 33 Rinsing the machine.................................................................................................................................... 33 Rinsing the cappuccino frother.................................................................................................................34 Cleaning the cappuccino frother...............................................................................................................34 Dismantling and rinsing the cappuccino frother...................................................................................35 Changing the filter.......................................................................................................................................36 Cleaning the machine................................................................................................................................. 37 Descaling the machine ...............................................................................................................................38 Cleaning the bean container.......................................................................................................................41 Descaling the water tank.............................................................................................................................41 6 Display messages 42 7 Troubleshooting 43 8 Transport and environmentally friendly disposal 45 Transport / Emptying the system..............................................................................................................45 Disposal..........................................................................................................................................................45 9 Technical data 46 10 Index 47 11 JURA contact details / Legal information 52 Symbol description Warnings J J DANGER This is the safety alert symbol. lt is used to alert you to potential personal injury hazards. Obey all safety messages that follow this symbol to avoid possible injury or death. DANGER indicates a hazardous situation which, if not avoided, will result in death or serious injury. J WARNING WARNING indicates a hazardous situation which, if not avoided, could result in death or serious injury. J CAUTION CAUTION, used with the safety alert symbol, indicates a hazardous situation which, if not avoided, could result in minor or moderate injury. NOTICE NOTICE is used to address practices not related to personal injury. Symbols used T Prompt to take action. This symbol means that you are being prompted to perform some action. E Information and tips to make it even easier to use your IMPRESSA. ‘Coffee’ Display message 3 IMPORTANT SAFEGUARDS IMPORTANT SAFEGUARDS Follow the basic safety precautions When using electrical appliances, basic safety precautions shall always be followed, to reduce the risk of fire, electric shock, and/or injury to persons, including the following: ZZ Read all instructions. ZZ Do not touch hot surfaces. Use handles or knobs. ZZ To protect against fire, electric shock and injury to persons, do not immerse power cord, plugs, or body of machine in water or other liquid. ZZ Close supervision is necessary when any appliance is used by or near children. ZZ Unplug from outlet when not in use and before cleaning. Allow to cool before putting on or taking off parts, and before cleaning the appliance. ZZ Do not operate any appliance with a damaged cord or plug or after the appliance malfunctions, or has been damaged in any manner. Return appliance to the nearest authorized service facility for examination, repair or adjustment. ZZ The use of an accessory attachment not recommended by the appliance manufacturer may result in fire, electric shock, or injury to persons. ZZ Do not use outdoors. ZZ Do not let the cord hang over the edge of a table or counter, or touch hot surfaces. ZZ Do not place on or near a hot gas or electric burner, or in a heated oven. ZZ Always attach plug to appliance first, then plug cord into the wall outlet. To disconnect, turn any control to ‘OFF’ then remove plug from wall outlet. ZZ Do not use appliance for other than intended use. ZZ Use extreme caution when dispensing hot steam, hot water or hot coffee. ZZ For household use only. SAVE THESE INSTRUCTIONS. Pass them on to any subsequent user. 4 IMPORTANT SAFEGUARDS Intended use The appliance is designed and intended for household use only. It shall only be used for coffee preparation and to heat milk and water, according to these instructions. Use for any other purpose will be deemed improper. JURA Elektroapparate AG cannot accept any responsibility for the consequences of improper use. People, including children, who ZZ do not have the physical, sensory or mental capabilities to use the appliance safely or ZZ are inexperienced or lack knowledge in how to use the appliance safely must be supervised by a responsible person when using it, or must be instructed in how to use it correctly. Special power cord set instructions ZZ The power cord is provided to reduce the risk resulting from becoming entangled in or tripping over a long cord. ZZ The cord shall be arranged so that it will not drape over the counter top or table top where it can be pulled on by children or tripped over. ZZ This appliance has a 3-pin grounded plug. As a safety feature, this plug will fit in a polarized outlet only one way. ZZ If the plug does not fit fully in the outlet, reverse the plug. If it still does not fit, contact a qualified electrician. ZZ Do not modify the plug in any way or attempt to defeat this safety feature. Do NOT use extension cords. If the user chooses to use an extension cord, ZZ the marked electrical rating of the extension cord shall be at least as great as the electrical rating of the appliance, and ZZ if the appliance is of the grounded type, the extension cord shall be a grounding type 3-wire cord, and ZZ the longer cord shall be arranged so that it will not drape over the counter top or tabletop where it can be pulled on by children or tripped over. J WARNING To reduce the risk of fire or electric shock, DO NOT remove any service covers. DO NOT modify the appliance in any way that is not described in these instructions. NO user serviceable parts included. Repair MUST be done by authorized personnel only. 5 IMPORTANT SAFEGUARDS In the event of signs of damage, for example if there is a smell of burning, unplug the machine immediately from outlet and contact JURA customer service. J CAUTION This appliance is for household use. Any servicing other than cleaning and user maintenance shall be performed by an authorized service representative: ZZ Do not immerse base in water or try to disassemble. ZZ Do not put the appliance or any individual parts in the dishwasher. ZZ Check voltage to be sure that the voltage indicated on the name plate complies with your voltage. ZZ Never use warm or hot water to fill the water container. Use cold water only. ZZ Keep your hands and the cord away from hot parts of the appliance during operation. There is a risk of scalds or burns on the spouts and the cappuccino frother / nozzle. ZZ Keep children away. ZZ Do not touch any hot parts. Use the handles or knobs provided. ZZ Ensure that the cappuccino frother / nozzle is correctly fitted and clean. If incorrectly fitted or if they become blocked, the cappuccino frother or its parts might come off. 6 NOTICE ZZ Never clean with scouring powders or hard implements. ZZ Ensure that the ventilation slots are not covered. ZZ Never pull out the drip tray during the brewing process. Only pull the drip tray when the display instructs you or when the appliance is ready for use. NEVER DO (or you will void your warranty protection): ZZ Never fill instant coffee, chocolate mix etc. into the bean container or ground coffee funnel (filler funnel for ground coffee). It will damage the functioning of the brewing chamber. ZZ Never fill sugar coated coffee beans into the bean container. In case of doubt, call your dealer. IMPORTANT SAFEGUARDS ZZ Never fill anything other than coffee beans into the bean container (no chocolate, no rice, no nuts, no spices, nothing other than roasted coffee beans). ZZ Never fill frozen beans into the bean container. If you store beans in the freezer, let them thaw 3 to 4 hours before filling them into the bean container. ZZ Never fill anything but fresh, cold and clean water into the water tank, except when decalcifying. ZZ Never use mineral or carbonated water. You can use tap water, bottled water, spring water and reverse osmosis water. ZZ Never do anything with the machine which is not described in these instructions. In case of doubt, call your dealer. 7 Control elements Control elements 9 10 11 1 2 12 3 13 4 5 J HOT 14 J HOT 6 7 15 8 1 2 3 4 5 6 7 8 8 Bean container cover Water tank cover Bean container with aroma preservation cover Water tank Height-adjustable cappuccino frother Coffee grounds container Drip tray Cup platform 9 10 11 12 13 14 15 Filler funnel for ground coffee Storage compartment cover Grinder adjustment switch Hot-water nozzle Measuring spoon for ground coffee Height- and width-adjustable coffee spout Power switch and power cord (side of machine) Control elements 1 2 3 4 5 Top of the machine 1 Q On/Off button 2 g Rotary Switch 3 O P button (programming) Front 4Display 5 Buttons (button function depends on what is shown in the display) 9 1 Preparing and using for the first time 1 Preparing and using for the first time JURA on the Internet Visit us on the Internet. You can download short operating instructions for your machine from the JURA website (www.jura.com). You will also find interesting and up-to-date information on your IMPRESSA and on every aspect of coffee. Setting up the machine When setting up your IMPRESSA, please note the following: Place the IMPRESSA on a horizontal surface that is not sensitive to water. Choose a spot for your IMPRESSA which protects the machine against overheating. Ensure that the ventilation slots are not covered. UU UU Filling the water tank NOTICE To enjoy the perfect cup of coffee we recommend changing the water every day. Milk, sparkling mineral water or other liquids can damage the water tank or the machine. T Only fill the water tank with fresh, cold water. T Open the water tank cover. T Remove the water tank and rinse it with cold water. T Fill the water tank with fresh, cold water and reinsert the tank. T Close the water tank cover. Filling the bean container The bean container has an aroma preservation cover. This will ensure that your coffee beans retain their aroma for longer. NOTICE Coffee beans which have been treated with additives (e.g. sugar), ground coffee or freeze-dried coffee will damage the grinder. T Only use untreated coffee beans to fill the bean container. T Open the bean container cover and remove the aroma preservation cover. 10 1 Preparing and using for the first time T Remove any dirt or foreign objects from inside the bean container. T Fill the bean container with coffee beans, then close the aroma preservation cover and the bean container cover. First-time use J WARNING If the machine is operated with a defective power cord, there is a danger of potentially fatal electric shock. T Never use a machine which is damaged. T Never use a machine which has a defective power cord. EE The water volume is given as standard in ‘oz’. You can change this setting to ‘ml’ in programming mode (see Chapter 4 ‘Permanent settings in programming mode – Unit for amount of water’). Precondition: The water tank and bean container have been filled. T Insert the power plug into a power socket. 3 T Switch on the IMPRESSA using the power switch on the right-hand side of the machine. Q T Press the On/Off button to switch the IMPRESSA on. The JURA logo appears. The display then shows the languages you can choose from. EE To display more languages, press the ‘Next’ button (bottom right). T Press the button that corresponds to the language you want, e.g. ‘English’. ‘Saved’ appears briefly on the display to confirm the setting. ‘Please press the Rotary Switch.’, the Rotary Switch lights up. T Place a receptacle under the cappuccino frother. k T Press the Rotary Switch. ‘System is filling.’, the system fills up with water. The operation stops automatically. ‘Please press the Rotary Switch.’ 11 1 Preparing and using for the first time T Place a receptacle under the coffee spout. k T Press the Rotary Switch. ‘Machine is rinsing.’, the machine rinses. The operation stops automatically. ‘Please select product:’ appears on the display. The IMPRESSA is now ready for use. EE The display shows the products you can prepare. Inserting and activating the filter Your IMPRESSA no longer has to be descaled if you are using the CLEARYL Blue filter cartridge. If the water hardness is 10° dH or more, we recommend using the filter cartridge. EE If you do not know the hardness of your water, you must find this out first (see Chapter 1 ‘Preparing and using for the first time – Determining the water hardness’). EE Perform the ‘inserting the filter’ operation without any interruptions. This will ensure that your IMPRESSA always produces its best. Precondition: ‘Please select product:’ is displayed. O T Press the P button. ‘Maintenance status (1/6)’ g T Turn the Rotary Switch until the program item ‘Maintenance settings (3/6)’ is displayed. T Press the ‘Filter’ button. ‘Filter’ T Press the ‘Active’ button. T Press the ‘Save’ button. ‘Saved’ appears briefly on the display. ‘Insert filter’ T Remove the filter cartridge extension from the Welcome Pack. T Fit the filter extension on top of a CLEARYL Blue filter cartridge. T Remove and empty the water tank. 12 1 Preparing and using for the first time T Open the filter holder and insert the filter cartridge into the water tank, exerting slight pressure. T Close the filter holder. It will click into place audibly. EE After two months, the filter will cease to work. You can check the elapsed time by referring to the date plate on the filter holder in the water tank. T Fill the water tank with fresh, cold water and reinsert the tank. T Place a receptacle (at least 17 oz or 500 ml) under the cappuccino frother. T Press the ‘Next’ button. ‘Filter is being rinsed.’, water flows out of the cappuccino frother. EE You can interrupt rinsing of the filter at any time by pressing any button. Press the Rotary Switch k to continue rinsing of the filter. EE The water may be slightly discolored. This is not harmful to health and does not affect the taste. Rinsing of the filter stops automatically after approximately 17 oz (500 ml). The machine heats up. ‘Please select product:’ appears on the display. The filter is now activated. 13 1 Preparing and using for the first time Determining and adjusting the water hardness EE If you are using the CLEARYL Blue filter cartridge and have activated it in programming mode, you will not be able to adjust the water hardness. The harder the water is, the more frequently the IMPRESSA needs to be descaled. It is therefore important to adjust the water hardness. The water hardness can be adjusted on a continuous scale between 1° dH and 30° dH. Level Display German Degrees of general Parts per Indicator Strip number Degree (°dH) hardness (°dGH) million (ppm) of ‘reddish’ fields Not active – – Very soft water <3 <3 < 53.4 Soft water >4 >4 > 71 1 Hard water > 8.4 > 8.4 > 150 2 Very hard water > 14 > 14 > 250 3 Determining the water hardness Adjusting the water hardness 14 – – None You can find out what the water hardness is by using the Aquadur® test strip supplied as standard. T Hold the test strip briefly (for 1 second) under flowing water. Shake off the water. T Wait for about one minute. T You will then be able to read the degree of water hardness from the discoloration of the Aquadur® test strip and the description on the packaging. You can now adjust the water hardness. Precondition: ‘Please select product:’ is displayed. O T Press the P button. ‘Maintenance status (1/6)’ g T Turn the Rotary Switch until the program item ‘Maintenance settings (3/6)’ is displayed. T Press the ‘Water hardness’ button. ‘Water hardness’ T Press the ‘ < ’ or ‘ > ’ button to set the water hardness. 1 Preparing and using for the first time T Press the ‘Save’ button. ‘Saved’ appears briefly on the display to confirm the setting. ‘Maintenance settings (3/6)’ O T Press the P button to exit programming mode. ‘Please select product:’ Adjusting the grinder NOTICE You can adjust the grinder on a continuous scale to suit the degree of roast of your coffee. If you adjust the consistency of grind when the grinder is not operating, the grinder adjustment switch could be damaged. T Only adjust the consistency of grind when the grinder is running. The consistency of grind setting is correct if the coffee flows regularly from the coffee spout. In addition a fine, thick crema forms. Example: Proceed as follows to change the consistency of grind during the preparation of an espresso. T Open the storage compartment cover. T Place a cup under the coffee spout. T Press the ‘Espresso’ button. The grinder starts up. ‘Espresso’ is displayed. T Turn the grinder adjustment switch to the desired position while the grinder is running. The espresso is prepared and the consistency of grind is adjusted. T Close the storage compartment cover. 15 2 Preparation 2 Preparation J WARNING Hot coffee, hot steam and hot water can cause scalding. Scalding is a serious burn. T Use extreme care when handling hot liquid or steam. T Allow liquid to cool down before drinking. T In the event of scalding, rinse affected area with cold water and seek medical attention. T Keep children AWAY. For a summary of the different temperatures, please refer to Chapter 4 ‘Permanent settings in programming mode – Product settings’. EE You can stop preparation of a specialty coffee, specialty coffee with milk or hot water at any time. Just press any button. EE During the grinding operation you can select the coffee strength of individual products by turning the Rotary Switch g: ; (extra-mild), ;; (mild), ;;; (normal), ;;;; (strong) or ;;;;; (extra-strong). EE During preparation, you can change the preset amount of water by turning the Rotary Switch g or pressing the ‘ < ’ and ‘ > ’ buttons. EE The water volume is given as standard in ‘oz’. You can change this setting to ‘ml’ in programming mode (see Chapter 4 ‘Permanent settings in programming mode – Unit for amount of water’). EE You can follow the current status of preparation on the display. You can make permanent settings for all products in programming mode (see Chapter 4 ‘Permanent settings in programming mode – Product settings’). Ways of preparing a beverage 16 Only some of the specialty coffees you can prepare are shown on the display at any one time. As soon as you turn the Rotary Switch, more specialty coffees are displayed in the product selector. The product selector disappears automatically after 5 seconds if no preparation is started. 2 Preparation The following specialty coffees are displayed as standard: ‘Espresso’ ‘Coffee’ ‘Cappuccino’ ‘Latte macchiato’ ‘Hot water’ ‘1 portion milk’ UU UU UU UU UU UU Additional specialty coffees in the product selector: ‘Ristretto’ ‘2 espressi’ ‘2 coffees’ ‘2 ristretti’ UU UU UU UU Espresso and coffee ‘Espresso’ and ‘Coffee’ are prepared following this model. Example: Proceed as follows to prepare one coffee. T Place a cup under the coffee spout. T Press the ‘Coffee’ button. Preparation will now begin. The preset amount of water for coffee flows into the cup. Preparation stops automatically and ‘Please select product:’ appears on the display. Preparing two specialty coffees To prepare two specialty coffees, either use the product selector or press the appropriate preparation button twice. Example: Proceed as follows to prepare two coffees (using product selector). T Place two cups under the coffee spout. g T Turn the Rotary Switch to view the product selector. g T Turn the Rotary Switch until ‘2 coffees’ is displayed. k T Press the Rotary Switch. Preparation starts and the preset amount of water for coffee flows into the cups. Preparation stops automatically and ‘Please select product:’ appears on the display. 17 2 Preparation EE Proceed as follows to prepare two cups of coffee at the touch of a button: Place two cups under the coffee spout. Press the ‘Coffee’ button twice (within two seconds) to start coffee preparation. Latte macchiato, cappuccino Your IMPRESSA can prepare a latte macchiato or cappuccino at the touch of a button. There is no need to move the glass or cup. Example: Proceed as follows to prepare one latte macchiato. T Remove the protective cover from the cappuccino frother. T Attach the milk pipe to the cappuccino frother. Use the long pipe for a milk carton and the short pipe for a milk container. T Insert the other end of the milk pipe into a milk carton or connect it to a milk container. T Place a glass under the cappuccino frother. T Turn the setting wheel of the cappuccino frother to the Milk Foam position ü. T Press the ‘Latte macchiato’ button. ‘Latte macchiato’, the milk foam is prepared. Preparation stops automatically when the preset amount of milk is reached. EE There is a short interval while the hot milk separates from the milk foam. This allows the typical layers of a latte macchiato to form. You can choose the length of this interval in programming mode (see Chapter 4 ‘Permanent settings in programming mode – Product settings’). Coffee preparation starts. The preset amount of water flows into the glass. Preparation stops automatically and ‘Please select product:’ appears on the display. To make sure the cappuccino frother always works properly, rinse and clean it regularly (see Chapter 5 ‘Maintenance – Rinsing the cappuccino frother’). 18 2 Preparation Warm milk and milk foam Example: Proceed as follows to prepare milk foam. T Remove the protective cover from the cappuccino frother. T Attach the milk pipe to the cappuccino frother. Use the long pipe for a milk carton and the short pipe for a milk container. T Insert the other end of the milk pipe into a milk carton or connect it to a milk container. T Place a cup under the cappuccino frother. T Turn the setting wheel of the cappuccino frother to the Milk Foam position ü. EE If you want to heat the milk turn the setting wheel of the cappuccino frother to the Milk position z. T Press the ‘1 portion milk’ button. ‘1 portion milk’ As soon as the machine has heated up, ‘Please select product:’ appears. T Press the ‘1 portion milk’ button again. ‘1 portion milk’, the milk foam is prepared. Preparation stops automatically when the preset amount of milk is reached. ‘Please select product:’ appears on the display. To make sure the cappuccino frother always works properly, rinse and clean it regularly (see Chapter 5 ‘Maintenance – Rinsing the cappuccino frother’). Ground coffee You can choose to use a second coffee variety, for example decaffeinated coffee, with the filler funnel for ground coffee. EE Never add more than two level measuring spoons of ground coffee. EE Use ground coffee which is not ground too finely. Very fine coffee can block up the system so that the coffee only comes out in drips. EE If you did not fill the machine with a sufficient amount of ground coffee, ‘Not enough ground coffee’ is displayed and the IMPRESSA stops the operation. 19 2 Preparation EE The desired specialty coffee must be prepared within approximately one minute after filling with the ground coffee. Otherwise the IMPRESSA stops the operation and is once more ready for use. All specialty coffees with ground coffee are prepared following this model. Example: Proceed as follows to prepare one espresso using ground coffee. T Place an espresso cup under the coffee spout. T Open the cover of the filler funnel for ground coffee. ‘Please add ground coffee.’ T Place one level measuring spoon of ground coffee into the filler funnel. T Close the cover of the filler funnel. ‘Please select product:’ T Press the ‘Espresso’ button. Preparation will now begin. The preset amount of water for espresso flows into the cup. Preparation stops automatically and ‘Please select product:’ appears on the display. Permanently setting the amount of water for the cup size It is easy to make permanent settings for the amount of water for all specialty coffees and hot water according to the cup size. Adjust the amount once as shown in the following example. Every time you prepare a drink in the future, this amount of water will be dispensed. The permanent settings for adapting the amount of water to the cup size for all specialty coffees and hot water follow this model. Example: Proceed as follows to permanently set the amount of water for one coffee. Precondition: ‘Please select product:’ is displayed. T Place a cup under the coffee spout. T Press and hold the ‘Coffee’ button. ‘Coffee’ and the fill volume are displayed. T Hold the ‘Coffee’ button down until ‘Enough water? Press button’ appears. T Release the ‘Coffee’ button. Preparation starts and the coffee flows into the cup. 20 2 Preparation T Press any button as soon as there is sufficient coffee in the cup. Preparation stops. ‘Saved’ appears briefly on the display. The set amount of water for one coffee is permanently stored. ‘Please select product:’ appears on the display. EE You can alter this setting at any time by repeating the above procedure. EE You can also permanently set the amount for all specialty coffees and hot water in programming mode (see Chapter 4 ‘Permanent settings in programming mode – Product settings’). Hot water To obtain a perfect water flow, use the hot-water nozzle. You can find the hot-water nozzle under the cover of the storage compartment. The following temperatures can be selected for preparing hot water: ‘Low’, ‘Normal’, ‘X high’ (approx. 149–203 °F (65–95 °C)). J CAUTION There is a danger of scalding from hot water splashes. T Avoid direct contact with the skin. T Carefully pull the cappuccino frother down and off. T Open the storage compartment cover, take out the hotwater nozzle and close the cover again. T Attach the hot-water nozzle to the connector. T Place a cup under the hot-water nozzle. T Press the ‘Hot water’ button. ‘Hot water’ and the temperature are displayed. EE By pressing the ‘ < ’ or ‘ > ’ button several times (within approximately 2 seconds) you can set the temperature to your individual preference. This setting is not saved. ‘Hot water’, hot water flows into the cup. Preparation stops automatically and ‘Please select product:’ appears on the display. 21 3 Daily operation 3 Daily operation Switching on When the IMPRESSA is switched on, it automatically prompts you to perform the rinse operation. Start the rinse operation by pressing the Rotary Switch k. In programming mode you can change this setting so that the machine starts the switch-on rinse automatically. Precondition: Your IMPRESSA is switched on at the power switch. T Place a receptacle under the coffee spout. Q T Press the On/Off button to switch the IMPRESSA on. ‘Welcome to JURA’ appears on the display. The machine heats up. ‘Please press the Rotary Switch.’ k T Press the Rotary Switch. The machine rinses. The operation stops automatically and ‘Please select product:’ appears on the display. Daily maintenance 22 To ensure that you get many years of reliable service out of your IMPRESSA and to guarantee the optimum coffee quality, the machine requires daily maintenance. T Pull out the drip tray. T Empty the coffee grounds container and the drip tray. Rinse them both with warm water. T Dry the metal contacts on the back of the drip tray. T Refit the coffee grounds container and the drip tray. T Rinse the water tank with clean water. T Dismantle and rinse the cappuccino frother (see Chapter 5 ‘Maintenance – Rinsing the cappuccino frother’). T Wipe the surface of the machine with a clean, soft, damp cloth (e.g. microfiber cloth). 3 Daily operation Switching off When you switch your IMPRESSA off, the spouts used to prepare a specialty coffee or milk are rinsed. T Place one receptacle under the coffee spout and another under the cappuccino frother. Q T Press the On/Off button. ‘Machine is rinsing.’, ‘Milk system is being rinsed.’. The spouts used to prepare a specialty coffee or milk are rinsed. The operation stops automatically and your IMPRESSA is switched off. EE When the IMPRESSA is switched off with the On/Off button, the machine consumes less than 0.1 W of standby energy. The machine can be completely disconnected from the power grid using the power switch. 23 4 Permanent settings in programming mode 4 Permanent settings in programming mode J WARNING Hot coffee, hot steam and hot water can cause scalding. Scalding is a serious burn. T Use extreme care when handling hot liquid or steam. T Allow liquid to cool down before drinking. T In the event of scalding, rinse affected area with cold water an seek medical attention. T Keep children AWAY. For a summary of the different temperatures, please refer to Chapter 4 ‘Permanent settings in programming mode – Product settings’. Press the P button to enter programming mode. You can navigate through the program items and permanently save the required settings simply by turning the Rotary Switch and using the variable buttons. The following settings can be made: Program item Sub-item Explanation ‘Maintenance status (1/6)’ ‘Clean’, ‘Descale’ (only if filter is not activated), ‘Change the filter’ (only if filter is activated), ‘Rinse the coffee system’, ‘Clean the milk system’ T Start the required maintenance program here. ‘Product settings (2/6)’ ‘Expert mode’ T Select your settings for specialty coffees and hot water. ‘Maintenance settings (3/6)’ ‘Filter’, ‘Water hardness’ (only if filter is not activated), ‘Rinse the coffee system’, ‘Rinse the milk system’ T Indicate whether you are operating your IMPRESSA with or without a CLEARYL Blue filter cartridge. T Adjust the water hardness. T Change the settings for the switch-on rinse and milk system rinse. 24 4 Permanent settings in programming mode Program item Sub-item Explanation ‘Machine settings 1 (4/6)’ ‘Save energy’, ‘Switch off after’, ‘Units’, ‘Factory setting’ T Select an energy-saving mode. T Set the time after which the IMPRESSA should switch off automatically. T Select the unit for the amount of water. T Reset the permanently set values of all products to the factory settings. ‘Machine settings 2 (5/6)’ ‘Choose language’, ‘Display’, ‘Colour scheme’ T Select your language and the background color for the display. ‘Information (6/6)’ ‘Product counter’, ‘Maintenance counter’, ‘Version’ T Keep track of all specialty coffees prepared and view the number of maintenance programs performed. Product settings J WARNING In the program item ‘Product settings (2/6)’ you can make individual settings for all specialty coffees and hot water. Hot coffee, hot steam and hot water can cause scalding. Scalding is a serious burn. T Use extreme care when handling hot liquid or steam. T Allow liquid to cool down before drinking. T In the event of scalding, rinse affected area with cold water an seek medical attention. T Keep children AWAY. The following settings can be made: Product Temperature Ristretto, espresso, coffee Volume: ‘0.5 oz’ – ‘8.0 oz’ ‘Normal’, ‘High’ ‘extra-mild ;’, (25 ml – 240 ml) (approx. 176–205 °F (80–96 °C)) ‘mild ;;’, ‘normal ;;;’, ‘strong ;;;;’, ‘extra-strong ;;;;;’ Coffee strength Two ristretti, two espressi, two coffees ‘Normal’, ‘High’ (approx. 176–205 °F (80–96 °C)) – Amount Volume: ‘0.5 oz’ – ‘8.0 oz’ (25 ml – 240 ml) (per cup) 25 4 Permanent settings in programming mode Product Temperature Latte macchiato, cappuccino ‘Normal’, ‘High’ ‘extra-mild ;’, (approx. 176–205 °F (80–96 °C)) ‘mild ;;’, ‘normal ;;;’, ‘strong ;;;;’, ‘extra-strong ;;;;;’ Milk portion Hot water – Coffee strength max. 149 °F (65 °C) ‘Low’, ‘Normal’, ‘X high’ (approx. 149–203 °F (65–95 °C)) Amount Amount of milk: ‘3 sec.’ – ‘120 sec.’ Interval: ‘0 sec.’ – ‘60 sec.’ Volume: ‘0.5 oz’ – ‘8.0 oz’ (25 ml – 240 ml) – ‘3 sec.’ – ‘120 sec.’ – ‘0.5 oz’ – ‘15.0 oz’ (25 ml – 450 ml) Example: Proceed as follows to change the amount of milk for a latte macchiato from ‘16 sec.’ to ‘20 sec.’, the interval from ‘30 sec.’ to ‘40 sec.’ and the amount of water from ‘1.5 oz’ (45 ml) to ‘1.0 oz’ (40 ml). Precondition: ‘Please select product:’ is displayed. O T Press the P button. ‘Maintenance status (1/6)’ g T Turn the Rotary Switch until the program item ‘Product settings (2/6)’ is displayed. T Press the ‘Expert mode’ button. ‘Expert mode’ EE Next select the button of the product for which you would like to make settings. No product is prepared at this point. T Press the ‘Latte macchiato’ button. ‘Latte macchiato’ T Press the ‘Amount of milk’ button. T Press the ‘ < ’ or ‘ > ’ button to change setting for the amount of milk to ‘20 sec.’. T Press the ‘Save’ button. ‘Saved’ appears briefly on the display. T Press the ‘Volume’ button. T Press the ‘ < ’ or ‘ > ’ button to change setting for the fill volume to ‘1.0 oz’ (40 ml). T Press the ‘Save’ button. ‘Saved’ appears briefly on the display. T Press the ‘Next’ button. T Press the ‘Interval’ button. 26 4 Permanent settings in programming mode T Press the ‘ < ’ or ‘ > ’ button to change setting for the interval to ‘40 sec.’. T Press the ‘Save’ button. ‘Saved’ appears briefly on the display. ‘Latte macchiato’ O T Press the P button to exit programming mode. ‘Please select product:’ Maintenance settings In the program item ‘Maintenance settings (3/6)’ you can make the following settings: ‘Filter’ UUActivate the CLEARYL Blue filter cartridge (see Chapter 1 ‘Preparing and using for the first time – Inserting and activating the filter’). ‘Water hardness’ UUIf you do not have a filter cartridge, you will need to set the water hardness (see Chapter 1 ‘Preparing and using for the first time – Adjusting the water hardness’). ‘Rinse the coffee system’ / ‘Manual’ UUThe switch-on rinse must be started manually. ‘Rinse the coffee system’ / ‘Automatic’ UUThe switch-on rinse is started automatically. ‘Rinse the milk system’ / ‘After 10 min.’ UUYou are prompted to rinse the milk system 10 minutes after preparation of a specialty coffee with milk. ‘Rinse the milk system’ / ‘Immediate’ UUYou are prompted to rinse the milk system immediately after preparation of a specialty coffee with milk. UU UU UU UU UU UU Example: Proceed as follows to make the machine prompt you to rinse the milk system immediately after preparing a specialty coffee with milk. Precondition: ‘Please select product:’ is displayed. O T Press the P button. ‘Maintenance status (1/6)’ g T Turn the Rotary Switch until the program item ‘Maintenance settings (3/6)’ is displayed. T Press the ‘Rinse the milk system’ button. ‘Rinse the milk system’ 27 4 Permanent settings in programming mode T Press the ‘Immediate’ button. T Press the ‘Save’ button. ‘Saved’ appears briefly on the display. ‘Maintenance settings (3/6)’ O T Press the P button to exit programming mode. ‘Please select product:’ Energy-saving mode In the program item ‘Machine settings 1 (4/6)’ / ‘Save energy’ you can permanently set an energy-saving mode (Energy Save Mode, E.S.M.©): ‘Inactive’ UUAll specialty coffees, specialty coffees with milk and hot water can be prepared without having to wait. UUBefore milk preparation, the machine heats up. ‘Active’ (Energy saving of up to 40%) UUSoon after the last preparation, the IMPRESSA stops heating up. As soon as the energy-saving temperature is reached, this is indicated in the display by the message ‘Save energy’ – this may take several minutes. UUThe machine heats up before coffee, hot water or milk preparation. UU UU Example: Proceed as follows to change the energy-saving mode from ‘Inactive’ to ‘Active’. Precondition: ‘Please select product:’ is displayed. O T Press the P button. ‘Maintenance status (1/6)’ g T Turn the Rotary Switch until the program item ‘Machine settings 1 (4/6)’ is displayed. T Press the ‘Save energy’ button. ‘Save energy’ T Press the ‘Active’ button. T Press the ‘Save’ button. ‘Saved’ appears briefly on the display. ‘Machine settings 1 (4/6)’ O T Press the P button to exit programming mode. ‘Please select product:’ 28 4 Permanent settings in programming mode Automatic switch-off By instructing your IMPRESSA to automatically switch itself off, you can cut down your energy consumption. If this function is activated, your IMPRESSA switches off automatically after the preset time following the last action on the machine. You can set the automatic switch-off time to 15 minutes or 0.5 – 15 hours. Precondition: ‘Please select product:’ is displayed. O T Press the P button. ‘Maintenance status (1/6)’ g T Turn the Rotary Switch until the program item ‘Machine settings 1 (4/6)’ is displayed. T Press the ‘Switch off after’ button. ‘Switch off after’ T Press the ‘ < ’ or ‘ > ’ button to change the setting. T Press the ‘Save’ button. ‘Saved’ appears briefly on the display. ‘Machine settings 1 (4/6)’ O T Press the P button to exit programming mode. ‘Please select product:’ Unit for amount of water The water volume is given as standard in ‘oz’. You can change this setting to ‘ml’ in programming mode. Example: Proceed as follows to change the unit for the amount of water from ‘ml’ to ‘oz’. Precondition: ‘Please select product:’ is displayed. O T Press the P button. ‘Maintenance status (1/6)’ g T Turn the Rotary Switch until the program item ‘Machine settings 1 (4/6)’ is displayed. T Press the ‘Units’ button. ‘Units’ T Press the ‘oz’ button. T Press the ‘Save’ button. ‘Saved’ appears briefly on the display. ‘Machine settings 1 (4/6)’ O T Press the P button to exit programming mode. ‘Please select product:’ 29 4 Permanent settings in programming mode Restore factory settings In the program item ‘Machine settings 1 (4/6)’ / ‘Factory setting’ you can reset various settings to their factory settings: ‘Machine’ UUAll customer settings (apart from the ‘filter’) are reset to factory settings. Your IMPRESSA then switches off. ‘Products’ UUThe settings (amount of water, aroma, temperature etc.) for any product can be reset individually to the factory settings. The corresponding double product is also reset to the factory settings at the same time. ‘All products’ UUThe settings (amount of water, aroma, temperature etc.) for all products are reset to the factory settings. ‘Display’ UUAll display settings are reset to the factory settings. UU UU UU UU Example: Proceed as follows to reset the values for ‘Espresso’ to the factory settings. Precondition: ‘Please select product:’ is displayed. O T Press the P button. ‘Maintenance status (1/6)’ g T Turn the Rotary Switch until the program item ‘Machine settings 1 (4/6)’ is displayed. T Press the ‘Factory setting’ button. ‘Factory setting’ T Press the ‘Products’ button. T Press the ‘Espresso’ button. ‘Espresso’ / ‘Reset this product to the factory setting?’ T Press the ‘Next’ button. ‘Saved’ appears briefly on the display. ‘Factory setting’ O T Press the P button to exit programming mode. ‘Please select product:’ 30 4 Permanent settings in programming mode Language In this program item you can set the language used by your IMPRESSA. EE If you choose the wrong language by mistake, you can easily reset the machine to ‘English’: Press the P button to enter programming mode. Use the Rotary Switch g to select program item ‘5/6’ and then press the top left-hand button. Example: Proceed as follows to change the language from ‘English’ to ‘Deutsch’. Precondition: ‘Please select product:’ is displayed. O T Press the P button. ‘Maintenance status (1/6)’ g T Turn the Rotary Switch until the program item ‘Machine settings 2 (5/6)’ is displayed. T Press the ‘Choose language’ button. ‘Choose language’ T Press the ‘Deutsch’ button. ‘Gespeichert’ appears briefly on the display. ‘Geräteeinstellungen 2 (5/6)’ O T Press the P button to exit programming mode. ‘Bitte wählen Sie Ihr Produkt:’ Color scheme In this program item you can set the background color for the display of your IMPRESSA. Precondition: ‘Please select product:’ is displayed. O T Press the P button. ‘Maintenance status (1/6)’ g T Turn the Rotary Switch until the program item ‘Machine settings 2 (5/6)’ is displayed. T Press the ‘Colour scheme’ button. ‘Colour scheme’ T Press the ‘ < ’ or ‘ > ’ button to change the setting. T Press the ‘Save’ button. ‘Saved’ appears briefly on the display. ‘Machine settings 2 (5/6)’ O T Press the P button to exit programming mode. ‘Please select product:’ 31 4 Permanent settings in programming mode EE The selected background color only applies on the selection page of the display showing the specialty coffees. Viewing information In the program item ‘Information (6/6)’ you can view the following information: ‘Product counter’: Number of prepared specialty coffees, specialty coffees with milk and hot water ‘Maintenance counter’: Maintenance status and number of maintenance programs performed (cleaning, descaling, changing the filter) ‘Version’: Software version UU UU UU Precondition: ‘Please select product:’ is displayed. O T Press the P button. ‘Maintenance status (1/6)’ g T Turn the Rotary Switch until the program item ‘Information (6/6)’ is displayed. T Press the ‘Product counter’ button. The number of specialty coffees prepared is displayed. T Press the ‘’ button. ‘Information (6/6)’ O T Press the P button to exit programming mode. ‘Please select product:’ 32 5 Maintenance 5 Maintenance J WARNING Use of maintenance products that are harmful to health and discharge of liquids during maintenance program. Harmful if swallowed. Irritating to eyes and skin. T Keep children AWAY. T Keep children away from the machine while it is performing a maintenance program. T Avoid contact with skin and eyes. T Avoid generation of dust. Do not inhale dust. T When using do not eat or drink. T Keep maintenance products away from food, drink and animal food. T Keep container tightly closed and dry. Keep in a cool place. Your IMPRESSA has the following integrated maintenance programs: Rinsing the machine (‘Rinse the coffee system’) Rinsing the cappuccino frother (‘Rinse the milk system’) Cleaning the cappuccino frother (‘Clean the milk system’) Changing the filter (‘Change the filter’) Cleaning the machine (‘Clean’) Descaling the machine (‘Descale’) UU UU UU UU UU UU EE Clean or descale the machine, rinse the milk system or change the filter when you are prompted to do so. EE Press the P button to view a list of the maintenance programs (‘Maintenance status (1/6)’). By referring to the bar you can see how soon each maintenance program is due. When the bar is completely filled with red, the IMPRESSA will prompt you to perform the maintenance program. EE The IMPRESSA will not prompt you to clean the milk system. In the interests of hygiene, you should clean the milk system daily when you have been preparing milk. Rinsing the machine You can initiate the rinse operation manually at any time. Precondition: ‘Please select product:’ is displayed. 33 5 Maintenance T Place a receptacle under the coffee spout. O T Press the P button. ‘Maintenance status (1/6)’ T Press the ‘Rinse the coffee system’ button. ‘Machine is rinsing.’, water flows out of the coffee spout. The rinse stops automatically and ‘Please select product:’ appears on the display. Rinsing the cappuccino frother After each milk preparation, the IMPRESSA prompts you to rinse the milk system. Precondition: ‘Rinse the milk system’ is displayed. T Place a receptacle under the cappuccino frother. k T Press the Rotary Switch. ‘Milk system is being rinsed.’, water flows out of the cappuccino frother. The rinse stops automatically and ‘Please select product:’ appears on the display. Cleaning the cappuccino frother To ensure that the cappuccino frother always works properly, you should clean it daily when you have been preparing milk. Your IMPRESSA will not prompt you to clean the cappuccino frother. J WARNING Non-recommended cleaning agents will not optimally remove milk residues. This may cause the cappuccino frother to become blocked and fly off the machine. Discharge of hot steam. T Use only original JURA Cappuccino Cleaner. J WARNING Harmful and irritating cleaning agent. Harmful if swallowed. Irritating to eyes and skin. T Keep children AWAY. T Avoid contact with skin and eyes. T After contact with skin, wash immediately with plenty of water. In case of skin irritation, seek medical advice. T After eye contact, immediately flush eyes with plenty of water and seek medical advice. T If swallowed, rinse mouth immediately and drink large quantities of water. Do not induce vomiting. Seek medical advice immediately and show label. 34 5 Maintenance EE JURA Cappuccino Cleaner is available from specialized dealers. Precondition: ‘Please select product:’ is displayed. O T Press the P button. ‘Maintenance status (1/6)’ T Press the ‘Clean the milk system’ button. ‘Cleaning agent for milk system’ T Pour 8.5 oz (250 ml) of fresh water into a receptacle and add one capful (max. 0.5 oz (15 ml)) of Cappuccino Cleaner. T Immerse the milk pipe in the receptacle. T Turn the setting wheel of the cappuccino frother to the Milk Foam ü or Milk z position. T Place another receptacle under the cappuccino frother. T Press the ‘Next’ button. ‘Milk system is being cleaned.’, water flows out of the cappuccino frother. ‘Water for cleaning milk system’ T Rinse the receptacle thoroughly, fill it with 8.5 oz (250 ml) of fresh water and immerse the milk pipe in the water. T Empty the other receptacle and place it under the cappuccino frother again. T Press the ‘Next’ button. ‘Milk system is being cleaned.’, the cappuccino frother and the pipe are rinsed with fresh water. ‘Please select product:’ appears on the display. Dismantling and rinsing the cappuccino frother T Carefully pull the cappuccino frother down and off. T Dismantle the cappuccino frother into its individual parts. T Rinse all parts of the cappuccino frother thoroughly under running water. T Reassemble the cappuccino frother. EE Ensure that all individual parts are correctly and firmly connected to ensure correct operation of the cappuccino frother. T Firmly attach it to the connector. 35 5 Maintenance Changing the filter EE After 2000 oz (60 liters) of water have flowed through, the filter will cease to work. Your IMPRESSA will automatically prompt you to change the filter. EE After three months, the filter will cease to work. You can check the elapsed time by referring to the date plate on the filter holder in the water tank. EE If the CLEARYL Blue filter cartridge is not activated in programming mode, you will not be prompted to change the filter. Precondition: ‘Change filter’ is displayed. O T Press the P button. ‘Maintenance status (1/6)’ T Press the ‘Change the filter’ button. ‘Change the filter’ EE If you do not want to start changing the filter just yet, press the ‘’ button. The prompt ‘Change filter’ remains active. T Press the ‘Next’ button. ‘Change filter’ T Remove and empty the water tank. T Open the filter holder and remove the old CLEARYL Blue filter cartridge and filter extension. T Fit the filter extension on top of a new filter cartridge. T Insert the filter cartridge into the water tank, exerting slight pressure. T Close the filter holder. It will click into place audibly. T Fill the water tank with fresh, cold water and reinsert the tank. T Place a receptacle (at least 17 oz or 500 ml) under the cappuccino frother. T Turn the setting wheel of the cappuccino frother to the Steam position n. T Press the ‘Next’ button. ‘Filter is being rinsed.’, water flows out of the cappuccino frother. 36 5 Maintenance EE You can interrupt rinsing of the filter at any time by pressing any button. Press the Rotary Switch k to continue rinsing of the filter. EE The water may be slightly discolored. This is not harmful to health and does not affect the taste. Rinsing of the filter stops automatically after approximately 17 oz (500 ml). The machine heats up. ‘Please select product:’ appears on the display. Cleaning the machine After 200 preparations or 80 switch-on rinses, the IMPRESSA will prompt you to clean it. J WARNING Non-recommended (e.g. liquid) cleaning agents may contain substances that could damage the machine or leave residues. T Use only original JURA cleaning tablets. These are specially formulated for your machine. J WARNING Harmful and irritating cleaning agent. Harmful if swallowed. Irritating to eyes and skin. T Keep children AWAY. T Avoid contact with skin and eyes. T Avoid generation of dust. Do not inhale dust. T After contact with skin, wash immediately with plenty of water. In case of skin irritation, seek medical advice. T After eye contact, immediately flush eyes with plenty of water and seek medical advice. T If swallowed, rinse mouth immediately and drink large quantities of water. Do not induce vomiting. Seek medical advice immediately and show label. EE The cleaning program lasts approximately 20 minutes. EE Do not interrupt the cleaning program. The quality of cleaning will be impaired if you do so. EE JURA cleaning tablets are available from specialized dealers. Precondition: ‘Clean machine’ is displayed. O T Press the P button. ‘Maintenance status (1/6)’ T Press the ‘Clean’ button. ‘Clean’ 37 5 Maintenance EE If you do not want to start cleaning just yet, press the ‘’ button. The prompt ‘Clean machine’ remains active. T Press the ‘Next’ button. ‘Empty coffee grounds container’ T Empty the drip tray and coffee grounds container and put them back into the machine. ‘Please press the Rotary Switch.’ T Place one receptacle under the coffee spout and another under the cappuccino frother. k T Press the Rotary Switch. ‘Machine is being cleaned.’, water flows out of the coffee spout. The operation is interrupted, ‘Add cleaning tablet’. T Open the cover of the filler funnel for ground coffee. T Insert a JURA cleaning tablet into the filler funnel. T Close the cover of the filler funnel. ‘Please press the Rotary Switch.’ k T Press the Rotary Switch. ‘Machine is being cleaned.’, water flows repeatedly out of the coffee spout and the cappuccino frother. The operation is interrupted, ‘Empty coffee grounds con tainer’. T Empty the drip tray and coffee grounds container and put them back into the machine. Cleaning is now complete. The IMPRESSA is once more ready for use. Descaling the machine J WARNING 38 The IMPRESSA builds up deposits of limescale over time and automatically prompts you to descale it when necessary. The degree of calcification depends on the hardness of your water. Non-recommended descaling agents (e.g. vinegar) may contain substances that could damage the machine or leave residues. T Use only original JURA descaling tablets. These are specially formulated for your machine. 5 Maintenance J WARNING NOTICE Harmful and irritating descaling agent. Harmful if swallowed. Irritating to eyes and skin. T Keep children AWAY. T Avoid contact with skin and eyes. T Avoid generation of dust. Do not inhale dust. T After contact with skin, wash immediately with plenty of water. In case of skin irritation, seek medical advice. T After eye contact, immediately flush eyes with plenty of water. Remove contact lenses. Seek medical advice. T If swallowed, rinse mouth immediately and drink large quantities of water. Do not induce vomiting. Seek medical advice immediately and show label. If the descaling operation is interrupted, there may be damage to the machine. T Allow the descaling program to run to the end. EE The descaling program lasts approximately 45 minutes. EE JURA descaling tablets are available from specialized dealers. EE If you use a CLEARYL Blue filter cartridge and this is activated, you will not be prompted to descale. EE If the descaling agent comes into contact with sensitive surfaces (e.g. marble), damage cannot be ruled out. Clean up any splashes immediately. Precondition: ‘Decalcify machine’ is displayed. O T Press the P button. ‘Maintenance status (1/6)’ T Press the ‘Descale’ button. ‘Descale’ EE If you do not want to start descaling just yet, press the ‘’ button. The prompt ‘Decalcify machine’ remains active. T Press the ‘Next’ button. ‘Empty drip tray’ T Empty the drip tray and coffee grounds container and put them back into the machine. ‘Pour descaling agent into water tank.’ T Remove and empty the water tank. 39 5 Maintenance T Completely dissolve the contents of one blister (three JURA descaling tablets) in a receptacle holding 17 oz (500 ml) of water. This may take several minutes. T Pour the solution into the empty water tank and insert it into the machine. ‘Please press the Rotary Switch.’ T Remove the cappuccino frother. T Place a receptacle (at least 17 oz or 500 ml) under the connector of the cappuccino frother. k T Press the Rotary Switch. ‘Machine is being descaled.’, water flows repeatedly out of the connector of the cappuccino frother. The operation stops automatically, ‘Empty drip tray’. T Empty the receptacle under the connector of the cappuccino frother. T Empty the drip tray and coffee grounds container and put them back into the machine. ‘Fill water tank’ T Remove the water tank and rinse it thoroughly. T Fill the water tank with fresh, cold water and reinsert the tank. ‘Please press the Rotary Switch.’ T Refit the cappuccino frother. T Place a receptacle under the cappuccino frother and another under the coffee spout. k T Press the Rotary Switch. ‘Machine is being descaled.’, water flows out of the cappuccino frother and the coffee spout. ‘Machine is heating.’, ‘Machine is rinsing.’, water flows out of the coffee spout. The operation stops automatically, ‘Empty drip tray’. T Empty the drip tray and coffee grounds container and put them back into the machine. Descaling is now complete. The IMPRESSA is once more ready for use. EE If the descaling operation stops unexpectedly, rinse the water tank thoroughly. 40 5 Maintenance Cleaning the bean container Coffee beans may be covered with a slight oil film which remains on the walls of the bean container. These traces may negatively affect the coffee result. For this reason clean the bean container from time to time. Precondition: ‘Fill bean container’ is displayed. Q T Switch the machine off with the On/Off button. 3 T Switch the machine off at the power switch. T Open the bean container cover and remove the aroma preservation cover. T Clean the bean container with a soft, dry cloth. T Fill the bean container with coffee beans, then close the aroma preservation cover and the bean container cover. Descaling the water tank Limescale deposits may form in the water tank. To ensure correct function of the machine, descale the water tank from time to time. T Remove the water tank. T If you use a CLEARYL Blue filter cartridge, remove this. T Descale the tank with a mild conventional descaling agent in accordance with the manufacturer's instructions. T Rinse out the water tank thoroughly. T If you use a CLEARYL Blue filter cartridge, insert this again. T Fill the water tank with fresh, cold water and reinsert the tank. 41 6 Display messages 6 Display messages Message Cause/Result Action ‘Fill water tank’ The water tank is empty. You cannot prepare any products. T Fill the water tank (see Chapter 1 ‘Preparing and using for the first time – Filling the water tank’). ‘Empty coffee grounds container’ The coffee grounds container is full. You cannot prepare any products. T Empty the coffee grounds container and the drip tray (see Chapter 3 ‘Daily operation – Daily maintenance’). ‘Empty drip tray’ The drip tray is full. You cannot prepare any products. T Empty the drip tray. T Clean and dry the metal contacts on the back of the drip tray. ‘Drip tray not fitted’ The drip tray is not inserted correctly or is not inserted at all. You cannot prepare any products. T Fit the drip tray. ‘Please press the Rotary Switch.’ The IMPRESSA is prompting you to perform a rinse or continue a maintenance program that was already started. T Press the Rotary Switch to start the rinse or to continue the maintenance program. ‘Fill bean container’ The bean container is empty. You cannot prepare any products. T Fill the bean container (see Chapter 1 ‘Preparing and using for the first time – Filling the bean container’). ‘Rinse the milk system’ The IMPRESSA is prompting you to rinse the milk system. T Press the Rotary Switch to start rinsing the milk system. ‘Change filter’ The filter cartridge no longer works. T Replace the CLEARYL Blue filter cartridge (see Chapter 5 ‘Maintenance – Changing the filter’). ‘Clean machine’ The IMPRESSA is prompting you to clean it. T Perform cleaning (see Chapter 5 ‘Maintenance – Cleaning the machine’). ‘Decalcify machine’ The IMPRESSA is prompting you to descale it. T Perform descaling (see Chapter 5 ‘Maintenance – Descaling the machine’). ‘Not enough ground coffee’ There is insufficient ground coffee in the machine; the IMPRESSA stops the operation. T The next time you prepare a beverage, add more ground coffee (see Chapter 2 ‘Preparation – Ground coffee’). 42 7 Troubleshooting 7 Troubleshooting Problem When preparing a latte macchiato, the typical three layers do not form. Cause/Result – Action T Turn the setting wheel of the cappuccino to the far right and the Milk Foam position ü. T Change the length of the interval to at least 30 seconds in programming mode (see Chapter 4 ‘Permanent settings in programming mode – Product settings’). The cappuccino frother is Insufficient foam is produced when the milk dirty. is frothed or milk sprays from the cappuccino frother. T Rinse and clean the cappuccino frother (see Chapter 5 ‘Maintenance – Rinsing the cappuccino frother’). T Check that the air intake pipe is fitted on the cappuccino frother. T Rinse or replace the air intake pipe. You will find a replacement in the Welcome Pack. Coffee only comes out in drips when it is being prepared. Coffee or ground coffee has been ground too finely and is blocking the system. The same filter cartridge may have been used several times or the water hardness set incorrectly in the programming mode. T Put the grinder on a coarser setting or use coarser ground coffee (see Chapter 1 ‘Preparing and using for the first time – Adjusting the grinder’). T Perform descaling (see Chapter 5 ‘Maintenance – Descaling the machine ’). Water hardness cannot be adjusted. The CLEARYL Blue filter cartridge is activated. T Deactivate the filter cartridge in programming mode. ‘Fill bean container’ is not displayed although the bean container is empty. The bean monitor is dirty. T Clean the bean container (see Chapter 5 ‘Maintenance – Cleaning the bean container’). ‘Empty drip tray’ is always displayed. The metal contacts of the drip tray are dirty or wet. T Clean and dry the metal contacts on the back of the drip tray. 43 7 Troubleshooting Problem Cause/Result Action ‘Fill water tank’ is displayed although the water tank is full. The water tank float is trapped. T Descale the water tank (see Chapter 5 ‘Maintenance – Descaling the water tank’). Little or no water or steam comes out of the cappuccino frother. The pump is very quiet. The connector of the cappuccino frother may be blocked by milk residues or limescale fragments loosened during descaling. T Remove the cappuccino frother. T Unscrew the black connector with the aid of the hexagonal hole on the measuring spoon for ground coffee. T Clean the connector thoroughly. T Screw the connector back on by hand. T Carefully tighten it using the hexagonal hole on the measuring spoon, turning by no more than a quarter of a rotation. Grinder is making a very loud noise. There are foreign objects in the grinder. T Contact customer support in your country (see Chapter 11 ‘JURA contact details / Legal information’). ‘ERROR 2’ is displayed. If the machine was exposed to the cold for a long period of time, heating is disabled for safety reasons. T Warm the machine at room temperature. Other ‘ERROR’ messages are displayed. – T Switch the IMPRESSA off at the power switch. Contact customer support in your country (see Chapter 11 ‘JURA contact details / Legal information’). EE If you were unable to solve the problem, contact customer support in your country (see Chapter 11 ‘JURA contact details / Legal information’). 44 8 Transport and environmentally friendly disposal 8 Transport and environmentally friendly disposal Transport / Emptying the system In order to protect the IMPRESSA from frost during transport, the system must be emptied. Precondition: ‘Please select product:’ is displayed. T Carefully pull the cappuccino frother down and off. T Place a receptacle under the connector of the cappuccino frother. T Press the ‘1 portion milk’ button. ‘Machine is heating.’ As soon as the machine has heated up, ‘Please select product:’ appears. T Press the ‘1 portion milk’ button again. ‘1 portion milk’, hot steam is discharged from the connector. T Remove and empty the water tank. g T Turn the Rotary Switch until ‘60 sec.’ is displayed. Steam will continue to be discharged from the connector until the system is empty. ‘Fill water tank’ Q T Press the On/Off button. The IMPRESSA is switched off. Disposal Please dispose of old machines in an environmentally neutral way. H 45 9 Technical data 9 Technical data Voltage 120 V ~, 60 Hz Power 1450 W Safety test Directives 46 Energy consumption ‘Save energy’ / ‘Active’ Approx. 5 Wh Energy consumption ‘Save energy’ / ‘Inactive’ Approx. 12 Wh Pump pressure Static, max. 15 bar Holding capacity of water tank 71 oz (2.1 l) Holding capacity of bean container 8.8 oz (250 g) Holding capacity of coffee grounds container Max. 16 portions Cord length Approx. 59 in. (Approx. 1.5 m) Weight 24.0 lb (10.9 kg) Dimensions (W × H × D) 11.2 × 13.5 × 17 in. (28.5 × 34.2 × 43.3 cm) The machine complies with the following directives: Standard UL 1082 Canadian Standard CSA C22.2 No. 64 UU UU 10 Index 10 Index A B C Addresses 52 Automatic switch-off 29 Bean container Bean container with aroma preservation cover 8 Cleaning 41 Filling 10 Bus bar Technical data 46 Button On/Off button 9 P button (programming) 9 Cappuccino 18 Cappuccino frother Cleaning 34 Rinsing 34 Cleaning Bean container 41 Cappuccino frother 34 Machine 37 CLEARYL Blue filter cartridge Changing 36 Inserting and activating the filter 12 Coffee 17 Coffee grounds container 8 Coffee spout Height- and width-adjustable coffee spout 8 Consistency of grind Adjusting the grinder 15 Grinder adjustment switch 8 Contact details 52 Cover Bean container 8 Cup platform 8 Customer support 52 D E F G H I Degree of water hardness 14 Descaling Machine 38 Water tank 41 Determining and adjusting the water hardness 14 Display 9 Display messages 42 Drip tray 8 Emptying the system 45 Energy-saving mode 28 Errors Troubleshooting 43 Espresso 17 Factory settings Restore factory settings 30 Filler funnel Filler funnel for ground coffee 8 Filling Bean container 10 Water tank 10 Filter Changing 36 Inserting and activating the filter 12 First-time use 11 Frother Cappuccino frother 8 Ground coffee 19 Hotline 52 Hot water 21 Hot-water nozzle 8 Important safeguards Safety 4 Instant coffee Ground coffee 19 Internet 10 47 10 Index J L M P Maintenance settings 27 Product settings 25 Restore factory settings 30 Unit for amount of water 29 JURA Contact details 52 Internet 10 R Language 31 Latte macchiato 18 Machine Cleaning 37 Descaling 38 Rinsing 33 Setting up 10 Switching off 23 Switching on 22 Maintenance Daily maintenance 22 Maintenance 33 Messages, display 42 Milk foam 19 Milk system cleaning Cappuccino frother cleaning 34 Milk system rinse Rinsing the cappuccino frother 34 Milk, warm 19 Permanently setting the water for the cup size 20 Permanent settings in programming mode 24 Power cord 8 Power switch 8 Preparation 16, 18 Cappuccino 18 Coffee 17 Espresso 17 Ground coffee 19 Latte macchiato 18 Milk 19 Problems Troubleshooting 43 Programming mode 24 Automatic switch-off 29 Energy-saving mode 28 Language 31 48 S T U V Rinsing Cappuccino frother 34 Machine 33 Rotary Switch 9 Safety Important safeguards 4 Settings Permanent settings in programming mode 24 Setting up Setting up the machine 10 Short operating instructions 10 Switching off 23 Switching on 22 Switch-off Automatic switch-off 29 Symbol description 3 Technical data 46 Telephone 52 Troubleshooting 43 Unit for amount of water 29 Use, First-time 11 Viewing information 32 W Warm milk 19 Water tank 8 Descaling 41 Filling 10 Website 10 – intentionally blank – 49 – intentionally blank – 50 – intentionally blank – 51 Art. 69624/J9.3/UL-en/20131114 11 JURA contact details / Legal information 11 JURA contact details / Legal information Headquarters JURA Elektroapparate AG Kaffeeweltstrasse 10 CH-4626 Niederbuchsiten Switzerland USA: JURA CAPRESSO, Inc. Canada: FAEMA Phone E-Mail 1-800-220-5701 [email protected] 1-(855)-544-8600 [email protected] Opening Hours (EST) Mon – Thu 9 am – 9 pm, Fri 9 am – 8 pm, Sat 9 am – 5 pm Distributor Address Phone Fax 81 Ruckman Road, Closter, NJ 07624 001 (201) 767-3999 001 (201) 767-9684 115 Matheson Boulevard East Mississauga, Ontario, L4Z 1X8 1-(905)-501-8600 Internet www.us.jura.com www.faema-canada.jura.com Customer Service @@ You will find additional contact details for your country at www.jura.com. Technical changes 52 We reserve the right to make technical changes. The diagrams used in these instructions for use are for illustration purposes only and do not represent the original colors of the machine. Some details of your IMPRESSA may vary. Feedback Your opinion is important to us! Use the contact link at www.jura.com. Copyright The instructions for use contain information which is protected by copyright. It is not permitted to photocopy these instructions for use or translate them into another language without the prior written consent of JURA Elektroapparate AG.