1
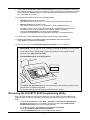
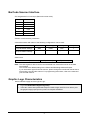
OLIVETTI ECR7900
Programming Utility
for
Windows 2000/XP/Vista
Installation Guide
1
Welcome to the Installation Guide
The purpose of this document is to provide you with a simple procedure for installing the
OLIVETTI ECR Programming Utility on the Windows operating system.
Cash registers supported are the model ECR7900.
Installing the OLIVETTI ECR Programming Utility
To install the OLIVETTI ECR Programming Utility on Windows, follow the instructions below:
1. Download the zip-format file with the name “software_ecr.zip” from the Customer Care Cash
Register area on the Olivetti site (http://www.olivetti.com).
2. Extract the contents of the zip file into a folder and run the file setup.exe (double-click on the
file named setup.exe).
3. Follow the instructions provided on the screen. You are advised to perform the installation in
the folder proposed by the installation program, otherwise you can choose another destination
folder if preferred.
4. Follow the instructions provided on the screen to complete the installation. At the end, a
message appears on the screen indicating that the setup has been carried out successfully
“Installation of ECR Programming Utility complete”.
5. Connect the cash register to a 220V-supply electrical outlet and make sure that the ECR7900
is in the OFF MODE.
6. Connect the computer to the cash register using a standard USB cable.
7. Wait until the computer detects the presence of a new USB peripheral device - displaying the
message “Found New Hardware Wizard” - and then searches for the drivers necessary.
•
If you are running Windows XP or Windows XP SP 1, temporarily disconnect your PC
from the Internet. This can be done either by removing the network cable from your PC or
by disabling your network card from "Control Panel - Network and Dial-Up Connections:
right-click on the appropriate connection and then select "Disable" from the menu. The
connection can be re-enabled when installation is complete. This is not necessary on
Windows XP SP 2 if it is configured to ask before connecting to Windows Update. The
settings for Windows Update on Windows XP SP 2 can be changed from "Control
Panel – System”: select the "Hardware" tab and click "Windows Update".
•
If no Internet connection is available or Windows XP SP 2 is configured to ask before
connecting to Windows Update, the screen below is shown. Select "No, not at this time"
from the options available and click "Next" to proceed with the installation. If there is an
Internet connection available, Windows XP silently connects to the Windows Update web
site and installs any suitable driver it finds for the device, giving it preference to the driver
selected manually.
•
During installation on Windows Vista, warning messages may appear. Select “Continue”
or “Confirm” to proceed with the installation.
•
On Windows 98/ME, when you connect the device to a spare USB port on your PC, the
“Windows Add New Hardware Wizard” is launched automatically. At this point Windows
may display a message to the effect "Building driver database" and take a few minutes
to complete. Click "Next" to proceed with the installation.
8. Select "Install from a list or specific location (Advanced)" as shown below and click "Next".
2
9. Select "Search for the best driver in these locations" and enter the file path in the text box
(the default location on your PC is C:\OLIVETTI_ECR_Programming_utility\driver) or browse
to it by clicking the “Browse” button and select the folder. Once the file path is entered in the
box, click “Next” to proceed.
10. Select the appropriate driver for your operating system:
•
Win2kcom.inf for Windows 2000/XP
(the default location on your PC is C:\OLIVETTI_ECR_Utility\Driver\w2k_Xp)
•
Winvista_com.inf for Windows Vista
(the default location on your PC is C:\OLIVETTI_ECR_Utility\Driver\Vista)
•
If installing a driver which is not a Microsoft WHQL-certified driver and Windows is
configured to warn in these situations, the following screen is displayed.
Click on "Continue anyway" to continue with the installation
If Windows is configured to ignore file signature warnings, no message appears.
11. The following screen is displayed as Windows copies the driver files required.
12. Windows then displays a message indicating that installation has been successful.
Click "Finish" to complete the installation.
13. You can now use the “Olivetti ECR Programming Utility” on your computer.
•
Getting Help: You can get help on any dialog by pressing the F1 key on your keyboard.
•
To be able to use the Olivetti ECR Programming Utility the cash register must be
connected to a 220V electrical outlet
•
The ECR7900 must be in the OFF position.
TOTAL
2nd RC
=
•
enter
enter
The upload and download times can vary depending on the operating system you are
using and the computer configuration.
For complex settings the time required could exceed one minute.
Removing the OLIVETTI ECR Programming Utility
When removing software programs from Windows, you must always use the Add/Remove
Programs utility so that files and registry entries are removed and the system is left in a clean
state.
•
On Windows 98/ME/2000, select Start > Settings > Control Panel > Add/Remove
Programs (depending on your operating system) and select the OLIVETTI ECR
Programming Utility to remove the related software.
•
On Windows XP/Vista, select Start > Control Panel > Programs.
Select the OLIVETTI ECR Programming Utility.
Click the Add/Remove button to remove the related software.
3
BarCode Scanner Interface
Pin assignments for D-sub 9 pin (Barcode scanner side):
Pin No.
Function
2
TXD
3
RXD
5
GND
7
CTS
8
RTS
9
+5V
RS232C communication parameters
A barcode scanner with either of the following configurations can be used:
Baud rate
Data length
Parity
Stop bit
PS700 Default Settings
9600
8 bits
Non
1
Metrologic MS5100
Eclipse Default Settings
9600
7 bits
Space
2
Data format
Bar code number (ASCII code)
CR (0D<hex>)
LF (0A<hex>)
Note: The cash register is able to receive scanned data from a barcode scanner in the data
format above.
This format is the default setting for the PS700 and Metrologic MS5100 Eclipse.
If you use another type of barcode scanner, please change the transferred data to above
format using your barcode scanner. For programming instructions, refer to the manual of
your barcode scanner.
Graphic Logo Characteristics
Some restrictions apply as to the type of Logo:
•
Logo size: Width 288 x Height 216 (pixels).
•
If the ratio of black dots printed with respect to white is high, the ECR is not able to print
the graphic image properly due to power consumption limitations.
4