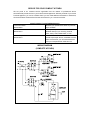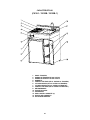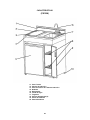
1
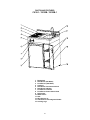
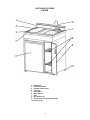
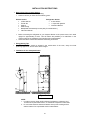
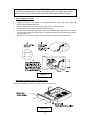
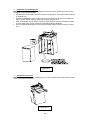
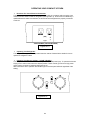
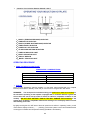
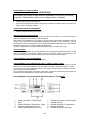
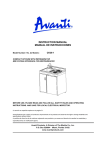
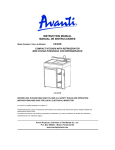
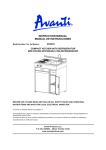
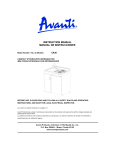
INSTRUCTION MANUAL MANUAL DE INSTRUCCIONES Model Numbers / Nos. de Modelo: CK30-1 / CK30B / CK30B-1 / CK30IH COMPACT KITCHEN WITH REFRIGERATOR MINI COCINA INTEGRADA CON REFRIGERADOR CK30-1 / CK30B / CK30B-1 CK30IH BEFORE USE, PLEASE READ AND FOLLOW ALL SAFETY RULES AND OPERATING INSTRUCTIONS AND SAVE FOR LOCAL ELECTRICAL INSPECTOR. La sección en español empieza en la página 21 Avanti Products has a policy of continuous improvement on its products and reserves the right to change materials and specifications without notice. La política de Avanti es la de continuar mejorando sus productos y se reserva el derecho de cambiar los materiales y especificaciones sin notificación alguna. Avanti Products, A Division of The Mackle Co., Inc. P.O. Box 520604 - Miami, Florida 33152 www.avantiproducts.com TABLE OF CONTENTS Help Us Help You 3 Parts and Features (CK30-1 / CK30B / CK30B-1) 4 Parts and Features (CK30IH – Only) 5 Important Safety Instructions 6 Electrical Installation Instructions 7 Installation Instructions 8 Before Using Your Compact Kitchen 8 Energy Saving Tips 8 Installation of Your Compact Kitchen 8 Electrical Connection 9 Power Supply Connections 10 Backsplash Installation (CK30-1 – Only) 10 Water Faucet Installation and Water Line Connection 11 Sink Strainer and Water Drain 11 Installation of Your Refrigerator 12 Installation of Side Tray (Tray Sold Separately) 12 Operating Your Compact Kitchen 13 Directions for Use of Electrical Connection 13 Operating Your Refrigerator 13 Operating Your Burners (CK30-1 / CK30B / CK30B-1) 13 Operating Your Induction Hotplate (CK30IH – Only) 14 – 15 Care and Maintenance 16 Cleaning Your Compact Kitchen 16 Cleaning the Burners and Reflector Bowls (CK30-1 / CK30B / CK30B-1) 16 Cleaning Your Induction Hotplate 16 Power Failure 16 Vacation Time 17 Moving Your Compact Kitchen 17 Troubleshooting (General) 17 – 18 Service for Your Compact Kitchen 19 Wiring Diagram (CK30-1 / CK30B / CK30B-1) 19 Your Avanti Products Warranty 20 Instrucciones en Español 21 - 29 Registration Information and Registration Card 31 2 HELP US HELP YOU... Read this guide carefully. Write down the model and serial numbers. It is intended to help you operate and maintain your new Compact Kitchen properly. You'll find them on a plate located on the rear wall of the Compact Kitchen Keep it handy to answer your questions. If you don't understand something or you need more assistance, please call: Please write these numbers here: ____________________________________ Date of Purchase Avanti Customer Service 800-220-5570 ____________________________________ Model Number Keep proof of original purchase date (such as your sales slip) with this guide to establish the warranty period. ____________________________________ Serial Number CAUTION: Use these numbers in any correspondence or service calls concerning your Compact Kitchen THE REFRIGERATOR OF COMPACT KITCHEN IS NOT DESIGNED FOR THE STORAGE OF MEDICINE OR OTHER MEDICAL PRODUCTS. If you received a damaged Compact Kitchen, immediately contact the dealer (or builder) that sold you the Compact Kitchen Save time and money. Before you call for service, check the Troubleshooting Guide. It lists causes of minor operating problems that you can correct yourself. IF YOU NEED SERVICE We're proud of our service and want you to be pleased. If for some reason you are not happy with the service you receive, here are some steps to follow for further assistance. FIRST, contact the people who serviced your Compact kitchen. Explain why you are not pleased. In most cases, this will solve the problem. NEXT, if you are still not pleased, write all the details, including your telephone number, and send it to: Customer Service Avanti Products 10880 NW 30 Street Miami, FL 33172 USA 3 PARTS AND FEATURES CK30-1 / CK30B / CK30B-1 1. 2. 3. 4. 5. 6. 7. 8. 9. 10. 11. 12. 13. 14. Backsplash Rear Burner (500 Watts) Front Burner (900 Watts) Cook-top Rear Burner Power Switch Knob Rear Burner Indicator Front Burner Indicator Front Burner Power Switch Knob Refrigerator Water Faucet Sink Wire Shelves (2) Cabinet Door with Integrated Handle Leveling Legs 4 PARTS AND FEATURES CK30IH 1. 2. 3. 4. 5. 6. 7. 8. 9. 10. Backsplash Induction Hotplate Hotplate Control Panel Cook-top Refrigerator Water Faucet Sink Wire Shelves (2) Cabinet Door with Integrated Handle Leveling Legs 5 IMPORTANT SAFETY INSTRUCTIONS aWARNINGa • • • • • • • • • • • • • • • • • • • • • To reduce the risk of fire, electrical shock, or injury when using your Compact Kitchen, follow these basic precautions: Read all instructions before using the Compact Kitchen. DANGER or WARNING: Risk of child entrapment. Child entrapment and suffocation are not problems of the past. Junked or abandoned appliances are still dangerous . . . even if they will “just sit in the garage a few days”. Before you throw away your old refrigerator: take off the doors. Leave the shelves in place so that children may not easily climb inside. Never allow children to operate, play with, or crawl inside the Compact Kitchen. Never clean Compact kitchen parts with flammable fluids. The fumes can create a fire hazard or explosion. Do not store or use gasoline or any other flammable vapors and liquids in the vicinity of this or any other appliance. The fumes can create a fire hazard or explosion. Proper Installation - Be sure your appliance is properly installed, per the manufacturer instructions. Never use your appliance for warming or heating the room. Do Not Leave Children Alone - Children should not be left alone or unattended in area where the appliance is in use. They should never be allowed to sit or stand on any part of the appliance. Wear Proper Apparel - Loose fitting or hanging garments should never be worn while using the appliance. User Servicing - Do not repair or replace any part of the appliance unless specifically recommended in the manual. All other servicing should be referred to a qualified technician. Storage in or on Appliance - Flammable materials should not be stored in the unit. Do Not Use Water on Grease Fires - Smother fire or flame or use dry chemical or foamtype extinguisher. Use Only Dry Potholders - Moist of damp potholders on hot surfaces may result in burns from steam. Do not let potholder touch hot heating elements. Do not use a towel or other bulky cloth. Use Proper Pan Size - This appliance is equipped with one or more surface units of different size. Select utensils having flat bottoms large enough to cover the surface unit heating element. The use of undersized utensils will expose a portion of the heating element to direct contact and may result in ignition of clothing. Proper relationship of utensil to burner will also improve efficiency. Never Leave Surface Units Unattended at High Heat Settings – Boil over causes smoking and greasy spillovers that may ignite. Make Sure Reflector Pans or Drip Bowls Are in Place - Absence of these pans or bowls during cooking may subject wiring or components underneath to damage. Protective Liners - Do not use aluminum foil to line surface unit drip bowls or oven bottoms, except as suggested in the manual. Improper installation of these liners may result in a shock or fire hazard. Glazed Cooking Utensils - Only certain types of glass, glass/ceramic, ceramic, earthenware, or other glazed utensils are suitable for range top service without breaking due to sudden change in temperature. Utensil Handles Should Be turned Inward and Not Extend Over Adjacent Surface Units – To minimize burns, ignition of flammable materials, and spillage due to unintentional contact with the utensil, the handle of a utensil should be positioned so that it is turned inward, and does not extend over adjacent surface units. Do Not Soak Removable Heating Elements – Heating elements should never be immersed in water. 6 • • • Caution - Do not store items of interest to children in cabinets above a range or on the back guard of a range - children climbing on the range to reach items could be seriously injured. Do Not Touch Surface Units or Areas Near Units - Surface units may be hot even though they are dark in color. Areas near surface units may become hot enough to cause burns. During and after use, do not touch or let clothing or other flammable materials contact surface units or areas near units until they have had sufficient time to cool. Among these areas are the cook-top and surfaces facing the cook-top. When Replacing Your Faucet – For safety reasons don not use a spout longer than 150mm (6”). This Unit Is For Indoor Use Only -SAVE THESE INSTRUCTIONSELECTRICAL INSTALLATION INSTRUCTIONS The electrical installation shown below must be performed by a qualified and licensed electrician, following all of the electrical codes and ordinances required by the State. • Select a designated power source to be used specifically for this unit. • Make sure that the A/C power and the designated circuit breaker is turned off. • Attach and secure conduit to the knockout hole of the junction box. • You must make sure that the conduit is long enough to reach from the unit junction box to the power source selected. • Take off the cover plate from the junction box to connect the stripped end of the wires to the receptacles of the junction box. Please follow the color codes of the wires to make sure that it is properly grounded. • At the other end connect all wires to the power source and secure the conduit to the power receptacle, making sure that the colors of the wires are matched during the connection. • Install or replace the cover plate to the junction box and turn ON the A/C from the source or circuit breaker. • Then install the power cord of the refrigerator and the burners to the junction box of the unit. 7 INSTALLATION INSTRUCTIONS ¾ Before Using Your Compact kitchen • Remove the exterior and interior packing. • Check to be sure you have all of the following parts: Kitchen Section Refrigerator Section • 2 Wire Shelves • 2 wire shelves • Faucet Set • 1 crisper with glass lid • Strainer • Instruction Manual • Strainer Plug • Backsplash and Assembly Screws (Only for model CK30-1) • Instruction Manual • • Before connecting the refrigerator of your Compact Kitchen to the power source, let it stand upright for approximately 2 hours. This will reduce the possibility of a malfunction in the cooling system of the refrigerator from handling during transportation. Clean the interior surface with lukewarm water using a soft cloth. ¾ • Energy Saving Tips The Compact kitchen should be located in the coolest area of the room, away from heat producing appliances, and out of the direct sunlight. ¾ Installation of Your Compact Kitchen Figure No. 1 NOTE: 1. In order to remove crisper and/or shelves of refrigerator, a clearance A of 10 inches is required. When built-in, no clearance is required on either side. 2. B = 30 inches minimum clearance between the top of the cooking surface and the bottom of an unprotected wood or metal cabinet. 8 • • • • • • • ¾ To eliminate the risk of burns or fire by reaching over heated surface units, cabinet storage space located above the surface units should be avoided. If cabinet storage is to be provided, the risk can be reduced by installing a range hood that projects horizontally a minimum of 5 inches beyond the bottom of the cabinets. Place your Compact kitchen on a floor that is strong enough to support it when it is fully loaded as above picture. To level your Refrigerator, adjust the leveling legs at the bottom of the refrigerator. For satisfactory water drainage of the sink, and proper door functioning, it is important to level the appliance in both directions, using the leveling legs provided on the bottom of the cabinet for this purpose. Locate the Compact kitchen away from direct sunlight and sources of heat (heater, radiator, etc.). Direct sunlight may affect the acrylic coating and heat sources may increase electrical consumption. Extreme cold ambient temperatures may also cause the unit not to perform properly. Avoid locating the unit in moist areas. Do not under any circumstances cut or remove the third (ground) prong from the power cord of your refrigerator or burners. Any questions concerning power and/or grounding should be directed toward a certified electrician or an authorized Avanti Products service center. After connecting the appliance to the power supply, allow the Refrigerator to cool down for 23 hours before placing items in the compartment. Electrical Connection aWARNINGa Improper connection of the equipment-grounding can result in the risk of electrical shock. If the power cord of the range or refrigerator is damaged, have it replaced by an authorized Avanti Products service center. • The appliance must be installed and grounded by a qualified technician in accordance with the National Electrical Code ANSI/NFPA No. 70 (Latest Edition) and local electrical code requirements. • The appliance is designed to be permanently connected with conduit. • This appliance requires a standard 115/120 Volt AC ~/60Hz electrical power, and connected to an individual properly grounded branch circuit, protected by a 15 amp circuit breaker or time delay fuse. • This unit should be properly grounded for your safety. The range and refrigerator power cords of the appliance are equipped with a grounded plug which is connected to the grounded permanent wiring system. • Do not under any circumstances cut or remove the third ground lead from the AC supply. Any questions concerning power and/or grounding should be directed toward a certified electrician or an authorized Avanti Products service center. • Remove house fuse or open circuit breaker before beginning installation. • Do not attempt to repair or replace any part of the appliance unless it is specifically recommended in this manual. All other servicing should be referred to a qualified technician. • To minimize the possibility of electric shock, disconnect this appliance from the A/C power supply before attempting any maintenance. • Do not use extension cords for the connections of the range and refrigerator. NOTE: Turning the appliance off does not disconnect the appliance from the power supply. We recommend having a qualified technician service your appliance. 9 WARNING The electrical installation shown below must be performed by a qualified and licensed electrician, following all of the electrical codes and ordinances required by the State. ¾ • • • • • Power Supply Connections Prepare the wiring in accordance to the National Electrical Code and/or local codes and ordinances by a qualified electrician. Remove junction box cover. Remove 7/8 in. knockout for conduit connection. Secure conduit to the junction box with a conduit connector. Locate the two wires (white and black) of the unit with stripped ends. Use wire nuts to connect incoming white to white and black to black. Connect the incoming ground wire directly to ground screw of junction box. Replace junction box cover. Check to be sure that wires are not pinched under the unit. Figure No. 2 ¾ Backsplash Installation (Only for model CK30-1) Install the backsplash to the kitchen cabinet as shown in Figure No. 3. . Figure No. 3 10 ¾ Water Faucet Installation And Water Line Connection Connection to the water supply must be performed by a professional licensed plumber and comply with all Local Codes and Ordinances. aWARNINGa IMPROPER WATER LINE CONNECTION MAY RESULT IN FLOODING YOU MUST USE A LICENSED PLUMBER REVIEW STATE AND LOCAL PLUMBING CODES BEFORE INSTALLATION Figure No. 4 • Turn off the water supply. • Install the water faucet as above picture. • Connect the water supply hoses to the water faucet by matching cold to cold and hot to hot. Do not stretch the water supply hose. If the hose is too short, replace the hose with a longer, highpressure hose. ¾ Sink Strainer Installation And Water Drain Connection to the water sink must be performed by a professional licensed plumber and comply with all Local Codes and Ordinances. • • The sink strainer is already preassembled in the factory. Secure the water drain system to the sink strainer as below shown. Figure No. 5 11 ¾ Installation Of Your Refrigerator NOTE: The refrigerator is supplied with a separate instruction manual. Please review prior to final installation of your Compact Kitchen. • Disconnect the power supply. Failure to disconnect the appliance could result in electrical shock or personal injury. • Connect the Refrigerator power supply cord to the receptacle in the junction box located at the back of kitchen cabinet under the countertop as shown in Figure No. 6. • Slide the refrigerator into the kitchen cabinet by slightly lifting the rear part of refrigerator. Make sure the power supply cord is not kinked or damaged under the refrigerator. • Secure refrigerator leveling legs in place using the bottom bracket notches as shown in Figure No. 6. Figure No. 6 ¾ Installation Of Side Tray NOTE: Side tray is not a standard supplied part. If you need it, please contact Avanti Service Center to buy it using the form provided. Figure No. 7 12 OPERATING YOUR COMPACT KITCHEN ¾ Directions For Use Of Electrical Connection The appliance is equipped with a junction box located under the countertop with two outlets. One outlet for burners and one outlet for refrigerator (see Figure No. 8). Once the unit is installed by a qualified electrician make sure that both, the burners and the refrigerator are properly connected to the box. JUNCTION BOX (CAJA ELECTRICA) Figure No. 8 ¾ Operating Your Refrigerator The refrigerator is supplied with a separate instruction manual. Please find the details for how to operate the refrigerator inside. ¾ Operating Your Burners (CK30-1 / CK30B / CK30B-1) Your compact kitchen comes with two burners (500W and 900W power input). To operate the burners simply push in and turn the knob to the desired position. These controls go from low to high power output, having a number of positions (see Figure No. 9). When the burners are in operation the indicator light on the front panel will be lit regardless of the setting. Figure No. 9 13 ¾ Operating Your Induction Hotplate (CK30IH - ONLY) 1、 MODE 1 (TEMPERATURE MODE) SELECTOR 2、 TIMER SET UP SELECTOR 3、 MODE 2 (POWER / WATTAGE MODE) SELECTOR 4、 TIMER CANCEL SELECTOR 5、 POWER ON / OFF SELECTOR 6、 UP AND DOWN SETTING SELECTORS 7、 TIMER ON INDICATOR LIGHT 8、 MODE 1 INDICATOR LIGHT 9、 DISPLAY WINDOW 10、MODE 2 INDICATOR LIGHT OPERATING PROCEDURE ¾ USING THE INDUCTION HOTPLATE TEMPERATURE / POWER SETTINGS: POWER / UNIT SPECIFICATIONS Rated Voltage 110-120 Volts – 60 Hz Rated Power / Temperature Output 60 - 1400 Watts / 180ºF – 460ºF Dimensions 320X380X60MM Net Weight 7.25 LBS ¾ DISPLAY Once you have plugged the induction hotplate in to the power outlet (supplied with your complete kitchen) it will remain in “Standby” mode until you turn the unit on using the ON / OFF button. REMINDER: You must place the included cooking pan (with food or water to be cooked) on the unit before operating as the hotplate is equipped with a cookware detection system that will not allow the unit to heat up unless it detects an induction compatible cookware on the cooktop. (DO NOT HEAT AN EMPTY PAN AS THIS WILL DAMAGE THE COOKTOP) If the system does not detect a compatible cookware the message “E1” will display and the unit will automatically power OFF. By lightly touching the ON / OFF area of the touch panel the unit will be in “Operating” mode, you will notice that the display will show ( - - - - ) advising you that the system is active and has detected the correct type of cookware and will operate normally (See Mode 1 and Mode 2). 14 ¾ • • • MODE 1 FUNCTION (TEMPERATURE MODE) Press the “Mode 1” area of the control panel, this will activate the cooking in temperature mode. Once the system is in temperature mode the default temperature 340ºF (171ºC) will be shown in the display. The MODE 1 indicator light will flash on and off while in this mode. You can select the temperature to suit your cooking needs by pressing the UP / DOWN arrows. You can select the cooking temperature from the following preset stages: 180º / 220º / 260º / 300º / 340º/ 380º / 420º / 460º ¾ • • • MODE 2 FUNCTION (POWER MODE) Press the “Mode 2” area of the control panel, this will activate the cooking in Power / Wattage mode. Once the system is in Power / Wattage mode the default power setting 1000 Watts will be shown in the display. The MODE 2 indicator light will flash on and off while in this mode. You can select the power / wattage output to suit your cooking needs by pressing the UP / DOWN arrow. You can select the cooking Power / Wattage from the following preset stages: 60w / 200w / 400w / 600w / 800w / 1000w / 1200w / 1400w ¾ • TIMER (SETUP) The Induction Hotplate can be set to cook at a set temperature for a set time period using the timer. • Simply press the TIMER area of the control panel to activate the timer set up function. 1. The TIMER indicator light will flash on and off while you are setting up the cooking time. 2. The Display will show 00:00 3. To set the cooking time in minutes (01 – 59 minutes) press the UP arrow (The timer will increase in increments of 1 minute each time you press the UP arrow, to increase by increments of 10 minutes, press and hold the UP arrow until the selected time is shown in the display). 4. To set the cooking time in hours (01 – 12 hours) press the Down arrow (the timer will increase in increments of 1 hour each time you press the DOWN arrow, press the DOWN arrow until the selected time is shown in the display). 5. Once you have finished setting the cook time, the system will apply the setting 5 seconds after the timer has been set and you have selected the appropriate cooking temperature. 6. During the Timed cooking cycle the display will intermittently show both the indicator light and set temperature or power and the remaining cooking time. 7. At the end of the Timed cycle (cooking time selected) the unit will sound a beep and will automatically shut off (Standby mode). ¾ TIMER OFF (CANCEL) To cancel the previously set cooking time simply press the “Timer Off” button. ¾ COOKWARE TIPS The physical characteristics of pots and pans influence the performance of any cooking systems. Therefore, emphasis must be placed on the importance of using proper cookware. • Cookware made of high-grade steel 18/10, aluminum, glass, and or copper cannot be used with any type of induction cooking device. • Only use cookware with a magnetic bottom. (Magnet must remain sticking to the bottom to ensure an accurate heat transfer between the induction hotplate and your cookware). • Use cooking vessels with flat bottoms and tight fitting lids to conserve energy and shorten cooking times. • Pan size should match the element size. A slightly larger pan covers the entire element and prevents spillovers from contacting the heat surface and burning in. Using a smaller pan than the element is a waste of energy. • To avoid spattering and to maximize efficiency, pan bottoms should be clean and dry before coming in contact with the elements. • Wipe spills off the element with a damp cloth as soon as it cools to cut down on clean up time. Be 15 . sure the control is To prevent damage use correct cookware, start cooking on the highest temperature and turn control down to continue cooking. Never leave an empty utensil, or one which has boiled dry, on a hot surface unit. The utensil could overheat and damage the utensils or surface unit. when you are not cooking. Always be sure that all of the indicator lights are ¾ • • • • CLEANING YOUR HOTPLATE Disconnect the A/C from the main power box or designated circuit breaker, turn off the hotplate, make sure the surface unit is off and cool before proceeding. Wring excess water out of the sponge or cloth when cleaning area of the controls, or any electrical parts. Wash the outside cabinet with warm water and mild liquid detergent. Rinse well and wipe dry with a clean soft cloth. Do not use steel wool or steel brush on the cook-top. NOTE: Do not immerse hotplate in water or any other liquids. CARE AND MAINTENANCE – COMPACT KITCHEN ¾ • • • • • • • Cleaning Your Compact Kitchen Disconnect the A/C from the main power box or designated circuit breaker, turn off the Compact Kitchen, make sure all surface units are off and cool before removing anything, then remove all items including shelves and rack. Wash the inside surfaces with a warm water and baking soda solution. The solution should be about 2 tablespoons of baking soda to a quart of water. Wash the shelves and rack with a mild detergent solution. The outside of the Compact Kitchen should be cleaned with mild detergent and warm water. Wring excess water out of the sponge or cloth when cleaning area of the controls, or any electrical parts. Wash the outside cabinet with warm water and mild liquid detergent. Rinse well and wipe dry with a clean soft cloth. Do not use steel wool or steel brush on the cook-top. CAUTION FAILURE TO DISCONNECT THE APPLIANCE COULD RESULT IN ELECTRICAL SHOCK OR PERSONAL INJURY. ¾ • • • • Cleaning Burners And Reflector Bowls (CK30-1 / CK30B / CK30B-1) Disconnect the A/C from the main power box or designated circuit breaker and turn off the Compact Kitchen to make sure that burners are off and cool before removing burners and reflector bowls. Removing the burners and reflector bowls as following: • Lift the edge of the burners opposite from the receptacle and pull them gently out of the mounting receptacles. • After the burners have been removed, the reflector bowls can be lifted out of their mountings. Clean the burners and reflector bowls with mild detergent and warm water. Wring excess water out of the sponge or cloth when cleaning them. Replace the burners and reflector bowls as following: • Line up the opening of the reflector bowls with the burners receptacle, hold the burners as level as possible with the terminals just positioned into the receptacle, then push the burners’ terminals into the receptacles. • When the terminals are pushed into the receptacles as far as it will go, push down the edge of burners opposite the receptacle. NOTE: Do not immerse burners in water or any other liquids. 16 ¾ • • • • CLEANING YOUR INDUCTION HOTPLATE (CK30IH) Disconnect the A/C from the main power box or designated circuit breaker, turn off the hotplate, make sure the surface unit is off and cool before proceeding. Wring excess water out of the sponge or cloth when cleaning area of the controls, or any electrical parts. Wash the outside cabinet with warm water and mild liquid detergent. Rinse well and wipe dry with a clean soft cloth. Do not use steel wool or steel brush on the cook-top. NOTE: Do not immerse hotplate in water or any other liquids. ¾ • • ¾ • • ¾ • • • • • • • • Power Failure Most power failures are corrected within a few hours and should not affect the temperature of your refrigerator if you minimize the number of times the door is opened. If the power is going to be off for a longer period of time, you need to take the proper steps to protect your contents. When power failures please make sure to turn all burners off. Vacation Time Short vacations: Leave the Refrigerator of Compact Kitchen operating during vacations of less than three weeks. Long vacations: If the appliance will not be used for several months, remove all items and turn off the power supply. Clean and dry the interior thoroughly. To prevent odor and mold growth, leave the door open slightly: blocking it open if necessary. Moving Your Compact kitchen Have a qualified electrician to disconnect the power supply and shut off the water supply. Use a qualified plumber to disconnect the water supply connections and water drain connection. Remove all items from the storage compartment. Unplug and remove the refrigerator out of the Compact Kitchen and move them separately. Securely tape down all loose items (shelves and basket) inside your Compact Kitchen Compartment and Refrigerator. Turn the adjustable feet up to the base to avoid damage. Tape the door shut. Be sure the Compact Kitchen and Refrigerator stay secure in the upright position during transportation. Also protect outside of Compact kitchen and Refrigerator with a blanket, or similar item. 17 PROBLEMS WITH YOUR COMPACT KITCHEN? You can solve many common Compact Kitchen problems easily, saving you the cost of a possible service call. Try the suggestions below to see if you can solve the problem before calling the servicer. TROUBLESHOOTING GUIDE PROBLEM COMPACT KITCHEN does not operate. POSSIBLE CAUSE Not connected to power supply. The circuit breaker tripped or blown fuse. The Refrigerator does not operate Not connected to power supply. The circuit breaker tripped or blown fuse. The temperature control knob is set in “OFF” position. The room temperature is hotter than normal. The door is opened too often. The door is not closed completely. The temperature control is not set correctly. The door gasket does not seal properly. Check to assure that the refrigerator is leveled. The rattling noise may come from the flow of the refrigerant, which is normal. As each cycle ends, you may hear gurgling sounds caused by the flow of refrigerant. Contraction and expansion of the inside walls may cause popping and crackling noises. The refrigerator is not leveled. The refrigerator is not leveled. The gasket is dirty. The shelves are out of position. You must use pans that are absolutely flat. Pan bottom should closely match the diameter of the burners selected. Improper cookware being used. The circuit breaker tripped or blown fuse. The burners are not plug in the receptacle all the way. The power switch knobs are not set correctly. You are not pushing in before turning. The Refrigerator turns on and off frequently. Vibrations. The Refrigerator seems to make too much noise. The refrigerator door will not close properly. Burners will not maintain a rolling boil or frying rate is not fast enough. Foods cook slowly Burners do not operate Burners control knobs will not turn TROUBLESHOOTING GUIDE (CK30IH – INDUCTION HOTPLATE) PROBLEM Surface units will not maintain a rolling boil or frying rate is not fast enough • • Foods cook slowly Surface units do not operate • • • • 18 POSSIBLE CAUSE You must use pans that are absolutely flat. Pan bottoms should closely match the diameter of the surface unit selected. Improper cookware being used. You have blown a household fuse or tripped a circuit breaker. The surface units are not plugged in all the way. Improper cookware being used. SERVICE FOR YOUR COMPACT KITCHEN We are proud of our customer service organization and the network of professional service technicians that provide service on your Avanti Products appliances. With the purchase of your Avanti Products appliance, you can be confident that if you ever need additional information or assistance, the Avanti Products Customer Service team will be here for you. Just call us toll-free. Product Information 800-323-5029 Part Orders 800-220-5570 In-Home Repair Service 800-220-5570 AVANTI PRODUCTS CUSTOMER SERVICES Whatever your questions are about our products, help is available. You may order parts and accessories that will be delivered directly to your home by personal check, money order, Master Card, or Visa. An Avanti Products authorized service center will provide expert repair service, scheduled at a time that is convenient for you. Our trained servicers know your Compact kitchen inside and out. WIRING DIAGRAM (COMPLETE KITCHEN) 19 YOUR AVANTI PRODUCTS WARRANTY Staple your sales receipt here. Proof of original purchase date is needed to obtain service under warranty. WHAT IS COVERED LIMITED ONE-YEAR WARRANTY LIMITED SECOND THROUGH FIFTH YEAR WARRANTY For the second through the fifth year from date of original purchase, Avanti Products will provide a replacement compressor free of charge due to a failure. You are responsible for the service labor and freight charges. In rental or commercial use, the limited compressor warranty is one year and nine months. Cost to move the unit to the servicers’ shop and back to the user's home, as may be required, are the user's responsibility. For one year from the date of purchase by the original owner, Avanti Products will, at its option, repair or replace any part of the unit, which proves to be defective in material or workmanship under normal use. During this period Avanti Products will provide all parts and labor necessary to correct such defects free of charge, so long as the unit has been installed and operated in accordance with the written instructions in this manual. In rental or commercial use, the warranty period is 90 days. Avanti Products will provide you with a reasonably similar replacement product that is either new or factory refurbished.All Avanti Appliances of 3.5 cubic feet capacity or less must be brought/sent to the appliance service shop for repair. WHAT IS NOT COVERED • • • • • • • • • • Content losses of food due to spoilage. Incidental or consequential damages. Parts and labor costs for the following will not be considered as warranty: Door springs, and/or frames. Inner door panels, door rails and/or door supports. Light bulbs and/or plastic housing. Plastic cabinet liners. Punctured evaporator that voids the warranty on the complete sealed system. Shipping and handling costs associated with the replacement of the unit. • • • • • • 20 Repairs performed by unauthorized servicers. Service calls that do not involve defects in material or workmanship such as customer education, door reversal, or proper installation. Service calls that are related to external problems, such as abuse, misuse, inadequate electrical power, accidents, fire, floods, or acts of God. Surcharges including but not limited to, any after hour, weekend, or holiday service calls, tolls, ferry trip charges, or mileage expenses for service calls to remote areas, including the State of Alaska. Replacement of house fuses or resetting circuit breakers. Failure of the product if it is used for other than its intended purpose. This warranty does not apply outside the Continental USA. CARACTERISTICAS (CK30-1 / CK30B / CK30B-1) 1. 2. 3. 4. 5. 6. 7. 8. 9. 10. 11. 12. 13. 14. PANEL TRASERO HORNILLA TRASERA DE 500 VATIOS HORNILLA FRONTAL DE 900 VATIOS GABINETE CONTROL DE TEMP (DE LA HORNILLA TRASERA) LUZ INDICADORA (DE LA HORNILLA TRASERA) LUZ INDICADORA (DE LA HORNILLA FRONTAL) CONTROL DE TEMP (DE LA HORNILLA FRONTAL) REFRIGERADOR FUENTE DE AGUA FREGADERO PARILLAS DEL GABINETE (2) PUERTA DEL GABINETE PATAS NIVELADORAS 21 CARACTERISTICAS (CK30IH) 11. 12. 13. 14. 15. 16. 17. 18. 19. 20. Panel Trasero Plancha de Inducción Panel de Control de la Plancha Inducción Gabinete Refrigerador Fuente de agua Fregadero Parrillas del Gabinete (2) Puerta del Gabinete Patas Niveladoras 22 INSTRUCCIONES EN ESPAÑOL Para reducir el riesgo de incendio, descarga eléctrica, o daño cuando use su electrodoméstico, siga las siguientes precauciones. Lea todas las instrucciones antes de usar su electrodoméstico. Peligro o Precaución: Existe el riesgo que los niños queden atrapados. Niños atrapados o sofocamiento no son un problema del pasado. Los electrodomésticos son peligrosos aún si solo los deja en el garaje por un par de días. Antes de desechar su electrodoméstico o refrigerador usado: quítele las puertas. Deje las repisas en su lugar para evitar que los niños se queden atrapados. No permita que los niños manejen, jueguen o entren dentro del electrodoméstico. No limpie su electrodoméstico con líquidos inflamables. Los gases pueden ocasionar fuego o una explosión. No guarde ni use gasolina u otros líquidos inflamables cerca de este o de cualquier otro electrodoméstico. Los vapores pueden ocasionar fuego o explosión. PRECAUCIÓN • • • • • • • - Guarde estas instrucciones- ADVERTENCIA La coneccion de la caja eléctrica debe ser realizada por un electricista profesional y licenciado. También debe cumplir con los códigos locales y estatales. INSTRUCCIONES PARA LA INSTALACION ELECTRICA. Primeramente seleccione el receptáculo donde la unidad va a ser conectada. Asegúrese que la corriente eléctrica del receptáculo que se va a usar esté propiamente desconectada antes de comenzar la instalación. Este receptáculo debe ser usado exclusivamente para esta unidad. Instale y asegure el conducto eléctrico de metal flexible al orificio de la caja eléctrica de la unidad. Use un conducto eléctrico de metal flexible (Greenfield) suficientemente largo para llegar desde la unidad hasta el receptáculo de la pared. Remueva la tapa de la caja eléctrica de la unidad, introduzca los alambres a través del conducto de metal y conecte los alambres a los receptáculos siguiendo los códigos de colores. Asegúrese también de tener la conexión a tierra. Al otro extremo del conducto eléctrico de metal (Greenfield) asegúrese de conectar al receptáculo de la pared los alambres siguiendo los códigos de colores. Asegúrese de hacer la conexión a tierra. Reemplace o instale la tapa de la caja eléctrica y conecte el cable de las hornillas y del refrigerador a los receptáculos propiamente designados en la caja eléctrica para su instalación. INSTALACION DEL REFRIGERADOR Retire los (plásticos protectores, y tiras engomadas). Limpie el exterior con un trapo suave y seco, y el interior con un trapo húmedo y tibio. UBICACION 1. Seleccione un lugar con un piso firme y nivelado. 2. Para un mejor desempeño, nivele el refrigerador utilizando las patas ajustables o tornillos niveladores. Para verificar el nivel, abra la puerta hasta la mitad, debe regresar sola. 23 INSTRUCCIONES PARA LA CONECCION A TIERRA Este aparato electrodoméstico debe estar conectado a tierra. En caso de un cortocircuito eléctrico, la conexión a tierra reduce el riesgo de choque eléctrico proporcionando un cable de escape para la corriente eléctrica. Asegúrese de usar un plomero certificado para la conectar el agua a la unidad. NO USE UN CORDON DE EXTENSION Use un tomacorriente de pared exclusivo. Nunca junto a cualquier otro electrodoméstico en el mismo tomacorriente de pared. ADVERTENCIA IMPORTANTE: Un refrigerador vacío es una atracción muy peligrosa para los niños. Quite los sellos magnéticos, puertas o cerraduras de todo electrodoméstico que esté en uso. OPERACION El tomacorriente usado debe ser 115-120v con fusible o protección de 15 AMP ó más. Para evitar vibraciones, la unidad debe estar bien nivelada. Para encender el refrigerador, gire el control de temperatura a la posición que corresponda al enfriamiento deseado. Bajo condiciones normales mueva el control a la posición “ 4 ”. De otra manera ajuste la temperatura siguiendo las indicaciones señaladas en los gráficos. CONTROL DE TEMPERATURAS El control de temperaturas está localizado en el interior del refrigerador. Cuando conecte su refrigerador por la primera vez se recomienda que el botón del control se coloque en la posición “ 4 ”. Deje el refrigerador trabajar por 20 minutos. La perilla de control se puede graduar desde la posición más calurosa hasta la más fría. Después de un día o dos usted decidirá si el control está graduado correctamente. Hay 8 posiciones incluyendo “ OFF ”. En la posición “ OFF ” el motor parará pero la unidad se mantendrá aun con corriente . PERDIDA DE LA FUENTE ELECTRICA La mayoría de las perdidas de la fuente eléctrica son solucionadas en pocas horas y no afectan el funcionamiento de su unidad. Minimice el abrir y cerrar la puerta durante ese periodo de tiempo. Si la perdida de la fuente eléctrica se extiende a muchas horas, siga los pasos necesarios para proteger el contenido de su refrigerador. CUIDADOS EN LOS PERIODOS DE AUSENCIA Para cortos períodos de ausencia (menos de 21 días) la unidad podrá quedar funcionando. En períodos de ausencia más largos, se aconseja dejar la unidad limpia y desconectada. Saque todo lo que tenga adentro de la unidad y haga y la limpieza general. Deje la puerta entreabierta para que penetre el aire y así evitar la formación de olores. ECONOMIA DE ENERGIA Evite dejar por mucho tiempo la puerta abierta. Evite aperturas frecuentes de la puerta. Coloque el botón de control de temperaturas en la posición adecuada. SI USTED SE VA DE VACACIONES Saque todos los artículos de la unidad si Ud. se va de vacaciones por un mes o más. Desconecte el refrigerador del tomacorriente de la caja eléctrical y limpielo bien. Deje la puerta abierta para evitar la formación de olores, condensación o moho. COMO CAMBIAR LA DIRECCION DE APERTURA DE LA PUERTA En caso de que necesite cambiar el lado de apertura de la puerta, por favor consulte al servicio pos-venta de su localidad o al empleado que le vendió la unidad. PREPARANDO SU COCINA PARA UTILIZARLA POR PRIMERA VEZ Coloque el panel trasero utilizando los 3 tornillos incluidos (vea Figura 3). 24 CONEXION DE LA FUENTE DE AGUA ADVERTENCIA La conexión de la fuente de agua debe ser realizada por un plomero profesional y licenciado. También debe cumplir con los códigos locales y estatales. • • • Ciérre la llave maestra del agua. Instale las llaves de agua (vea figura 4). Conecte las mangueras de suministro de agua (no incluidas a las llaves. Primero la de agua fría, haga lo mismo con el agua caliente. CONEXION DE DRENAJE (FREGADERO) • El filtro viene instalado de fábrica. • Asegure el sistema de drenaje (vea Fig 5). INSTALACION DEL REFRIGERADOR Su refrigerador viene equipado con su propio manual de instrucciones. For favor léalo antes de colocar el refrigerador en la posición que le corresponde. Este aparato viene equipado con su propio AC cable. Conecte este cable al receptáculo marcado “Fridge” en la caja eléctrica localizada debajo del gabinete superior de acero inoxidable y hacia la parte posterior. Mueva el refrigerador hacia el espacio designado levantándolo por la parte trasera. Asegúrese que el cordón no se trabe debajo del refrigerador. Para fijar el refrigerador en su lugar use las aperturas del soporte de metal (vea Fig 6). CAJA ELECTRICA Esta unidad viene equipada con una caja eléctrica (vea Fig 8) debajo del gabinete superior. La caja tiene 2 receptáculos, uno marcado “Fridge” donde se conecta el cordón del refrigerador y otro marcado “Burners” para las hornillas. Este último ya viene conectado desde la planta. FUNCIONAMIENTO DEL REFRIGERADOR Lea las instrucciones colocadas dentro de la unidad. FUNCIONAMIENTO DE LAS HORNILLAS (CK30-1 / CK30B / CK30B-1 / CK36) Conecte su mini-cocina al receptáculo de la pared (120V AC/60 ciclos), usando el cordón de la caja eléctrica. (El cordón de las hornillas ha sido conectado en la planta, antes de entregarle su cocina). Su cocina viene con dos hornillas (500 vatios y 900 vatios). Para encender las hornillas, presione y gire el control a la posición deseada. Los controles de temperatura van de bajo a alto poder. Cuando las hornillas están encendidas, los indicadores de luz localizados en el panel frontal se encenderán. FUNCIONAMIENTO DE LA PLANCHA DE INDUCCION (CK30IH - SOLAMENTE) 1 2 3 4 5 Selector de Modo 1 (Temperatura) Reloj Selector de Modo 2 (Potencia en vatios) Cancelar programación de reloj Selector de Encendido (ON / OFF) 25 6 7 8 9 10 Selectores de control (Arriba y Abajo) Indicador de reloj Indicador de Modo 1 (Temperatura) Pantalla electrónica Indicador de Modo 2 (Potencia) OPERANDO SU PLANCHA DE INDUCCION • USANDO SU PLANCHA DE INDUCCION USANDO EL MEDIDOR DE TIEMPO (SETUP) Presione el botón marcado “TIMER” para programar el reloj. Ud. puede seleccionar el tiempo de cocción desde 1 a 59 minutos. Para incrementar el tiempo de cocción en incrementos de 1 minuto, presione el botón “▲” una vez. Para incrementar el tiempo en 10 minutos a la vez, empuje y mantenga presionado el botón “▲” hasta que alcance el tiempo de cocción deseado. Para incrementar el tiempo de cocción en incrementos de 1 hora, presione el botón “▼” una vez. APAGANDO EL MEDIDOR DE TIEMPO (CANCEL) Para cancelar la selección previamente escogida, simplemente presione el botón “TIMER CANCEL”. FUNCIONES AUTOMATICAS Su Plancha de Inducción está diseñada con múltiples funciones automáticas de seguridad: • Reconocimiento de utensilio automático: Un mensaje de error “E1” aparecerá en la pantalla si trata de utilizar ollas o utensilios inapropiados para este electrodoméstico. Cuando este error aparezca, la unidad no funcionará hasta que el utensilio correcto sea usado. • Apagado automático: Si no presiona ningún botón o la olla o sartén no se saca de la hornilla en un periodo de 150 minutos (2 ½ horas), el calentador se apagará automáticamente. • Protección de sobrecalentamiento de la olla o sartén: Si la temperatura de la olla o sartén excede el límite máximo, el calentador se apagara automáticamente. Esta función también previene que la comida se queme cuando está asando o dorando alimentos. Para prevenir esto, reduzca la temperatura o ponga un poquito de agua fría en la olla para asegurar que la temperatura se mantenga. • Protección de sobrecalentamiento de la hornilla: La hornilla esta diseñada con un ventilador incorporado que ajusta la temperatura dentro del calentador. Si el conducto de aire se bloquea o tapa, la hornilla se apagará automáticamente después de 10 alarmas de sonido, avisando al consumidor que hay un problema. Para corregir la situación, limpie el conducto de aire y vuelva a encender la hornilla después de dejarla enfriar por 5 minutos. • Protección de seguridad de superficie: Si la olla o sartén es removida durante el proceso de cocción, la pantalla mostrará un mensaje de error “E1” y sonará una alarma de sonido. Si en 60 segundos (1 minuto) no coloca una olla o sartén en la hornilla, esta se apagará automáticamente y empezará el procedimiento de enfriamiento de 5 minutos. • Procedimiento de enfriamiento automático: Después de cada uso y/o cuando la temperatura llega a su máximo, la unidad entrará en el proceso de enfriamiento automático por 5 minutos durante los cuales el ventilador interno enfriará la unidad para evitar el sobrecalentamiento y extender la vida de la unidad. • • • Función “Mode 1”: (Calentar y cocinar a potencia / temperatura baja). Presione el botón marcado “Mode 1” la luz indicadora encenderá intermitentemente. Ajuste la temperatura a su gusto presionando los botones marcados con las flechas marcadas arriba y bajo. Puede seleccionar la temperatura a su gusto entre los siguientes: 180º / 220º / 260º / 300º / 340º/ 380º / 420º / 460º 26 • • • Función “Mode 2”: (Cocinar a potencia en vatios). Presione el botón marcado “Mode 2”, la luz indicadora encenderá intermitentemente. Ajuste la temperatura a su gusto presionando los botones marcados con las flechas marcadas arriba y bajo. Puedes seleccionar la potencia a su gusto entre los siguientes: 60w / 200w / 400w / 600w / 800w / 1000w / 1200w / 1400w CONSEJOS PARA COCCION Las características de las ollas y sartenes influencia el desempeño de cualquier sistema de cocción. Por tanto, hacemos énfasis en la importancia de usar el equipo de cocción apropiado. • Utensilios fabricados de acero de alto grado 18/10, aluminio, vidrio y o cobre no deben ser utilizados en ningún tipo de cocina de inducción. • Solamente use ollas que tengan el fondo magnético. La parte imantada debe mantenerse pegada al fondo para asegurar que el calor se transfiera entre la hornilla de inducción y la olla). • Use ollas y sartenes con fondos planos y que tengan tapas que ajusten bien, para conservar la energía y acortar el tiempo de cocción. • Use ollas y sartenes que sean acordes al tamaño de la hornilla. Una olla que sea un poquito más grande que la hornilla, cubrirá todo el calentador y previene que las salpicaduras caigan en el calentador y se quemen. El usar una olla o sartén más pequeña que la hornilla es un desperdicio de energía. • Para evitar salpicadura y para asegurar eficiencia máxima, los fondos de las ollas deben estar limpios y secos antes de entrar en contacto con el calentador. • Limpie cualquier derrame o salpicadura que haya caído en el calentador con un trapo húmedo, lo más pronto posible, antes que se enfríe, así acortará el tiempo de limpieza. Asegúrese que la unidad esté apagada (OFF). Para prevenir daños, use la olla y sartén correctas, empiece la cocción en la temperatura más alta y luego baje el control de temperatura para continuar la cocción. Nunca deje una olla o sartén vacía en la hornilla caliente, o una en la que el líquido se haya evaporado. La olla o sartén podría sobrecalentarse y dañarse o dañar la superficie de la hornilla. Asegúrese que todos los botones de control estén apagados (OFF) y que las luces indicadoras estén apagadas (OFF) cuando no esté cocinando. CUIDADO Y MANTENIMIENTO INFORMACION GENERAL PRECAUCION: Desconecte la unidad del suministro eléctrico antes de limpiar o dar mantenimiento. • Es aconsejable limpiar la unidad cuando esta esté fría, especialmente cuando vaya a limpiar las partes esmaltadas. • Evite usar productos de limpieza que contengan una base de cloro o ácido. LIMPIEZA DE SU PLANCHA DE INDUCCION • Apague la hornilla, desconecte la unidad del suministro eléctrico A/C del enchufe de pared o interruptor, asegúrese que la superficie de la unidad este fría antes de proceder. • Exprima la esponja o trapito cuando limpie el área de los controles, o cualquier parte eléctrica. 27 • • Limpie la parte externa con agua tibia y un detergente líquido suave. Enjuague bien y seque con un trapito limpio y suave. No use la esponja de metal o cepillo de metal en la superficie. NOTA: No sumerja la unidad en agua ni otros líquidos. 28 IRREGULARIDADES CON EL FUNCIONAMIENTO DEL REFRIGERADOR PROBLEMA CAUSAS PROBABLES SOLUCION El refrigerador no funciona. La refrigeración es insuficiente. Ruidos anormales. Falta de energía. Tomacorriente defectuoso. Control de temperaturas en la posición “ O ”. Enchufe desconectado. Botón de control de temperatura en la posición incorrecta. Elevada frecuencia de apertura de la puerta. Expansión del gas en el evaporador. Tubos en contacto con gabinetes o paredes. El refrigerador no funciona Verifique el fusible. Substitúyalo o arréglelo. Girar el botón en la posición correcta. Conéctelo. Observe las instrucciones. Evite abrir la puerta demasiado. Normal. Aléjelos. Enchufe el cordón del refrigerador en la caja eléctrica a la posición marcada “Fridge”. IRREGULARIDADES CON EL FUNCIONAMIENTO DE LAS HORNILLAS PROBLEMA CAUSAS PROBABLES SOLUCION Olor a quemado Las hornillas no encienden Solamente un elemento se calienta. Nada funciona Acumulación de residuo de alimentos en las hornillas La unida esta desconectada adentro. El control de temperatura para la hornilla correspondiente no esta encendido. Todos los cordones están desconectados. Fusible defectuoso. 29 Limpie las hornillas Enchufe el cordón de las hornillas en la caja eléctrica. Seleccione el control de temperatura que le corresponde. La unidad no esta conectada al enchufe de la pared. La caja eléctrica tiene los receptáculos abiertos. Reemplazar fusible. (This page left blank intentionally) 30 REGISTRATION INFORMATION Thank you for purchasing this fine Avanti product. Please fill out this form and return it within 100 days of purchase and receive these important benefits to the following address: Avanti Products, A Division of The Mackle Co., Inc. P.O.Box 520604 – Miami, Florida 33152 ¾ Protect your product: We will keep the model number and date of purchase of your new Avanti Products product on file to help you refer to this information in the event of an insurance claim such as fire or theft. ¾ Promote better products: We value your input. Your responses will help us develop products designed to best meet your future needs. ----------------------------------------------------------(detach here)---------------------------------------------------------Avanti Registration Form __________________________________ Name _____________________________________ Model # Serial # __________________________________ Address _____________________________________ Date Purchased Store/Dealer Name __________________________________ City State Zip ______________________________________ Occupation __________________________________ Area Code Phone Number As Your Primary Residence, Do You: Own Rent Did You Purchase An Additional Warranty: Extended Food Loss None Your Age: under 18 18-25 26-30 31-35 36-50 over 50 Marital Status: Married Single Is This Product Used In The: Home Business How Did You Learn About This Product: Advertising In Store Demo Personal Demo Other______________________________ Comments____________________________ _____________________________________ _____________________________________ Reason For Choosing This Avanti Product: Please indicate the most important factors that influenced your decision to purchase this product. Price Product Features Avanti Products Reputation Product Quality Salesperson Recommendation Friend/Relative Recommendation Warranty Other_______________________ 31 PRINTED IN CHINA 32