1
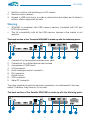
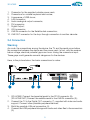
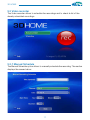
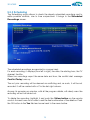
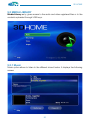
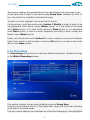
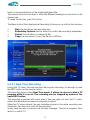
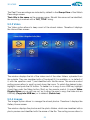
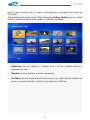
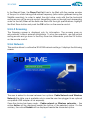
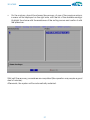
3D HOME
User Guide
1
Warnings and Installation
3D HOME
TABLE OF CONTENTS
1. CONTENTS
2. SAFETY WARNINGS
3. INTRODUCTION
3.1 What is 3DHOME
3.2 Box components
3.3 Description and installation
3.4 Connection
3.5 First switch-on and channel scan
4. REMOTE CONTROL
4.1 Optional component parts
5. USER INTERFACE
5.1 TV
5.1.1 TV functions
5.1.1.1 Time-Shift
5.1.1.2 Menù options
5.1.1.2.1 3D Menù
5.2 Video Recorder
5.2.1 Manual Schedule
5.2.2 Scheduling
5.3 Media library 5.3.1 Music
5.3.2 Recordings
5.3.2.1 Real-Time recordings
5.3.3 Video
5.3.4 Images
5.4 Web 5.5 Setup
5.5.1 Language
5.5.2 Audio
5.5.3 Video
5.5.4 Date
5.5.5 TV Settings
5.5.5.1 TV Channel Scan
with Terrestrial 3DHOME 5.5.5.2 TV Channel Scan
with Satellite 3DHOME
5.5.5.3 Scanning
5.5.6 Network
5.5.6 Update
5.5.7 Recovery
6. TECHNICAL SPECIFICATIONS
7. SECURITY PACKAGE Sim2 Multimedia - Versione 2.0 luglio 2011
3
4
4
4
7
7
7
8
9
11
11
12
13
13
14
15
16
17
17
19
20
20
21
22
23
23
25
25
25
26
26
26
26
27
28
31
31
33
35
38
40
3D HOME
1. CONTENTS
Inside information
This operating manual has been specially developed for 3DHOME use. The inside
information have been carefully verified; nevertheless the contents accuracy is not
assured, because of the changes that may occur without notice.
Copyright 2011
This operating manual contains intellectual property information, protected by
copyright laws. All rights are reserved. Do not reproduce any part of this document,
by mechanical, electronic or any other means, in any form, unless with the previous
producer authorization.
Trademark
All the trademarks and registered trademarks are recognized properties of their
respective owners.
2. SAFETY WARNINGS
The lightning symbol, inside the triangle, aims to warn the user of not
insulated dangerous voltages, inside the product, that may expose
people to a risk of electrical discharge.
!
The exclamation mark, inside the triangle, aims to warn the user of
outstanding operating and repairs instructions in the documents of
the set.
Caution
In order to reduce fire and electric shock hazards, do not expose this equipment to
the rain or to the moisture. Do not open the covering. Address to trained staff for
repairs.
Power
The 3DHOME set-top box must be only powered with the supplied power pack.
The power pack must be only connected to a 220 Volt ~, 50Hz socket.
Do not remove the receiver covering.
4
3D HOME
The unauthorized covering removal is a cause of immediate guarantee forfeiture!
Power cable
•
•
•
In order to mount the equipment, first test the power cable integrity. Should
it be damaged, do not connect it to the device and address to the customer
service.
Mount the power cable so as not to cause its squashing with objects on and
by it. Furthermore avoid placing it next to passing areas, where it could accidentally be trampled, pulled out or anyhow damaged.
Should the cable be damaged, carefully disconnect the receiver from the supply socket and address only to trained staff or to the customer service in order
to make it be repaired.
Liquids
•
•
•
Keep the product away from any kind of liquid. Do not put on it objects with
liquids inside, such as pots or moistener dampener and so on.
Do not place it where it could come into contact with liquid splash or squirt, or
in any case do not put it in rooms with a high damp level, subject to moisture
concentrations.
Should the receiver accidentally come in contact with liquids, immediately pull
out the plug from the socket. DO NOT HANDLE the device before it will have
been disconnected.
Cleaning
•
•
In order to clean the set-top box, first pull the device out of the socket.
In order to clean the outside of the receiver, use a smooth and dry cloth; or
slightly damp it with water. Avoid the use of chemical products or solvents.
Ventilation
•
•
•
Assure yourself that the place where the set-top box will be mounted is well
aired, so to allow enough heat dispersion and so to avoid over-heating.
In order to allow an adequate ventilation, keep a 0.33 feet (10 cm) minimum
free room at the set-top box sides and a 0.48 feet (15 cm) minimum free room
over the set-top box.
The airing fissures must be free, not obstructed with objects, such as newspapers, tablecloths, furnishing cloths and so on. Do not mount the receiver
next to heat sources (such as radiators, heaters and so on) or upon other
equipments that generate heat (such as video recorders, DVD players and so
on).
5
3D HOME
Safeguard
•
•
•
•
Keep the product out of reach of children.
Plastic packaging could be dangerous. In order to avoid chocking problems,
keep the bags out of reach of children.
The device must be put on a sound and safe base.
Hook up the receiver only after having accomplished the installation.
KEEP ATTENTION TO THE OPERATING MANUAL BEFORE
USING THE DECODER.
In order to make report procedures smoother in case of set-top box loss or theft,
note down the serial number, on the bottom side of the 3DHOME receiver. Before
recycling the packaging, assure yourself of having carefully checked the set components, using the special list in the relevant Set components section.
Symbols explanation
Waste disposal:
In order to dispose of electrical and electronic equip
ments do not use the municipal waste system. Address instead to an authorized reception centre, in charge of the electrical and electronic equipments handling.
This product is made in compliance with the EMI 2004/108/EC directives and with the directives on the 2006/95/EC low voltage equipments.
6
3D HOME
3. IntrodUCTION
3.1 WHAT IS 3DHOME
3DHOME is a new generation system, that gets together, in a single equipment,
all the household devices normally used for the multimedia files vision, recording
and filing. 3DHOME includes and integrates in a single box a TV receiver device
(Digital Terrestrial Television or Satellite TV, depending on the different box type); a
digital video recorder to catch up the broadcasted images; a flexible media-library
in order to watch videos and photos and to listen to the music by means of USB
outer devices; a complete, but simple, Internet access tool, in order to surf the Net
and to tune the TV through the Internet.
3DHOME is a cutting edge solution specially conceived for the multimedia services
integration, with an high usability level.
3DHOME is a tool that upgrades the converging of entertainment and communication
applications.
3.2 Box components
Open the box and assure yourself it includes all the following items:
Accessories box:
Operating Manual
Outside power pack
Remote Control
“AAA” Batteries
Power Cable
3.3 Description and installation
The front section of the product is made up with the following parts:
1
2
3
7
3D HOME
1. Switch-on button with switching-on LED marker;
2. Remote control receiver;
3. Access to USB front doors, in order to read photos and videos and to listen to
audios, while in supported formats.
Warning
•
•
3DHOME is consistent with USB memory devices, formatted with FAT and
NTFS file systems.
The full compatibility with all the USB memory devices in the market is not
assured.
The back section of the Terrestrial 3DHOME is made up with the following parts:
2
1
1.
2.
3.
4.
5.
6.
7.
8.
9.
3
4
5
6
7
8
9
Connector for the supplied outside power pack
Connectors for outside keyboard and mouse
A sequence of USB doors
LAN connector
Audio analogical output connector;
DVI connector
Digital Output
VGA connector
Aerial RF connector
The other possible connectors are back connectors, not addressed to the user
needs. Therefore, they have not to be used.
The back section of the Satellite 3DHOME is made up with the following parts:
2
1
3
4
5
8
6
7
8
10
9
3D HOME
1. Connector for the supplied outside power pack;
2. Connectors for outside keyboard and mouse;
3. A sequence of USB doors;
4. LAN connector;
5. Audio analogical output connector;
6. DVI connector;
7. Digital Output;
8. VGA connector;
9. LNB IN connector for the Satellite dish connection;
10. LNB OUT connector for the loop-through connection to another decoder.
3.4 Connection
Warning
As a rule, the connections among the device, the TV and the aerial come before
the connection between the device and the power pack. In fact, with the receiver
below voltage, electrical potential gaps can occur during the connectors input.
These gaps could generate currents dangerous for the devices.
Here, in the picture below, the basic connections to make:
2
1
3
4
7
9
1. (3D-HOME) Connect the terrestrial aerial to the RF-IN connector (9);
(3D-HOME-SAT) Connect the satellite aerial to the LNB-IN connector (9);
2. Connect the TV to the Digital OUT connector (7), supplied with video and audio
support. Connect other possible peripheral devices;
3. Build the possible LAN net connection (4);
4. Connect the USB peripheral storage with audio and video files to the connectors
(3);
9
3D HOME
5. Connect the possible keyboard and mouse (2);
6. Lastly connect the outside power pack by means of the proper connector (1).
After all this procedure, put the power pack socket in and switch-on the device,
pushing the switch-on button. Wait for the start-up performance execution.
Warning
In order to connect the TV and the decoder, use a HDMI cable.
3.5 First switch-on and channel scan
For the first switch-on, follow the instructions below:
1. Read the instructions on the remote control use (p. 11) and on the user interface
(p. XX);
2. Highlight the Setup entry in the main menu (5.5 paragraph, p. 25);
3. Highlight the TV Settings entry (5.5.5 paragraph, p. 26);
4. Highlight the Channel Scan entry (5.5.5.1 and 5.5.5.2 paragraphs, pp. 27, 28);
5. Highlight the Automatic Scan and then push the button Start Scan;
6. When the scanning is accomplished, the channel list is displayed;
7. If necessary, highlight the different channels in order to delete them or to change
their position.
10
3D HOME
4. REMOTE CONTROL
POWER
Mute
Power
abc
def
1
2
3
ghi
jkl
mno
4
5
6
pqrs
tuv
wxyz
7
8
9
Numerical buttons
TV/Radio
0
Menù
Volume -
Text
vol-
Surfing arrows
Channel -
vol+
volume +
OK
ch-
ch+
Exit
Channel +
Escape button
Interactive button
Rec
Play
i
information
Stop
EPG
Rewind
EPG
Pause
Forward
4.1 Optional component parts
The 3D-HOME following component parts must be considered optional. They
depend on the system release and on its relevant features:
•
•
USB keyboard and mouse (included the wireless ones);
WiFi Adapter (consistent with Linux, Ubuntu 10.04 systems).
NOTE: should a keyboard not be connected, to put in a text, 3DHOME provides
also a virtual keyboard, displayed with the OK button of the remote control. The
Text (or Menu) button is used for opening the different menu.
11
3D HOME
5. USER INTERFACE
The user interface consists in a menu hierarchy, organized in logical groups. In each
menu, the different entries may have two functions: they open an under-menu or
start an application.
The different applications are distinguished by the icons on the right side of the
screen.
The menu entries can be swiftly reviewed with the surfing UP and DOWN arrows. In
order to enter the under-menu, surf with the RIGHT arrow (or push the OK button);
in order to reach the upper menu, use the LEFT arrow (or the Exit button).
To start the wished application, use the RIGHT arrow (or the OK button), while to
come out and reach the other menus, use the Exit button. The Text button, or Menu
button, is used for opening the menu.
In any case, to help the user move across the different sections, each screen
provides - in the bottom left - an Help button, marked with a blue dot. It displays a
Guide screen.
Let’s give a glance to the 3DHOME services. The menu hierarchy can be summed
up as the picture below:
3D HOME
TV
LANGUAGE
VIDEO RECORDER
MANUAL SCHEDULE
AUDIO
SCHEDULING
VIDEO
MEDIA LIBRARY
MUSIC
WEB
RECORDINGS
DATE
SETUP
VIDEO
TV SETTINGS
IMAGES
NETWORK
UPDATE
With the 3DHOME switch-on, the main menu is displayed on the screen. It introduces
the main 3DHOME functions: live and local contents and Internet services. Here
below, in the picture, the TV entry is highlighted.
12
3D HOME
5.1 TV
The TV section goes into the live contents. It enables the TV channel vision.
5.1.1 TV functions
There are four options to change channel with the remote control:
•
•
•
•
•
push the key numbers;
use the surfing arrows UP and DOWN;
use the CH- e CH+ buttons;
use the “i” (information) button, that allows the immediate channel identification.
Push the button in association with the UP and DOWN arrows. Push the Exit
button to make the channel specifications disappear;
push the EPG (Electronic Program Guide) button, that displays the set channel
list with the relevant information on the broadcasting hours (and on the on-air
ones). In order to tune in, highlight the wished one and push the OK button.
Adjust the volume with the appropriate buttons on the remote control, as in the
picture, point four. The Mute button connects and disconnects the audio.
13
3D HOME
5.1.1.1 Time-Shift
3DHOME TV displays absolute innovative functions related to the vision and
information storage of the programs on hard disk. These functions are normally
identified as Time-Shift and are set up with the reproduction buttons on the remote
control.
Time-Shift functions:
•
•
•
•
•
•
•
Pause: the function allows to suspend the vision of the program for a lapse
longer than an hour. Pause button makes the image stop; in the meanwhile
3DHOME carries on the program storage on the hard disk. Afterwards, the
vision will be able to restart as from the moment of the stop.
Fast Forward: the button speeds up the reproduction of the stored part of the
program. At each push of the button the forward speed raises, up to a 180X
maximum.
Fast Rewind: the button allows to move back inside the stored part of the
program. At each push of the button the rewind speed raises, up to a 180X
maximum.
Jump backwards: the left arrow allows to jump 10 minutes back.
Jump forward: the right arrow allows to jump 10 minutes forward.
Repeat: the Play button allows to restart the vision at a normal speed as from
the moment of the stop.
Record: even during the TV vision, the program on air can be recorded. In
order to enable or disable the process, push the REC button.
In case of fast forward or jump forward, if the stored part of the program is
exceeded, the Real-Time TV vision is automatically re-enabled.
When one of these functions is set up, in the bottom centre of the screen an inset
gives notice of it. The systems keeps count of the progressive delay seconds
compared to the Real-Time TV, too.
The above functions are at user’s disposal, also in case of Media library videos
reproduction.
14
3D HOME
5.1.1.2 Options menu
During the vision, the Menu button displays an option list on the upper left side of
the screen. When highlighted, the different entries may show an arrow on the right.
It points at an under-menu, that can be displayed with the right surfing arrow.
Options menu:
1. Program Guide: it displays the channel list and, if available, the broadcasting
hour of the program. Highlight the program in order to schedule its recording.
2. Change Aspect Ratio: it allows the user to change the format screen as he
wishes.
3. 3D Menu: it displays the menu that enables/disables the 3D vision.
4. Adjust Time Stretch: it allows to adjust the speed of the program vision.
All the above functions are at user’s disposal, also in case of Media library videos
reproduction.
15
3D HOME
Menu palette: Change Aspect Ratio
Menu palette: Adjust Time Stretch
5.1.1.2.1 3D Menù
This option allows to enable/disable the 3D vision. Here are the different modes:
•
•
•
•
Automatic: it allows to enable/disable the automatic identification of the
possible 3D signal;
3D Manual: it allows the user to manually enable the 3D mode, on the basis
of the 3D format (the supported formats are Side By Side, Top Bottom, Tile
Format and Tile Format2);
2D Vision: it allows to display the 3D film in 2D mode, should the user not be
interested in 3D vision. In this case the 3D format source must be specified;
Disabled: it allows to fully disable the 3D vision. This mode turns out to be
useful when the user likes better relying on the TV 3D functions.
16
3D HOME
5.2 Video recorder
The Video recorder allows to schedule the recordings and to check le list of the
already scheduled recordings.
5.2.1 Manual Schedule
The Manual Schedule option allows to manually schedule the recording. The section
displays the screen below:
17
3D HOME
In order to manually schedule the recordings, fill the different fields in the screen.
To move from one field to the other, use the UP and DOWN surfing arrows. To set
down the contents of each field, use the RIGHT and LEFT surfing arrows.
The optional title may be entered by means of a connected outside keyboard or
through a virtual keyboard (enabled with the OK button on the remote control).
Push the Next button and move to the following window, that displays an undermenu, summing up the recording instructions. This menu allows to choose the
recording frequency - once, every day, every week - The different fields can be
highlighted with the UP and DOWN surfing arrows. Use the RIGHT and LEFT surfing
arrows to make the right choice.
The recording may be classified as episodic (Record only this showing). Otherwise
it can be scheduled with a daily frequency (Record in this timeslot every day) or
with a weekly frequency (Record In this timeslot every week).
After having scheduled the right recording option, confirm the choice pushing OK
button in Save field.
Accomplished the save, the user come back directly to the Manual Schedule and
Scheduling screen.
18
3D HOME
5.2.2 Scheduling
The Scheduling option allows to check the already scheduled recordings and to
settle possible conflicts, due to time conjunctions. It brings to the Scheduled
Recordings screen.
The scheduled recordings are reported in a proper inset.
For each recording, it displays (from left to right), the date, the starting hour, the TV
channel, the title.
When two recordings report the same date and hour, the conflict alert message
Conflict Today turns up.
The not prior recording will be deemed as conflicting and, as such, it will be not
recorded. It will be marked with a C in the last right column.
Anyway its summing up window, with all the program details, will clearly warn the
recording will not be carried out.
To delete the recording, highlight it and push the Yellow button on the remote
control. An inset turns out in order to ask the final confirmation of the deletion. Push
the OK button in the Yes field and come back to the menu before.
19
3D HOME
5.3 MEDIA LIBRARY
Media Library entry gives access to the audio and video registered files or to the
contents uploaded through USB keys.
5.3.1 Music
Music option allows to listen to the different stored tracks. It displays the following
screen:
20
3D HOME
The window displays the specifications of the last listened track and make it play.
At the same time it refers to the whole tracks Group View, classified by artist. In
turn, the artist list is classified in alphabetical order.
To listen to a track, highlight it and push the OK button.
On the contrary, push the remote control button 1 (Shuffle) in order to listen to the
comprehensive music album tracks (Album option), or to the tracks of the same
artist (Artist option), or to other tracks randomly (Rand option), or in a sequential
order (None option), or even in a smart sequence, according to fame, novelty and
length criteria (Smart option).
Finally, push the remote control button 2 in order to replay in loop the just listened
track (Track option) or all the tracks in the store (All option) or to listen to the whole
album once (None option).
5.3.2 Recordings
The Recordings option allows to watch the different recordings. Therefore it brings
to the Watch Recordings screen:
The window displays the recorded available programs Group View.
The left column displays the list of the single titles, along with the folders including
more titles of the same series.
The right column displays the specifications of the titles belonging to the highlighted
21
3D HOME
folder or the specifications of the single highlighted title.
The remote control arrows help to scroll the different headings up and down to the
desired one.
To make the file play, push OK button.
The Menu button (Text) displays the Recording Options pop-up with its four choices:
•
•
•
•
Play: the bar allows the recording play;
Scheduling Options: the bar allows to modify the recordings schedules;
Delete: the bar allows to delete the file;
Copy: the bar allows to copy the file on a USB key.
5.3.2.1 Real-Time Recording
During the TV vision, the user can start the program recording. It’s enough to push
the REC button on the remote control.
This recording type is called Real-Time mode. It allows to store on a disk a TV
program while it is on air. The recording can be stopped by means of the
same REC button.
The recording command still works even if the user gets out from the TV vision,
unless the recording has been pre-emptively stopped.
When the TV vision restarts, the only available program is the under recording one.
Otherwise, the user must write off the recording.
In any case the user is warned with the alert message: “Record in progress. Stop
record, to watch TV”.
22
3D HOME
The Real-Time recordings are included by default in the Group View of the Watch
Recordings screen.
Their title is the same as the program name. Should this name not be identified,
the recording is marked with a “NO_TITLE” string.
5.3.3 Video
The Video option allows to keep count of the stored videos. Therefore it displays
the Home Video screen:
The window displays the list of the videos and of the video folders, uploaded from
the outside. They are visualized with a Thumbnail (if it is available, or, in default of
it, with the question mark ?) and identified with the file name. The remote control
surfing arrows allow to scroll up and down the icons. To watch the desired video,
highlight it and push the OK button. To delete it or to copy it on a USB key, highlight
it and then push the Menu button (Text) on the remote control. A special Video
Display Menu pop-up will turn out, so to allow the user to copy the video into an
USB key (Copy into USB bar) or to delete it (Delete bar).
5.3.4 Images
The Images option allows to manage the stored photos. Therefore it displays the
Gallery Home screen.
The window displays the photos and the photo folders, which are visualized with a
photo preview and identified with the name of the file. The surfing arrows allow to
23
3D HOME
scroll up and down the files. To watch a full-page photo, highlight it and push the
OK button.
The remote control menu button (Text) displays the Gallery Options pop-up, which
allows to watch the stored photo gallery in different modalities.
•
Slideshow: the bar displays a tracking shot of all the available photos in
alphabetical order;
•
Random: the bar displays a random sequence;
•
File Menu: the bar displays the File Options pop-up, which allows to delete one
photo or the whole folder or else to copy them on a USB key.
24
3D HOME
5.4 WEB
The Web entry in the main menu allows to open the Firefox browser. In order
to interact with it, provide an internet connection with 3DHOME, along with a
connection with an outside keyboard and with a mouse.
5.5 SETUP
The Setup entry in the main menu gives access to the 3DHOME configuration
section, where the general setups can be changed.
5.5.1 Language
This option displays the Localization screen, that allows to setup the language:
English or Italiano.
25
3D HOME
5.5.2 Audio
This option allows to choose between two audio output device: Analog and Digital:
HDMI.
5.5.3 Video
This option allows to choose the Video type device to be connected with the
3DHOME - 3D or 2D monitor - It also displays an AUTO option, that makes the
3DHOME recognize the device and comply its parameters with it.
5.5.4 Date
The option displays the Setup the date screen, where the exact date and hour can
be setup. To enter the date and to setup the time, work in the proper fields with the
surfing arrows on the remote control. .
5.5.5 TV Settings
This option allows to manage the channel scan with Terrestrial and Satellite TV.
It displays the Channel Name Editor screen, with the list of the already scanned
channels.
The standard order of the different channels may be modified. To perform the
operation, highlight the desired channel, push the OK button and then drag it in the
desired position. To delete a channel, highlight it and then push the Yellow button
on the remote control.
26
3D HOME
To scan the channels, highlight the Channel Scan button with the assistance of the
left and right remote control arrows.
Then push the OK button on the remote control: a question pop up will be displayed
in order to delete (or not) the setup list. Whatever the answer (No or Yes), the feature
is a staging post to start and restart the scan.
The Channel Scan button displays the Select Scan screen, that puts forwards
different operations, depending on the 3DHOME box sort: Terrestrial or Satellite.
5.5.5.1 TV Channel Scan with Terrestrial 3DHOME
In case of Terrestrial 3DHOME, the Select Scan screen submits a double scan
option: Automatic or Manual. The Automatic Scan is complete. It is suggested
when the device has to be setup for the first time.
With the Manual Scan the Channel list can be updated on the basis of the wished
frequencies. They have to be defined precisely time by time.
27
3D HOME
When the Scan mode is decided, push the button Start Scan in order to start the
process.
5.5.5.2 TV Channel Scan with Satellite 3DHOME
In case of Satellite 3DHOME, the Select Scan screen displays three fields: Scan,
Satellite, Diseq Port.
In order to highlight them, move with the vertical surfing arrows. On the contrary,
for the selection of the different options, work with the horizontal surfing arrows on
the remote control.
Scan field submits two mode options: Automatic or Manual.
The Automatic Scan is suggested to the less skilled user.
Once it is defined, the following field asks to choose between the two Satellite
setup by default: Astra 13° Est and Hotbird 19,2° Est. .
28
3D HOME
The Diseq Port entry refers to the connection device for the possible different
satellite aerials (up till four). This option allows to setup one of the four, while leaving
out the others.
With the Automatic Scan the field Diseq Port has to be filled with a simple number,
referred to the port that receives the selected satellite (for example, 1 for Astra e 2
for Hotbird).
In order to choose the different values, work with the horizontal surfing arrows on
the remote control (ascending order on the right and descending order on the left).
When all the fields are filled with the right specifications, highlight the Start Scan
button and push the OK button on the remote control.
The Manual Scan is suggested to the skilled user. Once it is defined, the screen
displays further five fields, posing as many choices: Frequency, Polarity Mode,
Symbol Rate, Extend Search, Diseq Port.
29
3D HOME
The Frequency, Polarity Mode and Symbol Rate parameters must be assigned
by the user, that gets hold of the proper information thanks to targeted researches
on special Internet websites.
The Frequency is expressed in kHz. To entry the right numerical string, work with
the numerical keyboard on the remote control. In case of wrong entries, push the
OK button on the remote control: the screen will display an alphanumeric keyboard,
that allows to erase the wrong entries with the Back button and to replace them
with the right ones. Finally, confirm the operation with the enter key on the keyboard.
To move inside the keyboard use equally the vertical and horizontal surfing arrows
on the remote control.
The Polarity mode can be an horizontal or vertical. The user must be able to select
the right orientation, information acquired thanks to special Internet researches.
The Symbol Rate field (also known as baud rate) has to be filled with the right
speed: to reach the wished value, work repeatedly with the horizontal surfing
arrows (ascending order on the right and descending order on the left, with pre-set
increasing steps).
The Extend Search function allows, if wanted, to extend the search of the
frequencies administered by the same broadcaster in the satellite stream. This
operation allows to add new channels to the user selection. The option - Yes or
No - must be defined in any case.
30
3D HOME
In the Manual Scan, the Diseq Port field has to be filled with the precise number
of the port to which belongs the wished frequency (information gathered during the
Satellite mounting). In order to select the right value, work with the the horizontal
surfing arrows on the remote control (ascending order on the right and descending
order on the left).When all the fields are filled with the right specifications, highlight
the Start Scan button and push the OK button on the remote control.
5.5.5.3 Scanning
The Scanning screen is displayed only for information. The process goes on
automatically, without external solicitations. To stop the operation, use the vertical
surfing arrows and go down to the Stop Scan bar; afterwards, push the OK button
on the remote control.
5.5.6 Network
This section allows to outline the 3DHOME network settings. It displays the following
screen:
The user is asked to choose between two options: Cable Network and Wireless
Network (the latter one is available only in case the user has plugged in an optional
compatible USB adapter at his expense).
Once the choice has been made – Cable network or Wireless networks – the
notice Active will be displayed beside the button of the selected option. On the
contrary, the notice Disable will be displayed beside the discarded option.
31
3D HOME
The Cable Network option displays the Network Configuration screen (A notice
warns if the cable network is not connected).
The window allows to choose between a DHPC Automatic configuration (active by
default) or a Manual one. The manual configuration allows to modify the IP address
and network parameters.
Once all the fields are filled, push the Save button. Check the values and then push
Exit button to return to the upper menu.
The Wireless Network option displays the Wireless Configuration screen. A
notice warns if there are not wireless interfaces.
Once the proper connecting device is plugged in, a screen turns out with a sequence
of fields to be filled.
32
3D HOME
The user is required to enter the Essid (Extended Service Set Identifier) and the
Coding, that is the protection key WEP or WEP Passphrase or WPA. As an
alternative, he may accept the Open operational mode, that is suggested by default.
The user has also to enter the Phrase Key, that is the network protection key.
The fields – IP Address, Netmask, Default Gateway, DNS1 and DNS2 – can be
filled only after the DHCP (Dynamic Host Configuration Protocol) feature has been
disabled.
To enter the new codes, highlight the fields and push the OK button. An
alphanumerical keyboard turns out and allows to perform the operation.
To give the final confirmation, push the Save button. Otherwise, to get out from the
window, push the Exit button.
5.5.7 Update
This section allows to update the 3DHOME box software. Il displays the Update
system screen.
33
3D HOME
The window displays two options in order to select the updating source:
•
•
Network, that is the network default uploading;
USB, that is the key uploading, with the updating downloaded from the www.3dt.it website registered area.
To make the desired choice, move up and down between the two fields, with the
assistance of the surfing arrows of the remote control. To give the final confirmation,
push the OK button. A flag will mark the bar.
To start the updating, push the Update button, with the assistance of the horizontal
surfing arrows. Otherwise push the Exit button and come back to the previous
page.
For good measure, 3DHOME auto-saves the outlined setups, whenever an updating
is performed.
Should it be necessary to come back to a previous setup, follow the instructions in
the Recovery paragraph.
34
3D HOME
5.5.7.1 Recovery
This procedure allows the user to come back to one of the previous setups.
To perform this operation, first of all connect a keyboard to the 3DHOME, then
follow the instructions below:
•
•
Turn off the 3DHOME;
Switch on the 3DHOME and push one of the two SHIFT buttons on the
keyboard. (The SHIFT button is the one normally used to get the capital letters).
The following screen will be displayed:
Now two further steps:
•
•
Select the Start Recovery option;
Give the ok to the operation.
The following screen will be displayed:
35
3D HOME
•
Here another double option:
•
•
Come back to the original factory 3DHOME setup;
Recover one of the previous saved updating;
•
Should be chosen the recovery of the original factory 3DHOME setup, the
user has to confirm the deletion of all the TV programs recordings.
36
3D HOME
•
On the contrary, should be chosen the recovery of one of the previous setups,
a menu will be displayed on the right side, with the list of the available savings.
Highlight the choice with the assistance of the surfing arrows and confirm it with
the space bar.
Wait until the recovery procedures are completed (the operation may require a good
deal of minutes).
Afterwards, the system will be automatically restarted.
37
3D HOME
6. TECHNICAL SPECIFICATIONS
Power supply
200-240V~ 50Hz
Energy consumption
Active Mode: 72W
Stand-by Mode: 1W
Dimensions
390 mm (W) x 68 mm (H) x 348 mm (D)
15.354 inch (W) x 2.67716 inch (H) x 13.70076 inch (D)
Humidity
5%-65%
Functioning temperature
5°C – 32 °C
Entry frequency
(3D HOME DVB-T)
147÷230 MHz (VHF) / 470÷862 MHz (UHF)
Channel band width
(3D HOME DVB-T)
6 / 7 / 8 MHz
AERIAL IN
(3D HOME DVB-T)
Aerial input, 75 ohms
Tuning functions
(3D HOME DVB-T)
Automatic channel tuning
LCN management
Entry frequency
(3D HOME DVB-S)
950-2150 MHz
AERIAL IN
(3D HOME DVB-S)
F Connector, 75 ohms
Tuning functions
(3D HOME DVB-T)
Automatic channel tuning
Decoding
Decoding Mpeg2 SD and H.264 formats up to and
including 4.2 level (1080p50)
Decoding Mpeg1 layer 2 and AAC audio formats
Teletext
(ETSI EN 300 472)
Subtitles ( ETSI EN 300 706)
( ETSI EN 300 706)
GUI
bilingual (italian/english)
Video format report
Automatic format identification (473, 16/9, 16/10…)
and automatic switching of the output format
3D formats
3D Tile Format administration
Output video formats:
2D formats: 1080p@50Hz
3D formats: 1080p
(Frame packed – Side by side – Top Bottom)
Coaxial Audio Digital Output
HDMI Audio/ hi-fi
Recording
Total dimension of recordable HD: 450GB
Medialibrary
videos, photos, music
IPTV
TV and IP radio
Browser and news feed reader
Time stretching
38
3D HOME
RS232 serial data port
USB port
Head-on - USB 2.0 - 5V, 500mA MAX
USB maximum memory 1TB
Multimedia file reading through USB
Photos .JPG, Music .MP3,
videos SD HD MPEG2 - H264
Recording through USB
Inner TV tuning with original .MPG format. A channel
different from the registered one can be displayed.
Software updating
Through USB or LAN
The 3DHOME SW is the evolution of Omegabox research project.
It is based on Linux operating system and it has been developed
by CSP - ICT innovation s.c.a r.l. Torino. The source code of the present software is at disposal of all the interested people, upon written
application addressed to CSP.
On www.csp.it website more information about Omegabox.
39