1
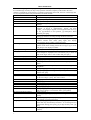
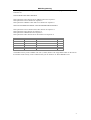
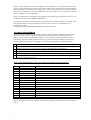
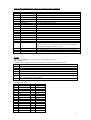
MOTOROLA USERS AND PROGRAMMING GUIDES
Original author: Mike Larsen 01/23/95 03/26/95
[email protected]
[email protected]
Additional information, graphics, other articles, and conversion to Word by Bob 03/20/95 v1.1 by Bob 3/21/95.
This is mainly a compilation of other peoples work. I, Bob, to not seek credit for something I did not do. I
however will be more then happy to take credit for what I did do. I compiled most of the data you see before you.
I took Mike Larsen’s manual, changed a few things, and added to it. I also turned a few documents into TIFs for
ease of reading. This manual was designed to make a nice printed copy of the data gathered by all parties
involved. Authors names remain intact throughout this document, and in most cases, the data has not be changed.
This manual may be altered to each users needs. Further, each user may add to this manual, and is encouraged to
do so. Further, each user may retransmit this manual in it’s altered state, provided the user credits all involved.
Further, the user may quote from this manual, provided the user credits the correct author, and makes a vague
reference to “Bob”. This manual may not be sold in any form for any amount of money, unless all authors
involved agree. Further, all data within this manual can not be sold in any for any amount of money unless the
appropriate author/s agree. However, learned procedures may be used to aid ones employment, or be used in the
gain of money, provided that such procedures are documented with this manual, or the information pertaining to
the procedure. In short: This information is to be shared with all who have an interested, and is ment to benefit
the users of the Motorola cellular phone, and the authors by being credited for the gathering of this information.
My special `contribularity` to Mike Larsen, Dr. Who, who compiled most of the hard data contained in this
manual. --bob
TABLE OF CONTENTS
BASIC COMMANDS
3
NAM PROGRAMMING
4
TEST MODE ACCESS:
6
INSTALLED MOBILE PHONES AND TRANSPORTABLE MODELS
6
HAND HELD PORTABLE MODELS:
6
8000 & ULTRA CLASSIC SERIES:
6
MICRO-TAC "FLIP" SERIES:
GENERAL NOTES:
7
7
NEWER 95xx PHONES (Thank you Motorola!!!)
7
ULTRA CLASSIC II SERIES:
7
LOCK/UNLOCK PROCEDURES:
7
SYSTEM SELECT PROCEDURES:
8
TEST MODE
8
1
TEST MODE PROGRAMMING:
TEST MODE PROGRAMING DATA: For AMPS and NAMPS Cellular Telephones
TEST MODE PROGRAMING DATA: For TDMA Cellular Telephones
NOTES:
9
9
10
10
TEST MODE COMMANDS:
12
GSM INFO AND TEST MODES.
14
TESTMODE for GSM PHONES:
14
Security Codes on the GSM phones:
16
Undocumented Menu shortcuts (7500, 8200, and maybe the 5200 and 7200)
16
Test Mode Functions:
17
HACKING THE FOVC
18
ASSEMBLING A _QUALITY_ MOTOROLA FLIP PROGRAMMING CABLE19
PINOUTS FOR MOTOROLA 8000 “BRICK” PHONE - “N” SERIES
22
15 PIN CABLE PINOUTS
22
OEM 32 PIN CABLE PINOUTS
22
CVC BLOCK
23
NEW EXTERNAL CONNECTOR FOR THE ULTRA CLASSIC II CVC
PINBLOCKS
23
PINOUTS FOR MOTOROLA SERIES 2 AND 3 TRANSCEIVERS 25 PIN
CABLE PIN DEFINITIONS
23
FLIP FONES AND ALL FONES USING THE DPC/PT FLIP CABLE
24
MOTOROLA / AMPS HANDSET SPECIFICATIONS:
24
MOTOROLA ESN RANGES
24
CELLULAR FREQUENCY LIST
25
2
Basic Commands
Before going in to the programming of the cellular phone, it is important for the user to know
the normal things necessary for day to day operation. While the majority of the stuff in the users
manual is intended for people that have problems programming their VCR, their are a few things that
are very important and are only mentioned in the users manual.
Turn On or Off
[Pwr]
Place Call
Enter number, [Snd]
Receive Call
[Snd] or open flip fone
End Call
[End] or close flip fone
Automatic Redial
To retry call, press [Snd] before ending the unsuccessful call
attempt.
Store Number
Phone number, [Sto], 2-digit location number or press [*] to
autoload. If phone is Alphanumeric, display will flash
"Alpha_". Press [Sto] to bypass or use keypad to enter letter (up
to 14). [#] advances to next position, [*] backspaces. When
finished, press [Sto].
Recall Number
[Rcl], 2-digit location number. Entering location 01, then
hitting [#] will allow scrolling through all stored locations.
Recall Name
Press [Name/Menu], [#] or [*] to scroll. [Rcl] will display
location number then name, [Rcl] again will display
corresponding phone number and [Snd] to dial.
Recalling Last 10 Numbers Called [Rcl], [0], [0]. Display will show "L0'" followed by the name or
number of the most recently placed call. Use [#] or [*] to scroll
and [Snd] to call displayed number.
Super Speed Dialing
Directory location number, [Snd]
Changing Entries
Press [Rcl] and the 2-digit location number so that the number
to be changed is displayed. Press and release [Clr] to back out
each of the digits. Enter a new number and press [Sto].
Call Number Displayed
[Snd]
Microphone Muting
Press [Fcn], [6]. To unmute, press [Fcn], [6]
Lock Unit
[Fcn], [5] or [LOCK]
Unlock
Three digit unlock code. If you make an error, [Clr] and enter
again.
Automatic Lock
[FCN], [6] (not all phones) "EnAbLE" will appear if
compatible.
Display Unlock Code
Press [Fcn], [0], your six-digit security code, [Rcl].
Changing Your Unlock Code
Press [Fcn], [0], your six-digit security code, your NEW 3-digit
unlock code, [Sto].
Review Battery Meter
Press [Fcn], [4] and release.
Adjust Volume
Earpiece - Press and hold [Vol] to increase. Release, press again
to decrease. Ringer - [Fcn], then Vol as above.
Recall Own Phone Number
[Rcl], [#]
Individual Call Timer
[Rcl], [#], [#]
Resettable Call Timer
[Rcl], [#], [#], [#]
Reset Resettable Call Timer
[Fcn], [0], [7], [Clr]
Cumulative Call Timer
[Rcl], [#], [#], [#], [#]
Access Features
Press [Fcn], [1]. To change features, press [*] and [#] to scroll
and [Clr] to change. To exit feature menu, press [END].
Review/Scroll Menu Features
Press [*] or [#]
Status Review
[Fcn], [0], [9], [Rcl], [#] or [*] scrolls messages. To end press
[END].
Changing System Type
Press [Rcl], [*]. Repeatedly press [*] until the desired system
type appears. To select press [Sto].
Outgoing Call Restrictions
Press [Fcn], [0], 6-digit security code, [1], [Sto]. Phone will
place calls only from memory locations 1-10. To change back to
unrestricted dialing press [Fcn], [0], 6-digit security code, [4],
[Sto].
Switch to Second Phone Number
[Rcl], [#], [Sto] (Press [Clr] to finish viewing newly activated
number).
3
NAM Programming
Once the phone model and sequence number are identified, determine the program access sequence
from this list.
HAND HELD PORTABLE MODELS
If the phone has a FCN button and no MENU button use sequence 1.
If the phone has no FCN button use sequence 2.
If the phone has a MENU button and a FCN button use sequence 4.
INSTALLED MOBILE PHONES AND TRANSPORTABLE MODELS
If the phone has no FCN button and no RCL button use sequence 3.
If the phone has a FCN button use sequence 4.
If the phone has a MEM button use sequence 5.
If the phone has a RCL button and no FCN button use sequence 6.
SEQUENCE#
1
2
3
4
5
6
ACCESS CODE
FCN
STO #
CTL 0
FCN 0
FCN 0
CTL 0
(SECURITY CODE TWICE)
(SECURITY CODE TWICE)
(SECURITY CODE TWICE)
(SECURITY CODE TWICE)
(SECURITY CODE TWICE)
(SECURITY CODE TWICE)
RCL
RCL
*
RCL
MEM
RCL
The default security code is 000000. The CTL (control) button is the single black button on the side of
the handset. If the security code is unknown then you can obtain it via TEST MODE access.
4
NAM programming:
Step 3: PROGRAMMING SEQUENCE
1. Turn the power on. PHONE MUST BE UNLOCK BEFORE IT CAN BE PROGRAMED
2. Within ten seconds enter the access sequence as determined above.
3. The phone should now show "01" in the left of the display, this is the first programming entry step number. If it does not the
security code is incorrect, or the programming lock-out counter has been exceeded. In either case you can still program the unit by
following the steps under TEST MODE PROGRAMMING below.
4. The * key is used to increment each step:
Each time you press * the display will increment from the step number, displayed on the left, to the data stored in that step,
displayed on the right. When the data is displayed make any necessary changes and press * to increment to the next step number.
5. The SND key is used to complete and exit programming when any STEP NUMBER is displayed
If you have enabled the second phone number bit in step 10 below then pressing SND will switch to NAM 2. Steps 01 thru 06, 09
and 10 will repeat for NAM 2, the step number will be followed by a "2" to indicate NAM two.
5. The CLR key will revert the display to the previously stored data.
6. The # key will abort programming at any time.
PROGRAMMING DATA:
STEP#
#OF DIGITS/RANGE
DESCRIPTION
01
00000 - 32767
SYSTEM ID
02
3 DIGITS
AREA CODE
03
7 DIGITS
TEL NUMBER
04
2 DIGITS
STATION CLASS MARK
05
2 DIGITS
ACCESS OVERLOAD CLASS
06
2 DIGITS
GROUP ID (10 IN USA)
07
6 DIGITS
SECURITY CODE
08
3 DIGITS
LOCK CODE
09
0333 OR 0334
INITIAL PAGING CHANNEL
10
6 DIGIT BINARY
OPTION PROGRAMMING (SEE NOTE 1)
11
3 DIGIT BINARY
OPTION PROGRAMMING (SEE NOTE 2)
NOTES:
Take care with Motorola's use of "0" and "1". Some options use "0" to enable, some use "1".
1. This is a 6 digit binary field used to select the following options:
Digit 1: Internal handset speaker, 0 to enable.
Digit 2: Local Use Mark, 0 or 1.
Digit 3: MIN Mark, 0 or 1.
Digit 4: Auto Recall, always set to 1 (enabled).
Digit 5: Second phone number (not all phones), 1 to enable.
Digit 6: Diversity (Two antennas, not all phones), 1 to enable.
2. This is a 3 digit binary field used to select the following options:
Digit 1: Continuous DTMF, 1 to enable
Digit 2: Transportable Ringer/Speaker, 0=Transducer, 1=Handset
Digit 3: 8 hour time out in transportable mode, 0 to enable
On newer models they have added and changed some numbers. The numbers as of the 3/27/92 manual are as follows:
1. The 6 digit binary field is still the same.
2. The 3 digit binary field has become a 5 digit binary field.
Digit 1: Failed Page Indicator
1=Disable
0=Enable
Digit 2: Motorola Enhanced Scan
1=Enable
0=Disable
Digit 3: Long Tone DTMF
1=Enable
0=Disable
Digit 4: Transportable Internal Ringer Speaker
1=Handset
0=Transdc
Digit 5: Eight Hour Timeout
1=Disable
0=Enable
5
TEST MODE ACCESS:
INSTALLED MOBILE PHONES AND TRANSPORTABLE MODELS
To enter test mode on units with software version 85 and higher you must short pins 20 and 21 of the
transceiver data connector. An RS232 break out box is useful for this, or construct a test mode adapter
from standard Radio Shack parts.
For MINI TR or Silver Mini Tac transceivers (smaller data connector) you can either short pins 9 and
14 or simply use a paper clip to short the hands free microphone connector.
HAND HELD PORTABLE MODELS:
There are two basic types of Motorola portable phones, the Micro-Tac series "Flip" phones, and the
larger 8000 and Ultra Classic phones. Certain newer Motorola and Pioneer badged Micro-Tac phones
do not have a "flip", but follow the same procedure as the Micro-Tac.
8000 & ULTRA CLASSIC SERIES:
If you have an 8000 series phone determine the "type" before trying to enter test mode. On the back of
the phone, or on the bottom in certain older models, locate the F09... number this is the series number.
If the FOURTH digit of this number is a "D" you CAN NOT program the unit through test mode, a
Motorola RTL4154/RTL4153 programmer is required to make any changes to this unit.
Having determined that you do not have a "D" series phone the following procedure is used to access
test mode:
Remove the battery from the phone and locate the 12 contacts at the top near the antenna connector.
These contacts are numbered 1 through 12 from top left through bottom right. Pin 6, top right, is the
Manual Test Mode Pin. You must ground this pin while powering up the phone. Pin 7 (lower left) or
the antenna connector should be used for ground. Follow one of these procedures to gain access to pin
6:
1. The top section of the battery that covers the contacts contains nothing but air. By careful
measuring you can drill a small hole in the battery to gain access to pin 6, alternately simply cut the
top off the
battery with a hack saw. Having gained access use a paper clip to short pin six to the antenna
connector ground while powering up the phone.
2. If you do not want to "destroy" a battery you can apply an external 7.5 volts to the + and connectors at the bottom of the phone, ground pin 6 while powering up the phone as above.
3. You can also try soldering or jamming a small jumper between pins 6 and 7 (top right to lower
left), or between pin 6 and the antenna connector housing ground. Carefully replace the battery and
power up the phone. Use caution with this method not to short out any other pin.
4. A cigarette lighter adapter, if you have one, also makes a great test mode adapter as it can be
disassembled to give you easier access to pin 6. Many are pre marked, or even have holes in the right
location. This is because they are often stamped from the same mold that the manufacturer
uses for making hands free adapter kits and these kits require access to the phone's connectors.
6
MICRO-TAC "FLIP" SERIES:
This phone follows similar methods as outlined for the 8000 series above.
Remove the battery and locate the three contacts at the bottom of the phone, the two outer contacts are
raised and connect with the battery. The center contact is recessed, this is the Manual Test Mode
connector.
Now look at the battery contacts, the two outer ones supply power to the phone, the center contact is
an "extra" ground. This ground needs to be shorted to the test mode connector on the phone. The
easiest way to do this is to put a small piece of solder wick, wire, aluminum foil or any other
conductive material into the recess on the phone. Having done this carefully replace the battery and
turn on the power, if you have been
successful the phone will wake up in test mode.
GENERAL NOTES:
HANDSETS: Most Motorola handsets are interchangeable, when a handset is used with a transceiver
other than the one it was designed for the display will show "LOANER". Some features and buttons
may not work, for instance if the original handset did not have a RCL or STO button, and the
replacement does, you will have to use the control * or control # sequence to access memory and A/B
system select procedures.
NEWER 95xx PHONES (Thank you Motorola!!!)
Many newer phones don't require grounding. If your software version number is 9526 (I think) or
newer, enter this:
[FCN] [0] [0] [*] [*] [8] [3] [7] [8] [6] [6] [3] [3] [STO]
In case you have trouble remembering the number sequence, it spells out "TESTMODE." Leave it to
Motorola to make this easier and easier all the time.
I have used this and it does work. This command just backs up my claim even further that esn
changing via handset is a reality. It's a matter of finding the correct combination of keys.
Normal test mode commands work like usual from then on.
For some odd reason, this hasn't been included in all the 95xx phones. I believe they started it in
Software 9526. This is only an estimate, so if you have a 95xx flip, let me know what software version
you have and whether it works or not so this date can be isolated. Mine is a 9562 that worked.
ULTRA CLASSIC II SERIES:
Ground Pin 2 to pin 4.
LOCK/UNLOCK PROCEDURES:
Phones with "LOCK" buttons: Press lock for at least 1/2 a second.
Phones with a "FCN" button: Press FCN 5, note that 5 has the letter's "J,K, and L" for lock.
Phones with no FCN or LOCK button: Press Control 5, control is the black volume button on the side
of the handset.
7
SYSTEM SELECT PROCEDURES:
Phones with a RCL button: Press RCL *, then * to select, STO to store.
Phones with no RCL button: Press Control * then * to select, # to store.
Options are:
CSCAn
Preferred/Non preferred with system lockout
Std A/b, or Std b/A:
Preferred/Non preferred.
SCAn Ab, or SCAn bA:
Non preferred/Preferred
SCAn A:
"A" ONLY
SCAn b:
"B" ONLY
HOME:
Home only
(these are typical options, some phone's vary. C-Scan is only available on newer models and does not
appear unless programmed, see below.)
TEST MODE
Test mode consists of two separate levels. When the telephone is first placed in Test Mode, it is in the
STATUS DISPLAY LEVEL. The display will be scrolling (or flashing), or it will be locked. If locked,
enter the unlock code and the display will begin scrolling. If the unlock code is not known, press #. By
pushing the # key, the technician causes the cellular telephone to change to its SERVICING LEVEL.
The display will be US' . There are five types of display, depending on the model of the telephone: a
16 character display, a 14 character display, a 10 digit display (with two versions), an 8 character
display, and a 7 character display. The status display is different in analog operation than in a TDMA
call.
NOTE: Use of a loaner handset is allowed in servicing level, but may not be allowed in the status
display level. A locked telephone will not show the status display, but will enter the servicing level.
14 Character Analog Call Display
Call Display
+------------------+
|ABCDEFG|
|HIJKLMN|
+------------------+
ABC = Channel
D = *Call Processing Mode
EFG = RSSI
H = **(D)SAT
I = 1=TX on
J = 1=Signalling Tone On
K = Power Level (0-7)
L = 1=Control Channel
M = 1=RX Audio off
N = 1=TX Audio off
*Call Processing Mode:
BLANK = AMPS
A = NAMPS High Sub-Channel
B = NAMPS Center Sub-Channel
C = NAMPS Low Sub-Channel
**(D)SAT:
0 = 5970 Hz
1 = 6000 Hz
2 = 6030 Hz
3 = No SAT
-----------0-6 = DSAT Vector
7 = No DSAT
14 Character TDMA
+------------------+
|ABCDEFG|
|HIJKLMN|
+------------------+
ABC = Channel ("A" in the
position indicates a
channel above 1000)
D = *Call Processing Mode
EFG = RSSI
HIJ = Digital Verification
Color Code (1-255)
K = Power Level (0-7)
L = 1=TX on
M = 1=Bit Error Rate (0-7)
N = 1=Audio Muted
*Call Processing Mode
BLANK = AMPS
1 = Slot 1, half rate
2 = Slot 2, half rate
3 = Slot 3, half rate
4 = Slot 4, half rate
5 = Slot 5, half rate
6 = Slot 6, half rate
7 = Slot 1, full rate
8 = Slot 2, full rate
9 = Slot 3, full rate
NOTE: The Analog Call
Display will always
show when on a control channel.
8
NOTE: Not all commands work on all telephones. If a command is not valid the display will show
"ErrOr." Not all numbers have been assigned. Not all numbers have been listed here. Some commands
were intended only for Motorola factory applications. (This is the disclaimer in the technical training
manual. I have included all of the other commands I have discovered one way or another. I do believe
this is a complete list of the commands.)
Three test commands are significant for programming and registering the telephone for service: see
full descriptions under TEST MODE COMMANDS.
32# Clears the telephone. (Older Motorola allowed either three or fifteen changes in the MIN. After
that, the phone had to be sent to Motorola to reset the counter. This is the command they use.)
38# Displays the ESN
55# This is the TEST MODE PROGRAMMING (as described below).
TEST MODE PROGRAMMING:
Assuming you have completed one of the above steps correctly the phone will wake up in test mode
when you turn the power on. When you first access test mode the phone's display will alternate
between various status information that includes the received signal strength and channel number.
The phone will operate normally in this mode. You can now access Service Mode by pressing the #
key, the display will clear and a ' will appear. Use the following procedure to program the phone:
1.
2.
3.
4.
5.
6.
Enter 55# to access programming mode.
The * key advances to the next step. (NOTE that test mode programming does NOT have step
numbers, each time you press the * key the phone will display the next data entry).
The CLR key will revert the display to the previously stored data.
The # key aborts programming at any time.
To complete programming you must scroll through ALL entries until a ' appears in the display.
Note that some entries contain more digits than can be displayed by the phone, in this case only the
last part of the data can be seen.
TEST MODE PROGRAMING DATA: For AMPS and NAMPS Cellular Telephones
STEP#
#OF DIGITS/RANGE
DESCRIPTION
01
02
03
04
05
06
07
08
09
10
11
12
13
14
15
16
00000 - 32767
8 DIGIT BINARY
10 DIGITS
2 DIGITS
2 DIGITS
2 DIGITS
6 DIGITS
3 DIGITS
3 DIGITS
8 DIGIT BINARY
8 DIGIT BINARY
0333 OR 0334
0333
0334
3 DIGIT
8 DIGIT BINARY
SYSTEM ID
OPTION PROGRAMING, SEE NOTE 1 BELOW
MIN (AREA CODE & TEL#)
STATION CLASS MARK, SEE NOTE 2 BELOW
ACCESS OVERLOAD CLASS
GROUP ID (10 IN USA)
SECURITY CODE
UNLOCK CODE
SERVICE LEVEL, SEE NOTE 3 BELOW
OPTION PROGRAMING, SEE NOTE 4 BELOW
OPTION PROGRAMING, SEE NOTE 5 BELOW
INITIAL PAGING CHANNEL
"A" SYSTEM IPCH
"B" SYSTEM IPCH
NUMBER PAGING CHANNEL (021 IN USA)
OPTION PROGRAMING, SEE NOTE 6 BELOW
Steps 01 through 06 and 12 will repeat for NAM 2 if the second phone number bit has been enabled in
step 11.
9
TEST MODE PROGRAMING DATA: For TDMA Cellular Telephones
STEP#
#OF DIGITS/RANGE
DESCRIPTION
01
02
03
04
05
06
07
08
09
10
11
12
13
14
15
16
00000 - 32767
8 DIGIT BINARY
10 DIGITS
2 DIGITS
2 DIGITS
2 DIGITS
6 DIGITS
3 DIGITS
3 DIGITS
8 DIGIT BINARY
8 DIGIT BINARY
0333 OR 0334
0333
0334
3 DIGITS
3 DIGITS
17
18
19
708
737
8 DIGITS
SYSTEM ID
OPTION PROGRAMING, SEE NOTE 1 BELOW
MIN (AREA CODE & TEL#)
STATION CLASS MARK, SEE NOTE 2 BELOW
ACCESS OVERLOAD CLASS
GROUP ID (10 IN USA)
SECURITY CODE
LOCK CODE
SERVICE LEVEL, SEE NOTE 3 BELOW
OPTION PROGRAMING, SEE NOTE 4 BELOW
OPTION PROGRAMING, SEE NOTE 5 BELOW
INITIAL PAGING CHANNEL
"A" SYSTEM IPCH
"B" SYSTEM IPCH
DEDICATED PAGING CHANNELS (021 IN USA)
SECONDARY INITIAL PAGING CHANNEL.
708 for system A, 737 for system B. Allows the TDMA telephone to
be assigned to a TDMA channel in a call
SECONDARY INITIAL PAGING CHANNEL FOR SYSTEM A
SECONDARY INITIAL PAGING CHANNEL FOR SYSTEM B
OPTION PROGRAMMING, SEE NOTE 6 BELOW
NOTES:
Take care with Motorola's use of "0" and "1". Some options use "0" to
enable, some use "1".
1. (step 02 above, suggested entry is: 11101001 for "A" system, 10101001 for "B" sys)
Digit 1 Local use mark, 0 or 1.
Digit 2 Preferred system, 1=system A, 0=system B.
Digit 3 End to end (DTMF) dialing, 1 to enable.
Digit 4 Not used, enter 0. Formerly used for test mobile.
Digit 5 Repertory (speed) dialing, 1 to enable. (Not used in TDMA)
Digit 6 Auxiliary (horn) alert, 1 to enable.
Digit 7 Hands free (VSP) auto mute, 1 to enable (mutes outgoing hands free audio until the MUTE
key is pressed). (Not used in TDMA)
Digit 8 Min mark, 1 = Enabled. NOT CHANGEABLE on series II or III.
2. Station Class Mark
SCM
00
01
02
03
04
05
06
07
08
09
10
11
12
13
14
15
666 or 832 Ch.
666
666
666
VOX
N
N
N
Max Power
3.0 W
1.2 W
0.6 W
666
666
666
Y
Y
Y
3.0 W
1.2 W
0.6 W
832
832
832
N
N
N
3.0 W
1.2 W
0.6 W
832
832
832
Y
Y
Y
3.0 W
1.2 W
0.6 W
10
3. Service Level Codes:
001 The telephone will only dial numbers in memory locations 01, 02 and 03. No keypad entries or
memory storage is possible. Restrict ALL outgoing calls by clearing locations 01, 02, and 03
and place the phone in servicing level 001. In some phones this applies to memory locations 01
- 10.
002 The telephone will dial only numbers from memory locations. The keypad is disabled and super
speed dialing is not enabled.
003 Keypad dial only; no memory recall allowed.
004 Unlimited keypad and memory dialing. (DEFAULT)
005 Seven-digit dialing only
006 Full keypad and memory dialing, but memory locations 1 through 10 cannot be changed.
007 The phone will dial only from as many as 50 programmable memory locations
4. (step 10 above, suggested entry is: 00000100)
Digits 1 - 3
Not used in USA, enter 0.
Digit 4
Extended Field. When enabled, the telephone will scan more than 32 paging
channels. Not used in USA, 0 to disable
Digit 5
Single system scan, 1 to enable (scan A or B system only, determined by bit 2 of step
02. Set to "0" to allow user the option).
Digit 6
Super speed dial, 1 to enable (pressing N, or NN SND will dial the number stored in
memory location NN).
Digit 7
User selectable service level, 0 to enable (allows user to set long distance/memory
access dialing restrictions).
Digit 8
Lock function, 0 to enable (allows user to lock/un-lock the phone, if this is set to 1 the
phone can not be locked).
5. (step 11 above, suggested entry is: 00000000)
Digit 1:
Handset programming, 0 to enable (allows access to programming mode without having
to enter test mode).
Digit 2:
Second phone number (not all phones), 1 to enable.
Digit 3:
Call timer access, 0 to enable. (Not used in TDMA)
Digit 4:
Auto system busy redial, 0 to enable.
Digit 5:
Internal Speaker disable, 1 to enable (use with select VSP units only, do not use with 2000
series mobiles).
Digit 6:
IMTS/Cellular, 1 to enable (rarely used).
Digit 7:
User selectable system registration, 0 to enable.
Digit 8:
Dual antenna (diversity), 1 to enable.
6. (step 16 and 19 above, suggested entry is: 0011010 for portable and 0011011 for mobile units)
Digit 1:
Enhanced Scan, when enabled, four strongest signalling channels are scanned instead of
two. 1=enabled, 0-disabled.
Digit 2:
Cellular Connection, used only in series II phones if a series I cellular connection is used
with a series II. 0=series II, 1=series I, 0 for ALL TDMA PHONES
Digit 3:
Continuous DTMF, 1 to enable (software version 8735 and later)
Digit 4:
Transportable Internal Ringer/Speaker. When set to 0, audio is routed to the external
speaker of the transportable; 1 routes it to the handset.
Digit 5:
8 hour time-out, 0 to enable (software version 8735 and later)
Digit 6:
Not used, 0 only.
Digit 7:
Failed page indicator, 0 to enable (phone beeps when an incoming call is detected but
signal conditions prevent completion of the call).
Digit 8:
Portable scan, 0 for portable, 1 for mobile units.
11
TEST MODE COMMANDS:
#
1#
2#
3#
4#
5#
6#
7#
8#
no function
Restart (Re-enter DC power start-up routine.) On
TDMA phones, this command has the same effect as
pressing PWR button.
Display Current Telephone Status (This is a nonaltering version of the STATUS DISPLAY. On a 14
character display, all the information is shown. On a 7
character display only the information on the second
line of a 14 character display is shown. On a 10
character display, all the information on the second line
of a 14 character display plus the last three characters of
the first line are shown.)
STATUS DISPLAY, ALTERNATES BETWEEN:
AAA BBB AAA = Channel Number (decimal)
BBB = RSSI reading for channel
CDEFGHI are as follows:
•C = SAT frequency (0=5970, 1=6000, 2=6030, 3=no
channel lock)
•D = Carrier (0=off, 1=on)
•E = Signaling tone (0=off, 1=on)
•F = Power attenuation level (0 through 7)
•G = Channel mode (0=voice channel, 1=control
channel)
•H = Receive audio mute (0=unmuted, 1=muted)
•I = Transmit audio mute (0=unmuted, 1=muted)
Press * to hold display and # to end.
Reset Autonomous Timer. This command results in the
reset of the autonomous timer but does not provide any
test function on these models
Initializes Telephone to Standard Default Conditions:
Carrier Off, Power Level 0, Receiver Audio Muted,
Transmit Audio Muted, Signaling Tone Off, SAT Off,
Resetting of Watch-Dog Timer Enabled, DTMF and
Audio Tones Off, Audio Path Set to Speaker
TX Carrier On (Key Transmitter)
TX Carrier Off
RX Audio Off (Mute Receiver Audio)
RX Audio On (Unmute Receiver Audio)
NOTE: It seems Motorola finally discovered that people
were using this command to eaves-drop on cellular
converstions. On MOST of the newer phones (95xx and
up), this command when used with 11xxxx# will only
work with the following channels:
This is designed to prevent the phone from roaming onto
specified non-home systems and therefore reduce
"accidental" roaming fees.
1. C-Scan can only be programmed from test mode,
power phone up with the relevant test mode contact
grounded (see above).
2. Press # to access test mode
3. Press 18#, the phone will display "0 40000".
4. Enter the first inhibited system ID and press *.
or
18#
19#
20#
11xxxx# Tower Freq. Mobile Freq. Channel
9#
10#
11
12y
13#
14#
15#
16#
17#
18#
#300 Tx 879.00 Rx 834.00 0300
#333 Tx 879.99 Rx 834.99 0333
#385 Tx 881.55 Rx 836.55 0385
#799 Tx 893.97 Rx 848.97 0799
#991 Tx 869.04 Rx 824.04 0800
TX Audio Off
TX Audio On
(Ch.No.)# Set Transceiver to Channel xxxx (Receive
and Transmit in Decimal; accepts 1, 2, 3, or 4 digits)
x# Set Power Step to x; (0,1-7) 0=Maximum Power (3
Watts) 7=Minimum Power Out
Power Off (Shuts off the radio)
10 kHz Signaling Tone On
10 kHz Signaling Tone Off
Setup (Transmits a five word RECC message; each of
the five words will be "FF00AA55CC33." Transmitter
dekeys at the end of the message.)
Voice (Transmits a two word REVC message; each of
the two words will be "FF00AA55CC33." Transmitter
de-keys at the end of the message.)
C-Scan (Allows for entry of as many as 5 negative SID's
for each NAM.)
Newer Motorola phones are equipped with a feature
called C-Scan, this is an option along with the standard
A/B system selections. C-Scan allows the phone to be
programmed with up to five inhibited system ID's per
NAM.
21#
22#
23#
24#
25
26#
Continue to enter additional system ID's if required.
After the 5th entry the phone will display "N2". Press *
to continue and add system ID's for NAM 2 as required.
5. If an incorrect entry is made (outside the range of
00000-32767) the display will not advance, press
CLR and re-enter. Use a setting of 40000 for any
un-needed locations.
6. When the last entry has been made press * to store
and press # to exit, turn off power.
[**Phones without the C-Scan option used this
command to SEND NAM.**]
SEND NAM. Display shows AA BB. Where
AA=Address and BB=Data. Displays the contents of the
NAM, one address at a time, advanced by pressing the *
key. The following data is contained in NAM. The test
is exited by depressing the # key.
SIDH Sec. Code
OPT. (1,2,&3) MIN
MIN1, MIN2 FCHNA
SCM FCHNB
IPCH NDED
ACCOLC CHKSUM GIM
Display Software Version Number (yyww year and
week)
NOTE:Entering commands 20# through 23# or 27#
causes the transceiver to begin a counting sequence or
continuous transmission as described below. In order to
exit from the commands to enter another test command,
the # key must be depressed; all other key depressions
are ignored.
Receive control channel messages counting correctable
and uncorrectable errors. When the command starts, the
number of the command will be displayed in the upperright corner of the display. Entering a # key will
terminate the command and display two three-digit
numbers in the display. The first number is the number
of correctable errors and the second is the uncorrectable
errors.
Received voice channel messages counting correctable
and uncorrectable errors. When the command starts, the
number of the command will be displayed in the upper
right-hand corner of the display. Entering a # key
terminates the command and will display two three-digit
numbers in the display. The first is the number of
correctable errors and the second is the uncorrectable
errors.
Receive control channel messages counting word sync
sequence. When the command starts, the number of the
command will be displayed in the upper right-hand
corner of the display. Entering a # key will terminate the
command and display the number of word sync
sequences in the display.
Receive voice channel messages counting word sync
sequences. When the command starts, the number of the
command will be displayed in the upper right-hand
corner of the display. Entering a # key will terminate the
command and display the number of word sync
sequences in the display.
Receive control channel data and display the majority
voted busy/idle bit. 0=idle 1=busy
x# SAT On When x=0, SAT=5970HZ
x=1, SAT=6000HZ
x=2, SAT=6030HZ
SAT Off
12
27#
28#
29#
30#
31#
32#
33
34#
35#
35
36
37#
38#
Transmit Data (Transmits continuous control channel
data. All words will be "FF00AA55CC33." When the
command starts, '27' will be displayed in the right side
of the display. Entering a # key will terminate the
command. The transmitter de-keys when finished.)
Activate the high tone (1150 Hz +/- 55 Hz)
De-activate the high tone
Activate the low tone (770 Hz +/- 40 Hz)
De-activate the low tone
Clear (Sets non-volatile memory to zeroes or factory
default. This command will affect all counters, all
repertory memory including the last number called
stack, and all user programmable features including the
setting of System Registration. It does not affect the
ESN, NAM, phasing data, or lock code. This takes a
minute or so. DO NOT TURN OFF THE
TELEPHONE WHILE THIS IS SHOWING '32' ON
THE DISPLAY. WAIT UNTIL THE NORMAL
SERVICE LEVEL DISPLAY RESUMES!)
x# Turn on DTMF for x (1-9, *, 0, #, plus the single
tones) where x=
1 697 Hz + 1209 Hz 10 697 Hz
2 697 Hz + 1336 Hz 11 770 Hz
3 697 Hz + 1477 Hz 12 852 Hz
4 770 Hz + 1209 Hz 13 941 Hz
5 770 Hz + 1336 Hz 14 1150 Hz (not used in cellular)
6 770 Hz + 1477 Hz 15 1209 Hz
7 852 Hz + 1209 Hz 16 1336 Hz
8 852 Hz + 1336 Hz 17 1477 Hz
9 852 Hz + 1477 Hz 18 1633 Hz (not used in cellular)
* 941 Hz + 1209 Hz
0 941 Hz + 1336 Hz
# 941 Hz + 1477 Hz
Turn DTMF Off
Display RSSI ("D" Series Portable Only)
or
x# Set Audio Path to x x=0, V.S.P Microphone (Applies
to mobiles only.)
x=1, Speaker
x=2, Alert
x=3, Handset
x=4, Mute
x=5, External Telephone (Applies to Portables Only)
x=6, External Handset (Applies to NEWER Portables)
nnn# Scan (TDMA Telephones only. Scans the primary
control channels and attempts to decipher the forward
data stream. The display will show PASS1 if the
strongest control channel was accessed, PASS2 if the
second strongest was accessed, and FAIL if no control
channel could be accessed.)
(nnn=Scan speed in milliseconds). Tunes from channel
1 to 666 in order. Entering a * pauses the scan and
displays current Channel Number and RSSI reading
AAA=Channel Number and BBB=RSSI Reading).
When scan speed is 300 milliseconds or greater, the
current status is displayed during the scan; when less
than 300 milliseconds the status is displayed only
during pause. Entering * during a pause causes the scan
to resume. Entering #aborts the scan and leaves the
mobile tuned to the current channel. During this
command only the * and # keys are recognized.
Sets Low Battery Threshold. Usage: #37#x# where x is
any number from 1 to 255. If set to 1, the Low Battery
indicator will come up when the phone is powered on. If
set to 255, it may never come up.
Display ESN (Displays ESN in four steps, two
hexadecimal digits at a time in a for digit display. The
decimal shows the address, 00 through 03 as the first
two digits, and two digits of the ESN as the last two
digits. Use the 'G' to step through the entire hexadecimal
ESN.)
Compander OFF ("D" Series Portables)
or
13
39#
39#
40#
41#
42#
43#
44#
45#
46#
47
SND-SNM. Display shows AA BB. Where
AA=Address;BB=Data. Send the SNM to the display.
All 32 bytes of the SNM will be displayed, one byte at a
time. The byte address will be displayed in the upper
right-hand corner and the contents of that address will
be displayed in the hex. The * key is used to step
through the address similar to the SEND-NAM (18#)
command.
Compander ON ("D" Series Portables)
or
RCVSU. Receive one control channel word. When the
word is received it is displayed in hex. This command
will be complete when a control channel word is
received or when the # key is entered to abort the
command.
RCVVC. Receive one voice channel word. When the
word is received it is displayed in hex. This command
will be complete when a voice channel word is received
or when the # key is entered to abort the command.
Enables Diversity (On F19CTA... Series only.)
Disables Diversity (On F19CTA... Series only.)
Disable Diversity
USE T/R ANTENNA (On F19CTA... Series only.)
USE R ANTENNA (On D.M.T./ Mini TAC)
Disable Diversity
USE R ANTENNA (On F19CTA... Series only.)
USE T/R ANTENNA (On D.M.T./ Mini TAC)
Display Current RSSI (Displayed as a three-digit decimal number)
Display Cumulative Call Timer
x# Set RX Audio level to X
(For F19CTA ...Series Transceivers)
X=0, Lowest Volume
X=6, Highest Volume
X=7, mute
Normal setting is 4.
(For D.M.T./ Mini TAC Transceivers)
X=0, Lowest Volume
X=7, Highest Volume
Normal setting is 4.
(For TDMA Transceivers and F09F... Series and Higher
Portables)
48#
49#
50#
51#
52
X=0, Lowest Volume
X=15, Highest Volume
Normal setting is 2 to 4. (On TDMA Transceivers and
Micro TAC portables, settings 8 through 15 are for
DTMF applications only.)
Side Tone On. Use this command in conjunction with
350# to test the entire audio path in hands-free
applications
Side Tone Off
Maintenance data is transmitted and test results
displayed:
•PASS=received data is correct
•FAIL 1=2second timeout, no data rec.
•FAIL 2=received data is incorrect
Test of mobile where maintenance data is transmitted
and looped back.
Display is as follows:
•PASS=looped-back data is correct
•FAIL 1=2 second timeout, no looped-back data
•FAIL 2=looped-back data is incorrect
x# SAT Phase Adjustment. A decimal value that
corresponds to phase shift compensation in 4.5 degree
increments. Compensation added to inherent phase shift
in transceiver to achieve a total of 0 degrees phase shift.
Do NOT enter any values except those shown below.
0 degrees = 0 121.5 degrees = 59 243.0 degrees = 86
4.5 = 1 126.0 = 60 247.5 = 87
9.0 = 2 130.5 = 61 252.0 = 112
13.5 = 3 135.0 = 62 256.5 = 113
18.0 = 4 139.5 = 63 261.0 = 114
22.5 = 5 144.0 = 40 265.5 = 115
27.0 = 6 148.5 = 41 270.0 = 116
31.5 = 7 153.0 = 42 274.5 = 117
36.0 = 16 157.5 = 43 279.0 = 118
40.5 = 17 162.0 = 44 283.5 = 119
45.0 = 18 166.5 = 45 288.0 = 120
49.5 = 19 171.0 = 46 292.5 = 121
54.0 = 20 175.5 = 47 297.0 = 122
58.5 = 21 180.0 = 64 301.5 = 123
63.0 = 22 184.5 = 65 306.0 = 124
67.5 = 23 189.0 = 66 310.5 = 125
72.0 = 48 193.5 = 67 315.0 = 126
76.5 = 49 198.0 = 68 319.5 = 127
81.0 = 50 202.5 = 69 324.0 = 104
85.5 = 51 207.0 = 70 328.5 = 105
90.0 = 52 211.5 = 71 333.0 = 106
94.5 = 53 216.0 = 80 337.5 = 107
99.0 = 54 220.5 = 81 342.0 = 108
103.5 = 55 225.0 = 82 346.5 = 109
108.0 = 56 229.5 = 83 351.0 = 110
112.5 = 57 234.0 = 84 355.5 = 111
117.0 = 58 238.5 = 85 360.0 = 70
53#
54#
55#
56#
57
58#
59#
60#
61#
62#
63#
64#
65#
66#
Enable scrambler option, when equipped
Disable scrambler option, when equipped.
Display/Program
N.A.M.
(see
Test
Mode
Programming)
Illumination Diagnostic. Lights up all lights (except the
green in use light) and displays all "8"'s. The phone is
also muted until repowered.
x# Call Processing Mode
x=0, AMPS
x=1, NAMPS
x=2-4, RESERVED
x=5, TDMA signaling
x=6, TDMA signaling with loopback before decoding
x=7, TDMA signaling with loopback voice after
decoding
x=8, TDMA signaling with loopback FACCH after
decoding
x=9, TDMA forced synchronization
Compander On (Audio compressor and expander) (See
67#
68#
69#
70#
71#
72#
73#
80x
#
Compander Off (Audio compressor and expander) (See
38#)
no function
ESN Transfer (For Series I D.M.T./Mini TAC only)
Turn On Ringer Audio Path
Turn Off Ringer Audio Path
no function
no function
66# Identity Transfer (Series II Transceivers and some
Current Shipping Portables)
no function
Display FLEX and Model Information
Used with Identity Transfer
Abbreviated field transmitter audio deviation command,
for transceivers with FCC ID ABZ89FT5668.
Abbreviated field power adjustment command, for
transceivers with FCC ID ABZ89FT5668.
Field audio phasing commands
Field power adjustment command.
Current Identity Transfer Procedure. (Available in
telephones shipping after April 1, 1995.) This does
NOT transfer the ESN.
x=0, Transfers NAM information (On TDMA
telephones, this command also transfers C-Scan SID's.)
x=1, Transfers repertory memory (names & telephone
numbers in memory.)
x=2, Transfers C-Scan SID's on analog telephones (Not
available on TDMA telephones.)
GSM Info and Test Modes.
Thanks to Janus Krarup ([email protected] http://www.ibt.dk/morten/friends/) for all the
information in this section. His web page has all of this information (and more) and is continually
updated. It's also offered in Italian and will be available soon in Czech.
TESTMODE for GSM PHONES:
Start with the sequence:
Testmode Command#
[pause] [pause] [pause] [1] [1] [3] [pause] [1] [pause] [ok] [MENU] (pause is accomplished by holding
down the [*] key until box appears).
This accomplishes the editing/viewing of the Engineer Field Options. By substituting different
numbers for the [1] [1] [3], many more test mode commands and functions are available. (see below
for an almost complete list)
After pressing [MENU], scroll until the new option appears. Pressing [OK] will then reveal 3 new
options:
ACTIVE CELL:
Displays Active Channel and lets you scroll through: RxLev, RxLevAM, NCC, BCC, MSTxPwr, and
C1.
During a call you can see: RxLev, RxLevFull, RxLevSub, RxQualFul, RxQualSub, Timeslot,
TimeAdv, and PwrLev.
The active channel may read "Hopping" during a call.
When establishing a network connection you can see what SDCCH (Standalone Dedicated Control
CHannel) the negotiation takes place on.
ADJACENT CELLS:
Lets you scroll through the adjacent cells (1-6) and view their channel allocations.
SYSTEM PARAMETERS:
Displays the following: Combined, AcsClas, MCC, MNC, LAC, CellID, T3212, BS-PA-MFRM, and
XZQTY.
During a call you can see: Combined, DTX, MCC, MNC, LAC, and CellID.
Key To The Readouts:
Combined:
Haven't got a clue. The two Danish operators has OFF and Swedish Comviq has
ON.
14
RxLev:
The strength of the received signal (in dBm), normally between -55 and -90 - the
signal drops at RxLevAm
When comparing RxLev's, remember the logarithmic nature of the dB scale and
that the signal intensity decays by a factor of 4 when the distance from the BST is
doubled (assuming line of sight to the BST, the signal will drop 6 db when the
distance is doubled.)
Receive signal strength cut off point (around -100 dBm and -110 dBm).
Broadcast Color Code (0 through 7)
Network Color Code (0 through 7)
BTS transmit power in dBm (see notes on power control)
Measurement of the signal quality (bit failure). A forced handoff will be made if
C1<0. ( I have seen C1 as high as 039). This value is reported from MS back to the
BSC which decides when to make a handoff.
C1 value with continuous transmission from tower.
C1 value with discontinuous transmission from tower.
Bit error rate with continuous transmission from tower.
Bit error rate with discontinuous transmission from tower.
The current timeslot (0 through 7). TDMA allows eight channels to be
accommodated on a single RF carrier.
Timing advance (0 through 63). TA can be multiplied with 547 meters (35 km/64
TA steps) to get the distance to the BTS.
Shows which power step/level the phone is transmitting at (see section below on
power control)
Discontinuous transmission, a feature used to save battery and reduce network
traffic.
Mobile Country Code. 238=Denmark
Mobile Network Code. 1=Tele Denmark, 2=Sonofon (these are the ones for the
MCC 238).
Local Area Code. (not sure, but I could imagine it being the BSC identity).
A unique number that identifies the cell. (BTS identity)
Time between periodic network updates. Appears to be fixed (010 for Tele
Denmark and 050 for Sonofon).
RxLevAm:
BCC:
NCC:
MSTxPwr:
C1:
RxLevFull:
RxLevSub:
RxQualFull:
RxQualSub:
Timeslot:
TimeAdv:
PwrLev:
DTX:
MCC:
MNC:
LAC:
CellID:
T3212:
POWER CONTROL:
To minimize co-channel interference and to conserve power, both the mobiles and the Base
Transceiver Stations operate at the lowest power level that will maintain an acceptable signal quality.
Power levels can be stepped up or down in steps of 2 db from the peak power for the class down to a
minimum of 13 dBm (20 milliwatts).
Use this table to translate between dBm, PwrLev, and Power:
Power
Level
dBm
Watts
0
1
2
3
4
5
6
7
8
9
10
11
12
13
14
15
43
16
41
12.
8
39
8
37
5.2
35
3.2
33
2
31
1.3
29
0.8
27
0.5
25
0.3
2
23
0.2
21
0.1
3
19
0.0
8
17
0.0
5
15
0.0
3
13|
0.0
2|
If you can help out with deciphering the readouts, additional sequences or corrections please feel free
to contact Janus Krarup at [email protected].
15
Security Codes on the GSM phones:
The phones are protected by two codes:
The UNLOCK code which consists of 4 digits (default 1234)
This is changed by typing MENU 51 and providing the security code. You can type in wrong codes
until you hit the right one.
The SECURITY code which consists of 6 digits (default 000000)
This is changed by typing MENU 54 and providing the old code. Again, you can keep hitting bogus
codes all day until you get the right one (hope you got some time to kill).
The SIM card is protected by 2 codes:
The PIN code (Personal Identification Number) which consists of 4 to 8 digits.
The PIN code can only be typed in wrong 3 times (you heard right...3). After this the SIM card will be
blocked until the PUK code is used. The PIN code is user definable. It can be changed by providing
the old PIN code or the PUK code. There is a menu for changing the PIN code by providing the old
one, but you can also type **04* in order to do so. To enter a whole new PIN on a blocked card or
without knowing the old PIN, you need to use **05* PUK (OK) NEWPIN (OK) NEWPIN (OK)
The PUK code (Personal Unblocking Key) consists of 8 digits.
This is set by the network provider and can not be changed. If entered wrongly 10 times, the card will
become permanently blocked and will need to be replaced.
Undocumented Menu shortcuts (7500, 8200, and maybe the 5200 and 7200)
Menu + XX
11
13
14
Status Review
Available networks
Preferred networks
21
22
25
26
Incoming call alert
Select keypad tones
Require SIM card PIN
Language selection
32
33
34
35
36
Repetitive timer
Single alert timer
Show meter during calls
Resettable call meters
Resettable call meters
37
38
Set call cost rates
Reset all meters
41
43
44
Keypad dialing (call restrictions)
Restrict incoming calls
Phone number length
51
52
53
54
55
Change unlock code
Master reset
Master clear
New security code
Automatic lock
63
Battery saving mode
16
Test Mode Functions:
3
4
5
6
7
8
9
10
11
12
13
14
15
16
17
18
19
20
21
22
23
24
25
26
27
28
29
30
31
32
33
34
35
36
37
38
39
40
41
42
43
44
45
46
47
48
49
50
51
52
53
54
55
56
57
17
MENU-phone book
MENU-messages
mute on/off (menu during call)
MENU-Call related features
MENU-"arrows"
select phone line
last ten calls•
restrict my phone number
call diverting
divert when available
Detailed diverting
Divert voice calls
Divert ALL voice calls
If Busy
If no answer
If not reachable
Divert fax calls
Divert Data calls
Cancel all diverting
Call waiting
Call barring
Bar outgoing calls
Bar incoming calls
Change Barr password
Call restrictions
Restrict incoming calls
Phone number length
Keypad dialing
Call voicemail
Received messages
Cell broadcast
Message settings
Message alert tone
Voicemail number
Incoming call alert
No alert
Vibrate only
Adjust ring volume
Lock now
Automatic lock
Change unlock code
Require SIM card PIN
Change SIM PIN code
New security code
Extended menus
Language selection
Automatic (Language Selection)
Change greeting
Battery saving mode
Select keypad tones
Phone status
Status review
Master reset
Master clear
Available networks
58
59
60
61
62
63
64
65
66
67
68
69
70
71
72
73
74
Network search
Registration preferences
Frequency of search•
Preferred networks
Add network to list
Show list of networks
Find new network
Show last call
Resettable call timers
Set audible call timers
Single alert timers
Repetitive timer
**1 = register write lock!!!•
Show meter during calls
Set meter format
Set call cost rates
Lifetime meter
81
82
83
84
85
86
87
88
89
90
91
92
93
94
95
Find entry by name
Find entry by location
Show services
Enter my phone number
Show my phone number
Add entry
Check phone capacity
Check SIM capacity
Prevent access
Edit name (my phone number)
Edit number (my phone number)
MENU - Call related features
MENU - Phone setup
MENU - Network selection
MENU - Call meters
99
100
101
102
103
104
105
106
107
108
Periodic search
Continuous search
Slow search
Medium search
Fast search
MENU - Phonebook
MENU - Phonebook
MENU - Messages
MENU - Messages
Copy SIM memory
110
111
112
113
Edit number (direct dial key)
Edit name (direct dial key)
Direct dial key
MENU - Eng Field Options
126
erase all numbers (last 10)
HACKING THE FOVC
Problem: When listening to something interesting (a conversation), just when that sexy sounding
horny broad begins to give her phone number to some lucky guy, HANDOFF!!! then static... DAMN!
Trick: Hack the FOVC.
FOVC FOward Voice Channel
FOCC FOward Control Channel
REVC REverse Voice Channel
RECC REverse Control Channel
As the phone travels through cells, the FOVC is where the tower tells the phone to adjust power levels
for the current cell or to change to a new channel for use in the new cell. This info can be hacked
apart. So. When you've found a good conversation, don't be lazy! Enter 40#! This makes the phone
listen for commands on the voice channel (embedded in the audio portion- you can hear it as a
"bump" sound). It will just sit there and the display will read '40' , but the conversation will still be
audible. Now when the phone receives a FOVC command (a 40 bit sequence) data will flow across the
display, in hex format, and stop. Listen to the phone, if the conversation is still there, then the
command was only to adjust power levels. If the conversation is gone, then its a handoff. If you only
got a power adjustment command just press # or clr, which ever gets you back to the ' prompt. Enter
40# and keep listening. You can also use the # key to cancel the 40# command, if you want to change
channels or something.
If it was a handoff, its time for some quick math. You have to convert some of the numbers to binary,
and then to decimal. I don't know how many characters your phone's display will show. Mine only
shows the last seven of the ten hex digits. Count left from the end 6 digits. Write down that digit and
the next two on a piece of paper, ie:
???j16djjj
j=junk numbers (hex numbers range from 0-9,a-f)
⇑
these are lost due to scrolling
write down 16d then convert it to a binary string:
1 = 0001
6 = 0110
d = 1101 (d=13)
now you have a binary string like this:
throw away the first 2 bits and get:
convert this to decimal and get:
000101101101
0101101101
365
365 is the new channel the conversation has moved to! Enter 110365# and viola! You too, can hear
the horny babe's phone number!
Don't forget to enter 40# again, as the call may be moving quickly through cells ( small cells or
freeway driving ) or the call can get bounced around by the tower for cell traffic purposes.
Here's one more example of the hex>binary>decimal conversion.
???j5aejjj
5 = 0101
a = 1010
e = 1110
full string
010110101110
truncate 2 msb
0110101110
convert to decimal
430
18
Assembling a _QUALITY_ Motorola Flip programming cable
from a standard battery eliminator.
Written by KG/Control Team/Umf 02/07/94
Word. It seems that alot of bad cables are being sold by some lame asses here on the west coast. The
result, alot of _rare_ LO phonez are being fried. Welp, this file should clear things up. Even if you've
never made anything but clay pots this should be easy for ya. Take your time and this, along with your
phone will last a lifetime...
Parts:
(1) 550 Battery Eliminator
(2) IN4001 Diodes
(1) Head pins(single row straight stick headers)
(1) DB25/RS232 Connector for connection to LPT1
(1) METAL DB25 cover/protector
(1) 1 1/2 foot of 5 line ribbon
(1) jumper wire (be creative)
Tools:
Scissors (I like scissors for splicing wires)
Soldering Iron
Hot glue gun (borrow mom's)
Exacto knife (optional)
DMM w/continuity
I'll try and be as verbose as possible. All references to the plastic part that connects the phone to the
cable will be known here as the ADAPTER. The hardest thing to find, at least in where I am, is a
battery eliminator that has all 8 pins on the ADAPTER. So if ya do have a cable with all the pins you
can skip this paragraph. What I did was to go ahead and shell out the 35 duckets for a battery
eliminator that only had pin's 7 & 8 (power) on the ADAPTER. Go to you local electronics shop and
pick up a pack of head pins. These puppies are the EXACT same thing as what's in the ADAPTER,
'cept their nickel instead of copper. Cut 4 of them off the plastic but be careful not to bend them when
you do so.
Carefully pry off the cover of the ADAPTER and use the exacto knife to get the pins and attached
wires out of the cover. Otherwise you'll end up melting the cover, and trashing the project. Now desolder the wires connected to pins 7 & 8, wrap then with 2 of the ribbon's leads then re-solder them
back to the same pins. Once again, be careful not to bend them. Now solder the other 4 ribbon lead to
the pins 1, 4-6. Now carefully put each pin back into the ADAPTER cover, if some of the holes are
filled with resin (batt eliminator), simply push an _extra_ bridge pin thru to get that shit out! Make a
note of their colors, then take the DMM and go over all the connections, making sure that no pin one
pin on the ADAPTER is _touching another: 1-4, 2-8, 4-6 ect... * note that pins 7 & 8 will show values
from due to the voltage regulator inside the ciggy plug.
Fire up that hot glue gun and place some on the cover to make sure those pins/ wires / solder don't
move around when ya put the ADAPTER back together. Don't put too much on or you wont be able to
close it. Wait a min or 2 until that dries, then throw some glue into the ADAPTER and quickly close
it up.
As for the DB25 you shouldn't have any trouble. Just make sure you solder the Diode to the wire
before soldering it the port. Remember parallel pin specs are not the same as serial!!
19
This cable will work with the 6.6, 9.11 & 9.9 software. This means that without a) AMPS or b) The
Trick Clip you'll need to find a Flip that has a firmware revision equal to or below 9122. A good sign
that the phone is indeed a LO, is to check the ESN located on the back and look for any prefix below
A2A. If you can't locate the ESN sticker, usually cause it's stolen, then look for a MCsquared printed
along with the menu sticker. If the phone has the MC2 don't buy it. If the phone doesn't have the
menu sticker don't buy it! Also before you fork over the $$$ make sure that all the ports on the phone
are in good condition.
Some people may experience problems with 486 machines. I'm looking into slowing the shit down in
order for the phone to respond. One way is to divide your BIOS bus clock by 6, another is to load a
TSR that actually slows your CPU, although I haven't yet found this to work for me. 286-386
processors work fine. Short cables are a must!
20
From: [email protected]
Date: Thu, 20 Oct 1994 09:53:54 GMT (altered Thu, 23 Mar 1995)
Anyway, I hope this helps, you CANNOT program the phones without twisting/connecting the
additional 19 & 20 DB25 connections.
21
Pinouts for Motorola 8000 “brick” phone - “N” series
numbering starts on top row left
pin
1
2
3
4
5
6
Signal
logic ground
not used
audio in to phone
audio out (and on/off toggle)
4.75 Bias
Manual test line
7
8
9
10
11
12
Ground for audio signals (common)
TRU data line
not used
CMP data line
RTN data line
ignition sense
15 pin cable pinouts
PIN
1
2
3
4
5
6
7
8
9
10
11
12
13
14
15
DESIGNATION/FUNCTION
Battery A+, red wire
Transmit Audio / ON-OFF Function, a shared line between Audio (AC) and ground. This line will
toggle the ON/OFF status of the telephone.
Ground (A+ return), black wire
Ignition Sense Lead, green with a black tracer
Receiver Audio (RX High), to handset connector pin 8
Regulated +9.5 volts, to handset connector pin 2
T-Data, one of the 3-wire bus lines, to handset connector pin 3
C-Data, one of the 3-wire bus lines, to handset connector pin 4
Digital Hands-Free Microphone / Manual Test. When the pin is grounded, which can be done by
shorting the two connectors of the Hands-Free microphone, the unit is enabled to work in TEST MODE.
R-Data, one of the 3-wire bus lines, to handset connector pin 5
Handset Logic Ground, to handset connector pin 1
Speaker High \ Only on SKN4279A and SKN4277A
Speaker Low /
Handset Audio Ground, to handset connector pin 6
Auxiliary Alert, yellow lead with a black tracer, used to blow the horn or flash the headlights. Provides
a ground for the relay; maximum current is 1/2 amp. It is *N O T* recommended that this circuit be
used to drive the horn or headlights directly.
OEM 32 pin cable pinouts
16 15 14 13 12 11 10 9 8 7 6 5 4 3 2 1
+----------------------------------------------+
Note: Looking into connector C |* * * * * * * * * * * * * * * *|
on the transceiver with the D |* * * * * * * * * * * * * * * *|
antenna port down. +----------------------------------------------+
Pin#
Designation/Function Row C
Pin#
Designation/Function Row D
1
Battery A+
1
Not Used
2
Ignition Sense
2
Antenna Drive (for power antenna)
3
Status Display Control
3
Not Used
4
Not Used
4
Auxiliary Alert, used to blow the horn or flash the
headlights through a relay
5
Ground (A+ Return)
5
Not Used
6
GM Proprietary Serial Data Bus 6
GM proprietary serial bus
7
Audio Ground, from GM Audio 7
Audio Ground (not connected)
bus to telephone
8
Low level audio, from telephone 8
Low Level Audio (not used)
to GM Audio bus
9
Not used
9
Manual Test Line; when grounded this line enables TEST
MODE
10
Not used
10
RX High
11
Mobile / Transportable select 11
Ground (TX Shield)
line
12
Handset Logic Ground
12
Regulated +9.5 volts
13
T-Data, one of the 3-wire bus 13
C-Data, one of the 3-wire bus lines
lines
14
R-Data, one of the 3-wire bus
14
Audio Ground
lines
15
TX High / ON-OFF
15
Ground (Rx Shield)
16
VSP Microphone High
16
VSP Microphone Ground
22
CVC BLOCK
[ 1] [ 2] [ 3] [ 4] [ 5] [ 6]
[ 7] [ 8] [ 9] [10] [11] [12]
1
2
3
4
5
6
VSP Enable
SPKR Enable
TX HI on/off
RX HI
RX HI OPT
MAN TEST
7
8
9
10
11
12
GROUND
S TRU
AUX Alert
SCMP
S RTN
IGN
New External Connector for the Ultra Classic II CVC Pinblocks
Pin
1
3
Designation/Function
Regulated 8 volts
ext. switched A+
enable
ext. spkr/mic enable
TX hi - on/off
T Data
5
7
9
11
2
4
6
8
10
12
R Data
Audio Ground
manual test
ignition / charger B+
RX hi
C Data
logic ground
Pinouts for Motorola series 2 and 3 transceivers 25 pin cable pin definitions
Pin
1
2
3
4
5
6
7
8
9
10
11
12
13
14
15
23
Designation/Function
Transmit Audio / ON - OFF
Function
Mobile / Transportable Select line
Ground (A+ return), one of 2 black
wires. Both are required for proper
operation
Battery A+, one of 2 red wires. Both
are required for proper operation.
Ignition Sense Lead, green with a
black tracer
Receiver Audio to handset (RX
High), pin 8 on the handset
connector
Ground
Regulated +9.5 volts to handset, pin
2 on handset connector
Ground
Auxiliary Alert, yellow with black
tracer, used to blow the horn or flash
the headlights. Provides a ground
function. NOTE: 1/2 amps maximum
current. The recommended method is
to drive a relay (e.q. MOT
59K813674). Ignition Sense, pin 5,
must be low for this function to
work.
T-Data, one of the 3-wire bus lines,
to pin 3 of the handset connector.
C-Data, one of the 3-wire bus lines,
to pin 4 of the handset connector.
Ground
Transmit Audio Shield
Transmit Audio
16
17
18
19.
20
21
22
23
24
25.
Battery A+, one of two red wires.
Both are required for proper
operation.
Ground, one of two black wires. Both
are required for proper operation.
R-Data, one of the 3-wire bus lines,
to pin 5 of the handset connector.
Receiver Audio to External Speaker
Ground for Receiver Audio (Shield)
to External Speaker.
Manual Test Line. When tied low
places the telephone in TEST
MODE.
Ground
Handset Logic Ground, to handset
connector pin 1
Handset Audio Ground, to handset
connector pin 6
Accessory Ground, to External
Speaker
Flip Fones and all fones using the dpc/pt flip cable
12345678+G|||||||| |||
(looking at back of phone with battery removed)
Pin
1
2
3
4
5
6
7
8
Function
Logic Ground
Ext. 7.5V
TRU
CMP
RTN
Audio Ground
RX Audio OUT (spkr)
(on/off)
TX Audio IN (mic)
Motorola / AMPS handset specifications:
RJ-45
1
2
3
4
5
6
7
8
DB-25
23
8
11
12
18
24
1
6
Description
ground
9.5v
3-wire databus “true”
complimentary line
return data line
audio ground
Tx Audio
Rx Audio
Motorola ESN ranges
The range of ESN numbers may be used to identify the type of Motorola Fone.
From
To
Type
8200 0000
8280 0000
82A0 0000
827F FFFF
829F FFFF
82DF FFFF
AMPS
NAMPS (Narrow AMPS)
AMPS
82E0 0000
82FF FFFF
TDMA
C300 0000
C37F FFFF
AMPS
C380 0000
C3BF FFFF
NAMPS
[Check with your system operator to verify your cellular switch is capable of operating with ESN's in
all of these ranges. There have been situations in the past where the switch software was not updated
to recognize the new ESN ranges, and customers were unable to complete phone calls as a result.]
24
Cellular Frequency List
Chan
#
1
2
3
4
5
6
7
8
9
10
11
12
13
14
15
16
17
18
19
20
21
22
23
24
25
26
27
28
29
30
31
32
33
34
35
36
37
38
39
40
41
42
43
44
45
46
47
48
49
50
51
52
53
54
55
56
57
58
59
60
61
62
63
64
65
66
67
68
69
70
25
Tx Freq
Mhz
870.03
870.06
870.09
870.12
870.15
870.18
870.21
870.24
870.27
870.30
870.33
870.36
870.39
870.42
870.45
870.48
870.51
870.54
870.57
870.60
870.63
870.66
870.69
870.72
870.75
870.78
870.81
870.84
870.87
870.90
870.93
870.96
870.99
871.02
871.05
871.08
871.11
871.14
871.17
871.20
871.23
871.26
871.29
871.32
871.35
871.38
871.41
871.44
871.47
871.50
871.53
871.56
871.59
871.62
871.65
871.68
871.71
871.74
871.77
871.80
871.83
871.86
871.89
871.92
871.95
871.98
872.01
872.04
872.07
872.10
Rx Freq
Mhz
825.03
825.06
825.09
825.12
825.15
825.18
825.21
825.24
825.27
825.30
825.33
825.36
825.39
825.42
825.45
825.48
825.51
825.54
825.57
825.60
825.63
825.66
825.69
825.72
825.75
825.78
825.81
825.84
825.87
825.90
825.93
825.96
825.99
826.02
826.05
826.08
826.11
826.14
826.17
826.20
826.23
826.26
826.29
826.32
826.35
826.38
826.41
826.44
826.47
826.50
826.53
826.56
826.59
826.62
826.65
826.68
826.71
826.74
826.77
826.80
826.83
826.86
826.89
826.92
826.95
826.98
827.01
827.04
827.07
827.10
Chan
#
334
335
336
337
338
339
340
341
342
343
344
345
346
347
348
349
350
351
352
353
354
355
356
357
358
359
360
361
362
363
364
365
366
367
368
369
370
371
372
373
374
375
376
377
378
379
380
381
382
383
384
385
386
387
388
389
390
391
392
393
394
395
396
397
398
399
400
401
402
403
Tx Freq
Mhz
880.02
880.05
880.08
880.11
880.14
880.17
880.20
880.23
880.26
880.29
880.32
880.35
880.38
880.41
880.44
880.47
880.50
880.53
880.56
880.59
880.62
880.65
880.68
880.71
880.74
880.77
880.80
880.83
880.86
880.89
880.92
880.95
880.98
881.01
881.04
881.07
881.10
881.13
881.16
881.19
881.22
881.25
881.28
881.31
881.34
881.37
881.40
881.43
881.46
881.49
881.52
881.55
881.58
881.61
881.64
881.67
881.70
881.73
881.76
881.79
881.82
881.85
881.88
881.91
881.94
881.97
882.00
882.03
882.06
882.09
Rx Freq
Mhz
835.02
835.05
835.08
835.11
835.14
835.17
835.20
835.23
835.26
835.29
835.32
835.35
835.38
835.41
835.44
835.47
835.50
835.53
835.56
835.59
835.62
835.65
835.68
835.71
835.74
835.77
835.80
835.83
835.86
835.89
835.92
835.95
835.98
836.01
836.04
836.07
836.10
836.13
836.16
836.19
836.22
836.25
836.28
836.31
836.34
836.37
836.40
836.43
836.46
836.49
836.52
836.55
836.58
836.61
836.64
836.67
836.70
836.73
836.76
836.79
836.82
836.85
836.88
836.91
836.94
836.97
837.00
837.03
837.06
837.09
71
72
73
74
75
76
77
78
79
80
81
82
83
84
85
86
87
88
89
90
91
92
93
94
95
96
97
98
99
100
101
102
103
104
105
106
107
108
109
110
111
112
113
114
115
116
117
118
119
120
121
122
123
124
125
126
127
128
129
130
131
132
133
134
135
136
137
138
139
140
141
142
872.13
872.16
872.19
872.22
872.25
872.28
872.31
872.34
872.37
872.40
872.43
872.46
872.49
872.52
872.55
872.58
872.61
872.64
872.67
872.70
872.73
872.76
872.79
872.82
872.85
872.88
872.91
872.94
872.97
873.00
873.03
873.06
873.09
873.12
873.15
873.18
873.21
873.24
873.27
873.30
873.33
873.36
873.39
873.42
873.45
873.48
873.51
873.54
873.57
873.60
873.63
873.66
873.69
873.72
873.75
873.78
873.81
873.84
873.87
873.90
873.93
873.96
873.99
874.02
874.05
874.08
874.11
874.14
874.17
874.20
874.23
874.26
827.13
827.16
827.19
827.22
827.25
827.28
827.31
827.34
827.37
827.40
827.43
827.46
827.49
827.52
827.55
827.58
827.61
827.64
827.67
827.70
827.73
827.76
827.79
827.82
827.85
827.88
827.91
827.94
827.97
828.00
828.03
828.06
828.09
828.12
828.15
828.18
828.21
828.24
828.27
828.30
828.33
828.36
828.39
828.42
828.45
828.48
828.51
828.54
828.57
828.60
828.63
828.66
828.69
828.72
828.75
828.78
828.81
828.84
828.87
828.90
828.93
828.96
828.99
829.02
829.05
829.08
829.11
829.14
829.17
829.20
829.23
829.26
404
405
406
407
408
409
410
411
412
413
414
415
416
417
418
419
420
421
422
423
424
425
426
427
428
429
430
431
432
433
434
435
436
437
438
439
440
441
442
443
444
445
446
447
448
449
450
451
452
453
454
455
456
457
458
459
460
461
462
463
464
465
466
467
468
469
470
471
472
473
474
475
882.12
882.15
882.18
882.21
882.24
882.27
882.30
882.33
882.36
882.39
882.42
882.45
882.48
882.51
882.54
882.57
882.60
882.63
882.66
882.69
882.72
882.75
882.78
882.81
882.84
882.87
882.90
882.93
882.96
882.99
883.02
883.05
883.08
883.11
883.14
883.17
883.20
883.23
883.26
883.29
883.32
883.35
883.38
883.41
883.44
883.47
883.50
883.53
883.56
883.59
883.62
883.65
883.68
883.71
883.74
883.77
883.80
883.83
883.86
883.89
883.92
883.95
883.98
884.01
884.04
884.07
884.10
884.13
884.16
884.19
884.22
884.25
837.12
837.15
837.18
837.21
837.24
837.27
837.30
837.33
837.36
837.39
837.42
837.45
837.48
837.51
837.54
837.57
837.60
837.63
837.66
837.69
837.72
837.75
837.78
837.81
837.84
837.87
837.90
837.93
837.96
837.99
838.02
838.05
838.08
838.11
838.14
838.17
838.20
838.23
838.26
838.29
838.32
838.35
838.38
838.41
838.44
838.47
838.50
838.53
838.56
838.59
838.62
838.65
838.68
838.71
838.74
838.77
838.80
838.83
838.86
838.89
838.92
838.95
838.98
839.01
839.04
839.07
839.10
839.13
839.16
839.19
839.22
839.25
143
144
145
146
147
148
149
150
151
152
153
154
155
156
157
158
159
160
161
162
163
164
165
166
167
168
169
170
171
172
173
174
175
176
177
178
179
180
181
182
183
184
185
186
187
188
189
190
191
192
193
194
195
196
197
198
199
200
201
202
203
204
205
206
207
208
209
210
211
212
213
214
215
216
217
874.29
874.32
874.35
874.38
874.41
874.44
874.47
874.50
874.53
874.56
874.59
874.62
874.65
874.68
874.71
874.74
874.77
874.80
874.83
874.86
874.89
874.92
874.95
874.98
875.01
875.04
875.07
875.10
875.13
875.16
875.19
875.22
875.25
875.28
875.31
875.34
875.37
875.40
875.43
875.46
875.49
875.52
875.55
875.58
875.61
875.64
875.67
875.70
875.73
875.76
875.79
875.82
875.85
875.88
875.91
875.94
875.97
876.00
876.03
876.06
876.09
876.12
876.15
876.18
876.21
876.24
876.27
876.30
876.33
876.36
876.39
876.42
876.45
876.48
876.51
829.29
829.32
829.35
829.38
829.41
829.44
829.47
829.50
829.53
829.56
829.59
829.62
829.65
829.68
829.71
829.74
829.77
829.80
829.83
829.86
829.89
829.92
829.95
829.98
830.01
830.04
830.07
830.10
830.13
830.16
830.19
830.22
830.25
830.28
830.31
830.34
830.37
830.40
830.43
830.46
830.49
830.52
830.55
830.58
830.61
830.64
830.67
830.70
830.73
830.76
830.79
830.82
830.85
830.88
830.91
830.94
830.97
831.00
831.03
831.06
831.09
831.12
831.15
831.18
831.21
831.24
831.27
831.30
831.33
831.36
831.39
831.42
831.45
831.48
831.51
476
477
478
479
480
481
482
483
484
485
486
487
488
489
490
491
492
493
494
495
496
497
498
499
500
501
502
503
504
505
506
507
508
509
510
511
512
513
514
515
516
517
518
519
520
521
522
523
524
525
526
527
528
529
530
531
532
533
534
535
536
537
538
539
540
541
542
543
544
545
546
547
548
549
550
884.28
884.31
884.34
884.37
884.40
884.43
884.46
884.49
884.52
884.55
884.58
884.61
884.64
884.67
884.70
884.73
884.76
884.79
884.82
884.85
884.88
884.91
884.94
884.97
885.00
885.03
885.06
885.09
885.12
885.15
885.18
885.21
885.24
885.27
885.30
885.33
885.36
885.39
885.42
885.45
885.48
885.51
885.54
885.57
885.60
885.63
885.66
885.69
885.72
885.75
885.78
885.81
885.84
885.87
885.90
885.93
885.96
885.99
886.02
886.05
886.08
886.11
886.14
886.17
886.20
886.23
886.26
886.29
886.32
886.35
886.38
886.41
886.44
886.47
886.50
839.28
839.31
839.34
839.37
839.40
839.43
839.46
839.49
839.52
839.55
839.58
839.61
839.64
839.67
839.70
839.73
839.76
839.79
839.82
839.85
839.88
839.91
839.94
839.97
840.00
840.03
840.06
840.09
840.12
840.15
840.18
840.21
840.24
840.27
840.30
840.33
840.36
840.39
840.42
840.45
840.48
840.51
840.54
840.57
840.60
840.63
840.66
840.69
840.72
840.75
840.78
840.81
840.84
840.87
840.90
840.93
840.96
840.99
841.02
841.05
841.08
841.11
841.14
841.17
841.20
841.23
841.26
841.29
841.32
841.35
841.38
841.41
841.44
841.47
841.50
218
219
220
221
222
223
224
225
226
227
228
229
230
231
232
233
234
235
236
237
238
239
240
241
242
243
244
245
246
247
248
249
250
251
252
253
254
255
256
257
258
259
260
261
262
263
264
265
266
267
268
269
270
271
272
273
274
275
276
277
278
279
280
281
282
283
284
285
286
287
288
289
290
291
292
876.54
876.57
876.60
876.63
876.66
876.69
876.72
876.75
876.78
876.81
876.84
876.87
876.90
876.93
876.96
876.99
877.02
877.05
877.08
877.11
877.14
877.17
877.20
877.23
877.26
877.29
877.32
877.35
877.38
877.41
877.44
877.47
877.50
877.53
877.56
877.59
877.62
877.65
877.68
877.71
877.74
877.77
877.80
877.83
877.86
877.89
877.92
877.95
877.98
878.01
878.04
878.07
878.10
878.13
878.16
878.19
878.22
878.25
878.28
878.31
878.34
878.37
878.40
878.43
878.46
878.49
878.52
878.55
878.58
878.61
878.64
878.67
878.70
878.73
878.76
831.54
831.57
831.60
831.63
831.66
831.69
831.72
831.75
831.78
831.81
831.84
831.87
831.90
831.93
831.96
831.99
832.02
832.05
832.08
832.11
832.14
832.17
832.20
832.23
832.26
832.29
832.32
832.35
832.38
832.41
832.44
832.47
832.50
832.53
832.56
832.59
832.62
832.65
832.68
832.71
832.74
832.77
832.80
832.83
832.86
832.89
832.92
832.95
832.98
833.01
833.04
833.07
833.10
833.13
833.16
833.19
833.22
833.25
833.28
833.31
833.34
833.37
833.40
833.43
833.46
833.49
833.52
833.55
833.58
833.61
833.64
833.67
833.70
833.73
833.76
551
552
553
554
555
556
557
558
559
560
561
562
563
564
565
566
567
568
569
570
571
572
573
574
575
576
577
578
579
580
581
582
583
584
585
586
587
588
589
590
591
592
593
594
595
596
597
598
599
600
601
602
603
604
605
606
607
608
609
610
611
612
613
614
615
616
617
618
619
620
621
622
623
624
625
886.53
886.56
886.59
886.62
886.65
886.68
886.71
886.74
886.77
886.80
886.83
886.86
886.89
886.92
886.95
886.98
887.01
887.04
887.07
887.10
887.13
887.16
887.19
887.22
887.25
887.28
887.31
887.34
887.37
887.40
887.43
887.46
887.49
887.52
887.55
887.58
887.61
887.64
887.67
887.70
887.73
887.76
887.79
887.82
887.85
887.88
887.91
887.94
887.97
888.00
888.03
888.06
888.09
888.12
888.15
888.18
888.21
888.24
888.27
888.30
888.33
888.36
888.39
888.42
888.45
888.48
888.51
888.54
888.57
888.60
888.63
888.66
888.69
888.72
888.75
841.53
841.56
841.59
841.62
841.65
841.68
841.71
841.74
841.77
841.80
841.83
841.86
841.89
841.92
841.95
841.98
842.01
842.04
842.07
842.10
842.13
842.16
842.19
842.22
842.25
842.28
842.31
842.34
842.37
842.40
842.43
842.46
842.49
842.52
842.55
842.58
842.61
842.64
842.67
842.70
842.73
842.76
842.79
842.82
842.85
842.88
842.91
842.94
842.97
843.00
843.03
843.06
843.09
843.12
843.15
843.18
843.21
843.24
843.27
843.30
843.33
843.36
843.39
843.42
843.45
843.48
843.51
843.54
843.57
843.60
843.63
843.66
843.69
843.72
843.75
26
293
294
295
296
297
298
299
300
301
302
303
304
305
306
307
308
309
310
311
312
313
314
315
316
317
318
319
320
321
322
323
324
325
326
327
328
329
330
331
332
333
667
668
669
670
671
672
673
674
675
676
677
678
679
680
681
682
683
684
685
686
687
688
689
690
691
692
693
694
695
696
697
698
699
700
27
878.79
878.82
878.85
878.88
878.91
878.94
878.97
879.00
879.03
879.06
879.09
879.12
879.15
879.18
879.21
879.24
879.27
879.30
879.33
879.36
879.39
879.42
879.45
879.48
879.51
879.54
879.57
879.60
879.63
879.66
879.69
879.72
879.75
879.78
879.81
879.84
879.87
879.90
879.93
879.96
879.99
890.01
890.04
890.07
890.10
890.13
890.16
890.19
890.22
890.25
890.28
890.31
890.34
890.37
890.40
890.43
890.46
890.49
890.52
890.55
890.58
890.61
890.64
890.67
890.70
890.73
890.76
890.79
890.82
890.85
890.88
890.91
890.94
890.97
891.00
833.79
833.82
833.85
833.88
833.91
833.94
833.97
834.00
834.03
834.06
834.09
834.12
834.15
834.18
834.21
834.24
834.27
834.30
834.33
834.36
834.39
834.42
834.45
834.48
834.51
834.54
834.57
834.60
834.63
834.66
834.69
834.72
834.75
834.78
834.81
834.84
834.87
834.90
834.93
834.96
834.99
845.01
845.04
845.07
845.10
845.13
845.16
845.19
845.22
845.25
845.28
845.31
845.34
845.37
845.40
845.43
845.46
845.49
845.52
845.55
845.58
845.61
845.64
845.67
845.70
845.73
845.76
845.79
845.82
845.85
845.88
845.91
845.94
845.97
846.00
626
627
628
629
630
631
632
633
634
635
636
637
638
639
640
641
642
643
644
645
646
647
648
649
650
651
652
653
654
655
656
657
658
659
660
661
662
663
664
665
666
717
718
719
720
721
722
723
724
725
726
727
728
729
730
731
732
733
734
735
736
737
738
739
740
741
742
743
744
745
746
747
748
749
750
888.78
888.81
888.84
888.87
888.90
888.93
888.96
888.99
889.02
889.05
889.08
889.11
889.14
889.17
889.20
889.23
889.26
889.29
889.32
889.35
889.38
889.41
889.44
889.47
889.50
889.53
889.56
889.59
889.62
889.65
889.68
889.71
889.74
889.77
889.80
889.83
889.86
889.89
889.92
889.95
889.98
891.51
891.54
891.57
891.60
891.63
891.66
891.69
891.72
891.75
891.78
891.81
891.84
891.87
891.90
891.93
891.96
891.99
892.02
892.05
892.08
892.11
892.14
892.17
892.20
892.23
892.26
892.29
892.32
892.35
892.38
892.41
892.44
892.47
892.50
843.78
843.81
843.84
843.87
843.90
843.93
843.96
843.99
844.02
844.05
844.08
844.11
844.14
844.17
844.20
844.23
844.26
844.29
844.32
844.35
844.38
844.41
844.44
844.47
844.50
844.53
844.56
844.59
844.62
844.65
844.68
844.71
844.74
844.77
844.80
844.83
844.86
844.89
844.92
844.95
844.98
846.51
846.54
846.57
846.60
846.63
846.66
846.69
846.72
846.75
846.78
846.81
846.84
846.87
846.90
846.93
846.96
846.99
847.02
847.05
847.08
847.11
847.14
847.17
847.20
847.23
847.26
847.29
847.32
847.35
847.38
847.41
847.44
847.47
847.50
701
702
703
704
705
706
707
708
709
710
711
712
713
714
715
716
991
992
993
994
995
996
997
998
999
1000
1001
1002
1003
1004
1005
1006
1007
1008
1009
1010
1011
1012
1013
1014
1015
1016
1017
1018
1019
1020
1021
1022
1023
891.03
891.06
891.09
891.12
891.15
891.18
891.21
891.24
891.27
891.30
891.33
891.36
891.39
891.42
891.45
891.48
869.04
869.07
869.10
869.13
869.16
869.19
869.22
869.25
869.28
869.31
869.34
869.37
869.40
869.43
869.46
869.49
869.52
869.55
869.58
869.61
869.64
869.67
869.70
869.73
869.76
869.79
869.82
869.85
869.88
869.91
869.94
869.97
870.00
846.03
846.06
846.09
846.12
846.15
846.18
846.21
846.24
846.27
846.30
846.33
846.36
846.39
846.42
846.45
846.48
824.04
824.07
824.10
824.13
824.16
824.19
824.22
824.25
824.28
824.31
824.34
824.37
824.40
824.43
824.46
824.49
824.52
824.55
824.58
824.61
824.64
824.67
824.70
824.73
824.76
824.79
824.82
824.85
824.88
824.91
824.94
824.97
825.00
751
752
753
754
755
756
757
758
759
760
761
762
763
764
765
766
767
768
769
770
771
772
773
774
775
776
777
778
779
780
781
782
783
784
785
786
787
788
789
790
791
792
793
794
795
796
797
798
799
892.53
892.56
892.59
892.62
892.65
892.68
892.71
892.74
892.77
892.80
892.83
892.86
892.89
892.92
892.95
892.98
893.01
893.04
893.07
893.10
893.13
893.16
893.19
893.22
893.25
893.28
893.31
893.34
893.37
893.40
893.43
893.46
893.49
893.52
893.55
893.58
893.61
893.64
893.67
893.70
893.73
893.76
893.79
893.82
893.85
893.88
893.91
893.94
893.97
847.53
847.56
847.59
847.62
847.65
847.68
847.71
847.74
847.77
847.80
847.83
847.86
847.89
847.92
847.95
847.98
848.01
848.04
848.07
848.10
848.13
848.16
848.19
848.22
848.25
848.28
848.31
848.34
848.37
848.40
848.43
848.46
848.49
848.52
848.55
848.58
848.61
848.64
848.67
848.70
848.73
848.76
848.79
848.82
848.85
848.88
848.91
848.94
848.97