1
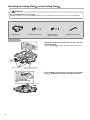
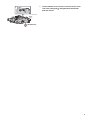
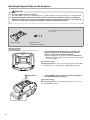
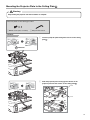
ELPMB25
User’s Guide
Contents
Included Items List . . . . . . . . . . . . . . . . . . . . . . . . . . . . . . . . . . . . . . . . . . . . . . . . . . . . . . . . . . . . . . . . 3
Safety Instructions . . . . . . . . . . . . . . . . . . . . . . . . . . . . . . . . . . . . . . . . . . . . . . . . . . . . . . . . . . . . . . . . 4
Precautions on Where to Mount the Projector. . . . . . . . . . . . . . . . . . . . . . . . . . . . . . . . . . . . . . . . . . 5
Installation . . . . . . . . . . . . . . . . . . . . . . . . . . . . . . . . . . . . . . . . . . . . . . . . . . . . . . . . . . . . . . . . . . . . . . . 6
Installing the Ceiling Plate
and Ceiling Plate
Mounting the Ceiling Plate
on the Ceiling Plate
on the Ceiling . . . . . . . . . . . . . . . . . . . . . . . . . . . . . . . . . . . . 6
.............................................8
Mounting Projector Plate on the Projector . . . . . . . . . . . . . . . . . . . . . . . . . . . . . . . . . . . . . . . . . . . . . . . . . . . . . 10
Mounting the Projector Plate to the Ceiling Plate
. . . . . . . . . . . . . . . . . . . . . . . . . . . . . . . . . . . . . . . . . . . . . 11
Adjusting the Position of the Projected Image . . . . . . . . . . . . . . . . . . . . . . . . . . . . . . . . . . . . . . . . 13
Shifting the Projected Image Up or Down . . . . . . . . . . . . . . . . . . . . . . . . . . . . . . . . . . . . . . . . . . . . . . . . . . . . . 14
Shifting the Projected Image to the Right or Left . . . . . . . . . . . . . . . . . . . . . . . . . . . . . . . . . . . . . . . . . . . . . . . . 16
Adjusting the Projected Image's Horizontal Roll . . . . . . . . . . . . . . . . . . . . . . . . . . . . . . . . . . . . . . . . . . . . . . . . . 17
Installing the Ceiling Plate Cover . . . . . . . . . . . . . . . . . . . . . . . . . . . . . . . . . . . . . . . . . . . . . . . . . . . 18
Inquiries . . . . . . . . . . . . . . . . . . . . . . . . . . . . . . . . . . . . . . . . . . . . . . . . . . . . . . . . . . . . . . . . . . . . . . . . 19
Specifications . . . . . . . . . . . . . . . . . . . . . . . . . . . . . . . . . . . . . . . . . . . . . . . . . . . . . . . . . . . . . . . . . . . 19
2
Low Profile Ceiling Mount
Included Items List
Check the following list and confirm that you have all of the supplied items. If there is anything missing or damaged, please
contact your dealer.
Y Ceiling plate
Stacked on the c eiling plate
and attached on the ceiling
together.
Y Ceiling plate
Stacked under the ceiling
plate
and attached on the
ceiling together.
Y Ceiling plate
Mounted on the ceiling plate .
Used to adjust the projector's
vertical/horizontal angle.
They are stacked temporarily when packed.(sp.6)
Y Projector plate
Attached on the projector.
Y Ceiling plate cover
Covers the ceiling plates.
Y M8x10 screws (mm)
Y M4x10 screws (mm; w/ washer)
Y M4x10 screws (mm; w/o washer)
Y Ball point hex wrench
Y User's Guide (this manual)
Y Document CD-ROM
Y M4x12 screws
(mm; pan, w/ washer)
Prepare commercially available anchor bolts and nuts necessary to attach the plates to the ceiling. (sp.6)
3
Safety Instructions
For your safety, read the attached documents carefully to assemble and install this product correctly. Be sure to follow the
safety precautions. After you have read all instructions, keep this information for later reference.
So that you can use the product safely and correctly, the following symbols are used to show dangerous operation or
handling. The indications and their meaning are as follows. Make sure you understand them before reading the guide.
Warning
This symbol indicates information that, if ignored, could possibly
result in serious personal injury or even death due to incorrect
handling.
Caution
This symbol indicates information that, if ignored, could possibly
result in personal injury or physical damage due to incorrect
handling.
Carefully read the warnings in "Safety Instructions/Support and Service Guide" supplied with your projector before starting the
installation to determine a suitable place to install it.
Warning
v The installation work should be performed only by specialists with the required technical know-how and ability.
Be sure to follow the instructions of this manual when installing this product.
Otherwise, the product may fall, and which may cause injury or an accident.
v At least two people are needed for the installation. Make sure to provide a sturdy scaffold for this work.
Otherwise, you may fall or drop this product and may cause injury.
v This product weighs about 3.5kg. Be careful when moving or transporting the product.
v Do not install the product on an unstable ceiling or a surface at an angle.
The ceiling must be strong enough to install the projector and this product. Before installation, carefully check the weight
of the projector and this product. Make sure to keep the enough strength of the ceiling and use the most appropriate
methods to prevent the projector and this product from falling.
v Do not set up this product in places where they might be subjected to vibration or shock.
Otherwise, the screws may be loosened and they may fall, which may cause injury or an accident.
v Do not set up this product in the following places. Doing so may cause fire, electric shock, or an accident.
• In places where there is a lot of humidity or in places such as outdoors or in bathroom where the product may come in
contact with water or rain.
• In places where there is a lot of humidity or dust, or in places such as near cooking or heating appliances where the
product may come in contact with oily or cigarette smoke, or steam.
v Always follow the instruction below to install this product. If installation is not carried out correctly, the projector
and this product may fall and cause injury.
• Check the structure and materials of the mounting location and use the most appropriate construction method.
• Do not hang or mount anything except the specified projector from or on this product. Projectors that can be mounted
on this product are listed in the catalogs.
• Do not hang from or apply excessive force to this product during or after installation.
• Be sure to tighten the screws firmly. Also, never loosen or remove any screws carelessly when mounting or removing
this product.
• Never disassemble or modify this product unless otherwise indicated in this manual.
v When loosening screws or the adjustment dials during installation, take care not to let this product fall.
Tighten all the screws and adjustment dials firmly after adjustment.
Otherwise, the product may fall, and which may cause injury or an accident.
v Never loosen any bolts, screws, or nuts after installation. Also check periodically that no screws have come
loose. If you find a loose screw, retighten it firmly.
Otherwise, the product may fall, and which may cause injury or an accident.
v Applying threadlocker, lubricant, oil or other substance to the points at which the projector is fixed to this
product may make the case crack and the projector may fall, and which may cause injury or an accident. Do not
use any sort of adhesive, lubricant, or oil when installing or adjusting this product.
v Be sure to turn off the projector when installing it. Also, do not plug or unplug the cables with wet hands.
Doing so may cause fire, or electric shock.
4
Warning
v Do not strongly pull or pinch the projector's power cable during installation. Do not modify the power cable or
use any damaged cable.
Doing so may cause fire or electric shock.
If the power cable is damaged (exposed conductor, breaking or the like), contact your dealer or Epson customer service
call center.
v Disconnect the power cable from the projector before cleaning. When cleaning it, do not use a moistened cloth or
solvents such as alcohol, thinner or benzine.
Doing so may cause damage, fire, or electric shock.
Clean the product using a damp, tightly wrung out cloth.
v Under the following conditions, do not use this product, but contact your dealer or Epson customer service call
center.
• If you dropped or broke the product before or during installation
• If the supplied parts is abnormal or do not function normally
Caution
Do not install the projector in places where the temperature may rise or fall out of the projector's operating
temperature range.
Doing so may cause damage to the projector.
Precautions on Where to Mount the Projector
Carefully read the warnings in "Safety Instructions / Support and Service Guide" supplied with your projector before starting
the installation to determine a suitable place to install it. In particular, pay attention to the following.
v Avoid installing the projector in a place where the receiver for the remote control may be exposed to direct sunlight or
strong light from fluorescent lamps. If strong light shines onto the receiver, remote control may not operate normally.
v Do not install the projector near the exhaust duct of an air conditioner.
v To limit the effect of external noises, it is recommended that the projector should be installed in a place so that the cables
connected to a computer or other devices can be shorter than 20 meters.
v Determine the mounting position leaving enough space to maintain the projector such as cleaning and replacing the
consumables.
5
Installation
Installing the Ceiling Plate
and Ceiling Plate
on the Ceiling
Determine the distance to the screen and locate the mounting position before mounting the ceiling plates. Refer to "Ceiling
template" below for the size of the ceiling plate
and the location of screw holes and their size.
The projection distance to the screen varies according to the projector. Refer to "User's Guide" supplied with the projector
or lens unit.
Caution
Be careful about where to mount the ceiling plates. Because depending on projectors, the center of the lens is not identical
with the center of the projector. Refer to "User's Guide" supplied with the projector.
Ceiling template (units: mm)
Set this cutout to the screen.
Necessary items for the following procedure
Prepare commercially available anchor bolts and
tools necessary to attach the plates.
Y Ceiling plate
Y Ceiling plate
Y Ball point hex wrench
Procedure
A
6
Refer to "Ceiling template" and cut the bolt-mounting holes into the ceiling.
Select the appropriate holes on the ceiling plates according to the material and the structure of the ceiling.
B
Remove the tape which secures the ceiling plate
and the
ceiling plate . Then loosen the screws (not until they come
off) that secure the plates with the ball point hex wrench.
Tape
Loosen these.
Cutouts
C
Attach the ceiling plate
and ceiling plate
Set the cutouts to the screen.
on the ceiling.
Caution
Take care not to catch the cables on or between the plates.
Route the cables through the
center hole of the plates.
f Typical installation case [Mounting to a Concrete Ceiling]
When installing the ceiling plates on a concrete ceiling, use four anchor bolts. Please prepare commercially available anchor
bolts.
Warning
v Make sure in advance that the concrete on which this product is installed can hold the weight and lateral
movement of the projector and ceiling mount. If the concrete is not strong enough or has deteriorated, fortify
it with reinforcing bars or something similar.
v Install the anchor bolts according to the specifications and methods of the manufacturer of the materials so
they do not come out, become loose, or shift.
v Tighten the screws firmly during installation or after adjusting the angles.
After tightening the screws, retighten them firmly and make sure that they are not loose.
v Epson accepts no responsibility for the projector and the ceiling mount falling due to inadequate installation.
Female type anchors
Concrete
Ceiling surface
Hanger bolts
Flat washers
Hexagon nut
At least 3 threads
But not more than 17 mm, otherwise it touches the
plate.
Spring washers
Hexagon nut
7
Mounting the Ceiling Plate
on the Ceiling Plate
Warning
Be sure to tighten the screws securely.
After tightening the screws, try re-tightening them once again and make sure that all of them are securely tightened.
Necessary items for the following procedure
Y Ceiling plate
Y M8x10 screws (mm)
Y M4x10 screws
(mm; w/ washer)
Y Ball point hex wrench
Procedure
A
Engage the screw holes onto the screws on the rear side of
the ceiling plate .
Set the ceiling plate
with the adjustment dials to the screen.
To the screen
Adjustment dials
Route the cables through the
center hole of the plates.
B
Do the same
for the other side.
To the screen
8
Insert the M8x10 screws into the screw holes on the ceiling
plate
and tighten them with the ball point hex wrench.
C
Insert the M4x10 screws into the screw holes on the screen
side of the ceiling plate
and tighten them with the ball
point hex wrench.
To the screen
Secure these.
9
Mounting Projector Plate on the Projector
Warning
v Be sure to tighten the screws securely.
After tightening the screws, try re-tightening them once again and make sure that all of them are securely tightened.
v Applying threadlocker, lubricant, oil or other substance to the points at which the projector is fixed to this
product may make the case crack and the projector may fall, and which may cause injury or an accident. Do
not use any sort of adhesive, lubricant, or oil when installing or adjusting this product.
Necessary items for the following procedure
Prepare a commercially available Phillips screwdriver necessary to
attach the plate.
Y Projector plate
Y M4x12 screws
(mm; pan, w/ washer)
Procedure
Set this part to the rear of the projector. *
A
Set the projector plate on the projector as shown in the
figure, and align the screw holes on the plate with the
projector's screw holes for the ceiling mount.
* When installing the projector plate on the EH-R4000/R2000/
R1000, the installation direction is the other way around of what
you see in the figure.
Caution
Depending on projectors, the screw holes for the projector plate differ.
For the details, refer to "User's Guide" supplied with the projector.
Secure these.
B
Insert the M4x12 screws into the screw holes and tighten
them with the Phillips screwdriver.
Caution
When securing the projector and the projector plate, be sure to use
the included M4x12 screws.
10
Mounting the Projector Plate to the Ceiling Plate
Warning
Keep holding the projector until the installation is complete.
Necessary items for the following procedure
Y M4x10 screws (mm; w/ washer)
Y Ball point hex wrench
Procedure
A
Insert the projector plate through the cutouts on the ceiling
plate .
White line
B
Slide the projector plate and engage the dowels on the
projector plate into the cutouts on the ceiling plate .
Dowel
Cutout
11
Secure these.
C
Insert the M4x10 screws into the screw holes on the
projector plate and tighten them with the ball point hex
wrench.
Angle adjustment should be done later, so there's no need to
firmly tighten the screws.
Warning
Do not pull the cables forcibly.
Do the same
for the other side.
When adjusting the angle of the projector, refer to "Adjusting the Position of the Projected Image" in the next section.
12
Adjusting the Position of the Projected Image
If the projected image is not fit to the screen, adjust the projection position as follows.
v Adjustment by the Lens Shift (for projectors with the lens shift function only)
Adjust the projection position by the lens shift function of the projector. For the details on the lens shift, refer to "User's Guide"
supplied with the projector.
v Adjusting the Installation Angle
The projection position can be adjusted by tilting or rotating the projector. Adjustment can be done within the following
ranges.
Vertical tilt adjustment: 0 to -8°
(sp.14)
Horizontal rotation adjustment: -3 to 3°
(sp.16)
Horizontal roll adjustment:
-2.5 to 2.5°
(sp.17)
If the projector is tilted, the projected image may become distorted into a trapezoidal shape. This distortion can be corrected
by the keystone adjustment. However, if the tilting angle becomes larger, focusing the image becomes difficult. For the details
on the lens shift and keystone adjustment, refer to "User's Guide" supplied with the projector.
Necessary item for the following procedures
Y Ball point hex wrench
When reversing the projected image upside down, select the following from the projector's configuration menu.
[Settings] (or [Extended]) - [Projection]
This setting method may differ depending on projectors. For the details, refer to "User's Guide" supplied with the projector.
13
Shifting the Projected Image Up or Down
Warning
v Keep holding the projector until the installation is complete.
v Do not loosen or remove the screws carelessly during vertical tilt adjustment.
The projector may fall and cause an accident.
v Do not apply extra force to the plate or projector during adjusting the plates.
The projector or plates may fall and cause an accident.
v After the adjustment, try re-tightening all the screws again and make sure that all of them are securely
tightened.
Procedure
Loosen these.
A
If the screws are tightened, slightly loosen the four screws
using the ball point hex wrench.
Do the same
for the other side.
B
Raise or lower the projector manually and roughly adjust the
projection position.
You can fine tune the position downwards in Step 4, so adjust the
position slightly higher at this point of the adjustment.
Support the projector at the angle as it was adjusted until
secured temporarily.
14
Tighten these temporarily.
C
While supporting the projector, tighten the four screws
temporarily with the ball point hex wrench.
Do not tighten the screws too much at this point.
Do the same
for the other side.
D
Adjust the angle while lowering the projected image by
turning the adjustment dial
.
If the projected image is lowered too much, go back to Step 1
and try again.
Secure these.
E
After angle adjustment is complete, tighten the four screws
firmly using the ball point hex wrench.
Do the same
for the other side.
15
Shifting the Projected Image to the Right or Left
Warning
v Keep holding the projector until the installation is complete.
v Do not loosen or remove the screws carelessly during horizontal rotation adjustment.
The projector may fall and cause an accident.
v Do not apply extra force to the plate or projector during adjusting the plates.
The projector or plates may fall and cause an accident.
v After the adjustment, try re-tightening all the screws again and make sure that all of them are securely
tightened.
Procedure
16
Loosen these.
A
Adjust these.
B
If the screws are tightened, loosen the two screws using the
ball point hex wrench.
While tightening the screws with the ball point hex wrench,
fine tune the position.
Adjusting the Projected Image's Horizontal Roll
Warning
v Keep holding the projector until the installation is complete.
v Do not loosen or remove the screws carelessly during horizontal roll adjustment.
The projector may fall and cause an accident.
v Do not apply extra force to the plate or projector during adjusting the plates.
The projector or plates may fall and cause an accident.
v After the adjustment, try re-tightening all the screws again and make sure that all of them are securely
tightened.
Procedure
Loosen these.
A
B
If the screws are tightened, slightly loosen the two screws
using the ball point hex wrench.
Adjust the angle by turning the adjustment dial
adjustment dial
.
Adjustment dial
Adjustment dial
Secure these.
C
or
: Lowers the right side of the projected image.
: Lowers the left side of the projected image.
After angle adjustment is complete, tighten the two screws
firmly using the ball point hex wrench.
17
Installing the Ceiling Plate Cover
Install the ceiling plate cover after adjusting the installation angles as necessary if you want to coordinate the colors of the
projector and the ceiling.
Necessary items for the following procedure
Y Ceiling plate cover
Y M4x10 screws
(mm; w/o washer)
Y Ball point hex wrench
Procedure
A
Insert the ceiling plate cover to the rear side.
Use the piece with a cutout to cover the rear side.
Cutout
Secure this.
Do the same
for the other side.
18
B
Insert the M4x10 screws into the screw holes on the ceiling
plate cover and tighten them with the ball point hex wrench.
C
D
Secure this.
Insert the other piece for the screen side and fit it to the
ceiling plate cover for the rear side.
Insert the M4x10 screws into the screw holes on the ceiling
plate cover and tighten them with the ball point hex wrench.
Do the same
for the other side.
Caution
Removal, installation, and adjustment for repair or maintenance of the projector should be performed only by specialists with
the required technical know-how and ability. For information about repair or maintenance of the projector, refer to "User's
Guide" supplied with the projector.
Inquiries
Inquiries can be directed to the contact information given in "User's Guide" supplied with the projector.
Specifications
Dimensions
342 (W) x 55 (H) x 230 (D) mm (including ceiling plate cover)
Weight
Adjustable range
Approx. 3.5 kg (including ceiling plate cover)
Vertical tilt adjustment
0 to -8°
Horizontal roll adjustment
-2.5 to 2.5°
Horizontal rotation adjustment
-3 to 3°
Vertical tilt adjustment
Horizontal roll adjustment
Horizontal rotation adjustment
19