1
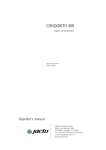
47002 Rev 1
3/6/03
2.02 PM
Page 1
Your two year guarantee
It is important to retain the retailers receipt
as proof of purchase. Staple your receipt to
this back cover for future reference.
Please quote the following information if
the product develops a fault. These numbers
can be found on the base of the product.
Model no.
Serial no.
All Morphy Richards products are
individually tested before leaving the factory.
In the unlikely event of any appliance proving
to be faulty within 28 days of purchase it
should be returned to the place of purchase
for it to be replaced.
If the fault develops after 28 days and
within 24 months of original purchase, you
should contact the Helpline number quoting
Model number and Serial number on the
product, or write to Morphy Richards at the
address shown.
You will be asked to return the product (in
secure, adequate packaging) to the address
below along with a copy of proof of
purchase.
Subject to the exclusions set out below (see
Exclusions) the faulty appliance will then be
repaired or replaced and dispatched usually
within 7 working days of receipt.
If for any reason this item is replaced
during the 2 year guarantee period, the
guarantee on the new item will be calculated
from original purchase date. Therefore it is
vital to retain your original till receipt or
invoice to indicate the date of initial
purchase.
To qualify for the 2 year guarantee the
appliance must have been used according to
the manufacturers instructions. For example
kettles should have been regularly descaled.
EXCLUSIONS
Morphy Richards shall not be liable to
replace or repair the goods under the terms
of the guarantee where:
1 The fault has been caused or is
attributable to accidental use, misuse,
negligent use or used contrary to the
manufacturers recommendations or where
the fault has been caused by power
surges or damage caused in transit.
2 The appliance has been used on a voltage
supply other than that stamped on the
products.
3 Repairs have been attempted by persons
other than our service staff (or authorised
dealer).
4 Where the appliance has been used for
hire purposes or non domestic use.
5 Morphy Richards are not liable to carry
out any type of servicing work, under the
guarantee.
6 Plastic filters for all Morphy Richards
kettles and coffee makers are not covered
by the guarantee.
This guarantee does not confer any rights
other than those expressly set out above and
does not cover any claims for consequential
loss or damage. This guarantee is offered as
an additional benefit and does not affect your
statutory rights as a consumer.
• This guarantee is valid in the UK and
Ireland only.
Morphy Richards products are intended for
household use only.
Morphy Richards has a policy of continuous
improvement in product quality and design.
The company, therefore reserves the right
to change the specification of its models at
any time.
The After Sales Division
Registered address
Morphy Richards Ltd, Mexborough
South Yorkshire, England, S64 8AJ
Helpline (office hours)
UK (local rate) 0870 060 2610
Republic of Ireland 1800 409119
CM47002M Rev 1
Downloaded from CoffeeMachineManual.com Manuals
47002 Rev 1
3/6/03
2.02 PM
Page 2
Cafe Rico 10 cup filter coffee maker
with frother
Please read and keep these instructions
getting the best from
your new coffee maker
• Safety first
Caution must be used when handling hot water, coffee or steam.
• Run water through your machine before first use
It is important to run water through your coffee maker in order to
rinse the machine. You can also run water through to warm your
coffee machine.
• Descale as appropriate for the hardness of the
water in your area
It is important to descale as the performance of your coffee
maker may be impaired by limescale and other impurities in the
water supply.
www.morphyrichards.co.uk
Downloaded from CoffeeMachineManual.com Manuals
47002 Rev 1
3/6/03
2.02 PM
Page 3
Important safety
instructions
• Do not operate any appliance with a
damaged cord or plug or after the
appliance malfunctions or has been
damaged in any manner. Ring the
helpline number for advice on
examination and repair.
• The use of attachments or tools not
recommended or sold by Morphy
Richards may cause fire, electric shock
or injury.
• Do not use abrasive cleaners on the
outside of the coffee maker, they may
scratch the surface. Clean only with a
soft damp cloth.
• Do not use the coffee maker for anything
other than its intended purpose.
The use of any electrical appliance
requires the following common sense safety
rules.
Primarily there is danger of injury or
death and secondly the danger of damage
to the appliance. These are indicated in the
text by the following two conventions:
WARNING: Danger to the person!
IMPORTANT: Damage to the appliance! In
addition we offer the following safety advice.
Location
Product safety
• Remove all the packaging and retain for
future reference.
• Ensure the coffee maker is used on a
firm, flat surface.
• Do not use the coffee maker outdoors or
in a bathroom.
• Do not place the coffee maker on a
highly polished wooden surface as
damage may occur to the surface.
• Do not place the coffee maker on or near
hot surfaces such as a hot plate or
radiant rings or near a naked flame.
• WARNING: Do not place the coffee
maker onto a metal tray or metal
surface whilst in use.
• Never use warm or hot water to fill the
water reservoir.
• Do not overfill the water reservoir.
Treating scalds
• Run cold water over the affected area
immediately. Do not stop to remove
clothing, get medical help quickly.
Personal safety
• Ensure the lid of the glass jug is securely
in place before pouring.
• Take care to pour hot coffee slowly and
carefully without tipping the glass jug too
fast.
• Do not place the glass jug on the hot
plate unless the lid is in position.
• Do not fill above the capacity mark of the
water level gauge.
• Do not use the glass jug in a microwave.
• Milk should not be reheated, only heat it
when required.
• When heating milk, please use stainless
steel jug provided.
• Do not fill milk jug above the MAX mark.
• Do not adjust the coffee strength once
brewing is in process.
Children
• Children do not understand the dangers
associated with operating electrical
appliances. Never allow children to use
this appliance.
Other safety considerations
• Disconnect the coffee maker from the
mains supply when filling, cleaning or
not in use.
• Keep the outside of the coffee maker
area clean and dry at all times.
• Do not touch hot surfaces. Always use
handles or knobs.
• Do not immerse the coffee maker itself in
water and always ensure the electrical
connections are kept dry.
2
Downloaded from CoffeeMachineManual.com Manuals
47002 Rev 1
3/6/03
2.02 PM
Page 4
Electrical requirements
WARNING: The plug removed from the
mains lead, if severed, must be destroyed
as a plug with bared flexible cord is
hazardous if engaged into a live socket
outlet.
Check that the voltage on the rating plate
of your appliance corresponds with your
house electricity supply which must be A.C.
(Alternating current).
Should the fuse in the 13 amp plug
require changing a 13 amp BS1362 fuse
must be fitted.
For appliances with fitted plug.
If the socket outlets in your home are not
suitable for the plug supplied with this
appliance the plug should be removed and
the appropriate one fitted.
WARNING: THIS APPLIANCE MUST BE
EARTHED.
Filter locating tab
Hinged reservoir
lid with strength
indicator
Removable permanent
mesh filter
Removable
filter holder
with locking
tab
Water level
indicator
Jug lid
Glass jug with
water level
indicator
Non drip valve
Milk frother
button
Frother
attachment
Measuring
spoon
Milk frother jug
Hot plate
Frother hotplate on/off switch with indicator
Hot plate
Coffee on/off switch with power & ready indicators
The first time you use your coffee maker
Before using your coffee maker the first time,
operate the coffee maker with water only.
3
Downloaded from CoffeeMachineManual.com Manuals
47002 Rev 1
3/6/03
2.02 PM
Page 5
Making coffee
7 Plug the filter coffee maker in at the wall
socket and push the coffee on/off switch
to ‘ON’ position. The orange light will
glow to show coffee maker is working.
8 Hot water will start to flow through the
coffee grounds and into the glass jug as
coffee.
1 Lift up the hinged reservoir lid.
2 Fill the water reservoir with the required
amount of water using the water level
indicator as a guide. Both the jug and
water level indicator are marked in cups.
Do not exceed the maximum level on the
water gauge.
Frothing milk
It is advised to start heating your milk
ready for frothing when you start making
coffee.
1 Fill the stainless steel milk jug provided
with the required amount of milk. Do not
exceed the maximum level.
2 Place the jug on the hot plate and push
the frother hot plate on/off switch to ‘ON’
position.
3 Once the coffee is brewed (the green
ready light will glow). The milk is ready
to froth. Lift the milk jug up to the milk
frother blade (see diagram). Raise the
milk jug ensuring that the frother blade is
just under the surface of the milk - this
will give the maximum froth. Push and
release the milk frother button. TAKE
CARE AS THE MILK WILL BE HOT. When
the milk is frothy, which normally takes
around 30 seconds, press the milk
frother button once more to stop the
frother.
3 Spoon the required amount of ground
filter coffee into the mesh filter spreading
it evenly. We suggest one level
measuring spoon for every cup. Ensure
the filter is sitting properly in the filter
holder.
4 Close the reservoir lid.
5 Select the strength of coffee required
using the strength selector on the
reservoir lid.
6 Slide the jug into the coffee maker
ensuring it sits correctly on the hot plate.
The jug lid must be in place during the
brewing process, otherwise the non-drip
valve will not open, causing the filter to
flood.
4
Downloaded from CoffeeMachineManual.com Manuals
47002 Rev 1
3/6/03
2.02 PM
Page 6
4 Pour the coffee into cups and gently
pour or preferably spoon the milk onto
the coffee, then sprinkle a little chocolate
powder. Turn off the milk frother hot plate
by pressing the neon on/off switch.
7 Allow unit to cool.
8 Remove the permanent mesh filter and
empty the used coffee grounds. Wash
the filter immediately and dry thoroughly.
NOTE: THE MESH WILL BECOME
DISCOLOURED AFTER A WHILE DUE
TO THE STAINING EFFECT OF
COFFEE.
Warning: the stainless steel jug and
the hotplate will remain hot for sometime
after switching off.
Refilling
The milk frother blade can be removed
for easy cleaning by unscrewing the blade
and wash carefully in hot soapy water. It is
recommended that you remove the blade
immediately after use, as dried milk can be
difficult to remove. To replace insert the
stem of the milk frother blade into the
mounting hole on the unit and screw into
place.
1 Switch off the coffee maker and allow 3
minutes to cool before refilling with cold
water.
Locating the filter
1 To remove the filter, slide the locking tab
on the removable filter holder to the
unlock position and and lift both the
holder and mesh filter out to clean. (see
cleaning)
Locking
tab
Rib
There may be some splash back of milk
on the underside of the frothing unit. Switch
the unit off then simply wipe this area clean
with a damp cloth.
2 To refit, place the removable filter holder
into the top of your coffee maker, making
sure the tab lines up with the rib then
slide the locking tab to the lock position.
Place the permanent mesh filter inside
the filter holder by lining up the locating
tab with the groove in the filter holder as
shown.
5 The anti-drip valve will prevent any
remaining coffee dripping onto the hot
plate. Ensure that the jug is replaced on
the hot plate after serving. While the
coffee maker is switched ON the hot
plate will keep the coffee warm.
6 Switch off the coffee maker when the jug
is empty or the coffee is no longer
required.
WARNING: The coffee maker and hot
plates are hot and remain hot for
some time after switching off.
5
Downloaded from CoffeeMachineManual.com Manuals
47002 Rev 1
3/6/03
2.02 PM
Page 7
Recipes
Irish coffee
Makes 4 servings
75ml of double cream
4 tsp sugar
8 shots of Irish whiskey
700ml hot strong coffee
Cafe Melange
2 parts coffee
1 part hot milk
dollop whipped cream
1 Whip double cream until thick then chill.
2 Warm 4 Irish coffee glasses with hot
water and place in each a teaspoon of
sugar and 2 shots of Irish whiskey.
3 Divide coffee among the glasses.
4 Slowly dribble the chilled cream over the
back of the spoon.
5 Do not stir.
1 Prepare filter coffee as per ‘making
coffee’ instructions.
2 Fill the stainless steel milk jug with the
required amount of milk, place on the
hotplate and switch on. The milk will take
approx. 7 minutes to reach the
appropriate temperature.
3 Once the coffee and milk are ready, pour
2 parts coffee into a cup and add 1 part
milk.
4 Top with a dollop of whipped cream to
serve.
Amaretto coffee
250ml hot strong coffee
2 tablespoons of double or whipped cream
2 shots of Amaretto
sugar to taste
Cafe Frappe
250ml cold strong coffee
1-2 tablespoons of condensed milk or
single cream
large splash of vanilla essence
crushed ice
1 Stir the coffee and alcohol together
either with a couple of tablespoons of
double-cream, or top with a dollop of
whipped cream.
2 Sprinkle with grated chocolate and
serve.
1 Combine ingredients in a blender until
smooth.
2 Serve in a tall glass.
Coffee milkshake
Combine in a blender or cocktail shaker:
100ml of cold strong filter coffee
1 scoop of vanilla icecream
250ml milk
grated chocolate
sugar to taste
double shot of Amaretto liqueur (optional)
1 Blend or shake until thick and frothy.
2 Serve in a tall glass and top with grated
chocolate.
• Note: for a thicker shake reduce the
quantity of milk and increase the amount
of icecream.
6
Downloaded from CoffeeMachineManual.com Manuals
47002 Rev 1
3/6/03
2.02 PM
Page 8
Descaling
Cleaning care
• If you live in a hard water area, we
recommend that your coffee maker is
descaled at regular intervals, e.g. every
2-3 months. In areas of moderately hard
water you should descale every 6
months.
Unplug the coffee maker and allow to
cool.
Do not immerse the coffee maker in
liquid.
Rinse the water reservoir occasionally
with cold water. Do not use a cloth as any
residue or lint may be left behind to clog the
coffee maker.
Remove the permanent filter, discard
used coffee and wash. Extended soaking
helps to remove coffee stains from the mesh.
Wash the glass jug, jug lid, filter holder,
stainless steel milk jug and milk frother blade
in warm soapy water. Rinse and dry all parts
thoroughly. Refit filter and filter holder and
milk frother blade.
Wipe all external surfaces including the
warming plate with a damp cloth and dry
thoroughly.
Care must be taken to ensure that nondrip valve situated on the bottom of the filter
holder is not damaged during cleaning.
• If the water filters through more slowly
than usual, it is a sign that descaling is
necessary.
• We recommend you use proprietary
liquid descaler which is especially made
for coffee makers and plastic kettles.
Follow the instructions on the bottle or
sachet, and then operate the coffee
maker with just water 3 times before
making coffee.
• Do not use kettle descaler unless the
packet specifically states it it suitable for
coffee makers.
Note: The permanent mesh filter should
not be used during descaling.
Never use harsh or abrasive cleaners.
ALL WASHABLE PARTS ARE
DISHWASHER SAFE.
Helpline
If you have any difficulty with your
appliance, do not hesitate to call us.
We are more likely able to help than the
store from where you bought it.
Please have the following information
ready to enable our staff to deal with your
query quickly.
• Name of the product
• Model number and serial number as
shown on the underside of the appliance.
7
Downloaded from CoffeeMachineManual.com Manuals