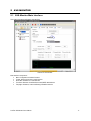
1
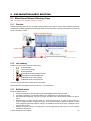
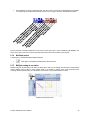
Version 1.5 LIMITATION OF LIABILITY In no case and in no way, the provider of this software (AuviTran, the distributor or reseller, or any other party acting as provider) shall be liable and sued to court for damage, either direct or indirect, caused to the user of the software and which would result from an improper installation or misuse of the software. “Misuse” and “improper installation” mean installation and use not corresponding to the instructions of this manual. AuviTran is constantly working on the improvement of the products. For that purpose, the products functionalities are bound to change and be upgraded without notice. Please read carefully the User’s manual as the new functionalities will be described therein. TRADEMARKS All trademarks listed in this manual are the exclusive property of their respective owners. They are respected “as is” by AuviTran. Any use of these trademarks must receive prior approval of their respective owners. For any question, please contact the trademark’s owner directly. COPYRIGHT The information in this manual is protected by copyright. Therefore, reproduction, distribution of whole or part of this manual is strictly forbidden without the prior written agreement of AuviTran. MORE INFORMATION Please visit our website for any question of further inquiry concerning our product range. Updates will also be posted when available. http://www.auvitran.com AuviTran AVS-Monitor User’s Manual 2 TABLE OF CONTENTS 1 WELCOME................................................................................................................................. 6 2 INSTALLATION ......................................................................................................................... 7 2.1 Computer requirements ........................................................................................................................................... 7 2.2 Installation................................................................................................................................................................ 7 2.3 Network setup .......................................................................................................................................................... 9 3 AVS-MONITOR SOFTWARE ....................................................................................................10 4 AUVITRAN SERVICE CONTROL PANEL .................................................................................11 4.1 General / Status...................................................................................................................................................... 11 4.2 Settings / AVS-Service ........................................................................................................................................... 12 4.3 Settings / AVS-Monitor........................................................................................................................................... 13 4.4 AVS-Event .............................................................................................................................................................. 14 4.5 Security .................................................................................................................................................................. 15 4.6 MIDI – Legacy function .......................................................................................................................................... 16 5 AVS-MONITOR .........................................................................................................................17 5.1 AVS-Monitor Main Interface ................................................................................................................................... 17 5.2 Menu....................................................................................................................................................................... 18 5.3 Toolbar ................................................................................................................................................................... 19 5.4 Macro functions ..................................................................................................................................................... 19 5.5 Status Bar............................................................................................................................................................... 19 5.6 Networks ................................................................................................................................................................ 20 5.7 Tab selection .......................................................................................................................................................... 22 5.8 Property Page ........................................................................................................................................................ 23 6 AVS-MONITOR AUDIO ROUTING ............................................................................................25 6.1 EtherSound Network Routing Page ....................................................................................................................... 25 6.2 EtherSound Routing Page ..................................................................................................................................... 30 AuviTran AVS-Monitor User’s Manual 3 6.3 Dante Routing ........................................................................................................................................................ 32 6.4 AVBx3 and AVBx7 Matrix routing case ................................................................................................................. 33 7 AVS-MONITOR DEVICE CONTROL PAGE ..............................................................................35 7.1 AVBx3 and AVBx7 Control Page ........................................................................................................................... 35 7.2 AVY16-ES100 Control Page ................................................................................................................................... 36 7.3 AVM500-ES Control Page ...................................................................................................................................... 37 7.4 AVP4-ES100 Control Page ..................................................................................................................................... 38 7.5 AVA4-ES100 Control Page ..................................................................................................................................... 39 7.6 AVY16-ES Control Page ......................................................................................................................................... 40 7.7 AVB32-ES / AVB32-ES100 Control Page ............................................................................................................... 41 7.8 AVRed-ES / AVRed-ES100 Control Page ............................................................................................................... 42 7.9 AVKit / AVKit-ES100 Control Page......................................................................................................................... 43 7.10 AVI64-ES Control Page .......................................................................................................................................... 44 7.11 Other Control Pages .............................................................................................................................................. 45 8 AVS-MONITOR OPERATING MODES ......................................................................................46 8.1 Online/Offline mode ............................................................................................................................................... 46 8.2 Configuration files ................................................................................................................................................. 46 8.3 Exporting a configuration to a file ......................................................................................................................... 46 8.4 Importing a configuration from a file ..................................................................................................................... 46 9 AVS-EDITOR ............................................................................................................................48 9.1 Main interface......................................................................................................................................................... 48 9.2 Menu....................................................................................................................................................................... 49 9.3 How to build a new configuration .......................................................................................................................... 49 9.4 How to edit a configuration.................................................................................................................................... 49 9.5 How to use generated configuration ..................................................................................................................... 49 10 AVS-EVENT EDITOR ................................................................................................................50 10.1 Requirements ......................................................................................................................................................... 50 10.2 Main interface......................................................................................................................................................... 50 10.3 Event creation/modification ................................................................................................................................... 51 AuviTran AVS-Monitor User’s Manual 4 11 NOTE ON USING ASIO WITH AVM500-ES ..............................................................................52 12 TUNNELING ON ETHERSOUND ..............................................................................................53 12.1 “Hardware RS232 Tunneling” function.................................................................................................................. 53 12.2 Remote Control over EtherSound via YGDAI Midi ................................................................................................ 55 13 IMPORTANT NOTES TO USE SEVERAL AVS-MONITOR .......................................................56 13.1 Single AVS-Monitor use ......................................................................................................................................... 56 13.2 Multiple AVS-Monitor use ...................................................................................................................................... 56 14 ETHERSOUND NETWORK ARCHITECTURE SAMPLES ........................................................57 14.1 Mono Directional system ....................................................................................................................................... 57 14.2 Bi Directional system ............................................................................................................................................. 58 14.3 Ring system ........................................................................................................................................................... 59 AuviTran AVS-Monitor User’s Manual 5 1 WELCOME AVS-Monitor software is a full set of tools to monitor, control and build your devices. AVS-Monitor provides control and monitor functions over several networks: Provides graphical user interface to device and network Provides quick information on networks and devices Provides hierarchical view of each networks Provides full access to dedicated devices such as AVY16-ES board Enables user to build his own audio routing Provides group management of devices Manages bi-directional audio routing for compatible devices Provides smart routing of all devices AVS-Monitor is able to handle with EtherSound networks for both control and routing of all EtherSound devices DANTE networks for remote control of AuviTran devices, as well as some 3 rd party devices. AVS-Monitor is based upon a service managing one or more networks. Therefore, AVS-Monitor can be used with a distant service (running on another computer), and several AVS-Monitor can use the same service. Service parameters can be set via its dedicated control panel. Group functionality allows user to set together several devices that share same network and same type. Thanks to graphical interface, user will be able to interact with these groups and send several orders via one action only (muting all inputs for instance). AuviTran AVS-Monitor User’s Manual 6 2 INSTALLATION 2.1 Computer requirements AVS-Monitor will install and work on any desktop or laptop PC equipped with Windows XP, Windows Vista or Windows 7 (32bit or 64-bit). 2.2 Installation Please visit our website to download the latest version of AVS- Monitor Software (http://www.auvitran.com/). When installation software is launched, a welcome screen will appear: Click on the « Next » button to start the installation. Accept license agreement to carry on with installation. The screen presents the components available for installation. By default, they are both ticked and will be installed. Select MIDI Tunneling to copy MIDI drivers on your hard drive. Refer to documentation to install these drivers after. Before installing EtherSound Monitor, please check your hard disk has the necessary space for the operation. Then, click on the “next” button. AuviTran AVS-Monitor User’s Manual 7 The next screen will ask for the destination folder you want the program to install in. A default folder will be proposed. You can browse on your hard disk to change that destination folder. Then click on the “install” button. Install process will go on automatically. If needed, install will prompt you for reinstallation of EtherSound API. Click on “Finish” to complete the installation. Automatic reboot will be done if needed. Or AVS-ControlPanel will be launched to start AVS-Service if desired. AVS- Monitor is now installed and ready for use. AuviTran AVS-Monitor User’s Manual 8 2.3 Network setup 2.3.1 EtherSound network In order to control and monitor your devices via AVS-Monitor, connect your PC from the selected network adapter to the 3rd port of an EtherSound device, the IN port of an EtherSound device or multiple EtherSound networks through a switch. AVS-Monitor will automatically detect and listed available EtherSound devices. 2.3.2 DANTE network In order to control and monitor DANTE known devices via AVS-Monitor, connect your PC from the selected network adapter to one DANTE device or to your DANTE network through a switch. AVS-Monitor will automatically detect and listed recognized DANTE devices. Note that DANTE devices require IP address assignment. In most cases, this will be done automatically by the network architecture where DHCP will be present. But if DHCP is required and not present, we recommend the use of OpenDHCP which is free of charge and available for download here: OpenDHCP download link AuviTran AVS-Monitor User’s Manual 9 3 AVS-MONITOR SOFTWARE AVS-Monitor comes with several software allowing user to configure, use and manage day by day his networks and devices. All these software are accessible using shortcuts located in menu All Programs, AuviTran, AVS- Monitor as shown here: Software shortcuts Shortcuts provide access to: AVS-Control Panel AVS-Editor AVS-Monitor User’s Manual AVS-Monitor FAQ AVS-Monitor Uninstall VirtualCAI AVS-Event Editor AVS-Event Editor User(s Manual To configure AVS-Monitor software To build and edit offline configuration This user’s manual Frequently Asked Questions To manage networks and devices To uninstall AVS-Monitor software Tool to manage CAI Communication protocol Tool to manage events Event Editor user’s manual A complete description of each software can be found in the following chapters. AuviTran AVS-Monitor User’s Manual 10 4 AUVITRAN SERVICE CONTROL PANEL Thanks to AuviTran Service Control Panel, user can modify software parameters at any time, as well as start and stop AuviTran Service. To access chosen category, user selects it by clicking on left side bar corresponding icon. 4.1 General / Status Service Control Panel Software Status displays current software version as well as current EtherSound API version installed on computer. AuviTran AVS-Service Status provides current service state via a Red/Green bullet. User can stop/start service using the Turn OFF/ON button. User can also affect the different adapters present on the computer. EtherSound Adapter is the adapter connected to the EtherSound network DANTE Adapter is the adapter connected to the DANTE network. IP addresses are provided for information only. Software client Adapter: is the adapter used for external communication with AVS-Monitor applications. Several options are available: - None : Only AVS-Monitor running on local computer will be addressed - All : All Adapter can be addressed by AVS-Monitor, including local computer - Selected adapter : Only selected adapter and local computer will be addressed Note that network Adapter and Software client Adapter can be identical if only one adapter is present. Note that EtherSound and DANTE adapter can be different, all recognized devices of these networks will be seen simultaneously in AVS-Monitor. Digigram Service Status provides information only if Digigram service is installed, state is also displayed beneath the AuviTran Service information. AuviTran AVS-Monitor User’s Manual 11 4.2 Settings / AVS-Service Configuration Control Panel This panel allows user to select devices check options, and periodicity. AVS-Service Timer settings: This will allow user to set check period as well as several options such as: Disconnection/Reconnection detection: AVS-Monitor will be prompted when device is disconnected or reconnected. Network Integrity Monitoring: Service will check device status to ensure EtherSound network is working properly. New Network/Device automatic detection: AVS-Monitor will be prompted when a new network is connected, or a new device is added to network. Automatic EtherSound Hierarchy detection: Service will build automatically device hierarchy. Log networks activity: creates a log file with all networks events. EtherSound Protocol options: This can be used to set EtherSound network timeout. Default value should be 5msec. Dante Protocol options: This can be used to set the Dante timeout value. Log files: They are stores in the “datas” folder where AVS-Monitor was installed on your computer. Note: logging activity over long period may create large files that can be harmful for your system, if not deleted regularly. AuviTran AVS-Monitor User’s Manual 12 4.3 Settings / AVS-Monitor Monitor Control Panel This panel is to be used to set AVS-Monitor connection to local or distant service. Several options are available through this interface: AVS-Monitor Connection o Local service: AVS-Monitor will connect to local computer o Remote service: AVS-Monitor will connect to distant computer knowing its IP address or its network name Routing options o Source Alias: Default alias used for source naming o Receiver Alias: Default alias used for receiver naming o Routing page control display: Allow use of only Net Patch or I/O Patch, or both Routing page o Device Channel Folding: Allow to group channel per device by 8, 16, 32 or Full o AVM500-ES Channel Folding: Allow to group AVM500-ES channel by 8, 16, 32 or Full o NetPatch Control Mode: Allow to select space or mouse button for assigning routing in NetPatch control page o NetPatch maximum Routing: Maximum patching performed with multi-selection in NetPatch control page o Display full AVM500 in NetPatch: Allow display of internal matrix routing. Processing time might be long and decrease overall performance. Advanced Settings o Auto Refresh Control Page: Device control page will be automatically refreshed automatically if checked o Automatic reconnection: When service is turned off, AVS-Monitor will switch to offline mode, and will try to get back to online mode when service will be turned on again o Flash secure saving: When saving to device non volatile memory, software will ensure what was saved o File secure saving: Ensures that a proper complete detection is performed before creating configuration file. o Log AVS-Monitor sessions: AVS-Monitor will log all specific events occurring while running (loading configuration, disconnection, …) AuviTran AVS-Monitor User’s Manual 13 GUI Setup o Night mode: Switches AVS-Monitor interface to dark mode o Iconic error display: Presents a Red Dot on device when error(s) is detected on devices such integrity error. o Default device view: Allows user to select between Properties or Control startup page. o Slider Response: Allow user to adjust slider response to its configuration. Value impacts command rate for device when slider is in use. Range from Very Slow to Full Range. This option may have significant impact on AVS-Monitor slider feedback. 4.4 AVS-Event Monitor Control Panel If “Activate event management” is checked AVS-Service will scan devices in order to react accordingly to events created with the AVS-Event Editor. AuviTran AVS-Monitor User’s Manual 14 4.5 Security Monitor Control Panel This panel is used to create/modify/delete user when AVS-Monitor is set to secure mode. “Activate secure server mode” option allows to change between secure/normal mode. List presents all users with their respective access level, and if password is set for this user. Admin level: User has access to all controls within AVS-Monitor. User level: User has access to control page of devices, but can’t modify routing. Viewer level: User can only view device control and routing tabs. Double-clicking on a user allows modification of user’s properties. Button “Add user” allows creation of a new user. Button “Delete user” allows deletion of currently selected user. Note: Security access can only be modified by administration user. Control panel will be only viewable for user without admin password. AuviTran AVS-Monitor User’s Manual 15 4.6 MIDI – Legacy function Note: MIDI tunneling is only available on AVY16-ES devices. AVY16-ES100 device is not compatible with this feature. MIDI Configuration Control Panel When MIDI drivers are installed (refer to dedicated documentation for installation procedure), this panel allows user to setup MIDI Port for MIDI tunneling through AVY16-ES board. Note: MIDI Yoke NT port selected must match the MIDI port selected in the Yamaha Studio Manager. Advanced parameters are reserved for expert users, as it may result in unstable MIDI tunneling. For instance, Yamaha Studio Manager software must be configured as shown below for the 01V96 Studio Manager for instance: MIDI Configuration for both control panel and Yamaha Studio Manager Note: Input and Output port must use a different MIDI Yoke NT port. AuviTran AVS-Monitor User’s Manual 16 5 AVS-MONITOR 5.1 AVS-Monitor Main Interface This screen presents the AVS-Monitor main interface: Overview of main interface Main interface is composed of: Menu: Configuration and network functions Toolbar: Allows quick access to useful functions Status Bar: Information on current selection Tree Views: Selection of both EtherSound and DANTE network/device Tab pages: Information, Control and Routing of EtherSound device AuviTran AVS-Monitor User’s Manual 17 5.2 Menu Menu is organized that way: Menu Submenu File Load configuration… Save configuration as… Save configuration Export alias to file… Import alias from file… Restore configuration from Flash For All Networks For Selected Network For Selected Device Write configuration to Flash On All Networks On Selected Network On Selected Device Exit Edit Connect to… Hide/Show left view Show log window Launch AVS-Editor Launch AVS-Event Editor Launch AVS-ASIO Control Panel Preferences/Control Panel Disable CTRL+SHIFT check Command Help NetPatch settings Keyboard control Global Switch offline mode Refresh networks Remove all groups Reset RME settings Network Rename Build all hierarchy Remove network Clear all routing Force to MonoDir Force Ring mode off Create routing report Device Rename Switch to Start of BiDir Loop Switch to End of BiDir Loop Set as Preferred PMaster Reboot device Read AVS-Monitor Doc. Launch AVS-Monitor webpage Check for updates About AuviTran AVS-Monitor User’s Manual Function Load a configuration previously saved to a file Save current configuration to a selected file Save current configuration to opened file Save all local devices alias to a file Load devices alias from a file for import to local computer Restore configuration from Non Volatile Memory to All connected devices All devices on current network Only to current selected device Write configuration to Non Volatile Memory of All connected devices All devices on current network Only to current selected device Exit AVS-Monitor Allow AVS-Monitor to connect to other AVS-Service IP Hide/Show EtherSound networks display Show AVS-Monitor log window with occurred events Launch AVS-Editor with current configuration by default Launch AVS-Event Editor Launch AVS-ASIO Control Panel if available Launch AVS-Control Panel directly from AVS-Monitor Remove the CTRL+SHIFT check on advanced configuration settings. Use this option with caution as confirmation will be no longer asked for the rest of the session. Allows keyboard control of NetPatch instead of mouse Switch between offline/online mode Ask for complete rediscover of devices Delete all current groups Delete all saved RME device board Rename selected network Force a manual hierarchy discovery Remove network from offline session Set all devices to Mute Set all devices to MonoDir mode Reset ring mode Create a .csv file of all network routing Rename selected device Switch Start BiDir Loop status ON/OFF Switch End BiDir Loop status ON/OFF Set device as Preferred PMaster (Ring) Reset device Launch this documentation if a .pdf reader is installed Launch a web-browser directly on AVS-Monitor webpage Check if a newer version is available on website Display AVS-Monitor version 18 5.3 Toolbar Main toolbar dialog Main toolbar from AVS-Monitor allows user to: Refresh networks Load configuration from a file Save configuration to a file Save all parameters from current network to devices Flash Save all parameters from current device to its Flash Launch a manual detection of EtherSound hierarchy Launch a refresh of current control page Clear selected EtherSound network routing Offline mode switching Show About dialog Macro button #1 (Blue=Assigned, Grey=Unassigned, Red=Configure) … Macro button #8 5.4 Macro functions Macro button allows user to directly store a configuration within AVS-Monitor for quick access. Macro button status Macro button color changes depending on its status Blue button: Macro is assigned Grey button: Macro is unassigned Red button: Macro can be configured To “program” a Macro button, hold Control key pressed, and select Macro button. Release Control key, and follow procedure: 1. Select a previously saved configuration file 2. Assign current devices to found devices in file 3. Click OK 4. Confirm Macro assignment Note that Macro assignment is based a MAC address unique device identifier. So if device is moved within the architecture, recalling a Macro will apply its file configuration. For a more detailed device assignment, see “Importing a configuration file” section of this document. 5.5 Status Bar Status bar On bottom of window, status bar provides quick information on: Device/Group alias Device/Group type Current service version Current AVS-Monitor version AuviTran AVS-Monitor User’s Manual 19 5.6 Networks Tree Views tab selector allows user to select device from three different representations of networks: List: Classic display of all networks and devices Tree: Display devices in hierarchy view, only when hierarchy was found or built Group: Display devices in group view as defined by user Network Tree Views available By right clicking either on a network or a device, a popup menu will be displayed for user to set several parameters. Note that available options depend on network/device selection. Menu Network Device Submenu Reset all Build all hierarchy Remove network Clear all routing Force to mono dir Force to ring mode OFF Rename Rename Start of BiDir Loop End of BiDir Loop Write to flash Restore from flash Group Ring Reset device Group Name Ring Active Preferred PMaster Function Reset all networks Build hierarchy for selected network Remove network from offline mode Mute all EtherSound channels Force all EtherSound devices to mono dir mode Force all EtherSound devices to be in normal mode Rename network Rename device Set device as start of Bi-Dir loop on EtherSound devices Set device as end of Bi-Dir loop on EtherSound devices Write all device parameters to its Non-volatile memory (Write to all devices when network is selected). Write all device parameters to its Non-volatile memory (Restore from all devices when network is selected). Reset device to restore default parameters Add/Remove device to/from group Checked if EtherSound device is in ring mode Set EtherSound device as Preferred Primary Master When a group is selected, dedicated popup menu is displayed. Menu Remove all groups Add group Rename group Remove group Function Remove all defined groups Add a new group Rename selected group Remove selected group Note: Some functions are not available for DANTE devices like BiDir Loop management. AuviTran AVS-Monitor User’s Manual 20 List and Tree view uses icon representation for devices that allows user to quickly see current device status. Device status icons are: Network is connected Network is disconnected Network if in ring mode, but ring is open Network is in ring mode, ring is closed Device is connected Device is disconnected Device is hardware configured (Routing can’t be changed via AVS-Monitor) Device is connected, set to Bi-Directional mode and within a loop Device is connected, set to Bi-Directional mode and is last in the loop Device is connected, set to Bi-Directional mode and is first in the loop Device is connected, but parameters are still unknown Red dot indicates that an error occurred on device (Upstream or Downstream integrity flaw) Device protocol can be easily identified through its icon: EtherSound device Dante device Note about ring mode: When network is set in ring mode, Preferred Primary Master device is identified by being the device in bold. In the following sample, Device B is the Preferred Primary Master EtherSound network in ring mode sample AuviTran AVS-Monitor User’s Manual 21 5.7 Tab selection On right side of interface, user is able to select property page, routing page or control page if available. All pages are described in documentation herein after. Tab pages button Properties: quick summary of device global information Net Patch: grid control for smart EtherSound Channel assignment I/O Patch: EtherSound Channel assignment for selected device Control: displays advanced properties for selected device if available For some devices, an additional tab selection might appear to provide advanced control properties such as Matrix Routing, AD8HR Remote control … AuviTran AVS-Monitor User’s Manual 22 5.8 Property Page Property page gives to the user a quick look over several device parameters. On network selection, only Information group is visible. Disconnection from server will be displayed in this control page. 5.8.1 Device information Among all device information, user will find: MAC address and alias Manufacturer and product family of device Current status of hardware configuration (device firmware version, EtherSound kernel version and audio routing lock status) Number of EtherSound inputs and outputs and current sample rate (irrelevant for DANTE devices) Group setup (check buttons to enable/disable device belonging to group) Network integrity monitor (irrelevant for DANTE devices) Properties page overview AuviTran AVS-Monitor User’s Manual 23 5.8.2 EtherSound Network integrity diagnosis Note on Network integrity monitor: Graph displays uses two colors to present EtherSound integrity for device. This graph must be at 100.0 all time. Any drop means that errors were encountered. Integrity checking sample for device B: A B C Green drops means that errors occurred between devices B and C. Blue drops means that errors occurred between devices A and B. AuviTran AVS-Monitor User’s Manual 24 6 AVS-MONITOR AUDIO ROUTING 6.1 EtherSound Network Routing Page Note: This feature is only available for EtherSound devices. 6.1.1 Overview Network routing page gives the user the ability to directly assign a device input to a device output. Software will perform automatically, if possible, the EtherSound sub-routing needed to match user desire. If required and available, bi-dir mode will be set on devices by software. Global Collapse/Expand button Collapse button SRC2 is routed to ES Device No routing done Current selection Expand button ES Channel summary icons Routing not available Network Routing page overview 6.1.2 Icon summary Different icons give a quick overview of current routing: Routing available Indirect routing available Routing unavailable Routing performed directly between devices / Routing performed through AVM500-ES AVM500-ES internal routing available AVM500-ES internal routing performed Icons turn into gray when device is folded and not fully patched. Note that all grids can be grayed if hierarchy is not known, or not yet detected. 6.1.3 NetPatch actions Thanks to NetPatch user can: Routing: It is simply done by left clicking in the grid while highlighting desired input and output. Un-routing: Left clicking on a square where black cross is displayed will un-route output from input. Direct ES Channel assignment: Left click on summary icons allows user to directly set ES Channel to an input or output. Expand/Collapse: To simplify viewing, left-click on “-“ button near device name, or directly on device name if too short, will collapse all inputs or outputs from device. To see full device inputs or outputs, just left click on device name to expand it again. When collapsed, routing is not available for device but a summary is displayed to see if routing is done on device. Setting a new alias for a device, or an input/output: It is done by right-clicking on the correct row or line. A window will appear to set new alias. AuviTran AVS-Monitor User’s Manual 25 View simplified icons next to input/output alias. Icons allows user to quickly view current EtherSound assignment. To directly assign a new EtherSound channel, left click on icon to popup a window to set EtherSound Channel. 3 4 2 3 M 3 4 3 4 M Previous schematic summarizes different icons and colors for each device input or output available through NetPatch. This allows user to have a quick view of channel used without the need to check this information in the I/O Page. 6.1.4 NetPatch control A simple option is available through the NetPatch interface: Clean patch: Automatically mute EtherSound channels unused 6.1.5 Multiple routing in one action Multiple routing can be performed in one action, by holding down “shift” key, and holding down left button to select multiple routing. Selection will turn yellow to show multiple routing. If full selection is already routed, action performed will be unrouting, otherwise software will try to route selection. This function is only available with mouse control. Multiple routing selection mode AuviTran AVS-Monitor User’s Manual 26 6.1.6 Direct EtherSound assignment Through the NetPatch, it is also possible to directly assigned EtherSound channels via dedicated windows. These windows are available by left clicking on simplified icons. Device output window On top of window presents current device output assignment. User can also set directly EtherSound channel by selecting EtherSound channel and direction, and click on “Set ES”. Or user can also set directly Device input and click on “Set Input”. NetPatch will assign both channels if a patch is available. Device input window On top of window presents current device input assignment. User can also set directly EtherSound channel by selecting EtherSound channel and direction, and click on “Set ES”. Or user can also set directly Device outputs and click on “Set Output”. NetPatch will assign channels if patch is available. AuviTran AVS-Monitor User’s Manual 27 6.1.7 NetPatch Routing Sample #1 This sample illustrates a simple EtherSound network architecture. AVY16-ES100 is hosted in a Yamaha console. AVKit-ES100 is hosted in a Yamaha AD8HR. Two NXAMP are used for output. Routing will consist of Assigning the 8 AD8HR channels to the console Assigning 4 channel mixed by the console to the two NXAMP NetPatch will automatically managed EtherSound assignment, just click on desired assignment: AVKit SRC1 to AVY16 DST1 AVKit SRC2 to AVY16 DST2… AVY16 SRC1 to NXAMP#1 DST1 AVY16 SRC2 to NXAMP#1 DST2… AVY16 SRC1 to NXAMP#2 DST1… At the end, NetPatch will look like this: AuviTran AVS-Monitor User’s Manual 28 6.1.8 NetPatch Routing Sample #2 This sample illustrates an EtherSound network architecture that includes the use of AVM500. AVY16-ES100 is hosted in a Yamaha console. AVKit-ES100 is hosted in a Yamaha AD8HR. Three AVP4-ES100 are used for output. AVM500 is used as a matrix to share EtherSound channels between ports. Routing will consist of Assigning the 8 AD8HR channels to AVY16-ES100 Assigning 4 Channels from AVY16-ES100 to AVP4 #1 Assigning 4 Channels from AVY16-ES100 to AVP4 #2 Assigning 4 Channels from AVY16-ES100 to AVP4 #3 NetPatch will automatically managed EtherSound assignment, just click on desired assignment: AVKit SRC1 to AVY16 DST1 AVKit SRC2 to AVY16 DST2.. (Up to SRC8/DST8) AVY16 SRC1 to AVP4 #1 DST1 AVY16 SRC2 to AVP4 #1 DST2 (Up to SRC4/DST4) Perform the same for AVP4#2 and #3 NetPatch will automatically build internal matrix patch and additional routing to match user request. After this, NetPatch will look like this: AuviTran AVS-Monitor User’s Manual 29 6.2 EtherSound Routing Page Note: This feature is only available for EtherSound devices. Routing page allows user to select EtherSound channel for each input and output (when available) of selected device. Routing page is divided in two main parts. Top bar Via top bar, user can change device BiDir settings, assign all inputs/outputs, lock or mute device by software. Global functions Show alias: when checked, grid show outputs/inputs aliases Clear All: mute all device outputs/inputs in one click BiDir Status Bi-Directional status icon: present the current device status graphically o Device is within a bi-directional loop o Device is last of bi-directional loop Start Loop: set device as a start loop device End Loop: set device as an end loop device Warning: Bi-directional loop may not contain any switches. Bi-directional is only usable within a daisy chained devices. As well as inserting a mono directional device (without bi-directional capability) within a bi-directional loop may result in unpredictable behavior of device and software. I/O Channel Assignment Clear: mute all outputs in one click Set same: set all outputs to same selected EtherSound channel Start from: set inputs/outputs increasingly to start with selected EtherSound channel End to: set inputs/outputs decreasingly to end with selected EtherSound channel Use Output/Input and Down/Up to select appropriate channels and direction when using channel assignment functions. Note that “Set same” function is unavailable when Input is selected. Session function Lock IN: when checked lock inputs by software for this session only Lock OUT: when checked lock outputs by software for this session only Mute IN: when checked mute inputs for this session only, when unchecked revert to previous status Mute OUT: when checked mute outputs for this session only, when unchecked revert to previous status AuviTran AVS-Monitor User’s Manual 30 Routing grid Channel assignment enables user to quickly set all inputs or outputs (depending on which channel is selected) to same EtherSound channel, starting from selected EtherSound channel or ending to a specific EtherSound channel. You can also mute all inputs or outputs of selected device using Mute buttons. On left side of grid, you can set aliases for each outputs and inputs of device. Thanks to this feature, you will find easily and quickly what is connected to your different EtherSound devices. Thanks to the grid, you can directly assign EtherSound channel to input or output of device by a simple click on the desired patch. Left click allows you to set for downstream, while right click allows you to set upstream EtherSound channel (only bidirectional device when available). On left Click: Patch device output 5 from downstream channel 13 Output Number Device Output Patch On left Click: Patch device Input 4 to downstream channel 28 Input Number Device Input Patch Routing page overview for Mono directional device Output Number Input Number On right Click: Patch device output 5 from upstream channel 13 Device Output Patch On right Click: Patch device Input 6 to upstream channel 26 Device Input Patch Routing page overview for Bi directional device AuviTran AVS-Monitor User’s Manual 31 6.3 Dante Routing Dante routing is not yet implemented in AVS-Monitor. Therefore, Dante audio routing is performed using the Audinate Dante Controller software. To build Dante routing between devices, launch the Dante Controller software. Main interface presents the global Dante patch available for detected Dante devices. Main interface Use mouse to assign or unassign an audio routing. When routing is performed green check icons appears. When stored routing is unavailable, an orange warning is displayed. Double clicking on the device name in the main window brings out a new window displaying the routing table for this particular device with same iconography. Dante device routing table Note: Be aware that renaming a device can lead to unwanted unassignment of current audio routing. AuviTran AVS-Monitor User’s Manual 32 6.4 AVBx3 and AVBx7 Matrix routing case This part will be dedicated to the description the Audio ToolBox Matrix and how to use it. 6.4.1 First-Card, Second-Card, … Prior to describe available modes, cards plugged into the AuviTran Audio ToolBox will be named that way: First card: is the AxC-Card plugged into the first non empty slot of the ToolBox. Usually a network card in slot #1. Second card: is the AxC-Card plugged into the second non empty slot of the ToolBox. Third card: … 6.4.2 Automatic Plug and Play mode vs Advanced Matrix Routing mode Automatic Plug and Play mode This mode enables automatic audio routing sources and receivers between the “First Card” and the other cards plugged into the AuviTran Audio ToolBox. Priority routing depends on the slot number in which cards are plugged (from slower to higher slot). The automatic audio routing done follows these two rules for receivers and sources: o “First-card” sources are sent to “Second-card” receivers o Remaining “First-card” sources are then sent to “Third-card” receivers o … until no “First-Card” sources are available for distribution o Unassigned receivers are muted o o o “First-card” receivers are fed with “Second-card” sources Remaining “First-card” receivers are fed with “Third-card” sources … until no “nth-card” sources are available Here are two examples on automatic plug and play mode results: o Toolbox with AxC-DANTE in slot #1, AxC-AX4O in slot #2, and AxC-MADI in slot #3 - AxC-DANTE RCV [01..04] AxC-AX4O SRC [01..04] - AxC-DANTE RCV [05..64] AxC-MADI SRC [01..60] - AxC-DANTE SRC [01..64] AxC-MADI RCV [01..64] o Toolbox with AxC-DANTE in slot #1, AxC-AE8IO in slot #2, and AxC-MADI in slot #3 - AxC-DANTE RCV [01..04] AxC-AE8IO SRC [01..04] - AxC-DANTE RCV [05..64] AxC-MADI SRC [01..60] - AxC-DANTE SRC [01..04] AxC-AE8IO RCV [01..04] - AxC-DANTE SRC [05..64] AxC-MADI RCV [01..60] Note: Automatic Plug and Play mode is the only mode available for AuviTran Audio ToolBox AVBx3. Advanced Matrix Routing mode This mode allows user to set manually the matrix routing using the dedicated matrix window. By clicking on the patch, a source can be assigned or unassigned to a receiver. Note: This mode is only available on AVBx7 with firmware 0x104. Note: When slot configuration is changed, matrix routing mode resets and sets back to Automatic Plug and Play mode. 6.4.3 Setting matrix mode Working mode can be set through Rack setup tab or through matrix window, only when available. Rack setup matrix tab AuviTran AVS-Monitor User’s Manual 33 6.4.4 Displayed status Current status can be easily identified on the AuviTran Audio Toolbox control page. Automatic Plug and Play vs Advanced Matrix Routing 6.4.5 Matrix window AVBx7 matrix window Through this window, user can view or set, when authorized, ToolBox internal matrix. It works like the NetPatch page. In addition to manually set patch between sources and receivers, two functions are available: Fully erase current matrix Change matrix mode Depending on matrix assignment, aliases available through the EtherSound NetPatch will be changed automatically to reflect sources and receivers in a user-friendly way. AuviTran AVS-Monitor User’s Manual 34 7 AVS-MONITOR DEVICE CONTROL PAGE Control page aspect depends on selected device. When available, user gets access to dedicated functionality of device. Refer to the specific user’s manual device for more info about dedicated function features and behavior. Control pages for AuviTran products are summarized herein the document. For comprehensive documentation, or other manufacturer products, please refer to dedicated product User’s Manual. Note that screen capture might not up to date as software is designed to control most recent device features and still being compatible with older device version. 7.1 AVBx3 and AVBx7 Control Page AVBx3 page overview The AVBx3 Control page provides: GPIO status and control Clock status Rack Setup, Slot Setup and Matrix access. Identify button. But it also allows user to setup all available slots: Slot 1 view. Slot 2 view. Slot 3 view. … Depending on slot configuration, direct access to parameters is allowed. Click on slot image brings the dedicated advanced setup window if available. AuviTran AVS-Monitor User’s Manual 35 7.2 AVY16-ES100 Control Page AuviTran AVY16-ES100 page overview The AVY16-ES100 Control page provides: Signal/Clips LEDs for each input/output Device option setup with dedicated interface Synchronization status with the host Console or Mixing-Engine. But it also allows user to select YGDAI Mode: Switch AVY16-ES100 in 8 or 16 channels bus mode for Yamaha compatibility, and manage 48k/96k mode. Serial port configuration. AuviTran AVS-Monitor User’s Manual 36 7.3 AVM500-ES Control Page AuviTran AVM500-ES page overview The AVM500-ES Control page provides: Current status of device. Port configuration. Advanced control configuration. Serial Port configuration. Note that AVM500-ES Control page options might defer depending on Port selection. AuviTran AVS-Monitor User’s Manual 37 7.4 AVP4-ES100 Control Page AuviTran AVP4-ES100 page overview The AVP4-ES100 Control page provides: Full control for 4 Outputs and Master control. Complete device setup and status feedback. Paging status and setup. But it also allows user to setup Equalization per channel. DRC setup. AuviTran AVS-Monitor User’s Manual 38 7.5 AVA4-ES100 Control Page AuviTran AVA4-ES100 page overview The AVA4-ES100 Control page provides: Full control for 2 Inputs and 2 Outputs. Quick EQ Setup overview and access. GPIO Setup. But it also allows user to setup Equalization per channel. AuviTran AVS-Monitor User’s Manual 39 7.6 AVY16-ES Control Page AuviTran AVY16-ES page overview The AVY16-ES Control page provides: 32 Vu-meters for each of 16 outputs and 16 inputs Host device for AVY16-ES Synchronization status with the host Console or Mixing-Engine. But it also allows user to select YGDAI Mode: Switch AVY16-ES in 8 or 16 channels bus mode for Yamaha compatibility. Lock routing: Use to lock current EtherSound audio routing. Emergency clock: When checked, host won’t mute audio channels when cable will be unplugged. Serial Port configuration. Tunneling configuration when available: User can select target device, and Start/Stop hardware tunneling function. Note that host device can only be found if MIDI is redirected to AVY16-ES slot. Once found, MIDI tunneling can be activated via appropriate push button. Note that MIDI tunneling will be active only if MIDI Drivers are correctly installed and set up in the Control Panel. Hardware tunneling functionality will be described later in the document. AuviTran AVS-Monitor User’s Manual 40 7.7 AVB32-ES / AVB32-ES100 Control Page AuviTran AVB32-ES page overview The AVB32-ES Control page provides: Slot information 32 Vu-meters for each slots Global Purpose Inputs controls Synchronization status AVB32-ES controls (Fan status and controls, panel dimmer and rack temperature) Serial port controls Hardware tunneling controls Thanks to the AVB32-ES, user can remotely control from the PC AD8HR devices connected through the AVB32-ES serial port connector. Note that this feature is not available when hardware tunneling is set to ON. See hardware tunneling part of this document for detailed information. AuviTran AVS-Monitor User’s Manual 41 7.8 AVRed-ES / AVRed-ES100 Control Page AuviTran AVRed-ES page overview The AVY16-ES Control page provides: Overview of AVRed status using a LED panel Bi-Directional controls User relays controls AVRed fan and dimmer controls and status Link status and controls Swap link button allows user to change active link if possible. If available, priority link allows user to set Link A to be used prior to link B. AuviTran AVS-Monitor User’s Manual 42 7.9 AVKit / AVKit-ES100 Control Page AuviTran AVKit page overview The AVKit Control page provides: Full control of AD8HR parameters Additional EtherSound functions o Lock EtherSound routing o Emergency clock management o Serial port management Please refer to AD8HR documentation for a full description of AD8HR parameters. Serial port management consists of three available configurations: Tunnel: Hardware tunneling is set on this device EtherSound: PC Remote control of AD8HR is set to ON (user can directly interact with AD8HR) RS232: AD8HR is controlled via its serial port AuviTran AVS-Monitor User’s Manual 43 7.10 AVI64-ES Control Page Depending on the host device, AVS-Monitor will display appropriate control page if AVI64-ES100 is hosted in: RME DMC842. RME Micstasy. RME ADI8-QS. AuviTran AVS-Monitor User’s Manual 44 7.11 Other Control Pages AVS-Monitor provides also control page for: ► Camco Vortex ► Nexo NXAmp ► Nexo NX242 ► Yamaha NAI48-ES ► Yamaha MY16-ES64 ► Yahama DME4io-ES ► Yahama DME8o-ES ► Yahama DME8i-ES ► Yahama SB168-ES ► Yahama M7CL-ES48 ► Digico ES8 ► Digigram Aqonda 8 ► Digigram Aqonda 16 ► Digigram ES8in ► Digigram ES8out ► Digigram ES8mic ► Digigram ES881 ► Digigram ES1241 ► Digigram ES16161 ► Digigram ES220 ► Digigram LX Boards ► NetCira MS8orMS88(MI-6C) ► NetCira MS8orMS88 ► NetCira ES1&2PRO ► NetCira ES1&2 ► NetCira ES6300 ► Pinanson ES-8In ► Pinanson ES-8Out ► Pinanson ES-8Mic ► Allen&Heath iLive surface ► Allen&Heath iDR mix rack A/B ► Innovason DO8X-ES ► Innovason DIO-ES ► Innovason DIO-8Out ►… More information is directly available from each manufacturer. AuviTran AVS-Monitor User’s Manual 45 8 AVS-MONITOR OPERATING MODES 8.1 Online/Offline mode AVS-Monitor has two different operating modes: Online mode: based on connected devices Offline mode: based on virtual devices Offline mode uses virtual devices. These virtual devices can be directly generated from your connected devices by switching to offline mode thanks to the appropriate icon, or generated using the offline editor which will be described later in this document. While in Online mode, each action performed on device is done immediately, such as routing, or parameter change. While in Offline mode, AVS-Monitor simulates each action performed on devices. When all actions are done, user can save configuration into file for future use such as applying on an existing EtherSound network. 8.2 Configuration files AVS-Monitor allows user to export/import configuration files from his current network architecture. Exporting configuration allows user to send his configuration for applying on similar networks, offline editing, or analysis for instance. Generated files contains all devices EtherSound information, as well as, enhanced information such as hierarchy (when available), and software version and parameters. 8.3 Exporting a configuration to a file To export a configuration, user has to select “Save” or “Save as…” option from File menu. A Dialog box will prompt user for naming the file which will contains all information. If hierarchy is unknown when exporting, a dialog box will prompt user to build manually the network hierarchy and redo the file export. 8.4 Importing a configuration from a file To import a configuration, user has to select “Load” option from File menu. A Dialog box will prompt user for selecting the file which will contains all information. In Offline mode, AVS-Monitor will import all devices contained within the configuration file. Thus, allowing user to interact with the virtually created network and devices as if all were connected. In Online mode, AVS-Monitor will try to perform an automatic assignment between information contained within the file and currently discovered devices. A pop-up window will appear after allowing user to make modifications to current AVS-Monitor proposal. For each device, 3 kinds of parameters can be imported: - ES Routing : EtherSound routing (R column) - ES Parameters : EtherSound device parameter (P) - Advanced Properties : Internal device properties Import of internal device properties is only available for: - AVKit-ES100 - SB168-ES - AD8HR connected to AVB32-ES100 and NAI48-ES When offline, these parameters can only be viewed. Multi-assign option allows user to apply one device configuration from file to several connected devices. AuviTran AVS-Monitor User’s Manual 46 Selection dialog after file import On the previous sample, 7 devices were detected by AVS-Monitor. DevA, DevB, DevF, DevD and DevE have been found to perfectly match from configuration file (Same product and MAC Address) DevC has not been found in configuration file, and user has to select manually a device to assign. DevG has been found to match DevH from configuration file (Same product type) At any time, user can: Clear current assignment Redo an automatic assignment (erasing previous manual selection done) When applying a configuration file, user can select what to apply ES Routing: EtherSound routing will be applied if checked ES Parameters: Devices properties will be applied (when possible) if checked Advanced Properties: Devices internal parameters will be applied (when possible) if checked User can also choose to import group saved within the configuration file. If not, previously created group will be kept without any modification. When done, user has to click OK to apply configuration from file to targeted devices. Clicking on cancel will perform nothing and devices will remain unchanged. AuviTran AVS-Monitor User’s Manual 47 9 AVS-EDITOR AVS-Editor is part of the AVS-Monitor software. This software allows user to build new configuration and edit previously saved configuration. 9.1 Main interface This is the control interface of AVS-Editor. ES-Editor control interface Main interface is composed of: Menu: Configuration and network functions Device selector: All available devices for editing configuration Network building: Current configuration Information module: Information on currently selected device AuviTran AVS-Monitor User’s Manual 48 9.2 Menu Menu is organized that way: Menu Submenu File New Load… Save Exit Help About Function Erase current configuration from memory, and start new session Load a configuration previously saved to a file Save current configuration to opened file Exit ES-Editor Display ES-Editor version 9.3 How to build a new configuration Building a configuration is done via drag and drop. User selects which device to add to your configuration from Device selector, and drags it to right place on the Network building side. Device will be automatically added to the configuration. If device is dragged over an empty place, a new network will be created with device set as Primary Master. In the bottom part of the interface, user can: Change device MAC Address Change device alias 9.4 How to edit a configuration Editing a configuration is done by right clicking on devices, and using drag and drop. After successful loading a previously created file, Network building will be updated with data contained within the file. Using drag and drop, user can move part of created EtherSound network from one place to another. Right clicking on device will allow user to delete selected device, or delete selected device and whole its child. 9.5 How to use generated configuration After successful building or editing configuration, user has to save it into a file by using the command “Save” from the file menu. Afterwards, this configuration can be imported in AVS-Monitor both in online or offline mode. Note that AVM500-ES exists in one single device with all ports associated, and as individual devices with dissociated port. AVM500-ES cannot be moved in architecture. AuviTran AVS-Monitor User’s Manual 49 10 AVS-EVENT EDITOR Since version 3.12, AVS-Monitor integrates an automated event management. Thanks to this function, automated script can be executed according to device status. Event reacts to defined GPI/GPO status, or other advanced test (only available on purchasable version). Depending on test type, scripted command are executed on one or more devices. 10.1 Requirements In order to be able to manage user defined events, AVS-Service has to be launched and computer must have access to appropriate devices. Meanwhile, AVS-Monitor is not required to run, ES-Service launch is mandatory as event are fully software managed. 10.2 Main interface This is the control interface of AVS-Event Editor. AVS-Event Editor Main interface Thanks to this interface, user is able to directly managed events. Window provides direct access to: - Add an event - Modify selected event - Create a copy of selected event - Move event Up/Down in the list - Remove selected event - Turn event On/Off Event list present a summary of main event features: - On/Off Status - Event name - Target device - Test type - Event pooling frequency - Event message displayed in ES-Monitor if defined - First action of script if available AuviTran AVS-Monitor User’s Manual 50 10.3 Event creation/modification Event creation or modification brings up a dedicated window that will allow user to fully set all event parameters. AVS-Event Editor Creation/Modification window In order to set/modify an event, user has to set all these fields: - Event name : Set name for this event - AVS-Service Log : To automatically store an entry in the service log file if checked - Target : Set MAC Address of target device to be tested - Test : Select which parameter to test among available AVA4-ES100 GPI / GPO AVP4-ES100 GPI/GPO AVB32-ES100 GPI/GPO AVNF49-ES100 GPI/GPO Audio Toolbox AVBx3 and AVBx7 GPI/GPO Advanced test (only available on option) - State : Parameter state to test or advanced test parameter - Test mode Execute script when test is true and as long as it remains true Execute script when test is false and as long as it remains false Execute script only once when test becomes true Execute script only once when test becomes false - Frequency : Test frequency in msec - Event Message : Displayed message in ES-Monitor if checked - Action : Script command that will be executed Script commands can be enable/disable, and commands sequence can be modified by moving up/down selected event thanks to Up/down button. Using Del button will remove selected script command. AuviTran AVS-Monitor User’s Manual 51 11 NOTE ON USING ASIO WITH AVM500-ES When ASIO Mode is activated on Port C,D or E on AVM500-ES, remember to deactivate 3rd port access if computer running AVS-Monitor is the same computer that will be used for ASIO Streaming. Otherwise, AuviTran Network ASIO Streamer will not be able to find ASIO target device. This happens in this configuration: ES Control + ASIO Ethernet Switch ASIO Streaming ES Control PC Port E Port Here is a capture of configuration to be set: AuviTran AVS-Monitor User’s Manual 52 12 TUNNELING ON ETHERSOUND 12.1 “Hardware RS232 Tunneling” function The “Hardware RS232 tunneling” is disable by default. If the AVY16-ES is the primary master (i.e. it is the first device of an EtherSound network), hardware RS232 tunneling can be set from this AVY16-ES to another remote device of the network. When started an internal hardware process will automatically transmit the data received from the local AVY16-ES RS232 to the remote device RS232 and will receive the incoming data from the remote RS232 to the local RS232. This function is very useful to remotely control from a digital mixing console, using only EtherSound connection, a set of AD8HR connected to EtherSound by AVB32-ES or by AVKit-ES for AD8HR. The digital mixers that can manage AD8HR from a remote serial connector are: PM5D, M7CL, DM2000, DM1000 and DME64N/24N. The procedure to create a Hardware tunneling is the following: 1. 2. 3. 4. 5. Set the speed and configuration of the remote device RS232 (if it is an AVKit-ES for AD8HR, it is done automatically). Press the “Stop” button of the “Hardware RS232 tunneling” area to stop the tunneling on your Primary Master AVY16-ES if it is working. Select the remote device in the combo box of the “Hardware RS232 tunneling” area on your Primary Master AVY16-ES. Press the “Start” button of “the Hardware RS232 tunneling area”. The red light on the left of “Start” button becomes Green to specify that the tunneling is working and the “Start” Button becomes a “Stop” Button. Notices: Hardware RS232 tunneling means that the tunneling between the 2 RS232 (local-remote) is performed even when the controlling PC with AVS-Monitor is disconnected (i.e. It is the AVY16-ES hardware which manages the tunneling not the PC software). Due to specific and intensive EtherSound hardware management, only AVY16-ES, AVKit-ES for AD8HR and AVB32-ES devices and compatible AuviTran devices can be used for hardware RS232 tunneling. AVY16-ES must have a firmware greater than or equal to 0x101. Upgrade it if it is not the case (check for new firmware on AuviTran web site www.auviTran.com). AVKit-ES must have a firmware greater than or equal to 0x201. Upgrade it if it is not the case (check for new firmware on AuviTran web site www.auviTran.com). AuviTran AVS-Monitor User’s Manual 53 Example of use: Remotely control 4xAD8HR connected to an AVB32-ES from a M7CL-32 desk fader. Control & Monitoring IN OUT IN AVY16ES AMP AMP 32 inputs Hardware RS232 Tunneling over EtherSound AMP OUT AVY16ES RS422 RS232(AVY16-ES) Connected to HA Remote(M7CL) RS422 RS422 Amp Control unit AD8HRAES/ EBU In AD8HRAES/ EBU AMP AMP AMP AD8HRAES/ EBU AD8HR AES/ RS232 In Out AMP Out EBU AVB32-ES Amp Control unit Out M7CL-32 Digital Mixer AMP AMP AMP AMP In Example of use: Remotely control AD8HR+AVkit-ES from PM5D desk fader. Amp Control unit In AD8HR+AVKit-ES Hardware RS232 Tunneling over EtherSound Out AMP AMP AMP AD8HR+AVKit-ES RS232/422 Daisy chain AMP HA Remote(PM5D) RS232(AVY16-ES) Control & Monitoring Amp Control unit In AD8HR+AVKit-ES AVY16ES IN OUT AVY16ES IN OUT Up to 64 outputs Out Up to 64 inputs AMP AMP AMP AMP Notices: Refer to appropriate user’s manual for correct wiring of serial cable to use with your Yamaha mixing console. AuviTran AVS-Monitor User’s Manual 54 12.2 Remote Control over EtherSound via YGDAI Midi The AVY16-ES provides a local YGDAI midi interface to its host console which can be remotely link to a build-in AVS-Monitor midi driver. Today, the local YGDAI midi interface is working on the following Yamaha devices: DM2000, DM1000, 02R96, 01V96. DM2000 AVY16-ES EtherSound Network Control over EtherSound Note that this function is only available on AVY16-ES device. AVY16-ES100 is not compatible with this feature. If AVS-Monitor displays a button “Launch Manager” on the control page, you can click on it to launch the Yamaha application which will remotely control the host device. If it is the first time, AVS-Monitor will ask you to provide the link to the application (i.e. the access to the Yamaha application software such as Studio Manager). After the Yamaha application such as studio manager is running, you have to set the Application midi link to “Midi Yoke NT: 2” for input port and “Midi Yoke NT: 1” for output port (if you let the default configuration). Sample below shows a working setting in Control Panel and Yamaha System Setup (screen capture might not be up to date depending on software versions): You can now start the configuration of your network and enjoy the functionalities of AuviTran’s AVY16-ES. AuviTran AVS-Monitor User’s Manual 55 13 IMPORTANT NOTES TO USE SEVERAL AVS-MONITOR To use multiple AVS-Monitor on more than one PC on same Ethernet LAN, the AuviTran (EtherSound) service must run on only one of the machine and must be disabled on the other one. o On the machine where the AuviTran service is running the Local service button must be selected. o On the distant machine, the distant service must be selected with The IP address of the machine where the service is running. Due to today limitation of the EtherSound API provided by Digigram, Only one service AuviTran or Digigram could work at a time on a same Ethernet network (LAN). 13.1 Single AVS-Monitor use Here is a sketch of typical use of AVS-Monitor running on the same computer as the service managing two EtherSound networks. PC Primary Master Ethersound Network #1 Primary Master Ethersound Network #2 AVS-ESMonitor ESService One computer manages two EtherSound networks. 13.2 Multiple AVS-Monitor use This sketch presents several AVS-Monitor on different PC using one service to control several EtherSound networks. PC-1 AVS-ESMonitor Primary Master Ethersound Network #1 Primary Master EtherSound Network #2 ESService PC-2 AVS-ESMonitor PC-3 AVS-ESMonitor Again, only one computer manages two EtherSound networks. AuviTran AVS-Monitor User’s Manual 56 14 ETHERSOUND NETWORK ARCHITECTURE SAMPLES In the following chapter, you will find samples of typical architecture EtherSound system. 14.1 Mono Directional system This sample describes a simple configuration using only downstream audio capabilities from EtherSound. AD824 provides clock for the whole network, and 4 inputs into downstream channels 1 to 4. DM1000 get feeds from downstream channels 1-4, provides 2 inputs to downstream channels 5-6, and adds 2 groups to downstream channels 7-8. DME64N get feeds from downstream channels 1-8, process them and reinsert them in downstream channels 9-16. Both DA824 get feeds from downstream channels 9-16. PC IN OUT IN OUT IN OUT AVY16-ES AVY16-ES AVY16-ES Ethernet Switch (100Megabit) IN OUT IN OUT AVY16-ES AVY16-ES CAT5 Cable Control Only CAT5 Cable Control+Audio EtherSound downstream channels are used that way: Downstream channels AD 824 AD 824 1-4 1-4 Sample 1 DM1000 5-8 1-8 Sample 1 DME64N 9-16 9-16 9-16 Sample 1 DA824 n m Sample 1 DA824 Device gets audio from EtherSound channel n Device provides audio into EtherSound channel m AuviTran AVS-Monitor User’s Manual 57 14.2 Bi Directional system This sample describes a simple configuration using both downstream and upstream audio capabilities from EtherSound. DM1000 provides clock for the whole network, get feeds from upstream channels 1-4, and reinserts them in downstream channels 1-4, provides 2 inputs to downstream channels 5-6, and adds 2 groups to downstream channels 7-8. It can also get monitoring from upstream channels 9-16. AD824 adds 4 inputs into upstream channels 1-4. DME64N get feeds from downstream channels 1-8, process them and reinsert them in downstream channels 9-16. Both DA824 get feeds from downstream channels 9-16. PC IN OUT IN OUT AVY16-ES AVY16-ES IN OUT AVY16-ES Ethernet Switch (100Megabit) IN OUT IN OUT AVY16-ES AVY16-ES CAT5 Cable Control Only CAT5 Cable Control+Audio CAT5 Cable Control+BiDirAudio EtherSound downstream and upstream channels are used that way: Downstream channels Upstream channels 1-4 + 9-16 AD 824 DM1000 1-4 + 5-8 Sample 1 AD824 1-4 1-8 Sample 1 DME64N 9-16 9-16 9-16 Sample 1 DA824 n m Sample 1 DA824 Device gets audio from EtherSound channel n Device provides audio into EtherSound channel m AuviTran AVS-Monitor User’s Manual 58 14.3 Ring system This sample describes a simple configuration using ring mode audio capabilities from EtherSound. DM1000 is set as Preferred Primary Master and provides clock for the whole network, get feeds from upstream channels 1-4, and reinserts them in downstream channels 5-8, provides 2 inputs to downstream channels 9-10, and adds 2 groups to downstream channels 11-12. It can also get monitoring from upstream channels 13-20. AD824 adds 4 inputs into downstream channels 1-4. DME64N get feeds from upstream channels 5-12, process them and reinsert them in downstream channels 13-20. Both DA824 get feeds from upstream channels 13-20. PC 3rd IN OUT IN OUT AVY16-ES100 AVY16-ES100 IN OUT AVY16-ES100 CAT5 Cable Control Only IN OUT AVY16-ES100 IN OUT AVY16-ES100 CAT5 Cable Control+BiDirAudio EtherSound downstream and upstream channels are used that way: Downstream channels Upstream channels 1-4 + 13-20 AD 824 DM1000 5-12 Sample 1 AD824 1-4 Sample 1 DME64N 13-20 5-12 13-20 Sample 1 DA824 13-20 Sample 1 DA824 n m Device gets audio from EtherSound channel n Device provides audio into EtherSound channel m AuviTran AVS-Monitor User’s Manual 59