1
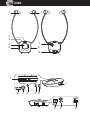
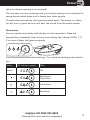
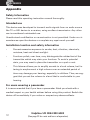
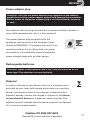
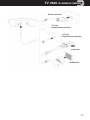
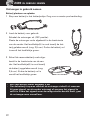
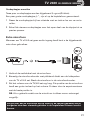
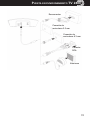
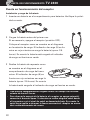
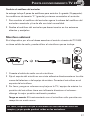
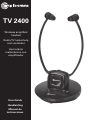
TV 2400
Wireless amplified
headset
Radio/TV luisterhulp
met versterker
Auriculares
inalámbricos con
amplificador
User Guide
Handleiding
Manual de
instrucciones
At a glance
Overzicht
Información general
Please open this page for “At a glance“ guide to your TV 2400.
Dit uitvouwblad toont u een overzicht van uw TV 2400.
Esta página desplegable le muestra una visión general de su TV 2400.
ÜBERSICHT
TV
2400
1
1
2
3
7
4
5
6
8
1
7
2
3
4
5 6
8
9
10
AT
A GLANCE
Receiver
1
Headset left/right
2
Volume control
3
Power on indicator
4
Microphone button for room monitoring
5
On/Off switch
6
Microphone
7
Volume balance (left/right)
8
Battery
Transmitter base
1
Charging cradle
2
LED Indicator of Tone Clarity
3
Tone Clarity Button
4
LED Indicator of Power
5
LED Charging Indicator for Main Battery (attached to Headset
Receiver)
6
LED Charging Indicator for Spare Battery
7
Spare Charging Slot
8
DC In
9
3.5 mm Audio In Socket
10
Mono/Stereo Switch
Helpline UK 0844 800 6503
(See page 32 for costs and hours of operation)
Getting started
Helpline UK 0844 800 6503
(See page 32 for costs and hours of operation)
1
GETTING
STARTED
Getting started
Box contents
•
1 Receiver with rubber ear buds size “L“ (large)
•
1 Transmitter base
•
1 AC adapter for the transmitter
•
2 Rechargeable batteries for the receiver (Lithium Polymer)
•
1 Audio cable (both ends with 3.5 mm stereo plug)
•
1 Adapter cable (RCA)
•
1 SCART Adapter for TV
•
1 Adapter plug 6.3 mm to 3.5 mm
•
1 External microphone with adapter plug and holder
•
1 Additional pair of rubber ear buds size “S“ (small)
•
1 User guide
Important: please make sure you’ve read the safety information on page
30 before you set up your device.
Connecting the transmitter
1 Connect the power adapter to the DC IN input socket located on the
transmitter rear panel.
2 Connect the power adapter provided to an electrical outlet.
3 Connect the transmitter to your audio source.
RCA adapter cable, audio cable, 6.3 mm to 3.5 mm adapter plug, external
microphone and a SCART adapter for TV are provided for various type of
connection to your audio source (e.g. TV set, Hi-Fi system, MP3 or iPod).
The green power indicator LED will blink as soon as you have connected the
power adapter to the electrical outlet and when the audio signal is detected
from the audio source, the green LED indicator will glow constantly.
2
Helpline UK 0844 800 6503
(See page 32 for costs and hours of operation)
GETTING
Helpline UK 0844 800 6503
(See page 32 for costs and hours of operation)
STARTED
3
GETTING
ERÄTE IN
STARTED
BETRIEB
NEHMEN
Set up the receiver
Installing and charging the battery
1 Insert a battery into the headset receiver with correct polarity.
2 Charge the battery for about 2 hours and 30 minutes
before first use. Switch off the receiver (position OFF).
Place the receiver into the charging cradle of the transmitter. The charging process starts automatically. The
battery LED indicator will be red and will turn to green
when the battery is fully charged. This takes about 2
hours and 30 minutes.
3 Insert the spare battery into the
base as indicated in the drawing.
The LED will remain red and turn
green when it is fully charged after
about 2 hours and 30 minutes.
•
•
4
A fully charged battery provides up to 5 hours of listening enjoyment.
To conserve battery power, the receiver automatically shuts off if no
signal is detected for a period of approx. 5 minutes or when the level
is too low. However, if the signal returns to an acceptable level, the
transmitter will automatically switch ON again.
Helpline UK 0844 800 6503
(See page 32 for costs and hours of operation)
GETTING
STARTED
Changing the rubber ear buds
Two pairs of ear buds are delivered with the device (L=large/S=small).
The ear buds “L“ (large) are already mounted on the headset.
1 For changing the ear buds pick the mounted ear buds at the end and tear
them off simply.
2 Position the spare ear buds onto the “open ends“ and let them snap into
place.
External microphone
If your TV set or HiFi system does not have any audio jack you should use
the external microphone.
1 Connect the audio cable to the microphone.
2 Fasten the microphone holder using the adhesive strip adjacent to the
speaker grill on the TV and then clip the microphone into the holder so
that it locates just above the speaker.
3 Please set a very low volume on the TV / on the HiFi system. The position of the microphone has a decisive influence on the volume - please
determine the best position by experimentation.
Note: The output will be in mono when using the microphone.
Please make sure that the microphone is not too close to the sender,
otherwise this will result in interference being picked up by the microphone which will be heard as digital noise in the headset.
Helpline UK 0844 800 6503
(See page 32 for costs and hours of operation)
5
GETTING
6
STARTED
Helpline UK 0844 800 6503
(See page 32 for costs and hours of operation)
Operation
Helpline UK 0844 800 6503
(See page 32 for costs and hours of operation)
7
OPERATION
Operation
Hearing damage due to high volumes!
This receiver allows you to set higher volumes than conventional headphones. This can cause hearing damage in persons with healthy hearing
and especially in children.
• Before putting the receiver on, set the volume on the receiver to a low
value.
• Do not continuously expose yourself to high volumes.
1 Switch on the audio source. The green indicator LED on the transmitter
will glow constantly.
2 Switch the On/Off switch on the headset receiver to ON position,
3 Flex the head set arms outwards until the ear buds can be inserted in the
ear. Please note the ear buds can be angled through a movement up,
down or sideways, so as to enter the ear a little deeper. This will improve
the sound quality and volume. Gently press the ear buds further into the
ear to find a comfortable position for the ear buds and an ideal position for
the sound.
4 Adjust the tone clarity setting if necessary.
Note: When the battery level is low you will hear 3 beeps every minute
in the headset receiver. The headset receiver will be switched off automatically after 5 minutes.
The microphone button
The microphone opening at the side of the receiver pick up the sounds of
your surroundings. When the microphone is switched on, you will hear
your surroundings louder. You can hear for example your door bell, your
telephone or your conversational partner even when you are wearing the
receiver.
Press the button to switch the microphone on. The power on indicator will
turn from green to red and two short beeps are to be heard. Make sure that
8
Helpline UK 0844 800 6503
(See page 32 for costs and hours of operation)
OPERATION
the microphone opening is not covered!
You can hear your surroundings and you use the receiver as an assistive listening device which helps you to better hear other people.
To switch the microphone off press the button again. The power on indicator will turn to green and you will hear the sound from the audio source.
Tone clarity
You can set the tone clarity with the key on the transmitter. Press the
depicted key repeatedly. Due to the current setting the indicator LEDs 1, 2,
3 or none of them will glow constantly.
The following table shows the settings. Try out which setting works best for
you.
Setting
Default
LED indicator (orange)
Effect
Flat
Bass Boost +
Treble Boost
Treble Boost
Bass Boost
Helpline UK 0844 800 6503
(See page 32 for costs and hours of operation)
9
OPERATION
Troubleshooting
No sound
- Ensure that the mains adapter is pushed fully into the power outlet and
that its cable is properly connected to the DC IN connector on the transmitter.
- Ensure that the headset receiver power ON/OFF switch is switched to ON.
- The charge level of the battery inside headset receiver may be too low.
Recharge the battery or replace it with a fully charged battery.
- Ensure that the TV set, Hi-Fi system or audio component is switched ON
and set to a channel that broadcasts an audio signal.
- Use the volume control on the headset receiver to increase the sound
level.
- The connected audio/video equipment may not be in playback mode.
Start playback on by the equipment.
- The headset receiver output level is set too low. Adjust the volume to a
suitable level.
Distortion
- The charge level of the battery inside the headset receiver may be too
low. Recharge the battery or replace them with a fully charged battery.
- The headset receiver may be too far away from the transmitter. Move closer to it.
- The audio signal input level is too low. Increase the volume from the
audio source.
10
Helpline UK 0844 800 6503
(See page 32 for costs and hours of operation)
Appendix
Helpline UK 0844 800 6503
(See page 32 for costs and hours of operation)
11
APPENDIX
NHANG
Appendix
Safety Information
Please read this operating instruction manual thoroughly.
Intended use
This device was developed to transmit audio signals from an audio source
like TV or HiFi device to a receiver, using cordless transmission. Any other
use is considered unintended use.
Unauthorised modification or reconstruction is not permitted. Under no circumstances open the devices or complete any repair work yourself.
Installation location and safety information
•
Prevent excessive exposure to smoke, dust, vibration, chemicals,
moisture, heat and direct sunlight.
•
Furniture polish, over time, may disintegrate the rubber feet of the
transmitter which may stain your furniture. To avoid a potential
stain, you may want to place the transmitter on a pad or mat.
•
This listener allows you to amplify sounds to a loud volume, but listening to earphones at a high volume over an extended period of
time may damage your hearing; especially in children. Thus, we suggest that you set the volume to a level that is comfortable to your
hearing.
For users wearing a pacemaker
It is recommended that if you have a pacemaker fitted you check with a
medical expert or your health adviser before using this product. Switch the
device off immediately if you notice or suspect any adverse effects.
12
Helpline UK 0844 800 6503
(See page 32 for costs and hours of operation)
APPENDIX
Power adapter plug
Attention: Only use the power adapter plug contained in the material
supplied since other power adapter plugs could damage the transmitter.
Ensure access to the power adapter plug is not obstructed by furniture
or such.
Pay attention that the plug and cable are in perfect condition. Kinked or
worn cable represents the risk of a fatal accident!
The power adapter plug supplied fulfils the
ecodesign requirements of the European Union
(Directive 2005/32/EC). This means that, both in an
operating state and in an idling state, the power
consumption is considerably lower compared to
power adapter plugs with an older design.
Rechargeable batteries
Attention: Never throw batteries into a fire. Only use batteries of the
same type! Pay attention to correct polarity.
Disposal
In order to dispose of your device, take it to a collection point
provided by your local public waste authorities (e.g. recycling
centre). According to laws on the disposal of electronic and
electrical devices, owners are obliged to dispose of old electronic and electrical devices in a separate waste container. The
adjacent symbol indicates that the device must not be disposed
of in normal domestic waste!
Helpline UK 0844 800 6503
(See page 32 for costs and hours of operation)
13
APPENDIX
NHANG
Batteries represent a hazard to health and the environment!
Never open, damage or swallow batteries or allow them to pollute the environment. They may contain toxic, ecologically
hazardous heavy metals. You are legally obliged to dispose of
power packs and batteries at the point of sale or in the corresponding containers provided at collection points provided by
local public waste authorities. Disposal is free of charge. The
adjacent symbols indicate that the batteries must not be disposed of in normal domestic waste and must be brought to collection points provided by local public waste authorities.
Packaging materials must be disposed of according to local
regulations.
Helpline
If you need some help and you’re in the UK, please first check and see if
your problem can be solved using the troubleshooting guide on page 28. If
it can’t , please call us on 0844 800 6503 (using a UK landline, at the time of
going to print: calls cost 6p for connection charge and then 5p a minute.
Mobile costs may vary). Lines are open Monday to Friday, 9am to 5pm,
excluding public holidays.
If you’ve a claim on your 2-year guarantee, please contact your supplier.
Declaration of conformity
This device fulfils the requirements stipulated in the EU directive:
1999/5 EU directive on radio equipment and telecommunications terminal
equipment and the mutual recognition of their conformity.
Conformity with the above mentioned directive is confirmed by the CE symbol on the device.
To view the complete Declaration of Conformity, please refer to the free
download available on our website www.amplicomms.com
14
Helpline UK 0844 800 6503
(See page on this page for costs and hours of operation)
APPENDIX
Maintenance
•
Clean the housing surfaces with a soft, fluff−free cloth.
•
Never use cleaning agents or solvents.
Technical data
Transmission mode:
UHF stereo
Carrier frequency:
2.4GHz Digital
Range:
Up to 30 meters (open area)
Frequency response:
30 Hz – 20 KHz
Max volume
120 dB
Distortion:
< 0.5%
Signal-to-noise ratio:
> 75 dB
Operating voltage (Transmitter): 5 VDC, 550 mA
Operating voltage (Receiver):
3.7 V, 350 mA Lithium Polymer Battery
Operation time:
With fully charged battery up to 5 hours
Charging time:
For empty battery approx. 2.5 hours
Weight Receiver
53 g
Weight Transmitter
115 g
Helpline UK 0844 800 6503
(See page 32 for costs and hours of operation)
15
APPENDIX
NHANG
Guarantee
AMPLICOMMS equipment is produced and tested according to the latest
production methods. The implementation of carefully chosen materials and
highly developed technologies ensure trouble free functioning and a long
service life.
The terms of the guarantee do not apply to the rechargeable batteries or
power packs used in the products. The period of guarantee is 24 months
from the date of purchase.
All deficiencies resulting from material of production faults which occur
during the period of guarantee will be eliminated free of charge. Rights to
claims under the terms of guarantee are annulled following intervention by
the purchaser or third parties. Damage caused as a result of improper handling or operation, incorrect positioning or storing, improper connection or
installation, Acts of God or other external influence are not covered by the
terms of guarantee.
In the case of complaints, we reserve the right to repair or replace defect
parts or provide a replacement device. Replacement parts or devices become our property.
Rights to compensation in the case of damage are excluded where there is
no evidence or intent or gross negligence by the manufacturer.
If your equipment shows signs of defect during the period of guarantee,
please return to the sales outlet in which you purchased the AMPLICOMMS
equipment together with the purchase receipt. All rights to claims under the
terms of guarantee in accordance with this agreement must be asserted
exclusively with regard to your sales outlet.
Two years after the purchase of our products, claims under the terms of
guarantee can no longer be asserted.
16
Helpline UK 0844 800 6503
(See page 32 for costs and hours of operation)
NOTES
Notes
Helpline UK 0844 800 6503
(See page 32 for costs and hours of operation)
17
TV2400
Ontvanger
1
Oordopjes links/rechts
2
Volumeknop
3
Stroom aan LED lampje
4
Microfoonknop om omgevingsgeluid te horen
5
Aan-/Uit-knop
6
Microfoon
7
Volume balans (links/rechts)
8
Batterij
Zender
18
1
Laaddoos
2
LED lampje toonkwaliteit
3
Knop voor toonkwaliteit
4
Stroom LED lampje
5
LED lampje voor laden van hoofdbatterij (koptelefoon)
6
LED lampje van reservebatterij
7
Reservebatterijhouder
8
Stroomaansluiting
9
Audio-ingang (3,5 mm)
10
Mono/Stereo-schakelaar
TV 2400 in
gebruik nemen
19
TV 2400
IN GEBRUIK NEMEN
TV 2400 in gebruik nemen
Verpakkingsinhoud
•
1 Ontvanger met oordopkapjes in L-grootte (groot)
•
1 Zender
•
1 Stroomaansluiting voor de zender
•
2 Oplaadbare batterijen voor de ontvanger (Lithium Polymer)
•
1 Audiokabel (2 x 3,5 mm connector)
•
1 Audio adapter (RCA)
•
1 Scart-Adapter voor TV
•
1 6,3 mm / 3,5 mm adapter plug
•
1 Extra microfoon met adapter plug en microfoonhouder
•
1 paar extra oordopkapjes in S-grootte(klein)
•
1 Handleiding
Belangrijk: Lees eerst de veiligheidsaanwijzingen op pagina 50 voordat
u het apparaat in gebruik neemt.
Zender aansluiten
1 Verbind de stekker van de netstroom met de DC IN-aansluiting aan de
achterkant van de zender.
2 Steek de stroomkabel in een stopcontact.
3 Verbind de zender met uw audiobron.
Verschillende adapters en een microfoon zijn bijgeleverd en maken allerlei aansluitingen met TV of stereoset en luidspreker mogelijk.
Het groene LED lampje knippert zodra de stroom aangesloten is en blijft
constant branden zodra het een audiosignaal herkent.
20
TV 2400
IN GEBRUIK NEMEN
Scart-connector
3,5 mm
Koptelefoonconnector
6,3 mm
Koptelefoonconnector
RCAconnector
Luidspreker
21
GERÄTE
TV
2400
IN IN
BETRIEB
GEBRUIK
NEHMEN
NEMEN
Ontvanger in gebruik nemen
Batterij plaatsen en opladen
1 Stop een batterij in het batterijvakje. Zorg voor correcte poolverbinding.
2 Laad de batterij voor gebruik.
Schakel de ontvanger uit (OFF-positie).
Plaats de ontvanger zoals afgebeeld in de laadruimte
van de zender. Het laadlichtje(5) is rood terwijl de batterij geladen wordt (ong. 2,5 uur). Zodra de batterij vol
is wordt het laadlichtje groen.
3 Schuif de reservebatterij zoals afgebeeld in de laadruimte van de zender. Het laadlichtje(6) is rood terwijl
de batterij opgeladen wordt (ong.
2,5 uur). Zodra de batterij vol is
wordt het laadlichtje groen.
•
•
22
Een volle batterij werkt ongeveer 5 uur
Om de batterij te sparen schakelt de ontvanger zichzelf uit wanneer
hij geen signaal van de zender ontvangt of wanneer het signaal te
zacht is. Zodra het signaal weer de nodige sterkte bereikt heeft, gaat
de ontvanger weer vanzelf aan.
TV 2400
IN GEBRUIK NEMEN
Oordopkapjes omruilen
Twee paar oordopkapjes worden bijgeleverd (L=groot/S=klein).
Een paar grote oordopkapjes„L“, zijn al op de koptelefoon gemonteerd.
1 Neem de oordopkapjes bij hun uiteinde vast en trek ze los om ze om te
ruilen.
2 Schuif de nieuwe oordopkapjes over het open deel van de dopjes tot ze
precies passen.
Extra microfoon
Wanneer uw TV of Hifi set geen audio-ingang heeft kunt u de bijgeleverde
microfoon gebruiken.
1 Verbind de audiokabel met de microfoon.
2 Bevestig de microfoonhouder met plakband direkt aan de luidspreker
van de TV of Hifi set. Steek de microfoon in de microfoonhouder.
3 Zet het volume van de TV/Hifi set erg laag. Die positie van de microfoon
heeft een grote invloed op het volume. Probeer door te experimenteren
wat de beste positie is.
NB: Als u gebruik maakt van de microfoon is alleen mono-ontvangst
mogelijk.
Zorg ervoor dat de microfoon niet te dicht bij de zender geplaatst wordt
aangezien daardoor storende geluiden in de koptelefoon kunnen terechtkomen.
23
TV 2400
24
IN GEBRUIK NEMEN
Gebruik
25
GEBRUIK
Gebruik
Hoog geluidsvolume beschadigt het gehoor!
Deze ontvanger kan op hogere volumes ingesteld worden dan conventionele koptelefoons. Personen met een gezond hoorvermogen en vooral kinderen kunnen hierdoor schade aan hun gehoor oplopen.
• Draai het volume van uw koptelefoon lager voordat u hem aanzet.
• Stel uzelf niet bloot aan hogere geluidsvolumes.
1 Zet het audiotoestel aan.Het groene LED-lampje van de zender gaat aan.
2 Schuif de Aan-/Uitschakelaar van de koptelefoon naar de „ON“-positie.
3 Buig de armen van de koptelefoon uit elkaar zodat de oordopjes in de
oren gestoken kunnen worden. Let erop dat men de dopjes naar boven,
naar beneden en zijwaarts kan ombuigen zodat ze een beetje dieper in
het oor gedrukt kunnen worden. Daardoor wordt de klankkwaliteit en het
volume beter. Druk de oordopjes zachtjes verder in het oor zodat ze goed
passen en de klank optimaal is.
4 Verander de volume-instelling volgens eigen behoefte .
Noteer: Wanneer de batterij bijna leeg is zult u elke minuut drie korte
pieptonen horen. De koptelefoon zal dan na ongeveer 5 minuten uitgeschakeld worden.
De Microfoonknop
De microfoonopening aan de zijkant van uw koptelefoon neemt geluiden uit
uw omgeving op. Wanneer de microfoon ingeschakeld is hoort u meer van
uw omgeving. U kunt dan bijvoorbeeld terwijl u de koptelefoon ophebt, uw
deurbel, uw telefoon of uw gesprekspartner horen.
Om de microfoon aan te zetten moet u de microfoonknop induwen. Het verkliklichtje verandert dan van groen naar rood en u hoort ook twee korte
pieptonen. Let erop dat de microfoonopening aan de zijkant niet afgeschermd is. U hoort uw omgeving en u kunt de koptelefoon als geluidsversterker gebruiken om uw gesprekspartner beter te verstaan.
26
GEBRUIK
Druk nogmaals op de knop om de microfoon uit te schakelen. Het verkliklichtje verandert weer naar groen en u hoort weer het geluid van uw TV of
radio.
Instellen van toonkwaliteit
De toonkwaliteit kan op de zender ingesteld worden Door herhaaldelijk op
de knop te drukken (zie afbeelding) gaan de LED-lichtjes 1, 2, of 3 branden
of geen van de drie.
De volgende tabel toont de mogelijke instellingen aan. Ga na welke instelling u het beste past.
Instelling
Standard
LED-lichtje (Oranje)
Effekt
Neutraal
Versterking bassen +
Versterking hoge tonen
Versterking hoge tonen
Versterking bassen
27
GEBRUIK
Problemen oplossen
Geen geluid
- Zorg ervoor dat de stroomkabel tussen de zender (DC IN) en het stopcontact aan beide kanten goed aangesloten is.
- Zorg ervoor dat de schakelaar aan de koptelefoon in de ON-positie is.
- Misschien is de batterij in de koptelefoon leeg. Laad de batterij van de
zender weer op of verwissel hem met de geladen reservebatterij.
- Verzeker u ervan dat het toestel waarvan u de klank wil horen (radio,TV)
aan is en op een zender.of kanaal afgestemd is. Gebruik ook de volumeknop aan de koptelefoon om het volume hoger te zetten.
- Het audio- of videotoestel waarop u aangesloten bent staat misschien niet
op playback. Zet de playback aan op het toestel.
- Het volume van de koptelefoon staat te laag. Draai het volume hoger.
Stoorgeluiden
- Misschien is de batterij van de koptelefoon leeg. Laad de batterij weer op
of vervang hem met de geladen reservebatterij.
- De afstand tussen de koptelefoon en de zender is misschien te groot. Probeer of de kwaliteit verbetert wanneer u dichter bij de zender gaat zitten.
- Het ingangsvermogen van het audiosignaal is te laag. Verhoog het volume van de audiobron.
28
Bijlage
29
AIJLAGE
B
NHANG
Bijlage
Veiligheidsaanwijzingen
Lees deze handleiding zorgvuldig door en bewaar hem goed.
Reglementair gebruik
Dit apparaat is bedoeld om klanksignalen van een televisietoestel of een
stereo-installatie vanuit een zender naar een ontvanger te sturen zonder
kabels, met behulp van een infraroodlicht. Elk ander gebruik is niet toegestaan.
Eigenhandige wijzigingen of aanpassingen zijn niet toegestaan. Open het
apparaat nooit en probeer het apparaat nooit zelf te repareren.
Plaatsing en veiligeidsinformatie
•
Vermijd blootstelling aan rook, stof, trillingen, chemische stoffen,
vocht, hitte of direct zonlicht.
•
Aangezien meubels tegenwoordig met een veelvoud van laksoorten
en kunststoffen behandeld worden, kan het gebeuren dat veel van
die stoffen de rubberen pootjes van dit toestel kunnen aantasten en
vlekken op uw meubels kunnen maken. Gebruik daarom een slipvaste onderlegger voor uw toestel.
•
Deze ontvanger kan grote geluidsvolumes opwekken. Als dit toestel
door meerdere personen gebruikt wordt, is het beter het volume
altijd op de laagste stand te zetten voordat u de koptelefoon in uw
oren aanbrengt.
Voor gebruikers van een pacemaker
Als u een pacemaker hebt, moet u eerst uw arts raadplegen of het begruik
van dit toestel veilig is. Schakel dit toestel uit wanneer u vermoedt dat er
iets niet in orde met u is.
30
BIJLAGE
Adapter
Opgelet: Gebruik enkel de meegeleverde adapter, want andere adapters
kunnen het bewakingssysteem beschadigen. De toegang tot de adapter
mag niet worden belemmerd door meubels of andere voorwerpen.
Zorg bij gebruik van de adapter ervoor dat de kabel en stekker niet beschadigd zijn. Geknakte of versleten kabels zijn levensgevaarlijk!
De adapter voldoet aan de vereisten voor ecologisch
ontwerp van de Europese Unie (Richtlijn 2005/32/EG).
Dit betekent dat wanneer het apparaat in gebruik of
in stand-by staat, het stroomverbruik in vergelijking
met oudere types adapters beduidend lager is.
Accu’s
Opgelet: Werp de accu's nooit in het vuur. Gebruik enkel de voor dit
apparaat gespecificeerde accu's! Let op een juiste polariteit!
Afvalverwijdering
Wanneer u het apparaat wilt afvoeren, brengt u het naar een verzamelpunt
van uw plaatselijke afvalverwerkingsbedrijf (bv. een containerpark). Krachtens de wetgeving betreffende afgedankte elektrische en elektronische apparaten zijn eigenaars van afgedankte apparaten wettelijk verplicht oude elektrische en elektronische apparaten apart
af te voeren. Het symbool hiernaast betekent dat het apparaat in
geen geval bij het huisvuil mag worden geworpen!
Gevaar voor de gezondheid en voor het milieu door accu's en
batterijen!
31
AIJLAGE
B
NHANG
Accu's en batterijen nooit openen, beschadigen, inslikken of in
het milieu introduceren. Ze kunnen giftige en milieuschadelijke
zware metalen bevatten.
U bent wettelijk verplicht om accu's en batterijen op een veilige
manier af te voeren via een handelaar die batterijen verkoopt of
via een inzamelpunt voor batterijen, waar geschikte containers
ter beschikking staan. Het afvoeren gebeurt kosteloos. De symbolen hiernaast betekenen dat u accu's en batterijen in geen
geval in het huisvuil mag werpen en dat u ze naar een geschikt
inzamelpunt moet brengen.
De verpakkingsmaterialen moeten worden afgevoerd in overeenstemming met de lokale voorschriften.
Probeemoplossing
Kijk eerst naar de aanwijzingen op bl. 10 indien u problemen hebt met uw
toestel. Bij garantieaanspraken neemt u contact op met uw handelaar.
De garantieperiode bedraagt 2 jaar.
Conformiteitsverklaring
Dit apparaat voldoet aan de vereisten van de EU-richtlijn:
1999/5/EG Richtlijn betreffende radioapparatuur en telecommunicatie-eindapparatuur en de wederzijdse erkenning van hun conformiteit. De conformiteit met bovengenaamde richtlijn wordt bevestigd door het CE-kenteken op
het apparaat.
De volledige conformiteitsverklaring kunt u gratis downloaden van onze
website www.amplicomms.com
32
BIJLAGE
Onderhoud
•
Reinig de behuizing met een zachte en pluisvrije doek.
•
Gebruik geen reinigingsmiddelen of oplossingsmiddelen.
Technische informatie
Transmissie
UHF Stereo
Frequentie
2,4 GHz digitaal
Reikwijdte
tot 30 m (in optimale omstandigheden)
Frequentiebereik
30 Hz - 20 kHz
Maximum volume
120 dB
Distortie
< 0,5 %
Signaal/ruis-verhouding
> 75 dB
Stroomvoorziening (zender)
Adapter, uitvoer: 5 VDC, 550 mA
Stroomvoorziening (ontvanger)
1 batterij 3,7 V / 350 mA Lithium Polymer
Bedrijfsduur
Met volle batterij tot 5 uur
Oplaadtijd
Voor lege batterij ong. 2,5 uur
Gewicht
Zender: ca. 115 g
Ontvanger: ca. 53 g
33
AIJLAGE
B
NHANG
Garantie
AMPLICOMMS-apparaten worden geproduceerd en getest met de modernste productieprocessen. Nauwkeurig geselecteerde materialen en geavanceerde technologieën zorgen voor een probleemloze werking en een lange
levensduur.
De garantieperiode bedraagt 24 maanden, berekend vanaf de dag van aankoop. De garantie geldt niet voor de batterijen, accu's of accupacks gebruikt
in het product.
Binnen de garantieperiode worden alle defecten die te wijten zijn aan materiaal- of fabricagefouten, kosteloos gerepareerd. De garantie vervalt bij
ingrepen aan het apparaat door de koper of door derden. Schade die door
onrechtmatige hantering of bediening, natuurlijke slijtage, verkeerd opstellen of bewaren, onrechtmatige aansluiting of installatie, geweld of andere
externe invloeden is ontstaan, wordt niet gedekt door de garantie.
Wij behouden ons het recht voor, in geval van een klacht, om naar eigen
goeddunken de defecte delen te repareren of te vervangen, of het volledige
apparaat te ruilen. Ingeruilde onderdelen of ingeruilde apparaten worden
onze eigendom. Aanspraken op schadevergoeding zijn uitgesloten, in zoverre ze niet gebaseerd zijn op opzet of grote nalatigheid vanwege de fabrikant.
Indien uw apparaat toch een defect vertoont binnen de garantieperiode,
neemt u uitsluitend contact op met de handelszaak waar u het AMPLICOMMS-apparaat hebt gekocht, op vertoon van uw aankoopbewijs. Alle
garantieclaims volgens deze bepaling kunnen enkel geldig worden gemaakt
bij uw handelaar. Na twee jaar na aankoop en overhandiging van onze producten vervallen de garantierechten.
34
NOTA'S
Nota's
35
TV2400
Receptor
1
Auricular derecha / izquierda
2
Configuración volumen
3
Indicador de funcionamiento
4
Tecla de micrófono para escuchar los sonidos del entorno
5
Interruptor On/Off
6
Micrófono
7
Ajuste (izquierda / derecha)
8
Batería
Transmisor
36
1
Entrada de carga
2
Indicación de la claridad de tono
3
Tecla para el ajuste de la claridad de tono
4
Indicador de funcionamiento
5
Indicador de carga del auricular
6
Indicador de carga de la batería de repuesto
7
Ranura de inserción batería de repuesto
8
Conexión para fuente de alimentación
9
Entrada de audio (3,5 mm)
10
Interruptor mono / estéreo
Puesta en
funcionamiento
TV 2400
37
PUESTA
EN FUNCIONAMIENTO
TV 2400
Puesta en funcionamiento TV 2400
Contenido del paquete
•
1 Receptor con audífono para auricular tamaño L (grande)
•
1 Transmisor
•
1 Fuente de alimentación para el transmisor
•
2 Baterías para el receptor (polímero de litio)
•
1 Cable de audio (clavija jack 2 x 3,5 mm)
•
1 Adaptador de audio (RCA)
•
1 Euroconector
•
1 Adaptador 6,3 mm / 3,5 mm
•
Micrófono con adaptador y soporte para micrófono (incluido el material
de fijación)
•
1 Par de audífonos para auricular en tamaño S (pequeño)
•
1 Manual de instrucciones
Importante: Antes de usar el aparato lea las instrucciones de seguridad
en la página 64.
Conectar el transmisor
1 Conecte la fuente de alimentación a la entrada de conexión situada en la
parte posterior del transmisor.
2 Conecte la fuente de alimentación en un enchufe.
3 Conecte el transmisor en su fuente de audio deseada.
Para las diversas opciones de conectividad (TV, equipo de música, etc.)
se incluye en la entrega más de un adaptador y un micrófono que puede
conectar antes del altavoz.
El indicador de funcionamiento verde parpadea cuando existe una tensión
de red y permanece encendido cuando se detecta la señal de una fuente de
audio.
38
PUESTA
EN FUNCIONAMIENTO
TV 2400
Euroconector
Conexión de
auriculares 3.5 mm
Conexión de
auriculares 6.3 mm
Conector
RCA
Altavoces
39
GUESTA
P
ERÄTE EN
IN B
FUNCIONAMIENTO
ETRIEB NEHMEN TV 2400
Puesta en funcionamiento del receptor
Instalación y carga de la batería
1 Inserte una batería en el compartimento para baterías. Verifique la polaridad correcta.
2 Cargue la batería antes del primer uso.
Si es necesario, apague el receptor (posición OFF).
Coloque el receptor como se muestra en el diagrama
en la estación de carga. El indicador de carga (5) se ilumina en rojo mientras se carga la batería (aprox. 2.5
horas). En cuanto la batería está cargada el indicador
de carga se ilumina en verde.
3 Deslice la batería de repuesto como
se muestra en el diagrama en el
compartimento de carga del transmisor. El indicador de carga (6) se
ilumina en rojo mientras se carga la
batería (aprox. 2.5 horas). En cuanto
la batería está cargada el indicador de carga se ilumina en verde.
•
•
40
Una batería completamente cargada ofrece un tiempo de funcionamiento de hasta 5 horas.
Para ahorrar la energía de la batería, el receptor se apaga automáticamente si durante aprox. 5 minutos no recibe ninguna señal desde
el transmisor o si el nivel de señal es demasiado bajo. En cuanto la
señal haya vuelto a alcanzar la fuerza necesaria el receptor se encenderá automáticamente de nuevo.
PUESTA
EN FUNCIONAMIENTO
TV 2400
Cambiar el audífono del auricular
La entrega incluye 2 pares de audífonos para auricular (L=grande / S=pequeño).
Los audífonos de tamaño "L" (grande) ya vienen conectados al auricular.
1 Para cambiar el audífono del auricular agarre la cabeza del audífono del
auricular conectado y tire de ella con total normalidad.
2 Deslice el audífono del auricular que desea insertar en los extremos
abiertos y encájelos.
Micrófono adicional
Si el dispositivo por el cual desea escuchar el sonido a través del TV 2400
no tiene salida de audio, puede utilizar el micrófono que se incluye.
1 Conecte el cable de audio con el micrófono.
2 Fije el soporte del micrófono con cinta adhesiva directamente en los altavoces del televisor o del equipo de música. Conecte el micrófono en el
soporte del micrófono.
3 Por favor, ponga un volumen muy bajo en la TV / equipo de música. La
posición del micrófono tiene una influencia directa en el volumen obtenga la mejor posición realizando pruebas.
Tenga en cuenta: El funcionamiento con el micrófono sólo permite una
recepción en modo mono.
Por favor, asegúrese de que el micrófono no esté demasiado cerca del
receptor, ya que puede producir ruidos en los auriculares.
41
PUESTA
42
EN FUNCIONAMIENTO
TV 2400
Manejo
43
MANEJO
Manejo
¡Un volumen muy elevado daña el oído!
En este auricular se pueden ajustar altos niveles de volumen al igual
que en los dispositivos convencionales. En las personas con oídos sanos
y en niños se pueden producir daños en la audición.
• Antes de colocarse los auriculares ajuste un volumen bajo.
• No utilice de forma permanente altos niveles de volumen.
1 Encienda el dispositivo desde el que desea escuchar el sonido. El indicador de funcionamiento verde del transmisor se ilumina.
2 Deslice el interruptor de encendido/apagado del auricular en posición
"ON".
3 Doble las patillas de los auriculares hacia afuera de manera que los audífonos del auricular puedan meterse en los oídos. Por favor, tenga en
cuenta que los audífonos de los auriculares se pueden mover hacia arriba, abajo y hacia los lados para que puedan meterse profundamente en
el oído. De esta manera se mejora la calidad del sonido y del volumen.
Presione cuidadosamente los audífonos del auricular en su oído de
manera que encuentre la posición más cómoda para recibir el mejor
sonido.
4 Si es necesario, cambie los ajustes de tono según sus necesidades.
Tenga en cuenta: Cuando la batería esté a punto de agotarse escuchará
en el auricular 3 pitidos cortos en un intervalo de un minuto. El auricular
se apagará automáticamente después de unos 5 minutos.
La tecla de micrófono
La entrada lateral de micrófono en el receptor capta los sonidos de su
entorno. Si el micrófono está conectado escuchará los sonidos de su entorno con mayor volumen. Es decir, que incluso llevando los auriculares puestos podrá escuchar, por ejemplo, el timbre de la puerta, el teléfono o interlocutor.
Para activar el micrófono pulse la tecla del micrófono. El indicador de fun-
44
MANEJO
cionamiento cambia de verde a rojo y oirá dos pitidos cortos. Asegúrese de
que la entrada lateral del micrófono no se encuentre tapada. Podrá
escuchar su entorno y utilizar los auriculares como amplificadores
de sonido para oír mejor a su interlocutor.
Para desactivar el micrófono vuelva a presionar la tecla. El indicador de funcionamiento vuelva a cambiarse a verde y oirá el sonido de su televisor o
radios, etc.
Ajuste de la claridad de tono
Puede ajustar la claridad del tono desde el transmisor. Al pulsar repetidamente la tecla (ver diagrama) se iluminan los LEDs 1, 2, 3 o ninguno.
La siguiente tabla muestra los posibles ajustes. Pruebe qué
ajustes le convienen más.
Configuración Indicador LED (Naranja)
Efecto
Standard
Neutral
Aumento de los bajos +
aumento de los altos
Aumento de los altos
Aumento de los bajos
45
MANEJO
Solución de problemas
No hay sonido
- Verificar la correcta conexión del transmisor a la fuente de alimentación
(aparato de conexión eléctrica - entrada en el transmisor).
- Compruebe el interruptor de los auriculares (posición ON).
- Es posible que la batería de los auriculares esté agotada. Cargue los auriculares en el cargador del transmisor o cambie la batería utilizada por la
batería de reserva (cargada).
- Compruebe si el dispositivo desde el que desea escuchar el sonido (radio,
televisión, etc.) está enchufado o si en realidad tiene una emisión/canal
encendido que emita señal.
- Si recibe el sonido para el transmisor desde una toma de auriculares en la
radio / reproductor de CD, etc., por favor verifique si dicha toma está
regulada por un control de volumen. Si es el caso, regule dicha salida de
volumen.
- El volumen en el auricular está demasiado bajo. Ajuste una volumen más
alto.
Distorsiones
- Es posible que la batería de los auriculares esté agotada. Cargue los auriculares en el cargador del transmisor o cambie la batería utilizada por la
batería de reserva (cargada).
- Posiblemente la distancia de los auriculares con el transmisor sea demasiado grande. Compruebe que la calidad del sonido mejora en cuanto se
acerca más al transmisor.
- Si recibe el sonido para el transmisor desde una toma de auriculares en la
radio / reproductor de CD, etc., por favor verifique si dicha toma está
regulada por un control de volumen. Si es el caso, regule dicha salida de
volumen.
46
Apéndice
47
APÉNDICE
NHANG
Apéndice
Indicaciones de seguridad
Lea este manual de instrucciones detenidamente y consérvelo en un lugar
seguro.
Propósito de uso
Este dispositivo está diseñado para transmitir desde un transmisor señales
de sonido de un televisor o equipo HiFi mediante luz infrarroja de manera
inalámbrica hasta un receptor. Cualquier otro uso resultará inapropiado. Los
cambios o modificaciones no están permitidos. No trate de abrir o repara el
aparato por cuenta propia bajo ninguna circunstancia.
Lugar de instalación e información de seguridad
•
Evite la exposición al humo, polvo, vibraciones, productos químicos,
humedad, calor y luz solar directa.
•
Puesto que en la actualidad muchos muebles están revestidos con
una gran variedad de pinturas y barnizados y son tratados con diferentes productos químicos, no se descarta que algunas de estas sustancias ataquen y suavicen los apoyos de goma del aparato. En caso
de que los apoyos se vean afectados, éstos pueden dejar marcas
desagradables en la superficie de los muebles. De esta forma, utilice
para su aparato una superficie antideslizante
•
El receptor es capaz de reproducir unos niveles de volumen muy elevados. Por este motivo, antes de colocarse los auriculares es aconsejable regular el volumen al mínimo, especialmente si el aparato es
usado por varias personas.
Usuarios con marcapasos
Si lleva un marcapasos debería consultar a su médico antes de usar este
producto. Si observa o sospecha alguna alteración en el producto debe
debe apagar inmediatamente el aparato.
48
APÉNDICE
Fuente de alimentación
Precaución: Use sólo la fuente de alimentación incluida, ya que otras
fuentes de alimentación pueden dañar el transmisor. No bloquee el
acceso a la fuente de alimentación por muebles u otros objetos.
Asegúrese del buen estado del cable y enchufe durante su utilización.
¡Los cables doblados y desgastados pueden producir graves heridas!
La fuente de alimentación cumple con los requisitos
de diseño ecológico de la Unión Europea (Directiva
2005/32/CE).
Esto significa que, en comparación con otros
componentes de red más antiguos, el consumo de energía del aparato, ya
sea en funcionamiento o en reposo, es mucho menor.
Baterías
Precaución: ¡No tire las pilas o baterías al fuego. Utilice únicamente las
baterías especificadas para el aparato! ¡Asegúrese de que la polaridad
sea la correcta!
Eliminación
Está obligado por la ley a deshacerse de forma adecuada de sus
artículos de uso corriente. El símbolo que aparece al margen de
su aparato significa que los dispositivos eléctricos y electrónicos
deben ser eliminados por separado de los residuos domésticos.
Debe deshacerse de los dispositivos eléctricos o electrónicos en
un punto de recogida autorizado por las autoridades.
Debe deshacerse de las baterías en el local que comercializa las
baterías o en el contenedor de reciclaje correspondiente de cual-
49
APÉNDICE
NHANG
quier punto de recogida autorizado.
Deshágase del material de embalaje de acuerdo con las regulaciones locales.
Reparación
Si tiene problemas con su aparato revise primero las indicaciones que aparecen en la página 10. Para reparación y las reclamaciones de garantía póngase en contacto con su distribuidor. El plazo de garantía es de 2 años.
Declaración de conformidad
Este dispositivo cumple con los requisitos de la
Directiva de la UE:
Directiva 1999/5/CE sobre equipos radioeléctricos y equipos terminales de
telecomunicación y reconocimiento mutuo de su conformidad. La conformidad con la directiva mencionada anteriormente se confirma mediante el
símbolo CE que aparece en el dispositivo.
Para obtener la declaración de conformidad completa utilice por favor la
descarga gratuita de nuestro sitio web www.amplicomms.com
Instrucciones de mantenimiento
•
Limpie las superficies de la carcasa con un paño suave y sin pelusa.
•
No utilice detergentes o disolventes.
50
APÉNDICE
Especificaciones
Transmisión
UHF estéreo
Frecuencia
2,4 GHz Digital
Alcance
hasta 30 m (en condiciones óptimas)
Rango de frecuencia
30 Hz - 20 kHz
Volumen máx.
120 dB
THD
<0,5%
Distancia señal / interf.
> 75 dB
Red (transmisor)
fuente de alimentación, salida:
5 VDC, 550 mA
Red (receptor)
pila 3,7 V / 350 mA Lithium Polymer
Tiempo de funcionamiento
con pila totalmente cargada hasta 5
horas
Tiempo de carga
para batería vacía apróx. 2,5 horas
Peso
transmisor: apróx. 115 g
Receptor: apróx. 53 g
51
APÉNDICE
NHANG
Garantía
Los dispositivos AMPLICOMMS son fabricados y probados de acuerdo con
los últimos métodos de producción. Los materiales seleccionados y el uso
de tecnologías avanzadas garantizan un funcionamiento sin problemas y de
larga vida.
La garantía no se aplica si la causa proviene de un mal funcionamiento del
dispositivo debido a la compañía telefónica o de cualquier centralita privada
conectada a la red pública. La garantía no se aplica a las pilas o baterías utilizadas en el producto. El período de garantía es de 24 meses a partir de la
fecha de compra.
Dentro del periodo de garantía todos los defectos materiales o de fábrica
serán solventados de forma gratuita. La garantía será nula si el comprador
o terceras personas manipulan el aparato. La garantía no se aplicará si se
producen desperfectos o daños causados por el manejo inadecuado del
aparato, la red de conexión y la instalación o por el desgaste natural debido
a un mantenimiento y almacenamiento incorrecto del dispositivo o por causas de fuerza mayor o influencias externas.
En caso de reclamación nos reservamos el derecho a reparar las piezas
defectuosas, sustituirlas o reemplazar el dispositivo. Las piezas o el dispositivo reemplazado deberán ser de nuestra propiedad. Las reclamaciones por
daños y perjuicios quedan excluidas, a menos que se demuestre intencionalidad o negligencia grave por parte del fabricante.
Si dentro del periodo de garantía el dispositivo sigue mostrando defectos,
póngase en contacto con su recibo de compra únicamente en la tienda
donde compró su dispositivo AMPLICOMMS. Todas las reclamaciones de
garantía conforme a estas disposiciones sólo tendrán validez frente al distribuidor del producto. Los derechos de garantía dejarán de tener validez una
vez finalizado el plazo de garantía de 2 años.
52
NOTAS
Notas
53
4 250711 990732
Distribution: Audioline GmbH, D-41460 Neuss
01/2013 – Edition 1.1