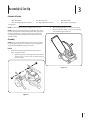
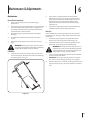
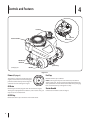
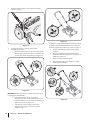
1
Safe Operation Practices • Set-Up • Operation • Maintenance • Service • Troubleshooting • Warranty operator’s manual Push Mower — Model Series A00, A10, A20, B00, B10, & B20 WARNING READ AND FOLLOW ALL SAFETY RULES AND INSTRUCTIONS IN THIS MANUAL BEFORE ATTEMPTING TO OPERATE THIS MACHINE. FAILURE TO COMPLY WITH THESE INSTRUCTIONS MAY RESULT IN PERSONAL INJURY. P. O. Box 1386, 97 Kent Avenue, KITCHENER, ONTARIO, CANADA N2G 4J1 Printed In USA 769-08603A 10.30.13 1 To The Owner Thank You Thank you for purchasing your new equipment. It was carefully engineered to provide excellent performance when properly operated and maintained. The manufacturer reserves the right to change product specifications, designs and equipment without notice and without incurring obligation. Please read this entire manual prior to operating the equipment. It instructs you how to safely and easily set up, operate and maintain your machine. Please be sure that you, and any other persons who will operate the machine, carefully follow the recommended safety practices at all times. Failure to do so could result in personal injury or property damage. If you have any problems or questions concerning the machine, phone your local service dealer or contact us directly. Customer Support telephone numbers, website address and mailing address can be found on this page. We want to ensure your complete satisfaction at all times. All information in this manual is relative to the most recent product information available at the time of printing. Review this manual frequently to familiarize yourself with the machine, its features and operation. Please be aware that this Operator’s Manual may cover a range of product specifications for various models. Characteristics and features discussed and/or illustrated in this manual may not be applicable to all models. Throughout this manual, all references to right and left side of the machine are observed from the operating position. The engine manufacturer is responsible for all engine-related issues with regards to performance, power-rating, specifications, warranty and service. Please refer to the engine manufacturer’s Owner’s/Operator’s Manual, packed separately with your machine, for more information. Table of Contents Safe Operation Practices......................................... 3 Assembly & Set-Up................................................... 9 Controls & Features.................................................13 Operation.................................................................14 Maintenance & Adjustment..................................15 Service......................................................................17 Troubleshooting......................................................18 Replacement Parts..................................................19 Warranty................................................................. 20 Record Product Information Model Number Before setting up and operating your new equipment, please locate the model plate on the equipment and record the information in the provided area to the right. You can locate the model plate by standing at the operating position and looking down at the rear of the machine. This information will be necessary, should you seek technical support via our web site or with your local dealer. Serial Number Customer Support Please do NOT return the unit to the retailer from which it was purchased, without first contacting Customer Support. If you have difficulty assembling this product or have any questions regarding the controls, operation, or maintenance of this machine, you can seek help from the experts. Choose from the options below: 2 ◊ Visit our web at www.mtdcanada.ca ◊ Locate your nearest dealer from Customer Support: 1-800-668-1238 ◊ Contact MTD CANADA • P.O. Box 1386 • 97 Kent Avenue • Kitchener, Ontario, Canada • N2G 4J1 Important Safe Operation Practices 2 WARNING: This symbol points out important safety instructions which, if not followed, could endanger the personal safety and/or property of yourself and others. Read and follow all instructions in this manual before attempting to operate this machine. Failure to comply with these instructions may result in personal injury. When you see this symbol. HEED ITS WARNING! WARNING: Engine Exhaust, some of its constituents, and certain vehicle components contain or emit chemicals known to State of California to cause cancer and birth defects or other reproductive harm. WARNING: Battery posts, terminals, and related accessories contain lead and lead compounds, chemicals known to the State of California to cause cancer and reproductive harm. Wash hands after handling. DANGER: This machine was built to be operated according to the safe operation practices in this manual. As with any type of power equipment, carelessness or error on the part of the operator can result in serious injury. This machine is capable of amputating fingers, hands, toes and feet and throwing objects. Failure to observe the following safety instructions could result in serious injury or death. General Operation 1. Read this operator’s manual carefully in its entirety before attempting to assemble this machine. Read, understand, and follow all instructions on the machine and in the manuals) before operation. Keep this manual in a safe place for future and regular reference and for ordering replacement parts. 6. Thoroughly inspect the area where the equipment is to be used. Remove all stones, sticks, wire, bones, toys and other foreign objects, which could be tripped over or picked up and thrown by the blade. Thrown objects can cause serious personal injury. 7. Plan your mowing pattern to avoid discharge of material toward roads, sidewalks, bystanders and the like. Also, avoid discharging material against a wall or obstruction, which may cause discharged material to ricochet back toward the operator. 2. Be completely familiar with the controls and the proper use of this machine before operating it. 3. This machine is a precision piece of power equipment, not a plaything. Therefore, exercise extreme caution at all times. This machine has been designed to perform one job: to mow grass. Do not use it for any other purpose. 8. To help avoid blade contact or a thrown object injury, stay in operator zone behind handles and keep children, bystanders, helpers and pets at least 75 feet from mower while it is in operation. Stop machine if anyone enters area. 4. Never allow children under 14 years of age to operate this machine. Children 14 and over should read and understand the instructions and safe operation practices in this manual and on the machine and should be trained and supervised by an adult. 9. Always wear safety glasses or safety goggles during operation and while performing an adjustment or repair to protect your eyes. Thrown objects which ricochet can cause serious injury to the eyes. 5. Only responsible individuals who are familiar with these rules of safe operation should be allowed to use this machine. 10. Wear sturdy, rough-soled work shoes and close-fitting slacks and shirts. Shirts and pants that cover the arms and legs and steel-toed shoes are recommended. Never operate this machine in bare feet, sandals, slippery or lightweight (e.g. canvas) shoes. 11. Do not put hands or feet near rotating parts or under the cutting deck. Contact with blade can amputate fingers, hands, toes and feet. 3 12. A missing or damaged discharge cover can cause blade contact or thrown object injuries. 13. 14. 15. Many injuries occur as a result of the mower being pulled over the foot during a fall caused by slipping or tripping. Do not hold on to the mower if you are falling; release the handle immediately. Never pull the mower back toward you while you are walking. If you must back the mower away from a wall or obstruction first look down and behind to avoid tripping and then follow these steps: a. Step back from mower to fully extend your arms. b. Be sure you are well balanced with sure footing. c. Pull the mower back slowly, no more than half way toward you. d. Repeat these steps as needed. Do not operate the mower while under the influence of alcohol or drugs. 16. Do not engage the self-propelled mechanism on machines so equipped while starting engine. 17. The blade control handle is a safety device. Never attempt to bypass its operation. Doing so makes the safety device inoperative and may result in personal injury through contact with the rotating blade. The blade control handle must operate easily in both directions and automatically return to the disengaged position when released. 18. Never operate the mower in wet grass. Always be sure of your footing. A slip and fall can cause serious personal injury. If you feel you are losing your footing, release the blade control handle immediately and the blade will stop rotating within three seconds. 19. Mow only in daylight or good artificial light. Walk, never run. 20. Stop the blade when crossing gravel drives, walks or roads. 21. If the equipment should start to vibrate abnormally, stop the engine and check immediately for the cause. Vibration is generally a warning of trouble. 22. Shut the engine off and wait until the blade comes to a complete stop before removing the grass catcher or unclogging the chute. The cutting blade continues to rotate for a few seconds after the blade control is released. Never place any part of the body in the blade area until you are sure the blade has stopped rotating. When starting engine, pull cord slowly until resistance is felt, then pull rapidly. Rapid retraction of starter cord (kickback) will pull hand and arm toward engine faster than you can let go. Broken bones, fractures, bruises or sprains could result. 28. If situations occur which are not covered in this manual, use care and good judgement. Contact Customer Support for assistance or the name of the nearest service dealer. Slope Operation Slopes are a major factor related to slip and fall accidents, which can result in severe injury. Operation on slopes requires extra caution. If you feel uneasy on a slope, do not mow it. For your safety, use the slope gauge included as part of this manual to measure slopes before operating this machine on a sloped or hilly area. If the slope is greater than 15 degrees, do not mow it. Do: 1. Mow across the face of slopes; never up and down. Exercise extreme caution when changing direction on slopes. 2. Watch for holes, ruts, rocks, hidden objects, or bumps which can cause you to slip or trip. Tall grass can hide obstacles. 3. Always be sure of your footing. A slip and fall can cause serious personal injury. If you feel you are losing your balance, release the blade control handle immediately and the blade will stop rotating within three (3) seconds. Do Not: 1. Do not mow near drop-offs, ditches or embankments, you could lose your footing or balance. 2. Do not mow slopes greater than 15 degrees as shown on the slope gauge. 3. Do not mow on wet grass. Unstable footing could cause slipping. Children Tragic accidents can occur if the operator is not alert to the presence of children. Children are often attracted to the mower and the mowing activity. They do not understand the dangers. Never assume that children will remain where you last saw them. 1. Keep children out of the mowing area and under watchful care of a responsible adult other than the operator. 2. Be alert and turn mower off if a child enters the area. 23. Never operate mower without proper trail shield, discharge cover, grass catcher, blade control handle or other safety protective devices in place and working. Never operate mower with damaged safety devices. Failure to do so can result in personal injury. 3. Before and while moving backwards, look behind and down for small children. 4. Use extreme care when approaching blind corners, doorways, shrubs, trees, or other objects that may obscure your vision of a child who may run into the mower. 24. 5. Keep children away from hot or running engines. They can suffer burns from a hot muffler. 6. Never allow children under 14 years of age to operate this machine. Children 14 and over should read and understand the instructions and safe operation practices in this manual and on the machine and be trained and supervised by an adult. Muffler and engine become hot and can cause a burn. Do not touch. 25. Never attempt to make a wheel or cutting height adjustment while the engine is running. 26. Only use parts and accessories made for this machine by the manufacturer. Failure to do so can result in personal injury. 4 27. Section 2 — Important Safe Operation Practices Service 3. Check the blade and engine mounting bolts at frequent intervals for proper tightness. Also, visually inspect blade for damage (e.g., bent, cracked, worn) Replace blade with the original equipment manufacture’s (O.E.M.) blade only, listed in this manual. “Use of parts which do not meet the original equipment specifications may lead to improper performance and compromise safety!” 4. Mower blades are sharp and can cut. Wrap the blade or wear gloves, and use extra caution when servicing them. Safe Handling Of Gasoline: 1. To avoid personal injury or property damage use extreme care in handling gasoline. Gasoline is extremely flammable and the vapors are explosive. Serious personal injury can occur when gasoline is spilled on yourself or your clothes, which can ignite. Wash your skin and change clothes immediately. 2. Use only an approved gasoline container. 5. 3. Never fill containers inside a vehicle or on a truck or trailer bed with a plastic liner. Always place containers on the ground away from your vehicle before filling. Keep all nuts, bolts, and screws tight to be sure the equipment is in safe working condition. 6. Never tamper with safety devices. Check their proper operation regularly. 4. Remove gas-powered equipment from the truck or trailer and refuel it on the ground. If this is not possible, then refuel such equipment on a trailer with a portable container, rather than from a gasoline dispenser nozzle. 7. After striking a foreign object, stop the engine, disconnect the spark plug wire and ground against the engine. Thoroughly inspect the mower for any damage. Repair the damage before starting and operating the mower. 5. Keep the nozzle in contact with the rim of the fuel tank or container opening at all times until fueling is complete. Do not use a nozzle lock-open device. 8. Never attempt to make a wheel or cutting height adjustment while the engine is running. 9. 6. Extinguish all cigarettes, cigars, pipes and other sources of ignition. 7. Never fuel machine indoors because flammable vapors will accumulate in the area. 8. Never remove gas cap or add fuel while engine is hot or running. Allow engine to cool at least two minutes before refueling. Grass catcher components, discharge cover, and trail shield are subject to wear and damage which could expose moving parts or allow objects to be thrown. For safety protection, frequently check components and replace immediately with original equipment manufacturer’s (O.E.M.) parts only, listed in this manual. “Use of parts which do not meet the original equipment specifications may lead to improper performance and compromise safety!” 9. Never over fill fuel tank. Fill tank to no more than 1 inch below bottom of filler neck to provide for fuel expansion. 10. 10. Replace gasoline cap and tighten securely. Do not change the engine’s governor setting or over-speed the engine. The governor controls the maximum safe operating speed of the engine. 11. If gasoline is spilled, wipe it off the engine and equipment. Move machine to another area. Wait 5 minutes before starting engine. 11. Check fuel line, tank, cap, and fittings frequently for cracks or leaks. Replace if necessary. 12. Never store the machine or fuel container near an open flame, spark or pilot light as on a water heater, space heater, furnace, clothes dryer or other gas appliances. 13. 14. To reduce fire hazard, keep machine free of grass, leaves, or other debris build-up. Clean up oil or fuel spillage and remove any fuel soaked debris. Allow machine to cool at least 5 minutes before storing. General Service: 1. Never run an engine indoors or in a poorly ventilated area. Engine exhaust contains carbon monoxide, an odorless and deadly gas. 2. Before cleaning, repairing, or inspecting, make certain the blade and all moving parts have stopped. Disconnect the spark plug wire and ground against the engine to prevent unintended starting. 12. Do not crank engine with spark plug removed. 13. Maintain or replace safety and instruction labels, as necessary. 14. Observe proper disposal laws and regulations. Improper disposal of fluids and materials can harm the environment. 15. According to the Consumer Products Safety Commission (CPSC) and the U.S. Environmental Protection Agency (EPA), this product has an Average Useful Life of seven (7) years, or 140 hours of operation. At the end of the Average Useful Life have the machine inspected annually by an authorized service dealer to ensure that all mechanical and safety systems are working properly and not worn excessively. Failure to do so can result in accidents, injuries or death. Do not modify engine To avoid serious injury or death, do not modify engine in any way. Tampering with the governor setting can lead to a runaway engine and cause it to operate at unsafe speeds. Never tamper with factory setting of engine governor. Section 2 — Important Safe Operation Practices 5 Notice Regarding Emissions Engines which are certified to comply with California and federal EPA emission regulations for SORE (Small Off Road Equipment) are certified to operate on regular unleaded gasoline, and may include the following emission control systems: Engine Modification (EM), Oxidizing Catalyst (OC), Secondary Air Injection (SAI) and Three Way Catalyst (TWC) if so equipped. Spark Arrestor WARNING: This machine is equipped with an internal combustion engine and should not be used on or near any unimproved forest-covered, brush covered or grass-covered land unless the engine’s exhaust system is equipped with a spark arrester meeting applicable local or state laws (if any). If a spark arrester is used, it should be maintained in effective working order by the operator. A spark arrester for the muffler is available through your nearest engine authorized service dealer. 6 Section 2 — Important Safe Operation Practices Safety Symbols This page depicts and describes safety symbols that may appear on this product. Read, understand, and follow all instructions on the machine before attempting to assemble and operate. Symbol Description READ THE OPERATOR’S MANUAL(S) Read, understand, and follow all instructions in the manual(s) before attempting to assemble and operate DANGER — ROTATING BLADES To reduce the risk of injury, keep hands and feet away. Do not operate unless discharge cover or grass catcher is in its proper place. If damaged, replace immediately. DANGER — BYSTANDERS Do not mow when children or others are around. DANGER — HAND/ FOOT CUT Keep hands and feet away from rotating parts. DANGER — THROWN DEBRIS Remove objects that can be thrown by the blade in any direction. Wear safety glasses. DANGER — SLOPES Use extra caution on slopes. Do not mow slopes greater than 15°. WARNING—GASOLINE IS FLAMMABLE Allow the engine to cool at least two minutes before refueling. WARNING— CARBON MONOXIDE Never run an engine indoors or in a poorly ventilated area. Engine exhaust contains carbon monoxide, an odorless and deadly gas. WARNING— HOT SURFACE Engine parts, especially the muffler, become extremely hot during operation. Allow engine and muffler to cool before touching. WARNING: Your Responsibility—Restrict the use of this power machine to persons who read, understand and follow the warnings and instructions in this manual and on the machine. SAVE THESE INSTRUCTIONS! Section 2 — Important Safe Operation Practices 7 8 Section 2 — Important Safe Operation Practices Figure 1 line Figure 2 (TOO STEEP) 15° Slope WARNING! Slopes are a major factor related to tip-over and roll-over accidents which can result in severe injury or death. Do not operate machine on slopes in excess of 15 degrees. All slopes require extra caution. Always mow across the face of slopes, never up and down slopes. To check the slope, proceed as follows: 1. Remove this page and fold along the dashed line. 2. Locate a vertical object on or behind the slope (e.g. a pole, building, fence, tree, etc.) 3. Align either side of the slope gauge with the object (See Figure 1 and Figure 2 ). 4. Adjust gauge up or down until the left corner touches the slope (See Figure 1 and Figure 2). 5. If there is a gap below the gauge, the slope is too steep for safe operation (See Figure 2 above). ashed 15° d USE THIS SLOPE GAUGE TO DETERMINE IF A SLOPE IS TOO STEEP FOR SAFE OPERATION! (OK) 15° Slope Slope Gauge 3 Assembly & Set-Up Contents of Carton • One Lawn Mower • • One Lawn Mower Operator’s Manual • One Grass Catcher† • One Bottle of Oil One Engine Operator’s Manual • One Side Discharge Chute† † If Equipped NOTE: The units illustrated may vary slightly from your unit. NOTE: Please be aware that this Operator’s Manual covers both the low and high wheel models of this mower. While this manual illustrates the low wheel model, the instructions and features are equally applicable to the high wheel model as well, unless otherwise noted. b. While stabilizing mower so it doesn’t move, pivot upper handle up as shown in Fig. 3-2. Do not crimp cable while lifting the handle up. Assembly NOTE: This unit is shipped without gasoline or oil in the engine. Fill up with gasoline and oil as instructed in the accompanying engine manual BEFORE operating your mower. B Handle 1. Remove any packing material which may be between upper and lower handles. a. Remove wing nuts and carriage bolts from handle as shown in Fig. 3-1. Do not loosen or remove adjacent hex head screws. A Figure 3-2 A Figure 3-1 9 2. Remove the T-bolts from the handle brackets as shown in Fig. 3-3. C C Figure 3-5 4. Figure 3-3 3. Follow the steps below to complete handle assembly: a. Pull upward on the handle until holes in lower handle (shown in Fig. 3-3 deck cutaway) line up with holes in handle bracket. See Fig. 3-4. The rope guide is attached to the right side of the upper handle. Loosen the wing knob which secures the rope guide. See Fig. 3-6. a. Hold blade control against upper handle. b. Slowly pull starter rope handle from engine and slip starter rope into the rope guide. See Fig. 3-6. A D B A B B C Figure 3-6 Figure 3-4 NOTE: When pulling upward on handle, make sure to not pull handle all the way out. 10 b. Insert the T-bolts removed earlier through the handle brackets and lower handle and tighten securely to secure the handle in place. See Fig. 3-4. c. Reattach wing nuts and carriage bolts removed earlier into lower holes of handle as shown in Fig. 3-5. Section 3 — Assembly & Set-Up c. Tighten rope guide wing knob. d. Use cable tie(s) to secure cable(s) to lower handle. Grass Catcher (If Equipped) 1. Follow steps below to assemble the grass catcher (if needed). Make certain bag is turned right side out before assembling (warning label will be on the outside). a. Place bag over frame so that its black plastic side is at the bottom. b. Slip plastic channel of grass bag over hooks on the frame. See Fig. 3-7. Side Discharge Chute (If Equipped) Your mower may be shipped as a mulcher. To convert to side discharge, make sure grass catcher (if equipped) is off of the unit and rear discharge door (if equipped) is closed. 1. On the side of the mower, lift the side mulching plug. See Figure 3-9. Side Mulching Plug 1 2 Figure 3-7 2. Follow steps below to attach grass catcher: a. Lift rear discharge door. b. Place grass catcher into the slots in the handle brackets as shown in Fig. 3-8. Let go of discharge door so that it rests on the grass catcher. Figure 3-9 2. Slide two hooks of side discharge chute under hinge pin on mulching plug assembly. Lower the mulching plug. Do not remove side mulching plug at any time, even when you are not mulching. B A B Figure 3-8 To remove grass catcher, lift rear discharge door on the mower. Lift grass catcher up and of the slots in the handle brackets. Release rear discharge door to allow it to close rear opening of mower. Section 3 — Assembly & Set-Up 11 Adjustments Handle Pitch (If Equipped) Cutting Height For convenience of operation, you may be able to adjust the pitch of the handle as follows: There is a cutting height adjustment lever located above the front and rear right wheel. 1. 1. Pull the height adjustment lever towards wheel. 2. Move lever to desired position for a change in cutting height. See Fig. 3-10 and Fig. 3-10A. Remove wing nuts and carriage bolts from handle. See Fig. 3-11. 2 Lower 1 Higher 3 2 Higher 1 Lower Figure 3-11 3 Low Wheel Figure 3-10 Position the handle in one of the three positions that is most comfortable. See Fig. 3-11 inset. 3. Secure into position with wing nuts and carriage bolts removed earlier. Set-Up 2 Higher 2. Gas and Oil Fill-Up 1 3 Refer to the separate engine owner’s manual for additional engine information. Lower 2 Higher 1 Lower 3 High Wheel Figure 3-10A NOTE: For mowers with low wheels, the height adjustment levers move in the opposite direction to adjust; for those with high wheels, the levers move in the same direction. 3. Release lever towards deck. IMPORTANT: Both the front and rear wheels must be placed in the same relative position. For rough or uneven lawns, move the height adjustment levers to a higher position. This will stop scalping of grass. 12 Section 3 — Assembly & Set-Up 1. Add oil provided before starting unit for the first time out of the box. 2. Service the engine with gasoline as instructed in the separate engine owner’s manual. WARNING: Use extreme care when handling gasoline. Gasoline is extremely flammable and the vapors are explosive. Never fuel the machine indoors or while the engine is hot or running. Extinguish cigarettes, cigars, pipes and other sources of ignition. 4 Controls and Features Blade Control Recoil Starter Grass Catcher† Cutting Height Adjustment Lever Side Discharge Chute† Cutting Height Adjustment Lever Mulch Plug† † If Equipped Figure 4-1 Blade Control Mulch Plug (If Equipped) The blade control is attached to the upper handle of the mower. Depress and squeeze it against the upper handle to operate the unit. Release it to stop engine and blade. The mulch plug is used for mulching purposes. Instead of collecting the grass clippings in a grass catcher or using the side discharge chute, some mower models have the option of recirculating the clippings back to the lawn. This is called mulching. WARNING: This blade control is a safety device. Never attempt to bypass its operations. Cutting Height Adjustment Lever One adjustment lever is located on the right rear wheel and one is located on the right front wheel. Both levers have to be at the same relative position to ensure a uniform cut. To adjust the cutting height, refer to the “Assembly & Set-Up” Section. Grass Catcher (If Equipped) The grass catcher, located at the rear of the mower, is used to bag the grass clippings for disposal at another site. Once the bag is full, remove it up through the handles using the strap provided and empty it before any further mowing. Side Discharge Chute (If Equipped) Your mower may be shipped as a mulcher. To discharge the grass clippings to the side instead, follow the instructions in the “Assembly & Set-Up” section to attach the side discharge chute. WARNING: Keep hands and feet away from the chute area on cutting deck. Refer to warning label on the unit. Recoil Starter The recoil starter is attached to the right upper handle. Stand behind the unit and pull the recoil starter rope to start the unit. 13 5 Operation Starting & Stopping Engine Using Grass Catcher (If Equipped) Refer to the Engine Operator’s manual packed with your lawn mower for instructions on starting and stopping the engine. You can use the grass catcher to collect clippings while you are operating the mower. Using Your Lawn Mower 1. Attach grass catcher following instructions in the “Assembly & Set-Up” section. Grass clippings will automatically collect in bag as you run mower. Operate mower till grass bag is full. 2. Stop engine completely by releasing the blade control. Make sure that the unit has come to a complete stop. 3. Lift discharge door and pull grass bag up and away from the mower to remove the bag. Dispose of the grass clippings and reinstall the bag when complete. Be sure lawn is clear of stones, sticks, wire, or other objects which could damage lawn mower or engine. Such objects could be accidently thrown by the mower in any direction and cause serious personal injury to the operator and others. WARNING: The operation of any lawn mower can result in foreign objects being thrown into the eyes, which can damage your eyes severely. Always wear safety glasses while operating the mower, or while performing any adjustments or repairs on it. Using as Mulcher (If Equipped) For mulching grass, remove the side discharge chute (if equipped) or the grass catcher (if equipped) and allow the rear discharge door (if equipped) to close the rear opening of mower. For effective mulching, do not cut wet grass. If the grass has been allowed to grow in excess of four inches, mulching is not recommended. Use the grass catcher to bag clippings instead. 14 WARNING: If you strike a foreign object, stop the engine. Remove wire from the spark plug, thoroughly inspect mower for any damage, and repair damage before restarting and operating. Extensive vibration of mower during operation is an indication of damage. The unit should be promptly inspected and repaired. 6 Maintenance & Adjustments Maintenance 2. If your mower is equipped with ball bearing wheels, lubricate at least once a season with a light oil, all other types require no lubrication. However, if the wheels are removed for any reason, lubricate the surface of the axle bolt and the inner surface of the wheel with light automotive oil. Follow the accompanying engine manual for lubrication schedule and instruction for engine lubrication. General Recommendations 1. Always observe safety rules when performing any maintenance. 2. The warranty on this lawn mower does not cover items that have been subjected to operator abuse or negligence. To receive full value from warranty, operator must maintain the lawn mower as instructed here. 3. 3. Changing of engine-governed speed will void engine warranty. 4. All adjustments should be checked at least once each season. Clean underside of the mower deck after each use to prevent build-up of grass clippings or other debris. Follow steps below for this job. 5. Periodically check all fasteners and make sure these are tight. Deck Care 1. Disconnect spark plug wire. Drain gasoline from lawn mower or place a piece of plastic under the gas cap. 2. Tip mower so that it rests on the housing. Keep the side with the air cleaner facing up. Hold mower firmly. WARNING: Always stop engine, disconnect spark plug, and ground against engine before performing any type of maintenance on your machine. WARNING: Never tip the mower more than 90º in any direction and do not leave the mower tipped for any length of time. Oil can drain into the upper part of the engine causing a starting problem. Lubrication 1. Lubricate pivot points on the blade control at least once a season with light oil. The blade control must operate freely in both directions. See Fig. 6-1. 3. Scrape and clean the underside of the deck with a suitable tool. Do not spray with water. IMPORTANT: Do not use a pressure washer to clean your unit. This may cause damage to bearings, or the engine. 4. Put the mower back on its wheels on the ground. If you had put plastic under the gas cap earlier, make sure to remove it now. Figure 6-1 15 Engine Deck Wash (If Equipped) 1. Refer to the separate engine manual for engine maintenance instructions. Your mower’s deck may be equipped with a water port on its surface as part of its deck wash system. 2. Maintain engine oil as instructed in the separate engine manual packed with your unit. Read and follow instructions carefully. Use the deck wash to rinse grass clippings from the deck’s underside and prevent the buildup of corrosive chemicals. Complete the following steps AFTER EACH MOWING: 3. Under normal conditions service air cleaner as instructed in the separate engine manual packed with your unit. Clean every few hours under extremely dusty conditions. Poor engine performance and flooding usually indicates that the air cleaner should be serviced. 1. 4. The spark plug should be cleaned and the gap reset once a season. Spark plug replacement is recommended at the start of each mowing season; check engine manual for correct plug type and gap specifications. NOTE: This spark ignition system meets all requirements of the Canadian Interference-Causing Equipment Regulations. 5. 6. Clean the engine regularly with a cloth or brush. Keep the cooling system (blower housing area) clean to permit proper air circulation which is essential to engine performance and life. Be certain to remove all grass, dirt and combustible debris from muffler area. Engines stored for more than 30 days need to be treated with a gasoline stabilizer such as STA-BIL® to prevent deterioration and gum from forming in fuel system or on essential carburetor parts. If the gasoline in your engine deteriorates during storage, you may need to have the carburetor, and other fuel system components, serviced or replaced. Push the mower to a level, clear spot on your lawn, near enough for your garden hose to reach. CAUTION: Make certain the mower’s discharge chute is directed AWAY from your house, garage, parked cars, etc. 2. Thread the hose coupler (packaged with your mower’s Operator’s Manual) onto the end of your garden hose. 3. Attach the hose coupler to the water port on your decks surface. See Fig. 6-2. 4. Turn the water on. 5. Start the engine as as instructed in the separate engine manual packed with your unit. 6. Run the engine for a minimum of two minutes, allowing the underside of the cutting deck to thoroughly rinse. 7. Release blade control to stop the engine and blade. 8. Turn the water off and detach the hose coupler from the water port on your deck’s surface. IMPORTANT : After cleaning your deck, restart the mower. Keep the engine and blade running for a minimum of two minutes, allowing the underside of the cutting deck to thoroughly dry. Figure 6-2 16 Section 6— Maintenance & Adjustments 7 Service Blade Care 5. Periodically inspect the blade adapter for cracks, especially if you strike a foreign object. Replace when necessary. Follow the steps below for blade service. Lubricate the engine crankshaft and the inner surface of the blade adapter with light oil. Slide the blade adapter onto the engine crankshaft. Place the blade on the adapter such that the side of the blade marked “Bottom” (or with part number) faces the ground when the mower is in the operating position. Make sure that the blade is aligned and seated on the blade adapter flanges. 6. Place blade bell support on the blade. Align notches on the blade bell support with small holes in blade. 1. Disconnect spark plug boot from spark plug. Turn mower on its side making sure that the air filter and the carburetor are facing up. 7. Replace hex bolt and tighten hex bolt to torque: 450 in. lbs. min., 600 in. lbs. max. 2. Remove the bolt and blade bell support which holds the blade and the blade adapter to the engine crankshaft. See Fig. 7-1. 3. Remove blade and adapter from the crankshaft. See Fig. 7-1. WARNING: When removing the cutting blade for sharpening or replacement, protect your hands with a pair of heavy gloves or use a heavy rag to hold the blade. Blade Blade Adapter To ensure safe operation of your mower, periodically check the blade bolt for correct torque. Off-Season Storage The following steps should be taken to prepare your lawn mower for storage. • Clean and lubricate mower thoroughly as described in the lubrication instructions. • Coat mower’s cutting blade with chassis grease to prevent rusting. • Refer to engine manual for correct engine storage instructions. • Do not use a pressure washer or garden hose to clean your unit. • Store mower in a dry, clean area. Do not store next to corrosive materials, such as fertilizer. When storing any type of power equipment in a poorly ventilated or metal storage shed, care should be taken to rust-proof the equipment. Using a light oil or silicone, coat the equipment, especially cables and all moving parts of your lawn mower before storage. Blade Bell Support Bolt Figure 7-1 4. Remove blade from the adapter for testing balance. Balance the blade on a round shaft screwdriver to check. Remove metal from the heavy side until it balances evenly. When sharpening the blade, follow the original angle of grind. Grind each cutting edge equally to keep the blade balanced. WARNING: An unbalanced blade will cause excessive vibration when rotating at high speeds. It may cause damage to mower and could break causing personal injury. 17 8 Troubleshooting Problem Engine Fails to start Remedy 1. Blade control disengaged. 1. Engage blade control. 2. Spark plug boot disconnected. 2. Connect wire to spark boot. 3. Fuel tank empty or stale fuel. 3. Fill tank with clean, fresh gasoline. 4. Engine not primed (if equipped with primer). 4. Prime engine as instructed in the Operation section. 5. Faulty spark plug. 5. Clean, adjust gap, or replace. 6. Blocked fuel line. 6. Clean fuel line. 7. Engine flooded. 7. Wait a few minutes to restart, but do not prime. 8. Fuel valve (if equipped) closed. 8. Open fuel valve. See engine manual. 9. Engine not choked (if equipped with choke). 9. Choke engine. See engine manual. 10. Burnt fuse. (Electric Start Only). 10. Replace fuse. (See Maintenance Section). 1. Spark plug boot loose. 1. Connect and tighten spark plug boot. 2. Blocked fuel line or stale fuel. 2. Clean fuel line; fill tank with clean, fresh gasoline. 3. Vent in gas cap plugged. 3. Clear vent. 4. Water or dirt in fuel system. 4. Drain fuel tank. Refill with fresh fuel. 5. Dirty air cleaner. 5. Refer to engine manual. 6. Unit running with CHOKE applied or in the “ON” position (if equipped). 6. Put CHOKE in the “OFF” position.. 1. Engine oil level low. 1. Fill crankcase with proper oil. 2. Air flow restricted. 2. Clean area around and on top of engine. Occasional skips (hesitates) at high speed 1. Spark plug gap too close. 1. Adjust gap to .030”. Refer to engine manual. Idles poorly 1. Spark plug fouled, faulty, or gap too wide. 1. Reset gap to .030” or replace spark plug. 2. Dirty air cleaner. 2. Refer to engine manual. 1. Cutting blade loose or unbalanced. 1. Tighten blade and adapter. Balance blade. 2. Bent cutting blade. 2. See an authorized service dealer. 1. Wet grass. 1. Do not mow when grass is wet; wait until later to cut. 2. Excessively high grass. 2. Mow once at a high cutting height, then mow again at desired height or make a narrower cutting path. 3. Dull blade. 3. Sharpen or replace blade. 1. Wheels not positioned correctly. 1. Place front and rear wheels in same height position. 2. Dull blade. 2. Sharpen or replace blade. Engine runs erratic Engine overheats Excessive Vibration Mower will not mulch grass Uneven cut 18 Cause 9 Replacement Parts Component Part Number and Description 734-04063A 734-04562 734-1988 Wheel (Front - 7”, Star Diamond) Wheel (Front - 7” x 1.8”, SL:Pin Bar) Wheel (Front - 7” x 1.8”, SL:Spoke Bar) 734-04063A 734-04563 634-04625 Wheel (Rear - 7”, Star Diamond) Wheel (Rear - 8” x 1.8”, Bar) Wheel (Rear - 11” x 1.75”) 942-0741A Mulching Blade 764-04077B † Grass Bag (Black) 664-05026 † Grass Bag w/sprigs (Black) 764-04082A † Grass Bag (Black, dust blocking) 731-07131 ‡ † Discharge Chute (w/clip) 731-07486 † Discharge Chute (w/o clip) 731-07877 ‡ † Discharge Chute (w/o hinge) † If Equipped ‡ Not Shown NOTE: Download a complete Parts Manual, refer to customer support on page 2. Be sure to have your model number and serial number ready. Refer to page 2 for more information regarding locating your model and serial numbers. 19 TWO YEAR LIMITED WARRANTY The limited warranty set forth below is given by MTD Products Limited with respect to new merchandise purchased and used in Canada and/or its territories and possessions (either entity respectively, “MTD”). MTD warrants this product (excluding its normal wear parts as described below) against defects in material and workmanship for a period of two (2) years commencing on the date of original purchase and will, at its option, repair or replace, free of charge, any part found to be defective in materials or workmanship. This limited warranty shall only apply if this product has been operated and maintained in accordance with the Operator’s Manual furnished with the product, and has not been subject to misuse, abuse, commercial use, neglect, accident, improper maintenance, alteration, vandalism, theft, fire, water, or damage because of other peril or natural disaster. Damage resulting from the installation or use of any part, accessory or attachment not approved by MTD for use with the product(s) covered by this manual will void your warranty as to any resulting damage. Normal wear parts are warranted to be free from defects in material and workmanship for a period of thirty (30) days from the date of purchase. Normal wear parts include, but are not limited to items such as: batteries, belts, blades, blade adapters, grass bags, rider deck wheels, seats, snow thrower skid shoes, friction wheels, shave plates, auger spiral rubber, tires, engine oil, air filters and spark plugs. HOW TO OBTAIN SERVICE: Warranty service is available, WITH PROOF OF PURCHASE, through your local authorized service dealer. To locate the dealer in your area contact MTD Products Limited, Kitchener, ON N2G 4J1, or call 1-800-668-1238 or log on to our Web site at www.mtdcanada.com. This limited warranty does not provide coverage in the following cases: a. The engine or component parts thereof. These items may carry a separate manufacturer’s warranty. Refer to applicable manufacturer’s warranty for terms and conditions. The Powermore engine is not excluded under this agreement. b. Log splitter pumps, valves, and cylinders have a separate one-year warranty. c. Routine maintenance items such as lubricants, filters, blade sharpening, tune-ups, brake adjustments, clutch adjustments, deck adjustments, and normal deterioration of the exterior finish due to use or exposure. d. Service completed by someone other than an authorized service dealer. e. MTD does not extend any warranty for products sold or exported outside of Canada, including possessions and territories. f. Replacement parts that are not genuine MTD parts. g. Transportation charges and service calls. h. If Products are used commercially. (MTD may separately offer Limited Commercial Warranties on certain select products. Ask your dealer or retailer for details or contact MTD Service for more information.) No implied warranty, including any implied warranty of merchantability of fitness for a particular purpose, applies after the applicable period of express written warranty above as to the parts as identified. No other express warranty, whether written or oral, except as mentioned above, given by any person or entity, including a dealer or retailer, with respect to any product, shall bind MTD. During the period of the warranty, the exclusive remedy is repair or replacement of the product as set forth above. The provisions as set forth in this warranty provide the sole and exclusive remedy arising from the sale. MTD shall not be liable for incidental or consequential loss or damage including, without limitation, expenses incurred for substitute or replacement lawn care services or for rental expenses to temporarily replace a warranted product. Some jurisdictions do not allow the exclusion or limitation of incidental or consequential damages, or limitations on how long an implied warranty lasts, so the above exclusions or limitations may not apply to you. In no event shall recovery of any kind be greater than the amount of the purchase price of the product sold. Alteration of safety features of the product shall void this warranty. You assume the risk and liability for loss, damage, or injury to you and your property and/or to others and their property arising out of the misuse or inability to use the product. This limited warranty shall not extend to anyone other than the original purchaser or to the person for whom it was purchased as a gift. HOW LOCAL LAWS RELATE TO THIS WARRANTY: This limited warranty gives you specific legal rights, and you may also have other rights that vary in different jurisdictions. IMPORTANT: Owner must present Original Proof of Purchase to obtain warranty coverage. MTD Products Ltd., P. O. BOX 1386, KITCHENER, ON N2G 4J1; Phone: 1-800-668-1238 12.08.06 20 Safe Operation Practices • Set-Up • Operation • Maintenance • Troubleshooting • Warranty OPERATOR’S MANUAL * Model 1T65 Shown 140 cc OHV Vertical Shaft Engine WARNING READ AND FOLLOW ALL SAFETY RULES AND INSTRUCTIONS IN THIS MANUAL BEFORE ATTEMPTING TO OPERATE THIS MACHINE. FAILURE TO COMPLY WITH THESE INSTRUCTIONS MAY RESULT IN PERSONAL INJURY. MTD Products Ltd., P. O. Box 1386, KITCHENER, ONTARIO N2G 4J1 Printed In USA 769-09442A 1.10.14 1 To The Owner Thank You This Operator’s Manual is an important part of your new engine. It will help you prepare and maintain the engine for the best performance. Please read and understand the contents before operating the engine. Table of Contents Safe Operation Practices......................................... 3 Safety Labels............................................................ 5 Set-Up........................................................................ 6 Controls & Features.................................................. 8 Operation.................................................................. 9 Maintenance & Adjustments..................................10 Troubleshooting......................................................14 Replacement Parts..................................................15 Warranty..................................................................16 Record Product Information Before operating your new engine, please locate the model plate on the engine and record the information in the provided area below. This information will be necessary, should you seek technical support via our web site or with your local dealer. Model Number/Serial Number / Customer Support Please do NOT return the machine to the retailer or dealer without first contacting our Customer Support Department. If you have difficulty with this product or have any questions regarding the controls, operation, or maintenance of this engine, you can seek help from the experts. Choose from the options below: 2 ◊ Visit us on the web at www.mtdcanada.ca ◊ Call a Customer Support Representative at (800) 668-1238 ◊ Write us at P.O. Box 1386 • 97 Kent Avenue • Kitchener, Ontario, Canada • N2G 4J1 Important Safe Operation Practices 2 WARNING! This symbol points out important safety instructions which, if not followed, could endanger the personal safety and/or property of yourself and others. Read and follow all instructions in this manual before attempting to operate the equipment. Failure to comply with these instructions may result in personal injury. When you see this symbol. HEED IT’S WARNING! CALIFORNIA PROPOSITION 65 WARNING! Engine Exhaust, some of its constituents, and certain vehicle components contain or emit chemicals known to State of California to cause cancer and birth defects or other reproductive harm. DANGER! This machine was built to be operated according to the safe operation practices in this manual. As with any type of power equipment, carelessness or error on the part of the operator can result in serious injury. This machine is capable of amputating fingers, hands, toes and feet and throwing foreign objects. Failure to observe the following safety instructions could result in serious injury or death. Training 1. Read, understand and follow all instructions on the engine and in the manual(s) before attempting to assemble and operate. Keep this manual in a safe place for future and regular reference and for ordering replacement parts. 2. Be familiar with all controls and their proper operation. Know how to stop the engine and disengage them quickly. 3. Never allow children under 14 years of age to operate the engine. Children 14 and over should read and understand the instructions and safe operation practices in this manual and on the engine and be trained and supervised by an adult. 4. Never allow adults to operate the machine without proper instruction. 5. Keep the area of operation clear of all persons, particularly small children and pets. Stop machine if anyone enters the area. Preparation 1. Thoroughly inspect the area where the equipment is to be used. Remove all stones, sticks, wire and other foreign objects which could be tripped over and cause personal injury. 2. Wear sturdy, rough-soled work shoes and close fitting slacks and shirts. Loose fitting clothes or jewelry can be caught in the moving parts. Never operate the machine in bare feet or sandals. 3. Disengage clutch levers and shift (if equipped) into nuetral (“N”) before starting the engine. 4. Never leave the engine running while unattended. 5. Never attempt to make any adjustments while the engine is running, except where specifically recommended in the operator’s manual. Safe Handling of Gasoline: To avoid personal injury or property damage, use extreme care in handling gasoline. Gasoline is extremely flammable and the vapors are explosive. Serious personal injury can occur when gasoline is spilled on yourself and/or your clothes which can ignite. Wash your skin and change clothes immediately. 1. When adding fuel, turn engine OFF and let engine cool at least 2 minutes before removing the gas cap. 2. Fill fuel tank outdoors or in well ventilated area. 3. Use only an approved gasoline container. 4. Never fill containers inside a vehicle or on a truck or trailer bed with a plastic liner. Always place containers on the ground away from your vehicle before filling. 5. If possible, remove gas-powered equipment from the truck or trailer and refuel it on the ground. If this is not possible, then refuel such equipment on a trailer with a portable container, rather than from a gasoline dispenser nozzle. 6. Keep the nozzle in contact with the rim of the fuel tank or container opening at all times until fueling is complete. Do not use a nozzle lock-open device. 3 Do not overfill fuel tank. Fill tank to full as indicated by the fuel level indicator installed inside of the fuel tank. Do not over-fill to allow space for fuel expansion. On some models, a fuel level indicator may NOT be present, in this instance, fill the tank no more than 1/2 inch below the bottom of the filler neck to allow space for fuel expansion. Maintenance & Storage 8. 7. 1. Keep the engine in safe working order 2. Allow the engine to cool at least five minutes before storing. Never tamper with safety devices. Check their proper operation regularly. Replace fuel cap and tighten until the cap ratchets. 3. 9. If gasoline is spilled, wipe it off the engine and the equipment. Move the machine to another area. Wait five minutes before starting the engine. Check bolts and screws for proper tightness at frequent intervals to keep the engine in safe working condition. Visually inspect the engine for any damage. 4. 10. To reduce fire hazards, keep the machine free of grass , leaves or other debris build up. Clean up oil or fuel spillage and remove any fuel-soaked debris. Before cleaning, repairing or inspecting; stop the engine and make certain all moving parts have stopped. Disconnect the spark plug wire and ground it against the engine to prevent unintended starting. 11. Keep gasoline away from sparks, open flames, pilot lights, heat, and other ignition sources. 5. Do not change the engine governor settings or over-speed the engine. The governor controls the maximum safe operating speed of the engine. 6. Maintain and replace safety and instruction labels as necessary. 7. Always refer to the operator’s manual for important details if the machine is to be stored for an extended period of time. 8. If the fuel tank has to be drained, do this outdoors. 9. Observe proper disposal laws and regulations for gas, oil, etc. to protect the environment. 12. Never fuel equipment indoors because flammable vapors will accumulate in the area. 13. Extinguish all cigarettes, cigars, pipes, and other sources of ignition. 14. Check fuel line, tank, cap, and fittings frequently for cracks or leaks. Replace if necessary. Operation 1. When starting the engine, make sure spark plug, muffler, and fuel cap are in place. 2. Do not crank engine with spark plug removed. 3. If fuel spills, wait until it evaporates before starting engine. 4. Allow muffler, engine cylinder, and fins to cool before touching. To avoid serious injury or death, do not modify engine in any way. Tampering with the governor setting can lead to a runaway engine and cause it to operate at unsafe speeds. Never tamper with factory setting of engine governor. 5. Keep children away from hot or running engines. They can suffer burns from a hot muffler. Notice Regarding Emissions 6. Remove accumulated combustibles from muffler and cylinder area. 7. Operate equipment with all guards in place. 8. Keep hands and feet away from rotating parts. 9. Tie up long hair and remove jewelry. Engines which are certified to comply with California and federal EPA emission regulations for SORE (Small Off Road Equipment) are certified to operate on regular unleaded gasoline, and may include the following emission control systems: Engine Modification (EM), Oxidizing Catalyst (OC), Secondary Air Injection (SAI) and Three Way Catalyst (TWC) if so equipped. 10. Do not wear loose-fitting clothing, dangling drawstrings or items that could become caught. 11. When starting the engine, pull cord slowly until resistance is felt, then pull rapidly. 12. Remove all external equipment/engine loads before starting engine. 13. Direct coupled equipment components such as, but not limited to blades, impellers, pulleys, sprockets, etc., must be securely attached. Do not modify engine Spark Arrestor WARNING: This machine is equipped with an internal combustion engine and should not be used on or near any unimproved forest-covered, brush covered or grass-covered land unless the engine’s exhaust system is equipped with a spark arrester meeting applicable local or state laws (if any). If a spark arrester is used, it should be maintained in effective working order by the operator. A spark arrester for the muffler is available through your nearest engine authorized service dealer. 4 Section 2 — Important Engine Safe Operation Practices Safety Symbols This page depicts and describes safety symbols that may appear on this product. Read, understand, and follow all instructions on the machine before attempting to assemble and operate. Symbol Description READ THE OPERATOR’S MANUAL(S) Read, understand, and follow all instructions in the manual(s) before attempting to assemble and operate WARNING—GASOLINE IS FLAMMABLE Allow the engine to cool at least two minutes before refueling. WARNING— CARBON MONOXIDE Never run an engine indoors or in a poorly ventilated area. Engine exhaust contains carbon monoxide, an odorless and deadly gas. WARNING— ELECTRICAL SHOCK Do not use the engine’s electric starter in the rain WARNING— HOT SURFACE Engine parts, especially the muffler, become extremely hot during operation. Allow engine and muffler to cool before touching. WARNING! Your Responsibility — Restrict the use of this power machine to persons who read, understand and follow the warnings and instructions in this manual and on the machine. SAVE THESE INSTRUCTIONS! Section 2 — Important Engine Safe Operation Practices 5 3 Set-Up Gas & Oil Checking Oil Level NOTE: The engine is shipped without gasoline or oil in the engine. Running the engine with insufficient oil can cause serious engine damage and void the engine warranty. IMPORTANT: Be sure to check the oil while on a level surface with the engine stopped. WARNING! Always keep hands and feet clear of equipment moving parts. Do not use a pressurized starting fluid. Vapors are flammable. Oil Recommendations NOTE: Your engine may be equipped with either a short or extended oil dipstick. Follow the appropriate instructions below for the engine on your unit. Short Dipstick 1. Remove the oil filler cap/dipstick and wipe the dipstick clean. See Figure 3-2. 2. Insert the cap/dipstick into the oil filler neck, but do not screw it in. 3. Remove the oil filler cap/dipstick. If the level is low, slowly add oil to the upper limit on the dipstick. See Figure 3-2. 4. Replace and tighten cap/dipstick firmly before starting engine. Before starting engine, fill with motor oil, capacity is 600 ml/20 oz. Refer to viscosity chart in Figure 3-1 for oil recommendations. Do not over-fill. Use a 4-stroke, or an equivalent high detergent, premium quality motor oil certified to meet or exceed U.S. automobile manufacturer’s requirements for service classification of a minimum level SJ (higher letter ratings are acceptable such as SL and SM grades). Motor oil will display this designation on the container. SAE 10W-30 is recommended for general, all temperature use. If single viscosity oil is used, select the appropriate viscosity for the average temperature in your area from the chart below. 10w 20w 1 20 30 40 20w40, 20w50 Figure 3-2 15w40, 15w50 2 10w40 10w30 (ºC) -30º -20º -10º 0º 10º 20º 30º 40º (ºF) -20º 0º 20º 40º 60º 80º 100º Figure 3-1 1. Single Viscosity 2. Multi Viscosity CAUTION: Do not use non-detergent oil or 2-stroke engine oil. It could shorten the engine’s service life. NOTE: A 5w30 synthetic oil may be used to improve start ability for cold weather (temperatures below 400 F). 6 NOTE: Do not overfill. Overfilling with oil may cause smoking, hard starting, spark plug fouling, or oil saturation of air cleaner. Extended Dipstick 1. Fuel Requirements Remove the oil filler cap and wipe the dipstick clean. See Figure 3-3. CAUTION: Operating the engine with E15 or E85 fuel, an oil/gasoline mixture, dirty gasoline, or gasoline over 30 days old without fuel stabilizing additive may result in damage to your engine’s carburetor. Subsequent damage would not be covered under the manufacturer’s warranty. Use automotive gasoline (unleaded or low leaded to minimize combustion chamber deposits) with a minimum of 87 octane. Gasoline with up to 10% ethanol (E10) or 15% MTBE (Methyl Tertiary Butyl Ether) can be used. Never use an oil/gasoline mixture or dirty gasoline. Avoid getting dirt, dust, or water in the fuel tank. DO NOT use E15 or E85 gasoline. WARNING! Gasoline is extremely flammable and is explosive under certain conditions. Figure 3-3 2. Insert the dipstick into the oil filler neck. Turn the dipstick a 1/4 turn into the locked position to fully seat. 3. Remove dipstick. If the level is low, slowly add oil until oil level registers between high (H) and low (L). See Figure 3-3 inset. 4. Reinsert the dipstick into the locked position before starting the engine. • Refuel in a well-ventilated area with the engine stopped. Do not smoke or allow flames or sparks in the area where the engine is refueled or where gasoline is stored. • Do not overfill the fuel tank. After refueling, make sure the tank cap is closed properly and securely. • Be careful not to spill fuel when refueling. Spilled fuel or fuel vapor may ignite. If any fuel is spilled, make sure the area is dry before starting the engine. • Avoid repeated or prolonged contact with skin or breathing of vapor. Adding Fuel WARNING! An adult should fuel this engine. NEVER allow children to refuel the engine. Gasoline (fuel) vapors are highly flammable and can explode. Fuel vapors can spread and be ignited by a spark or flame many feet away from engine. To prevent injury or death from fuel fires, follow these instructions: NOTE: Do not overfill. Overfilling with oil may cause smoking, hard starting, spark plug fouling, or oil saturation of air cleaner. NOTE: Some engines may not have the fuel cap installed for shipping purposes. To install, remove and discard the fuel tank dust cap labeled “Discard”. Remove the bubble wrap packaging from around the fuel cap and tighten securely. • DO NOT use leaded fuel. • Fuel must be fresh and clean. NEVER use fuel left over from last season or stored for long periods. • NEVER mix oil with fuel. • DO NOT use fuel containing Methanol (Wood Alcohol) NOTE: Before refueling, allow engine to cool two minutes. 1. Clean around fuel fill before removing cap to fuel. 2. Fill tank until fuel reaches 1⁄2 inch below the bottom of the filler neck to allow space for fuel expansion. Be careful not to overfill. 3. Replace the gasoline cap and tighten securely. Wipe up spilled fuel before starting engine. If fuel is spilled DO NOT start engine. Move machine away from area of spillage. Avoid creating any source of ignition until fuel vapors are gone. Section 3 — Set-Up 7 4 Controls and Features Fuel Cap Primer† Air Cleaner Starter Handle Oil Fill Cap Oil Drain Spark Plug † If Equipped Muffler Figure 4-1 Primer (If Equipped) Fuel Cap The primer is located on the left side of the engine, next to the air cleaner. Pressing the primer forces fuel directly into the engine’s carburetor to aid in starting the engine. Remove the fuel cap to add fuel. Oil Drain Removing the oil drain plug will drain the oil from the engine. The engine is equipped with a side drain, and on select units, you may also access a bottom drain. Oil Fill Cap Remove the oil fill cap to check the oil level and add oil. 8 NOTE: Some engines may not have the fuel cap installed for shipping purposes. To install, remove and discard the fuel tank dust cap labeled “Discard”. Remove the bubble wrap packaging from around the fuel cap and tighten securely. Starter Handle Pull the starter handle to start the engine. 5 Operation Pre-Operation Check 1 The engine is shipped without gasoline or oil in the engine. See the Set-Up Section of this manual for instructions on adding oil and gasoline. Determine The Starting System Before starting the engine, you must determine the type of starting system that is on your engine. Your engine will have one of the following types: • Auto-Choke System: This features an automatic choke that does not have a manual choke or primer. • Primer System: This features a primer on the engine. To start your engine, follow the instructions for your type of starting system. Note: Equipment may have remote controls. See the equipment manual for location and operation of remote controls. 2 Starting the Engine Figure 5-1 WARNING: Always keep hands and feet clear of equipment moving parts. Do not use a pressurized starting fluid. Vapors are flammable. Auto-Choke System 1. Standing behind the mower, depress the blade control handle and hold it against the upper handle. See Figure 5-1. 2. Pull the starter grip lightly until resistance is felt, then pull rapidly to overcome compression, prevent kickback and start engine. Repeat if necessary. 2 IMPORTANT: Do not allow the starter grip to snap back against the engine. Return it gently to prevent damage to the starter. 3 1 Primer System 1. Push primer 3 times. Wait about two seconds between each push. See Figure 5-2. In temperature below 50°F, prime 5 times. After the engine is warmed up, one prime may be needed for all temperatures. 2. Standing behind the mower, squeeze and hold the blade control against upper handle. 3. Pull the recoil starter lightly until resistance is felt, then pull rapidly to overcome compression, prevent kickback, and start the engine. Repeat if necessary. See Figure 5-2. IMPORTANT: Do not allow the recoil starter to snap back against the rope guide. 3 Figure 5-2 Stopping Engine 1. Release blade control or turn off the engine switch (if equipped). If engine does not start, it may be necessary to re-prime the engine. 9 6 Engine Maintenance WARNING: Shut off the engine before performing any maintenance. To prevent accidental start-up, disconnect the spark plug boot. IMPORTANT: If engine must be tipped to transport equipment or to inspect or remove grass, keep spark plug side of engine up. Transporting or tipping engine spark plug down may cause smoking, hard starting, spark plug fouling, or oil saturation of air cleaner. Periodic inspection and adjustment of the engine is essential if high level performance is to be maintained. Regular maintenance will also ensure a long service life. The required service intervals and the kind of maintenance to be performed are described in the table below. Follow the hourly or calendar intervals, whichever occur first. More frequent service is required when operating in adverse conditions. WARNING: If the engine has been running, the muffler will be very hot. Be careful not to touch the muffler. Maintenance Schedule First 5 Hours Every Season Every Season Every Season or 25 Hours or 50 Hours or 100 Hours P Check Engine Oil Level Change Engine Oil †† Each Use or Every 5 Hrs. P Check Air Cleaner P P P Service Air Cleaner † P Check Spark Plug P Replace Spark Plug Clean Engine Shroud Clean around muffler P P Replace Fuel Filter † Service more frequently when used in dusty areas. †† Every season or 25 hours if operating under heavy load or high ambient temperature. 10 P Service Dates Oil Service Air Filter Service • Check oil level regularly. • Be sure correct oil level is maintained. Check every five hours or daily before starting engine. See oil checking procedure in the Operation section. WARNING: Never use gasoline or low flash point solvents for cleaning the air filter element. A fire or explosion could result. Oil Change IMPORTANT: Never run the engine without the air filter. Rapid engine wear will result. IMPORTANT: Be sure to check engine on a level surface with the engine stopped. Drain the oil while the engine is still warm to assure rapid and complete draining. NOTE: Engines with the primer starting system are equipped with a foam air filter element. Those with the auto-choke system have a paper element. Follow the applicable service instructions below. 1. Remove all fuel from tank by running engine until it stops from lack of fuel. 2. Remove drain plug and allow oil to drain into a suitable container. See Figure 6-1. Foam Filter 1. Remove the air filter cover by turning counter-clockwise then pulling it towards you. See Figure 6-2. Clean foam element or replace when damaged. * Short Dipstick Shown Oil Fill Cap Drain Plug Figure 6-1 WARNING: Before tipping engine or equipment to drain oil, drain fuel from tank by running engine until fuel tank is empty. 3. Reinstall the drain plug and tighten it securely. 4. Refill with the recommended oil and check the oil level. Refer to the Set-Up Section and follow the appropriate instructions for a short or extended dipstick. 5. Reinstall the oil fill cap securely. Figure 6-2 2. To clean foam element, remove it from the air filter base and wash in mild liquid detergent and water. Squeeze or press the foam element to rinse out dirt and water. Do not twist, this could damage or tear the foam element. Allow to dry thoroughly before using. OIL the foam element with a light engine oil. IMPORTANT: Used motor oil may cause skin cancer if repeatedly left in contact with the skin for prolonged periods. Although this is unlikely unless you handle used oil on a daily basis, it is still advisable to thoroughly wash your hands with soap and water as soon as possible after handling used oil. NOTE: Please dispose of used motor oil in a manner that is compatible with the environment. We suggest you take it in a sealed container to your local service station for reclamation. Do not throw it in the trash or pour it on the ground. Section 6 — Maintenance 11 WARNING: If the engine has been running, the muffler will be very hot. Be careful not to touch the muffler. Paper Filter 1. Remove the air filter cover by turning counter-clockwise then pulling it towards you. See Figure 6-3. NOTE: Paper filters cannot be cleaned and must be replaced once a year or every 100 operating hours; more often if used in extremely dusty conditions. 2. Visually inspect the spark plug. Discard the spark plug if there is apparent wear, or if the insulator is cracked or chipped. Clean the spark plug with a wire brush if it is to be reused. 3. Measure the plug gap with a feeler gauge. Correct as necessary by bending side electrode. See Figure 6-5. The gap should be set to 0.030 in. Electrode 0.030 in. Figure 6-3 Spark Plug Service WARNING: DO NOT check for spark with spark plug removed. DO NOT crank engine with spark plug removed. To ensure proper engine operation, the spark plug must be properly gapped and free of deposits. 1. Remove the spark plug boot and use a spark plug wrench to remove the plug. See Figure 6-4. Spark Plug Spark Plug Boot Figure 6-4 12 Section 6 — Maintenance Figure 6-5 4. Check that the spark plug washer is in good condition and thread the spark plug in by hand to prevent crossthreading. 5. After the spark plug is seated, tighten with a spark plug wrench to compress the washer. NOTE: When installing a new spark plug, tighten 1/2 turn after the spark plug seats to compress the washer. When reinstalling a used spark plug, tighten 1/8-1/4 turn after the spark plug seats to compress the washer. IMPORTANT: The spark plug must be securely tightened. An improperly tightened spark plug can become very hot and may damage the engine. Fuel Filter Service Storage The fuel filter cannot be cleaned and must be replaced once a year or every 100 operating hours; more often if run with old gasoline. 1. Remove all fuel from tank by running engine until it stops from lack of fuel. 2. Remove hose clamp from fuel line and remove fuel line from tank outlet. See Figure 6-6. CAUTION: Failure to use a fuel stabilizing additive such as STA-BIL® or completely run the engine until it’s out of fuel before off-season storage may result in damage to your engine’s carburetor. Subsequent damage would not be covered under the manufacturer’s warranty. Gasoline that will be stored longer than 30 days needs to be pre-treated upon purchase with fuel stabilizer such as STA-BIL® to prevent gum and varnish from forming in the engines fuel and intake system. Improper fuel storage can result in hard starting, no starting, stalling and poor performance. If the gasoline in your engine deteriorates during storage, you may need to have the carburetor, and other fuel system components, serviced or replaced. 1. Remove all fuel from tank by running engine until it stops from lack of fuel. WARNING: Never leave engine unattended while running. Fuel Filter 2. Change oil. See Oil Change section. 3. Remove spark plug and pour about 1/2 an ounce of engine oil into cylinder. Replace spark plug and crank slowly to distribute oil. 4. Clean debris from around engine, under finger guard, and under, around and behind muffler. Touch up any damaged paint, and coat other areas that may rust with a light film of oil. 5. Store in a clean, dry and well ventilated area away from any appliance that operates with a flame or pilot light, such as a furnace, water heater, or clothes dryer. Also avoid any area with a spark producing electric motor, or where power tools are operated. 6. If possible, also avoid storage areas with high humidity, because that promotes rust and corrosion. 7. Keep the engine level in storage. Tilting can cause fuel or oil leakage. Figure 6-6 3. Pull out old fuel filter from tank outlet. Replace when dirty or damaged. 4. Grasp new fuel filter from shouldered end and insert it completely to the shoulder into the tank outlet. See Figure 6-6 inset. 5. Replace fuel line and hose clamp. Clean Engine If the engine has been running, allow it to cool for at least half an hour before cleaning. Periodically remove dirt build-up from engine. Clean finger guard and around muffler. Clean with a brush or compressed air. IMPORTANT: Do not spray engine with water to clean because water could contaminate fuel. Using a garden hose or pressure washing equipment can also force water into the air cleaner or muffler opening. Water in the air cleaner will soak the paper element, and water that passes through the element or muffler can enter the cylinder, causing damage. WARNING: Accumulation of debris around muffler could cause a fire. Inspect and clean before every use. Removing From Storage 1. Check your engine as described in the Pre-Operation Check section of this manual. 2. If the fuel was drained during storage preparation, fill the tank with fresh gasoline. If you keep a container of gasoline for refueling, make certain it contains only fresh fuel. Gasoline oxidizes and deteriorates over time, causing hard starting. 3. If the cylinder was coated with oil during storage preparation, the engine will smoke briefly at startup. This is normal. Section 6 — Maintenance 13 7 Troubleshooting Problem Cause Engine Fails to start 1. Blade control disengaged. 1. Engage blade control. 2. Spark plug boot disconnected. 2. Connect wire to spark boot. 3. Fuel tank empty or stale fuel. 3. Fill tank with clean, fresh gasoline. 4. Engine not primed (if equipped with primer). 4. Prime engine as instructed in the Operation section. 5. Faulty spark plug. 5. Clean, adjust gap, or replace. 6. Blocked fuel line. 6. Clean fuel line. 7. Engine flooded. 7. Wait a few minutes to restart, but do not prime. 8. Fuel valve (if equipped) closed. 8. Open fuel valve. See engine manual. 9. Engine not choked (if equipped with choke). 9. Choke engine. See engine manual. 10. Burnt fuse. (Electric Start Only). Engine runs erratic 10. Replace fuse. (See Maintenance Section). 1. Spark plug boot loose. 1. Connect and tighten spark plug boot. 2. Blocked fuel line or stale fuel. 2. Clean fuel line; fill tank with clean, fresh gasoline. 3. Vent in gas cap plugged. 3. Clear vent. 4. Water or dirt in fuel system. 4. Drain fuel tank. Refill with fresh fuel. 5. Dirty air cleaner. 5. Refer to engine manual. 6. Unit running with CHOKE applied or in the “ON” position (if equipped). 6. Put CHOKE in the “OFF” position.. 1. Engine oil level low. 1. Fill crankcase with proper oil. 2. Air flow restricted. 2. Clean area around and on top of engine. Occasional skips (hesitates) at high speed 1. Spark plug gap too close. 1. Adjust gap to .030”. Refer to engine manual. Idles poorly 1. Spark plug fouled, faulty, or gap too wide. 1. Reset gap to .030” or replace spark plug. 2. Dirty air cleaner. 2. Refer to engine manual. Engine overheats 14 Remedy 8 Replacement Parts Component Part Number and Description 951-14437 Spark Plug 951-14627 951-14628 Air Cleaner (Foam) Air Cleaner (Paper) 951-12738 Fuel Cap Assembly 951-10358A Fuel Filter NOTE: Download a complete Parts Manual, refer to customer support on page 2. Be sure to have your model number and serial number ready. Refer to page 2 for more information regarding locating your model and serial numbers. 15 FEDERAL and/or CALIFORNIA EMISSION CONTROL WARRANTY STATEMENT YOUR WARRANTY RIGHTS AND OBLIGATIONS MTD Consumer Group Inc, the United States Environmental Protection Agency (EPA), and for those products certified for sale in the state of California, the California Air Resources Board (CARB) are pleased to explain the emission control system (ECS) warranty on your 20132014 small off-road spark-ignited engine and equipment (outdoor equipment). In California, new outdoor equipment must be designed, built and equipped to meet the State’s stringent anti-smog standards (in other states, outdoor equipment must be designed, built, and equipped to meet the U.S. EPA small off-road spark ignition engine regulations). MTD Consumer Group Inc must warrant the ECS on your outdoor equipment for the period of time listed below, provided there has been no abuse, neglect, or improper maintenance of the outdoor equipment. Your ECS may include parts such as the carburetor, fuel-injection system, ignition system, catalytic converter, fuel tanks, fuel lines, fuel caps, valves, canisters, filters, vapor hoses, clamps, connectors, and other associated emission-related components. Where a warrantable condition exists, MTD Consumer Group Inc will repair your outdoor equipment at no cost to you including diagnosis, parts, and labor. MANUFACTURER’S WARRANTY COVERAGE: This emission control system is warranted for two years. If any emission-related part on your outdoor equipment is defective, the part will be repaired or replaced by MTD Consumer Group Inc. OWNER’S WARRANTY RESPONSIBILITIES: As the outdoor equipment owner, you are responsible for performance of the required maintenance listed in your owner’s manual. MTD Consumer Group Inc recommends that you retain all receipts covering maintenance on your outdoor equipment, but MTD Consumer Group Inc cannot deny warranty solely for the lack of receipts. As the outdoor equipment owner, you should however be aware that MTD Consumer Group Inc may deny you warranty coverage if your outdoor equipment or a part has failed due to abuse, neglect, improper maintenance, or unapproved modifications. You are responsible for presenting your outdoor equipment engine to MTD Consumer Group Inc’s distribution center or service center as soon as the problem exists. The warranty repairs should be completed in a reasonable amount of time, not to exceed 30 days. If you have a question regarding your warranty coverage, you should contact the MTD Consumer Group Inc Service Department. In the U.S.A.: at 1-800-800-7310 or at http://support.mtdproducts.com. In Canada: at 1-800-668-1238 or at http://www.mtdcanada.com GENERAL EMISSIONS WARRANTY COVERAGE: MTD Consumer Group Inc warrants to the ultimate purchaser and each subsequent purchaser that the outdoor equipment is: (1) designed, built, and equipped so as to conform with all applicable regulations; and (2) free from defects in materials and workmanship that cause the failure of a warranted part for a period of two years. The warranty period begins on the date the outdoor equipment is delivered to an ultimate purchaser or first placed into service. Subject to certain conditions and exclusions as stated below, the warranty on emission-related parts is as follows: 1. Any warranted part that is not scheduled for replacement as required maintenance in the written instructions supplied is warranted for the warranty period stated above. If the part fails during the period of warranty coverage, the part will be repaired or replaced by MTD Consumer Group Inc according to subsection (4) below. Any such part repaired or replaced under warranty will be warranted for the remainder of the period. 2. Any warranted part that is scheduled only for regular inspection in the written instructions supplied is warranted for the warranty period stated above. Any such part repaired or replaced under warranty will be warranted for the remaining warranty period. 3. Any warranted part that is scheduled for replacement as required maintenance in the written instructions supplied is warranted for the period of time before the first scheduled replacement date for that part. If the part fails before the first scheduled replacement, the part will be repaired or replaced by MTD Consumer Group Inc according to subsection (4) below. Any such part repaired or replaced under warranty will be warranted for the remainder of the period prior to the first scheduled replacement point for the part. 4. Repair or replacement of any warranted part under the warranty provisions herein must be performed at a warranty station at no charge to the owner. 5. Notwithstanding the provisions herein, warranty services or repairs will be provided at all of our distribution centers that are franchised to service the subject engines or equipment. 6. The outdoor equipment owner will not be charged for diagnostic labor that is directly associated with diagnosis of a defective, emission-related warranted part, provided that such diagnostic work is performed at a warranty station. 7. MTD Consumer Group Inc is liable for damages to other engine or equipment components proximately caused by a failure under warranty of any warranted part. 8. Throughout the off-road engine and equipment warranty period stated above, MTD Consumer Group Inc will maintain a supply of warranted parts sufficient to meet the expected demand for such parts. 16 9. Any replacement part may be used in the performance of any warranty maintenance or repairs and must be provided without charge to the owner. Such use will not reduce the warranty obligations of MTD Consumer Group Inc. 10. Add-on or modified parts that are not exempted by the Air Resources Board may not be used. The use of any non-exempted add-on or modified parts by the ultimate purchaser will be grounds for disallowing a warranty claim. MTD Consumer Group Inc will not be liable to warrant failures of warranted parts caused by the use of a non-exempted add-on or modified part. WARRANTED PARTS: The repair or replacement of any warranted part otherwise eligible for warranty coverage may be excluded from such warranty coverage if MTD Consumer Group Inc demonstrates that the outdoor equipment has been abused, neglected, or improperly maintained, and that such abuse, neglect, or improper maintenance was the direct cause of the need for repair or replacement of the part. That notwithstanding, any adjustment of a component that has a factory installed, and properly operating, adjustment limiting device is still eligible for warranty coverage. Further, the coverage under this warranty extends only to parts that were present on the off-road equipment purchased. The following emission warranty parts are covered (if applicable): 1. 2. 3. 4. 5. 6. Fuel Metering System • Cold start enrichment system (soft choke) • Carburetor and internal parts (or fuel injection system) • Fuel pump • Fuel tank Air Induction System • Air cleaner • Intake manifold Ignition System • Spark plug(s) • Magneto ignition system Exhaust System • Catalytic converter • SAI (Reed valve) Miscellaneous Items Used in Above System • Vacuum, temperature, position, time sensitive valves and switches • Connectors and assemblies Evaporative Control • Fuel hose • Fuel hose clamps • Tethered fuel cap • Carbon canister • Vapor lines NOTE: If you require warranty service in Canada and your product was sold by MTD Products Limited within Canada to the retailer you purchased it from in Canada then the MTD Consumer Group Inc portion of this warranty will be honored by MTD Products Limited in Canada. 050790CN Rev. B 17 Notes 18 $POTJHOFTEFTÏDVSJUÏt.POUBHFt'PODUJPOOFNFOUt&OUSFUJFOt4FSWJDFt%ÏQBOOBHFt(BSBOUJF NOTICE D’UTILISATION Tondeuse poussée – Modèles/Séries A00, A10, A20, B00, B10, & B20 AVERTISSEMENT PRIÈRE DE LIRE TOUTES LES INSTRUCTIONS FIGURANT DANS CETTE NOTICE D’UTILISATION AVANT D’ESSAYER DE VOUS SERVIR DE CETTE MACHINE. LE NON-RESPECT DE CES INSTRUCTIONS PEUT ENTRAÎNER DES BLESSURES CORPORELLES. P. O. Box 1386, 97 Kent Avenue, KITCHENER, ONTARIO, CANADA N2G 4J1 IMPRIMÉ AUX ÉTATS-UNIS 769-08603A 10.30.13 1 À l’intention du propriétaire Merci ! Merci d’avoir acheté votre nouvel équipement. Celui-ci véhicule a été soigneusement conçu pour vous offrir des performances remarquables s’il est correctement utilisé et entretenu. ne pas s’appliquer à tous les modèles. Le fabricant se réserve le droit de modifier les caractéristiques techniques du produit, les modèles et l’équipement sans préavis et sans obligation. Veuillez lire cette notice d’utilisation au complet avant d’utiliser MÏRVJQFNFOU&MMFWPVTFYQMJRVFDPNNFOUQSÏQBSFSMBNBDIJOF et comment l’utiliser et l’entretenir facilement et en toute sécurité. Veuillez vous assurer que toute personne qui utilisera la machine suivra soigneusement les consignes de sécurité énoncées. Le non respect de ces consignes peut causer des blessures corporelles ou des dégâts matériels. En cas de problème ou de question concernant cette machine, adressez-vous au concessionnaire de service de votre localité ou appelez-nous directement. Les numéros de téléphone du service après-vente, l’adresse internet et l’adresse postale se trouvent sur cette page. Nous voulons nous assurer que nos clients seront toujours satisfaits. Tous les renseignements fournis ici sont les plus récents qui sont disponibles à propos de ce produit au moment de l’impression de cette notice d’utilisation. Consultez souvent cette notice d’utilisation pour vous familiariser avec la machine, ses caractéristiques et son fonctionnement. Sachez que cette notice peut mentionner une vaste gamme de spécifications techniques concernant différents modèles. Les caractéristiques et les avantages mentionnés et/ou illustrés dans cette notice peuvent Les mentions de droite et de gauche dans cette notice d’utilisation s’entendent à partir du poste de conduite. Le fabricant du moteur est responsable pour tous les problèmes concernant la performance, la puissance, les caractéristiques techniques, la garantie et l’entretien du moteur. Veuillez consulter la notice d’utilisation du moteur, fournie séparément avec la machine, pour obtenir de plus amples renseignements. Table des matières Consignes de sécurité ............................................. 3 Assemblage et Montage ......................................... 9 Commandes et caractéristiques ..........................13 Fonctionnement .....................................................14 Entretien et réglages ..............................................15 Service technique ...................................................17 Dépannage .............................................................18 Pièces de rechange .................................................19 Garantie ................................................................. 20 Enregistrez les renseignements concernant la machine. NUMÉRO DE MODÈLE "WBOUEFQSÏQBSFSFUEVUJMJTFSWPUSFOPVWFMMFNBDIJOFWFVJMMF[ localiser la plaque signalétique et reporter les renseignements GPVSOJTTVSMBESPJUF1PVSMPDBMJTFSMBQMBRVFTJHOBMÏUJRVFQMBDF[ vous derrière la machine au poste de conduite et regardez à l’arrière de la machine. Ces renseignements seront nécessaires si vous avez besoin d’une aide technique soit par l’intermédiaire de notre site internet, soit auprès du concessionnaire de votre localité. NUMÉRO DE SÉRIE Service après-vente Veuillez NE PAS retourner la machine au détaillant qui vous l’à vendue, sans vous adresser d’abord au service après vente. Nos techniciens peuvent vous aider si vous avez des difficultés en assemblant cette machine ou si vous avez des questions concernant ses commandes, son fonctionnement ou son entretien. Choisissez parmi les options ci-dessous : 2 ◊ Visitez notre site web à www.mtdcanada.ca ◊ Rendez visite au concessionnaire le plus proche de chez vous en appelant le service après-vente au 1-800-668-1238. ◊ ²DSJWF[OPVTË.5%$BOBEBt10#PYt,FOU"WFOVFt,JUDIFOFS0OUBSJP$BOBEBt/(+ Importantes consignes de sécurité 2 AVERTISSEMENT: Ce symbole attire votre attention sur des consignes de sécurité importantes qui, si elles ne sont pas respectées, peuvent mettre en danger non seulement votre personne et WPTCJFOTNBJTBVTTJDFVYEBVUSVJ1SJÒSFEFMJSFUPVUFTMFTJOTUSVDUJPOTGJHVSBOUEBOTDFUUFOPUJDF d’utilisation avant d’essayer de vous servir de cette machine. Le non-respect de ces instructions QFVUFOUSBÔOFSEFTCMFTTVSFTDPSQPSFMMFT3&41&$5&;-"7&35*44&.&/526*"$$0.1"(/&$& 4:.#0-& AVERTISSEMENT: Les gaz d’échappement de ce produit contiennent des produits chimiques reconnus dans l’État de Californie comme causant le cancer, des anomalies congénitales ou d’autres problèmes liés à la reproduction. AVERTISSEMENT -FTCPSOFTFUDPTTFTEFCBUUFSJFFUEBVUSFTBDDFTTPJSFTBOOFYFTDPOUJFOOFOU du plomb et des mélanges à base de plomb, soit des produits chimiques reconnus cancérigènes FUSFTQPOTBCMFTEBOPNBMJFTDPOHÏOJUBMFTPVBVUSFTQBSM²UBUEF$BMJGPSOJF*MFTUJNQÏSBUJGEF bien se laver les mains après toute manutention. DANGER: $FUUFNBDIJOFEPJUÐUSFVUJMJTÏFDPOGPSNÏNFOUBVYDPOTJHOFTEFTÏDVSJUÏRVJGJHVSFOU dans la notice d’utilisation. Comme avec tout appareil motorisé, une négligence ou une erreur de la part de l’utilisateur peut entraîner des blessures graves. Cette machine peut amputer mains FUQJFETFUQSPKFUFSEFTEÏCSJT1BSDPOTÏRVFOUMFOPOSFTQFDUEFDFTDPOTJHOFTQFVUDBVTFSEFT blessures corporelles graves et même mortelles. Utilisation en général 1. Veuillez lire attentivement la notice d’utilisation avant EFTTBZFSEBTTFNCMFSMBNBDIJOF"TTVSF[WPVTEFMJSFFUEF bien comprendre toutes les instructions qui figurent sur la machine et dans la notice d’utilisation avant de la mettre en marche. Conservez cette notice d’utilisation à un endroit sûr pour toute consultation ultérieure et pour commander des pièces de rechange. 2. Familiarisez-vous avec les commandes et les conseils d’utilisation de la machine avant de vous en servir. 3. Cette machine motorisée est un outil de précision, pas un jouet. Soyez par conséquent toujours très prudent. Le seul rôle de cette machine est de tondre le gazon. Ne l’utilisez jamais dans un autre but. /FQFSNFUUF[KBNBJTËEFTFOGBOUTEFNPJOTEFBOTEF se servir de la machine. Des enfants plus âgés doivent lire et comprendre le mode d’emploi de la machine et les consignes de sécurité qui figurent dans cette notice d’utilisation. Un adulte doit leur apprendre à se servir de cette machine et les surveiller. 5. Seules des personnes mûres ayant pris connaissance des consignes de sécurité doivent être autorisées à utiliser cette machine. &YBNJOF[TPJHOFVTFNFOUMB[POFEFUSBWBJM3BNBTTF[MFT pierres, bâtons, fils métalliques, os, jouets et autres objets qui pourraient vous faire trébucher ou qui risquent d’être ramassés et projetés par la lame. Les objets projetés par la machine peuvent causer des blessures graves. 1SÏWPZF[EFUSBWBJMMFSFOÏWJUBOUEFQSPKFUFSMIFSCFWFST des rues, des trottoirs, des spectateurs, etc. Évitez d’éjecter l’herbe en direction d’un mur ou d’un obstacle. De cette façon, les débris éventuels ne risquent pas de ricocher et de blesser quelqu’un. 1PVSÏWJUFSUPVUSJTRVFEFDPOUBDUBWFDMBMBNFPVEF blessure par un projectile, éloignez les enfants, passants et BOJNBVYËBVNPJOTQJFETEFMBUPOEFVTFQFOEBOURVFMMF GPODUJPOOF"SSÐUF[MBNBDIJOFTJRVFMRVVOTBQQSPDIF 1PSUF[UPVKPVSTEFTMVOFUUFTEFTÏDVSJUÏFOVUJMJTBOUMB machine ou en effectuant un réglage ou une réparation. Un PCKFUQFVUFOFGGFUÐUSFQSPKFUÏSJDPDIFSFUWPVTCMFTTFSBVY ZFVY 1PSUF[EFTDIBVTTVSFTSPCVTUFTËTFNFMMFÏQBJTTFFUEFTWÐUFment bien ajustés. Une chemise et un pantalon qui protègent les bras et les jambes et des chaussures à bout d’acier sont recommandés. N’utilisez jamais la tondeuse si vous êtes pieds nus ou si vous portez des sandales ou des tennis. 11. Ne placez jamais vos mains ou vos pieds près d’une pièce en mouvement ou sous le plateau de coupe. La lame peut amputer mains et pieds. 12. L’absence du clapet de la goulotte d’éjection ou un clapet endommagé peut causer des blessures en cas de contact avec la lame ou projeter des objets. 13. De nombreuses blessures se produisent lorsque la tondeuse passe sur le pied à la suite d’une chute. Ne retenez pas la tondeuse si vous tombez. Lâchez immédiatement le guidon. 3 /FUJSF[KBNBJTMBUPOEFVTFWFSTWPVTFONBSDIBOU4JMGBVU faire reculer la tondeuse près d’un mur d’un autre obstacle, regardez d’abord par terre et derrière vous, puis procédez comme suit: a. Éloignez-vous de la tondeuse à bout de bras. C "TTVSF[WPUSFTUBCJMJUÏ c. Reculez la tondeuse lentement et d’une demilongueur de bras seulement. d. Répétez selon les besoins. 15. N’utilisez jamais la tondeuse en état d’ébriété ou si vous prenez des médicaments ralentissant les réactions. 16. Dégagez le dispositif d’auto-propulsion ou l’embrayage d’entraînement, le cas échéant, avant de faire démarrer le moteur. -BQPJHOÏFEFDPNNBOEFEFMBMBNFFTUVOEJTQPTJUJGEF sécurité. Ne tentez jamais de contourner son rôle. Ceci empêche le dispositif de sécurité de fonctionner correctement et peut causer des blessures en cas de contact avec la lame. La poignée de commande de la lame doit bouger GBDJMFNFOUEBOTMFTEFVYTFOTFUSFWFOJSBVUPNBUJRVFNFOUË la position non énclenchée quand on la lâche. 18. N’utilisez jamais la tondeuse si le gazon est mouillé. Soyez toujours bien en équilibre. Faites attention de ne pas glisser et de ne pas tomber pour éviter des blessures graves. Si vous perdez votre équilibre, lâchez la poignée de commande de la lame immédiatement et la lame arrêtera de tourner en trois secondes. 6UJMJTF[MBUPOEFVTFTFVMFNFOUEBOTMBMVNJÒSFEVKPVSPV dans la bonne lumière artificielle. Marchez, ne courrez pas. "SSÐUF[MBMBNFBWBOUEFUSBWFSTFSEFTBMMÏFTUSPUUPJSTPV chemins recouverts de gravier. 21. Si la machine commence à vibrer d’une manière anormale, arrêtez le moteur et cherchez immédiatement la cause. En général, toute vibration indique un problème. "SSÐUF[MFNPUFVSFUBUUFOEF[RVFMBMBNFTFTPJUJNNPCJMJTÏF avant de détacher le sac à herbe ou de déboucher la goulotte. La lame continue à tourner pendant quelques secondes après que le moteur s’est éteint. Ne placez jamais une partie du corps dans le secteur de la lame avant d’être certain que celle-ci est immobile. 28. En cas de situations non mentionnées dans cette notice, soyez prudent et faites preuve de bon sens. Contactez le service à la clientèle pour obtenir le nom du concessionaire local. Utilisation sur une pente Les accidents provoqués par des chutes et des glissades, qui surviennent souvent sur des pentes, peuvent causer des blessures graves. Travailler sur un terrain en pente demande des précautions supplémentaires. Si vous ne sentez pas à l’aise TVSMBQFOUFOZUSBWBJMMF[QBT1BSNFTVSFEFTÏDVSJUÏVUJMJTF[ l’inclinomètre fourni dans la notice d’utilisation pour mesurer la pente du terrain avant de commencer à travailler. Si selon l’inclinomètre, la pente est supérieure à 15°, n’utilisez pas la tondeuse pour éviter toute blessure grave. À faire: 1. Travaillez parallèlement à la pente, jamais perpendiculairement, Faites très attention en changeant de direction sur une pente. 'BJUFTBUUFOUJPOBVYUSPVTFUPSOJÒSFT-BNBDIJOFQFVU se retourner sur un terrain accidenté. Des herbes hautes peuvent cacher des obstacles. 3. Vérifiez toujours votre équilibre. Vous risquez de glisser, de tomber et de vous blesser grièvement. Si vous sentez que vous allez perdre l’équilibre, lâchez immédiatement le guidon, et la lame arrêtera de tourner en trois secondes. À ne pas faire: 1. Ne tondez pas près d’une falaise ou d’un talus. Le conducteur peut facilement perdre l’équilibre. 2. Ne tondez pas sur une pente supérieure à 15° selon l’inclinomètre. 3. Ne tondez pas de l’herbe mouillée. La traction réduite peut provoquer un dérapage. 23. N’utilisez jamais la tondeuse si l’abattant de protection arrière, la goulotte d’éjection, un sac à herbe, la poignée de commande de la lame ou tout autre dispositif de sécurité approprié n’est pas en place et qui en bon état de fonctionnent. N’utilisez jamais la tondeuse avec des dispositifs de sécurité endommagés. Le non-respect de ces consignes peut causer des blessures graves. Enfant -FTJMFODJFVYFUMFNPUFVSEFWJFOOFOUUSÒTDIBVETFUQFVWFOU causer des brûlures. Ne les touchez pas. 1. Éloignez les enfants de la zone de travail et placez-les sous la surveillance d’un adulte autre que le conducteur de la machine. 25. N’essayez jamais d’ajuster une roue ou de changer la hauteur de coupe pendant que la moteur tourne. 26. N’utilisez que des accessoires recommandés par le fabricant de la machine. Le non-respect de ce consigne peut causer des blessures graves. 4 1PVSNFUUSFMFNPUFVSFONBSDIFUJSF[MFOUFNFOUMBQPJHOÏF du démarreur à lanceur jusqu’à ce que vous sentiez une légère résistance, puis tirez-la rapidement. Le retour rapide de la corde du démarreur (le recul) attirera votre main et votre bras vers le moteur plus vite que vous ne pourrez lâcher la poignée. Des fractures des os, hématomes ou foulures peuvent en résulter. SECTION 2 — IMPORTANTES CONSIGNES DE SÉCURITÉ Un accident grave risque de se produire si le conducteur n’est pas toujours vigilant en présence d’enfants. Les enfants sont TPVWFOUBUUJSÏTQBSMBNBDIJOFFUMBUPOUFEFMIFSCF*MTOF comprennent pas les dangers. Ne supposez jamais qu’ils vont rester là où vous les avez vus. 2. Restez vigilant et arrêtez la machine si des enfants s’approchent de la zone de travail. 3. Regardez toujours derrière vous et par terre avant de reculer et en reculant. 'BJUFTUSÒTBUUFOUJPOFOBQQSPDIBOUEBOHMFTNPSUTEFCVJTsons, d’autres objets qui peuvent gêner votre visibilité. -BJTTF[MBNBDIJOFSFGSPJEJSQFOEBOUBVNPJOTNJOVUFT avant de la remiser. 5. Éloignez les enfants des moteurs chauds ou en cours d’utilisation. Les enfants peuvent subir des brûlures graves au DPOUBDUEVOTJMFODJFVYDIBVE Entretien général: /FQFSNFUUF[KBNBJTËEFTFOGBOUTEFNPJOTEFBOT EVUJMJTFSMBUPOEFVTF%FTBEPMFTDFOUTÉHÏTEFBOTPV plus doivent lire la notice d’utilisation, bien comprendre le fonctionnement de la machine et respecter les consignes de TÏDVSJUÏ*MTEPJWFOUBQQSFOESFËVUJMJTFSMBNBDIJOFFUTFO servir sous la surveillance étroite d’un adulte. ENTRETIEN Manipulation de l’essence: 1PVSÏWJUFSUPVUFCMFTTVSFPVEÏHÉUNBUÏSJFMGBJUFTUSÒT BUUFOUJPOFONBOJQVMBOUEFMFTTFODF*MTBHJUEVOQSPEVJU FYUSÐNFNFOUJOGMBNNBCMFFUMFTWBQFVSTSJTRVFOUEFYQMPTFS Vous pouvez être grièvement blessé si des éclaboussures sur votre peau ou sur vos vêtements s’enflammaient. Rincez votre peau et changez immédiatement de vêtements. 2. Remissez le carburant dans des bidons homologués seulement. 3. Ne faites jamais le plein dans un véhicule, ni à l’arrière d’une camionnette dont le plancher est recouvert d’un revêtement FOQMBTUJRVF1MBDF[UPVKPVSTMFTCJEPOTQBSUFSSFFUMPJOEF votre véhicule avant de les remplir. %BOTMBNFTVSFEVQPTTJCMFEÏDIBSHF[MÏRVJQFNFOU motorisé de la remorque et faites le plein par terre. Si cela n’est pas possible, faites le plein avec un bidon plutôt que directement de la pompe à essence. 5. Maintenez le gicleur en contact avec le bord du réservoir d’essence ou avec l’ouverture du bidon jusqu’à ce que le plein soit terminé. N’utilisez pas un gicleur équipé d’un dispositif de blocage en position ouverte. 6. Éteignez toute cigarette ou pipe, tout cigare ou toute autre chaleur incandescente. /FGBJUFTKBNBJTMFQMFJOËMJOUÏSJFVSDBSEFTWBQFVSTJOGMBNmables risquent de s’accumuler. 8. N’enlevez jamais le capuchon d’essence et n’ajoutez pas d’essence pendant que le moteur tourne ou s’il est chaud. -BJTTF[MFNPUFVSSFGSPJEJSQFOEBOUBVNPJOTEFVYNJOVUFT avant de faire le plein. /FGBJUFTKBNBJTEÏCPSEFSMFSÏTFSWPJS-BJTTF[VOFTQBDF EVOEFNJQPVDFFOWJSPOQPVSQFSNFUUSFMFYQFOTJPOEV carburant. 10. Resserrez bien le capuchon d’essence. 11. En cas de débordement, essuyez toute éclaboussure de carburant ou d’huile et enlevez tous les débris imbibés EFTTFODF%ÏQMBDF[MBNBDIJOFËVOBVUSFFOESPJU"UUFOEF[ 5 (cinq) minutes avant de mettre en marche le moteur. 12. Ne remisez jamais la machine ou les bidons d’essence à l’intérieur s’il y a une flamme, une étincelle (chauffe-eau à gaz, radiateur, sèche-linge, etc.). 13. Limitez les risques d’incendie en débarrassant le moteur des brins d’herbe, feuilles et autres saletés. Essuyez les éclaboussures de carburant ou d’huile et enlevez tous les débris imbibés d’essence. 1. Ne faites jamais fonctioner la machine dans un local clos car MFTHB[EÏDIBQQFNFOUEVNPUFVSDPOUJFOOFOUEVNPOPYZEF EFDBSCPOFVOHB[JOPEPSFUSÒTEBOHFSFVY "WBOUEFOFUUPZFSEFSÏQBSFSPVEFYBNJOFSMBNBDIJOF vérifiez que la lame et toutes les pièces mobiles se sont immobilisées. Débranchez le fil de la bougie et mettez-le à la terre contre le moteur pour empêcher tout démarrage accidentel. 3. Vérifiez souvent que la lame et les boulons de montage du NPUFVSTPOUCJFOTFSSÏT&YBNJOF[WJTVFMMFNFOUMBMBNF QPVSEÏUFDUFSUPVUFVTVSFFYDFTTJWFUPVUGFOEJMMFNFOU Remplacez-la avec une lame authentique seulement (de la liste de pièces qui se trouve dans cette notice). «L’emploi de QJÒDFTOPODPOGPSNFTBVYDBSBDUÏSJTUJRVFTEFMÏRVJQFNFOU d’origine peut causer des performances inférieures et réduire la sécurité.» -BMBNFFTUDPVQBOUFFUQFVUDBVTFSEFTCMFTTVSFTHSBWFT Enveloppez-la avec un chiffon ou portez des gants et faites très attention en la manipulant. "TTVSF[WPVTRVFUPVTMFTÏDSPVTCPVMPOTFUWJTTPOUCJFO serrés pour que l’équipement soit toujours en bon état de marche. 6. Ne modifiez jamais les dispositifs de sécurité. Vérifiez souvent qu’ils fonctionnent bien. 4JWPVTIFVSUF[VOPCKFUBSSÐUF[JNNÏEJBUFNFOUMFNPUFVS EÏCSBODIF[MFGJMEFMBCPVHJFFUFYBNJOF[TPJHOFVTFNFOUMB machine. Réparez les dégâts éventuels avant de remettre la machine en marche. 8. N’essayez jamais d’ajuster une roue ou de changer la hauteur de coupe pendant que la moteur tourne. -FTQJÒDFTEVTBDËIFSCFFUMFDMBQFUEFMBHPVMPUUF d’éjection peuvent s’user et être endommagés et, par DPOTÏRVFOUFYQPTFSMFTQJÒDFTNPCJMFTPVDBVTFSMB QSPKFDUJPOEFEÏCSJT1BSNFTVSFEFTÏDVSJUÏWÏSJGJF[TPVWFOU les pièces et remplacez-les immédiatement avec des pièces authentiques seulement (de la liste de pièces qui se trouve EBOTDFUUFOPUJDF j-FNQMPJEFQJÒDFTOPODPOGPSNFTBVY caractéristiques de l’équipement d’origine peut causer des performances inférieures et réduire la sécurité.» 10. Ne modifiez pas le réglage du régulateur et ne laissez pas le moteur s’emballer. Le régulateur maintient le moteur à son SÏHJNFNBYJNBMEFGPODUJPOOFNFOUTBOTEBOHFS 11. Vérifiez souvent l’état des conduites d’essence, du réservoir, du bouchon d’essence et autres raccords. Remplacez-les si vous détectez un fendillement ou une fuite. 12. Ne faites pas tourner le moteur si la bougie n’est pas installée. 1SFOF[TPJOEFTÏUJRVFUUFTEJOTUSVDUJPOTFUSFNQMBDF[MFTBV besoin. 3FTQFDUF[MFTSÒHMFNFOUTDPODFSOBOUMÏMJNJOBUJPOEFT déchets et liquides qui risquent de nuire à la nature et à l’environnement. SECTION 2 — IMPORTANTES CONSIGNES DE SÉCURITÉ 5 %BQSÒTMB$POTVNFS1SPEVDUT4BGFUZ$PNNJTTJPO$14$ Commission sur la sécurité des produits de consommation) FUMBi64&OWJSPONFOUBM1SPUFDUJPO"HFODZw&1""HFODF américaine de protection de l’environnement), ce produit a VOFEVSÏFEFWJFVUJMFNPZFOOFEFTFQU BOTPVIFVSFTEFGPODUJPOOFNFOU"VUFSNFEFDFUUFEVSÏFEFWJFVUJMF moyenne, achetez une machine neuve ou faites inspecter la machine chaque année par une station technique agréée pour vous assurer que tous les dispositifs mécaniques et de sécurité sont en bon état de marche et ne sont pas usés EFGBÎPOFYDFTTJWF-FOPOSFTQFDUEFDFTSFDPNNBOEBtions peut causer des accidents et des blessures graves ou mortelles. Ne modifiez pas le moteur 1PVSÏWJUFSUPVUFCMFTTVSFHSBWFPVGBUBMFOFNPEJGJF[QBTEV tout le moteur. Toute modification du réglage du régulateur peut provoquer l’emballement du moteur et entraîner son fonctionnement à des vitesses dangereuses. Ne modifiez jamais le réglage de l’usine du régulateur. 6 SECTION 2 — IMPORTANTES CONSIGNES DE SÉCURITÉ Avis concernant les émissions de gaz -FTNPUFVSTDFSUJGJÏTDPOGPSNFTBVYOPSNFTSÏHVMBUSJDFTEF MB$BMJGPSOJFFUEFMBHFODF&1"GÏEÏSBMFTQPVS403&QFUJU équipement hors route) sont certifiés pour fonctionner avec de l’essence sans plomb ordinaire et peuvent être dotés des systèmes de contrôle des émissions de gaz suivants : Engine Modification (EM) et Three Way Catalyst (TWC) le cas échéant. Pare-étincelles AVERTISSEMENT: Cette machine est équipée d’un moteur à combustion interne et elle ne doit pas être utilisée sur un terrain non entretenu, recouvert de broussailles ou d’herbe si le système d’échappement du moteur n’est pas muni d’un QBSFÏUJODFMMFTDPOGPSNÏNFOUBVYMPJTFU SÒHMFNFOUTQSPWJODJBVYPVMPDBVYMFDBTÏDIÏBOU Si un pare-étincelles est utilisé, il doit être maintenu en bon état de marche par l’utilisateur de la machine. La station technique agréée la plus proche peut vous fournir un pare-étincelles pour le pot d’échappement de cette machine. Symboles de sécurité $FUUFQBHFJMMVTUSFFUFYQMJRVFMFTTZNCPMFTEFTÏDVSJUÏRVJQFVWFOUTFUSPVWFSTVSDFUUFNBDIJOF7FVJMMF[MJSFFUTVJWSFUPVUFTMFT instructions sur la machine et vous assurer de bien les comprendre avant d’essayer d’assembler et d’utiliser la machine. Symbol Description 7&6*--&;-*3&-"06-&4/05*$&4%65*-*4"5*0/ Veuillez lire et suivre toutes les instructions sur la machine et vous assurer de bien les comprendre avant d’essayer d’assembler et d’utiliser la machine. %"/(&3o-".&4&/.067&.&/5 1PVSÏWJUFSMFTSJTRVFTEFCMFTTVSFTOBQQSPDIF[KBNBJTMFTNBJOTOJMFTQJFETEFTQJÒDFTFO mouvement. N’utilisez pas la machine si le déflecteur de la goulotte ou si le sac à herbe n’est pas en place. S’ils sont endommagés, remplacez-les immédiatement. %"/(&3o41&$5"5&634 /FUPOEF[QBTTJEFTFOGBOUTPVBVUSFTTQFDUBUFVSTTPOUËQSPYJNJUÏ %"/(&3o".165"5*0/%&4."*/41*&%4 N’’approchez jamais les mains ni les pieds des pièces en mouvement. %"/(&3o0#+&54130+&5²4 Enlevez tous les objets qui pourraient être projetés par les lames dans des directions difGÏSFOUFT1PSUF[EFTMVOFUUFTEFTÏDVSJUÏ %"/(&31&/5&4 Soyez très prudent sur des pentes. Ne tondez pas sur des pentes supérieures à 15°. "7&35*44&.&/5o-&44&/$&&456/130%6*5*/'-".."#-& -BJTTF[MFNPUFVSSFGSPJEJSQFOEBOUBVNPJOTEFVYNJOVUFTBWBOUEFSFGBJSFMFQMFJO "7&35*44&.&/5o.0/09:%&%&$"3#0/& Ne faites jamais fonctionner un moteur à l’intérieur ou dans un bâtiment mal ventilé. Les gaz EÏDIBQQFNFOUDPOUJFOOFOUEVNPOPYZEFEFDBSCPOFVOHB[JOPEPSFFUNPSUFM "7&35*44&.&/5ū463'"$&$)"6%& -FTQJÒDFTEVNPUFVSFOQBSUJDVMJFSMFTJMFODJFVYPOUUFOEBODFËDIBVGGFSQFOEBOUMF GPODUJPOOFNFOUEFMBNBDIJOF-BJTTF[MFNPUFVSFUMFTJMFODJFVYSFGSPJEJSBWBOUEFMFT toucher. AVERTISSEMENT: Votre responsabilité. Cette machine ne doit être utilisée que par des personnes qui peuvent lire, comprendre et respecter les avertissements et instructions qui figurent dans cette notice et sur la machine CONSERVEZ CES INSTRUCTIONS! SECTION 2 — IMPORTANTES CONSIGNES DE SÉCURITÉ 7 8 SECTION 2 — IMPORTANTES CONSIGNES DE SÉCURITÉ Figure 1 Ligne Pente à 15° AVERTISSEMENT: Les accidents provoqués par des chutes et des glissades, qui surviennent souvent sur des pentes, peuvent causer des blessures graves. Ne travaillez pas sur des pentes supérieures à 15 degrés. Travailler sur un terrain en pente demande des précautions supplémentaires.Travaillez toujours parallèlement à la pente, jamais perpendiculairement. Procédez comme suit pour vérifier la pente : 1. Détachez cette page et pliez-la en suivant la ligne pointillée. 2. Trouvez un objet vertical sur ou derrière la pente (un poteau téléphonique, une clôture, un arbre, etc.). 3. Alignez un côté de cette page avec l’objet (Voir les Figures 1 et 2). 4. Remontez ou abaissez l’inclinomètre jusqu’à ce que le coin gauche touche la pente (Voir les Figures 1 et 2). 5. S’il y a un espace sous l’inclinomètre, la pente est trop abrupte pour y travailler en toute sécurité. (Voir la Figure 2 ci-dessus). 15° Figure 2 (TROP ABRUPTE) illée à point UTILISEZ CET INCLINOMÈTRE POUR DÉTERMINER SI UNE PENTE EST TROP ABRUPTE POUR PERMETTRE L’UTILISATION SANS DANGER DE LA MACHINE. (OK) Pente à 15° Inclinomètre 3 Assemblage et Montage Pièces détachées dans le carton • Un tondeuse • • Une notice d’utilisation de la tondeuse • Un sac à herbe † • Un bidon d’huile Une notice d’utilisation du moteur • Une goulotte d’éjection latérale † † le cas écheant REMARQUE: Les modèles représentés peuvent varier légèrement de votre tondeuse. REMARQUE : Veuillez noter que cette notice d’utilisation concerne les modèles de cette tondeuse équipés des grandes et des petites roues. Bien que cette notice d’utilisation représente le modèle à petites roues, les instructions et les caractéristiques s’appliquent également au modèle à grandes roues, à moins d’indications contraires. b. Stabilisez la tondeuse pour qu’elle ne bouge pas, puis relevez le guidon supérieur, comme à la Figure 3-2. Ne pincez pas le câble en redressant le guidon. Assemblage B NOTE: Cette machine est expédiée SANS HUILE NI ESSENCE. Après l’assemblage, faites les pleins d’essence et d’huile conformément aux instructions de la notice d’utilisation du moteur fournie avec la machine. Guidon 1. Retirez les pièces détachées et les garnitures d’emballage qui peuvent se trouver entre les guidons supérieur et inférieur. a. Enlevez les écrous à oreilles et les boulons ordinaires du guidon, comme à la Fig. 3-1. Ne desserrez pas ou n’enlevez pas les vis à tête hex. adjacentes. A Figure 3-2 A Figure 3-1 9 2. Retirez les boulons à tête en T des supports du guidon, comme la Figure 3-3. C C Figure 3-5 Figure 3-3 3. Suivez les instructions ci-dessous pour terminer l’assemblage du guidon . a. Relevez le guidon jusqu’à ce que les trous du guidon inférieur (voir l’éclaté de la Figure 3-3) s’alignent avec MFTUSPVTEFTTVQQPSUTEVHVJEPO7PJSMB'JHVSF -FHVJEFEFMBDPSEFEVEÏNBSSFVSFTUJOTUBMMÏTVSMBESPJUF du guidon supérieutr. Desserrez le boulon à oreilles qui maintient le guide de la corde en place. Voir la Figure 3-6. a. Tenez la commande de la lame contre le guidon supérieur. b. Dégagez lentement la poignée du démarreur à lanceur du moteur et faites passer la corde dans son guide. Voir la Figure 3-6. c. Serrez le bouton à oreilles du guide. d. Utilisez l’attache-câble pour maintenir les câbles contre le guidon inférieur. B A A D B B Figure 3-4 REMARQUE 2VBOEWPVTSFMFWF[MFHVJEPOBTTVSF[WPVTEFOF pas le dégager complètement. b. c. 10 *OTÏSF[MFTCPVMPOTËUÐUFFO5FOMFWÏTBV paragraphe 1b, dans les supports du guidon et dans le guidon inférieur et serrez à fond pour maintenir le HVJEPOFOQMBDF7PJSMB'JHVSF Remettez les écrous à oreilles et les boulons ordinaires dans les trous inférieurs du guidon, comme à la Fig. 3-5. SECTION 3 — ASSEMBLAGE ET MONTAGE C Figure 3-6 Sac à herbe (les cas écheant) 1. 1SPDÏEF[DPNNFTVJUQPVSJOTUBMMFSMFTBDËIFSCFTVSMB tondeuse s’il n’est pas déjà installé. Vérifiez que le sac à herbe est bien à l’endroit avant l’assemblage (l’étiquette EBWFSUJTTFNFOUEPJUTFUSPVWFSTVSMFYUÏSJFVS a. (MJTTF[MFTBDTVSMBSNBUVSFDÙUÏFOQMBTUJRVFOPJS sur le dessous). b. "UUBDIF[MFTBDTVSMBSNBUVSFFOBDDSPDIBOUMFT HMJTTJÒSFTTVSMBSNBUVSFDPNNFËMB'JH 1PVSFOMFWFSMFTBDËIFSCFSFMFWF[MFDMBQFUEÏKFDUJPOBSSJÒSF de la tondeuse. Relevez le sac à herbe et dégagez-le des fentes des supports du guidon. Lâchez le clapet d’éjection arrière pour fermer l’ouverture sur l’arrière de la tondeuse. Déflecteur d’éjection latérale (les cas écheant) -BUPOEFVTFBÏUÏFYQÏEJÏFQPVSGPODUJPOOFSDPNNFVOF tondeuse déchiqueteuse. Si la tondeuse est adaptée pour éjecter l’herbe sur le côté, assurez-vous que le sac à herbe a été démonté de la tondeuse et que le clapet d’éjection arrière est fermé. 1. Relevez le bouchon de déchiquetage à charnière qui se USPVWFTVSMFDÙUÏEVQMBUFBVEFDPVQF7PJSMB'JHVSF Bouchon de déchiquetage 1 2 Figure 3-7 1SPDÏEF[DPNNFTVJUQPVSJOTUBMMFSMFTBDËIFSCF a. Relevez le clapet d’éjection arrière. b. *OTUBMMF[MFTBDËIFSCFEBOTMFTGFOUFTBNÏOBHÏFT dans les supports du guidon, comme à la Figure 3-8. Lâchez le clapet pour qu’il repose sur le sac à herbe. Figure 3-9 2. (MJTTF[MFTEFVYDSPDIFUTEVEÏGMFDUFVSEÏKFDUJPO latérale sous la goupille de la charnière du bouchon de déchiquetage à charnière. Rabaissez le bouchon de déchiquetage à charnière. Ne retirez jamais le bouchon de déchiquetage à charnière, même quand vous ne déchiquetez pas. B A B Figure 3-8 SECTION 3 — ASSEMBLAGE ET MONTAGE 11 Réglages Hauteur de coupe La manette de réglage de la hauteur de coupe se trouve audessus des roues avant et arrière droites. 1. Tirez la manette de réglage vers la roue. 2. 1MBDF[MBNBOFUUFËMBQPTJUJPOEÏTJSÏFQPVSDIBOHFSMB IBVUFVSEFDPVQF7PJSMFT'JHVSFTFU" IMPORTANT: Les roues avant et arrière doivent être réglées à la NÐNFQPTJUJPOSFMBUJWF1PVSUSBWBJMMFSTVSVOUFSSBJOBDDJEFOUÏ placez le levier à une hauteur plus élevée. Vous éviterez ainsi d’arracher l’herbe. Inclinaison du guidon (les cas écheant) *MFTUQPTTJCMFEBKVTUFSMJODMJOBJTPOEVHVJEPOQPVSGBDJMJUFS MVUJMJTBUJPOEFMBUPOEFVTF1SPDÏEF[DPNNFTVJU 1. Retirez les écrous à oreilles et les boulons ordinaires du guidon. Voir la Figure 3-11. 2. Choisissez la position la plus confortable parmi les trois positions possibles. Voir le détail de la Figure 3-11. 3. Remettez en place les écrous à oreilles et les boulons ordinaires retirés plus tôt. 2 #BJTFr 1 Lever 3 2 Lever 1 #BJTFr 3 Petite roue Figure 3-10 2 Lever Figure 3-11 1 3 Montage #BJTFr Pleins d’essence et d’huile Consultez la notice d’utilisation du moteur pour tout renseignement supplémentaire concernant le moteur. 2 Lever 1 3 (SBOEFSPVF #BJTFr Figure 3-10A REMARQUE : Les manettes de réglage de la hauteur bougent dans la direction opposée sur les tondeuses à petites roues. Les manettes de réglage bougent dans la même direction sur les tondeuses à grandes roues. 3. 12 Laissez la manette revenir vers le plateau de coupe. SECTION 3 — ASSEMBLAGE ET MONTAGE 1. Faites le plein avec l’huile fournie la première fois que vous utilisez la machine après son assemblage. 2. 'BJUFTMFQMFJOEFTTFODFDPOGPSNÏNFOUBVYJOTUSVDUJPOT fournies dans la notice d’utilisation du moteur. AVERTISSEMENT: Faites très attention en NBOJQVMBOUEFMFTTFODF-FTTFODFFTUFYUSÐNFNFOU JOGMBNNBCMFFUMFTWBQFVSTTPOUFYQMPTJWFT/FGBJUFT jamais le plein d’essence à l’intérieur, pendant que le moteur tourne ou quand le moteur est chaud. Éteignez toute cigarette ou pipe, tout cigare ou toute autre source incandescente. 4 Commandes et caractéristiques Commande de la lame Démarreur à lanceur Sac à herbe † Levier de réglage de la hauteur de coupe Levier de réglage de la hauteur de coupe Goulotte d’éjection latérale † † Le cas échéant Bouchon de déchiquetage † Figure 4-1 Commande de la lame Bouchon de déchiquetage (le cas écheant) La commande de la lame se trouve sur le guidon supérieur de la UPOEFVTF*MGBVUTFSSFSDFUUFDPNNBOEFDPOUSFMFHVJEPOQPVS que la tondeuse fonctionne. Le fait de lâcher la commande de la lame arrête le moteur et la lame. *MFTUVUJMJTÏQPVSMFEÏDIJRVFUBHFEFMIFSCF"VMJFVEFSBNBTTFS les brins d’herbe coupée dans un sac à herbe ou d’utiliser une goulotte d’éjection latérale, certaines tondeuses offrent l’option de les renvoyer dans la pelouse après les avoir déchiquetés. AVERTISSEMENT: La commande de la lame est un dispositif de sécurité. N’essayez jamais d’éviter son emploi. Leviers de réglage de la hauteur de coupe Un levier de réglage se trouve sur la roue arrière droite et un BVUSFFTUQMBDÏTVSMBSPVFBWBOUESPJUF-FTEFVYMFWJFSTEPJWFOU se trouver à la même position relative pour assurer une tonte VOJGPSNF1PVSNPEJGJFSMBIBVUFVSEFDPVQFDPOTVMUF[MF DIBQJUSFj"TTFNCMBHFFUNPOUBHFx Sac à herbe (les cas écheant) Le sac à herbe, placé à l’arrière de la tondeuse, sert à ramasser les brins d’herbe coupée pour les jeter ailleurs. Lorsque le sac est plein, il faut le détacher de la tondeuse et le vider avant de continuer à tondre. Goulotte d’éjection latérale (les cas écheant) -BUPOEFVTFFYQÏEJÏFFTUQSÐUFQPVSEÏDIJRVFUFSMIFSCF4J vous préférez éjecter l’herbe sur le côté, suivez les instructions EVDIBQJUSFj"TTFNCMBHFFUNPOUBHFxQPVSJOTUBMMFSMBHPVMPUUF d’éjection latérale. AVERTISSEMENT : Éloignez les pieds et les mains EFMBQSPYJNJUÏEFMBHPVMPUUFTVSMFQMBUFBVEF coupe. Lisez l’étiquette d’avertissement placée sur la machine. Démarreur à lanceur *MFTUJOTUBMMÏTVSMBESPJUFEVHVJEPOTVQÏSJFVS5FOF[WPVT derrière la tondeuse et tirez sur le démarreur à lanceur pour faire démarrer la tondeuse. 13 5 Utilisation Mise en marche et arrêt du moteur Emploi du sac à herbe (les cas écheant) Consultez la notice d’utilisateur du moteur emballé avec votre tondeuse pour des instructions concernant la mise en marche et l’arrêt du moteur. Vous pouvez utiliser le sac à herbe pour ramasser l’herbe coupée pendant que vous travaillez. 1. *OTUBMMF[MFTBDËIFSCFTFMPOMFTJOTUSVDUJPOTEVDIBQJUSFj *OTUBMMBUJPOx-FTCSJOTEIFSCFTPOUBVUPNBUJRVFNFOUNJT en sac pendant que vous travaillez. Tondez l’herbe jusqu’à ce que le sac soit plein. 2. "SSÐUF[MFNPUFVSFOMÉDIBOUMBDPNNBOEFEFMBMBNFFU assurez-vous que celle-ci est tout à fait immobile. 3. Relevez le clapet d’éjection et soulevez le sac à herbe en l’éloignant de la tondeuse pour le retirer. Videz le sac et remettez-le en place. Utilisation de la tondeuse 7ÏSJGJF[RVJMOZBQMVTEFQJFSSFTEFNPSDFBVYEFCPJTEF fils métalliques ou autres objets sur la pelouse, qui risquent d’endommager la tondeuse ou le moteur. Ces objets pourraient être projetés par la tondeuse dans une direction ou une autre et blesser grièvement le conducteur ou toute autre personne présente. AVERTISSEMENT: Les objets projetés par une UPOEFVTFQFVWFOUBUUFJOESFMFTZFVYFUDBVTFSEFT CMFTTVSFTHSBWFT1PSUF[UPVKPVSTEFTMVOFUUFTEF sécurité en utilisant la tondeuse, ou en effectuant tout entretien ou toute réparation. Fonction de déchiquetage (les cas écheant) 1PVSEÏDIJRVFUFSMIFSCFFOMFWF[MBHPVMPUUFEÏKFDUJPOMBUÏSBMF (le cas échéant) ou le sac à herbe (le cas échéant) et le clapet d’éjection arrière (le cas échéant) bloquera l’ouverture arrière EFMBUPOEFVTF1PVSEFNFJMMFVSTSÏTVMUBUTOFEÏDIJRVFUF[QBT une herbe mouillée. Le déchiquetage est déconseillé si l’herbe mesure plus de quatre pouces de longueur. Utilisez plutôt le sac à herbe. AVERTISSEMENT: "SSÐUF[MFNPUFVSTJWPVT heurtez un objet quelconque. Débranchez le fil de la bougie, cherchez soigneusement tout signe de dégât à la tondeuse et réparez-la avant de la remettre en marche et de vous en servir. Des vibrations importantes de la tondeuse indiquent des EÏHÉUT'BJUFTFYBNJOFSFUSÏQBSFSMBNBDIJOF rapidement. 14 6 Entretien & Réglages Entretien 2. Lubrifiez les roulements à billes (s’il en est) des roues au moins une fois par saison avec de l’huile fluide. Tous les autres types de roues n’ont pas besoin d’être lubrifiées. Toutefois, si les roues doivent être démontées pour une raison quelconque, lubrifiez la surface du boulon d’essieu et la surface intérieure de la roue avec une huile automobile légère. 3. Consultez la notice d’utilisation du moteur pour les instructions de lubrification. Recommandations d’ordre général 1. Suivez toujours les consignes de sécurité lors de tout entretien. 2. La garantie de cette tondeuse ne s’applique pas à toute pièce qui a fait l’objet d’un emploi abusif ou d’une OÏHMJHFODF1PVSCÏOÏGJDJFSBVNBYJNVNEFMBHBSBOUJF MVUJMJTBUFVSEPJUFOUSFUFOJSMBUPOEFVTFDPOGPSNÏNFOUBVY instructions de cette notice. 3. La garantie sera nulle et non avenue si une modification est apportée au régulateur du moteur. Vérifiez tous les réglages au moins une fois par saison. 5. Vérifez régulièrement que toute la boulonnerie est bien serrée. AVERTISSEMENT: "SSÐUF[UPVKPVSTMFNPUFVS et débranchez le fil de la bougie et mettez-le à la masse contre le moteur avant tout nettoyage, toute lubrification ou autre entretien sur la machine. Entretien du plateau de coupe Nettoyez le dessous du plateau de coupe après chaque utilisation de la tondeuse pour éviter toute accumulation de EÏCSJT1SPDÏEF[DPNNFTVJU 1. Débranchez le fil de la bougie. Videz le réservoir de carburant ou placez un morceau de plastique sous le capuchon. 2. *ODMJOF[MBUPOEFVTFQPVSRVFMMFSFQPTFTVSMIBCJUBDMF-F côté du filtre à air doit se trouver sur le dessus. Tenez bien la tondeuse. AVERTISSEMENT: Ne basculez jamais la UPOEFVTFËQMVTEFEBOTUPVUFEJSFDUJPOFUOF la laissez pas dans cette position longtemps. L’huile peut couler dans la partie supérieure du moteur et causer des problèmes au démarrage. Lubrification 1. Lubrifiez les points de pivot de la poignée de commande de la lame au moins une fois par saison avec une huile légère. La commande de la lame doit fonctionner facilement dans MFTEFVYTFOT7PJSMB'JHVSF 3. (SBUUF[FUOFUUPZF[MFEFTTPVTEVQMBUFBVEFDPVQFBWFDVO outil adéquat. N’utilisez pas un jet d’eau. IMPORTANT : N’utilisez pas un appareil de nettoyage sous pression ou un boyau d’arrosage. Ceci risque d’endommager les roulements ou le moteur. 3FESFTTF[MBUPOEFVTFTVSTFTSPVFT&OMFWF[MFNPSDFBV de plastique sous le capuchon, le cas échéant. Figure 6-1 15 Moteur 1. Consultez la notice d’utilisation du moteur pour tout ce qui concerne l’entretien du moteur. 2. Utilisez l’huile à moteur recommandée dans la notice d’utilisation du moteur fournie avec la tondeuse. Lisez attentivement les instructions et suivez-les. 3. Dans des conditions normales nettoyez le filtre à air selon les recommandations de la notice d’utilisation du moteur fournie avec la tondeuse. Nettoyez-le à intervalles plus rapprochés dans des conditions très poussiéreuses. Une mauvaise performance du moteur et sa «noyade» sont des indications que le filtre à air doit être nettoyé. 6. Un orifice à eau est incorporé au plateau de coupe de cette tondeuse et fait partie du système de nettoyage de celui-ci. Servez-vous du système de nettoyage pour éliminer les brins d’herbe du dessous du plateau de coupe et pour empêcher toute BDDVNVMBUJPOEFQSPEVJUTDIJNJRVFTDPSSPTJGT1SPDÏEF[DPNNF TVJU"13µ4$)"26&65*-*4"5*0/ 1. Nettoyez le moteur régulièrement avec un linge ou une CSPTTF(BSEF[MFTZTUÒNFEFSFGSPJEJTTFNFOUËQSPYJNJUÏ du ventilateur) propre pour assurer la bonne circulation d’air FTTFOUJFMMFBVYCPOOFTQFSGPSNBODFTFUËMBMPOHÏWJUÏEV moteur. Enlevez tous les brins d’herbe, la saleté et autres EÏCSJTDPNCVTUJCMFTTFUSPVWBOUËQSPYJNJUÏEVTJMFODJFVY Moteurs remisé plus de 30 jours doivent être traités avec VOTUBCJMJTBUFVSEFTTFODFDPNNF45"#*-¥QPVSFNQÐDIFS toute détérioration et toute formation de gomme dans les conduites d’essence ou sur les pièces principales du carburateur. Si l’essence dans le moteur se détériore pendant le remisage, il sera peut-être nécessaire de faire FYBNJOFSFUQFVUÐUSFSFNQMBDFSMFDBSCVSBUFVSFUMFTBVUSFT pièces par une station technique. Stationnez la tondeuse sur une surface plane et dégagée sur la pelouse, suffisamment proche d’un robinet d’eau pour pouvoir y brancher un boyau d’arrosage. ATTENTION : Vérifiez que la goulotte d’éjection de la tondeuse n’est pas dirigée vers un bâtiment, un garage, des véhicules, etc. Nettoyez la bougie et ajustez l’écartement une fois par TBJTPO*MFTUSFDPNNBOEÏEFSFNQMBDFSMBCPVHJFBVEÏCVU de chaque saison. Vérifiez le type de bougie à utiliser et l’écartement correct dans la notice d’utilisation du moteur. REMARQUE: Ce système d’allumage par étincelle de véhicule SFTQFDUFUPVUFTMFTFYJHFODFTEV3ÒHMFNFOUTVSMFNBUÏSJFM brouilleur du Canada. 5. Système de nettoyage du plateau de coupe (le cas échéant) 2. Vissez le raccord pour boyau d’arrosage (fourni avec cette OPUJDFEVUJMJTBUJPO TVSMFYUSÏNJUÏEVCPZBVEBSSPTBHF 3. "UUBDIF[MFSBDDPSEQPVSCPZBVEBSSPTBHFËMPSJGJDF incorporé à la surface du plateau de coupe. Voir la Figure 6-2. 0VWSF[MFSPCJOFUEFBV 5. Faites démarrer le moteur selon les instructions dans la notice d’utilisation du moteur fournie avec la tondeuse. 6. -BJTTF[UPVSOFSMFNPUFVSQFOEBOUBVNPJOTEFVYNJOVUFT pour que le dessous du plateau de coupe soit bien rincé. Lâchez la commande de la lame pour arrêter le moteur et la lame. 8. Fermez le robinet d’eau et débranchez le raccord du boyau d’arrosage de l’orifice sur la surface du plateau de coupe. iMPORTANT: Une fois le nettoyage du plateau de coupe terminé, faites à nouveau démarrer la tondeuse. Laissez tourner le moteur FUMBMBNFQFOEBOUBVNPJOTEFVYNJOVUFTQPVSRVFMFEFTTPVT du plateau de coupe puisse bien sécher. Figure 6-2 16 SECTION 6— ENTRETIEN & RÉGLAGES 7 Service Entretien et remplacement de la lame 5. Lubrifiez le vilebrequin et la surface intérieure de MBEBQUBUFVSEFMBMBNFBWFDVOFIVJMFMÏHÒSF(MJTTF[ l’adaptateur de la lame sur le vilebrequin et positionnez la MBNFTVSMBEBQUBUFVSEFGBÎPORVFMFDÙUÏj#PUUPNxPV le numéro de pièce) se trouve sur le dessous (vers le sol) QFOEBOUMFGPODUJPOOFNFOU"TTVSF[WPVTRVFMBMBNFFTU bien alignée et qu’elle repose sur les paliers de l’adaptateur. 7PJSMFEÏUBJMEFMB'JHVSF 6. 1MBDF[MFTVQQPSUDPVEÏTVSMBMBNF"MJHOF[MFTFODPDIFTEV support coudé avec les petits trous de la lame. 3FNFUUF[MFCPVMPOIFYFOQMBDFFUTFSSF[MFËVODPVQMFEF QPMCNJOQPMCNBY AVERTISSEMENT : En enlevant la lame ou la courroie, portez toujours des gants épais ou utilisez un chiffon épais pour tenir la lame. &YBNJOF[QÏSJPEJRVFNFOUMBEBQUBUFVSEFMBNFQPVSZEÏUFDUFS tout fendillement éventuel, surtout après avoir heurté un objet. 3FNQMBDF[MFBVCFTPJO1SPDÏEF[DPNNFTVJUQPVSMFOUSFUJFO de la lame: 1. %ÏCSBODIF[MFGJMEFMBCPVHJF*ODMJOF[MBUPOEFVTFQPVS qu’elle repose sur le plateau de coupe. Le côté du filtre à air et du carburateur doit se trouver sur le haut. 7ÏSJGJF[QÏSJPEJRVFNFOURVF5064MFTÏDSPVTFUCPVMPOTEFMB machine sont bien serrés. Remisage hors saison 1SPDÏEF[EFMBNBOJÒSFTVJWBOUFQPVSQSÏQBSFSWPUSFUPOEFVTF pour un entreposage prolongé. Lame Adaptateur de la lame Support de la lame Boulon Figure 7-1 2. Enlevez le boulon et le support de la lame qui maintiennent MBMBNFFUMBEBQUBUFVSTVSMFWJMFCSFRVJO7PJSMB'JH 3. %ÏHBHF[MBMBNFFUMBEBQUBUFVSEVWJMFCSFRVJO7PJSMB'JH Démontez toujours la lame de son adaptateur pour vérifier son bon équilibre. Vérifiez l’équilibre de la lame sur un tournevis à tige ronde. Limez le métal du côté le plus lourd jusqu’à ce que la lame soit parfaitement équilibrée. Suivez MBOHMFEBJHVJTBHFEPSJHJOF"JHVJTF[DIBRVFUSBODIBOUEF façon égale pour que la lame reste équilibrée. t Nettoyez et lubrifiez soigneusement la tondeuse selon les instructions de lubrification. t N’utilisez pas un appareil de nettoyage sous pression ou un boyau d’arrosage pour nettoyée votre unité. t Enduisez la lame de la tondeuse d’une graisse à châssis pour l’empêcher de rouiller. t Entreposez la tondeuse dans un endroit sec et propre. Ne la remisez pas près de produits corrosifs, comme des engrais. t $POTVMUF[MBOPUJDFEVUJMJTBUJPOEVNPUFVSRVBOUBVY instructions d’entreposage du moteur. REMARQUE: *MFTUUSÒTJNQPSUBOUEFCJFOQSPUÏHFSMFNBUÏSJFM contre la rouille s’il doit être entreposé dans un abri métallique non ventilé. Enduisez toute la machine, en particulier les câbles et toutes les pièces mobiles, avec une huile légère ou de la silicone. AVERTISSEMENT: Une lame déséquilibrée peut DBVTFSEFTWJCSBUJPOTFYDFTTJWFTËWJUFTTFÏMFWÏF&MMF risque aussi d’endommager la tondeuse et, si elle se brise, elle peut causer des blessures corporelles. 17 8 Dépannage Problème Solution 1. La poignée de commande de la lame n’est pas embrayée. 1. Embrayez la commande de la lame. 2. Fil de la bougie débranché. 2. #SBODIF[MFGJMËMBCPVHJF 3. Le réservoir est vide ou l’essence est éventée. 3. Faites le plein avec une essence propre et fraîche. Moteur non amorcé. Consultez la notice d’utilisation du moteur. 5. La bougie est défectueuse. 5. Nettoyez, réglez l’écartement ou remplacez la bougie. 6. Canalisation de carburant bouchée. 6. Nettoyez la canalisation. Le moteur est noyé. "UUFOEF[RVFMRVFTNJOVUFTBWBOUEFTTBZFSEFGBJSF démarrer le moteur sans l’amorcer. 8. La soupape de carburant (le cas échéant) est fermée. 8. 0VWSF[MBTPVQBQFEFDBSCVSBOU7PJSMBOPUJDF d’utilisation du moteur. Le volet de départ (le cas échéant) n’a pas été utilisé. Utilisez le volet de départ. Voir la notice d’utilisation du moteur. 10. Un fusible a sauté (Démarrage électrique seulement). 10. Remplacez le fusible (Voir le chapitre « Entretien ».) 1. Fil de la bougie desserré. 1. #SBODIF[FUTFSSF[MFGJMEFMBCPVHJF 2. La canalisation de carburant est bouchée ou l’essence est eventée. 2. Nettoyez la canalisation. Faites le plein avec une essence propre et fraîche. 3. L’évent du capuchon du réservoir est bouché. 3. Débouchez l’évent. De l’eau ou une saleté est présente dans le système. Videz le réservoir à carburant. Faites le plein avec une essence fraîche. 5. Le filtre à air est sale. 5. Consultez la notice d’utilisation du moteur. 6. Le volet de départ est fermé ou à la position j0/xMFDBTÏDIÏBOU 6. 1MBDF[MFWPMFUEFEÏQBSUËMBQPTJUJPOj0''x 1. Niveau d’huile trop bas. 1. Faites le plein d’huile du carter. 2. La circulation d’air est gênée. 2. Démontez l’habitacle du ventilateur et nettoyez-le. Le moteur hésite parfois à régime élevé. 1. L’écartement de la bougie est trop petit. 1. Réglez l’écartement à 0,030 po. Consultez la notice d’utilisation du moteur. Le moteur tourne irrégulièrement. 2. La bougie est sale, défectueuse ou l’écartement est trop grand. 1. Réglez l’écartement à 0,030 po ou remplacez la bougie. Consultez la notice d’utilisation du moteur. 3. Le filtre à air est sale. 2. Consultez la notice d’utilisation du moteur. 1. La lame est desserrée ou mal équilibrée. 1. Serrez la lame et l’adaptateur. Équilibrez la lame. 2. La lame est déformée. 2. Remplacez la lame. 1. L’herbe est mouillée. 1. /FUPOEF[QBTRVBOEMIFSCFFTUNPVJMMÏF"UUFOEF[ qu’elle sèche. 2. L’herbe est trop haute. 2. Coupez l’herbe à un réglage élevé, puis tondez à nouveau à la hauteur voulue ou sur une largeur plus étroite. 3. La lame est émoussée. 3. "JHVJTF[PVSFNQMBDF[MBMBNF 1. Les roues ne sont pas bien positionnées. 1. 1MBDF[MFTRVBUSFSPVFTËMB même hauteur. 2. La lame est émoussée. 2. "JHVJTF[PVSFNQMBDF[MBMBNF Le moteur ne démarre pas. Le moteur tourne irrégulièrement. Le moteur surchauffe. 7JCSBUJPOTFYDFTTJWFT La tondeuse ne déchiquette pas l’herbe. La coupe est irrégulière 18 Cause 9 Pièces de rechange Pièce No. de pièce et description 734-04063A 734-04562 734-1988 Roue (avant) - 7 po, Star Diamond Roue (avant) - 7 po x 1,8 po, barrettes Roue (avant) - 7 po x 1,8 po, SL:Spoke Bar 734-04063A 734-04563 634-04625 Roue (arrière) - 7 po, Star Diamond Roue (arrière) - 8 po x 1,8 po, barrettes Roue (arrière) - 11 po x 1,75 po 942-0741A Lame de déchiquetage 764-04077B † 664-05026 † 764-04082A † Sac à herbe (noir) Sac à herbe (avec sprigs,noir) Sac à herbe, la poussière de blocage, noir 731-07486 † 731-07131 ‡ † 731-07877 ‡ † Goulotte d’éjection (avec attache) Goulotte d’éjection (sans attache) Goulotte d’éjection (sans charnière) † les cas écheant ‡ non illustrée REMARQUE : Vous pouvez télécharger un livret contenant la liste complète des pièces détachées. Adressez-vous au Service aprèsvente à la page 2. Soyez prêt à fournir les numéros de modèle et de série de votre machine ou voir les renseignements à la page 2 quant à leur emplacement. 19 GARANTIE LIMITÉE DE DEUX ANS -BHBSBOUJFMJNJUÏFRVJFTUÏOPODÏFDJEFTTPVTFTUPGGFSUFQBS.5%1SPEVDUT-JNJUFEQPVSUPVUFTMFTNBSDIBOEJTFTOFVWFTBDIFUÏFTet utilisées au Canada et/ou ses territoires (l’une ou l’autre entité respectivement appelée « MTD »). j.5%xHBSBOUJURVFDFQSPEVJUËMFYDFQUJPOEFTQJÒDFTËVTVSFOPSNBMFÏOVNÏSÏFTDJEFTTPVT FTUFYFNQUEFUPVUWJDFEFNBUJÒSFFU EFGBCSJDBUJPOQPVSVOFEVSÏFEFEFVY BOTËDPNQUFSEFMBEBUFEFMBDIBUJOJUJBMFUTFOHBHFËSÏQBSFSPVËSFNQMBDFSHSBUVJUFNFOU FUËTPODIPJYUPVUFQJÒDFRVJTBWÒSFEÏGFDUVFVTFFOSBJTPOEVOWJDFEFNBUJÒSFPVEFGBCSJDBUJPO$FUUFHBSBOUJFMJNJUÏFOFTU BQQMJDBCMFRVFTJDFQSPEVJUBÏUÏVUJMJTÏFUFOUSFUFOVDPOGPSNÏNFOUBVYJOTUSVDUJPOTEFMBOPUJDFEVUJMJTBUJPORVJMBDDPNQBHOF%F plus, le produit ne doit pas avoir fait l’objet d’un emploi incorrect ou abusif, d’une utilisation à des fins commerciales, d’une négligence, d’un accident, d’un entretien incorrect, d’une modification, d’un acte de vandalisme, d’un vol, d’un incendie, d’une inondation ou de tout autre dégât causé par tout incident ou désastre naturel. Les dégâts causés par l’installation ou l’utilisation d’une pièce, d’un BDDFTTPJSFPVEVOÏRVJQFNFOUBOOFYFEPOUMFNQMPJBWFDMFQSPEVJUGBJTBOUMPCKFUEFMBOPUJDFEVUJMJTBUJPOOFTUQBTIPNPMPHVÏQBS MTD, rendront la garantie nulle et non avenue. -FTQJÒDFTPVDPNQPTBOUTËVTVSFOPSNBMFTPOUHBSBOUJTFYFNQUTEFUPVUWJDFEFNBUJÒSFFUEFGBCSJDBUJPOQPVSVOFQÏSJPEFEF jours à compter de la date d’achat. Les pièces et composants à usure normale comprennent, sans s’y limiter, les batteries, courroies, lames, adaptateurs de lame, sacs à herbe, roues du plateau de coupe des tondeuses à siège, sièges, patins de souffleuses, roues de frottement, lames de raclage, le caoutchouc de la tarière et pneus, l’huile à moteur, les filtres à air et bougies. POUR FAIRE HONORER LA GARANTIE 1SÏTFOUF[6/&13&67&%"$)"5ËMBTUBUJPOUFDIOJRVFBHSÏÏFEFWPUSFMPDBMJUÏ1PVSMPDBMJTFS VOFTUBUJPOUFDIOJRVFBHSÏÏFPVVODPODFTTJPOOBJSFEBOTWPUSFSÏHJPOBESFTTF[WPVTË.5%1SPEVDUT-JNJUFE,JUDIFOFS0OUBSJP/( +PVBQQFMF[MFPVWJTJUF[OPUSFTJUFXFCBVXXXNUEDBOBEBDPN Cette garantie limitée ne couvre pas: a. Le moteur ou ses composants. Ces articles peuvent être couverts par une garantie séparée du fabricant. Consultez la HBSBOUJFEVGBCSJDBOURVBOUBVYDPOEJUJPOT-FNPUFVS1PXFSNPSFËTPVQBQFTFOUÐUFOFTUQBTFYDMVTBVYUFSNFTEFDFUUF garantie. b. Les pompes, soupapes et pistons des fendeuses à bois sont couverts par une garantie séparée d’un an. c. Les articles d’entretien courant tels que les lubrifiants, filtres, aiguisages de lame et révisions, les réglages de frein, de l’embrayage ou du plateau de coupe et la détérioration normale de la finition du fait de l’utilisation de la machine ou de TPOFYQPTJUJPOBVYJOUFNQÏSJFT d. L’entretien ou les réparations effectués par quiconque autre qu’une station technique agréée. e. .5%OFHBSBOUJUQBTMFTQSPEVJUTWFOEVTPVFYQPSUÏTEV$BOBEBEFTFTQPTTFTTJPOTFUUFSSJUPJSFT f. Les pièces de rechange si elles ne sont pas des pièces MTD authentiques. g. Les frais de transport des machines et de déplacement des techniciens. h. Les produits utilisés dans un but commercial. (Certains produits peuvent être accompagnés d’une garantie limitée MTD séparée pour usage commercial. Renseignez-vous auprès du concessionnaire ou détaillant pour plus de détails ou adressez-vous directement au service après-vente de MTD.) Aucune garantie tacite, y compris toute garantie tacite de qualité marchande ou d’adaptabilité dans un but particulier, ne s’applique aux pièces identifiées ci-dessus après la période de vigueur de la garantie écrite expresse. Aucune autre garantie expresse, qu’elle soit verbale ou écrite, à l’exception des stipulations ci-dessus, offerte par toute personne ou entité (y compris un concessionnaire/revendeur), pour tout produit, n’engage MTD. Pendant la période de garantie, la réparation ou le remplacement du produit ci-dessus constitue le recours exclusif à la disposition du client. Les stipulations énoncées dans cette garantie offrent le seul recours à la suite de la vente. MTD ne peut être tenue responsable pour toute perte ou tout dommage accessoire ou immatériel comprenant, sans s’y limiter, les frais de remplacement ou de substitution des services d’entretien des pelouses ou les frais de location pour remplacer temporairement un article sous garantie. Certaines juridictions ne permettent pas l’inclusion ou la restriction des dommages accessoires ou immatériels ou une limite à la durée EFMBHBSBOUJFUBDJUF1BSDPOTÏRVFOUMFTFYDMVTJPOTDJEFTTVTQFVWFOUOFQBTTBQQMJRVFSEBOTWPUSFTJUVBUJPO -FSFNCPVSTFNFOUPVSFNQMBDFNFOURVFMRVJMTPJUOFTFSBFOBVDVODBTTVQÏSJFVSBVNPOUBOUEVQSJYEBDIBUEVQSPEVJUWFOEV Toute modification des caractéristiques de sécurité rendra la garantie nulle et non avenue. L’utilisateur assume tout risque et toute responsabilité en cas de perte, de dommage matériel ou de blessure résultant de l’utilisation incorrecte du produit ou de l’incapacité de l’employer. Cette garantie limitée n’est offerte qu’à l’acheteur initial ou à la personne à laquelle le produit a été offert en cadeau. LES LOIS LOCALES ET CETTE GARANTIE : Cette garantie limitée vous accorde des droits juridiques spécifiques et vous pouvez bénéficier d’autres droits qui varient selon les juridictions. IMPORTANT : Le propriétaire doit présenter le reçu original pour faire honorer la garantie. MTD Products Ltd., C.P. 1386, Kitchener, Ontario N2G 4J1; téléphone: 1-800-668-1238 12.16.06 20