1
40003475ENG.qxd
08/07/2005
18:17
Page 1
Instruction Book
Vented Tumble Dryer
English
Français
Deutsch
Nederlands
Português
Italiano
Español
Polski
Český
®
40003475ENG.qxd
08/07/2005
18:17
Page 2
Italiano . . . . . . . . . . . . . . . . 77
Español . . . . . . . . . . . . . . . . 92
Polski . . . . . . . . . . . . . . . . . 107
. . . . . . . . . . . . . . 122
Český . . . . . . . . . . . . . . . . 137
English . . . . . . . . . . . . . . . . . 2
Français . . . . . . . . . . . . . . . . 17
Deutsch . . . . . . . . . . . . . . . . 32
Nederlands . . . . . . . . . . . . . 47
Português . . . . . . . . . . . . . . 62
Introduction
...............................................3
Delivery information . . . . . . . . . . . . . . . . . . . . . . . . . . . . . . . . . . . . . . . . . . . . . 3
Unpacking the Product . . . . . . . . . . . . . . . . . . . . . . . . . . . . . . . . . . . 3
Safety reminders . . . . . . . . . . . . . . . . . . . . . . . . . . . . . . . . . . . . . . . . . . 4
Installation . . . . . . . . .
Use . . . . . . . . . . . . . . .
The Laundry . . . . . . . .
Environmental Issues .
GIAS Service . . . . . . . .
.
.
.
.
.
.
.
.
.
.
.
.
.
.
.
.
.
.
.
.
.
.
.
.
.
.
.
.
.
.
.
.
.
.
.
.
.
.
.
.
.
.
.
.
.
.
.
.
.
.
.
.
.
.
.
.
.
.
.
.
.
.
.
.
.
.
.
.
.
.
.
.
.
.
.
.
.
.
.
.
.
.
.
.
.
.
.
.
.
.
.
.
.
.
.
.
.
.
.
.
.
.
.
.
.
.
.
.
.
.
.
.
.
.
.
.
.
.
.
.
.
.
.
.
.
.
.
.
.
.
.
.
.
.
.
.
.
.
.
.
.
.
.
.
.
.
.
.
.
.
.
.
.
.
.
.
.
.
.
.
.
.
.
.
.
.
.
.
.
.
.
.
.
.
.
.
.
.
.
.
.
.
.
.
.
.
.
.
.
.
.
.
.
.
.
.
.
.
.
.
.
.
.
.
.
.
.
.
.
.
.
.
.
.
.
.
.
.
.
.
4
4
4
5
5
Installation . . . . . . . . . . . . . . . . . . . . . . . . . . . . . . . . . . . . . . . . . . . . . . . . . 6
Electrical requirements . . . . . . . . . . . . . . . . . . . . . . . . . . . . . . . . . . . . . . . . . . . 6
Adjusting the feet . . . . . . . . . . . . . . . . . . . . . . . . . . . . . . . . . . . . . . . . . . . . . . . 6
Ventilation . . . . . . . . . . . . . . . . . . . . . . . . . . . . . . . . . . . . . . . . . . . . . . . . . 7
Installation of the Discharge Hose. . . . . . . . . . . . . . . . . . . . . . . . . . . . . . . . . . . 7
Preparing the load . . . . . . . . . . . . . . . . . . . . . . . . . . . . . . . . . . . . . . . . 8
Clothes preparation . . . . . . . . . . . . . . . . . . . . . . . . . . . . . . . . . . . . . . . . . . . . . . 8
Sorting the load. . . . . . . . . . . . . . . . . . . . . . . . . . . . . . . . . . . . . . . . . . . . . . . . . 9
Drying advice . . . . . . . . . . . . . . . . . . . . . . . . . . . . . . . . . . . . . . . . . . . . . 10
Do not tumble dry . . . . . . . . . . . . . . . . . . . . . . . . . . . . . . . . . . . . . . . . . . . . . . 10
Energy saving. . . . . . . . . . . . . . . . . . . . . . . . . . . . . . . . . . . . . . . . . . . . . . . . . . 10
Controls and indicators . . . . . . . . . . . . . . . . . . . . . . . . . . . . . . . . . 11
Door and Filter . . . . . . . . . . . . . . . . . . . . . . . . . . . . . . . . . . . . . . . . . . . 12
Opening the door . . . . . . . . . . . . . . . . . . . . . . . . . . . . . . . . . . . . . . . . . . . . . . 12
Filter. . . . . . . . . . . . . . . . . . . . . . . . . . . . . . . . . . . . . . . . . . . . . . . . . . . . . . . . . 12
Filter care indicator . . . . . . . . . . . . . . . . . . . . . . . . . . . . . . . . . . . . . . . . . . . . . 12
Operation . . . . . . . . . . . . . . . . . . . . . . . . . . . . . . . . . . . . . . . . . . . . . . . . . 13
Cleaning and Routine Maintenance . . . . . . . . . . . . . . . . . . . . 14
Cleaning the dryer . . . . . . . . . . . . . . . . . . . . . . . . . . . . . . . . . . . . . . . . . . . . . . 14
Technical specifications . . . . . . . . . . . . . . . . . . . . . . . . . . . . . . . . . . . . . . . . . . 14
Troubleshooting . . . . . . . . . . . . . . . . . . . . . . . . . . . . . . . . . . . . . . . . . . 15
Customer Service . . . . . . . . . . . . . . . . . . . . . . . . . . . . . . . . . . . . . . . . . 16
Spares. . . . . . . . . . . . . . . . . . . . . . . . . . . . . . . . . . . . . . . . . . . . . . . . . . . . . . . . 16
GIAS Service . . . . . . . . . . . . . . . . . . . . . . . . . . . . . . . . . . . . . . . . . . . . . . . . . . . 16
2
40003475ENG.qxd
08/07/2005
18:17
Page 3
Introduction
Please read and follow these instructions
carefully and operate the machine accordingly.
This booklet provides important guidelines for
safe use, installation, maintenance and some
useful advice for best results when using your
machine.
Check that no
damage has
occurred to the
machine during
transit. If it has,
call for service by
GIAS.
Keep all documentation in a safe place for future
reference or for any future owners
Delivery information
Please check that the following items are
delivered with the appliance:
●
Instruction manual
●
Guarantee card
●
Vent kit and instructions
●
Energy label
Failure to comply
with the above
can compromise
the safety of the
appliance. You
may be charged
for a service call
if a problem with
your machine is
caused by
misuse.
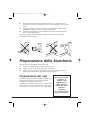
Unpacking the product
Remove the machine from its packaging close to
the final location of the machine.
1.
Cut carefully around the base of the
packaging and up one corner.
2.
Remove the polythene sleeve and lift the
dryer off the polystyrene base.
Dispose of the packaging safely. Make
sure it is out of the reach of children,
it is a potential source of danger.
3
40003475ENG.qxd
12/12/2005
18:49
Page 4
Safety reminders
Installation
●
●
●
●
Check that the product has no visible signs of damage before use. If
damaged do not use and please call GIAS Service.
Do not use adapters, multiple connectors and/or extensions.
This machine should not be installed in a bathroom or shower room.
Never install the dryer against curtains and be sure to prevent items from
falling or collecting behind the dryer.
Use
●
●
●
●
●
●
●
●
●
●
●
●
WARNING Misuse of a tumble dryer may create a fire hazard.
This machine is solely for domestic use, i.e. to dry household textiles and
garments.
This machine should only be used for its intended purpose as described in
this manual. Ensure that the instructions for installation and use are fully
understood before operating the appliance.
Do not touch the appliance when hands or feet are damp or wet.
Do not lean on the door when loading the machine or use the door to
lift or move the machine.
Do not allow children to play with the machine or its controls.
WARNING Do not use the product if the fluff filter is not in position or is
damaged; fluff could be ignited.
WARNING Where the hot surface symbol
is located the temperature
rise during operation of the tumble dryer may be in excess of 60 degrees C.
Remove the plug from the electricity supply. Always remove the plug
before cleaning the appliance.
Do not continue to use this machine if it appears to be faulty.
Lint and fluff must not be allowed to collect on the floor around the
outside of the machine.
The drum inside may be very hot. Always allow the dryer to complete the
cool down period before removing the laundry.
The Laundry
●
●
●
●
4
WARNING Do not tumble dry fabrics treated with dry cleaning fluids.
WARNING Foam rubber materials can, under certain circumstances, when
heated become ignited by spontaneous combustion. Foam plastic, foam
rubber and rubber-like material are not suitable for tumble drying.
Articles made from these materials MUST NOT be placed in the dryer.
Always refer to the laundry care labels for directions on suitability for
drying.
Clothes should be spin dried or thoroughly wrung before they are put
into the tumble dryer. Clothes that are dripping wet should NOT be put
into the dryer.
40003475ENG.qxd
●
●
●
12/12/2005
18:50
Page 5
Lighters and matches must not be left in pockets and NEVER use
flammable liquids near the machine.
Glass fibre curtains should NEVER be put in this machine. Skin irritation
may occur if other garments are contaminated with the glass fibres.
Garments treated or contaminated with flammable cleaning sprays or
liquids such as petrol, cooking oil or aerosol sprays MUST NOT be put in
this machine.
Environmental Issues
●
●
All packaging materials used are environmentally-friendly and recyclable.
Please help dispose of the packaging via environmentally-friendly means.
Your local council will be able to give you details of current means of
disposal.
To ensure safety when disposing of an old tumble dryer disconnect the
mains plug from the socket, cut the mains power cable and destroy this
together with the plug. To prevent children shutting themselves in the
machine break the door hinges or the door lock.
GIAS Service
●
To ensure the continued safe and efficient operation of this appliance we
recommend that any servicing or repairs are only carried out by an
authorised GIAS Service engineer.
European directive 2002/96/EC
This appliance is marked according to the European directive 2002/96/EC on
Waste Electrical and Electronic Equipment (WEEE).
By ensuring this product is disposed of correctly, you
will help prevent potential negative consequences for
the environment and human health, which could
otherwise be caused by inappropriate waste handling
of this product.
The symbol on the product indicates that this product
may not be treated as household waste. Instead it shall
be handed over to the applicable collection point for
the recycling of electrical and electronic equipment
Disposal must be carried out in accordance with local
environmental regulations for waste disposal.
For more detailed information about treatment,
recovery and recycling of this product, please contact
your local city office, your household waste disposal
service or the shop where you purchased the product.
If the appliance is not running properly or breaks down,
switch it off and disconnect the plug from the socket.
Consult GIAS Service for possible repair.
5
40003475ENG.qxd
08/07/2005
18:17
Page 6
Installation
You may be
charged for a
service call if a
problem with
your machine is
caused by
incorrect
installation.
Electrical requirements
Tumble dryers are supplied to operate at a
voltage of 230-240V, 50 Hz single phase. Check
that the supply circuit is rated to at least 10A.
Electricity can be extremely dangerous.
This appliance must be earthed.
The socket outlet and the plug on the appliance
must be of the same type.
Do not use multiple adapters and/or extension
leads.
The plug should be accessible for disconnection
after the appliance has been installed.
If the mains cord
on this appliance
is damaged, it
must be replaced
by a special cord
which is ONLY
obtainable from
the GIAS spares
service. It must
be installed by a
competent
person.
The wires in the mains lead are coloured in
accordance with the following codes:
Blue
NEUTRAL
Brown
LIVE
Green and Yellow
EARTH
CE Appliance complies with European Directive
89/336/EEC, 73/23/EEC and subsequent
amendments.
Do not plug the machine in and switch
it on at the mains until the installation
is completed.
For your safety, this dryer must be
correctly installed.
If there is any doubt about installation,
call GIAS Service for advice.
Adjusting the feet
Once the machine is in place the feet should be
adjusted to ensure that the machine is level.
Adjust the four feet to ensure the machine is firm
and level.
6
40003475ENG.qxd
08/07/2005
18:17
Page 7
Ventilation
Adequate ventilation must be provided in the
room where the tumble dryer is located to
prevent gases from appliances burning other
fuels, including open fires, being drawn into the
room during operation of the tumble dryer.
●
Exhaust air must not be discharged into a
flue which is used for exhausting fumes
from appliances burning gas or other fuels.
●
Check regularly that the air flowing through
the dryer is not restricted.
●
Check the fluff filter after use, and clean, if
necessary.
●
The inlet and outlets should be kept free
from obstructions. To ensure adequate
ventilation the space between the bottom
of the machine and the floor must not be
obstructed. There should be a gap of at
least 12mm between the machine and any
obstructions.
●
Prevent items from falling or collecting
behind the dryer as these may obstruct the
air inlet and outlet.
●
NEVER install the dryer up against curtains.
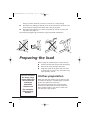
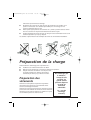
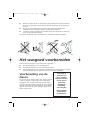
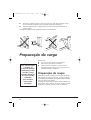
Installation of the Discharge Hose
It is essential to use a venting hose to carry the
hot moist air away from the dryer unless the
dryer is situated in a open space with a good air
flow around it. Re-recirculation of the moist air
will prevent the efficient operation of the dryer.
The hose is assembled to the machine as shown
The hose may be fitted through a wall or
through an open door or window. The hose is
110mm in diameter and will extend 1.8 meters.
The following guidelines should be followed
when installing the discharge hose.
●
Do not use two hoses joined together as the drying performance will be
reduced.
●
Do not restrict the flow of air through the hose e.g. by kinking it or
7
40003475ENG.qxd
08/07/2005
18:17
Page 8
fitting a smaller diameter connector to mount to a wall opening.
●
Avoid the hose making U shaped curves as this will restrict the flow of air
and increase the chance that water will collect in the hose.
●
Check the hose regularly to remove any build-up of fluff or water that
may have collected in it.
The following diagrams give examples of good and bad installations.
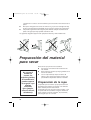
Preparing the load
Before using the tumble dryer for the first time:
Do not overload
the drum, large
items when wet
can exceed the
maximum
admissible
clothes load
(for example:
sleeping bags,
duvets).
8
●
Please read this instruction book thoroughly.
●
Remove all items packed inside drum.
●
Wipe the inside of the drum and door with
a damp cloth to remove any dust which may
have settled in transit.
Clothes preparation
Make sure that the laundry you are going to dry
is suitable for drying in a tumble dryer, as shown
by the care symbols on each item.
Check that all fastenings are closed and that
pockets are empty. Turn the articles inside out.
Place clothes loosely in the drum to make sure
that they don't get tangled.
40003475ENG.qxd
08/07/2005
18:17
Page 9
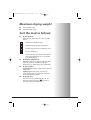
Maximum drying weight
●
Cottons Max. 6 kg
●
Synthetics Max. 3 kg
Sort the load as follows:
●
By care symbols
These can be found on the collar or inside
seam:
Suitable for tumble drying.
Tumble drying at high temperature.
Tumble drying at low temperature only.
Do not tumble dry.
If the item does not have a care label it
must be assumed that it is not suitable
for tumble drying.
●
By amount and thickness
Whenever the load is bigger than the dryer
capacity, separate clothes according to
thickness (e.g. towels from thin underwear).
●
By type of fabric
Cottons/linen: Towels, cotton jersey, bed and
table linen.
Synthetics: Blouses, shirts, overalls, etc.
made of polyester or polyamid, as well as
for cotton/synthetic mixes.
●
By drying level
Sort into: iron dry, cupboard dry, etc. For
delicate articles press the
button to
select low drying temperature.
9
40003475ENG.qxd
08/07/2005
18:17
Page 10
Drying advice
IMPORTANT: Do
not dry articles
which have been
treated with a
dry cleaning fluid
or rubber clothes
(danger of fire or
explosion).
Do not tumble dry:
Woollens, silk, delicate fabrics, nylon stockings,
delicate embroidery, fabrics with metallic
decorations, garments with PVC or leather
trimmings, training shoes, bulky items such as
sleeping bags, etc.
Energy saving
Only put into the tumble dryer laundry which has
been thoroughly wrung or spin-dried. The drier
the laundry the shorter the drying time thus
saving electricity.
ALWAYS
During the last
15 minutes the
load is always
tumbled in
cool air.
10
●
Try to dry the maximum weight of laundry,
this will save time and electricity.
●
Check that the filter is clean before every
drying cycle.
NEVER
●
Exceed the maximum weight, this will waste
time and electricity.
●
Put dripping wet items into the tumble
dryer, this may damage the appliance.
40003475ENG.qxd
08/07/2005
18:17
Page 11
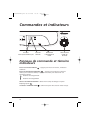
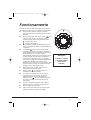
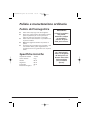
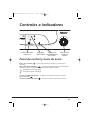
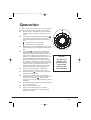
Controls and indicators
ACRYLICS/SYNTHETICS
BUTTON
ON
BUTTON
FILTER CARE
INDICATOR
DRYING TIME
SELECTOR
Control panel and indicator lights
'ON' Button and Indicator
– press to switch on, the indicator will light.
'ACRYLICS/SYNTHETICS' Button
– press to reduce the heat level for
delicate items, press again to select high temperature.
HIGH heat setting
LOW heat setting
'DRYING TIME' Selector – selects the drying time or the Fast Iron option
'FILTER CARE' Indicator
.
– lights when the filter needs cleaning.
11
40003475ENG.qxd
08/07/2005
18:17
Page 12
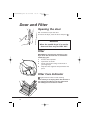
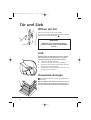
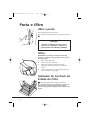
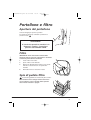
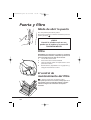
Door and Filter
Opening the door
Pull on handle to open the door.
To restart the dryer, close the door and press
.
WARNING!
When the tumble dryer is in use the
drum and door may be VERY HOT
Filter
IMPORTANT: To maintain the efficiency of the
dryer check that the fluff filter is clean before
each drying cycle.
1.
Pull the filter upwards.
2.
Open filter as shown.
3.
Gently remove lint using a soft brush or
your fingertips.
4.
Snap the filter together and push back into
place.
Filter Care Indicator
lights when the filter needs cleaning.
If the laundry is not drying check that the filter is
not clogged. The indicator will also light when
the venting hose is blocked or kinked.
12
40003475ENG.qxd
08/07/2005
18:17
Page 13
Operation
Refer to the Drying guide table or the fabric
labels to select the most suitable programme.
●
Open the door and load the drum with
laundry. Ensure that garments do not hinder
closure of the door.
●
If drying delicate items press the
button
to reduce the heat level. Press again on
completion, to select high temperature.
HIGH heat setting
LOW heat setting
●
Turn the 'DRYING TIME' Selector until the
required drying time aligns with the dial.
●
The
programme provides a conditioning
and anti-crease function. The dryer will heat
the load for 8 minutes followed by a 2
minute cool down period and is especially
good for garments which may have been
left for some time prior to ironing, in a linen
basket for example. Garments may also
become stiffened when dried outside on a
washing line or inside on radiators. This
process relaxes the creases in the fabric
making ironing quicker and easier.
●
Gently close the door pushing it slowly until
you hear the door 'click' shut.
●
Press the
button. The indicator will light
and the drying cycle begins.
●
The load is dried by tumbling in
thermostatically controlled warm air. Cool
air
is used for the last 15 minutes to
reduce creasing and cool the load ready for
handling.
●
When the program is fully completed the
drum will stop rotating and the dial will
point to 0.
●
Open the door and remove the load.
●
Clean the filter after every drying cycle to
ensure maximum dryer efficiency.
WARNING!
The drum, door
and load may be
very hot.
13
40003475ENG.qxd
08/07/2005
18:17
Page 14
Cleaning and Routine Maintenance
IMPORTANT
Always switch
off and remove
the plug from
the electricity
supply before
cleaning this
Cleaning the dryer
●
Clean the filter after every drying cycle.
●
After each period of use, wipe the inside of
the drum and leave the door open for a
while to allow circulation of air to dry it.
●
Wipe the outside of the machine and the
door with a soft cloth.
●
DO NOT use abrasive pads or cleaning
agents.
●
To prevent the door sticking or the build up
of fluff periodically clean the inner door and
gasket with a damp cloth.
Technical specifications
For electrical data
refer to the
rating label on
the front of the
dryer cabinet
(with the door
open).
14
Drum capacity
115 litres
Maximum load
6 kg
Height
85cm
Width
60cm
Depth
60cm
Energy Label Band
C
40003475ENG.qxd
08/07/2005
18:17
Page 15
Troubleshooting
What might be the cause of...
Defects you can remedy yourself
Before calling GIAS Service for technical advice please run through the
following checklist. A charge will be made if the machine is found to be
working or has been installed incorrectly or used incorrectly. If the problem
persists after completing the recommended checks, please call GIAS Service,
they may be able to assist you over the telephone.
Drying time is too long/clothes are not dry enough…
●
Have you selected the correct drying time/programme?
●
Were the clothes too wet? Were the clothes thoroughly wrung or spindried?
●
Does the filter need cleaning?
●
Is the dryer overloaded?
●
Is the venting hose kinked or blocked?
●
Has the
option been selected from a previous cycle?
The dryer does not operate…
●
Is there a working electricity supply to the dryer? Check using another
appliance such as a table lamp.
●
Is the plug properly connected to the mains supply?
●
Is there a power failure?
●
Has the fuse blown?
●
Is the door fully closed?
●
Is the dryer switched on, both at the mains supply and at the machine?
●
Has the drying time or the programme been selected?
●
Has the machine been switched on again after opening the door?
The dryer is noisy…
●
Switch off the dryer and contact GIAS Service for advice.
The Filter Care Indicator is on…
●
Does the filter need cleaning?
●
Is the venting hose kinked or blocked?
15
40003475ENG.qxd
08/07/2005
18:17
Page 16
Customer Service
Should there still be a problem with your dryer
after completing all the recommended checks,
please call GIAS Service for advice. They may be
able to assist you over the telephone or arrange
for a suitable appointment for an engineer to call
under the terms of your guarantee. However, a
charge may be made if any of the following
applies to your machine:
●
Is found to be in working order.
●
Has not been installed in accordance with
the installation instructions.
●
Has been used incorrectly.
Spares
Always use genuine spares, available direct from
GIAS Service.
GIAS Service
For service and repairs call your local GIAS
Service engineer.
The manufacturer declines all responsibility in the
event of any printing mistakes in this booklet.
The manufacturer also reserves the right to make
appropriate modifications to its products without
changing the essential characteristics.
16
40003475FRE.qxd
08/07/2005
18:18
Page 17
Introduction . . . . . . . . . . . . . . . . . . . . . . . . . . . . . . . . . . . . . . . . . . . . . . 18
Informations sur la livraison . . . . . . . . . . . . . . . . . . . . . . . . . . . . . . . . . . . . . . 18
Déballage du produit . . . . . . . . . . . . . . . . . . . . . . . . . . . . . . . . . . . . 18
Rappels de sécurité . . . . . . . . . . . . . . . . . . . . . . . . . . . . . . . . . . . . . . 19
Installation . . . . . . . . . . . . . . . .
Utilisation. . . . . . . . . . . . . . . . .
Le linge . . . . . . . . . . . . . . . . . .
Protection de l’environnement
Service GIAS . . . . . . . . . . . . . . .
.
.
.
.
.
.
.
.
.
.
.
.
.
.
.
.
.
.
.
.
.
.
.
.
.
.
.
.
.
.
.
.
.
.
.
.
.
.
.
.
.
.
.
.
.
.
.
.
.
.
.
.
.
.
.
.
.
.
.
.
.
.
.
.
.
.
.
.
.
.
.
.
.
.
.
.
.
.
.
.
.
.
.
.
.
.
.
.
.
.
.
.
.
.
.
.
.
.
.
.
.
.
.
.
.
.
.
.
.
.
.
.
.
.
.
.
.
.
.
.
.
.
.
.
.
.
.
.
.
.
.
.
.
.
.
.
.
.
.
.
.
.
.
.
.
.
.
.
.
.
.
.
.
.
.
.
.
.
.
.
.
.
.
.
.
.
.
.
.
.
.
.
.
.
.
.
.
.
.
.
19
19
19
20
20
Installation . . . . . . . . . . . . . . . . . . . . . . . . . . . . . . . . . . . . . . . . . . . . . . . . 21
Besoins électriques. . . . . . . . . . . . . . . . . . . . . . . . . . . . . . . . . . . . . . . . . . . . . . 21
Ajustement des pieds. . . . . . . . . . . . . . . . . . . . . . . . . . . . . . . . . . . . . . . . . . . . 21
Ventilation . . . . . . . . . . . . . . . . . . . . . . . . . . . . . . . . . . . . . . . . . . . . . . . . 22
Installation du tuyau d'évacuation . . . . . . . . . . . . . . . . . . . . . . . . . . . . . . . . . 22
Préparation de la charge . . . . . . . . . . . . . . . . . . . . . . . . . . . . . . . . 23
Préparation des vêtements . . . . . . . . . . . . . . . . . . . . . . . . . . . . . . . . . . . . . . . 23
Tri de la charge . . . . . . . . . . . . . . . . . . . . . . . . . . . . . . . . . . . . . . . . . . . . . . . . 24
Conseils de séchage. . . . . . . . . . . . . . . . . . . . . . . . . . . . . . . . . . . . . . 25
Ne séchez pas en machine . . . . . . . . . . . . . . . . . . . . . . . . . . . . . . . . . . . . . . . . 25
Économies d’énergie . . . . . . . . . . . . . . . . . . . . . . . . . . . . . . . . . . . . . . . . . . . . 25
Commandes et indicateurs . . . . . . . . . . . . . . . . . . . . . . . . . . . . . 26
Porte et filtre . . . . . . . . . . . . . . . . . . . . . . . . . . . . . . . . . . . . . . . . . . . . . 27
Ouverture de la porte . . . . . . . . . . . . . . . . . . . . . . . . . . . . . . . . . . . . . . . . . . . 27
Filtre. . . . . . . . . . . . . . . . . . . . . . . . . . . . . . . . . . . . . . . . . . . . . . . . . . . . . . . . . 27
Indicateur d’entretien du filtre . . . . . . . . . . . . . . . . . . . . . . . . . . . . . . . . . . . . 27
Fonctionnement . . . . . . . . . . . . . . . . . . . . . . . . . . . . . . . . . . . . . . . . . . 28
Nettoyage et Entretien de Routine . . . . . . . . . . . . . . . . . . . . 29
Nettoyage du sèche-linge . . . . . . . . . . . . . . . . . . . . . . . . . . . . . . . . . . . . . . . . 29
Spécifications techniques . . . . . . . . . . . . . . . . . . . . . . . . . . . . . . . . . . . . . . . . . 29
Dépistage de pannes . . . . . . . . . . . . . . . . . . . . . . . . . . . . . . . . . . . . 30
Service clientèle . . . . . . . . . . . . . . . . . . . . . . . . . . . . . . . . . . . . . . . . . . 31
Pièces de rechange. . . . . . . . . . . . . . . . . . . . . . . . . . . . . . . . . . . . . . . . . . . . . . 31
Service GIAS . . . . . . . . . . . . . . . . . . . . . . . . . . . . . . . . . . . . . . . . . . . . . . . . . . . 31
17
40003475FRE.qxd
08/07/2005
18:18
Page 18
Introduction
Vérifiez que la
machine ne s’est
pas détériorée en
transit. Si c’est le
cas, contactez GIAS
pour une opération
de dépannage.
Le non-respect de
ces instructions
peut compromettre
la sécurité de votre
appareil. Un appel
de service peut
vous être facturé si
la défaillance de
votre appareil est
causée par une
mauvaise
utilisation.
Veuillez lire et suivre ces instructions avec soin et
utiliser la machine conformément. Ce livret contient des
instructions importantes sur la sécurité d’utilisation,
l’installation et l’entretien de la machine, ainsi que des
conseils utiles pour obtenir les meilleurs résultats
possibles lors de son utilisation.
Conservez toute la documentation dans un endroit sûr
pour pouvoir vous y reporter à une date ultérieure ou la
transmettre aux prochains propriétaires
Informations sur la
livraison
Vérifiez que les articles suivants ont bien été livrés avec
l’appareil :
●
Manuel d’utilisation
●
Carte de garantie
●
Kit d’évacuation et instructions
●
Étiquette d’énergie
Déballage du produit
Retirez la machine de l’emballage, à proximité de son
emplacement définitif.
1.
Coupez délicatement autour de la base de
l’emballage en remontant vers l’angle supérieur.
2.
Retirer le manchon en polyéthylène et sortez le
sèche-linge de la base en polystyrène.
Mettre l’emballage au rebut en toute
sécurité. Conserver hors de portée des
enfants car il représente une source de
danger potentielle.
18
40003475FRE.qxd
13/12/2005
10:28
Page 19
Rappels de sécurité
Installation
●
●
●
●
Vérifiez que la machine ne présente aucun signe visible de détérioration avant de
l’utiliser. En cas de détérioration, assurez-vous de ne pas l’utiliser et de contacter le
service GIAS.
N’utilisez pas d’adaptateurs, de multi-prises et/ou de rallonges.
Cette machine ne doit pas être installée dans une salle de bain ou de douche.
Veillez à ne pas installer le sèche-linge contre des rideaux et assurez-vous que rien
ne pourra tomber ou s’accumuler derrière le sèche-linge.
Utilisation
●
●
●
●
●
●
●
●
●
●
●
●
ATTENTION La mauvaise utilisation d’un sèche-linge risque de causer un d’incendie.
Cette machine est conçue uniquement pour usage domestique, à savoir pour
sécher le linge domestique et les vêtements.
Cette machine ne doit être utilisée que pour l’emploi auquel elle est destinée et
qui est décrit dans ce manuel. Assurez-vous d’avoir bien compris les instructions
d’installation et d’utilisation avant de faire fonctionner la machine.
Ne touchez pas la machine si vous avez les mains ou les pieds mouillés ou humides.
Ne vous appuyez pas sur la porte lorsque vous chargez la machine et n’utilisez pas
la porte pour soulever ou déplacer la machine.
Ne laissez pas des enfants jouer avec la machine ou avec ses commandes.
ATTENTION N’utilisez pas cette machine si le filtre à peluches n’est pas en place ou
s’il est endommagé ; les peluches risquent en effet de s’allumer.
ATTENTION L’augmentation de température pendant le fonctionnement du sèchelinge peut être supérieure à 60°C là où se trouve le symbole de surface chaude.
Débranchez du courant de secteur. Retirez toujours la prise avant de nettoyer la
machine.
Cessez d’utiliser la machine si elle semble défectueuse.
Veillez à ce que les peluches ne puissent pas s’accumuler sur le sol, à l’extérieur de
la machine.
Il se peut que l’intérieur du tambour soit très chaud. Veillez à ce que le sèche-linge
termine son cycle de refroidissement avant d’en sortir le linge.
Le linge
●
●
●
●
ATTENTION NE séchez PAS les tissus qui ont été traités avec des liquides de
nettoyage à sec.
ATTENTION Quand elles sont chauffées, les mousses alvéolaires peuvent dans
certains cas brûler par combustion spontanée. Les articles en plastique alvéolaire,
en caoutchouc alvéolaire et en caoutchouc ne conviennent pas au séchage en
machine. Les articles fabriqués à partir de ces matériaux NE DOIVENT PAS être
placés dans le sèche-linge.
Reportez-vous toujours aux étiquettes d’entretien du linge pour vérifier le mode
de séchage recommandé.
Les vêtements doivent être essorés en machine ou à la main avant d’être placés
dans le sèche-linge. Les vêtements qui dégoulinent NE DOIVENT PAS être mis dans
19
40003475FRE.qxd
●
●
●
13/12/2005
10:29
Page 20
le sèche-linge.
Enlevez les briquets et les allumettes des poches et veillez à ne JAMAIS utiliser de
liquides inflammables à proximité de la machine.
Les rideaux en fibres de verre ne doivent JAMAIS être placés dans cette machine.
La contamination d’autres vêtements par les fibres de verre peut entraîner des
irritations de la peau.
Les vêtements traités ou contaminés par des produits de nettoyage ou des liquides
inflammables, comme le pétrole, l’huile de cuisson ou les aérosols NE DOIVENT
PAS être placés dans la machine.
Protection de l’environnement
●
●
Tous les matériaux de conditionnement utilisés sont écologiques et recyclables.
Veuillez les éliminer de manière écologique. Votre municipalité pourra vous
donner le détail exact des méthodes d’élimination en vigueur.
Pour assurer la sécurité lors de l’élimination d’un vieux sèche-linge, veuillez
débrancher la fiche du courant de secteur, couper le câble d’alimentation et le
détruire avec la fiche. Pour empêcher que les enfants ne s’enferment dans la
machine, cassez les charnières de la porte ou son dispositif de verrouillage.
Service GIAS
●
Pour veiller au fonctionnement efficace et sans risque de cet appareil, nous vous
recommandons de faire exclusivement appel à un technicien GIAS agréé pour son
entretien ou sa réparation éventuelle.
Directive européenne 2002/96/CE
Cet appareil est commercialisé en accord avec la directive européenne 2002/96/CE sur les
déchets des équipements électriques et électroniques (DEEE).
En vous assurant que ce produit est correctement recyclé,
vous participez à la prévention des conséquences négatives
sur l’environnement et la santé publique qui pourrait être
causé par une mise au rebut inappropriée de ce produit.
Le symbole sur ce produit indique qu’il ne doit pas être traité
comme un déchet ménager. Il doit être rapporté jusqu’à un
point de recyclage des déchets électriques et électroniques.
La collecte de ce produit doit se faire en accord avec les
réglementations environnementales concernant la mise au
rebut de ce type de déchets.
Pour plus d’information au sujet du traitement, de la collecte
et du recyclage de ce produit, merci de contacter votre mairie,
votre centre de traitement des déchets ou le magasin où vous
avez acheté ce produit.
Si l’appareil ne fonctionne pas correctement ou s’il tombe en
panne, mettez-le à l’arrêt et débranchez-le du courant de secteur.
Consultez le service GIAS pour prévoir une éventuelle réparation.
20
40003475FRE.qxd
08/07/2005
18:18
Page 21
Installation
Besoins électriques
Les sèche-linges sont prévus pour une tension
monophasée de 230-240 V, 50 Hz. Vérifiez que la
tension nominale du circuit d’alimentation est réglée
sur 10 A minimum.
L’électricité peut être extrêmement dangereuse.
Cet appareil doit être mis à la terre.
La prise de courant et la fiche de la machine doivent
être du même type.
Un appel de
service peut vous
être facturé si la
défaillance de
votre appareil est
causée par une
installation
incorrecte.
N’utilisez pas de multi-prises et/ou de rallonges.
La fiche doit être accessible pour débrancher l’appareil
une fois qu’il a été installé.
Les fils du câble de secteur sont colorés en fonction des
codes suivants :
Bleu
NEUTRE
Marron
SOUS TENSION
Vert et jaune
TERRE
La machine est conforme aux directives européennes
89/336/EEC, 73/23/EEC et à leurs modifications
ultérieures.
Ne branchez pas l’appareil et ne mettez
pas en marche l’interrupteur de secteur
tant que l’installation n’est pas terminée.
Par mesure de sécurité, veillez à installer
ce sèche-linge correctement.
Si le cordon
électrique de cet
appareil est
endommagé, il doit
être remplacé par
un cordon spécial
qui est
UNIQUEMENT
disponible auprès
du service des
pièces de rechange
de GIAS. Il doit être
installé par une
personne
compétente.
En cas de doute concernant son
installation, veuillez demander conseil à
GIAS Service.
Ajustement des pieds
Lorsque la machine est en place, les pieds doivent être
ajustés pour mettre la machine de niveau.
Ajustez les quatre pieds pour stabiliser la machine et la
mettre de niveau.
21
40003475FRE.qxd
08/07/2005
18:18
Page 22
Ventilation
La pièce où se trouve le sèche-linge doit avoir une
ventilation adéquate de manière à ce que les gaz des
appareils qui brûlent d’autres combustibles, y compris
les cheminées, ne soient pas attirés dans la pièce
pendant que le sèche-linge est en marche.
●
L’air d’échappement ne doit pas être évacué par
un conduit qui est également utilisé pour évacuer
les fumées d’échappement d’appareils qui brûlent
du gaz ou d’autres combustibles.
●
Vérifiez régulièrement que l’air peut circuler
librement autour du sèche-linge.
●
Vérifiez le filtre à peluches après usage, et
nettoyez-le le cas échéant.
●
Les entrées et sorties doivent être libres
d’obstructions. Pour veiller à une ventilation
adéquate, l’espace entre le bas de la machine et
le sol ne doit pas être obstrué. Il doit y avoir un
espace d’au moins 12 mm entre la machine et
d’éventuelles obstructions.
●
Veillez à ce que rien ne puisse tomber ou
s’accumuler entre les côtés et l’arrière du sèchelinge, afin de ne pas obstruer l’entrée et la sortie
d’air.
●
N’installez JAMAIS le sèche-linge contre des
rideaux.
Installation du tuyau
d'évacuation
Il est essentiel d'utiliser un tuyau de ventilation pour
évacuer l'air chaud humide du sèche-linge sauf si celui-ci
se trouve dans un espace ouvert disposant d'une bonne
circulation d'air. Une reprise de l'air humide réduit
l'efficacité du sèche-linge.
Le tuyau est monté sur la machine comme indiqué sur le
schéma.
Le tuyau peut être installé à travers un mur ou une
porte ou fenêtre ouverte. Le tuyau est d'un diamètre de
110 mm et déroulée d'une longueur de 1,8 m.
Veillez à suivre les instructions ci-après pour installer le
tuyau d'évacuation.
●
22
N'utilisez pas deux tuyaux raccordés car cela
40003475FRE.qxd
08/07/2005
18:18
Page 23
réduirait les performances de séchage.
●
N'obstruez pas le flux de l'air dans le tuyau par exemple en le coudant ou en
posant un connecteur d'un diamètre plus faible pour un montage sur une
ouverture pratiquée dans un mur.
●
Évitez que le tuyau présente des courbures en U, celles-ci pouvant obstruer le flux
de l'air et accroître le risque d'accumulation d'eau dans le tuyau.
●
Vérifiez régulièrement l'état du tuyau et nettoyez toute accumulation d'eau ou de
résidus de poussière qui a pu s'y déposer.
Les schémas ci-après illustrent des exemples de bonnes et de mauvaises installations.
Préparation de la charge
Avant d’utiliser le sèche-linge pour la première fois :
●
Veuillez lire ce manuel d’instruction en détail.
●
Retirez tous les articles qui se trouvent à l’intérieur du tambour.
●
Essuyez l’intérieur du tambour et de la porte avec
un chiffon humide pour éliminer la poussière
éventuelle qui aurait pu s’y infiltrer en transit.
Préparation des
vêtements
Vérifiez sur les étiquettes comportant les symboles
d’entretien que le linge que vous souhaitez sécher
convient au séchage en machine.
Vérifiez que toutes les fermetures sont fermées et que les
poches sont vides. Mettez les articles à l’envers. Placez les
vêtements en vrac dans le tambour en veillant à ce qu’ils
ne s’emmêlent pas les uns avec les autres.
Ne surchargez pas
le tambour ;
lorsqu’ils sont
mouillés, les
grands articles
peuvent dépasser
le poids de
maximum
admissible
(ex : sacs de
couchage,
couettes).
23
40003475FRE.qxd
08/07/2005
18:18
Page 24
Poids de séchage
maximum
●
Coton, 6 kg maxi
●
Synthétiques, 3 kg maxi
Triez la charge comme
suit :
●
Par symbole de soin d’entretien
Vous les trouverez sur le col ou la couture
intérieure :
Convient pour séchage en machine.
Séchage à haute température.
Séchage à basse température uniquement.
Ne séchez pas en machine.
Si le vêtement ne comporte aucune étiquette
de conseils de lavage, considérez qu’il ne
convient pas pour le séchage en machine.
●
Par quantité et épaisseur
Lorsque la charge est plus importante que la
capacité du sèche-linge, séparez les vêtements
selon leur épaisseur (ex : les serviettes des sousvêtements fins).
●
Par type de tissu
Coton/toile de lin : Serviettes, jersey en coton,
linge de lit ou de table.
Synthétiques : Chemisiers, chemises, blouses etc.
en polyester ou polyamide, ainsi que pour les
mélanges de coton/synthétique.
●
24
Par degré de séchage
Triez selon : sec pour repassage, sec pour
rangement, etc. Pour les articles délicats, appuyez
sur le bouton
pour sélectionner une
température de séchage basse.
40003475FRE.qxd
08/07/2005
18:18
Page 25
Conseils de séchage
Ne séchez pas en
machine :
Les lainages, la soie, les tissus délicats, les bas de nylon,
les broderies délicates, les tissus ayant des décorations
métalliques, les vêtements avec des bordures en PVC ou
en cuir, les chaussures de sport, les articles volumineux
comme les sacs de couchage, etc.
Économies d’énergie
IMPORTANT : Ne
séchez pas les
articles qui ont été
traités avec un
liquide de
nettoyage à sec ou
les vêtements en
caoutchouc (risque
d’incendie ou
d’explosion).
Ne mettez que du linge essoré en machine ou à la main
dans le sèche-linge. Plus le linge est sec, plus le temps
de séchage sera court, ce qui économisera de l’énergie.
TOUJOURS
●
Essayez de sécher le poids de linge maximum,
pour économiser du temps et de l’électricité.
●
Vérifiez que le filtre est propre avant chaque cycle
de séchage.
JAMAIS
●
Ne dépassez pas le poids maximum pour ne pas
gaspiller du temps ou de l’électricité.
●
Ne mettez pas d’articles dégoulinant d’eau dans le
sèche-linge pour ne pas endommager l’appareil.
Pendant les
15 dernières
minutes, la charge
est toujours séchée
dans de l’air froid.
25
40003475FRE.qxd
08/07/2005
18:18
Page 26
Commandes et indicateurs
BOUTON
ACRYLIQUE/SYNTHÉTIQUES
BOUTON
MARCHE
INDICATEUR
D’ENTRETIEN DU
FILTRE
SÉLECTEUR DE
DURÉE DE
SÉCHAGE
Panneau de commande et témoins
indicateurs
Bouton et indicateur MARCHE
s’allumera.
– appuyez pour mettre en marche ; l’indicateur
Bouton ‘ACRYLIQUE/SYNTHETIQUES’
– appuyez pour diminuer le niveau de
chaleur, pour les articles délicats, et appuyez à nouveau pour sélectionner une
température élevée.
Puissance de séchage HAUTE
Puissance de séchage BASSE
Sélecteur de DURÉE DE SÉCHAGE – sélectionne le temps de séchage ou l’option
Repassage rapide
.
L’indicateur ‘ENTRETIEN FILTRE’
26
– s’allume lorsque le filtre a besoin d’être nettoyé.
40003475FRE.qxd
08/07/2005
18:18
Page 27
Porte et filtre
Ouverture de la porte
Tirez sur la poignée pour ouvrir la porte.
Pour remettre le sèche-linge en marche, fermez la porte
et appuyez
.
ATTENTION !
Lorsque le seche-linge est en cours
d’utilisation, il se peut que le tambour
et la porte soient TRES CHAUDS.
Filtre
IMPORTANT : Pour assurer l’efficacité du sèche-linge,
vérifiez que le filtre à peluches est propre avant chaque
cycle de séchage.
1.
Tirez le filtre vers le haut.
2.
Ouvrez le filtre, comme illustré.
3.
Retirez doucement les peluches à l’aide d’une
brosse douce ou du bout des doigts.
4.
Réenclenchez le filtre et poussez-le en place.
Indicateur d’entretien du
filtre
s’allume lorsqu’il faut nettoyer le filtre.
Si le linge ne sèche pas, vérifiez que le filtre n’est pas
colmaté. L’indicateur s’allume également lorsque le
tuyau de ventilation est bloqué ou coudé.
27
40003475FRE.qxd
08/07/2005
18:18
Page 28
Fonctionnement
Référez-vous au tableau du guide de séchage ou aux
étiquettes des vêtements pour sélectionner le
programme le plus adapté.
●
Ouvrez la porte et chargez le sèche-linge de linge.
Vérifiez qu’aucun vêtement n’entrave la
fermeture de la porte.
●
Pour sécher des articles délicats, appuyez sur le
bouton
pour baisser la température.
Appuyez à nouveau sur ce bouton à la fin du cycle
pour augmenter la température.
Puissance de séchage HAUTE
Puissance de séchage BASSE
●
Tournez le sélecteur de DURÉE DE SÉCHAGE
jusqu’à ce que la durée de séchage voulue s’aligne
sur le cadran.
●
Le programme
propose une fonction de
conditionnement et anti-froissement. Le sèchelinge chauffera la charge pendant 8 minutes et le
refroidira ensuite pendant 2 minutes, ce qui est
particulièrement utile pour les vêtements qui ont
été laissés pendant un certain temps avant le
repassage, dans le sac à linge par exemple. Les
vêtements peuvent également raidir lorsqu’ils
sont séchés en plein air sur une corde à linge ou à
l’intérieur sur des radiateurs. Le processus détend
les froissements du tissu pour rendre le repassage
plus rapide et plus facile.
●
Fermez doucement la porte en la poussant
lentement jusqu’à ce que vous entendiez un
déclic.
●
Appuyez sur le bouton
. L’indicateur s’allume
et le cycle de séchage commence.
●
La charge est séchée par rotation dans de l’air
chaud contrôlé par un thermostat. De l’air froid
est utilisé au cours des 15 dernières minutes
pour réduire les froissements et pour refroidir la
charge en vue de sa manipulation.
●
Lorsque le programme est terminé, le tambour
s’arrête de tourner et le cadran s’arrête sur 0 .
●
Ouvrez la porte et retirez la charge.
●
Nettoyez le filtre après chaque cycle de séchage
pour assurer une efficacité maximale du sèchelinge.
ATTENTION !
Il est possible que
le tambour, la
porte et la charge
soient très chauds.
28
40003475FRE.qxd
08/07/2005
18:18
Page 29
Nettoyage et Entretien de Routine
Nettoyage du sèchelinge
●
Nettoyez le filtre après chaque cycle de séchage.
●
Après chaque période d’utilisation, essuyez
l’intérieur du tambour et laissez la porte ouverte
pendant un moment pour qu’il puisse sécher
grâce à la circulation d’air.
●
Essuyez l’extérieur de la machine et la porte avec
un chiffon doux.
●
N’utilisez PAS de tampons ou d’agents de
nettoyage abrasifs.
●
Pour empêcher que la porte n’adhère ou que les
peluches ne s’accumulent, nettoyez régulièrement
la surface intérieure et le joint de la porte avec un
chiffon humide.
Spécifications
techniques
Capacité du tambour
115 litres
Charge maximale
6 kg
Hauteur
85 cm
Largeur
60 cm
Profondeur
60 cm
Bande étiquette d’énergie
C
IMPORTANT
Coupez toujours le
courant et
débranchez la fiche
de l’alimentation
électrique avant de
nettoyer cet
appareil.
Pour les données
électriques,
veuillez consulter
l’étiquette des
valeurs nominales
qui se trouve à
l’avant de l’armoire
du sèche-linge
(avec la porte
ouverte).
29
40003475FRE.qxd
08/07/2005
18:18
Page 30
Dépistage de pannes
Quelle pourrait être l’origine de...
Défauts que vous pouvez rectifier vous-même
Avant d’appeler le service GIAS pour obtenir des conseils, veuillez suivre la liste des
vérifications ci-dessous. L’intervention sera facturée si la machine fonctionne
correctement ou si elle a été installée ou utilisée de manière incorrecte. Si le problème
persiste alors que vous avez terminé les vérifications recommandées, veuillez appeler le
service GIAS qui pourra peut-être vous aider par téléphone.
La période de séchage est trop longue/les vêtements
ne sont pas suffisamment secs…
●
Avez-vous sélectionné le temps de séchage/le programme qui convient ?
●
Les vêtements étaient-ils trop mouillés ? Les vêtements avaient-ils été
adéquatement essorés en machine ou à la main ?
●
Le filtre doit-il être nettoyé ?
●
Le sèche-linge est-il surchargé ?
●
Le tuyau de ventilation est-il coudé ou colmaté ?
●
Avez-vous sélectionné le bouton
au cours d’un cycle précédent ?
Le sèche-linge ne fonctionne pas…
●
Le sèche-linge est-il branché sur une alimentation électrique adéquate ? Vérifiez à
l’aide d’un autre appareil, par exemple une lampe de chevet.
●
La fiche est-elle bien branchée sur l’alimentation de secteur ?
●
Y a-t-il une panne de courant ?
●
Le fusible a-t-il sauté ?
●
La porte est-elle bien fermée ?
●
Le sèche-linge est-il en position de marche, au niveau du courant de secteur et de
la machine ?
●
La période de séchage ou le programme a-t-il été sélectionné ?
●
La machine a-t-elle été remise en marche après l’ouverture de la porte ?
Le sèche-linge est bruyant…
●
Arrêtez le sèche-linge et contactez le service GIAS pour obtenir des conseils.
L’indicateur d’entretien du filtre est allumé.
●
Le filtre doit-il être nettoyé ?
●
Le tuyau de ventilation est-il coudé ou colmaté ?
30
40003475FRE.qxd
08/07/2005
18:18
Page 31
Service clientèle
En cas de problème après avoir effectué toutes les
inspections recommandées, veuillez contacter le service
GIAS. Il pourra vous aider par téléphone ou organiser la
visite d’un technicien, en vertu des conditions de votre
garantie. Cependant, vous serez facturé dans l’un des
cas suivants :
●
Si la machine est en bon état de marche.
●
Si la machine n’a pas été installée conformément
aux instructions d’installation.
●
Si la machine a été utilisée incorrectement.
Pièces de rechange
Utilisez toujours des pièces de rechange, disponibles
auprès du service GIAS.
Service GIAS
Pour les entretiens et les réparations, contactez votre
technicien local du service GIAS.
Le constructeur décline toute responsabilité en cas
d’erreurs d’impression dans le présent document. Le
constructeur se réserve le droit d’apporter les
modifications nécessaires à ses produits sans en changer
les caractéristiques de base.
31
40003475GER.qxd
08/07/2005
18:19
Page 32
Einführung . . . . . . . . . . . . . . . . . . . . . . . . . . . . . . . . . . . . . . . . . . . . . . . . 33
Lieferinformationen. . . . . . . . . . . . . . . . . . . . . . . . . . . . . . . . . . . . . . . . . . . . . 33
Auspacken des Produkts . . . . . . . . . . . . . . . . . . . . . . . . . . . . . . . . 33
Sicherheitshinweise . . . . . . . . . . . . . . . . . . . . . . . . . . . . . . . . . . . . . . 34
Installation . . .
Gebrauch . . . .
Die Wäsche . .
Umweltschutz
GIAS-Service . .
.
.
.
.
.
.
.
.
.
.
.
.
.
.
.
.
.
.
.
.
.
.
.
.
.
.
.
.
.
.
.
.
.
.
.
.
.
.
.
.
.
.
.
.
.
.
.
.
.
.
.
.
.
.
.
.
.
.
.
.
.
.
.
.
.
.
.
.
.
.
.
.
.
.
.
.
.
.
.
.
.
.
.
.
.
.
.
.
.
.
.
.
.
.
.
.
.
.
.
.
.
.
.
.
.
.
.
.
.
.
.
.
.
.
.
.
.
.
.
.
.
.
.
.
.
.
.
.
.
.
.
.
.
.
.
.
.
.
.
.
.
.
.
.
.
.
.
.
.
.
.
.
.
.
.
.
.
.
.
.
.
.
.
.
.
.
.
.
.
.
.
.
.
.
.
.
.
.
.
.
.
.
.
.
.
.
.
.
.
.
.
.
.
.
.
.
.
.
.
.
.
.
.
.
.
.
.
.
.
.
.
.
.
.
.
.
.
.
.
.
.
.
.
.
.
.
.
.
.
.
.
.
.
.
.
.
.
.
.
.
.
.
.
.
.
34
34
34
35
35
Aufstellung . . . . . . . . . . . . . . . . . . . . . . . . . . . . . . . . . . . . . . . . . . . . . . . 36
Elektro-Anschluss . . . . . . . . . . . . . . . . . . . . . . . . . . . . . . . . . . . . . . . . . . . . . . . 36
Einstellen der Füße . . . . . . . . . . . . . . . . . . . . . . . . . . . . . . . . . . . . . . . . . . . . . 36
Entlüftung . . . . . . . . . . . . . . . . . . . . . . . . . . . . . . . . . . . . . . . . . . . . . . . . 37
Installation des Ablaufschlauchs . . . . . . . . . . . . . . . . . . . . . . . . . . . . . . . . . . . 37
Vorbereitung der Füllung
. . . . . . . . . . . . . . . . . . . . . . . . . . . . . . . 38
Vorbereitung der Textilien . . . . . . . . . . . . . . . . . . . . . . . . . . . . . . . . . . . . . . . 38
Sortierung der Füllung . . . . . . . . . . . . . . . . . . . . . . . . . . . . . . . . . . . . . . . . . . 39
Tipps zum Trocknen . . . . . . . . . . . . . . . . . . . . . . . . . . . . . . . . . . . . . . 40
Nicht für den Trockner geeignet . . . . . . . . . . . . . . . . . . . . . . . . . . . . . . . . . . 40
Energiesparen . . . . . . . . . . . . . . . . . . . . . . . . . . . . . . . . . . . . . . . . . . . . . . . . . 40
Schalterblende & Anzeigen . . . . . . . . . . . . . . . . . . . . . . . . . . . . . 41
Tür und Sieb . . . . . . . . . . . . . . . . . . . . . . . . . . . . . . . . . . . . . . . . . . . . . . 42
Öffnen der Tür . . . . . . . . . . . . . . . . . . . . . . . . . . . . . . . . . . . . . . . . . . . . . . . . . 42
Sieb . . . . . . . . . . . . . . . . . . . . . . . . . . . . . . . . . . . . . . . . . . . . . . . . . . . . . . . . . 42
Flusensieb-Anzeige . . . . . . . . . . . . . . . . . . . . . . . . . . . . . . . . . . . . . . . . . . . . . 42
Betrieb . . . . . . . . . . . . . . . . . . . . . . . . . . . . . . . . . . . . . . . . . . . . . . . . . . . . 43
Reinigung und Routinewartungen . . . . . . . . . . . . . . . . . . . . . 44
Reinigung des Trockners . . . . . . . . . . . . . . . . . . . . . . . . . . . . . . . . . . . . . . . . . 44
Technische Daten . . . . . . . . . . . . . . . . . . . . . . . . . . . . . . . . . . . . . . . . . . . . . . . 44
Fehlersuche . . . . . . . . . . . . . . . . . . . . . . . . . . . . . . . . . . . . . . . . . . . . . . . 45
Kundendienst. . . . . . . . . . . . . . . . . . . . . . . . . . . . . . . . . . . . . . . . . . . . . 46
Ersatzteile . . . . . . . . . . . . . . . . . . . . . . . . . . . . . . . . . . . . . . . . . . . . . . . . . . . . 46
GIAS-Service . . . . . . . . . . . . . . . . . . . . . . . . . . . . . . . . . . . . . . . . . . . . . . . . . . . 46
32
40003475GER.qxd
08/07/2005
18:19
Page 33
Einführung
Bitte lesen Sie diese Anleitung sorgfältig durch und
richten Sie sich bei der Bedienung der Waschmaschine
nach der Anleitung. Dieses Handbuch enthält wichtige
Hinweise für die sichere Installation, Anwendung und
Wartung sowie einige nützliche Hinweise für optimale
Ergebnisse beim Gebrauch Ihrer Maschine.
Heben Sie diese Dokumentation an einem sicheren Ort
auf, um jederzeit wieder darauf zurückgreifen zu
können bzw. um sie an zukünftige Besitzer weitergeben
zu können
Lieferinformationen
Zum Lieferumfang Ihrer Waschmaschine gehören
folgende Dokumentation und Zusatzteile:
●
Bedienungsanleitung
●
Garantieschein
●
Entlüftungsbausatz und Anleitung
●
Energieeffizienzklasse
Kontrollieren Sie,
ob die Maschine
durch den Transport
beschädigt wurde.
Falls dies der Fall
ist, wenden Sie sich
an den GIASService.
Die Sicherheit des
Geräts kann
beeinträchtigt
werden, wenn Sie
sich nicht an diese
Sicherheitshinweis
e halten. Falls ein
Problem mit Ihrer
Maschine durch
Zweckentfremdung
verursacht wird,
müssen Sie
Reparaturarbeiten
möglicherweise
selbst bezahlen.
Auspacken des Produkts
Entfernen Sie die Verpackung der Maschine dicht an
dem Platz, wo sie aufgestellt werden soll.
1.
Schneiden Sie sie sorgfältig rund um den Boden
der Verpackung und an einer Ecke nach oben auf.
2.
Entfernen Sie die Polyethylenhülle und heben Sie
den Trockner von der Polystyrenplatte.
Entsorgen Sie die Verpackung
ordnungsgemäß. Achten Sie darauf,
dass sie nicht in die Hände von Kindern
gelang, da sie eine potentielle
Gefahrenquelle darstellt.
33
40003475GER.qxd
12/12/2005
18:55
Page 34
Sicherheitshinweise
Installation
●
●
●
●
Überprüfen Sie vor dem Gebrauch, ob das Produkt sichtbare Schäden aufweist.
Verwenden Sie es nicht, wenn es beschädigt ist, und wenden Sie sich an den GIASService.
Verwenden Sie keine Adapter, Mehrfachsteckdosen und/oder Verlängerungskabel.
Installieren Sie das Gerät nicht in einem Badezimmer oder Duschraum.
Stellen Sie den Trockner nie in der Nähe von Vorhängen auf. Achten Sie darauf,
dass keine Gegenstände hinter den Trockner fallen oder sich dort ansammeln
können.
Gebrauch
●
●
●
●
●
●
●
●
●
●
●
●
WARNUNG Zweckentfremdung des Trockners kann zu Brandgefahr führen.
Diese Maschine dient als Haushaltsgerät ausschließlich zum Trocknen von
Haushaltstextilien und Kleidungsstücken.
Verwenden Sie dieses Gerät nur für die vorgesehenen Zwecke gemäß der
Anleitung. Lesen Sie die Gebrauchsanleitung sorgfältig durch, bevor Sie das Gerät
in Betrieb nehmen.
Berühren Sie das Gerät nicht mit feuchten oder nassen Händen oder Füßen.
Lehnen Sie sich nicht gegen die Tür, wenn Sie die Maschine beladen, und fassen
Sie die Maschine nicht an der Tür, wenn Sie sie hochheben oder verschieben.
Lassen Sie Kinder nicht mit der Maschine oder den Schaltern spielen.
WARNUNG Verwenden Sie das Produkt nicht, wenn das Flusensieb nicht richtig
eingebaut oder beschädigt ist; Flusen könnten Feuer fangen.
WARNUNG An der Stelle, an der sich das Symbol für heiße Flächen befindet
,
kann die Temperatur während des Trocknerbetriebs auf über 60°C steigen.
Ziehen Sie den Stecker aus der Steckdose! Ziehen Sie vor dem Reinigen des Geräts
immer den Stecker heraus!
Verwenden Sie die Maschine bei vermuteten Störungen nicht weiter.
Fusseln und Flusen dürfen sich nicht auf dem Fußboden im Bereich um die
Maschine ansammeln.
Die Trommel in dem Gerät kann sehr heiß werden. Lassen Sie den Trockner stets
vollständig bis zum Ende der Abkühlphase laufen, bevor Sie die Wäsche
herausnehmen.
Die Wäsche
●
●
●
●
34
WARNUNG AUF KEINEN FALL Stoffe in der Maschine trocknen, die mit chemischen
Reinigungsmitteln behandelt wurden.
WARNUNG Wenn Schaumgummimaterialien heiß werden, können sie sich unter
bestimmten Bedingungen plötzlich entzünden. Textilien, die Schaumplastik,
Schaumgummi und gummiähnliche Materialien enthalten, eignen sich nicht für
das Trocknen im Wäschetrockner. Füllen Sie AUF KEINEN FALL Textilien aus diesen
Materialien in den Trockner ein.
Sehen Sie immer auf den Pflegeetiketten nach, ob das Material für das Trocknen
geeignet ist.
Textilien vor dem Einfüllen in den Trockner erst schleudern oder gründlich
40003475GER.qxd
●
●
●
12/12/2005
18:56
Page 35
auswringen. Füllen Sie KEINE tropfnassen Textilien in den Trockner.
Feuerzeuge und Streichhölzer unbedingt aus den Taschen entfernen und AUF
KEINEN FALL mit feuergefährlichen Flüssigkeiten in der Nähe der Maschine
hantieren.
KEINE Vorhänge aus Glasfasermaterial in die Maschine füllen. Kommen andere
Textilien mit Glasfasern in Berührung, so kann dies zu Hautreizungen führen.
Kleidungsstücke, die mit feuergefährlichen Reinigungssprays oder Flüssigkeiten
wie Benzin, Speiseöl oder Aerosolsprays behandelt oder verunreinigt sind, DÜRFEN
NICHT in dieser Maschine getrocknet werden.
Umweltschutz
●
●
Das gesamte Verpackungsmaterial besteht aus umweltfreundlichen,
wiederverwertbaren Materialien. Bitte helfen Sie mit, diese umweltfreundlich zu
entsorgen. Ihre Stadtverwaltung kann Sie über Entsorgungsmöglichkeiten
informieren.
Ziehen Sie den Stecker aus der Steckdose, zerschneiden Sie das Netzkabel und
werfen Sie Netzkabel und Netzstecker getrennt in den Müll, bevor Sie Ihren alten
Trockner entsorgen. Zerstören Sie Scharniere und die Türverriegelung, damit sich
Kinder nicht versehentlich in der Waschmaschine einsperren können.
GIAS-Service
●
Um einen sicheren und einwandfreien Betrieb dieses Geräts zu gewährleisten,
empfehlen wir, alle Wartungs- und Reparaturarbeiten nur von einem zugelassenen
GIAS-Kundendiensttechniker durchführen zu lassen.
Europäische Vorschrift 2002/96/EC
Dieses Elektrohaushaltsgerät ist entsprechend der EU-Richtlinie 2002/96/EC über Elektround Elektronik-Altgeräte (WEEE) gekennzeichnet.
Bitte sorgen Sie dafür, dass das Gerät ordnungsgemäß entsorgt wird, damit mögliche
negative Auswirkungen auf Umwelt und Gesundheit
vermieden werden, die bei einer unsachgemäßen Entsorgung
des Altgerätes entstehen könnten.
Das Symbol auf dem Produkt bedeutet, dass dieses Gerät
nicht in den normalen Hausmüll gehört, sondern den
jeweiligen kommunalen Rücknahmesystemen für Elektro- und
Elektronik-Altgeräte übergeben werden muss.
Die Entsorgung muss im Einklang mit den geltenden
Umweltrichtlinien für die Abfallentsorgung erfolgen.
Für nähere Informationen über Entsorgung und Recycling
dieses Produktes wenden Sie sich bitte an Ihre kommunalen
Einrichtungen (Umweltamt) oder an die
Abfallentsorgungsgesellschaft Ihrer Stadt bzw. an Ihren
Händler.
Falls das Gerät nicht richtig funktioniert oder ausfällt, schalten Sie
es aus und ziehen Sie den Stecker aus der Steckdose. Wenden Sie
sich an den GIAS-Service.
35
40003475GER.qxd
08/07/2005
18:19
Page 36
Aufstellung
Falls ein Problem
mit Ihrer Maschine
durch falsche
Installation
verursacht wird,
müssen Sie
Reparaturarbeiten
möglicherweise
selbst bezahlen.
Elektro-Anschluss
Dieser Trockner ist für eine Netzspannung von 230 - 240 V
und 50 Hz (Einphasenstrom) ausgelegt. Stellen Sie sicher,
dass der Stromkreis eine Nennleistung von 10 A hat.
Strom kann lebensgefährlich sein.
Dieses Gerät muss an eine geerdete Steckdose mit
Schutzkontakt angeschlossen werden.
Die Steckdose und der Stecker am Gerät müssen vom
selben Typ sein.
Verwenden Sie keine Mehrfachstecker und/oder
Verlängerungskabel.
Sollte das
Netzanschlusskabel
an diesem Gerät
beschädigt sein,
muss es durch ein
spezielles Kabel
ersetzt werden, das
NUR beim GIASErsatzteilservice
erhältlich ist. Es
muss von einer
fachkundigen
Person installiert
werden.
Der Stecker sollte so angebracht werden, dass er nach
der Installation des Geräts leicht aus der Steckdose zu
ziehen ist.
Die Drähte im Netzanschlusskabel sind farblich gemäß
folgender Codes unterschieden:
Blau
NEUTRAL
Braun
STROMFÜHREND
Grün und Gelb
ERDE
Das Gerät stimmt mit den Bestimmungen der
Europäischen Vorschrift 89/336/EEC, 73/23/EEC sowie
deren Nachfolgebestimmungen überein.
Schließen Sie die Maschine erst an und
drücken Sie die Einschalttaste erst, wenn
die Installation abgeschlossen ist.
Zu Ihrer eigenen Sicherheit muss der
Trockner richtig installiert werden.
Sollten Sie bezüglich der Installation
Fragen haben, wenden Sie sich an den
GIAS-Service.
Einstellen der Füße
Sobald sich die Maschine am endgültigen Ort befindet,
sollten die Füße so eingestellt werden, dass die
Maschine eben steht.
Stellen Sie die vier Füße so ein, dass die Maschine sicher
und eben steht.
36
40003475GER.qxd
08/07/2005
18:19
Page 37
Entlüftung
In dem Raum, in dem sich der Trockner befindet, muss
eine ausreichende Entlüftung vorhanden sein, um zu
verhindern, dass Gase aus der Verbrennung anderer
Brennstoffe, zum Beispiel offene Feuer, während des
Trocknerbetriebs in den Raum gesogen werden.
●
Die Abluft darf nicht in einen Kaminschacht
geleitet werden, der für das Ableiten von Rauch
aus der Verbrennung von Gas oder anderen
Brennstoffen verwendet wird.
●
Prüfen Sie regelmäßig die reibungslose
Luftzirkulation im Trockner.
●
Überprüfen Sie nach Gebrauch das Flusensieb und
reinigen Sie es, wenn es erforderlich ist!
●
Die Ansaug- und Abluftanschlüsse dürfen nicht
zugestellt werden. Um eine richtige Abluft zu
gewährleisten, muss die Fläche zwischen dem
Boden der Maschine und dem Fußboden frei
bleiben. Zwischen der Maschine und anderen
Gegenständen sollte ein Abstand von mindestens
12 cm eingehalten werden .
●
Achten Sie darauf, dass keine Gegenstände
zwischen beiden Seitenteilen und der Rückseite
des Trockners herunterfallen und sich dort
ansammeln, da hierdurch die Ansaug- und
Abluftanschlüsse blockiert werden können.
●
Der Trockner darf AUF KEINEN FALL in der
unmittelbaren Nähe von Vorhängen aufgestellt
werden.
Installation des Ablaufschlauchs
Die Verwendung eines Ablaufschlauchs, der einen
Großteil der heißen, feuchten Luft vom Trockner
abtransportiert, ist äußerst wichtig, außer der Trockner
befindet sich an einem freien Platz mit guter
Luftzirkulation. Die erneute Zirkulation der feuchten Luft
verhindert einen effizienten Betrieb des Trockners.
Der Schlauch wird wie abgebildet an der Maschine
befestigt.
Der Schlauch kann durch eine Wand, offene Tür oder ein
offenes Fenster geführt werden. Der Schlauch hat einen
Durchmesser von 110 mm und eine Länge von 1,8 m.
Beim Installieren des Ablaufschlauchs sollten die
folgenden Hinweise beachtet werden.
●
Verwenden Sie keine zwei verbundenen Schläuche, da dies die Trocknerleistung
verringert.
37
40003475GER.qxd
08/07/2005
18:19
Page 38
●
Schränken Sie die Luftströmung durch den Schlauch nicht ein, z. B. durch Knicken
oder Anbringen eines Verbindungsstücks mit kleinerem Durchmesser zur
Befestigung an einer Wandöffnung.
●
Vermeiden Sie U-förmige Biegungen des Schlauchs, da dies die Luftströmung
einschränkt und die Gefahr erhöht, dass sich Wasser im Schlauch sammelt.
●
Überprüfen Sie den Schlauch regelmäßig, um angesammelte Flusen oder Wasser,
das sich darin gesammelt haben kann, zu entfernen.
Die folgenden Grafiken zeigen Beispiele für gute und schlechte Installationen.
Vorbereitung der Füllung
Bevor Sie den Trockner das erste Mal benutzen:
Überladen Sie die
Trommel nicht,
große Teile
können, wenn sie
nass sind, die
maximal zulässige
Wäscheladung
überschreiten
(zum Beispiel
Schlafsäcke,
Bettdecken).
38
●
Lesen Sie die Gebrauchsanleitung bitte sorgfältig
durch!
●
Entfernen Sie alle in der Trommel befindlichen
Gegenstände!
●
Wischen Sie die Innenseiten der Trommel und Tür
mit einem feuchten Tuch aus, um den beim
Transport eventuell dort angesammelten Staub zu
entfernen.
Vorbereitung der
Textilien
Vergewissern Sie sich anhand der Pflegeanleitungssymbole in jedem Wäschestück, dass die Wäsche, die Sie
trocknen wollen, für eine Trocknung im Trockner
geeignet ist.
Überprüfen Sie, ob alle Verschlüsse zu und die Taschen
entleert sind. Wenden Sie die Innenseiten der Textilien
nach außen. Füllen Sie die Kleidungsstücke locker in die
Trommel, so dass diese sich nicht verheddern.
40003475GER.qxd
08/07/2005
18:19
Page 39
Maximales
Fassungsvermögen
(Trockengewicht)
●
Baumwolle max. 6 kg
●
Synthetische Stoffe max. 3 kg
Sortieren Sie die Füllung
folgendermaßen:
●
Anhand der Pflegeanleitungssymbole
Diese finden Sie am Kragen oder der
Sauminnenseite:
Für Trockner geeignet.
Im Trockner bei hoher Temperatur.
Im Trockner nur bei geringer Temperatur.
Nicht für den Trockner geeignet.
Falls ein Wäschestück keine Pflegeanleitung
hat, muss angenommen werden, dass es nicht
für das Trocknen im Trockner geeignet ist.
●
Nach Menge und Volumen
Ist die Füllmenge größer als das
Fassungsvermögen des Trockners, sortieren Sie die
Wäsche nach Stoffdicke (trennen Sie z.B.
Handtücher von dünner Unterwäsche).
●
Nach Stoffart
Baumwolle/Leinen: Handtücher, Baumwolljersey,
Bett- und Tischwäsche.
Textilien aus Kunstfaser: Blusen, Hemden,
Overalls, usw. aus Polyester oder Polyamid und
auch Baumwoll/Synthetikgemische.
●
Nach Trocknungsgrad
Sortieren Sie nach: Bügelfeucht, Schranktrocken,
usw. Für empfindliche Textilien drücken Sie zur
Wahl einer niedrigeren Trocknungstemperatur
den Knopf
.
39
40003475GER.qxd
08/07/2005
18:19
Page 40
Tipps zum Trocknen
WICHTIG:
Kleidungsstücke,
die mit einem
chemischen
Reinigungsmittel
behandelt worden
sind, oder
Gummibekleidung
dürfen nicht im
Wäschetrockner
getrocknet werden
(Brand- oder
Explosionsgefahr).
Nicht für den Trockner
geeignet:
Wollsachen, Seide, empfindliche Stoffe, Nylonstrümpfe,
gewirkte Textilien, Stoffe mit Metall-Dekor, Kleidungsstücke mit PVC- oder Lederbesatz, Trainingsschuhe,
voluminöse Wäschestücke wie Schlafsäcke usw.
Energiesparen
Füllen Sie nur gründlich ausgewrungene oder
geschleuderte Wäsche in den Trockner. Je trockener die
Wäsche, desto kürzer ist die Trocknungszeit, was sich
energiesparend auswirkt.
IMMER
Während der
letzten 15 Minuten
des Programms
wird die Wäsche
im kalten
Luftstrom
abgekühlt.
40
●
Es ist wirtschaftlicher, IMMER die maximale
Füllmenge zu trocknen.
●
Kontrollieren Sie IMMER vor jedem
Trocknungsvorgang, ob das Sieb sauber ist.
NIE
●
Überschreiten Sie NIE die maximale Füllmenge,
denn dies ist zeitaufwendig und
Energieverschwendung.
●
Füllen Sie AUF KEINEN FALL tropfnasse
Kleidungsstücke in den Wäschetrockner; dies kann
zu Schäden am Gerät führen.
40003475GER.qxd
08/07/2005
18:19
Page 41
Schalterblende und
Anzeigen
TASTE
ACRYL/SYNTHETIKWÄSCHE
TASTE ‘EIN’
FLUSENSIEBANZEIGE
TROCKNUNGSZEITWÄHLER
Schalterblende: Kontroll- und
Lichtanzeige
Schaltknopf und Anzeige ‘EIN’
– zum Anstellen drücken. Die Anzeige leuchtet auf.
Schaltknopf ‘ACRYL/SYNTHETIKWÄSCHE’
– drücken Sie den Knopf, um eine
niedrigere Temperatur für empfindliche Textilien einzustellen. Drücken Sie den Knopf
erneut, um wieder eine höhere Temperatur einzustellen.
HOHE Temperaturstufe
NIEDRIGE Temperaturstufe
Wählschalter ‘TROCKNUNGSZEIT’ – für die Wahl der Trocknungszeit oder die Option
’Schnellbügeln’
.
‘FLUSENSIEB’-Anzeige
– leuchtet auf, wenn das Sieb gereinigt werden muss.
41
40003475GER.qxd
08/07/2005
18:19
Page 42
Tür und Sieb
Öffnen der Tür
Ziehen Sie am Griff, um die Tür zu öffnen.
Um den Trocknungsvorgang wieder in Gang zu setzen,
schließen Sie die Tür und drücken
.
WARNUNG!
Während des Trocknungsvorgangs
können Trommel und Tür SEHR HEISS
werden.
Sieb
WICHTIG: Damit der Wäschetrockner immer optimale
Leistung erbringen kann, überprüfen Sie vor jedem
Trocknungsvorgang, ob das Flusensieb sauber ist.
1.
Ziehen Sie das Sieb nach oben.
2.
Öffnen Sie das Sieb wie auf der Abbildung.
3.
Entfernen Sie die Flusen sanft mit einer weichen
Bürste oder den Fingerspitzen.
4.
Klappen Sie das Sieb zusammen und setzen Sie es
wieder an seinen Platz ein.
Flusensieb-Anzeige
die Anzeige leuchtet auf, wenn das Sieb gesäubert
werden muss.
Wenn die Wäsche nicht trocknet, kontrollieren Sie, ob
das Sieb verstopft ist. Die Anzeige leuchtet auch auf,
wenn der Abluftschlauch blockiert oder abgeknickt ist.
42
40003475GER.qxd
08/07/2005
18:19
Page 43
Betrieb
Sehen Sie in der Tabelle mit den Trocknungswerten oder
auf den Etiketten nach, um das geeignetste Programm
auszuwählen.
●
Öffnen Sie die Tür, und füllen Sie die Wäsche in
die Trommel. Achten Sie darauf, dass keine
Kleidungsstücke von der Tür eingeklemmt werden.
●
Wenn Sie empfindliche Wäschestücke trocknen,
drücken Sie zur Einstellung einer niedrigeren
Temperatur den Schaltknopf
. Drücken Sie
den Knopf nach dem Trocknungsvorgang erneut,
um eine höhere Temperatur einzustellen.
HOHE Temperaturstufe
NIEDRIGE Temperaturstufe
●
Drehen Sie den Wählschalter ‘TROCKNUNGSZEIT’,
bis die gewünschte Trockenzeit mit dem
Drehschalter übereinstimmt.
●
Das Programm
ermöglicht eine Form- und
Knitterschutz-Funktion. Der Trockner erhitzt die
Füllung für die Dauer von 8 Minuten, worauf eine
Abkühlphase von 2 Minuten folgt, was insbesondere
für Kleidungsstücke von Vorteil ist, die
normalerweise einige Zeit vor dem Bügeln, z.B. in
einem Wäschekorb, abgelegt werden. Kleidungsstücke können auch hart werden, wenn sie draußen
an der Luft auf einer Wäscheleine oder in der
Wohnung über Heizungen getrocknet werden.
Dieses Verfahren lockert die Liegefalten im Stoff,
wodurch er sich schneller und leichter bügeln lässt.
●
Schließen Sie die Tür mit einem sanften Druck, bis
Sie ein ‘Klick’-Geräusch hören.
●
Drücken Sie den
-Knopf. Die Anzeige leuchtet
auf und der Trocknungsvorgang beginnt.
●
Die Wäsche trocknet, während sie sich in der
thermostatisch kontrollierten Warmluft dreht. Um
die Knitterbildung zu reduzieren und die Wäsche
abzukühlen, wird die Wäsche in den letzten
15 Minuten im kalten Luftstrom
in der
Trommel gedreht.
●
Wenn das Programm vollständig beendet ist, stoppt
die Trommel und der Drehschalter zeigt auf 0.
●
Öffnen Sie die Tür und nehmen Sie die Wäsche
heraus.
●
Reinigen Sie das Sieb nach jedem
Trocknungsvorgang, um die maximale Funktion
des Trockners sicherzustellen.
WARNUNG!
Trommel, Tür und
die Wäsche selbst
können sehr heiß
sein.
43
40003475GER.qxd
08/07/2005
18:19
Page 44
Reinigung und Routinewartungen
WICHTIG
Schalten Sie immer
das Gerät aus und
ziehen Sie den
Stecker aus der
Steckdose, bevor
das Gerät gereinigt
wird.
Reinigung des Trockners
●
Reinigen Sie das Sieb nach jedem
Trocknungsvorgang.
●
Wischen Sie nach jeder Anwendungsphase die
Innenseite der Trommel aus und lassen Sie die Tür
einige Zeit offen stehen, damit sie durch die
Luftzirkulation getrocknet wird.
●
Reinigen Sie die Außenseite der Maschine und der
Tür mit einem weichen Tuch.
●
AUF KEINEN FALL Scheuerschwämme oder
Scheuermittel benutzen.
●
Um ein Verkleben der Tür oder ein Ansammeln
von Flusen zu vermeiden, sollten Sie die Innentür
und die Türdichtung regelmäßig mit einem
feuchten Tuch reinigen.
Technische Daten
Die elektrischen
Daten befinden
sich auf dem
Betriebstypenschild
an der Vorderseite
des Trockners (bei
offener Tür).
44
Trommelinhalt
115 Liter
Maximales Fassungsvermögen
6 kg
Höhe
85 cm
Breite
60 cm
Tiefe
60 cm
Energieeffizienzklasse
C
40003475GER.qxd
08/07/2005
18:19
Page 45
Fehlersuche
Mögliche Gründe für...
Fehler, die Sie selbst beheben können
Prüfen Sie alle Punkte in der folgenden Checkliste, bevor Sie sich an den GIAS-Service
wenden. Sollte die Waschmaschine funktionstüchtig sein oder unsachgemäß installiert
oder verwendet worden sein, wird Ihnen der Besuch des Kundendiensttechnikers in
Rechnung gestellt. Wenn das Problem weiterhin besteht, nachdem Sie die Checkliste
durchgegangen sind, wenden Sie sich bitte an den GIAS-Service, der Ihnen evtl.
telefonisch weiterhelfen kann.
Die Trocknungszeit ist zu lang/die Textilien sind nicht
trocken genug…
●
Haben Sie die richtige Trocknungszeit/das richtige Programm gewählt?
●
Waren die Textilien zu nass? Wurden die Textilien sorgfältig ausgewrungen oder
geschleudert?
●
Muss das Sieb gereinigt werden?
●
Ist der Trockner überladen?
●
Ist der Abluftschlauch abgeknickt oder blockiert?
●
Ist die Taste
noch von einem früher gewählten Programm gedrückt?
Der Trockner funktioniert nicht…
●
Ist der elektrische Netzanschluss für den Trockner in Ordnung? Kontrollieren Sie
diesen mit einem anderen Gerät, wie z.B. einer Tischlampe.
●
Befindet sich der Stecker korrekt in der Steckdose?
●
Gibt es einen Stromausfall?
●
Ist die Sicherung herausgesprungen?
●
Ist die Tür richtig geschlossen?
●
Ist der Trockner sowohl am Netzanschluss als auch an der Maschine angestellt?
●
Ist die Trocknungszeit oder das Programm gewählt worden?
●
Ist die Maschine nach dem Türöffnen wieder angestellt worden?
Der Trockner ist zu laut…
●
Schalten Sie den Trockner aus und wenden Sie sich an den GIAS-Service.
Die Flusensieb-Anzeige leuchtet…
●
Muss das Sieb gereinigt werden?
●
Ist der Abluftschlauch abgeknickt oder blockiert?
45
40003475GER.qxd
08/07/2005
18:19
Page 46
Kundendienst
Sollten trotz obengenannter Kontrollen weiterhin
Störungen bei Ihrem Trockner auftreten, wenden Sie
sich bitte an den GIAS-Service, der Sie beraten kann. Der
Kundendienst kann Sie möglicherweise telefonisch
beraten oder mit Ihnen einen geeigneten Termin für
einem Techniker im Rahmen der Garantie vereinbaren.
Ihnen wird jedoch eventuell eine Gebühr berechnet,
wenn sich herausstellt, dass Ihre Maschine:
●
funktionsfähig ist.
●
nicht gemäß der Installationsanweisung installiert
worden ist.
●
unsachgemäß benutzt wurde.
Ersatzteile
Verwenden Sie immer Original-Ersatzteile, die Sie direkt
beim GIAS-Service erhalten.
GIAS-Service
Wenden Sie sich für Wartungs- und Reparaturarbeiten
an Ihren GIAS-Servicetechniker.
Der Hersteller übernimmt keine Verantwortung für
etwaige Druckfehler in dieser Bedienungsanleitung. Der
Hersteller behält sich das Recht vor, seine Produkte ggf.
anzupassen, ohne wesentliche Eigenschaften zu
verändern.
46
40003475DUT.qxd
08/07/2005
18:20
Page 47
Inleiding. . . . . . . . . . . . . . . . . . . . . . . . . . . . . . . . . . . . . . . . . . . . . . . . . . . 48
Afleveringsinformatie . . . . . . . . . . . . . . . . . . . . . . . . . . . . . . . . . . . . . . . . . . . 48
Uitpakken van het product . . . . . . . . . . . . . . . . . . . . . . . . . . . . . 48
Veiligheidsaanwijzingen . . . . . . . . . . . . . . . . . . . . . . . . . . . . . . . . 49
Installatie . . .
Gebruik . . . .
De was . . . . .
Het milieu . .
GIAS-Service .
.
.
.
.
.
.
.
.
.
.
.
.
.
.
.
.
.
.
.
.
.
.
.
.
.
.
.
.
.
.
.
.
.
.
.
.
.
.
.
.
.
.
.
.
.
.
.
.
.
.
.
.
.
.
.
.
.
.
.
.
.
.
.
.
.
.
.
.
.
.
.
.
.
.
.
.
.
.
.
.
.
.
.
.
.
.
.
.
.
.
.
.
.
.
.
.
.
.
.
.
.
.
.
.
.
.
.
.
.
.
.
.
.
.
.
.
.
.
.
.
.
.
.
.
.
.
.
.
.
.
.
.
.
.
.
.
.
.
.
.
.
.
.
.
.
.
.
.
.
.
.
.
.
.
.
.
.
.
.
.
.
.
.
.
.
.
.
.
.
.
.
.
.
.
.
.
.
.
.
.
.
.
.
.
.
.
.
.
.
.
.
.
.
.
.
.
.
.
.
.
.
.
.
.
.
.
.
.
.
.
.
.
.
.
.
.
.
.
.
.
.
.
.
.
.
.
.
.
.
.
.
.
.
.
.
.
.
.
.
.
.
.
.
.
.
.
.
.
.
.
49
49
49
50
50
Installatie . . . . . . . . . . . . . . . . . . . . . . . . . . . . . . . . . . . . . . . . . . . . . . . . . 51
Elektrische vereisten . . . . . . . . . . . . . . . . . . . . . . . . . . . . . . . . . . . . . . . . . . . . 51
De voeten verstellen . . . . . . . . . . . . . . . . . . . . . . . . . . . . . . . . . . . . . . . . . . . . 51
Ventilatie. . . . . . . . . . . . . . . . . . . . . . . . . . . . . . . . . . . . . . . . . . . . . . . . . . 52
Installatie van de afvoerslang . . . . . . . . . . . . . . . . . . . . . . . . . . . . . . . . . . . . . 52
Het wasgoed voorbereiden . . . . . . . . . . . . . . . . . . . . . . . . . . . . . 53
Voorbereiding van de kleren . . . . . . . . . . . . . . . . . . . . . . . . . . . . . . . . . . . . . . 53
Sorteren van het wasgoed. . . . . . . . . . . . . . . . . . . . . . . . . . . . . . . . . . . . . . . . 54
Droogadvies . . . . . . . . . . . . . . . . . . . . . . . . . . . . . . . . . . . . . . . . . . . . . . 55
Niet in de droogtrommel doen . . . . . . . . . . . . . . . . . . . . . . . . . . . . . . . . . . . 55
Energie besparen . . . . . . . . . . . . . . . . . . . . . . . . . . . . . . . . . . . . . . . . . . . . . . 55
Bedieningsknoppen & indicatielampjes. . . . . . . . . . . . . . . . 56
Deur en filter . . . . . . . . . . . . . . . . . . . . . . . . . . . . . . . . . . . . . . . . . . . . . 57
De deur openen . . . . . . . . . . . . . . . . . . . . . . . . . . . . . . . . . . . . . . . . . . . . . . . . 57
Filter. . . . . . . . . . . . . . . . . . . . . . . . . . . . . . . . . . . . . . . . . . . . . . . . . . . . . . . . . 57
Filter Schoonmaken Indicatielampje . . . . . . . . . . . . . . . . . . . . . . . . . . . . . . . . 57
Bediening . . . . . . . . . . . . . . . . . . . . . . . . . . . . . . . . . . . . . . . . . . . . . . . . . 58
Schoonmaken en Onderhoudsbeurten . . . . . . . . . . . . . . . . 59
Schoonmaken van de droger. . . . . . . . . . . . . . . . . . . . . . . . . . . . . . . . . . . . . . 59
Technische specificaties . . . . . . . . . . . . . . . . . . . . . . . . . . . . . . . . . . . . . . . . . . 59
Storingen . . . . . . . . . . . . . . . . . . . . . . . . . . . . . . . . . . . . . . . . . . . . . . . . . 60
Klantenservice . . . . . . . . . . . . . . . . . . . . . . . . . . . . . . . . . . . . . . . . . . . . 61
Reserveonderdelen . . . . . . . . . . . . . . . . . . . . . . . . . . . . . . . . . . . . . . . . . . . . . 61
GIAS-Service . . . . . . . . . . . . . . . . . . . . . . . . . . . . . . . . . . . . . . . . . . . . . . . . . . . 61
47
40003475DUT.qxd
08/07/2005
18:20
Page 48
Inleiding
Controleer of de
machine schade
heeft opgelopen
tijdens het vervoer.
Indien dit het geval
is, neem dan contact
op met GIAS.
Als u de
bovenstaande
aanwijzingen niet
opvolgt, kan de
veiligheid van de
machine niet worden
gegarandeerd. Indien
het probleem met
uw machine wordt
veroorzaakt door
misbruik, kunnen de
kosten van de
onderhoudsbeurt aan
u worden
doorberekend.
Lees deze instructies zorgvuldig door en gebruik deze
machine op basis van deze aanwijzingen. Dit boekje
geeft u naast belangrijke richtlijnen voor het veilige
gebruik de veilige installatie en het veilige onderhoud
van de machine ook enkele nuttige tips over hoe u de
beste resultaten bekomt wanneer u met deze machine
wast.
Bewaar alle documentatie op een veilige plek zodat u
of de toekomstige eigenaars van de machine ze in de
toekomst opnieuw kunnen raadplegen
Afleveringsinformatie
Controleer dat de volgende items samen met de
wasmachine werden geleverd:
●
Handleiding
●
Garantiekaart
●
Luchtafvoer en instructies
●
Energiekeurmerk
Uitpakken van het product
Verwijder de machine uit de verpakking op de plek
waar u de machine wilt plaatsen.
1.
Snij voorzichtig rond de voet van de verpakking
en langs een hoek omhoog.
2.
Verwijder de hoes van polyethyleen en til de
droger van de polystyrene voet.
Gooi de verpakking veilig weg. Zorg dat de
verpakking buiten bereik van kinderen blijft,
het vormt een potentieel gevaar.
48
40003475DUT.qxd
12/12/2005
18:58
Page 49
Veiligheidsaanwijzingen
Installatie
●
●
●
●
Controleer het apparaat op zichtbare beschadigingen vooraleer u het gebruikt.
Gebruik het niet als het beschadigd is maar neem contact op met GIAS-Service.
Gebruik geen adapters, meervoudige stekkers en/of verlengsnoeren.
Dit apparaat mag niet worden geïnstalleerd in een badkamer of douchekamer.
Installeer de droger nooit tegen gordijnen aan en zorg ervoor dat er geen
artikelen achter de droger kunnen vallen en zich daar kunnen ophopen.
Gebruik
●
●
●
●
●
●
●
●
●
●
●
●
WAARSCHUWING Misbruik van een droogtrommel kan brand veroorzaken.
Deze machine is alleen voor huishoudelijk gebruik, m.a.w. voor het drogen van
huishoudelijk textiel en kleding.
Dit apparaat mag uitsluitend gebruikt worden voor het doel waarvoor het
vervaardigd is, zoals dat in deze handleiding beschreven wordt. Verzeker u ervan
dat u de instructies voor de installatie en het gebruik volledig begrijpt voordat u
de machine gebruikt.
Raak de machine niet aan als uw handen of voeten nat of vochtig zijn.
Leun niet tegen de deur als u de machine laadt en gebruik de deur niet om de
machine op te tillen of te verplaatsen.
Sta niet toe dat kinderen met de machine of de bediening ervan spelen.
WAARSCHUWING Gebruik het apparaat niet als de pluizenfilter niet geplaatst of
beschadigd is; pluis kan ontbranden.
WAARSCHUWING Op de plaats van het symbool voor warm oppervlak
kan de
temperatuur tijdens het drogen tot meer dan 60 graden C stijgen.
Haal de stekker uit het stopcontact. Haal altijd de stekker uit het stopcontact
voordat u de machine schoonmaakt.
Blijf deze machine niet gebruiken als ze een gebrek lijkt te hebben.
Pluizen of dons mogen zich niet op de grond rondom de buitenkant van de
machine ophopen.
De trommel kan vanbinnen erg heet worden. Wacht altijd met het uithalen van
het wasgoed tot de afkoelingsperiode van de droger voorbij is.
De was
●
●
●
●
WAARSCHUWING Geen stoffen in de droogtrommel doen die met chemische
reinigingsvloeistoffen zijn behandeld.
WAARSCHUWING Materialen uit schuimrubber kunnen onder bepaalde
omstandigheden, wanneer ze verhit worden, spontaan ontbranden. Schuimplastic,
schuimrubber en rubberachtige materialen zijn niet geschikt om in de
droogtrommel gedroogd te worden. Artikelen die van deze materialen gemaakt
zijn MOGEN NIET in de droger gestopt worden.
Bekijk altijd de wasvoorschriften op het wasgoed om te controleren of u het in de
droger mag drogen.
Kleren moeten gecentrifugeerd of grondig uitgewrongen worden, voordat zij in
de droogtrommel gestopt worden. Druipnatte kleren mogen NIET in de droger
49
40003475DUT.qxd
●
●
●
12/12/2005
18:59
Page 50
gestopt worden.
Aanstekers en lucifers mogen niet in zakken blijven zitten en gebruik NOOIT
ontvlambare vloeistoffen in de buurt van het apparaat.
Glasvezelgordijnen mogen NOOIT in dit apparaat worden gestopt. Er kunnen zich
huidirritaties voordoen als andere kledingstukken met de glasvezels in aanraking
geweest zijn.
Kledingstukken die behandeld of vervuild zijn met brandbare
schoonmaakmiddelen of producten zoals benzine, bakolie of aërosols, MOGEN
NIET in deze machine gedroogd worden.
Het milieu
●
●
Alle verpakkingsmaterialen zijn milieuvriendelijk en recycleerbaar. Doe de
verpakkingsmaterialen op een milieuvriendelijke manier van de hand. Uw
gemeente kan u informeren over de beste manier om deze materialen weg te
ruimen.
Wanneer u een oude wasmachine van de hand doet, moet u voor alle veiligheid
de stekker uit het stopcontact halen, het stroomsnoer afknippen en dit samen met
de stekker vernietigen. Om te voorkomen dat kinderen zichzelf in de machine
opsluiten, breekt u de scharnieren of het slot van de deur.
GIAS-Service
●
Om te zorgen voor een continue veilige en efficiënte werking van dit apparaat,
bevelen wij aan dat servicing of reparaties alleen worden uitgevoerd door een
bevoegde GIAS onderhoudsmonteur.
Europese richtlijn 2002/96/EC
Dit apparaat voldoet aan de Europese richtlijnen 2002/96/EC voor elektrische en
elektronische afval.
Door dit apparaat correct te verwijderen, helpt u het
potentiële negatieve gevolg voor de omgeving en menselijke
gezondheid te voorkomen, welke anders door onjuiste
verwijdering zou kunnen worden veroorzaakt.
Het symbool op het product duidt aan dat dit product niet
behandeld zal worden als huishuidelijk afval. In plaats
daarvan zal het apparaat naar het verzamelpunt voor de
recycling van elektrische en elektronische uitrusting gaan.
De verwijdering moet in overeenstemming met plaatselijke
milieuvoorschriften voor afvalverwerking uitgevoerd worden.
Voor meer gedetailleerde informatie over de verwijderingvan
dit product, neemt u contact op met uw gemeenlijke
reinigingsdienst of de dealer waar u het apparaat heeft
gekocht.
Als de machine niet correct functioneert of kapot gaat, schakel
het dan uit en haal de stekker uit het stopcontact. Wendt u tot
GIAS-Service voor reparaties.
50
40003475DUT.qxd
08/07/2005
18:20
Page 51
Installatie
Elektrische vereisten
Drogers worden geleverd om te kunnen werken op een
voltage van 230-240V, 50 Hz monophase. Controleer of
het voedingscircuit ten minste 10A bedraagt.
Elektriciteit kan erg gevaarlijk zijn.
Deze machine moet geaard zijn.
Het stopcontact en de stekker van de machine moeten
van hetzelfde soort zijn.
Gebruik geen meervoudige adapters en/of
verlengsnoeren.
Indien het
probleem met uw
machine wordt
veroorzaakt door
een verkeerde
installatie, kunnen
de kosten van de
onderhoudsbeurt
aan u worden
doorberekend.
Nadat het apparaat is geïnstalleerd, moet de stekker
bereikbaar blijven om uit het stopcontact te halen.
De draden in het stroomsnoer hebben de volgende
kleuren:
Blauw
NEUTRAAL
Bruin
ONDER STROOM
Groen en Geel
AARDVERBINDING
CE apparaat voldoet aan de Europese richtlijn
89/336/EEC, 73/23/EEC en volgende aanvullingen.
Sluit de machine niet aan en start deze
niet voordat de installatie is voltooid.
Voor uw veiligheid moet deze droger op
de juiste manier worden geïnstalleerd.
Als er ook maar enige twijfel bestaat over
de installatie, bel dan de GIAS-Service
voor advies.
Als de stroomkabel
van het toestel
beschadigd is, dan
moet hij vervangen
worden door een
speciaal snoer dat
ALLEEN bij
servicedienst van
GIAS verkrijgbaar
is. De kabel moet
door een bekwaam
persoon worden
geïnstalleerd.
De voeten verstellen
Als de machine is geplaatst, moeten de voeten worden
versteld zodat de machine waterpas staat.
Verstel de vier voeten zodat de machine stevig en
waterpas staat.
51
40003475DUT.qxd
08/07/2005
18:20
Page 52
Ventilatie
Er moet voldoende ventilatie zijn in de kamer waar de
droger staat om te voorkomen dat de dat gassen van
andere apparaten die brandstof verbranden, waaronder
een open haard, de kamer in worden gezogen als de
droger wordt gebruikt.
●
Afzuiglucht mag niet in een via een afvoer
waarlangs uitlaatstoffen van mechanismen die gas
of andere brandstoffen verbranden, worden
afgevoerd.
●
Controleer regelmatig dat de lucht die door de
droger stroomt, niet geblokkeerd wordt.
●
Controleer na gebruik de pluizenfilter en maak
die indien nodig schoon.
●
De aanvoeren en afvoeren moeten vrij gehouden
worden van obstructies. Om te zorgen voor
voldoende ventilatie moet de ruimte tussen de
onderkant van de machine en de vloer vrij blijven.
Er moet een opening van ten minste 12 mm zijn
tussen de machine en enig obstakel.
●
Voorkom dat artikelen achter de droger vallen of
zich daar ophopen omdat deze de luchtaanvoer
en afvoer kunnen belemmeren.
●
Installeer de droger NOOIT tegen gordijnen aan.
Installatie van de
afvoerslang
Het is essentieel om een ontluchtingsslang te gebruiken
voor de afvoer van de vochtige lucht van de droger,
tenzij de droger op een open plek staat met voldoende
ruimte voor luchtcirculatie. De hercirculatie van de
vochtige lucht zal de efficiënte werking van de droger
verhinderen.
De slang wordt zoals afgebeeld op de machine
gemonteerd.
De slang kan door een muur of door een open deur of
raam worden gelegd. De slang heeft een diameter van
110 mm en kan tot 1,8 meter uitgerekt worden.
De volgende richtlijnen dienen opgevolgd te worden bij
het installeren van de afvoerslang.
●
52
Gebruik geen twee aaneengesloten slangen.
Hierdoor zullen de droogprestaties minder
worden.
40003475DUT.qxd
08/07/2005
18:20
Page 53
●
Blokkeer de luchttoevoer via de slang niet, bijvoorbeeld door de slang te knikken
of door een verbinding met een kleinere diameter te plaatsen op een opening in
de muur.
●
Zorg ervoor dat de slang geen U-bochten maakt. Dit zal de luchtdoorvoer
verminderen en de kans dat er water in de slang komt vergroten.
●
Controleer de slang regelmatig en verwijder de opbouw van pluizen of water die
zich in de slang kunnen ophopen.
De volgende tekeningen laten voorbeelden zien van goede en slechte installaties.
Het wasgoed voorbereiden
Alvorens de droogtrommel voor de eerste keer te gebruiken:
●
Lees deze handleiding a.u.b. aandachtig door.
●
Verwijder alle artikelen die in de trommel zijn gepakt.
●
Veeg de binnenkant van de trommel en de deur met een vochtige doek af om alle
stof te verwijderen dat zich tijdens het vervoer kan hebben verzameld.
Voorbereiding van de
kleren
Zorg ervoor dat het wasgoed dat u wilt drogen, geschikt
is voor het drogen in een droogtrommel, zoals wordt
aangegeven door de wasvoorschriften op ieder artikel.
Controleer dat alle sluitingen dicht zijn en dat de zakken
leeg zijn. Keer de kleren binnenstebuiten. Leg de kleren
losjes in de trommel om ervoor te zorgen dat ze niet in
elkaar verward raken.
Overlaadt de
trommel niet.
Grote stukken
kunnen wanneer
ze nat zijn de
maximaal
toegelaten
waslading
overschrijden
(bijvoorbeeld:
slaapzakken,
donsdekens).
53
40003475DUT.qxd
08/07/2005
18:20
Page 54
Maximaal te drogen
gewicht
●
Katoen Max. 6 kg
●
Synthetische stoffen Max. 3 kg
Sorteer het wasgoed als
volgt:
●
Op wasvoorschrift
Deze vindt u in de kraag of in de binnennaad:
Kan in de droogtrommel gedroogd worden.
Drogen in de droogtrommel op hoge
temperatuur.
Drogen in de droogtrommel alleen op lage
temperatuur.
Niet in de droogtrommel drogen.
Als de stof geen wasvoorschrift heeft, kunt u
er van uitgaan dat het niet geschikt is voor
de droogtrommel.
●
Op hoeveelheid en dikte
Altijd wanneer de hoeveelheid wasgoed groter is
dan de capaciteit van de droger, sorteer de kleren
op dikte (b.v. handdoeken apart van dun
ondergoed).
●
Op type stof
Katoen/linnen: Handdoeken, jersey katoen, beden tafellinnen.
Synthetische stoffen: Blouses, overhemden,
overalls, enz. gemaakt van polyester of
polyamide, evenals voor gemengd
katoen/synthetisch.
●
54
Op de temperatuur van het drogen
Sorteer op: strijkdroog, kastdroog, enz. Voor fijn
goed druk op de
-knop om een lage
droogtemperatuur in te stellen.
40003475DUT.qxd
08/07/2005
18:20
Page 55
Droogadvies
Niet in de droogtrommel
drogen:
Wol, zijde, fijn goed, nylon kousen, fijn borduurwerk,
stoffen met metalen versieringen, kledingstukken met
pvc of leren randen, trainingsschoenen, artikelen met
een groot volume zoals slaapzakken, enz.
Energiebesparing
Stop alleen wasgoed in de droogtrommel dat grondig is
uitgewrongen of gecentrifugeerd. Hoe droger het
wasgoed, hoe korter de droogtijd waardoor elektriciteit
wordt bespaard.
BELANGRIJK: Stop
geen artikelen in
de droogtrommel,
die zijn behandeld
met een chemische
reinigingsvloeistof
en ook geen
rubber kleren
(gevaar voor brand
of explosie).
ALTIJD
●
●
Probeer altijd om het maximale gewicht aan
wasgoed te drogen, zo bespaart u tijd en
elektriciteit.
Controleer altijd voor iedere droogcyclus of de
filter schoon is.
NOOIT
●
Stop nooit meer dan het maximale gewicht in de
droger, dit is verspilling van tijd en elektriciteit.
●
Stop nooit druipnat wasgoed in de
droogtrommel, dit kan het apparaat beschadigen.
Gedurende de
laatste 15 minuten
draait de was altijd
in koude lucht.
55
40003475DUT.qxd
08/07/2005
18:20
Page 56
Bedieningsknoppen en
indicatielampjes
ACRYL/SYNTHETISCH-KNOP
AAN-KNOP
FILTER
SCHOONMAKEN
INDICATIELAMPJE
DROOGTIJD KNOP
Bedieningspaneel en indicatielampjes
‘AAN’ knop en indicatielampje
indicatielampje zal aangaan.
– hierop drukken om aan te zetten, het
‘ACRYL/SYNTHETISCHE STOFFEN’ knop
– indrukken om de lage temperatuur voor
fijn goed te kiezen, weer indrukken om een hoge temperatuur te selecteren.
HOGE Temperatuurinstelling
LAGE Temperatuurinstelling
‘DROOGTIJD’-schakelaar
strijken.
– hiermee selecteert u de droogtijd voor de optie Snel
‘FILTER SCHOONMAKEN’ indicatielampje
moet worden.
56
– brandt wanneer de filter schoongemaakt
40003475DUT.qxd
08/07/2005
18:20
Page 57
Deur en filter
De deur openen
Trek aan de hendel om de deur te openen.
Om de droger opnieuw te starten, doet u de deur dicht
en drukt u op
.
WAARSCHUWING!
Wanneer de droger in gebruik is,
kunnen de trommel en de deur ERG
warm worden.
Filter
BELANGRIJK: Controleer, om ervoor te zorgen dat de
droger efficiënt blijft werken, voor iedere droogcyclus
of de pluizenfilter schoon is.
1.
Trek de filter omhoog.
2.
Open de filter zoals getoond wordt.
3.
Haal de pluizen met een zacht borsteltje of met
uw vingertoppen voorzichtig weg.
4.
Klik de filter samen en duw hem terug op zijn
plaats.
Filter Schoonmaken
Indicatielampje
brandt wanneer het filter schoongemaakt moet
worden.
Als het wasgoed niet droog wordt, controleer dan of
de filter verstopt is. Het indicatielampje gaat ook aan
wanneer de ontluchtingsslang geblokkeerd is of
wanneer er kinken in zitten.
57
40003475DUT.qxd
08/07/2005
18:20
Page 58
Bediening
Zie de richtlijn voor het drogen of de wasvoorschriften
om het meest geschikte programma te kiezen.
●
Doe de deur open en laad de trommel met
wasgoed. Zorg ervoor dat de kledingstukken het
sluiten van de deur niet belemmeren.
●
Als u fijn goed wilt drogen druk dan op de
knop om de temperatuur te verlagen. Druk er na
afloop weer op om een hoge temperatuur te
kiezen.
HOGE Temperatuurinstelling
LAGE Temperatuurinstelling
●
Draai de ‘DROOGTIJD’-schakelaar totdat de
vereiste droogtijd overeenkomt met de
keuzeschakelaar.
●
Het
-programma verzorgt een verzorgings- en
anti-vouwfunctie. De droger zal gedurende
8 minuten het wasgoed verwarmen, gevolgd door
een afkoelingsperiode van 2 minuten en is vooral
goed voor kledingstukken die misschien enige tijd
voorafgaande aan het strijken zijn blijven liggen,
b.v. in een linnen mand. Het is eveneens mogelijk
dat er kledingstukken stijf zijn geworden toen ze
buiten aan de waslijn of binnen op een radiator
droogden. Dit proces verwijderd de vouwen in de
stof en maakt het strijken gemakkelijker en
sneller.
●
Doe de deur voorzichtig dicht waarbij u haar
langzaam aandrukt tot u ze hoort ‘dichtklikken’.
●
Druk op de
-knop. Het indicatielampje zal
branden en de droogcyclus begint.
●
Het wasgoed wordt gedroogd door in warme
lucht rond te draaien die door een thermostaat
wordt geregeld. Gedurende de laatste 15 minuten
wordt er koude lucht
gebruikt om het
kreuken te verminderen en het wasgoed te laten
afkoelen zodat u het beet kunt pakken.
●
Wanneer het programma helemaal klaar is, zal de
trommel ophouden met draaien en de
keuzeschakelaar zal naar de 0 wijzen.
●
Doe de deur open en haal de was eruit.
●
Maak de filter na iedere droogcyclus schoon om
te zorgen dat de efficiëntie van de droger
maximaal is.
WAARSCHUWING!
De trommel, de
deur en het
wasgoed kunnen
erg warm zijn.
58
40003475DUT.qxd
08/07/2005
18:20
Page 59
Schoonmaken en Onderhoudsbeurten
Schoonmaken van de
droger
●
Maak de filter na iedere droogcyclus schoon.
●
Veeg na iedere gebruiksperiode de binnenkant
van de trommel af en laat de deur een poosje
open zodat ze kan drogen door de circulatie van
de lucht.
●
Veeg de buitenkant van de machine en de deur af
met een zachte doek.
●
GEEN schuursponsjes of schoonmaakmiddelen
gebruiken.
●
Om te voorkomen dat de deur plakt of pluis zich
ophoopt, moet u de binnendeur regelmatig
schoonmaken met een natte doek.
Technische specificaties
Trommelcapaciteit
115 liter
Maximale lading
6 kg
Hoogte
85 cm
Breedte
60 cm
Diepte
60 cm
Energieniveaugroep
C
BELANGRIJK
Voor u dit
apparaat
schoonmaakt,
moet u het altijd
uitschakelen en de
stekker uit het
stopcontact halen.
De elektrische
gegevens vindt u
op het kwalificatieetiket op de
voorkant van de
droger (met de
deur open).
59
40003475DUT.qxd
08/07/2005
18:20
Page 60
Storingen
Wat zou de reden kunnen zijn voor…
Defecten die u zelf kunt oplossen
Voordat u de GIAS-Service voor technisch advies belt, kunt u de volgende controlelijst
afgaan. Er zullen kosten worden aangerekend als blijkt dat de machine werkt of dat de
machine niet juist werd geïnstalleerd of gebruikt. Als het probleem zich na de
aanbevolen controles nog steeds voordoet, belt u GIAS-Service, zodat zij u telefonisch
kunnen helpen.
De droogtijd is te lang/kleren zijn niet droog
genoeg…
●
Hebt u de juiste droogtijd/het juiste programma gekozen?
●
Waren de kleren te nat? Waren de kleren grondig uitgewrongen of
gecentrifugeerd?
●
Moet het filter schoongemaakt worden?
●
Is de droger te vol geladen?
●
Is de ontluchtingsslang geblokkeerd of zitten er kinken in?
●
Is de
-knop geselecteerd voor een voorgaande cyclus?
De droger werkt niet…
●
Staat er spanning op het elektriciteitssnoer van de droger? Controleer dit door het
met een ander apparaat te gebruiken, zoals een tafellamp.
●
Is de stekker op de juiste manier verbonden met de netspanning?
●
Is de stroom uitgevallen?
●
Is de zekering doorgeslagen?
●
Is de deur helemaal dicht?
●
Staat de droger aan, zowel bij de netspanning als bij de machine?
●
Is de droogtijd of het programma ingesteld?
●
Is de machine opnieuw ingeschakeld nadat de deur open is geweest?
De droger maakt herrie…
●
Schaker de droger uit en neem contact op met GIAS-Service voor advies.
Het indicatielampje Filter schoonmaken staat aan…
●
Moet het filter schoongemaakt worden?
●
Is de ontluchtingsslang geblokkeerd of zitten er kinken in?
60
40003475DUT.qxd
08/07/2005
18:20
Page 61
Klantenservice
Als er nog steeds een probleem mocht zijn met uw
droger nadat u alle aanbevolen controles hebt
uitgevoerd, bel dan a.u.b. de GIAS-Service voor advies.
Zij kunnen u misschien aan de telefoon helpen of
volgens de bepalingen van de garantie een afspraak
maken met een technicus die u komt opzoeken. Er
kunnen evenwel kosten in rekening worden gebracht
als een van de volgende punten op uw machine van
toepassing is:
●
De machine blijkt goed te werken.
●
Ze is niet geïnstalleerd volgens de
installatievoorschriften.
●
Ze is op een onjuiste manier gebruikt.
Reserveonderdelen
Gebruik altijd originele reserveonderdelen. Deze zijn
direct beschikbaar via GIAS-Service.
GIAS-Service
Voor onderhoud en reparaties belt u met uw locale
GIAS onderhoudsmonteur.
De fabrikant aanvaardt geen verantwoordelijkheid voor
drukfouten in dit boekje. De fabrikant behoudt ook het
recht voor om de producten waar nodig aan te passen
zonder de hoofdkenmerken te veranderen.
61
40003475PORT.qxd
08/07/2005
18:21
Page 62
Introdução . . . . . . . . . . . . . . . . . . . . . . . . . . . . . . . . . . . . . . . . . . . . . . . . 63
Informações de entrega. . . . . . . . . . . . . . . . . . . . . . . . . . . . . . . . . . . . . . . . . . 63
Desembalar o produto . . . . . . . . . . . . . . . . . . . . . . . . . . . . . . . . . . 63
Segurança . . . . . . . . . . . . . . . . . . . . . . . . . . . . . . . . . . . . . . . . . . . . . . . . . 64
Instalação . . . . . .
Utilização . . . . . .
Lavandaria . . . . .
Ambiente . . . . . .
Assistência GIAS .
.
.
.
.
.
.
.
.
.
.
.
.
.
.
.
.
.
.
.
.
.
.
.
.
.
.
.
.
.
.
.
.
.
.
.
.
.
.
.
.
.
.
.
.
.
.
.
.
.
.
.
.
.
.
.
.
.
.
.
.
.
.
.
.
.
.
.
.
.
.
.
.
.
.
.
.
.
.
.
.
.
.
.
.
.
.
.
.
.
.
.
.
.
.
.
.
.
.
.
.
.
.
.
.
.
.
.
.
.
.
.
.
.
.
.
.
.
.
.
.
.
.
.
.
.
.
.
.
.
.
.
.
.
.
.
.
.
.
.
.
.
.
.
.
.
.
.
.
.
.
.
.
.
.
.
.
.
.
.
.
.
.
.
.
.
.
.
.
.
.
.
.
.
.
.
.
.
.
.
.
.
.
.
.
.
.
.
.
.
.
.
.
.
.
.
.
.
.
.
.
.
.
.
.
.
.
.
.
.
.
.
.
.
.
.
.
.
.
.
.
.
.
.
.
.
.
.
.
.
.
.
.
.
.
.
64
64
64
65
65
Instalação . . . . . . . . . . . . . . . . . . . . . . . . . . . . . . . . . . . . . . . . . . . . . . . . . 66
Requisitos eléctricos . . . . . . . . . . . . . . . . . . . . . . . . . . . . . . . . . . . . . . . . . . . . . 66
Ajustar os pés. . . . . . . . . . . . . . . . . . . . . . . . . . . . . . . . . . . . . . . . . . . . . . . . . . 66
Ventilação . . . . . . . . . . . . . . . . . . . . . . . . . . . . . . . . . . . . . . . . . . . . . . . . . 67
Instalação da mangueira de descarga . . . . . . . . . . . . . . . . . . . . . . . . . . . . . . . 67
Preparação da carga . . . . . . . . . . . . . . . . . . . . . . . . . . . . . . . . . . . . . 68
Preparação da roupa . . . . . . . . . . . . . . . . . . . . . . . . . . . . . . . . . . . . . . . . . . . . 68
Separação da carga . . . . . . . . . . . . . . . . . . . . . . . . . . . . . . . . . . . . . . . . . . . . . 69
Conselhos para a secagem . . . . . . . . . . . . . . . . . . . . . . . . . . . . . . 70
Não pôr na máquina de secar. . . . . . . . . . . . . . . . . . . . . . . . . . . . . . . . . . . . . 70
Economia de energia . . . . . . . . . . . . . . . . . . . . . . . . . . . . . . . . . . . . . . . . . . . . 70
Controles e indicadores . . . . . . . . . . . . . . . . . . . . . . . . . . . . . . . . . 71
Porta e filtro . . . . . . . . . . . . . . . . . . . . . . . . . . . . . . . . . . . . . . . . . . . . . . 72
Abrir a porta . . . . . . . . . . . . . . . . . . . . . . . . . . . . . . . . . . . . . . . . . . . . . . . . . . 72
Filtro. . . . . . . . . . . . . . . . . . . . . . . . . . . . . . . . . . . . . . . . . . . . . . . . . . . . . . . . . 72
Indicador de estado do filtro . . . . . . . . . . . . . . . . . . . . . . . . . . . . . . . . . . . . . . 72
Funcionamento . . . . . . . . . . . . . . . . . . . . . . . . . . . . . . . . . . . . . . . . . . . 73
Limpeza e manutenção de rotina . . . . . . . . . . . . . . . . . . . . . . 74
Limpeza da máquina . . . . . . . . . . . . . . . . . . . . . . . . . . . . . . . . . . . . . . . . . . . . 74
Especificações técnicas . . . . . . . . . . . . . . . . . . . . . . . . . . . . . . . . . . . . . . . . . . . 74
Resolução de problemas . . . . . . . . . . . . . . . . . . . . . . . . . . . . . . . . 75
Serviço de clientes . . . . . . . . . . . . . . . . . . . . . . . . . . . . . . . . . . . . . . . 76
Peças sobressalentes. . . . . . . . . . . . . . . . . . . . . . . . . . . . . . . . . . . . . . . . . . . . . 76
Assistência GIAS . . . . . . . . . . . . . . . . . . . . . . . . . . . . . . . . . . . . . . . . . . . . . . . . 76
62
40003475PORT.qxd
08/07/2005
18:21
Page 63
Introdução
Leia e siga estas instruções cuidadosamente antes de
colocar a máquina a funcionar. Este manual fornece-lhe
instruções importantes para proceder em segurança à
utilização, instalação e manutenção, assim como
conselhos úteis para obter melhores resultados da
utilização da máquina.
Guarde todos os documentos num lugar seguro para
referência futura ou para ceder aos eventuais futuros
proprietários
Verifique se a
máquina não sofreu
qualquer tipo de
dano durante o
transporte. Caso
contrário, solicite a
assistência da GIAS.
Informações de entrega
Verifique se os seguintes artigos estão incluídos na
máquina:
●
Manual de instruções
●
Cartão de garantia
●
Kit de ventilação e instruções
●
Etiqueta de energia
A inobservância do
exposto
anteriormente pode
pôr em causa a
segurança da
máquina. Pode serlhe cobrada uma
visita da assistência
se o problema da
máquina se dever a
uma utilização
indevida.
Desembalar o produto
Retire a máquina da embalagem próximo do local final
de instalação da máquina.
1.
Corte cuidadosamente em redor da base da
embalagem e ascendentemente num canto.
2.
Retire a protecção de politeno e erga a máquina
de secar acima da base de poliestereno.
Descarte-se da embalagem em segurança.
Certifique-se de que está fora do alcance
de crianças, pois trata-se de uma fonte
potencial de perigo.
63
40003475PORT.qxd
12/12/2005
19:08
Page 64
Segurança
Instalação
●
●
●
●
Verifique se o produto não tem quaisquer sinais visíveis de danos antes da
utilização. Se estiver danificado, não o utilize e contacte a Assistência GIAS.
Não utilize adaptadores, vários conectores e/ou extensões.
Esta máquina não deve ser instalada numa casa de banho.
Nunca instale a máquina junto a cortinas e tenha o cuidado de evitar a queda ou
acumulação de objectos atrás da mesma.
Utilização
●
●
●
●
●
●
●
●
●
●
●
●
ATENÇÃO A má utilização de uma máquina de secar pode criar risco de incêndio.
Esta máquina destina-se apenas a uso doméstico, ou seja, para secar têxteis e
vestuário domésticos.
Esta máquina deve apenas ser utilizada para os fins para os quais foi concebida,
conforme descrito neste manual. Certifique-se de que compreende perfeitamente
as instruções de instalação e utilização antes de colocar a máquina em
funcionamento.
Não toque na máquina com as mãos ou pés húmidos ou molhados.
Não se apoie na porta ao carregar a máquina ou utilize a porta para erguer ou
mover a máquina.
Não permita que as crianças brinquem com a máquina ou os respectivos controlos.
ATENÇÃO Não utilize o produto se o filtro de cotão não estiver bem posicionado
ou se estiver danificado; o cotão é inflamável.
ATENÇÃO O aumento de temperatura durante o funcionamento da máquina de
secar pode exceder os 60 graus C, onde exista o símbolo de superfície quente
.
Retire a ficha da tomada de corrente eléctrica. Faça o mesmo antes de limpar a
máquina.
Não insista em utilizar a máquina, se lhe parecer que existe qualquer avaria.
Não deixe que se acumulem partículas de fibras e cotão em torno da máquina.
O interior do tambor pode estar muito quente. Antes de retirar a roupa, deixe
sempre a máquina de secar completar o período de arrefecimento.
Lavandaria
●
●
●
●
●
64
ATENÇÃO Não pôr na máquina de secar roupa tecidos tratados com produtos de
limpeza a seco.
ATENÇÃO Os materiais de borracha esponjosa podem, em certas circunstâncias, ser
inflamáveis por combustão espontânea quando aquecidos. Plástico esponjoso,
borracha esponjosa e materiais à base de borracha, não são apropriados para
secagem em máquina. Os artigos em cuja composição entrem estes materiais NÃO
PODEM ser colocados na máquina.
Consulte sempre as indicações das etiquetas de lavagem e secagem.
A roupa deve ser centrifugada ou bem torcida antes de ser colocada na máquina
de secar. NÃO deve pôr na máquina roupa ensopada e a pingar.
Não deixe isqueiros e fósforos nos bolsos e NUNCA utilize líquidos inflamáveis
40003475PORT.qxd
●
●
12/12/2005
19:09
Page 65
perto da máquina.
NUNCA deverá utilizar-se esta máquina para secar cortinas de fibra de vidro. Se
outras roupas forem contaminadas com estas fibras, podem provocar irritações na
pele.
As peças tratadas ou contaminadas com aerossóis ou líquidos de limpeza
inflamáveis, tais como petróleo, óleo de cozinha ou aerossóis NÃO PODEM ser
colocadas nesta máquina.
Ambiente
●
●
Todos os materiais de embalagem utilizados não são hostis ao ambiente e são
recicláveis. Ajude, desfazendo-se das embalagens por meios não hostis ao
ambiente. As autoridades locais estarão em condições de o informar sobre os
meios actuais de recolha de lixo.
Para garantir as condições de segurança, quando se desfizer de uma máquina de
secar velha, retire a ficha eléctrica da tomada de corrente, corte o cabo de
alimentação e destrua ambos. Para evitar a eventualidade de alguma criança ficar
fechada dentro da máquina, parta as dobradiças ou o fecho da porta.
Assistência GIAS
●
Para assegurar continuadamente as operações seguras e eficientes desta máquina,
recomendamos que os serviços de manutenção ou reparação sejam executados
apenas por um técnico autorizado da GIAS.
Directiva Europeia 2002/96/CE
Este electrodoméstico está marcado de acordo com o disposto na directiva europeia
2002/96/CE relativa aos resíduos de equipamentos eléctricos e electrónicos (REEE).
Ao assegurar que este produto seja correctamente eliminado, estará a prevenir
eventuais consequências negativas para o ambiente e para
a saúde, que, de outra forma, poderiam resultar de um
tratamento incorrecto deste produto, quando eliminado.
O símbolo patente neste produto indica que ele não pode
ser tratado como lixo doméstico. Em vez disso, deve ser
entregue no centro de recolha apropriado, para reciclagem
do equipamento eléctrico e electrónico.
A eliminação deste produto deve ser levada a cabo de
acordo com os regulamentos localmente aplicáveis à
eliminação e ao tratamento de lixo e resíduos.
Para obter informações mais detalhadas sobre o
tratamento, a recuperação e a reciclagem deste produto,
agradecemos que entre em contacto com a entidade
municipal competente, com o serviço de eliminação de lixos
e resíduos ou com o estabelecimento comercial onde
adquiriu o produto.
Se o electrodoméstico não estiver a funcionar devidamente,
desligue-o e desconecte a ficha da tomada. Consulte a Assistência
GIAS para uma possível reparação.
65
40003475PORT.qxd
08/07/2005
18:21
Page 66
Instalação
Pode ser-lhe
cobrada uma visita
da assistência se o
problema da
máquina se dever
a uma instalação
incorrecta.
Requisitos eléctricos
As máquinas de secar destinam-se a funcionar com uma
tensão de 230-240 V, 50 Hz monofásica. Verifique se o
circuito de corrente está classificado a, pelo menos,
10 A.
A electricidade pode ser extremamente perigosa.
Esta máquina deve estar ligada à terra.
A tomada de corrente e a ficha da máquina devem ser
do mesmo tipo.
Não utilize vários adaptadores e/ou extensões.
Se o cabo de
alimentação da
máquina se
danificar, deve ser
substituído por um
cabo especial
APENAS disponível
no serviço de peças
sobressalentes da
GIAS. Tem de ser
instalado por uma
pessoa
competente.
A ficha deve ficar acessível para se poder desligar a
máquina após a sua instalação.
Os fios do cabo de alimentação têm cores diferentes de
acordo com os seguintes códigos:
Azul
NEUTRO
Castanho
FASE
Verde e amarelo
TERRA
Esta máquina está conforme à Directiva Europeia
89/336/EEC, 73/23/EEC e emendas subsequentes.
Não conecte a máquina nem a ligue até
que a instalação esteja concluída.
Para sua segurança, a máquina deve ser
correctamente instalada.
Se tiver alguma dúvida sobre a instalação,
aconselhe-se com a Assistência GIAS.
Ajustar os pés
Depois de a máquina estar devidamente posicionada, os
pés devem ser ajustados para assegurar que a máquina
está nivelada.
Ajuste os quatro pés para assegurar que a máquina está
firme e nivelada.
66
40003475PORT.qxd
08/07/2005
18:21
Page 67
Ventilação
Deve existir uma ventilação adequada na divisão onde
está situada a máquina de secar para evitar que os gases
dos electrodomésticos que queimem outros combustíveis,
incluindo chamas vivas, sejam atraídos para a divisão
durante o funcionamento da máquina de secar.
●
O ar de exaustão não pode ser eliminado pelo
tubo de chaminé que é utilizado para os fumos de
exaustão de electrodomésticos que queimem gás
ou outros combustíveis.
●
Verifique regularmente se nada está a limitar o
fluxo de ar na máquina.
●
Verifique a eventual presença de cotão após a
utilização e limpe, se necessário.
●
As entradas e saídas devem manter-se livres de
quaisquer obstruções. Para uma ventilação
adequada, o espaço entre a base da máquina e o
chão deverá estar desobstruído. Deve existir uma
abertura de pelo menos 12 mm entre a máquina e
quaisquer obstruções.
●
Evite que caiam e se acumulem objectos atrás e
ao lado da máquina, uma vez que podem obstruir
a entrada e saída de ar.
●
NUNCA instale a máquina junto a cortinas.
Instalação da mangueira de descarga
É essencial utilizar uma mangueira de ventilação para
transportar o ar húmido e quente para o exterior da
máquina de secar, excepto no caso de a máquina estar
localizada num espaço ao ar livre com uma boa circulação
de ar em seu redor. A recirculação do ar húmido impede o
eficaz funcionamento da máquina de secar.
A mangueira é montada na máquina tal como é indicado.
A mangueira pode passar através de uma parede ou de
uma porta ou janela abertas. A mangueira tem 110 mm
de diâmetro e atinge os 1,8 metros de comprimento.
As seguintes directrizes devem ser seguidas ao instalar a
mangueira de descarga.
●
Não utilize duas mangueiras em conjunto, pois o desempenho da secagem
diminui.
●
Não restrinja o fluxo de ar ao longo da mangueira, por exemplo, dando-lhe
pontapés ou montando um conector de diâmetro inferior para fazer a ligação a
uma abertura na parede.
67
40003475PORT.qxd
08/07/2005
18:21
Page 68
●
Evite que a mangueira forme curvas em forma de U, pois assim restringe o fluxo
de ar e aumenta as hipóteses de acumulação de água na mangueira.
●
Verifique regularmente a mangueira para remover eventuais acumulações de
cotão ou água.
Os diagramas seguintes dão exemplos de boas e más instalações.
Preparação da carga
Antes de utilizar a máquina de secar roupa pela
primeira vez:
Não sobrecarregue
o tambor, os
artigos de grandes
dimensões podem
exceder a carga
máxima admissível
de roupa quando
molhados
(por exemplo:
sacos-cama,
edredões).
68
●
Leia com atenção este livro de instruções.
●
Retire tudo o que estiver no tambor.
●
Limpe o interior do tambor e a porta com um
pano húmido para remover o pó que possa ter-se
instalado durante o transporte.
Preparação da roupa
Certifique-se de que a roupa que vai secar é apropriada
para secagem por máquina de secar, conforme indicado
nos símbolos das etiquetas, representativos dos cuidados
a ter com cada um dos artigos.
Certifique-se de que todos os fechos estão fechados e os
bolsos vazios. Vire os artigos do avesso. Coloque a roupa
livremente no tambor de modo a não se emaranhar.
40003475PORT.qxd
08/07/2005
18:21
Page 69
Peso máximo de secagem
●
Algodões Máx. 6 kg
●
Sintéticos Máx. 3 kg
Separe a carga como se
segue:
●
Por símbolos de cuidados de secagem
Podem ser encontrados no colarinho ou na costura
interna:
Pode ser seco em máquina de secar.
Secagem a alta temperatura.
Secagem apenas a baixa temperatura.
Não pôr na máquina de secar roupa.
Se o artigo não possuir uma etiqueta de
cuidados, deve assumir-se que não se adequa à
máquina de secar.
●
Por quantidade e volume
Sempre que a carga for superior à capacidade da
máquina, separe a roupa de acordo com o volume
(por exemplo, toalhas e roupa interior).
●
Por tipo de tecido
Algodões/linho: Toalhas, camisolas de algodão,
lençóis e toalhas de mesa.
Sintéticos: Blusas, camisas, fatos-macacos, etc., de
poliéster ou poliamida, assim como misturas de
algodão/fibras sintéticas.
●
Por grau de secagem
Separe por: secagem para engomar, secagem para
guardar, etc. Para artigos delicados prima o botão
para seleccionar uma temperatura de
secagem baixa.
69
40003475PORT.qxd
08/07/2005
18:21
Page 70
Conselhos para a secagem
IMPORTANTE: Não
seque artigos
tratados com um
produto de
limpeza a seco ou
vestuário de
borracha (perigo
de incêndio ou de
explosão).
Não pôr na máquina de
secar:
Lãs, sedas, tecidos delicados, meias de nylon, bordados
delicados, tecidos com decoração metálica, vestuário
com guarnições de PVC ou couro, ténis, artigos
volumosos, tais como sacos-cama, etc.
Economia de energia
Ponha somente na máquina de secar roupa as peças que
tenham sido bem torcidas ou centrifugadas. Quanto
mais seca estiver a roupa, menor será o tempo de
secagem, resultando numa economia de electricidade.
SEMPRE
Durante os últimos
15 minutos, a
roupa é sempre
seca com ar frio.
70
●
Tente secar o peso máximo de roupa, o que
origina economia de tempo e de electricidade.
●
Verifique se o filtro está limpo antes de cada ciclo
de secagem.
NUNCA
●
Exceda o peso máximo recomendado, o que
provocará desperdício de tempo e de
electricidade.
●
Ponha na máquina artigos ensopados e a pingar,
o que pode danificar a máquina.
40003475PORT.qxd
08/07/2005
18:21
Page 71
Controlos e indicadores
BOTÃO
ACRÍLICOS/SINTÉTICOS
BOTÃO
LIGAR
INDICADOR DO
ESTADO DO
FILTRO
SELECTOR DO
TEMPO DE
SECAGEM
Painel de controlo e luzes indicadoras
Tecla ‘ON’ e indicador
– prima para ligar, o indicador ilumina-se.
Tecla ‘TECIDOS DE FIBRAS ACRÍLICAS/SINTÉTICAS’
– prima para reduzir o grau de
calor para artigos delicados, e prima novamente para seleccionar alta temperatura.
Regular calor ALTO
Regular calor BAIXO
Selector ‘TEMPO DE SECAGEM’
Passagem rápida.
Indicador ‘ESTADO DO FILTRO’
– selecciona o tempo de secagem ou a opção
– acende-se quando o filtro necessitar de limpeza.
71
40003475PORT.qxd
08/07/2005
18:21
Page 72
Porta e filtro
Abrir a porta
Puxe o manípulo para abrir a porta.
Para reiniciar a máquina de secar, feche a porta e prima
.
ATENÇÃO!
Quando a máquina de secar roupa
estiver a ser utilizada, o tambor e a
porta podem estar MUITO QUENTES
Filtro
IMPORTANTE: Para manter a eficiência da máquina,
verifique se o filtro do cotão está limpo antes de cada
ciclo de secagem.
1.
Puxe o filtro para cima.
2.
Abra o filtro como ilustrado.
3.
Retire com cuidado os resíduos de tecido,
utilizando uma escova macia ou a ponta dos
dedos.
4.
Junte e feche entre si as duas metades do filtro e
volte a montá-lo no seu lugar.
Indicador de Controlo do
Estado do Filtro
acende quando o filtro necessitar de limpeza.
Se a roupa não estiver a secar, verifique se o filtro não
está obstruído. O indicador iluminar-se-á também
quando a mangueira de ventilação estiver obstruída ou
torcida.
72
40003475PORT.qxd
08/07/2005
18:21
Page 73
Funcionamento
Consulte a tabela do guia de secagem ou as etiquetas
da fábrica para seleccionar o programa mais adequado.
●
Abra a porta e coloque a roupa no tambor.
Assegure-se de que a roupa não entrava o fecho
da porta.
●
Se secar artigos delicados, prima a tecla
para
reduzir o nível de calor. Ao terminar, prima
novamente para seleccionar temperatura alta.
Regular calor ALTO
Regular calor BAIXO
●
Rode o selector ‘TEMPO DE SECAGEM’ até que o
tempo de secagem necessário esteja alinhado com
o indicador.
●
O programa
proporciona uma função de
amaciador e anti-vincos. A máquina aquecerá a
carga durante 8 minutos, seguidos de um período
de arrefecimento de 2 minutos, sendo
especialmente vantajoso para roupas que possam
ter sido deixadas por um tempo considerável
antes de serem passadas a ferro, por exemplo,
num cesto de roupa. A roupa pode também ficar
endurecida quando seca no exterior, num
estendal, ou no interior junto a aquecedores. Este
processo atenua os vincos do tecido tornando a
passagem a ferro mais rápida e fácil.
●
Feche a porta com cuidado, empurrando-a
lentamente até ouvir um clique.
●
Prima o botão
. O indicador ilumina-se,
iniciando-se o ciclo de secagem.
●
A roupa é seca revolvendo-se em ar quente
controlado por um termóstato. Durante os
últimos 15 minutos do ciclo de secagem é
utilizado ar frio
para minimizar a formação
de vincos e arrefecer a roupa de forma a ser
manuseada.
●
Quando o programa chegar ao fim, o tambor
deixará de girar e o selector apontará para 0.
●
Abra a porta e retire a roupa.
●
Limpe o filtro após cada ciclo de secagem para
assegurar eficiência máxima de secagem.
ATENÇÃO!
O tambor, a porta
e a carga podem
estar muito
quentes.
73
40003475PORT.qxd
08/07/2005
18:21
Page 74
Limpeza e manutenção de rotina
IMPORTANTE
Desligue sempre a
máquina e retire a
ficha da tomada de
corrente antes de
limpá-la.
Limpeza da máquina
●
Limpe o filtro após cada ciclo de secagem.
●
Após cada utilização, limpe o interior do tambor e
deixe a porta aberta por alguns instantes, de
modo a permitir que a circulação do ar o seque.
●
Limpe o exterior da máquina e a porta com um
pano macio.
●
NÃO usar produtos ou discos de limpeza
abrasivos.
●
Para evitar que a porta se cole ou a acumulação
de cotão, limpe periodicamente a porta interior e
a junta com um pano húmido.
Especificações técnicas
Quanto a dados
eléctricos, consulte
a etiqueta na
frente da máquina
(com a porta
aberta).
74
Capacidade do tambor
115 litros
Carga máxima
6 kg
Altura
85 cm
Largura
60 cm
Profundidade
60 cm
Faixa da Etiqueta de Energia
C
40003475PORT.qxd
08/07/2005
18:21
Page 75
Resolução de problemas
Qual poderá ser a causa de...
Anomalias que você mesmo pode remediar
Antes de contactar a Assistência GIAS para aconselhamento técnico, passe rapidamente
pela seguinte lista de verificação. Se chamar um técnico e este verificar que a máquina
está a funcionar normalmente, foi mal instalada ou usada incorrectamente, ser-lhe-á
cobrada uma quantia consoante o caso. Se o problema persistir após ter completado as
verificações recomendadas, ligue para a Assistência GIAS, eles poderão eventualmente
resolver o problema pelo telefone.
O tempo de secagem é demasiado longo/as roupas
não estão suficientemente secas…
●
Seleccionou o tempo/programa de secagem correctos?
●
A roupa estava demasiado ensopada? As roupas foram bem torcidas ou
centrifugadas?
●
O filtro necessita de limpeza?
●
A máquina está com excesso de roupa?
●
A mangueira de ventilação está torcida ou obstruída?
●
A opção
foi seleccionada num ciclo anterior?
A máquina não funciona…
●
Existe energia eléctrica para alimentar a máquina? Verifique utilizando outro
aparelho eléctrico, por exemplo, um candeeiro.
●
A ficha está correctamente ligada à corrente eléctrica?
●
Houve algum corte de corrente?
●
O fusível fundiu-se?
●
A porta está bem fechada?
●
A máquina está ligada à corrente, quer através da tecla ‘ON’, quer através do cabo
de alimentação?
●
O tempo de secagem ou o programa foram seleccionados?
●
A máquina foi ligada de novo após ter aberto a porta?
A máquina de secar faz muito ruído…
●
Desligue a máquina de secar e contacte a Assistência GIAS para obter ajuda.
O indicador de estado do filtro está aceso…
●
O filtro necessita de limpeza?
●
A mangueira de ventilação está torcida ou obstruída?
75
40003475PORT.qxd
08/07/2005
18:21
Page 76
Serviço de clientes
Se após todas as verificações recomendadas, ainda
subsistir qualquer problema com a máquina, ligue por
favor para o Serviço de Assistência GIAS para
aconselhamento. Podem conseguir ajudá-lo pelo
telefone ou combinar consigo a intervenção adequada
de um técnico, nos termos da garantia. No entanto,
pode ser debitado nas seguintes situações:
●
A máquina está em bom estado de
funcionamento.
●
Não foi instalada de acordo com as instruções de
instalação.
●
Foi utilizada incorrectamente.
Peças sobressalentes
Utilize sempre peças sobressalentes genuínas,
disponíveis directamente da Assistência GIAS.
Assistência GIAS
Para obter assistência e reparações, contacte o
engenheiro local da Assistência GIAS.
O fabricante declina toda e qualquer responsabilidade
pela eventual ocorrência de erros de impressão contidos
no manual. O fabricante reserva-se também o direito de
fazer as modificações apropriadas aos seus produtos
sem alterar as características essenciais.
76
40003475ITA.qxd
08/07/2005
18:21
Page 77
Introduzione . . . . . . . . . . . . . . . . . . . . . . . . . . . . . . . . . . . . . . . . . . . . . . 78
Informazioni sulla consegna . . . . . . . . . . . . . . . . . . . . . . . . . . . . . . . . . . . . . . 78
Estrazione del prodotto dall’imballaggio . . . . . . . . . . . . . . 78
Consigli di sicurezza . . . . . . . . . . . . . . . . . . . . . . . . . . . . . . . . . . . . . 79
Installazione. . . . . . .
Utilizzo. . . . . . . . . . .
La biancheria . . . . . .
Tutela dell’ambiente
Servizio GIAS . . . . . .
.
.
.
.
.
.
.
.
.
.
.
.
.
.
.
.
.
.
.
.
.
.
.
.
.
.
.
.
.
.
.
.
.
.
.
.
.
.
.
.
.
.
.
.
.
.
.
.
.
.
.
.
.
.
.
.
.
.
.
.
.
.
.
.
.
.
.
.
.
.
.
.
.
.
.
.
.
.
.
.
.
.
.
.
.
.
.
.
.
.
.
.
.
.
.
.
.
.
.
.
.
.
.
.
.
.
.
.
.
.
.
.
.
.
.
.
.
.
.
.
.
.
.
.
.
.
.
.
.
.
.
.
.
.
.
.
.
.
.
.
.
.
.
.
.
.
.
.
.
.
.
.
.
.
.
.
.
.
.
.
.
.
.
.
.
.
.
.
.
.
.
.
.
.
.
.
.
.
.
.
.
.
.
.
.
.
.
.
.
.
.
.
.
.
.
.
.
.
.
.
.
.
.
.
.
.
.
.
.
.
.
.
.
.
.
.
.
.
.
.
79
79
79
80
80
Installazione . . . . . . . . . . . . . . . . . . . . . . . . . . . . . . . . . . . . . . . . . . . . . . 81
Requisiti elettrici . . . . . . . . . . . . . . . . . . . . . . . . . . . . . . . . . . . . . . . . . . . . . . . 81
Regolazione dei piedini . . . . . . . . . . . . . . . . . . . . . . . . . . . . . . . . . . . . . . . . . 81
Ventilazione . . . . . . . . . . . . . . . . . . . . . . . . . . . . . . . . . . . . . . . . . . . . . . 82
Installazione del tubo di scarico . . . . . . . . . . . . . . . . . . . . . . . . . . . . . . . . . . . 82
Preparazione della biancheria
. . . . . . . . . . . . . . . . . . . . . . . . . 83
Preparazione dei capi . . . . . . . . . . . . . . . . . . . . . . . . . . . . . . . . . . . . . . . . . . . 83
Selezione della biancheria . . . . . . . . . . . . . . . . . . . . . . . . . . . . . . . . . . . . . . . . 84
Consigli per l’asciugatura
. . . . . . . . . . . . . . . . . . . . . . . . . . . . . . . 85
Evitare di asciugare . . . . . . . . . . . . . . . . . . . . . . . . . . . . . . . . . . . . . . . . . . . . . 85
Risparmio energia . . . . . . . . . . . . . . . . . . . . . . . . . . . . . . . . . . . . . . . . . . . . . . 85
Comandi e spie di segnalazione . . . . . . . . . . . . . . . . . . . . . . . 86
Portellone e filtro . . . . . . . . . . . . . . . . . . . . . . . . . . . . . . . . . . . . . . . . 87
Apertura del portellone. . . . . . . . . . . . . . . . . . . . . . . . . . . . . . . . . . . . . . . . . . 87
Filtro. . . . . . . . . . . . . . . . . . . . . . . . . . . . . . . . . . . . . . . . . . . . . . . . . . . . . . . . . 87
Spia di pulizia filtro . . . . . . . . . . . . . . . . . . . . . . . . . . . . . . . . . . . . . . . . . . . . . 87
Funzionamento . . . . . . . . . . . . . . . . . . . . . . . . . . . . . . . . . . . . . . . . . . . 88
Pulizia e manutenzione ordinaria . . . . . . . . . . . . . . . . . . . . . . 89
Pulizia dell’asciugatrice . . . . . . . . . . . . . . . . . . . . . . . . . . . . . . . . . . . . . . . . . . 89
Specifiche tecniche. . . . . . . . . . . . . . . . . . . . . . . . . . . . . . . . . . . . . . . . . . . . . . 89
Ricerca guasti . . . . . . . . . . . . . . . . . . . . . . . . . . . . . . . . . . . . . . . . . . . . . 90
Servizio assistenza clienti . . . . . . . . . . . . . . . . . . . . . . . . . . . . . . . 91
Ricambi . . . . . . . . . . . . . . . . . . . . . . . . . . . . . . . . . . . . . . . . . . . . . . . . . . . . . . 91
Servizio assistenza GIAS . . . . . . . . . . . . . . . . . . . . . . . . . . . . . . . . . . . . . . . . . . 91
77
40003475ITA.qxd
08/07/2005
18:21
Verificare che
durante il trasporto
la macchina non
abbia subito danni.
In caso contrario,
rivolgersi al Centro
Assistenza GIAS.
Page 78
Introduzione
Leggere attentamente le istruzioni per un corretto
funzionamento della macchina. Questo opuscolo
fornisce importanti linee guida per una manutenzione,
un uso e un’installazione sicuri. Esso contiene inoltre
utili consigli che consentiranno di sfruttare al meglio le
potenzialità di questa macchina.
Conservare la documentazione in un luogo sicuro per
eventuali riferimenti o per futuri proprietari
La mancata
osservanza di tale
procedura potrebbe
compromettere la
sicurezza
dell’apparecchio. La
chiamata può essere
soggetta a
pagamento se le
cause di
malfunzionamento
della macchina sono
attribuibili a un uso
improprio.
Informazioni sulla
consegna
Controllare che al momento della consegna la macchina
sia dotata dei seguenti componenti:
●
Libretto di istruzioni
●
Certificato di garanzia
●
Kit tubi di sfiato e istruzioni
●
Etichetta efficienza energetica
Estrazione del prodotto
dall’imballaggio
Estrarre la macchina dall’imballaggio vicino al punto
previsto per l’installazione.
1.
Con cautela, eseguire un taglio lungo il perimetro
della base dell’imballaggio e un altro verso l’alto,
in corrispondenza di un angolo.
2.
Togliere la fascia in politene e sollevare
l’asciugatrice togliendola dalla base di polistirolo.
Smaltire l’imballaggio in maniera sicura.
Accertarsi che sia fuori dalla portata dei
bambini, in quanto fonte potenziale di rischio.
78
40003475ITA.qxd
12/12/2005
19:12
Page 79
Consigli di sicurezza
Installazione
●
●
●
●
Prima dell’uso, controllare che il prodotto non presenti segni visibili di danni. Non
usare in caso di danni e contattare il Servizio Assistenza GIAS.
Non utilizzare adattatori, connettori multipli e/o prolunghe.
Non installare la macchina in bagno.
Non installare l’asciugatrice vicino ai tendaggi e rimuovere tempestivamente
eventuali oggetti caduti dietro la macchina.
Utilizzo
●
●
●
●
●
●
●
●
●
●
●
●
ATTENZIONE L’uso improprio dell’asciugatrice può provocare rischio di incendio.
Questa macchina è prevista unicamente per uso domestico, ovvero per
l’asciugatura di capi e indumenti per la casa.
La macchina qui descritta deve essere utilizzata esclusivamente per lo scopo al
quale è destinata secondo quanto illustrato nel presente libretto. Prima di attivare
la macchina, accertarsi di avere letto attentamente e compreso le istruzioni d’uso e
di installazione.
Non toccare l’asciugatrice con mani o piedi umidi o bagnati.
Non appoggiarsi al portellone per caricare la macchina; non utilizzare il portellone
per sollevare o spostare la macchina.
Non consentire ai bambini di giocare con la macchina o con i suoi comandi.
ATTENZIONE Non utilizzare il prodotto se il filtro antifilacce non è correttamente
posizionato o risulta danneggiato; il filtro non è ignifugo.
ATTENZIONE Se è esposto il simbolo indicante il riscaldamento della superficie,
quando l’asciugatrice è in funzione la temperatura può essere superiore a
60 gradi C.
Staccare la spina dalla presa elettrica. Prima di pulire la macchina, staccare sempre
la spina.
Se si presume che la macchina sia guasta, non continuare ad usarla.
Non accumulare cascami e filacce sul pavimento attorno alla macchina.
Dopo il ciclo di asciugatura, l’interno del cestello può essere molto caldo. Prima di
estrarre la biancheria è pertanto opportuno lasciar raffreddare completamente la
macchina.
La biancheria
●
●
●
●
ATTENZIONE Evitare di asciugare articoli trattati con prodotti di pulizia a secco.
ATTENZIONE In determinate circostanze, i materiali in gomma possono essere
soggetti ad autocombustione se riscaldati. I materiali in plastica, in gomma e
similgomma non sono adatti ad essere asciugati meccanicamente. EVITARE
ASSOLUTAMENTE di asciugare articoli in questi materiali.
Leggere attentamente le etichette con le istruzioni di lavaggio per conoscere le
caratteristiche dell’asciugatura idonea.
Gli indumenti devono essere introdotti nell’asciugatrice solo dopo essere stati
opportunamente centrifugati in lavatrice o strizzati a mano. EVITARE di caricare
nel cestello indumenti ancora gocciolanti.
79
40003475ITA.qxd
●
●
●
12/12/2005
19:13
Page 80
Controllare accuratamente che nelle tasche degli indumenti da asciugare non
siano presenti accendini o fiammiferi ed EVITARE assolutamente l’uso di prodotti
infiammabili in prossimità della macchina.
EVITARE ASSOLUTAMENTE di asciugare tende in fibra di vetro. La contaminazione
dei capi con le fibre di vetro può infatti dar luogo a fenomeni d’irritazione
cutanea.
NON introdurre nella macchina indumenti trattati o contaminati con spray o
liquidi detergenti infiammabili, come benzina, olio da cucina o spray con aerosol.
Tutela dell’ambiente
●
●
Tutti i materiali utilizzati per l’imballaggio sono ecologici e riciclabili. Smaltite
l’imballaggio con metodi ecologici. Presso il comune di residenza si potranno
reperire ulteriori informazioni sui metodi di smaltimento.
Per garantire la sicurezza al momento dello smaltimento di una asciugatrice,
scollegare la spina dell’alimentazione dalla presa, tagliare il cavo
dell’alimentazione di rete e distruggerlo insieme alla spina. Per evitare che i
bambini possano rimanere intrappolati all’interno della lavatrice, rompere i cardini
o la chiusura dell’oblò.
Servizio GIAS
●
Ai fini della durata e del buon funzionamento della macchina, per gli eventuali
interventi di assistenza o riparazione consigliamo di rivolgersi esclusivamente al
servizio assistenza autorizzato GIAS.
Direttiva Europea 2002/96/CE
Questo elettrodomestico è marcato conformemente alla Direttiva Europea 2002/96/CE
sui rifiuti da apparecchiature elettriche ed elettroniche (WEEE).
Assicurandovi che questo prodotto sia smaltito correttamente,
aiuterete ad evitare possibili conseguenze negative
all'ambiente e alla salute delle persone, che potrebbero
verificarsi a causa d'un errato trattamento di questo prodotto
giunto a fine vita.
Il simbolo sul prodotto indica che questo apparecchio non
può essere trattato come un normale rifiuto domestico; dovrà
invece essere consegnato al punto più vicino di raccolta per il
riciclo delle apparecchiature elettriche ed elettroniche.
Lo smaltimento deve essere effettuato in accordo con le
regole ambientali vigenti per lo smaltimento dei rifiuti.
Per informazioni più dettagliate sul trattamento, recupero e
riciclo di questo prodotto, per favore contattare l'ufficio
pubblico di competenza (del dipartimento ecologia e
ambiente), o il vostro servizio di raccolta rifiuti a domicilio, o
il negozio dove avete acquistato il prodotto.
Nel caso in cui la macchina non funzioni correttamente o sia fuori
uso, spegnere e staccare la spina dalla presa. Per la riparazione,
rivolgersi al Centro Assistenza GIAS.
80
40003475ITA.qxd
08/07/2005
18:21
Page 81
Installazione
Requisiti elettrici
Le asciugatrici sono state progettate per funzionare ad
una tensione di 230-240V, 50 Hz monofase. Controllare
che il circuito dell’alimentazione sia idoneo per valori di
corrente di almeno 10A.
L’elettricità può essere estremamente pericolosa.
L’apparecchio deve essere opportunamente collegato a
terra.
La presa e la spina dell’apparecchio devono essere dello
stesso tipo.
La chiamata può
essere soggetta a
pagamento, se le
cause di
malfunzionamento
della macchina sono
attribuibili a
un’installazione non
corretta.
Non utilizzare adattatori multipli e/o prolunghe.
Una volta completata l’installazione, la spina deve
risultare accessibile e facilmente scollegabile.
I fili dell’impianto elettrico sono contrassegnati con i
seguenti colori:
Blu
NEUTRO
Marrone
SOTTO TENSIONE
Verde e giallo
TERRA
L’apparecchio con marchio CE è conforme alle direttive
europee 89/336/CEE, 73/23/CEE e successive modifiche.
Non inserire la spina nella presa e non
accendere la macchina finché l’installazione
non sarà stata completata.
Ai fini della sicurezza personale è essenziale
che l’asciugatrice venga installata
correttamente.
Nel caso risulti
danneggiato, il cavo
di alimentazione
dell’apparecchio
dev’essere
prontamente
sostituito con
apposito cavo
reperibile
esclusivamente
presso il servizio
assistenza GIAS.
L’installazione deve
essere effettuata da
persone competenti.
In caso di dubbi sull’installazione, rivolgersi
al Servizio Assistenza GIAS.
Regolazione dei piedini
Una volta posizionata la macchina, si dovrebbe
procedere alla regolazione dei piedini, per garantire
una perfetta messa in bolla.
Regolare i quattro piedini per garantire che la macchina
sia stabile e in bolla.
81
40003475ITA.qxd
08/07/2005
18:21
Page 82
Ventilazione
Accertarsi che nel locale scelto per l’installazione vi sia
un ricambio d’aria sufficiente, onde evitare che i gas
provenienti da apparecchiature funzionanti con altri
combustibili, comprese fiamme libere, siano aspirati nel
locale dove l’asciugatrice è in funzione.
●
Non scaricare l’aria nella canna fumaria utilizzata
per lo scarico di fumi provenienti da attrezzature
funzionanti a gas o altri combustibili.
●
Controllare periodicamente che attorno
all’asciugatrice vi sia una buona circolazione
d’aria, senza impedimenti di sorta.
●
Dopo l’uso ispezionare il filtro antifilacce e, se
necessario, pulirlo.
●
Verificare costantemente che presa e sfiati non
siano ostruiti. Per assicurare un’idonea
ventilazione è essenziale che lo spazio tra il fondo
macchina e il pavimento non sia ostruito. Tra la
macchina ed eventuali ostacoli si dovrebbe
lasciare uno spazio di almeno 12mm.
●
Rimuovere tempestivamente eventuali oggetti
caduti dietro/sotto la macchina in quanto
potrebbero ostruire le prese e gli sfiati dell’aria.
●
EVITARE ASSOLUTAMENTE d’installare la
macchina contro tendaggi.
Installazione del tubo di
scarico
L'impiego di un tubo flessibile di sfiato è fondamentale
per trasportare l'aria calda e umida lontano
dall'asciugatrice, a meno che quest'ultima sia installata
in uno spazio aperto, con una buona circolazione d'aria
tutto intorno alla macchina. In tal modo si elimina il
ricircolo continuo dell'aria umida, che potrebbe
impedire il funzionamento efficiente dell'asciugatrice.
Il tubo si installa sulla macchina come raffigurato nel
disegno.
Il tubo può essere fatto passare attraverso una parete, o
attraverso una porta o finestra aperte. Il tubo ha un
diametro pari a 110mm e una lunghezza di 1,8 metri.
Per installare il tubo di scarico, si raccomanda di seguire
le indicazioni di seguito riportate.
●
82
Non usare due tubi collegati insieme, in quanto si
ridurrebbero le prestazioni dell'asciugatrice.
40003475ITA.qxd
08/07/2005
18:21
Page 83
●
Non restringere il flusso d'aria passante dal tubo, per es. piegando il tubo o
inserendo un connettore di diametro inferiore, per il montaggio a un foro nella
parete.
●
Evitare le curvature a U del tubo, in quanto restringerebbero il flusso d'aria,
aumentando la possibilità che si raccolga acqua nel tubo.
●
Controllare periodicamente il tubo flessibile, eliminando eventuali depositi di
filacce o di acqua all'interno.
Gli schemi di seguito riportati spiegano cosa fare e cosa non fare per installare
correttamente il tubo di scarico.
Preparazione della biancheria
Prima di utilizzare l’asciugatrice per la prima volta:
●
Leggere attentamente il presente libretto d’istruzioni.
●
Togliere tutti gli articoli presenti all’interno del cestello.
●
Pulire l’interno del cestello e il portellone con un panno umido in modo da
eliminare l’eventuale polvere depositata durante il trasporto.
Preparazione dei capi
Verificare che la biancheria da asciugare sia idonea per
l’asciugatura meccanica, come indicato dai simboli
sull’etichetta di lavaggio dei vari articoli.
Controllare che le chiusure siano chiuse e le tasche vuote.
Girare i capi con il rovescio all’esterno. Introdurre i capi
nel cestello uno ad uno, in modo che non si aggroviglino.
Non sovraccaricare
il cestello, in
quanto i capi
ingombranti, a
caldo, possono
superare il carico
massimo
consentito
(per esempio sacchi
a pelo e piumoni).
83
40003475ITA.qxd
08/07/2005
18:21
Page 84
Peso massimo di
asciugatura
●
Capi in cotone Max. 6 kg
●
Capi sintetici Max. 3 kg
Selezionare la biancheria
nel modo seguente:
●
In base ai simboli delle etichette di lavaggio
Le etichette di lavaggio sono apposte sul collo o
sulle cuciture interne:
Articolo idoneo per l’asciugatura meccanica.
Asciugatura ad alta temperatura.
Solo asciugatura a bassa temperatura.
Articolo non idoneo all’asciugatura
meccanica.
Se il capo è sprovvisto di etichetta di
lavaggio, si deve presumere che non sia
idoneo all’asciugatura meccanica.
●
In base al quantitativo ed alla pesantezza
Se il carico è superiore alla capacità della
macchina, separare i capi in base alla pesantezza
(p. es., separare gli asciugamani dalla biancheria
leggera).
●
In base al tipo di tessuto
Articoli di cotone/lino: Asciugamani, jersey di
cotone, biancheria da tavola/letto.
Articoli sintetici: Camicette, camicie, tute ecc. in
poliestere o poliammide e misti cotone/sintetici.
●
84
In base al grado di asciugatura
Selezionare tra: capi asciutti da stirare, capi pronti
da riporre ecc. Per i capi delicati premere il
pulsante
, impostando una temperatura di
asciugatura ridotta.
40003475ITA.qxd
08/07/2005
18:21
Page 85
Consigli per l’asciugatura
Evitare di asciugare:
Articoli di lana, seta, tessuti delicati, calze di nylon,
ricami delicati, tessuti con decorazioni metalliche,
indumenti con guarnizioni in PVC o in pelle, scarpe da
ginnastica, articoli pesanti come sacchi a pelo ecc.
Risparmio energia
Introdurre nell’asciugatrice solo biancheria
accuratamente strizzata a mano o centrifugata a
macchina. Quanto più asciutta è la biancheria, tanto più
rapido è il tempo richiesto per l’asciugatura, con
conseguente risparmio di consumo elettrico.
IMPORTANTE:
Evitare di asciugare
articoli
preventivamente
trattati con
prodotti di pulizia
a secco o capi in
gomma (pericolo
d’incendio o
esplosione).
COSA FARE SEMPRE
●
Cercare sempre di far lavorare la macchina a
pieno carico di biancheria: si risparmia tempo ed
elettricità.
●
Prima di ogni ciclo di asciugatura verificare
SEMPRE che il filtro sia pulito.
COSA NON FARE MAI
●
Non superare mai il peso massimo: si perde tempo
e si consuma più elettricità.
●
Evitare di caricare capi ancora gocciolanti: si
rischia di rovinare la macchina.
Nel corso degli
ultimi 15 minuti, il
carico viene
sempre asciugato
con aria fredda.
85
40003475ITA.qxd
08/07/2005
18:21
Page 86
Comandi e spie di
segnalazione
PULSANTE
ACRILICI/SINTETICI
IL PULSANTE
ON
SPIA DI
PULIZIA FILTRO
SELETTORE TEMPO DI
ASCIUGATURA
Pannello di comando e spie luminose
Tasto e spia di macchina accesa (‘ON’)
illumina.
– premere questi tasti per attivarli, la spia si
Tasto ‘ACRILICI/SINTETICI’
– serve per ridurre il grado di calore quando si devono
asciugare articoli delicati; ripremere il tasto per selezionare una temperatura elevata.
Selezione della temperatura ELEVATA
Selezione della temperatura BASSA
Selettore TEMPO DI ASCIUGATURA – consente di selezionare la durata del ciclo di
asciugatura o l’opzione Stiro facile
.
Spia ‘PULIZIA FILTRO’
86
– si accende segnalando la necessità di pulire il filtro.
40003475ITA.qxd
08/07/2005
18:21
Page 87
Portellone e filtro
Apertura del portellone
Tirare la maniglia per aprire lo sportello.
Per avviare la macchina, richiudere il portellone e
premere il tasto
.
AVVERTENZA!
Si ricorda che quando la macchina è in
funzione il cestello e il portellone
possono essere MOLTO CALDI
Filtro
IMPORTANTE: Ai fini della massima efficacia della
macchina, prima di ogni ciclo di asciugatura è essenziale
verificare la pulizia del filtro antifilacce.
1.
Tirare il filtro verso l’alto.
2.
Aprire il filtro come illustrato.
3.
Rimuovere delicatamente le filacce con la punta
delle dita o aiutandosi con uno spazzolino
morbido.
4.
Richiudere il filtro e reinserirlo in sede.
Spia di pulizia filtro
si accende segnalando la necessità di pulire il filtro.
Se la biancheria non si asciuga verificare che il filtro
non sia intasato. La spia si accende anche quando il
tubo di sfiato è bloccato o piegato.
87
40003475ITA.qxd
08/07/2005
18:21
Page 88
Funzionamento
Per selezionare il programma più idoneo, consultare la
tabella della guida all’asciugatura o le etichette
riportate sui capi.
●
Aprire il portellone e caricare la biancheria nel
cestello. Verificare che i capi non impediscano la
chiusura del portellone.
●
Per l’asciugatura di articoli delicati premere il
tasto
per ridurre il grado di calore. Al
termine del ciclo, ripremere il tasto di selezione
della temperatura, impostando una temperatura
elevata.
Selezione della temperatura ELEVATA
Selezione della temperatura BASSA
●
Agire sul selettore ‘TEMPO DI ASCIUGATURA’
finché il tempo di asciugatura voluto si allinea con
il quadrante.
●
Il programma
assicura una funzione di
trattamento antipiega. La macchina effettua un
ciclo di riscaldamento della biancheria per 8
minuti, seguito da 2 minuti di raffreddamento. Si
tratta di una funzione particolarmente utile
quando si prevede di riporre la biancheria (ad
esempio, nel cesto della biancheria) per un certo
periodo di tempo prima della stiratura. I capi
possono ‘seccarsi’ eccessivamente anche quando
vengono fatti asciugare all’aperto sul filo o
vengono posti su radiatori. Il ciclo di Stiro facile
attenua le pieghe sul tessuto rendendo più facile
e più rapida la stiratura.
●
Chiudere delicatamente il portellone spingendolo
lentamente fino ad avvertirne lo scatto di
chiusura.
●
Premere il pulsante
. Si accende la spia di
accensione ed ha inizio il ciclo di asciugatura.
●
Il carico viene asciugato mediante aria calda
controllata termostaticamente. Negli ultimi
15 minuti del ciclo viene utilizzata aria fredda
al fine di ridurre le pieghe sui tessuti e di
raffreddare il carico prima del prelievo.
●
Al termine del programma, il cestello smette di
ruotare e il selettore si ferma sul 0.
●
Aprire l’oblò e togliere la biancheria.
●
La pulizia del filtro dopo ogni ciclo di asciugatura
assicura la massima efficienza della macchina.
AVVERTENZA!
Il cestello, il
portellone e il
carico possono
essere molto caldi.
88
40003475ITA.qxd
08/07/2005
18:21
Page 89
Pulizia e manutenzione ordinaria
Pulizia dell’asciugatrice
●
Pulire il filtro dopo ogni ciclo di asciugatura.
●
Dopo l’uso, pulire l’interno del cestello e lasciare
aperto il portellone per un certo periodo di
tempo in modo che circoli aria e si asciughi.
●
Pulire l’esterno della macchina e il portellone con
un panno morbido.
●
NON usare spugnette abrasive né prodotti di
pulizia.
●
Per evitare che il portellone resti ‘incollato’ o che
si accumulino filacce, pulire regolarmente il
portellone interno e le guarnizioni con un panno
umido.
Specifiche tecniche
Capacità del cestello
115 litri
Carico massimo
6 kg
Altezza
85 cm
Larghezza
60 cm
Profondità
60 cm
Efficienza Energetica
C
IMPORTANTE
Prima di procedere
alla pulizia,
disattivare sempre
la macchina e
staccare la spina
dalla presa a muro.
Per i dati elettrici
vedere la targhetta
dei dati posta sul
davanti del mobile
della macchina
(con portellone
aperto).
89
40003475ITA.qxd
08/07/2005
18:21
Page 90
Ricerca guasti
Quale può essere la causa...
Problemi che può risolvere l’utente
Prima di rivolgersi al Centro Assistenza GIAS, consultare la seguente checklist. La
chiamata verrà addebitata all’utente nel caso in cui risulti che la macchina funziona o è
stata installata o utilizzata in maniera errata. Se il problema persiste anche dopo aver
eseguito i controlli consigliati, rivolgersi al servizio di assistenza GIAS che sarà a
disposizione per suggerire eventuali soluzioni per telefono.
Tempo di asciugatura eccessivamente lungo/capi non
sufficientemente asciutti…
●
Il programma/tempo di asciugatura selezionato è corretto?
●
I capi sono stati introdotti eccessivamente bagnati? Si è provveduto a strizzare o
centrifugare adeguatamente i capi prima d’introdurli nella macchina?
●
Si deve pulire il filtro?
●
L’asciugatrice è stata caricata eccessivamente?
●
Il tubo di sfiato è piegato o bloccato?
●
Il tasto
è stato selezionato da un ciclo precedente?
L’asciugatrice non funziona…
●
L’alimentazione elettrica cui è collegata la macchina è attiva? Controllare
provando con un altro apparecchio (ad esempio, lampada da tavolo).
●
La spina di alimentazione è stata collegata correttamente all’alimentazione
elettrica?
●
Manca la corrente?
●
Fusibile bruciato?
●
Il portellone è stato chiuso perfettamente?
●
La macchina è stata opportunamente attivata (sia collegata all’alimentazione sia
attivata localmente)?
●
È stato selezionato il tempo o il programma di asciugatura?
●
La macchina è stata riattivata dopo aver aperto il portellone?
L’asciugatrice fa molto rumore…
●
Spegnere l’asciugatrice e rivolgersi al Servizio Assistenza GIAS.
La spia di segnalazione Pulizia filtro è accesa…
●
Si deve pulire il filtro?
●
Il tubo di sfiato è piegato o bloccato?
90
40003475ITA.qxd
08/07/2005
18:21
Page 91
Servizio assistenza clienti
Se il problema persiste anche dopo aver effettuato tutti
i controlli consigliati, rivolgersi al Servizio Assistenza
GIAS. Sarà a disposizione per suggerire eventuali
soluzioni per telefono o per fissare la visita del tecnico
in base alle condizioni di garanzia. Si ricorda che
l’intervento del tecnico può essere soggetto a
pagamento nel caso la macchina:
●
risulti perfettamente funzionante.
●
non sia stata installata secondo quanto indicato
nelle istruzioni d’installazione.
●
sia stata utilizzata in modo improprio.
Ricambi
Utilizzare sempre ricambi originali, disponibili
direttamente presso il Servizio Assistenza GIAS.
Servizio GIAS
Per assistenza e riparazioni, rivolgersi al tecnico del
Servizio Assistenza GIAS più vicino.
Il produttore declina ogni responsabilità in caso di
eventuali errori di stampa nel presente opuscolo. Il
produttore si riserva il diritto di apportare le necessarie
modifiche ai propri prodotti senza modificarne le
caratteristiche essenziali.
91
40003475SPA.qxd
08/07/2005
18:24
Page 92
Introducción . . . . . . . . . . . . . . . . . . . . . . . . . . . . . . . . . . . . . . . . . . . . . . 93
Información de entrega . . . . . . . . . . . . . . . . . . . . . . . . . . . . . . . . . . . . . . . . . . 93
Desembalaje del producto . . . . . . . . . . . . . . . . . . . . . . . . . . . . . . 93
Advertencias sobre seguridad . . . . . . . . . . . . . . . . . . . . . . . . . . 94
Instalación . . . . . . . . . . . .
Uso . . . . . . . . . . . . . . . . . .
La colada . . . . . . . . . . . . .
Temas medioambientales.
Servicio técnico de GIAS. .
.
.
.
.
.
.
.
.
.
.
.
.
.
.
.
.
.
.
.
.
.
.
.
.
.
.
.
.
.
.
.
.
.
.
.
.
.
.
.
.
.
.
.
.
.
.
.
.
.
.
.
.
.
.
.
.
.
.
.
.
.
.
.
.
.
.
.
.
.
.
.
.
.
.
.
.
.
.
.
.
.
.
.
.
.
.
.
.
.
.
.
.
.
.
.
.
.
.
.
.
.
.
.
.
.
.
.
.
.
.
.
.
.
.
.
.
.
.
.
.
.
.
.
.
.
.
.
.
.
.
.
.
.
.
.
.
.
.
.
.
.
.
.
.
.
.
.
.
.
.
.
.
.
.
.
.
.
.
.
.
.
.
.
.
.
.
.
.
.
.
.
.
.
.
.
.
.
.
.
.
.
.
.
.
.
.
.
.
.
.
.
.
.
.
.
.
.
.
.
.
94
94
94
95
95
Instalación . . . . . . . . . . . . . . . . . . . . . . . . . . . . . . . . . . . . . . . . . . . . . . . . 96
Requisitos eléctricos . . . . . . . . . . . . . . . . . . . . . . . . . . . . . . . . . . . . . . . . . . . . . 96
Ajuste de las patas . . . . . . . . . . . . . . . . . . . . . . . . . . . . . . . . . . . . . . . . . . . . . . 96
Ventilación . . . . . . . . . . . . . . . . . . . . . . . . . . . . . . . . . . . . . . . . . . . . . . . . 97
Instalación de la manguera de descarga . . . . . . . . . . . . . . . . . . . . . . . . . . . . . 97
Preparación del material para secar . . . . . . . . . . . . . . . . . . . . 98
Preparación de la ropa. . . . . . . . . . . . . . . . . . . . . . . . . . . . . . . . . . . . . . . . . . . 98
Clasificación del material para secar . . . . . . . . . . . . . . . . . . . . . . . . . . . . . . . . 99
Consejos para el secado . . . . . . . . . . . . . . . . . . . . . . . . . . . . . . . . 100
No secar en secadora . . . . . . . . . . . . . . . . . . . . . . . . . . . . . . . . . . . . . . . . . . . 100
Ahorro de energía . . . . . . . . . . . . . . . . . . . . . . . . . . . . . . . . . . . . . . . . . . . . . 100
Controles e indicadores . . . . . . . . . . . . . . . . . . . . . . . . . . . . . . . . 101
Puerta y filtro. . . . . . . . . . . . . . . . . . . . . . . . . . . . . . . . . . . . . . . . . . . . 102
Modo de abrir la puerta . . . . . . . . . . . . . . . . . . . . . . . . . . . . . . . . . . . . . . . . 102
Filtro. . . . . . . . . . . . . . . . . . . . . . . . . . . . . . . . . . . . . . . . . . . . . . . . . . . . . . . . 102
Control de mantenimiento del filtro . . . . . . . . . . . . . . . . . . . . . . . . . . . . . . . 102
Operación . . . . . . . . . . . . . . . . . . . . . . . . . . . . . . . . . . . . . . . . . . . . . . . . 103
Limpieza y mantenimiento de rutina . . . . . . . . . . . . . . . . . 104
Limpieza de la secadora. . . . . . . . . . . . . . . . . . . . . . . . . . . . . . . . . . . . . . . . . 104
Especificaciones técnicas . . . . . . . . . . . . . . . . . . . . . . . . . . . . . . . . . . . . . . . . 104
Resolución de problemas . . . . . . . . . . . . . . . . . . . . . . . . . . . . . . . 105
Servicio de atención al cliente . . . . . . . . . . . . . . . . . . . . . . . . . 106
Servicio de recambios. . . . . . . . . . . . . . . . . . . . . . . . . . . . . . . . . . . . . . . . . . . 106
Servicio técnico de GIAS. . . . . . . . . . . . . . . . . . . . . . . . . . . . . . . . . . . . . . . . . 106
92
40003475SPA.qxd
08/07/2005
18:24
Page 93
Introducción
Por favor lea cuidadosamente estas instrucciones y
utilice la máquina según sus indicaciones. Este folleto
presenta directrices importantes para uso seguro,
instalación y mantenimiento, y algunos consejos para
obtener los mejores resultados de su secadora.
Conserve toda la documentación en un lugar seguro
para referencia futura o para los dueños futuros
Verifique que no se
hayan producido
daños al
electrodoméstico
durante el
transporte. De
haberlos, llame al
Servicio técnico de
GIAS.
Información de entrega
Por favor verifique que los siguientes artículos hayan
sido entregados con el electrodoméstico:
●
Manual de instrucciones
●
Tarjeta de garantía
●
Kit e instrucciones de ventilación
●
Etiqueta de energía
Si no se cumplen los
requisitos descritos
anteriormente, es
posible que se
perjudique la
seguridad del
electrodoméstico. Es
posible que se le
cobre una llamada al
servicio técnico si el
problema con el
electrodoméstico es
el resultado de un
uso incorrecto.
Desembalaje del producto
Desembale la secadora en un lugar cercano al de su
instalación definitiva.
1.
Corte con cuidado la base del embalaje y levante
una de las esquinas.
2.
Retire la funda de plástico y saque la secadora de
la base de poliestireno.
Deshágase de los materiales de embalaje
de forma segura. Asegúrese de que estén
fuera del alcance de los niños, dado que
es una fuente potencial de peligro.
93
40003475SPA.qxd
12/12/2005
19:17
Page 94
Advertencias sobre seguridad
Instalación
●
●
●
●
Verifique que el producto no tenga daños visibles antes de usarlo. En caso de
presentar algún daño, no lo use y póngase en contacto con el Servicio técnico de
GIAS.
No utilice adaptadores, conectores múltiples ni alargaderas.
No se debe instalar esta máquina en un cuarto de baño ni en una sala de ducha.
Nunca instale la secadora junto a cortinas, y procure que no caigan objetos ni se
acumule nada detrás de la secadora.
Uso
●
●
●
●
●
●
●
●
●
●
●
●
ADVERTENCIA El uso incorrecto de una secadora puede provocar riesgo de incendio.
Esta máquina está diseñada para ser utilizada en el hogar, es decir, para secar
tejidos y prendas de uso diario.
Esta máquina debe usarse solamente para el propósito para el cual fue diseñada.
Las instrucciones para la instalación y el uso deben comprenderse cabalmente
antes de hacer funcionar el electrodoméstico.
No toque el electrodoméstico cuando tenga las manos o los pies mojados o
húmedos.
No se apoye en la puerta al cargar la secadora ni utilice la puerta para levantar o
mover la máquina.
No permita a los niños jugar con la máquina ni los mandos.
ADVERTENCIA No use el producto si el filtro de pelusa no está en su lugar o si está
dañado, ya que la pelusa podría arder.
ADVERTENCIA En el lugar donde aparezca el símbolo de superficie caliente
,
el incremento de temperatura durante la operación de la secadora puede exceder
los 60 grados centígrados.
Desconecte el enchufe de la red del suministro eléctrico. Siempre debe
desenchufar la máquina antes de limpiarla.
No siga usando esta máquina si pareciera tener algún desperfecto.
No hay que dejar que se acumulen lanilla y pelusas en el suelo alrededor de la
máquina.
El tambor del interior puede calentarse mucho. Antes de retirar la ropa de la
máquina, siempre deje que ésta termine de enfriarse.
La colada
●
●
●
●
94
ADVERTENCIA No debe usarse para secar tejidos tratados con líquidos para
limpiado en seco.
ADVERTENCIA Los materiales de goma de espuma, en algunas circunstancias,
pueden arder por combustión espontánea si se calientan. Espuma plástica, goma
de espuma, y materiales semejantes a la goma no son apropiados para secarse en
secadora. NO HAY QUE introducir en la secadora piezas hechas de estos materiales.
Consulte siempre las etiquetas sobre lavado de las prendas para conocer si se
pueden secar en secadora.
Antes de introducir ropa en la secadora, aquélla debe centrifugarse o estrujarse
40003475SPA.qxd
●
●
●
12/12/2005
19:18
Page 95
bien. Prendas que escurren agua NO deben introducirse en la secadora.
Deben sacarse de los bolsillos encendedores y cerillas, y no se debe NUNCA usar
líquidos inflamables cerca de la máquina.
No se debe NUNCA introducir cortinas de fibra de vidrio en esta máquina. Puede
producirse irritación de la piel si otras prendas se contaminan con fibras de vidrio.
Las prendas tratadas o contaminadas con productos de limpieza inflamables o
líquidos tales como gasolina, aceite para cocinar o aerosoles NO DEBEN colocarse
en esta máquina.
Temas medioambientales
●
●
Todos los materiales de embalaje utilizados son ecológicos y reciclables. Por favor
deshágase de los materiales de embalaje por medios ecológicos. Su ayuntamiento
podrá informarle de los medios actuales de desecho.
Por razones de seguridad cuando se deseche una secadora, desenchufe el cable
eléctrico de la toma general, corte el cable y destrúyalo junto con el enchufe. Para
evitar que los niños se queden encerrados en la máquina, rompa las bisagras o la
cerradura de la puerta.
Servicio técnico de GIAS
●
Para que esta máquina siga funcionando de modo seguro y eficiente,
recomendamos que todo mantenimiento o reparación sea efectuado únicamente
por un ingeniero autorizado de mantenimiento GIAS.
Directiva europea 2002/96/EC
Este electrodoméstico está marcado conforme a la directiva Europea 2002/96/CE sobre
los residuos de aparatos eléctricos y electrónicos (WEEE).
Asegurándose que este producto ha sido eliminado
correctamente, ayudará a evitar posibles consecuencias
negativas en el ambiente y la salud de las personas, que
pudiera verificarse por causa de un anómalo tratamiento de
este producto.
El símbolo sobre el producto indica que este aparato no
puede ser tratado como un residuo doméstico normal, en su
lugar deberá ser entregado al centro de recogidas para
reciclaje de aparatos eléctricos y electrónicos.
La eliminación debe ser efectuada de acuerdo con las reglas
medioambientales vigentes para el tratamiento de los
residuos.
Para información más detallada sobre el tratamiento,
recuperación y reciclaje de este producto, por favor contacte
con la oficina competente (del departamento de ecología y
medioambiente), o su servicio de recogida a domicilio si lo
hubiera o el punto de venta donde compró el producto.
Si el electrodoméstico no funciona correctamente o se avería,
apáguelo y desconecte el enchufe de la toma de corriente.
Consulte al Servicio técnico de GIAS para la posible reparación.
95
40003475SPA.qxd
08/07/2005
18:24
Page 96
Instalación
Es posible que se le
cobre una llamada
al servicio técnico
si el problema con
el electrodoméstico
es el resultado de
una instalación
incorrecta.
Requisitos eléctricos
Las secadoras están preparadas para funcionar con un
voltaje monofásico de 230-240 V, a 50 Hz. Verifique que
el circuito de suministro tenga una corriente nominal de
al menos 10 A.
La electricidad puede ser muy peligrosa.
Es imprescindible que esta máquina tenga conexión a
tierra.
La toma de corriente y el enchufe del electrodoméstico
deben ser del mismo tipo.
No utilice adaptadores múltiples ni alargaderas.
Si se dañara el
cable eléctrico de
esta máquina,
debe reemplazarse
con un cable
especial que se
puede obtener
ÚNICAMENTE del
Servicio de
recambios de
GIAS. Una persona
capacitada debe
encargarse de la
instalación.
Después de haberse instalado la máquina, el enchufe
debe quedar en una posición fácil de alcanzar en el
momento de desconectarlo.
Los conductores del cable de conexión eléctrica son de
diferentes colores, según la codificación siguiente:
Azul
NEUTRO
Marrón
CON CORRIENTE
Verde y amarillo
CONEXIÓN A TIERRA
Este electrodoméstico CE cumple la Directiva europea
89/336/EEC, 73/23/EEC y sus enmiendas subsiguientes.
No enchufe el electrodoméstico ni lo
encienda conectado a la red eléctrica hasta
que se haya completado la instalación.
Para su protección, hay que instalar esta
secadora correctamente.
En caso de alguna duda acerca de la
instalación, llame al Servicio GIAS de
Atención al Cliente para obtener
información.
Ajuste de las patas
Una vez que la máquina esté en su sitio, las patas deben
ajustarse para asegurarse de que esté nivelada.
Ajuste las cuatro patas para garantizar que la máquina
esté firme y nivelada.
96
40003475SPA.qxd
08/07/2005
18:24
Page 97
Ventilación
Debe suministrarse ventilación adecuada en la sala
donde esté ubicada la secadora para evitar que los
gases de aparatos que quemen otros combustibles,
incluyendo llamas abiertas, ingresen en la sala cuando
se está usando la secadora.
●
El aire extraído no debe descargarse dentro de un
conducto que sea utilizado para expulsar humos
de aparatos que quemen gas u otros
combustibles.
●
Compruebe periódicamente que no esté obstruido
el paso de la corriente de aire a través de la
secadora.
●
Después de usar la máquina, revise el filtro de
polvo y límpielo si es necesario.
●
Las tomas y salidas de aire deben mantenerse
libres de todo obstáculo. Para que haya suficiente
ventilación, no debe haber ningún obstáculo en el
espacio que se encuentra entre el fondo de la
máquina y el suelo. Debería haber una separación
de por lo menos 12 mm entre la máquina y
cualquier obstáculo.
●
Procure que no caigan objetos ni se acumulen
detrás de la máquina, ya que éstos pueden tapar
la entrada y salida de aire.
●
NUNCA instale la secadora junto a cortinas.
Instalación de la manguera de
descarga.
A menos que la secadora esté situada en un espacio
abierto con un buen flujo de aire alrededor de ella, es
esencial utilizar una manguera de ventilación para
extraer el aire caliente y húmedo del interior de la
secadora. La recirculación del aire húmedo impedirá el
funcionamiento eficiente de la secadora.
La manguera se instala en la máquina de la manera
señalada.
Se puede instalar la manguera de tal manera que pase
a través de una pared o por una puerta o ventana
abierta. El diámetro de la manguera es de 110mm y su longitud de 1,8 metros.
Al instalar una manguera de descarga se deben seguir las pautas siguientes.
●
No utilice dos mangueras unidas ya que se reducirá el rendimiento de secado.
●
No restrinja el flujo de aire que circula a través de la manguera, p.ej. retorciéndola
97
40003475SPA.qxd
08/07/2005
18:24
Page 98
o instalando un conector de menor diámetro para montarla en una abertura de la
pared.
●
Evite que la manguera cree curvas en forma de U, ya que esto restringiría el flujo
de aire e incrementaría la posibilidad de que el agua se acumule en la manguera.
●
Compruebe regularmente la manguera para eliminar cualquier acumulación de
pelusa o de agua que haya quedado retenida en ella.
Los siguientes diagramas proporcionan ejemplos de buenas y malas instalaciones.
Preparación del material
para secar
Antes de usar por primera vez la secadora:
No cargue el
tambor en
exceso; los
artículos grandes,
al humedecerse,
pueden superar
la carga de ropa
máxima
admisible
(por ejemplo:
sacos de dormir,
edredones).
98
●
Por favor lea con atención las instrucciones de
este manual.
●
Retire todos los artículos que haya guardado en el
interior del tambor.
●
Con un trapo húmedo, limpie el interior del
tambor y de la puerta para quitar el polvo que
pueda haberse depositado durante el traslado.
Preparación de la ropa
Compruebe que los artículos que propone secar sean
apropiados para secadora, de acuerdo a los símbolos
sobre cuidado que lleve cada artículo.
Compruebe que todos los cierres estén cerrados, y que
no quede nada en los bolsillos. Ponga los artículos al
revés. Coloque la ropa en el tambor, sin presionarla,
para asegurar que no se enrede.
40003475SPA.qxd
08/07/2005
18:24
Page 99
Peso máximo del
material
●
Piezas de algodón máx. 6 kg
●
Piezas de fibras sintéticas máx. 3 kg
Clasifique los artículos
que se van a secar de la
siguiente manera:
●
Según los símbolos de cuidado
Se encuentran en el cuello o en la costura interior:
Apropiado para secadora.
Usar secadora a alta temperatura.
Usar secadora solamente a baja temperatura.
No secar en secadora.
Si el artículo no tiene etiqueta de lavado, se
debe presuponer que no es apropiado para
secadora.
●
Según la cantidad y el grosor
Cuando la cantidad del material para secar sea
mayor que la capacidad de la secadora, separe la
ropa de acuerdo a su espesor (por ej. separe las
toallas de la ropa interior delgada).
●
Según el tipo de tela
Algodón/hilo: Toallas, jerseys de algodón, ropa de
cama y mantelería.
Fibras sintéticas: Blusas, camisas, monos, etc.
hechos de poliéster o poliamida, y también para
mezclas de algodón/fibras sintéticas.
●
Según el grado de secado
Clasificar los artículos según como tienen que
quedar: listos para planchar, listos para guardar,
etc. Para prendas delicadas, presione el botón
para seleccionar una temperatura más baja de
secado.
99
40003475SPA.qxd
08/07/2005
18:24
Page 100
Consejos para el secado
IMPORTANTE: No
usar la secadora
para artículos
que se hayan
tratado con
líquidos para
limpiado en seco
ni para prendas
de goma (peligro
de incendio o de
explosión).
No secar en secadora:
Prendas de lana, seda, telas delicadas, medias de nylon,
bordados delicados, tela con adornos metálicos, prendas
con guarniciones de PVC o de cuero, zapatillas de
deporte, piezas voluminosas como sacos de dormir, etc.
Ahorro de energía
Se deben poner en la secadora solamente artículos que
se hayan estrujado bien o que se hayan centrifugado
para quitar el agua. A menos humedad que tengan las
prendas que se han de secar, más corto será el tiempo
de secado, lo cual ahorrará energía eléctrica.
SIEMPRE
Durante los
últimos 15
minutos, las
piezas siempre
giran en aire frío.
100
●
Procure secar el máximo peso permitido de
artículos, para economizar tiempo y energía.
●
Compruebe que el filtro esté limpio antes de
iniciar el ciclo de secado.
NUNCA
●
Debe excederse del peso máximo, porque de
hacerlo así se malgasta tiempo y energía eléctrica.
●
Introduzca en la secadora artículos que chorreen
agua, porque se puede dañar el aparato.
40003475SPA.qxd
08/07/2005
18:24
Page 101
Controles e indicadores
BOTÓN DELICADOS
SINTÉTICOS
CONTROL DE
BOTÓN ON
(ENCENDIDO) MANTENIMIENTO
DEL FILTRO
SELECTOR DEL
TIEMPO DE
SECADO
Panel de control y luces de aviso
Botón ‘ON’ e indicador
indicador.
– presione para activar la máquina, y se iluminará el
Botón ‘DELICADOS SINTÉTICOS’
– presione para bajar la temperatura para piezas
delicadas, y presione nuevamente para seleccionar temperatura alta.
Temperatura seleccionada ALTA
Temperatura seleccionada BAJA
Selector del ‘TIEMPO DE SECADO’ – se selecciona el tiempo de secado o la opción
Planchado Rápido
.
Indicador ‘CUIDADO DEL FILTRO’
– se ilumina cuando hay que limpiar el filtro.
101
40003475SPA.qxd
08/07/2005
18:24
Page 102
Puerta y filtro
Modo de abrir la puerta
Tire de la palanca para abrir la puerta.
Para poner la secadora en marcha nuevamente, cierre la
puerta y presione
.
¡AVISO!
Cuando la secadora está en uso,
puede que el tambor y la puerta SE
CALIENTEN MUCHO
Filtro
IMPORTANTE: Para mantener la secadora en condiciones
de funcionamiento eficiente, compruebe que el filtro de
polvo esté limpio antes de cada ciclo de secado.
1.
Tire del filtro hacia arriba.
2.
Abra el filtro de la manera señalada.
3.
Saque las pelusas usando un cepillo suave o con la
punta de los dedos.
4.
Rearme el filtro, acoplándolo con un golpe seco, y
empújelo nuevamente a su sitio.
El control de
mantenimiento del filtro
se ilumina cuando hay que limpiar el filtro.
Si las piezas para secar no se secan, verifique que no se
haya tapado el filtro. El indicador también se ilumina
cuando la manguera de ventilación está tapada o
enroscada.
102
40003475SPA.qxd
08/07/2005
18:24
Page 103
Operación
Consulte la tabla de la guía de secado o las etiquetas de
cuidado para seleccionar el programa más adecuado.
●
Abra la puerta e introduzca la ropa en el tambor,
cuidando de que aquélla no estorbe al cerrar la
puerta.
●
Para secar prendas delicadas, pulse el botón
para bajar la temperatura. Pulse el botón de
nuevo al terminar, para seleccionar temperatura
alta.
Temperatura seleccionada ALTA
Temperatura seleccionada BAJA
●
Haga girar el selector ‘TIEMPO DE SECADO’ hasta
que el tiempo de secado requerido coincida con el
dial.
●
El programa
proporciona una función de
acondicionamiento y antiarrugas. La secadora
calienta las piezas para secar durante 8 minutos,
seguido por un período de enfriamiento de 2
minutos, y es especialmente apropiado para ropa
que pueda haberse dejado por algún tiempo
antes de plancharla, en una canasta de la ropa,
por ejemplo. Cuando se ha secado la ropa afuera
en una cuerda o en radiadores, dentro de la casa,
también a veces se pone rígida. Esta función
afloja las arrugas de la ropa, por lo cual se hace
más fácil y más rápido el trabajo de planchar.
●
Cierre la puerta suavemente, empujándola
lentamente hasta que oiga un ruido de ‘clic’.
●
Presione el botón
. Se iluminará el indicador y
empieza el ciclo de secado.
●
La ropa se seca al dar vueltas en aire caliente
controlado por termostato. Durante los últimos 15
minutos, se usa aire frío
para reducir el
arrugado de la ropa y enfriarla para que se pueda
manipular.
●
Al finalizarse todo el programa, el tambor deja de
girar y el dial señala 0.
●
Abra la puerta y saque la ropa.
●
Para que la secadora funcione con óptima
eficiencia, se debe limpiar el filtro después de
cada ciclo de secado.
¡AVISO!
El tambor, la
puerta y las
piezas que se
han secado
pueden estar
muy calientes.
103
40003475SPA.qxd
08/07/2005
18:24
Page 104
Limpieza y mantenimiento de
rutina
IMPORTANTE
Antes de limpiar
esta máquina,
siempre debe
apagarla y retirar
el enchufe de la
red del
suministro
eléctrico.
Limpieza de la secadora
●
Limpie el filtro después de cada ciclo de secado.
●
Cada vez, después de usar la secadora, pase un
trapo por el interior del tambor y deje la puerta
abierta por un rato para permitir que circule el
aire para secarla.
●
Con un trapo suave, limpie la parte exterior de la
máquina y la puerta.
●
NO use almohadillas abrasivas ni productos
químicos de limpieza.
●
Para evitar que la puerta quede pegada o que se
acumule pelusa, se debe limpiar la puerta interna
y la junta con un trapo húmedo.
Especificaciones técnicas
Para datos
referentes a
energía eléctrica,
refiérase a la
etiqueta de
homologación
que se encuentra
en la parte
delantera de la
secadora (con la
puerta abierta).
104
Capacidad del tambor
115 litros
Cantidad máxima de
piezas para secar
6 kg
Altura
85 cm
Ancho
60 cm
Profundidad
60 cm
Categoría de consumo
de energía
C
40003475SPA.qxd
08/07/2005
18:24
Page 105
Resolución de problemas
Causa posible de...
Defectos que puede solucionar usted mismo
Antes de llamar al Servicio técnico de GIAS para obtener asesoramiento técnico, lea
detenidamente la siguiente lista. Se cobrará el servicio técnico si resulta que la máquina
funciona correctamente, o si ha sido instalada o utilizada incorrectamente. Si el
problema continúa después de completar la verificación recomendada, por favor llame
al Servicio técnico de GIAS para recibir asistencia telefónica.
El tiempo de secado es excesivamente largo/la ropa
no se seca suficientemente…
●
¿Ha seleccionado el tiempo de secado/programa correcto?
●
¿Estaba la ropa demasiado mojada? ¿La ropa fue bien estrujada o centrifugada?
●
¿Hace falta limpiar el filtro?
●
¿Se ha sobrecargado la secadora?
●
¿Está enroscada o tapada la manguera de ventilación?
●
¿Se tiene todavía seleccionada la opción
de un ciclo anterior?
La secadora no funciona…
●
¿Está funcionando el suministro de electricidad hacia la secadora? Compruébelo
con otro aparato como una lámpara de mesa.
●
¿El enchufe está correctamente conectado al suministro de la red?
●
¿Se ha cortado la electricidad?
●
¿Se ha quemado el fusible?
●
¿La puerta está completamente cerrada?
●
¿La secadora está encendida, tanto en el suministro de electricidad como en la
máquina?
●
¿Se ha seleccionado el programa o el tiempo de secado?
●
¿Se ha encendido la máquina después de abrir la puerta?
La secadora hace mucho ruido…
●
Apague la secadora y póngase en contacto con el Servicio técnico de GIAS para
obtener asesoría.
El control de mantenimiento del filtro está
encendido…
●
¿Hace falta limpiar el filtro?
●
¿Está enroscada o tapada la manguera de ventilación?
105
40003475SPA.qxd
08/07/2005
18:24
Page 106
Servicio de atención al
cliente
Si después de revisar todos los aspectos recomendados
persistiera algún problema con la secadora, llame al
Servicio GIAS de Atención al Cliente para obtener
asesoría. Es posible que le puedan asesorar por teléfono
o bien convenir una hora apropiada para que le visite
un ingeniero bajo los términos de la garantía. Sin
embargo, es posible que se le cobre si alguna de las
situaciones siguientes es aplicable a su máquina:
●
Si se halla en buen estado de funcionamiento.
●
Si no se ha realizado la instalación de acuerdo a
las instrucciones.
●
Si se ha usado incorrectamente.
Servicio de recambios
Utilice siempre recambios auténticos, que se pueden
conseguir a través del Servicio técnico de GIAS.
Servicio técnico de GIAS
Para mantenimiento y reparaciones, llame al ingeniero
del Servicio técnico de GIAS local.
El fabricante no se hace responsable de los errores de
imprenta que puedan existir en este folleto. El
fabricante también se reserva el derecho de efectuar
modificaciones a sus productos sin cambiar las
características esenciales.
106
40003475POLISH.qxd
08/07/2005
18:27
Page 107
Wprowadzenie . . . . . . . . . . . . . . . . . . . . . . . . . . . . . . . . . . . . . . . . . . 108
Informacja o dostarczonym zestawie . . . . . . . . . . . . . . . . . . . . . . . . . . . . . . . . 108
Rozpakowywanie produktu . . . . . . . . . . . . . . . . . . . . . . . . . . . . 108
Bezpieczeństwo . . . . . . . . . . . . . . . . . . . . . . . . . . . . . . . . . . . . . . . . . 109
Instalacja. . . . . . . . .
Używanie . . . . . . . .
Pranie . . . . . . . . . . .
Ochrona środowiska
Serwis GIAS . . . . . .
.
.
.
.
.
.
.
.
.
.
.
.
.
.
.
.
.
.
.
.
.
.
.
.
.
.
.
.
.
.
.
.
.
.
.
.
.
.
.
.
.
.
.
.
.
.
.
.
.
.
.
.
.
.
.
.
.
.
.
.
.
.
.
.
.
.
.
.
.
.
.
.
.
.
.
.
.
.
.
.
.
.
.
.
.
.
.
.
.
.
.
.
.
.
.
.
.
.
.
.
.
.
.
.
.
.
.
.
.
.
.
.
.
.
.
.
.
.
.
.
.
.
.
.
.
.
.
.
.
.
.
.
.
.
.
.
.
.
.
.
.
.
.
.
.
.
.
.
.
.
.
.
.
.
.
.
.
.
.
.
.
.
.
.
.
.
.
.
.
.
.
.
.
.
.
.
.
.
.
.
.
.
.
.
.
.
.
.
.
.
.
.
.
.
.
.
.
.
.
.
.
.
.
.
.
.
.
.
.
.
.
.
.
.
.
.
.
.
.
.
109
109
109
110
110
Instalacja. . . . . . . . . . . . . . . . . . . . . . . . . . . . . . . . . . . . . . . . . . . . . . . . . 111
Wymagania dotyczące elektryczności . . . . . . . . . . . . . . . . . . . . . . . . . . . . . . . 111
Regulacja nóżek . . . . . . . . . . . . . . . . . . . . . . . . . . . . . . . . . . . . . . . . . . . . . . . 111
Wentylacja . . . . . . . . . . . . . . . . . . . . . . . . . . . . . . . . . . . . . . . . . . . . . . . 112
Instalacja przewodu odprowadzającego . . . . . . . . . . . . . . . . . . . . . . . . . . . . . . 112
Przygotowanie ładunku prania . . . . . . . . . . . . . . . . . . . . . . . . 113
Przygotowanie ubrania . . . . . . . . . . . . . . . . . . . . . . . . . . . . . . . . . . . . . . . . . . 113
Sortowanie ładunku . . . . . . . . . . . . . . . . . . . . . . . . . . . . . . . . . . . . . . . . . . . . . 114
Porady dotyczące suszenia . . . . . . . . . . . . . . . . . . . . . . . . . . . . 115
Nie suszyć w suszarce bębnowej . . . . . . . . . . . . . . . . . . . . . . . . . . . . . . . . . . 115
Oszczędność energii . . . . . . . . . . . . . . . . . . . . . . . . . . . . . . . . . . . . . . . . . . . . 115
Pokrętła i lampki . . . . . . . . . . . . . . . . . . . . . . . . . . . . . . . . . . . . . . . . 116
Drzwiczki i filtr . . . . . . . . . . . . . . . . . . . . . . . . . . . . . . . . . . . . . . . . . . 117
Otwieranie drzwiczek. . . . . . . . . . . . . . . . . . . . . . . . . . . . . . . . . . . . . . . . . . . . 117
Filtr . . . . . . . . . . . . . . . . . . . . . . . . . . . . . . . . . . . . . . . . . . . . . . . . . . . . . . . . . 117
Lampka sygnalizacyjna filtra . . . . . . . . . . . . . . . . . . . . . . . . . . . . . . . . . . . . . . 117
Działanie . . . . . . . . . . . . . . . . . . . . . . . . . . . . . . . . . . . . . . . . . . . . . . . . . 118
Czyszczenie i konserwacja . . . . . . . . . . . . . . . . . . . . . . . . . . . . 119
Czyszczenie suszarki . . . . . . . . . . . . . . . . . . . . . . . . . . . . . . . . . . . . . . . . . . . 119
Dane techniczne . . . . . . . . . . . . . . . . . . . . . . . . . . . . . . . . . . . . . . . . . . . . . . . 119
Wykrywanie i usuwanie usterek . . . . . . . . . . . . . . . . . . . . . . 120
Obsługa klienta . . . . . . . . . . . . . . . . . . . . . . . . . . . . . . . . . . . . . . . . . 121
Części zamienne . . . . . . . . . . . . . . . . . . . . . . . . . . . . . . . . . . . . . . . . . . . . . . . 121
Serwis GIAS . . . . . . . . . . . . . . . . . . . . . . . . . . . . . . . . . . . . . . . . . . . . . . . . . . 121
107
40003475POLISH.qxd
08/07/2005
18:27
Page 108
Wprowadzenie
Sprawdź, czy nie
nastąpiło
uszkodzenie
urządzenia podczas
transportu. Jeżeli
tak się stało, należy
wezwać serwis
GIAS.
Niezastosowanie
się do powyższych
zaleceń może
wpłynąć na
bezpieczeństwo
korzystania z
suszarki. Jeżeli
problem związany
z urządzeniem
wynika z
niewłaściwego
użytkowania, może
zostać pobrana
opłata za wezwanie
serwisu.
PROSIMY dokładnie zapoznać się z instrukcją i zgodnie
z nią użytkować pralkę. Niniejszy poradnik zawiera
ważne informacje dotyczące bezpiecznej instalacji,
użytkowania, konserwacji oraz porady, jak osiągnąć
najlepsze wyniki podczas korzystania z urządzenia.
Dokumentacja urządzenia powinna być zabezpieczona na
wypadek konieczności skorzystania z niej w przyszłości, a
także dla kolejnych jego posiadaczy
Informacja o
dostarczonym zestawie
PROSIMY sprawdzić, czy następujące pozycje zostały
dostarczone wraz z urządzeniem:
●
●
●
●
Instrukcja obsługi
Karta gwarancyjna
Zestaw wywiewowy i instrukcja
Informacja o zużyciu energii
Rozpakowywanie
produktu
Wyjmij urządzenie z opakowania w pobliżu planowanego
miejsca eksploatacji.
1.
Przetnij ostrożnie opakowanie wokół podstawy i w
górę, wzdłuż jednej krawędzi bocznej.
2.
Usuń polietylenowe opakowanie i zdejmij suszarkę ze
styropianowej podstawy.
Zachowaj ostrożność przy wyrzucaniu
elementów opakowania. Dzieci nie
powinny mieć dostępu do części
opakowania, które mogą stwarzać
niebezpieczeństwo.
108
40003475POLISH.qxd
12/12/2005
19:28
Page 109
Bezpieczeństwo
Instalacja
●
●
●
●
Przed użyciem sprawdź, czy nie ma widocznych oznak uszkodzenia wyrobu. W razie
uszkodzenia nie używaj i wezwij serwis GIAS.
Nie używaj przejściówek, rozgałęźników ani przedłużaczy.
Urządzenie nie powinno być instalowane w łazience ani w pomieszczeniu z
prysznicem.
Suszarka nie powinna być instalowana w pobliżu zasłon. Należy upewnić się, że żadne
przedmioty nie będą spadać pod suszarkę ani gromadzić się za nią.
Użytkowanie
●
●
●
●
●
●
●
●
●
●
●
●
OSTRZEŻENIE Nieprawidłowe użytkowanie suszarki bębnowej może spowodować
niebezpieczeństwo pożaru.
Urządzenie służy do zastosowań w gospodarstwie domowym, do suszenia tkanin i
odzieży.
Urządzenie powinno być użytkowane zgodnie z przeznaczeniem opisanym w instrukcji.
Przed rozpoczęciem obsługi urządzenia należy się upewnić, że instrukcje instalacji i
eksploatacji zostały dobrze zrozumiane.
Nie wolno dotykać urządzenia wilgotnymi rękami ani nogami.
Nie należy opierać się o drzwiczki podczas ładowania urządzenia, podnosić ani
przesuwać urządzenia, pociągając za drzwiczki.
Nie wolno dopuszczać, aby dzieci bawiły się urządzeniem oraz jego pokrętłami.
OSTRZEŻENIE Nie używaj wyrobu, jeśli filtr kłaczków znajduje się nie na swoim
miejscu lub jest uszkodzony; kłaczki mogą spowodować zapalenie.
OSTRZEŻENIE Tam gdzie umieszczony jest symbol gorącej powierzchni
,
podczas pracy suszarki bębnowej może nastąpić wzrost temperatury powyżej 60°C.
Wyjmij wtyczkę ze źródła zasilania. Zawsze wyjmuj wtyczkę przed czyszczeniem
urządzenia.
Jeżeli urządzenie nie pracuje prawidłowo, nie należy kontynuować posługiwania się nim.
Na podłodze wokół urządzenia nie powinny znajdować się drobne zanieczyszczenia
ani kurz.
Bęben znajdujący się wewnątrz może być bardzo nagrzany. Przed wyjmowaniem
prania suszarka powinna całkowicie ostygnąć.
Pranie
●
●
●
●
OSTRZEŻENIE Nie susz tkanin pranych przy użyciu płynów do czyszczenia
chemicznego.
OSTRZEŻENIE W pewnych okolicznościach materiały z gumy piankowej mogą, w
przypadku ich nagrzania, samorzutnie się zapalić. Plastiki piankowe, gumy piankowe i
materiały gumopodobne nie nadają się do suszenia w suszarce bębnowej. Wyroby
wykonane z tych materiałów NIE POWINNY być umieszczane w suszarce.
Przy suszeniu należy zawsze stosować się do zaleceń nt. prania odzieży.
Przed umieszczeniem w suszarce ubranie powinno być odwirowane lub dokładnie
109
40003475POLISH.qxd
12/12/2005
19:29
Page 110
wykręcone. Do suszarki NIE NALEŻY wkładać ubrań ociekających wodą.
Nie należy pozostawiać w kieszeniach zapalniczek czy zapałek oraz NIE używać
łatwopalnych płynów w pobliżu suszarki.
Zasłony z włókna sztucznego NIE powinny być wkładane do tego urządzenia. Odzież
zanieczyszczona włóknem szklanym może powodować podrażnienie skóry.
Odzież, która była poddana działaniu lub zanieczyszczona łatwo zapalnymi
rozpylaczami do czyszczenia bądź takimi płynami, jak benzyna, olej do gotowania czy
rozpylacze w aerozolu, NIE powinna być wkładana do urządzenia.
●
●
●
Ochrona środowiska
●
Wszystkie elementy opakowania są wykonane z materiałów przyjaznych środowisku i
nadają się do odzysku. Prosimy o usuwanie opakowania w sposób przyjazny dla
środowiska. Informacje o aktualnych szczegółach na temat usuwania zużytych
urządzeń można uzyskać u lokalnych władz.
W celu zapewnienia bezpieczeństwa przy wyrzucaniu starej suszarki wyłącz wtyczkę z
gniazdka, odłącz kabel zasilania i zniszcz go wraz z wtyczką. Dla zapobieżenia
zamknięciu się dzieci w starej pralce wyłam zawiasy lub zamek drzwiczek.
●
Serwis GIAS
●
W celu zapewnienia bezpiecznego i wydajnego użytkowania tego urządzenia zaleca
się przeprowadzanie wszelkiego rodzaju serwisów i napraw przez autoryzowanego
serwisanta.
Dyrektywa europejska 2002/96/WE
To urządzenie oznaczone jest zgodnie z europejską dyrektywą 2002/96/WE w sprawie
zużytego sprzętu elektrycznego i elektronicznego (WEEE).
Pozbywając się tego produktu w odpowiedni sposób, zapobiegniesz potencjalnym
negatywnym wpływom na środowisko i ludzkie zdrowie, które
mogłyby mieć miejsce, gdyby urządzenie nie zostało zutylizowane
w odpowiedni sposób.
Symbol na produkcie wskazuje, że nie może być on traktowany
jako odpady z gospodarstwa domowego. Dlatego też należy
przekazać go do odpowiedniego punktu przyjmującego odpady
elektryczne i elektroniczne do recyklingu
Utylizacja zużytego urządzenia musi zostać przeprowadzona
zgodnie z lokalnymi przepisami dotyczącymi pozbywania się
odpadów.
Aby uzyskać bardziej szczegółowe informacje na temat
obchodzenia się z tym produktem i jego recyklingu, skontaktuj się
z oddziałem lokalnym, zakładem oczyszczania miasta lub
sklepem, w którym zakupiłeś produkt.
Jeżeli urządzenie działa nieprawidłowo lub przestaje działać,
należy wyłączyć zasilanie i wyjąć wtyczkę z gniazda zasilania. W
sprawie ewentualnych napraw należy zgłosić się do serwisu GIAS.
110
40003475POLISH.qxd
08/07/2005
18:27
Page 111
Instalacja
Wymagania dotyczące
elektryczności
Suszarki bębnowe są przygotowane do pracy z
jednofazowym prądem 230–240 V, 50 Hz. Upewnij się, że
natężenie prądu w obwodzie wynosi przynajmniej 10 A.
Napięcie elektryczne może być skrajnie niebezpieczne.
Urządzenie musi być uziemione.
Gniazdko i wtyczka urządzenia muszą być tego
samego typu.
Jeżeli problem z
urządzeniem
wynika z
niewłaściwej
instalacji, może
zostać pobrana
opłata za wezwanie
serwisu.
Nie używaj przejściówek ani przedłużaczy.
Po zainstalowaniu urządzenia wtyczka powinna być
dostępna do odłączenia.
Druty przewodu sieci zasilającej są pokolorowane według
następującego kodu:
Niebieski
NEUTRALNY
Brązowy
POD NAPIĘCIEM
Zielony i żółty
UZIEMIENIE
Urządzenie z oznaczeniem CE spełnia wymogi dyrektyw
89/336/EWG i 73/23/EWG z późniejszymi zmianami.
Nie podłączaj urządzenia ani nie włączaj
zasilania do czasu zakończenia instalacji.
Dla zapewnienia bezpieczeństwa suszarka
musi być prawidłowo zainstalowana.
W przypadku jakichkolwiek wątpliwości
dotyczących instalacji należy
skontaktować się telefonicznie z serwisem
GIAS.
Jeżeli przewód
sieci zasilającej w
urządzeniu ulegnie
uszkodzeniu,
należy go zastąpić
specjalnym
przewodem,
dostępnym TYLKO
w serwisie części
zamiennych GIAS.
Instalację taką
musi
przeprowadzić
upoważniona
osoba.
Regulacja nóżek
Po ustawieniu urządzenia na miejscu sprawdź, czy
urządzenie jest wypoziomowane.
Wyreguluj cztery nóżki, aby upewnić się, że urządzenie
pewnie stoi na miejscu.
111
40003475POLISH.qxd
08/07/2005
18:27
Page 112
Wentylacja
Zapewnić właściwą wentylację pomieszczenia, w którym
znajduje się suszarka, aby nie doszło do nagromadzenia
gazów pochodzących z innych urządzeń lub zaprószenia
ognia w czasie pracy suszarki.
●
Usuwane powietrze nie powinno dostać się do
kanału wentylacyjnego, przeznaczonego do
usuwania wyziewów z urządzeń spalających gaz lub
inne paliwa.
●
Regularnie sprawdzaj, czy jest swobodny przepływ
powietrza przechodzącego przez suszarkę.
●
Sprawdź filtr kłaczków po jego użyciu i wyczyść, jeśli
to konieczne.
●
Wejścia i wyjścia powinny być drożne. W celu
zabezpieczenia odpowiedniej wentylacji przestrzeń
pomiędzy dolną częścią urządzenia a podłogą musi
być wolna od przeszkód. Odstęp między
urządzeniem a jakimkolwiek innym przedmiotem
powinien wynosić przynajmniej 12 mm.
●
Zapobiegaj gromadzeniu się jakichkolwiek
przedmiotów za suszarką, ponieważ mogą one
blokować wlot i wylot powietrza.
●
NIGDY nie ustawiaj suszarki w pobliżu zasłon.
Instalacja przewodu
odprowadzającego
Konieczne jest użycie przewodu odpowietrzania do
odprowadzania gorącego, wilgotnego powietrza z suszarki,
chyba że suszarka umieszczona jest na otwartej
przestrzeni i jest wokół niej dobry przepływ powietrza.
Ponowna cyrkulacja wilgotnego powietrza uniemożliwi
wydajną pracę suszarki.
Przewód jest montowany i mocowany do urządzenia w
sposób przedstawiony na ilustracji.
Przewód można przeprowadzić przez ścianę lub otwarte
drzwi albo okno. Przewód ma średnicę 110 mm i długość
1,8 metra.
Podczas instalacji przewodu odprowadzającego należy
stosować się do następujących zaleceń.
●
112
Nie używaj dwóch połączonych ze sobą przewodów,
gdyż spowoduje to zmniejszenie efektywności
suszenia.
40003475POLISH.qxd
08/07/2005
18:27
Page 113
●
Nie ograniczaj przepływu powietrza przez przewód, np. poprzez załamywanie go lub
instalowanie złączki o mniejszej średnicy, aby podłączyć go do otworu w ścianie.
●
Dopilnuj, aby przewód nie zwijał się na kształt litery U, gdyż ogranicza to przepływ
powietrza i zwiększa prawdopodobieństwo gromadzenia się wody w przewodzie.
●
Regularnie kontroluj przewód, aby usuwać nagromadzone kłaczki lub wodę.
Poniższe diagramy przedstawiają przykłady dobrych i złych instalacji.
Przygotowanie ładunku
Przed użyciem suszarki po raz pierwszy należy:
●
Dokładnie zapoznać się z instrukcją.
●
Wyjąć wszystkie przedmioty zapakowane wewnątrz
bębna.
●
Wytrzeć wnętrze bębna i drzwiczki wilgotną
ściereczką, aby usunąć kurz, który mógł się
nagromadzić podczas transportu.
Przygotowanie ubrań
Sprawdź, czy przeznaczone do suszenia pranie może być
suszone w suszarce bębnowej, zgodnie z etykietkami na
każdym wyrobie.
Sprawdź, czy wszystkie zapięcia są zamknięte, a kieszenie
puste. Odwróć wszystkie wyroby na lewą stronę. Umieść
ubranie w bębnie luźno, aby się nie poplątało.
Nie należy
przeładowywać
bębna; duże sztuki
(np. śpiwory,
kołdry) mogą po
namoknięciu
spowodować
przekroczenie
maksymalnego
dopuszczalnego
obciążenia.
113
40003475POLISH.qxd
08/07/2005
18:27
Page 114
Maksymalny ciężar przy
suszeniu
●
Maks. ciężar wyrobów z bawełny 6 kg
●
Maks. ciężar wyrobów syntetycznych 3 kg
Sortuj ładunek
następująco:
●
Ze względu na symbole użytkowania
Można je znaleźć na kołnierzyku lub wewnętrznym
szwie:
Nadaje się do suszenia w suszarce bębnowej.
Suszenie w suszarce bębnowej w wysokiej
temperaturze.
Suszenie w suszarce bębnowej tylko w niskiej
temperaturze.
Nie suszyć w suszarce bębnowej.
Jeżeli na odzieży nie ma wskazówek
dotyczących prania, należy założyć, że tkanina
nie nadaje się do suszenia w suszarce.
●
Według ilości i grubości
W przypadku ładunku większego niż pojemność
suszarki oddziel ubranie w zależności od jego
grubości (np. ręczniki od bielizny).
●
Według typu tkaniny
Bawełna/len: ręczniki, bluzy bawełniane, bielizna
pościelowa i stołowa.
Tkaniny syntetyczne: Bluzki, koszule, kombinezony
itp., wykonane z poliestru lub poliamidu, jak również
mieszanki bawełny z włóknem syntetycznym.
●
Pod względem stanu wysuszenia
Podzielić według grup: do wysuszenia żelazkiem, do
wysuszenia w ciepłym pomieszczeniu itp. W
przypadku delikatnych tkanin naciśnij przycisk
w celu wybrania niskiej temperatury suszenia.
114
40003475POLISH.qxd
08/07/2005
18:27
Page 115
Porady dotyczące suszenia
Nie suszyć w suszarce
bębnowej:
Wełna, jedwab, tkaniny delikatne, pończochy nylonowe,
delikatne hafty, tkaniny z metalowymi ozdobami, odzież z
ozdobami z tworzywa sztucznego lub skóry, buty sportowe,
duże artykuły, takie jak śpiwory itp.
Oszczędność energii
Wkładaj do suszarki bębnowej tylko pranie dokładnie
wykręcone lub odwirowane. Im bardziej suche pranie, tym
krótszy czas jego suszenia i dzięki temu oszczędność
energii elektrycznej.
UWAGA: Nie
należy suszyć
wyrobów, które
były poddawane
działaniu płynów
do czyszczenia
chemicznego lub
rękawic gumowych
(niebezpieczeństw
o pożaru lub
wybuchu).
ZAWSZE
●
Susz jak największą ilość prania – w ten sposób
oszczędzisz czas i energię elektryczną.
●
Przed każdym cyklem czyszczenia sprawdź czystość
filtra.
NIGDY
●
Nie przekraczaj maksymalnego ciężaru; spowoduje
to stratę czasu i energii elektrycznej.
●
Nie wkładaj do suszarki prania ociekającego wodą,
może to doprowadzić od uszkodzenia urządzenia.
Podczas ostatnich
15 minut ładunek
jest obracany w
chłodnym
powietrzu.
115
40003475POLISH.qxd
08/07/2005
18:27
Page 116
Pokrętła i lampki
PRZYCISK TKANINY
AKRYLOWE/
SYNTETYCZNE
PRZYCISK
ON
LAMPKA
SYGNALIZACYJNA
FILTRA
POKRĘTŁO
WYBORU CZASU
SUSZENIA
Panel sterowania i lampki
sygnalizacyjne
Przycisk ON i lampka sygnalizacyjna
– naciśnij w celu włączenia, lampka zapali się.
Przycisk TKANINY DELIKATNE
– naciśnij w celu zmniejszenia poziomu temperatury
dla delikatnych tkanin; naciśnij ponownie, aby wybrać wysoką temperaturę.
WYSOKA – ustawienie temperatury
NISKA – ustawienie temperatury
Pokrętło CZAS SUSZENIA – umożliwia wybór czasu suszenia lub opcji szybkiego
prasowania
.
Lampka sygnalizacyjna FILTR
116
– zapala się, gdy filtr wymaga czyszczenia.
40003475POLISH.qxd
08/07/2005
18:27
Page 117
Drzwiczki i filtr
Otwieranie drzwiczek
Pociągnij za uchwyt, aby otworzyć drzwiczki.
Zamknij drzwiczki i naciśnij
suszarkę.
, aby ponownie uruchomić
OSTRZEŻENIE!
Podczas użytkowania suszarki
bębnowej bęben i drzwiczki mogą być
BARDZO GORĄCE
Filtr
UWAGA: Aby suszarka pracowała wydajnie, przed
każdym cyklem suszenia należy sprawdzić, czy filtr
kłaczków jest czysty.
1.
Wyciągnij filtr do góry.
2.
Otwórz filtr, tak jak pokazano.
3.
Delikatnie usuń kłaczki przy użyciu miękkiej
szczoteczki lub palców.
4.
Zatrzaśnij filtr i wsuń na właściwe miejsce.
Lampka sygnalizacyjna
filtra
zapala się, jeżeli filtr wymaga czyszczenia.
Jeżeli pranie nie jest suszone, sprawdź, czy filtr nie
jest zatkany. Lampka zapala się również w przypadku,
gdy przewód odpowietrzania jest zatkany lub
pozwijany.
117
40003475POLISH.qxd
08/07/2005
18:27
Page 118
Działanie
Aby wybrać odpowiedni program, zapoznaj się ze
wskazówkami dotyczącymi suszenia lub oznaczeniami na
etykiecie tkaniny.
●
Otwórz drzwi i załaduj bęben praniem. Sprawdź, czy
odzież nie przeszkadza przy zamknięciu drzwiczek.
●
Przy suszeniu delikatnych wyrobów naciśnij przycisk
w celu zmniejszenia temperatury. Po
zakończeniu naciśnij ponownie w celu wybrania
wysokiej temperatury.
WYSOKA – ustawienie temperatury
NISKA – ustawienie temperatury
●
Przekręcaj pokrętło CZAS SUSZENIA, aż osiągnie
ono odpowiednią pozycję.
●
Program
obejmuje funkcję kondycjonowania i
zapobiegania gnieceniu. Suszarka będzie nagrzewać
ładunek przez 8 minut, po czym nastąpi 2-minutowe
schłodzenie, co jest szczególnie korzystne w
przypadku odzieży zostawionej przez pewien czas
przed prasowaniem w koszu na bieliznę. Może to
być właściwe dla odzieży pozostawionej do suszenia
na zewnątrz lub na kaloryferach, gdzie mogła ulec
zesztywnieniu. Proces ten poluźnia pognieciony
materiał i czyni prasowanie tkaniny szybszym i
łatwiejszym.
●
Delikatnie zamknij drzwiczki, popychając je powoli,
aż do usłyszenia ich zamknięcia przez „kliknięcie”.
●
Naciśnij przycisk
. Lampka sygnalizacyjna zapali
się i rozpocznie się cykl suszenia.
●
Ładunek jest suszony przez obracanie w
termostatycznie kontrolowanym ciepłym powietrzu.
Chłodne powietrze jest stosowane przez ostatnie 15
minut w celu zmniejszenia pogniecenia i ochłodzenia
ładunku przed wyjęciem
.
●
Po całkowitym zakończeniu programu bęben
przestanie się obracać i pokrętło wskaże symbol 0.
●
Otworzyć drzwi i wyjmij ładunek.
●
Czyść filtr po każdym cyklu czyszczenia – zapewni
to najwyższą wydajność suszarki.
OSTRZEŻENIE!
Bęben, drzwiczki i
ładunek mogą być
bardzo gorące.
118
40003475POLISH.qxd
08/07/2005
18:27
Page 119
Czyszczenie i konserwacja
Czyszczenie suszarki
●
Czyść filtr po każdym cyklu czyszczenia.
●
Po każdym użytkowaniu wytrzyj wnętrze bębna i
przez pewien czas pozostaw otwarte drzwiczki, aby
pozwolić cyrkulacji powietrza na wysuszenie go.
●
Wytrzyj z zewnątrz urządzenie i drzwiczki za pomocą
miękkiej szmatki.
●
NIE używaj ostrych czyścików ani szorujących
środków czyszczących.
●
Aby zapobiec przywieraniu drzwiczek i
nagromadzeniu kłaczków, należy od czasu do czasu
czyścić wewnętrzną stronę drzwiczek i uszczelkę
mokrą szmatką.
Dane techniczne
Pojemność bębna
115 litrów
Maksymalne załadowanie
6 kg
Wysokość
85 cm
Szerokość
60 cm
Głębokość
60 cm
Pasmo poziomu energetycznego
C
UWAGA
Przed
czyszczeniem
urządzenie
powinno być
wyłączone, a
wtyczka wyjęta z
gniazdka zasilania.
Odnośnie do
danych
elektrycznych –
patrz etykietka
wartości
znamionowych na
przedniej części
suszarki (przy
otwartych
drzwiczkach).
119
40003475POLISH.qxd
08/07/2005
18:27
Page 120
Wykrywanie i usuwanie
usterek
Przyczyny usterek...
Usterki, które można naprawić samodzielnie
Przed zwróceniem się po pomoc techniczną do serwisu GIAS należy sprawdzić listę
następujących problemów. W razie stwierdzenia, że urządzenie pracuje prawidłowo lub
zostało nieprawidłowo zainstalowane albo użytkowane, koszt wezwania serwisanta poniesie
użytkownik. Jeżeli po sprawdzeniu poniższych punktów problem z urządzeniem nadal
istnieje, najpierw należy skontaktować się z serwisem GIAS telefonicznie.
Czas suszenia zbyt długi/odzież nie jest
wystarczająco sucha…
●
Czy został wybrany prawidłowy czas/program suszenia?
●
Czy odzież była zbyt mokra? Czy była dokładnie wykręcona lub odwirowana?
●
Czy filtr wymaga czyszczenia?
●
Czy suszarka nie jest przepełniona?
●
Czy przewód odpowietrzania nie jest skręcony lub zatkany?
●
Czy opcja
została wybrana z poprzedniego cyklu?
Suszarka nie działa…
●
Czy jest prawidłowe zasilanie elektryczne suszarki? Sprawdź za pomocą innego
urządzenia, np. lampki stołowej.
●
Czy wtyczka jest prawidłowo podłączona do źródła zasilania?
●
Czy nie ma przerwy w dopływie prądu?
●
Czy bezpiecznik nie jest przepalony?
●
Czy drzwiczki są całkowicie zamknięte?
●
Czy suszarka jest włączona zarówno do źródła prądu, jak i na urządzeniu?
●
Czy został wybrany czas suszenia lub program?
●
Czy urządzenie zostało włączone ponownie po otwarciu drzwiczek?
Suszarka głośno pracuje…
●
Wyłącz suszarkę i skontaktuj się z serwisem GIAS w celu uzyskania pomocy
technicznej.
Lampka sygnalizacyjna filtra pozostaje zapalona…
●
Czy filtr wymaga czyszczenia?
●
Czy przewód odpowietrzania nie jest skręcony lub zatkany?
120
40003475POLISH.qxd
08/07/2005
18:27
Page 121
Obsługa klienta
Jeżeli po zakończeniu sprawdzania zalecanych punktów
nadal występuje problem w działaniu suszarki, zwróć się po
poradę do serwisu GIAS. Możliwe jest uzyskanie pomocy
drogą telefoniczną lub zamówienie wizyty serwisanta
zgodnie z warunkami gwarancji. Przy zaistnieniu
jakiejkolwiek z wymienionych sytuacji użytkownik może
zostać obciążony kosztami serwisu:
●
Suszarka pracuje prawidłowo.
●
Nie została zainstalowana zgodnie z instrukcją
dotyczącą instalacji.
●
Była nieprawidłowo użytkowana.
Części zamienne
Należy zawsze korzystać z oryginalnych części
zamiennych, dostępnych bezpośrednio w serwisie
GIAS.
Serwis GIAS
W sprawie serwisowania i napraw należy kontaktować
się z serwisantem GIAS.
Producent nie ponosi odpowiedzialności za błędy
drukarskie w niniejszej instrukcji. Producent zastrzega
sobie również prawo do dokonania odpowiednich zmian
produktu bez zmiany zasadniczych jego cech.
121
40003475GREEK.qxd
08/07/2005
18:29
Page 122
. . . . . . . . . . . . . . . . . . . . . . . . . . . . . . . . . . . . . . . . . . . . . . . . 123
. . . . . . . . . . . . . . . . . . . . . . . . . . . . . . . . . . . . . . . . 123
. . . . . . . . . . . . . . . . . . . . . . . 123
. . . . . . . . . . . . . . . . . . . . . . . . . . . . . . 124
. . . . . . . .
. . . . . . . . . . . . .
. . . .
GIAS . . . . .
.
.
.
.
.
.
.
.
.
.
.
.
.
.
.
.
.
.
.
.
.
.
.
.
.
.
.
.
.
.
.
.
.
.
.
.
.
.
.
.
.
.
.
.
.
.
.
.
.
.
.
.
.
.
.
.
.
.
.
.
.
.
.
.
.
.
.
.
.
.
.
.
.
.
.
.
.
.
.
.
.
.
.
.
.
.
.
.
.
.
.
.
.
.
.
.
.
.
.
.
.
.
.
.
.
.
.
.
.
.
.
.
.
.
.
.
.
.
.
.
.
.
.
.
.
.
.
.
.
.
.
.
.
.
.
.
.
.
.
.
.
.
.
.
.
.
.
.
.
.
.
.
.
.
.
.
.
.
.
.
.
.
.
.
.
.
.
.
.
.
.
.
.
.
.
.
.
.
.
.
.
.
.
.
.
.
.
.
.
.
.
.
.
.
.
.
.
.
.
.
.
.
.
.
.
.
.
.
.
.
124
124
124
125
125
. . . . . . . . . . . . . . . . . . . . . . . . . . . . . . . . . . . . . . . . . . . . 126
. . . . . . . . . . . . . . . . . . . . . . . . . . . . . . . . . . . . . . . . . . . 126
! " # . . . . . . . . . . . . . . . . . . . . . . . . . . . . . . . . . . . . . . . . . . . . 126
. . . . . . . . . . . . . . . . . . . . . . . . . . . . . . . . . . . . . . . . . . . . . . 127
$ $ " $ . . . . . . . . . . . . . . . . . . . . . 127
. . . . . . . . . . . . . . . . . . . 128
" . . . . . . . . . . . . . . . . . . . . . . . . . . . . . . . . . . . . . . . . . . . 128
%& $ $ " . . . . . . . . . . . . . . . . . . . . . . . . . . . . . . . . . . . 129
!
. . . . . . . . . . . . . . . . . . . . . . . . . . . . . . . . 130
' # " . . . . . . . . . . . . . . . . . . . . . . . . . . . . . . . . . . . . 130
E%& . . . . . . . . . . . . . . . . . . . . . . . . . . . . . . . . . . . . . . . . . . 130
"
#$ . . . . . . . . . 131
. . . . . . . . . . . . . . . . . . . . . . . . . . . . . . . . . . . . . . . . 132
( &. . . . . . . . . . . . . . . . . . . . . . . . . . . . . . . . . . . . . . . . . . . . . 132
). . . . . . . . . . . . . . . . . . . . . . . . . . . . . . . . . . . . . . . . . . . . . . . . . . . . . . . 132
$ $ $ . . . . . . . . . . . . . . . . . . . . . . . . . . . . . . 132
%
. . . . . . . . . . . . . . . . . . . . . . . . . . . . . . . . . . . . . . . . . . . . . . . 133
"& . . . . . . . . . . . . . . . . . . 134
*& $ "$. . . . . . . . . . . . . . . . . . . . . . . . . . . . . . . . . . . . . 134
. . . . . . . . . . . . . . . . . . . . . . . . . . . . . . . . . . . . . . . . . . 134
! . . . . . . . . . . . . . . . . . . . . . . . . . . 135
' $ ! . . . . . . . . . . . . . . . . . . . . 136
+ . . . . . . . . . . . . . . . . . . . . . . . . . . . . . . . . . . . . . . . . . . . . . . . . . . 136
GIAS . . . . . . . . . . . . . . . . . . . . . . . . . . . . . . . . . . . . . . . . . . . . . . . 136
122
40003475GREEK.qxd
08/07/2005
18:29
Page 123
. , ,
.
, $ & $& " $ $&
.
#
% & " $
- $$:
●
#
●
* ●
* % ●
!" # . ! #,
GIAS.
$ . ! ,
% .
+ & $$ $
$.
1.
*&/ " & $$ " $
& ".
2.
+ $ $$$ # " & $$$.
% .
& , .
123
40003475GREEK.qxd
12/12/2005
19:37
Page 124
●
●
●
●
, . , GIAS.
!, """# / .
$ ! ".
! ! % !! !% !.
●
●
●
●
●
●
●
●
●
●
●
●
& ! !.
$ " ! , " ! ! % #
.
$ " ! # !
, ! !
. "! , " !
! .
!! ! !.
! ! % .
# .
" ! # ". $ # # "!#.
#" ,
! "!, 60 # C.
' #. ( .
".
)# " !% !# * .
$ "# . ' ! ""% +#* #
.
●
●
●
●
●
124
& !% *! ! !# #.
$ % " # , , # "
#. '% ", %
# " # """ ! ! . ' " # !.
( #
"# ! """ #
! !.
$ #
# # " # !. # !
#
! .
' 40003475GREEK.qxd
●
●
12/12/2005
19:38
Page 125
# #" ! .
- !"# # . #+ , !"# "" .
# #
*! #" !, ",
! " ".
●
●
3" " # " "" "%. 7 + % " "". $ #" % " ! # +.
8 " " ! + "# !,
" # , + "%
# + . 8 + "# , " .
GIAS
●
8 " " " "! # " ! !#
" * GIAS.
! " 2002/96EC
"% !
2002/96EC ! &" &" (WEEE).
#" , % % # "" % !, " """ .
$ " !! . ' """
""! #" "# "#
*"#.
& ! # "" * ! #"
.
8 " *!, ""! #" #,
, #" % .
,
!" # $ %# ! &. ' $# # GIAS ( .
125
40003475GREEK.qxd
08/07/2005
18:29
Page 126
! ,
% .
*$ " $ $ &
230-240 V, 50 H. % "
10 A $.
/ .
$ .
$ # .
0 /
.
! #, , (56!)+/)5
GIAS. /
.
$ # .
# $ "
" "
:
0
(4*!/!'(
5
$6!5/'(7('(
8!)9+$
CE $$ $"
< 89/336/D*,
73/23/D* .
0 # .
8 , .
! , + GIAS .
+& #!
'& $, $ & # & .
!$ &, # & & .
126
40003475GREEK.qxd
08/07/2005
18:29
Page 127
D # &
$ " %&, $ & " # & $$ $ , $
" " $$# $
$ $ &, $ $ "$.
●
% "& $ $ & $$ $ $ .
●
, & $ " -.
●
, $# & -, .
●
% .
@ %&, &
% $ $
# . F $
$ 12 mm %
$ $& ".
●
' $ $# " " & ",
# $ %$ &$ %&$ .
●
(/! " # - $.
$
& " % $ $
$ & ", & " & # " $. $ $ $ / $ $
"$.
D " $ &
" D " #
& , & $. D " 110 mm 1,8 .
* $ $ " $ $ " $$ .
●
' $ " "$ % $, & &
# ".
●
' - " $ $ " .. " $ 127
40003475GREEK.qxd
08/07/2005
18:29
Page 128
$$ & $ " $.
+
& $# U ", $& $% & $ ".
●
" $& $#$
$# $ $ $ $&.
&$ $ # # ".
●
" # :
0
, ( :
,
).
128
●
$& #
.
●
+ & $ $ $$
.
●
$
"& $ $
$ & $& $&
& $ $" .
?" & $ & #
" " , &
" & $ $.
% & & $
, $ .
. $ & . @$ & . ,
# " & % $.
40003475GREEK.qxd
08/07/2005
18:29
Page 129
,$
!
●
'. 6 ●
'. $ 3 )
:
●
+ +$ "
:
* ".
" $/ .
" &.
' # ".
, $
& ".
●
5 > & "& $ "$, %" (
.. & #$).
●
5 &/: -G,
-.
+: -, $, "& .
.
& $ $, # /$.
●
5 %& : $ , # .
. @ $ $
% #.
129
40003475GREEK.qxd
08/07/2005
18:29
Page 130
!
+$0=/)5(: 0
" (
").
, ! :
', %", $ $, ,
$ , $ , & PVC ,
, &
" $
&
.
.
E
$
, " & $ $
$ $ $ . > &
$ & & & " % .
-).)
/ 15 , .
●
, # " . +$& % & .
●
& #, & &.
.)
130
●
' $
. +$& &$ .
●
' $ $ -$ ", $& - $$.
40003475GREEK.qxd
08/07/2005
18:29
Page 131
"
#$ *DH'J
+*!HKJ*L,/H,FJ*L,
*DH'J
,IJ*J* KH,J+ *DH'J JKD@
,!@DDJ/
H,!
!D,DH
+,!@DDJ
)JK!DH
@,L'+D
(ON)
$
#$
5 ‘ON’ $ /.
– % $, 5 /
– # $ % $/
.
HIGH (H/) LOW () 5 ‘?'(=(4 +/!8=90/(+’ – & # $ #
.
$ ‘FILTER CARE’ () $)
- &.
– & 131
40003475GREEK.qxd
08/07/2005
18:29
Page 132
1
% % &.
@ ", &
$
.
'(!)*(()$+$!
G , ' (64 H!+/
3
+$0=/)5(: 8 , .
1.
% ".
2.
+% &
" &.
3.
+ #
$ .
4.
I
# #% $.
# & - &.
! , " # . $ % " .
132
40003475GREEK.qxd
08/07/2005
18:29
Page 133
%
+% $ # " $" % &.
●
+% & . ?" & -$
&.
●
# $ , $
" .
& " ",
% $/ .
HIGH (H/) LOW () ●
●
●
●
●
●
●
●
@$ $
‘!D,DH
@,L'+D’ " &$ &
# $$ &
$
.
&
$
% " " #
-#$. " " " 8 $
/%, $ &
$ " $ & ", .. ". $ #$ " #$ " #. $ # - $
$, " $&.
* & - ,
" &$ ‘’ &.
$
. $ / #.
# & $ . D /$& $ 15 - /$ # &.
> & ", &
$
0.
+% & .
* & # & $ "$.
'(!)*(()$+$!
/ , #.
133
40003475GREEK.qxd
08/07/2005
18:29
Page 134
"& +$0=/)5(
#
.
8 "
% (
).
134
"& ●
, - & #.
●
' & , $
"& $ $
$ & , # $ $ #.
●
$
%"& $ & & .
●
0$ $ $ " .
●
@ & & $#$ $, - " & $ $&
.
)$ #$
"& $
$ 115 ' 6 M/
85 cm
60 cm
?
60 cm
N# C
40003475GREEK.qxd
08/07/2005
18:29
Page 135
!
#$ ...
GIAS $$, "
$. " & $ $ , $ ". & & " " $#" ", GIAS,
# $ " #$.
. !
/
# ...
●
●
●
●
●
●
O % "& &/
& #;
'
" $
$; Q $;
'
" - &;
'
" " $
";
'
" " " ;
'
" & ;
)
# …
●
●
●
●
●
●
●
●
" & ; % # $$, &
" - .
- $ " ;
'
" $ ;
'
" ‘’ ;
O &;
O " $ & &
;
O & # &;
O &;
)
&
…
●
I&/ $ $ "$ " GIAS $$.
* # $…
●
●
'
" - &;
'
" " " ;
135
40003475GREEK.qxd
08/07/2005
18:29
Page 136
' $
!
" " $#" "
%$ "
- & "& , GIAS $$. " $ $&
$ "# / " &"
. L&, & "
$ , $
%
":
●
& $ .
●
" .
●
$
.
? , + GIAS.
$ GIAS
8 + GIAS.
D $ $ "
# " $& . D $
" & <& $, " "
# #.
136
40003475CZECH.qxd
08/07/2005
18:34
Page 137
Úvod . . . . . . . . . . . . . . . . . . . . . . . . . . . . . . . . . . . . . . . . . . . . . . . . . . . . . . 138
Informace o dodání . . . . . . . . . . . . . . . . . . . . . . . . . . . . . . . . . . . . . . . . . . . . . 138
Vybalení produktu . . . . . . . . . . . . . . . . . . . . . . . . . . . . . . . . . . . . . . 138
Bezpečnostní upozornění . . . . . . . . . . . . . . . . . . . . . . . . . . . . . . 139
Instalace . . . . . . . . . . . . . . .
Použití . . . . . . . . . . . . . . . . .
Prádlo . . . . . . . . . . . . . . . . .
Ochrana životního prostředí .
Servis GIAS . . . . . . . . . . . .
.
.
.
.
.
.
.
.
.
.
.
.
.
.
.
.
.
.
.
.
.
.
.
.
.
.
.
.
.
.
.
.
.
.
.
.
.
.
.
.
.
.
.
.
.
.
.
.
.
.
.
.
.
.
.
.
.
.
.
.
.
.
.
.
.
.
.
.
.
.
.
.
.
.
.
.
.
.
.
.
.
.
.
.
.
.
.
.
.
.
.
.
.
.
.
.
.
.
.
.
.
.
.
.
.
.
.
.
.
.
.
.
.
.
.
.
.
.
.
.
.
.
.
.
.
.
.
.
.
.
.
.
.
.
.
.
.
.
.
.
.
.
.
.
.
.
.
.
.
.
.
.
.
.
.
.
.
.
.
.
.
.
.
.
.
.
.
.
.
.
.
.
.
.
.
.
.
.
.
.
.
.
.
.
.
.
.
.
.
.
139
139
139
140
140
Instalace . . . . . . . . . . . . . . . . . . . . . . . . . . . . . . . . . . . . . . . . . . . . . . . . . 141
Požadavky na elektrické připojení . . . . . . . . . . . . . . . . . . . . . . . . . . . . . . . . . . 141
Úprava nožek . . . . . . . . . . . . . . . . . . . . . . . . . . . . . . . . . . . . . . . . . . . . . . . . . 141
Ventilace . . . . . . . . . . . . . . . . . . . . . . . . . . . . . . . . . . . . . . . . . . . . . . . . . 142
Instalace vypouštěcí hadice . . . . . . . . . . . . . . . . . . . . . . . . . . . . . . . . . . . . . . . 142
Příprava náplně . . . . . . . . . . . . . . . . . . . . . . . . . . . . . . . . . . . . . . . . . 143
Příprava prádla . . . . . . . . . . . . . . . . . . . . . . . . . . . . . . . . . . . . . . . . . . . . . . . . 143
Třídění náplně . . . . . . . . . . . . . . . . . . . . . . . . . . . . . . . . . . . . . . . . . . . . . . . . . 144
Rady pro sušení . . . . . . . . . . . . . . . . . . . . . . . . . . . . . . . . . . . . . . . . 145
Nesušit v bubnové sušičce . . . . . . . . . . . . . . . . . . . . . . . . . . . . . . . . . . . . . . . 145
Úspora energie . . . . . . . . . . . . . . . . . . . . . . . . . . . . . . . . . . . . . . . . . . . . . . . . 145
Ovládací prvky a indikátory . . . . . . . . . . . . . . . . . . . . . . . . . . . 146
Dveře a filtr . . . . . . . . . . . . . . . . . . . . . . . . . . . . . . . . . . . . . . . . . . . . . . 147
Otevření dveří . . . . . . . . . . . . . . . . . . . . . . . . . . . . . . . . . . . . . . . . . . . . . . . . . 147
Filtr . . . . . . . . . . . . . . . . . . . . . . . . . . . . . . . . . . . . . . . . . . . . . . . . . . . . . . . . . 147
Indikátor ošetřování filtru . . . . . . . . . . . . . . . . . . . . . . . . . . . . . . . . . . . . . . . . . 147
Obsluha . . . . . . . . . . . . . . . . . . . . . . . . . . . . . . . . . . . . . . . . . . . . . . . . . . 148
Čištění a údržba. . . . . . . . . . . . . . . . . . . . . . . . . . . . . . . . . . . . . . . . . 149
Čištění sušičky . . . . . . . . . . . . . . . . . . . . . . . . . . . . . . . . . . . . . . . . . . . . . . . . 149
Technické údaje . . . . . . . . . . . . . . . . . . . . . . . . . . . . . . . . . . . . . . . . . . . . . . . 149
Řešení potíží . . . . . . . . . . . . . . . . . . . . . . . . . . . . . . . . . . . . . . . . . . . . 150
Zákaznický servis . . . . . . . . . . . . . . . . . . . . . . . . . . . . . . . . . . . . . . . 151
Náhradní díly . . . . . . . . . . . . . . . . . . . . . . . . . . . . . . . . . . . . . . . . . . . . . . . . . . 151
Servis GIAS . . . . . . . . . . . . . . . . . . . . . . . . . . . . . . . . . . . . . . . . . . . . . . . . . . 151
137
40003475CZECH.qxd
08/07/2005
Zkontrolujte, zda
nebylo zařízení
během přepravy
poškozeno. Pokud
ano, obrate se na
pracovníky servisu
GIAS.
Pokud výše
uvedené pokyny
nedodržíte, můžete
nepříznivě ovlivnit
bezpečnost
spotřebiče. Pokud
budou potíže se
sušičkou souviset
s nesprávným
zacházením, může
vám být naúčtován
poplatek za hovor
s pracovníky
servisu.
18:34
Page 138
Úvod
Důkladně si prostudujte následující pokyny a
postupujte podle nich při obsluze zařízení. Tento návod
k použití obsahuje důležité pokyny pro bezpečné
použití, instalaci, údržbu a některé užitečné rady pro
dosažení nejlepších výsledků.
Veškerou dokumentaci si uschovejte na bezpečném místě,
abyste je mohli v případě potřeby použít.
Informace o dodání
Zkontrolujte, zda bylo zařízení dodáno s těmito položkami:
●
●
●
●
Návod k použití
Záruční karta
Odvětrací sada a pokyny
Štítek s údaji o úspoře energie
Vybalení produktu
Vyjměte sušičku z balení v blízkosti místa instalace.
1.
Opatrně prořízněte balení okolo základny a po jedné
hraně nahoru.
2.
Sejměte fólii a vyzvedněte sušičku z polystyrenové
základny.
Bezpečně zlikvidujte balicí materiál.
Zajistěte, aby nebyl v dosahu dětí,
protože představuje potenciální
nebezpečí.
138
40003475CZECH.qxd
13/12/2005
10:14
Page 139
Bezpečnostní upozornění
Instalace
●
●
●
●
Před použitím zkontrolujte, zda na produktu nejsou viditelné známky poškození. Pokud
je zařízení poškozené, nepoužívejte je a obrate se na pracovníky servisu GIAS.
Nepoužívejte adaptéry, vícenásobné spojky ani prodlužovací kabely.
Sušičku neinstalujte v koupelně nebo místnosti se sprchami.
Sušičku nikdy neinstalujte v blízkosti závěsů a zajistěte, aby za ni nemohlo nic
spadnout.
Použití
●
●
●
●
●
●
●
●
●
●
●
●
VÝSTRAHA Nesprávným zacházením s bubnovou sušičkou může dojít k požáru.
Tato sušička je určena pouze k domácímu použití, tj. k sušení domácích textilií a oděvů.
Sušičku používejte pouze k určenému účelu tak, jak je uvedeno v návodu k použití.
Před zahájením práce se sušičkou se ujistěte, že všem pokynům pro instalaci a použití
naprosto rozumíte.
Nedotýkejte se spotřebiče, máte-li mokré nebo vlhké ruce či nohy.
Nikdy se při plnění bubnu neopírejte o dveře ani zařízení za dveře nezvedejte či
nepřesunujte.
Nedovolte, aby si děti se sušičkou a jejími ovládacími tlačítky hrály.
VÝSTRAHA Sušičku nepoužívejte, pokud není nainstalován prachový filtr nebo pokud
je tento filtr poškozen; prach by se mohl vznítit.
VÝSTRAHA Tam, kde se nachází symbol označení horkého povrchu
, se teplota
během provozu bubnové sušičky zvyšuje a může dosáhnout hodnoty vyšší než 60
stupňů C.
Odpojte zástrčku ze síové zásuvky. Před každým čištěním odpojte spotřebič ze sítě.
Pokud se objeví závada, přestaňte spotřebič používat.
Dbejte, aby se na podlaze v okolí spotřebiče neusazovala textilní vlákna a prach.
Buben uvnitř sušičky může být velmi horký. Než začnete ze sušičky vyndávat prádlo,
vždy ji nechejte zcela vychladnout.
Prádlo
●
●
●
●
●
●
VÝSTRAHA Nečistěte v bubnové sušičce tkaniny ošetřené chemickými prostředky.
VÝSTRAHA Materiály z pěnové gumy se mohou za určitých okolností při zahřívání
vznítit. Pěnová umělá hmota, pěnová guma a materiály podobné gumě nejsou vhodné
k sušení v bubnové sušičce. Výrobky z těchto materiálů se do sušičky NESMĚJÍ
vkládat.
Informace týkající se vhodnosti k sušení v sušičce naleznete na štítcích oděvů.
Prádlo musíte před vložením do bubnové sušičky dobře odstředit nebo dokonale
vyždímat. Do sušičky NEVKLÁDEJTE prádlo, z něhož kape voda.
Neponechávejte v kapsách oděvů zapalovače ani zápalky a v blízkosti zařízení NIKDY
nepoužívejte hořlaviny.
Závěsy se skleněným vláknem NIKDY do sušičky nevkládejte. Oděvy znečištěné
skleněnými vlákny mohou vyvolat následné podráždění kůže.
139
40003475CZECH.qxd
●
13/12/2005
10:15
Page 140
Do sušičky NEVKLÁDEJTE oděvy ošetřené nebo znečištěné hořlavými čisticími spreji
či takovými látkami, jako je benzín, potravinářský olej nebo aerosolové spreje.
Ochrana životního prostředí
●
●
Veškerý použitý balicí materiál je neškodný vůči životnímu prostředí a je recyklovatelný.
Zlikvidujte balicí materiál s ohledem na ochranu životního prostředí. Podrobné
informace o aktuálních způsobech likvidace vám poskytnou místní úřady.
Aby byla likvidace staré bubnové sušičky bezpečná, odpojte zástrčku z elektrické
zásuvky, přeřízněte napájecí kabel a společně se zástrčkou jej zničte. Aby se do
zařízení nemohly schovat děti, zničte dveřní závěsy nebo zámek dveří.
Servis GIAS
●
Aby byl zajištěn bezpečný a efektivní provoz tohoto spotřebiče, doporučujeme, aby
jakýkoli servis nebo opravu prováděl pouze autorizovaný servisní technik GIAS.
Evropská směrnice 2002/96/CE
Tento elektrospotřebič je značený podle evropské směrnice 2002/96/CE o odpadech z
elektrických a elektronických zařízení (WEEE).
Ujistěte se, že byl tento výrobek zlikvidován správně, pomůžete
tím vyhnout se případným negativním následkům na životním
prostředí a zdraví, které by mohly nastat v případě chybného
zacházení s výrobkem po ukončení jeho životnosti.
Symbol na výrobku znamená, že s tímto spotřebičem nelze
zacházet jako s běžným domácím odpadem. Musí být doručen do
nejbližšího sběrného místa na recyklaci elektrických a
elektronických zařízení.
Likvidace musí být provedena v souladu s platnými předpisy pro
životní prostředí týkající se likvidace odpadu.
Podrobnìjší informace o zacházení, vracení a recyklaci tohoto
výrobku dostanete na pøíslušném úøadu veøejné správy
(odbor ekologie a životního prostøedí) nebo u vašeho
poskytovatele služeb svozu odpadu nebo v obchodì, kde jste
výrobek zakoupili.
Pokud zařízení nefunguje správně nebo se porouchá,
vypněte je a odpojte zástrčku ze zásuvky. Informace o
možných opravách vám poskytnou pracovníci
servisu GIAS.
140
40003475CZECH.qxd
08/07/2005
18:34
Page 141
Instalace
Požadavky na elektrické
připojení
Bubnové sušičky jsou určeny k provozu při jednofázovém
napětí 230-240 V, 50 Hz. Zkontrolujte, zda je jmenovitý
proud napájecího okruhu min. 10 A.
Elektrický proud může být velice nebezpečný.
Spotřebič je nutno uzemnit.
Zásuvka a zástrčka spotřebiče musí být stejného typu.
Nepoužívejte vícenásobné adaptéry ani prodlužovací
kabely.
Pokud budou
potíže se sušičkou
souviset s
nesprávnou
instalací, může
vám být naúčtován
poplatek za hovor
s pracovníky
servisu.
Zástrčka by měla být přístupná, aby bylo možno
spotřebič po instalaci odpojit ze zásuvky.
Vodiče napájecího kabelu jsou barevně označeny podle
následujících kódů:
Modrá
NULOVÝ VODIČ
Hnědá
FÁZE
Zeleno-žlutá
UZEMNĚNÍ
Zařízení CE vyhovuje evropským směrnicím 89/336/EEC,
73/23/EEC a jejich odpovídajícím dodatkům.
Zařízení zapojte do sítě až po dokončení
instalace.
Pro vaši bezpečnost je nutné, aby sušička
byla řádně nainstalována.
Pokud je napájecí
kabel zařízení
poškozený, je
nutné jej vyměnit
za zvláštní kabel,
který vám
poskytnou POUZE
pracovníci servisu
GIAS s
náhradními díly.
Zařízení musí
nainstalovat
kompetentní
osoba.
Jestliže máte pochybnosti o instalaci,
požádejte pracovníky servisu GIAS o radu.
Úprava nožek
Po umístění sušičky na místo upravte nožky tak, aby byla
ve vodorovné poloze.
Upravte nožky tak, aby sušička stála pevně a vodorovně.
141
40003475CZECH.qxd
08/07/2005
18:34
Page 142
Ventilace
V místnosti, v níž se sušička nachází, musí být zajištěna
dostatečná ventilace v případě, že do místnosti vniknou
během provozu sušičky plyny produkované zařízeními
spalujícími různá paliva (včetně krbů).
●
●
●
●
●
●
Odsávaný vzduch se nesmí odvádět do stejného
komína, do něhož se odvádějí výfukové plyny jiných
zařízení spalujících benzín či jiná paliva.
Pravidelně kontrolujte, zda proud vzduchu
procházející sušičkou není něčím omezen.
Po použití zkontrolujte prachový filtr a v případě
potřeby jej vyčistěte.
Přívod a vývody musí zůstat volně průchodné. Aby
byla zajištěna dostatečná ventilace, nesmí být v
prostoru mezi dolní částí spotřebiče a podlahou
žádné překážky zabraňující proudění vzduchu. Mezi
spotřebičem a jakoukoli překážkou by měla zůstat
mezera o velikosti minimálně 12 mm.
Za sušičku nesmí zapadnout předměty, které by
mohly zablokovat vstup a výstup vzduchu.
NIKDY neinstalujte sušičku naproti záclonám.
Instalace vypouštěcí
hadice
Pokud sušička není umístěna v otevřeném prostoru s
dobrým odvětráním, je podstatné, abyste použili vypouštěcí
hadici, kterou se bude odvádět horký vzduch ze sušičky.
Recirkulace vlhkého vzduchu by bránila efektivnímu
provozu sušičky.
Hadice se montuje ke stroji, jak ukazuje obrázek.
Hadice se může namontovat skrz stěnu nebo vést
otevřenými dveřmi nebo oknem. Hadice má průměr 110
mm a délku 1,8 metru.
Při instalaci vypouštěcí hadice byste se měli řídit
následujícími pokyny.
●
●
●
142
Nepoužívejte dvě hadice spojené k sobě, protože
byste snížili výkon sušení.
Neomezujte průtok vzduchu skrz hadici např. tím, že
byste na ní udělali smyčku nebo ji připojili na
koncovku s nižším průměrem.
Zamezte tomu, aby se hadice tvarovala do U,
protože to by omezilo proudění vzduchu a zvýšilo
šanci, že se v hadici nahromadí voda.
40003475CZECH.qxd
08/07/2005
18:34
Page 143
●
Hadici pravidelně kontrolujte a odstraňujte z ní nahromaděné cucky a vodu.
Následující schémata ukazují příklady dobrých a špatných instalací.
Příprava náplně
Před prvním použitím bubnové sušičky:
●
●
●
si prostudujte důkladně tento návod,
vyjměte všechny předměty vložené do bubnu,
vytřete vnitřní část bubnu a dveře vlhkou látkou a odstraňte veškerý prach, který se zde
během přepravy mohl usadit.
Příprava prádla
Podle symbolů pro ošetřování prádla na štítku každého kusu
se ujistěte, že prádlo, které hodláte sušit, je vhodné pro
sušení v bubnové sušičce.
Zkontrolujte, zda jsou všechny upínací části sepnuty a zda
jsou kapsy prázdné. Obrate jednotlivé kusy prádla naruby.
Vkládejte kusy prádla do bubnu volně, aby se nezamotaly.
Nepřeplňujte
buben sušičky;
hmotnost mokrých
velkých kusů
prádla může
překročit
maximální
přípustnou zátěž
sušičky
(např. spacáky
nebo povlečení).
143
40003475CZECH.qxd
08/07/2005
18:34
Page 144
Maximální hmotnost
prádla k sušení
●
●
Bavlna max. 6 kg
Syntetické látky max. 3 kg
Způsob třídění prádla:
●
Podle symbolů ošetřování prádla
Symboly, které naleznete u límce nebo ve švu:
Vhodné pro sušení v bubnové sušičce.
Vhodné pro sušení v bubnové sušičce při
vyšších teplotách.
V bubnové sušičce sušit jen při nižších
teplotách.
Nesušit v bubnové sušičce.
Pokud se na prádle štítek nenachází,
předpokládejte, že není pro sušení v bubnové
sušičce vhodné.
●
Podle množství a tloušky
Kdykoli náplň přesahuje kapacitu sušičky, rozdělte
prádlo podle tloušky (např. oddělte osušky od
tenkého spodního prádla).
●
Podle druhu tkaniny
Bavlna/len: Osušky, bavlněný žerzej, ložní prádlo a
ubrusy.
Syntetické látky: Halenky, košile, montérky atd. z
polyesteru nebo polyamidu, a smíšené tkaniny
bavlna/syntetické látky.
●
144
Podle stupně sušení
Utřite prádlo podle stupňů sušení: sušení pro
žehlení, sušení bez žehlení apod. Chcete-li usušit
jemné tkaniny, vyberte stisknutím tlačítka
sušení při nízké teplotě.
40003475CZECH.qxd
08/07/2005
18:34
Page 145
Rady pro sušení
Nesušit v bubnové
sušičce:
vlnu, hedvábí, jemné tkaniny, nylonové punčochy, jemné
výšivky, tkaniny s kovovým dekorem, oděvy s obrubou z
PVC nebo kůže, cvičky, objemné kusy (např. spací pytle)
apod.
Úspora energie
Do bubnové sušičky vkládejte jen prádlo, které je důkladně
vyždímáno nebo řádně odstředěno. Čím je prádlo sušší, tím
je doba sušení kratší a ušetří se tak více elektrické energie.
DŮLEŽITÉ:
Nesušte kusy
prádla, které byly
ošetřeny
chemickými
prostředky ani
gumové oděvy
(mohlo by dojít
ke vzniku požáru
nebo k explozi).
VŽDY
●
●
Snažte se vždy usušit maximální náplň prádla,
protože tím ušetříte čas a elektrickou energii.
Před každým cyklem sušení vždy zkontrolujte, zda je
filtr čistý.
NIKDY
●
●
Nikdy nepřekračujte maximální hmotnost; plýtvali
byste časem a elektrickou energií.
Nikdy do bubnové sušičky nevkládejte prádlo, z
něhož kape voda; spotřebič by se mohl poškodit.
Během
posledních 15
minut se náplň
vždy pohybuje v
chladném
vzduchu.
145
40003475CZECH.qxd
08/07/2005
18:34
Page 146
Ovládací prvky a
indikátory
TLAČÍTKO PRO
AKRYLOVÉ A
SYNTETICKÉ LÁTKY
TLAČÍTKO
ON
INDIKÁTOR
ÚDRŽBY FILTRU
VOLIČ DOBY
SUŠENÍ
Ovládací panel a indikátory
Tlačítko „ON“ a kontrolka
– stiskem sušičku zapnete a rozsvítí se kontrolka.
Tlačítko pro akrylové a syntetické látky
– stiskem se sníží úroveň ohřevu pro
choulostivé kusy prádla, dalším stiskem se volí vysoká teplota.
VYSOKÉ Nastavení ohřevu
NÍZKÉ Nastavení ohřevu
Volič „ČAS SUŠENÍ“ – volí čas sušení nebo volbu Rychlé žehlení
Kontrolka „FILTER CARE“
146
– se rozsvítí, když je třeba vyčistit filtr.
.
40003475CZECH.qxd
08/07/2005
18:34
Page 147
Dveře a filtr
Otevření dveří
Dveře se otevírají tahem za rukoje.
Chcete-li sušičku znovu spustit, zavřete dveře a stiskněte
tlačítko
.
VÝSTRAHA!
Když je bubnová sušička v provozu,
mohou být buben a dveře VELICE
HORKÉ
Filtr
DŮLEŽITÉ: Aby byla zachována účinnost sušičky,
zkontrolujte před každým cyklem sušení, zda je
prachový filtr čistý.
1.
Vytáhněte filtr směrem nahoru.
2.
Otevřete filtr tak, jak je znázorněno na obrázku.
3.
Opatrně odstraňte textilní vlákna pomocí měkkého
kartáče nebo prsty.
4.
Zaklapněte filtr a zatlačte jej zpět na místo.
Indikátor údržby filtru
se rozsvítí, když je nutné filtr vyčistit.
Když se prádlo nesuší, zkontrolujte, zda filtr není
zanesen. Tato kontrolka se rozsvítí také tehdy, když je
zanesená nebo přiskřípnutá ventilační hadice.
147
40003475CZECH.qxd
08/07/2005
18:34
Page 148
Obsluha
Řite se tabulkou Průvodce sušením nebo štítky na
oděvech, abyste vybrali nejvhodnější program.
●
●
Otevřete dveře a naplňte buben prádlem. Prádlo
nesmí bránit zavření dveří.
Když sušíte choulostivé kusy prádla, stiskněte
tlačítko
a snižte úroveň ohřevu. Na dokončení
tlačítko stiskněte ještě jednou a zvolte vysokou
teplotu.
VYSOKÉ Nastavení ohřevu
NÍZKÉ Nastavení ohřevu
●
●
VÝSTRAHA!
Buben, dveře a
náplň mohou být
velice horké.
●
●
●
●
●
●
148
Otáčejte volič „DOBA SUŠENÍ“, až se požadovaná
doba sušení bude krýt se stupnicí.
Tento program
připravuje prádlo a zabraňuje
jeho zmačkání. Sušička bude náplň prádla 8 minut
ohřívat a pak budou následovat 2 minuty chlazení. Je
to dobré zejména pro oděvy, které se před žehlením
na chvíli odloží, například do koše na prádlo. Oděvy
mohou také ztuhnout, jestliže se suší venku na šňůře
nebo v místnosti na radiátorech. Tento proces
uvolňuje na tkanině záhyby a usnadňuje a urychluje
žehlení.
Pomalu zatlačte a opatrně dveře zavřete, dokud
neuslyšíte „zaklapnutí“.
Stiskněte tlačítko
. Rozsvítí se kontrolka a cyklus
sušení začne.
Náplň se suší za otáčení bubnu v termostaticky
regulovaném horkém vzduchu. Posledních 15 minut
je použit chladný vzduch
, aby se snížila tvorba
záhybů a prádlo vychladlo a bylo schopné
manipulace.
Když je program zcela dokončen, buben se zastaví a
kotouč voliče bude ukazovat na 0.
Otevřete dveře a vyjměte náplň.
Po každém cyklu sušení vyčistěte filtr, aby byla
zajištěna maximální účinnost sušičky.
40003475CZECH.qxd
08/07/2005
18:34
Page 149
Čištění a údržba
Čištění sušičky
●
●
●
●
●
Po každém cyklu sušení vyčistěte filtr.
Po každém použití vytřete vnitřní část bubnu a
nechejte dveře na chvíli otevřené, aby mohl dovnitř
proudit vzduch, a buben tak mohl vyschnout.
Vnější povrch sušičky a dveře otřete jemnou látkou.
NEPOUŽÍVEJTE abrazivní pomůcky ani čisticí
prostředky.
Aby se dveře nepřilepily nebo aby nedošlo k
nahromadění vláken a prachu, čistěte pravidelně
vnitřní část dveří a těsnění vlhkou látkou.
DŮLEŽITÉ:
Před čištěním
zařízení vždy
vypněte a odpojte
zástrčku z
elektrické zásuvky.
Technické údaje
Objem bubnu
115 litrů
Maximální náplň
6 kg
Výška
85 cm
Šířka
60 cm
Hloubka
60 cm
Třída energetické
účinnosti
C
Elektrické údaje se
nacházejí na
typovém štítku na
přední straně
skříně sušičky
(když jsou dveře
otevřené).
149
40003475CZECH.qxd
08/07/2005
18:34
Page 150
Řešení potíží
Co může být příčinou...
Vady, které můžete opravit sami
Dříve než se obrátíte na pracovníky servisu GIAS a požádáte je o technickou radu, projděte si
následující kontrolní seznam. Pokud se zjistí, že spotřebič funguje, že byl nainstalován
nesprávně nebo že byl nesprávně používán, bude vám účtován poplatek. Pokud problém po
dokončení doporučených kontrol přetrvává, obrate se na pracovníky servisu GIAS, kteří vám
prostřednictvím telefonu pomohou.
Doba sušení je příliš dlouhá nebo prádlo není
dostatečně suché...
●
●
●
●
●
●
Zvolili jste správnou dobu sušení nebo správný program?
Nebylo prádlo příliš vlhké? Bylo prádlo důkladně vyždímáno nebo řádně odstředěno?
Není nutné filtr vyčistit?
Není sušička přetížena?
Není ventilační hadice přiskřípnuta nebo zanesena?
Nebyla z předchozího cyklu zvolena funkce
?
Sušička nefunguje...
●
●
●
●
●
●
●
●
Má sušička funkční elektrické napájení? Napájení zkontrolujte zapojením jiného
spotřebiče do zásuvky, například stolní lampy.
Je zástrčka řádně zapojena do zásuvky?
Nedošlo k výpadku dodávky elektřiny?
Nejsou spálené pojistky?
Jsou dveře úplně zavřeny?
Je sušička zapnuta jak u přívodu napájení, tak na spotřebiči?
Byla provedena volba doby sušení nebo programu?
Zapnuli jste sušičku po otevření dveří znovu?
Sušička je hlučná…
●
Vypněte sušičku a obrate se na pracovníky servisu GIAS.
Indikátor údržby filtru svítí…
●
●
150
Není nutné filtr vyčistit?
Není ventilační hadice přiskřípnuta nebo zanesena?
40003475CZECH.qxd
08/07/2005
18:34
Page 151
Zákaznický servis
Kdyby po provedení všech doporučených kontrol problém
na vaší sušičce přetrvával, prosím zavolejte servis a
požádejte o radu. Pracovníci servisu vám pomohou
prostřednictvím telefonu nebo vám zařídí návštěvu technika
podle podmínek vaší záruky. Jestliže však bude zjištěna
některá z následujících skutečností, bude vám účtován
poplatek:
●
●
●
Sušička je ve funkčním stavu.
Sušička není nainstalována v souladu s pokyny pro
instalaci.
Sušička nebyla používána správně.
Náhradní díly
Vždy používejte originální náhradní díly, které vám
poskytnou přímo pracovníci servisu GIAS.
Servis GIAS
Ohledně servisu a oprav se obracejte na pracovníky
místního servisu GIAS.
Výrobce neodpovídá za žádné pøípadné tiskové chyby v
tomto návodu. Výrobce si dále vyhrazuje právo na
provedení úprav svých produktù bez nutnosti zmìny
dùležitých vlastností.
151
40003475ENG.qxd
08/07/2005
18:17
Page 17
40003475