1
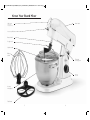
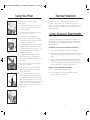
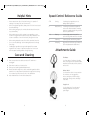
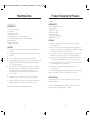
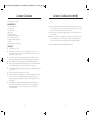
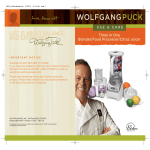
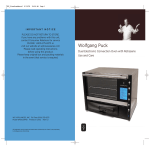
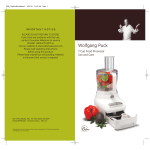
HSN_StandMixerManual_BPSM0050A2_HSN_StandMixerManual_BPSM0050A2 9/2/11 1:20 PM Page 1
USE & CARE
LIFE IS ABOUT BALANCE
AND EATING WELL
700 Watt Stand Mixer
with Food Grinder Attachment
I M P O R TA N T N OT I C E
PLEASE DO NOT RETURN TO STORE.
If you have any problems with this unit, contact Consumer
Relations for service PHONE: 1-800-275-8273 or visit our
website at wphousewares.com
Please read operating instructions before using this
product. Please keep original box and packing materials
in the event that service is required.
Photo's throughout this manual may
vary slightly from actual product
W.P. APPLIANCES, INC. Toll Free (800) 275-8273
Models BPSM0050A2 Printed in China REV 2.0
All trademarks, service marks and trade names (collectively the “Marks”) are proprietary
to Wolfgang Puck World Wide.
HSN_StandMixerManual_BPSM0050A2_HSN_StandMixerManual_BPSM0050A2 9/2/11 1:20 PM Page 1
IMPORTANT SAFEGUARDS
When using electrical appliances, basic safety precautions should always
be followed, including the following:
1
Read all instructions carefully.
2 To protect against risk of electrical shock, do not put cord, plug, or
mixer body in water or other liquid.
3 Close supervision is necessary when any appliance is used by or
near children. This appliance is not to be used by children.
4 Unplug from outlet when not in use, before putting on or taking off
parts, and before cleaning.
5 Remove beaters and other attachments from mixer before washing.
6 Do not operate any appliance with a damaged cord or plug or
after the appliance malfunctions or is dropped or damaged in any
manner. Return the appliance to an authorized service facility for
examination, repair, or electrical or mechanical adjustment.
7 The use of accessory attachments not recommended or sold by the
manufacturer for use with this model may cause fire, electric shock
or injury.
ADDITIONAL SAFETY
INFORMATION
GROUNDING INSTRUCTIONS: This appliance must be grounded. It is
equipped with a 3-wire cord having a grounded plug. The plug must be
plugged into an outlet which is properly installed and grounded.
Warning: Improper use of the grounded wire can result in the risk of
electric shock. Consult a qualified electrician if necessary. Do not attempt to
defeat this safety feature by modifying plug.
A short power-supply cord is provided to reduce the hazards resulting
from entanglement or tripping over a longer cord. If it is necessary to
use an extension cord, it should be positioned such that it does not
drape over the counter or tabletop where it can be pulled on by children
or tripped over and:
A. Use only 3-wire extension cord with 3-blade grounding plug.
B. The marked rating of the extension cord must be equal to or
greater then the rating of this appliance. The electrical rating is
listed on the bottom of this unit.
8 Avoid contacting moving parts. Keep hands, hair, and clothing, as
well as spatulas and other utensils, away from beaters during
operation to reduce risk of injury to persons, and/or damage to
mixer.
9 Do not use outdoors.
10 Do not let cord hang over edge of table or counter. Do not let cord
contact hot surfaces, including stove.
1 1 Do not place on or near a hot gas or electric burner, or in a heated
oven.
12 Check that control is off before plugging cord into wall outlet. To
disconnect, turn control to OFF, then grasp the plug and remove it
from the outlet, never yank the cord to remove the plug.
13 Do not use appliance for other than intended purpose.
14 To ensure continued protection against risk of electric shock,
connect to properly grounded outlets only.
Before Your First Use
Carefully unpack the appliance and remove all packaging materials. To remove
any dust that may have accumulated during packaging, wipe the exterior of the
mixer base with a damp cloth and dry thoroughly. Wash the Flat Beater, Dough
Hook, Balloon Whisk and 6-Quart Mixing Bowl in warm, soapy water and
dry thoroughly.
Caution: Do not immerse the appliance base, cord or plug in water. Wash bowls,
splash guard, flat beater, wire whisk and dough hook in hot, soapy water.
Dry thoroughly.
Important: Do not use harsh or abrasive cleansers on any part of the appliance.
SAVE THESE INSTRUCTIONS
1
2
HSN_StandMixerManual_BPSM0050A2_HSN_StandMixerManual_BPSM0050A2 9/2/11 1:20 PM Page 3
Table of Contents
Wolfgang Puck,
owner of the famous
Spago restaurants and
one of the most influential
chef-restauranteurs in
America, is credited with
reviving California’s rich
culinary heritage. His
cooking innovations, a
result of blending fresh
California ingredients with his classical French techniques, are
enjoyed by world leaders, stars and fellow chefs alike. He established
other trend-setting restaurants like Postrio, Chinois on Main in Santa
Monica, Trattoria del Lupo, Cut, and his latest creation, Jai, an Asian
fusion restaurant in San Diego. Home chefs can also share Mr. Puck’s
talents through his cookbooks, cutlery, cookware and, of course,
through his appliances!
Important Safeguards
1
Before Your First Use
2
About Wolfgang Puck
3
Know Your Stand Mixer
5
Using Your Mixer
7
Thermal Protecton
8
Using Accessory Attachments
8
Helpful Hints
9
Care and Cleaning
9
Speed Control Reference Guide
10
Attachments Guide
10
Food Grinder Attachment Section
11
Before Your First Use
13
Helpful Hints
13
Care & Cleaning
13
Know Your Food Grinder
14
Assembling Your Food Grinder
15
Using Your Food Grinder
15
Optional Stand Mixer Attachments
16
Stand Mixer Recipes
17
Food Grinder Recipes
43
Limited Warranty
52
Contact Information
3
Back
4
HSN_StandMixerManual_BPSM0050A2_HSN_StandMixerManual_BPSM0050A2 9/2/11 1:20 PM Page 5
Know Your Stand Mixer
Hub Cover
Mixer Head
(swing up to
insert accessories)
Accessory Release
Beater Shaft
Dough Hook
Splash Guard
Balloon
Whisk
Tilt-Head
Locking Lever
Speed
Control
6 Quart
Mixing Bowl
Flat Beater
5
6
HSN_StandMixerManual_BPSM0050A2_HSN_StandMixerManual_BPSM0050A2 9/2/11 1:20 PM Page 7
Using Your Mixer
1
Make sure mixer is turned to OFF and
unplugged.
2
Tilt mixer head back by pulling the mixer head
locking lever up. Lift until head locks into up
position. (see figure 1).
3
Place mixing bowl into base and turn clockwise
to lock into place. (see figure 2).
4
Attach beater, whisk or dough hook by
pressing up into beater shaft as far as it will go.
Turn counterclockwise, hooking pin into grooves
on beater shaft. (see figure 3 & 4).
Figure 1
5
Figure 2
6
If mixing liquid ingredients place the splash
guard over the opening of the bowl with the
opened end of the splash guard away from you.
(see figure 5).
7
Plug cord into electrical outlet. Prepare recipe
according to instructions.
8
When finished, turn speed control dial to OFF
and unplug stand mixer from outlet. Remove
splash guard (if used).
Figure 3
9
Figure 4
Apply upward pressure to the mixing head while
pulling the locking lever up and guide the mixer
head back down until it locks into place. Do not
let the mixing head fall down freely. Always
guide as instructed above.
Pull the mixer head locking lever up to raise
mixer head. Grasp bowl, turn counterclockwise,
and lift straight up to remove. To remove beater
attachment apply upward pressure to the beater
and turn clockwise about 1/4 turn (or until it will
not turn any longer) and pull straight down.
Remove bowl by turning counterclockwise and
lift straight up.
Thermal Protection
Your stand mixer motor is equipped with an automatic Thermal
Protection feature which will shut your motor off if it gets too hot.
Should this occur, turn the speed selector to Off, unplug the unit and
allow it to cool down. It is normal for the mixing head to become hot
after prolonged use.
Using Accessory Attachments
A number of OPTIONAL accessory attachments are available for use
with your stand mixer, including a meat grinder, pasta extruder and
slicer/shredder. See the following general instructions for assembling
and removing these.
ASSEMBLING OPTIONAL FRONT POWER HUB ATTACHMENTS
1
Ensure stand mixer is turned off and the unit is unplugged.
2
Flip the hub cover up, and then press down and hold the accessory
release tab while inserting the accessory into the hub as far as it
will go.
3
Let go of the accessory release tab and rotate the attachment
slightly left and right until you hear the locking pin click into place.
To ensure your attachment is locked into place try pulling it out
while not pressing down on the accessory release tab.
REMOVING FRONT POWER HUB ATTACHMENTS
1
Turn stand mixer off and unplug from outlet.
2
Press the attachment lock down and hold while pulling the
accessory attachment out of the hub
Figure 5
7
8
HSN_StandMixerManual_BPSM0050A2_HSN_StandMixerManual_BPSM0050A2 9/2/11 1:20 PM Page 9
Helpful Hints
Speed Control Reference Guide
•
Never scrape down sides of bowl while mixer is in operation. If
scraping is necessary, first turn the mixer OFF.
STIR
Stirring
Combining dry ingredients prior to
adding liquid ingredients
•
When mixing liquid ingredients, always start off at the lowest speed
to avoid splattering.
2
Gentle Mixing
•
When making meringues, the mixer bowl and wire whisk must be
very clean and dry.
Combining dry and liquid ingredients
such as thin and thick batters, mashing
potatoes, kneading dough using optional
accessory attachments.
•
When making mousse don’t overbeat your egg whites or your
cream. If the egg whites are beaten too dry, they’ll fall apart; if the
cream is overbeaten, it won’t blend evenly through the mousse
4-6
Beating
Cookie dough, cake mixes, and for
optional food grinder and slicer shredder
•
When making whipped creams, first chill the bowl and the whisk.
8
Creaming
Creaming butter, and finishing batters
•
Do not over-knead dough. Over-kneading will prevent the dough
from rising.
10
Whipping
Egg whites, boiled frostings, cream, and
optional pasta extruder attachment
•
If adding dry ingredients through splash guard, first measure
ingredients onto a piece of parchment paper, then form a cone
with the paper to add ingredients through opening.
Attachments Guide
Care and Cleaning
Flat Beater
1
Make sure speed selector dial is turned to OFF and mixer is
unplugged.
2
Raise mixer head to up locked position.
3
Remove bowl, splash guard and attachments.
4
Bowls, flat beater, dough hook, whisk, and splash guard should be
washed in hot, soapy water. Dry all parts thoroughly before storing.
Do not place any parts or accessories in the dishwasher.
5
Wipe head and base of mixer with a damp cloth.
Use for a variety of mixtures, including
cakes, frostings, biscuits, mashed potatos,
meatloaf, quick breads, muffins, pastries,
and cookies.
Balloon Whisk
Use the balloon whisk to incorporate air
into mixtures, such as egg whites,
mousse, meringues, boiled frostings,
mayonnaise, sponge cakes, and angel
food cakes
Dough Hook
Use the dough hook for mixing and
kneading bread and other types of
yeast dough.
9
10
HSN_StandMixerManual_BPSM0050A2_HSN_StandMixerManual_BPSM0050A2 9/2/11 1:20 PM Page 11
ATTACHMENT SAFEGUARDS
When using Food Grinder Attachment, basic safety precautions should
always be followed, including the following:
Food Grinder
Attachment Section
11 - Food Grinder Attachment
1
Read all instructions before using.
2
Close supervision is necessary when this appliance with attachment
is used by or near children.
3
Unplug unit from outlet when not in use, before putting on or taking
offparts, and before cleaning.
4
Avoid contacting moving parts. Keep fingers away from food chute
while unit is plugged in. Never feed food by hand. Always use food
pusher during operation to reduce the risk of injury to persons.
5
Do not use appliance for other than intended purpose.
6
Never remove or attach the food grinder, or ring nut when the motor
is operating.
7
Do not disassemble the grinder or place anything, such as
finger,spoon, fork, etc., in the grinder during operation.
8
Do not use fingers to scrape food away from discharge disc while
appliance is operating. Cut type injury may result.
9
All frozen food must be thoroughly thawed before grinding.
SAVE THESE INSTRUCTIONS
12 - Food Grinder Attachment
HSN_StandMixerManual_BPSM0050A2_HSN_StandMixerManual_BPSM0050A2 9/2/11 1:20 PM Page 13
Before Your First Use
•
Carefully unpack your attachment and disassemble all parts for
cleaning prior to first use. Handle blades and cutting plates with care
– they are extremely sharp.
•
Wash all components by hand in hot soapy water, and then
dry thoroughly.
•
Do not wash the components of the food grinder in dishwasher.
•
Assemble the food grinder and store until ready to use.
Know Your Food Grinder
• Food Pusher
Helpful Hints
1
Cut food into small, uniform pieces and feed into grinder using
food pusher.
2 When processing tough foods such as red meat, cut pieces into
1” squares. Process through larger plate first, then reprocess using
smaller plate if you desire a narrower cut.
3 When grinding breads, either use fresh bread or oven dried bread.
Using bread that is only partially dried is not recommended and may
cause the food grinder to jam.
Care & Cleaning
•
Always switch off and unplug before cleaning.
•
Handle blades and cutting plates with care – they are extremely
sharp.
•
Wash all components by hand in hot soapy water, and then
dry thoroughly.
•
Do not wash the components of the food grinder in dishwasher.
•
Assemble the food grinder and store until next use.
• Food Tray
• Food Tray Cover
Fine Plate •
Course Plate •
• Body
• Blade
• Scroll
• Wrench
• Ring nut
13 - Food Grinder Attachment
14 - Food Grinder Attachment
HSN_StandMixerManual_BPSM0050A2_HSN_StandMixerManual_BPSM0050A2 9/2/11 1:20 PM Page 15
Assembling Your Food Grinder
1
Place the scroll into the body, long end first, by turning the scroll
slightly until it is engaged into the socket.
2 Place the cutting blade over the square end of the drive shaft
with the blade facing the front. If it is not fitted properly, food will
not be processed.
3 Place the desired cutting plate next to the cutting blade. Make sure
the notch fits over the protrusion of the head.
4 Screw the ring nut into place and hand tighten.
Warning
Avoid serious injury! Unit operates with rotating blades. Always use
food pusher. Never put your fingers in the food chute while the unit
is plugged in.
Optional Stand Mixer
Attachments
Pasta Extruder
Make your own fresh Spaghetti, Small
Macaroni, Large Macaroni, Rigatoni,
Fettuccini, and Lasagna with these 6
extruding disks included with this
attachment.
Slicer/Shredder
Includes one fine and one coarse
shredding cone for lettuce, cheese, etc.
or use the fine or coarse slicing blade for
items such as carrots, cucumbers,
potatoes, etc.
Using Your Food Grinder
1
Lower the mixer head until it clicks shut.
2 Press the attachment release button down and remove the front
cap.
3 Slide the grinder body into the outlet turning it slightly and release
the button to lock with pin located in the hole.
4 Place the food tray cover on top of the feed tube. The food tray can
be placed beneath the outlet to collect the food.
5 Switch mixer on to speed 4 (do not process above speed 4) and use
the pusher to feed the food through, one piece at a time.
15 - Food Grinder Attachment
16
HSN_StandMixerManual_BPSM0050A2_HSN_StandMixerManual_BPSM0050A2 9/2/11 1:20 PM Page 17
Chocolate Chip Cookies
Makes 12 large cookies
INGREDIENTS
1 cup walnuts or pecans
1 3/4 cups cake or pastry flour, sifted
1/2 teaspoon salt
1 1/2 sticks unsalted butter
3/4 cup light brown sugar
1/2 cup sugar
1/2 teaspoon baking soda
2 teaspoons warm water
1 large egg
1 teaspoon vanilla
1 cup chocolate chips
Stand Mixer Recipes
METHOD
1
Preheat oven to 375°.
2
Arrange nuts on a baking tray or sauté pan with riveted metal
handles. Toast for 12 - 15 minutes, turning occasionally. Cool and
chop coarsely. Set aside.
3
Sift together flour and salt; set aside.
4
In the mixer bowl with the flat beater attached, cream together
butter and sugar on speed 2 until smooth.
5
In a small cup or bowl, dissolve the baking soda in warm water
and pour into the mixer bowl. Add the vanilla and egg and mix
until well blended.
6
With mixer off, sprinkle nuts, chocolate chips and flour mixture
around the beater. Mix on low speed until just incorporated.
7
Turn dough out of bowl and wrap with plastic wrap. Chill until firm.
With lightly floured hands, shape the dough into 12 equal balls, about
3 ounces each. Arrange on parchment-lined baking trays about 3
inches apart. Flatten each ball slightly and bake 20-22 minutes, or
until golden brown. Let the cookies cool slightly on the baking tray,
then transfer to a rack to finish cooling.
Recipe courtesy Wolfgang Puck, Adventures in the Kitchen (Random
House, 1991)
17
18
HSN_StandMixerManual_BPSM0050A2_HSN_StandMixerManual_BPSM0050A2 9/2/11 1:20 PM Page 19
Rich Black and White
Baked Alaska
Angel Food Cake
Makes 12-16 slices
Makes 12 - 16 slices
INGREDIENTS
INGREDIENTS
1 cup cake flour
1 1/2 cups powdered sugar
12 large egg whites
1 1/2 teaspoons cream of tartar
1 cup sugar
1/4 teaspoon salt
2 teaspoons vanilla
1 Angel Food Cake (see recipe, page 20)
1 quart vanilla ice cream, softened
1 quart chocolate ice cream, softened
1 cup dark chocolate, shaved
1 batch Italian Meringue (see recipe, page 21)
METHOD
METHOD
1
Line an 8-inch deep bowl or mold with plastic wrap.
2
Slice the angel food cake into 1-inch slices. Press slices around the
entire mold.
3
Press the chocolate ice cream around the side of the bowl, leaving
a deep hole in the center. Press the vanilla ice cream in the hole.
Wrap with plastic wrap and refreeze for several hours.
4
Prepare the Italian meringue.
5
Spread the entire batch of meringue onto the ice cream. Do this by
using a large star tip on a pastry bag, or simply by spooning on.
Freeze until ready to serve.
6
7
Before serving, lightly brown the peaks by using a torch on medium
flame, holding the flame an inch away from meringue. (HINT: Use the
same torch to heat your knife before slicing Baked Alaska.) If you
don’t have a torch, brown the peaks by placing under the broiler for
2-3 minutes.
1
Preheat oven to 375°.
2
Mix flour and powdered sugar together in a small bowl.
3
In the bowl of the stand mixer with the whisk attached, beat egg
whites on medium speed until foamy.
4
Add cream of tartar and a pinch of the sugar. Increase speed.
When soft peaks start to form, slowly drizzle sugar into whites, about
3 tablespoons at a time. Beat just until whites are stiff and glossy;
do not overbeat.
5
Add salt and vanilla to mixture and lower speed. With mixer still on
low speed, gradually add flour mixture, about 1/4 cup at a time.
6
Scrape batter into an ungreased tube pan. Run spatula through the
batter to break up any bubbles. Bake for 30-35 minutes or until cake
feels dry and top back springs.
7
Invert cake pan on a bottle or funnel until cool. Remove from pan.
Serve with raspberry sauce or warm ganache (see p. 23).
Recipe courtesy Debra Murray, Wolfgang Puck HSN Guest Host
Recipe courtesy Debra Murray, Wolfgang Puck HSN Guest Host
19
20
HSN_StandMixerManual_BPSM0050A2_HSN_StandMixerManual_BPSM0050A2 9/2/11 1:20 PM Page 21
Italian Meringue
Black & White Cake
Makes one mile high meringue pie or two (2) 9-inch regular pies
Serves 8
INGREDIENTS
INGREDIENTS
6 large egg whites
1 1/2 cups sugar
1/2 cup water
1 pinch salt
1 package chocolate cake mix, with ingredients according to the box
1 cup sugar
1/2 cup water
6 large eggs
2 cans sweetened condensed milk
2 cans whole milk, measured by empty condensed milk containers
METHOD
1
Place the egg whites in the mixer bowl, making sure bowl is dry
and clean. Attach the wire whisk to mixer.
2
In a small saucepan with a candy thermometer attached, heat the
sugar and water to 210°. Meanwhile, turn the stand mixer on speed
3 and start whipping egg whites. When the egg whites are almost at
soft peaks, add the pinch of salt. Continue to heat sugar and water
to 240°. This is soft ball candy stage.
3
With mixer still on, carefully pour the hot sugar liquid into egg
whites. Go slow and be consistent.
4
After all sugar mixture is added, increase to speed 4 and beat until
the stainless bowl is cool to touch, about 5 minutes.
5
Scrape meringue onto pie quickly. (Once the meringue sets up, it
becomes hard to work with. If this happens, just put back into mixer
and whip until stiff peaks form again.)
METHOD
1
Preheat oven to 350°.
2
Prepare chocolate cake mix according to box in the bowl of the
stand mixer fitted with flat beater. Set aside; do not put into pan yet.
3
Spray 9-inch springform pan with nonstick cooking spray.
4
In a nonstick skillet, brown sugar and water until it turns to a
beautiful caramel color. Pour into the base of prepared cake pan.
5
In a separate bowl, prepare custard by mixing eggs well with
the milks.
6
Pour chocolate cake mix into the cake pan. Top with the custard.
Do not move pan for at least 5 minutes while custard sinks to bottom
of pan.
7
Fill a larger baking pan with 1 inch of water. Wrap the springform pan
well with aluminum foil; place in water bath. Bake in water bath for 1
hour or until cake is firm.
8
When cake is cooked through, allow to cool on wire rack. Invert
cooled cake onto platter and remove springform pan. The custard
will be on top of the chocolate cake.
9
Serve chilled.
SERVING SUGGESTION
This meringue sets up perfectly and never weeps. The quantity here will
do one enormous “mile-high” pie, or two average. This also works great
for a Baked Alaska.
Recipe courtesy Debra Murray, Wolfgang Puck HSN Guest Host
Recipe courtesy Debra Murray, Wolfgang Puck HSN Guest Host
21
22
HSN_StandMixerManual_BPSM0050A2_HSN_StandMixerManual_BPSM0050A2 9/2/11 1:20 PM Page 23
Chocolate Ganache
Raspberry White Chocolate
Blondies
Makes enough for one 9-inch cake
INGREDIENTS
Serves 8
1 cup heavy cream
2 cups chocolate morsels, chopped
INGREDIENTS
METHOD
1
In a heavy-bottomed saucepan, heat cream to small bubbles. Cover pan.
2
Remove pan from heat and add chocolate. Stir constantly with a
whisk until smooth and glossy.
3
Allow to cool until the consistency of heavy cream or molasses,
then pour over cake or use as desired.
Recipe courtesy Debra Murray, Wolfgang Puck HSN Guest Host
1/2 cup margarine or butter, room temperature
1/2 cup dark brown sugar, firmly packed
1/2 cup granulated sugar
2 whole eggs, well beaten
1 cup flour
1/4 teaspoon salt
1/2 teaspoon baking powder
1 cup raspberry preserves
1 cup white baking chips
METHOD
1
Preheat oven to 350°.
2
Prepare a 9 x 13 baking pan by spraying well with nonstick cooking spray.
3
In the bowl of stand mixer with flat beater attached,
thoroughly cream together butter and sugars. Add eggs, one at
a time, mixing well.
4
In a separate bowl, sift together flour, salt and baking powder.
5
With mixer running, gradually add flour mixture to butter mixture.
6
Pour batter evenly into prepared pan, spreading out well. Spoon
raspberry preserves on top of batter. Sprinkle chips evenly around.
7
Bake for 30-35 minutes. Let cool before cutting into bars.
Recipe courtesy Debra Murray, Wolfgang Puck HSN Guest Host
23
24
HSN_StandMixerManual_BPSM0050A2_HSN_StandMixerManual_BPSM0050A2 9/2/11 1:20 PM Page 25
Marshmallows
Frozen Strawberry Mousse
Serves 8
Makes 20 - 30
INGREDIENTS
INGREDIENTS
1 1/2 quarts strawberries, hulled
2 large egg whites
2 tablespoons sugar
3 tablespoons water
6 tablespoons sugar
1 cup heavy cream, whipped
Grand Marnier, for sauce
1 cup cornstarch, divided
2 cups sugar
2 cups light corn syrup
1 cup water, divided
3 heaping tablespoons of unflavored gelatin
(or 7 individual packages of Knox unflavored gelatin)
4 large egg whites
2 tablespoons vanilla
1 teaspoon butter extract
METHOD
METHOD
1
Reserve 8 - 10 strawberries for sauce. Pureé the rest in a food
processor and chill.
2
In the mixer bowl with the whisk attached, whip the egg whites on
speed 3 until soft peaks form. Slowly add the 2 tablespoons of sugar
and continue to beat until shiny stiff peaks form.
1
Sift 1/2 cup of cornstarch onto a cookie sheet with raised edges.
Set aside.
2
In a small saucepan, combine sugar, corn syrup and 1/4 cup of water.
Set aside.
3
In a small sauce pan with a candy thermometer, heat the water and
6 tablespoons of sugar to 240°, which is soft ball candy stage.
3
In bowl of stand mixer, dissolve gelatin into 3/4 cup water.
4
4
Bring saucepan with sugar mixture to a boil. Over medium-high heat,
bring sugar mixture to 238° while watching candy thermometer.
This is soft ball candy stage.
Slowly pour the hot candy liquid into the egg whites with the mixer
on speed 3. Continue to beat until the bowl is cool to the touch.
5
Combine egg whites with 1 1/2 - 2 cups of strawberry pureé. Fold in
the whipped cream. Check for sweetness.
6
Pour into a 5- or 6-cup mold or 8 small individual molds.
Freeze overnight.
7
Strain remaining strawberry puree and perfume with Grand Marnier.
8
Before serving, place molds in refrigerator for 30 minutes.
5
Place whisk on stand mixer. Add the syrup mixture to the gelatin
and water mixture on low speed. Add the egg whites, followed by
the vanilla and butter extract and whip on highest speed for
approximately seven minutes or until the mixture has risen to the
top of the bowl.
6
Spread mixture onto cornstarch-lined cookie sheet. Evenly sift
remaining 1/2 cup of cornstarch on top. Let cool for 1-2 hours
PREPARATION
7
While coating knife with cornstarch, cut into squares and store in an
airtight container. Marshmallows will keep for up to 3 weeks.
To serve, unmold mousse onto dessert plate and surround with sauce.
Garnish with a berry.
Recipe courtesy Marian Getz, Wolfgang Puck Chef
25
Recipe courtesy Wolfgang Puck, Modern French Cooking for the
American Kitchen (Houghton Mifflin Co., 1998)
26
HSN_StandMixerManual_BPSM0050A2_HSN_StandMixerManual_BPSM0050A2 9/2/11 1:20 PM Page 27
Linzer Cookies
Linzer Cookies (cont’d)
Makes 2 dozen cookies
INGREDIENTS
10 Repeat with the other rolled dough. These will be the top cookies, so
you need to cut out the center with a small round cutter. (HINT: The
top of a vanilla extract bottle is the perfect size.)
1 1/2 cups hazelnuts
2 sticks butter
2/3 cup sugar
1 large egg
1/2 teaspoon salt
1 teaspoon vanilla extract
2 cups all-purpose flour
1 teaspoon baking powder
1 cup jam
powdered sugar, for dusting
11
Keep cookies on parchment paper; place on cookie sheet. Bake 20
to 25 minutes.
12 When cookies are cool, spread or pipe jam onto bottoms. (Try these
with a variety of jams or preserves to make a colorful platter.) Top
with cookie that has the cutout, and dust with powdered sugar.
Recipe courtesy Marian Getz, Wolfgang Puck Chef
METHOD
1
Preheat oven to 350°.
2
Spread the nuts onto a cookie sheet and place in oven for 3 to 5
minutes, until you can smell the rich nut flavor. Let cool; then chop
well with a food processor.
3
In the bowl of the stand mixer with flat beater attached, cream
butter and sugar together until fluffy. Add egg, salt and vanilla.
4
In a separate bowl, sift together the flour and baking powder.
5
Add cooled chopped nuts and flour mixture to the mixer and beat
until a dough ball forms. (Less than a minute on speed 2.)
6
Form a large dough ball; wrap with plastic wrap. Refrigerate at least
2 to 3 hours.
7
When ready to bake, preheat oven to 325°.
8
Remove dough from refrigerator. Cut into two equal pieces. Roll out
one of the pieces of dough by placing it between two slices of
parchment paper. Roll until about 1/8-inch thick. Repeat with other
dough half.
9
Slowly pull off the top piece of parchment paper only. Using a 2 - inch
biscuit cutter or a linzer cookie cutter, cut out cookies, removing the
extra dough. Keep cookies on the bottom piece of parchment
paper for baking.
27
28
HSN_StandMixerManual_BPSM0050A2_HSN_StandMixerManual_BPSM0050A2 9/2/11 1:20 PM Page 29
Caramel-Pecan Rolls
Caramel-Pecan Rolls (cont’d)
Makes 12 rolls
10 Spread the cinnamon sugar mixture over dough.
INGREDIENTS
11
1/2 cup butter
2 tablespoons light corn syrup
2 cups pecans halves
1/2 pod vanilla bean, scraped
1/2 cup pecans, chopped
3 tablespoons butter, melted
1/2 cup granulated sugar
1 teaspoon ground cinnamon
4 cups bread flour, divided
1 package active dry yeast
1 cup whole milk
1/3 cup sugar
1/3 cup butter
1 teaspoon kosher salt
2 large eggs
3/4 cup light brown sugar
Roll the long side up jelly-roll style; this will make an 18-inch roll. Slice
the roll into 1-inch slices. Place slices in a 12-inch ovenproof skillet.
Cover and let rise again for another 30 minutes.
12 Preheat oven to 375°.
13 Uncover pan and bake in preheated oven for 20 minutes.
14 After removing from oven, place a large plate over the top of the
pan and invert. Leave for several seconds so all caramel and pecans
release. Serve warm.
Recipe courtesy Debra Murray, Wolfgang Puck HSN Guest Host
METHOD
1
In the mixer bowl of the stand mixer with the flat beater attached,
mix 2 cups of flour and the yeast on speed 1, until mixed.
2
In a medium saucepan over medium heat, heat milk, butter, 1/3 cup
sugar and 1/3 cup butter to 115-120°, stirring constantly. (Use a candy
thermometer to check temperature.)
3
Pour milk mixture into flour mixture in mixer bowl. Add salt and
eggs. Scrape sides of bowl down. Beat mixture for 30 seconds on
speed 1, then 3 minutes on speed 3.
4
Remove the flat beater and replace with dough hook. With mixer on
speed 1, add remaining flour. When incorporated, turn to speed 3
and beat for 5 minutes.
5
Remove dough from bowl. Tuck the dough into a firm ball and place
into a well buttered bowl. Cover with a clean towel and place in a
draft-free area for at least 1 hour, until doubled in size.
6
When the dough ball has doubled in size, punch it down and let rest,
covered, for 10 minutes.
7
In a 12-inch chicken fryer over medium heat, melt 1/2 cup of butter
with 3/4 cup brown sugar and 2 tablespoons corn syrup. Scrape the
inside of vanilla bean into the caramel mixture. Add the 2 cups of
pecans and mix well. Remove from burner and reserve.
8
Mix the remaining chopped pecans, melted butter, 1/3 cup sugar and
the cinnamon. Set aside.
9
Lightly flour a work space. Roll out dough ball to an approximately
9 X 18-inch rectangle.
29
30
HSN_StandMixerManual_BPSM0050A2_HSN_StandMixerManual_BPSM0050A2 9/2/11 1:20 PM Page 31
Walnut Bread
Makes two 1 - 1/2 lb loaves, approx 16 - 20 slices
Walnut Bread (continued)
8
Using a razor blade or a very sharp knife, make a slash down the
length of each loaf. Spray with water and place in hot oven. Spray
twice more at 3-minute intervals.
9
Bake 20 minutes; reduce heat to 350° and bake an additional 20 to
25 minutes.
“THE SPONGE” INGREDIENTS
2 cups unbleached all-purpose flour
1/2 tablespoon dry yeast
1 1/4 cups lukewarm water
“THE SPONGE” METHOD
1
Place flour in mixer bowl with the flat beater attached.
2
Dissolve the yeast in 1/4 cup of water at 115 -120°. Add the dissolved
yeast into the mixer bowl and beat on low. Add the remaining water to
mixture. When a smooth batter is achieved, remove the beater and
cover the bowl with plastic wrap. Let sit at room temperature for 2 1/2
to 3 hours or place in the refrigerator overnight.
10 Remove the bread from the oven and turn off oven. Place breads on
wire racks and place back in oven with door slightly ajar for 20
minutes longer to dry out bread.
Recipe courtesy Wolfgang Puck
THE DOUGH INGREDIENTS
1 tablespoon dry yeast
1 3/4 cups lukewarm water
2 cups rye flour
2 cups stone-ground whole wheat flour
2 cups unbleached flour
The Sponge (above)
1 cup walnuts, chopped
“THE DOUGH” METHOD
1
Dissolve the yeast into 1/4 cup of warm water at 115 -120 degrees.
2
Add the newly dissolved yeast ,1 1/2 cups of water and the flours to
The Sponge.
3
With the dough hook attached, knead the ingredients on speed 3 for 5
minutes. You should have a smooth, elastic ball. If the dough seems
too wet, add a little more flour.
4
Cover the bowl with plastic wrap and let rise for 3 hours more, until
tripled in bulk.
5
Lightly flour a work surface and scatter 1/2 cup of nuts onto flour. Turn
dough out onto nuts and sprinkle the dough with the remaining nuts.
Knead by hand until all of the nuts are combined with dough.
6
Butter 2 loaf pans or molds. Divide the dough in half and shape loaves
to fit each pan. Cover loosely with plastic wrap and let rise at room
temperature until doubled in bulk.
7
Preheat oven to 450°.
31
32
HSN_StandMixerManual_BPSM0050A2_HSN_StandMixerManual_BPSM0050A2 9/2/11 1:20 PM Page 33
Wolfgang’s Sachertorte
White Bread
Serves 10
Makes 2 loaves
INGREDIENTS
INGREDIENTS
1 pound bittersweet chocolate, cut into small pieces
2 ounces unsweetened chocolate, cut into small pieces
8 ounces unsalted butter
3/4 cup sugar
Filling and Glaze ingredients
12 large eggs, separated
1 teaspoon vanilla extract
1 cup apricot preserves
2 tablespoons sugar
1 tablespoon apricot brandy
1/2 teaspoon salt
10 ounces bittersweet chocolate
flour for dusting pan
2 tablespoons butter
6 cups all-purpose flour
1 package dry yeast
2 1/4 cups milk
2 tablespoons sugar
1 tablespoon shortening
2 teaspoons kosher salt
melted butter
METHOD
METHOD
1
In the mixer bowl with the dough hook attached, place 2 1/2 cups of the
flour and the yeast. Set to speed 1 and blend for 1 minute until well blended.
2
In a saucepan over medium heat, heat the milk, sugar, shortening
and salt to 115 - 120°. The shortening should be just melted,
stirring constantly.
1
Preheat oven to 350°.
2
Butter and flour a 9-inch springform pan.
3
In a double boiler, melt the chocolates.
3
4
In mixer bowl fitted with flat beater, cream butter, 3/4 cup of sugar, the
egg yolks and vanilla. Add melted chocolate. Remove to another bowl.
Add the milk mixture to the mixer bowl. Beat on speed 1 for 30
seconds, then for 3 minutes on speed 3.
4
Turn off the mixer and add the remaining flour. Mix on low for 1 minute
then on speed 3 for 5 minutes.
5
Turn out onto a lightly floured board and form a ball. Dough should be
smooth and elastic. Place in a greased bowl and cover with a clean tea
towel. Let rise until doubled, about 1 1/4 hours.
5
Place egg whites in thoroughly cleaned and dry mixer bowl with the
whisk attached. Beat egg whites and salt on speed 3 until stiff peaks
form. Add the 2 tablespoons sugar to the whites with the
machine running.
6
Gently fold 1/3 of the egg whites into the chocolate mixture to lighten
it. Fold in the remaining egg whites, gently yet thoroughly.
6
When doubled in size, punch down and place on a lightly floured
board. Cut dough in half and let rest 10 minutes more.
7
Turn cake batter into prepared cake pan. Bake for 1 hour. To check for
doneness, insert a toothpick gently into cake. It should come out dry.
Remove the ring from the cake and cool on a rack.
7
Grease two bread pans.Tucking sides of bread dough under to form a
smooth log, place dough into loaf pans. Brush with melted butter and
let rise again until doubled, about an hour.
8
To make the filling, place one cup apricot preserves and 1 tablespoon
apricot brandy in food processor and process until smooth. Set aside
until ready to use.
8
Preheat oven to 375°.
9
Bake for 45 minutes or until done. Remove from pans and cool on wire rack.
When cake is cool, slice in half horizontally to make two layers. Spread
two thirds of the apricot filling on the bottom layer. Place the second layer
on top and lightly brush the entire cake with a thin layer of preserves.
Recipe courtesy Debra Murray, Wolfgang Puck HSN Guest Host
9
10 To make the glaze, melt 10 ounces bittersweet chocolate and 2
tablespoons butter in a double boiler. Remove from heat and cool
until it reaches glazing consistency. Spread over cake and chill.
11
Remove Sachertorte from refrigerator 1 hour before serving.
Recipe courtesy Wolfgang Puck, Adventures in the Kitchen (Random
House, 1991)
33
34
HSN_StandMixerManual_BPSM0050A2_HSN_StandMixerManual_BPSM0050A2 9/2/11 1:20 PM Page 35
Buttermilk Biscuits
Olive French Bread
Makes 20 to 22 biscuits
Makes 2 baguettes
INGREDIENTS
INGREDIENTS
2 3/4 cups all-purpose flour
1 1/2 tablespoons sugar
1 tablespoon plus 1 teaspoon baking powder
3/4 teaspoon salt
1/4 teaspoon baking soda
10 tablespoons (5 ounces) chilled unsalted butter, cut into small pieces
1/4 cup minced onion
1 tablespoon chopped fresh or 2 teaspoons dried thyme
1 cup buttermilk
1 or 2 tablespoons milk or cream
1/4 cup grated Parmesan cheese, optional
5 cups plus 2 teaspoons bread flour, divided
2 cups cold water
1 1/2 packages yeast
4 ounces nicoise olives, pitted and sliced
2 teaspoons salt
METHOD
1
Insert the dough hook into the stand mixer; put 5 cups flour and the
water into mixer bowl. Beat on speed 1 for 4 minutes.
2
Sprinkle yeast over dough, increase speed to 2 and beat for 4 minutes longer.
3
Toss the olives with the 2 teaspoons of flour, add to the dough with the
salt and mix 2 minutes longer.
4
Remove bowl from stand mixer and cover with a clean tea towel; let rest
for
15 minutes.
5
Turn the dough out onto a lightly floured surface. Lightly knead into a
ball, and let rest, covered, for 45 minutes.
6
Punch out the air, cut dough in half (about 21 ounces each half), and
shape into two baguettes. Place the loaves on one or two baking trays
and sprinkle with flour. Cover with towel, and let rest for 45 minutes.
7
Preheat the oven to 400°.
8
With a single-edge razor blade or a very sharp knife, make a slash down
the center of each loaf. Carefully slide the breads onto a baking stone
and bake for 9 minutes. Spray with water and continue baking until the
bread is well browned, about 1 hour 10 minutes longer.
9
Cool on wire rack.
METHOD
1
2
In bowl of stand mixer fitted with flat beater, combine the flour,
sugar, baking powder, salt, and baking soda on low speed. Add the
butter, onion, and thyme. Mix on speed 4 until the mixture resembles
fine meal. Reduce speed to 2 and slowly add buttermilk. Continue
mixing until dough comes together. Remove flat beater; attach dough
hook and continue to knead on speed 3 until round ball is formed.
Turn out onto a well-floured work surface and roll out dough to
about 1- inch thickness. With a 2-inch cookie or biscuit cutter, cut
out about 20 to 22 biscuits. Arrange the biscuits, as cut, on a
parchment-lined baking sheet. Refrigerate for at least 1 hour, up to
24 hours.
3
Preheat the oven to 350°.
4
Brush the top of each biscuit with milk or cream and sprinkle
with the Parmesan cheese, if desired. Bake 25 to 30 minutes, until
lightly golden.
PRESENTATION
Delicious by themselves, these biscuits are great with soup or served
with butter and honey, or your favorite preserves.
Recipe courtesy Wolfgang Puck, Adventures in the Kitchen (Random
House, 1991)
Recipe courtesy Wolfgang Puck, Adventures in the Kitchen
(Random House, 1991)
35
36
HSN_StandMixerManual_BPSM0050A2_HSN_StandMixerManual_BPSM0050A2 9/2/11 1:20 PM Page 37
Banana-Nut Quick Bread
Sandwich Bread Ball
Makes two 8-inch loaves, approx. 16 slices
Serves 6
INGREDIENTS
INGREDIENTS
1 cup walnuts
3 ripe bananas
1/4 cup shortening
1/2 cup sugar
1/2 cup light brown sugar
2 1/2 cups all-purpose flour
3 1/2 teaspoons baking powder
1 teaspoon salt
1/2 cup milk
1 large egg
1 teaspoon grated orange peel
1 tablespoon banana liqueur, optional
1 box bread mix for bread machines (2 lb. size, yeast packet included)
1 cup warm water (80°)
2 tablespoons bread flour
1 tablespoon mustard
1 1/2 pounds thinly sliced deli meats: ham, salami and/or pepperoni
1/2 pound provolone cheese, thinly sliced
1 cup spinach leaves
kosher salt and caraway seeds, if desired
1
In the mixer bowl, empty bread mix and sprinkle with yeast. With the
dough hook attached, slowly mix the flour and yeast on speed 1.
METHOD
2
With mixer still on, slowly pour the water into the flour mixture. Increase
mixer speed to 3 and mix for 5 minutes. (If the dough looks too wet, add
up to 2 tablespoons of additional bread flour.)
3
Turn dough out onto lightly floured surface. Knead gently by hand while
shaping into a ball. Ball should be smooth and elastic. Place the dough
ball in a well-greased bowl and cover with a tea towel until doubled in
size, about 1 hour.
METHOD
1
Preheat oven to 350°.
2
Place nuts in a baking tray and toast for 15 minutes,
then chop coarsely.
3
In the mixer bowl with the flat beater attached, place the bananas,
nuts and shortening. Cream until smooth on speed 3.
4
Add all remaining ingredients and mix on speed 1 just until blended,
about 30 seconds.
4
When dough is finished rising, punch down. Turn out onto a lightly
floured surface. Let rest for 10 minutes.
5
Spray two 8-inch bread pans with nonstick spray, (or you may use a
Wolfgang Puck 2-quart saucepan). Pour batter into prepared pans.
Bake for 55 - 60 minutes or until cooked through.
5
Preheat oven to 375°.
6
Roll the dough flat and cut into 3 equal pieces. Roll the first piece to a 7to 8- inch round. Spread half of mustard over dough; top with half of the
deli meat, cheese and spinach. Alternate slices to give good color. Place
ingredients evenly over entire dough, leaving a 1/2 inch edge.
7
Roll out another piece of dough, place it on top of meat, and crimp the
outside edge of the bottom dough to the new dough. Top with
remaining mustard, meat, cheese and spinach as in previous step.
8
Roll out the last dough ball, stretch over entire stack, and tuck under to close.
9
Sprinkle baking sheet with semolina or corn meal. Place the sandwich
round on top. Brush round with eggwash, then sprinkle with kosher salt
and caraway seeds, if desired. Bake in preheated oven for 50 minutes.
6
Cool slightly. Remove from pan. Allow to cool fully before slicing.
Recipe courtesy Debra Murray, Wolfgang Puck HSN Guest Host
10 Remove from oven and let cool slightly. Cut into wedges and serve warm.
Recipe courtesy Debra Murray, Wolfgang Puck HSN Guest Host
37
38
HSN_StandMixerManual_BPSM0050A2_HSN_StandMixerManual_BPSM0050A2 9/2/11 1:20 PM Page 39
Regular Pasta Dough
Pizza Dough
Makes 1 1/2 pounds pasta.
Makes four 8-inch pizzas
INGREDIENTS
INGREDIENTS
2 teaspoons salt
1 1/2 cups semolina flour
1 1/2 cups all-purpose flour
4 large eggs
2 tablespoons olive oil
1 package active dry or fresh yeast
1 teaspoon honey
1 cup warm water (105º F to 115º F)
3 cups all-purpose flour
1 teaspoon kosher salt
1 tablespoon extra-virgin olive oil,
plus more for brushing
Topping of your choice
(see Pizza recipes online at
www.wolfgangpuck.com)
METHOD
1
In the large bowl of the stand mixer, combine salt and flours.
METHOD
2
Create a well in the middle of the flour. Crack the eggs and place
them in well, pour oil on top of eggs.
1
2
3
Using stand mixer fitted with the dough hook, begin kneading the
dough on speed 3, gradually increasing to speed 5 and kneading
until a ball is formed.
4
Stop mixer and roll ball around bowl to gather all remaining flour.
Continue to knead onto a lightly floured surface until a smooth ball is
achieved. Wrap in plastic wrap and let rest at room temperature for
30 minutes.
5
Cut dough into 4 equal pieces and roll out 1 piece at a time, keeping
the remaining dough wrapped until needed. Cut as desired, or form
into 1-inch balls and process in the optional pasta attachment for this
stand mixer.
3
4
5
Recipe courtesy Wolfgang Puck, Adventures in the Kitchen
(Random House, 1991)
6
7
In a small bowl, dissolve the yeast and honey in 1/4 cup of the warm water.
In a mixer fitted with a dough hook, combine the flour and the salt.
Add the oil, yeast mixture, and the remaining 3/4 cup of water and mix
on low speed until the dough comes cleanly away from the sides of
the bowl and clusters around the dough hook, about 5 minutes
Turn the dough out onto a clean work surface and knead by hand 2 or
3 minutes longer. The dough should be smooth and firm. Cover the
dough with a clean, damp towel and let it rise in a warm spot for about
30 minutes. (When ready, the dough will stretch as it is lightly pulled.)
Place a pizza stone on the middle rack of the oven and preheat the
oven to 500º F.
Divide the dough into 4 balls, about 6 ounces each. Work each ball by
pulling down the sides and tucking under the bottom of the ball.
Repeat 4 or 5 times. Then on a smooth, unfloured surface, roll the ball
under the palm of your hand until the top of the dough is smooth and
firm, about 1 minute. Cover the dough with a damp towel and let it rest
for 15 to 20 minutes. At this point, the balls can be wrapped in plastic
and refrigerated for up to 2 days.
To prepare each pizza, dip the ball of dough into flour, shake off the
excess flour, place the dough on a clean, lightly floured surface, and
start to stretch the dough. Press down on the center, spreading the
dough into an 8-inch circle, with outer border a little thicker than the
inner circle. If you find this difficult to do, use a small rolling pin to roll
out the dough. Lightly brush the inner circle of the dough with oil and
arrange the toppings of your choice over the inner circle.
Using a lightly floured baker’s peel or a rimless flat baking tray, slide
the pizza onto the baking stone and bake until the pizza crust is nicely
browned, 10 to 12 minutes. Remember that the oven is very hot and be
careful as you place the pizza into and out of the oven. Transfer the
pizza to a firm surface and cut into slices with a pizza cutter or very
sharp knife. Serve immediately.
Recipe courtesy Wolfgang Puck, Live, Love, Eat! (Random House, 2002)
39
40
HSN_StandMixerManual_BPSM0050A2_HSN_StandMixerManual_BPSM0050A2 9/2/11 1:20 PM Page 41
Creamy Mashed Potatoes
with Brown Onions
Wolfgang’s Three Nut Cookies
Makes 20 - 30 cookies
Serves 6-8
INGREDIENTS
INGREDIENTS
4 sticks butter, softened
1/2 cup dark brown sugar
1 cup toasted hazelnuts, chopped*
1 cup toasted pecans, chopped*
1 cup toasted almonds, chopped*
3 cups all-purpose flour
1 teaspoon salt
2 teaspoons vanilla
powdered sugar, for dusting
2 1/2 pounds baking potatoes, peeled and cut into chunks
8 tablespoons unsalted butter, cut into small pieces
1/2 cup heavy cream, brought to a boil
1 teaspoon salt
1 pinch freshly ground white pepper
1 pinch freshly ground nutmeg
vegetable oil for frying
1/2 pound onions, sliced in thin rings
all-purpose flour, for dredging
METHOD
METHOD
1
Preheat oven to 350°.
1
In a saucepan, cook the potatoes in lightly salted water to cover,
until tender. Drain well.
2
Line two large baking sheets with parchment paper.
3
2
Place the potatoes in the mixer bowl with the flat beater attached.
Add butter, heated cream, salt, white pepper and nutmeg. Mash the
potatoes on speed 2 until well blended.
In stand mixer with the flat beater attached, cream butter and brown
sugar until smooth. Stop mixer and scrape down sides of bowl. Add
nuts. Mix well.
4
3
Place 2 inches of water in a stock pot or dutch oven. Place the
potatoes in the stainless bowl over bowling water to keep warm.
Cover the bowl with a towel or lid to keep the heat in.
Sift together flour and salt. Tilt mixer head back and add sifted flour
and salt. Mix well, about 30 seconds.
5
With a teaspoon, form the dough into small ovals and place about
1 1/2 inches apart on baking sheets.
4
Dredge the onions in the flour.
6
5
Heat the oil in a deep fryer or a fry pan. When the oil reaches 350°,
shake off excess flour then drop the onions into the hot oil and fry to
golden brown.
Bake 20 minutes or until golden brown. Remove from oven and let
cool. Dust the cookies well with powdered sugar before serving.
6
Remove onions from oil and drain on a paper towel. Season lightly
with salt.
*HELPFUL HINT: To toast nuts, preheat oven to 350°. Spread the nuts
onto a cookie sheet and place in oven for 3 to 5 minutes, until you can
smell the rich nut flavor. Let cool; then chop well with a food processor.
Recipe courtesy Marian Getz, Wolfgang Puck Chef
SERVING SUGGESTION
Spoon some of the mashed potatoes onto plates and top with french
fried onions.
Recipe courtesy Wolfgang Puck, Live, Love, Eat! (Random House, 2002)
41
42
HSN_StandMixerManual_BPSM0050A2_HSN_StandMixerManual_BPSM0050A2 9/2/11 1:20 PM Page 43
Minute Meatloaf Patties
Serves 6
INGREDIENTS
1 tablespoon olive oil
1 medium onion,
peeled and quartered
2 tablespoons parsley
1 clove garlic
8 ounces mushrooms
Salt and pepper
1 pound beef, 2 inch cubes
1/2 pound pork, 2 inch cubes
2 slices bread
1 large egg
1 beef bouillon cube
1/4 cup cream
METHOD
1
Food Grinder Recipes
Attach and assemble the food grinder to the stand mixer with the
course plate. Grind the onion, parsley, garlic and mushrooms, set
aside. Grind the meats into the large bowl of the stand mixer, grind
the bread crumbs.
2 In a small skillet, heat olive oil, add onion, sauté till tender. Add
garlic, parsley and mushrooms, season with salt and pepper. When
mushrooms are heated through, turn off heat and let cool.
3 When the vegetable mixture has cooled add it to the meat and
bread crumbs.
4 Dissolve bouillon cube in 1 tablespoon of warm water, add to
ground meat mixture.
5 Add the egg and cream, place bowl on stand mixer equipped
with the flat beater and mix on speed 5 for 1 minute to incorporate
all the ingredients.
6 Form 6 large meatloaf patties.
7 Preheat your Panini maker, or a grill or fry pan. Cook to medium well.
In Panini this would be 5-7 minutes, on a grill or fry pan on mediumhigh heat 7 minutes per side. Serve with mashed potatoes and gravy,
or great as a sandwich!
NOTE: Patties can be individually made to fit everyone’s tastes, by
omitting undesired ingredients or adding other favorites! If you are
watching the fat, just substitute the beef for ground turkey, and add a
pinch of tarragon! Delicious.
Recipe courtesy Debra Murray, Wolfgang Puck HSN Guest Host
43 - Food Grinder Attachment
44 - Food Grinder Attachment
HSN_StandMixerManual_BPSM0050A2_HSN_StandMixerManual_BPSM0050A2 9/2/11 1:20 PM Page 45
Gazpacho
Serves 6
Serves 4
INGREDIENTS
8 medium ripe tomatoes, quartered
2 medium cucumber, peeled & seeded cut in 1/2 inch pieces
2 small bell pepper, cored and seeded cut into quarters
1 stalk celery, cut into 1” cubes
1 tablespoon sherry vinegar
3 tablespoons tomato paste
3 tablespoons olive oil
2 teaspoons salt
1/2 teaspoon freshly ground pepper
1/2 teaspoon cayenne pepper
1 small cucumber
INGREDIENTS
1 pound fresh sea scallops or bay scallops – cut into tiny pieces
5 whole limes – juiced (2/3 cups)
2 tablespoons extra virgin olive oil
2 cloves garlic – blanched and chopped
2 medium ripe tomatoes – peeled, seeded & chopped
1 medium jalapeño – seeded, membrane removed, finely chopped
3 whole green onions – finely chopped
1 tablespoon capers – drained
2 tablespoons fresh cilantro – chopped
Kosher salt and fresh ground pepper to taste
METHOD
METHOD
1
Scallop Ceviche
Prepare the vegetables. Place them in a stainless steel bowl with
vinegar. Cover and refrigerate at least 6 hours, preferably overnight.
2 Assemble and attach food grinder with the coarse grinding plate.
On speed 5 process the vegetables.
3 Return to bowl, add the tomato paste, olive oil, salt, pepper, and
cayenne pepper. Check for correct seasoning Chill until time to
serve.
4 Peel, seed and slice remaining cucumber for garnish.
1
Place fresh, chopped scallops into a glass bowl.
Cover scallops with the lime juice.
2 Cover and refrigerate for 24 hours. After 24 hours, drain the scallops
from the liquid.
3 Blanch garlic in bowling water for 2 minutes. Drain.
4 Assemble and attach food grinder to stand mixer with coarse plate.
On speed five grind all the vegetables.
5 Mix the scallops, ground veggies and all the remaining ingredients.
Test for seasoning. Season with salt & pepper to taste.
6 Cover ceviche and refrigerate until ready to serve.
SERVING IDEAS
Serve in chilled martini glasses with cucumber slices. Great served with
grilled seafood as a garnish on a skewer.
Recipe courtesy Wolfgang Puck
SERVING IDEAS
The ceviche is wonderful served on a chilled tray in pretty lettuce leaves
like radicchio. Or you may serve them in a chilled martini glass filled with
shredded lettuce in the bottom.
Recipe courtesy Debra Murray, Wolfgang Puck HSN Guest Host
45 - Food Grinder Attachment
46 - Food Grinder Attachment
HSN_StandMixerManual_BPSM0050A2_HSN_StandMixerManual_BPSM0050A2 9/2/11 1:20 PM Page 47
My Spaghetti and Meatballs
Serves 6
INGREDIENTS
4 tablespoons unsalted butter
1 medium onion, quartered and peeled
3 cloves garlic, peeled
4 slices italian bread, crusts discarded
1/4 cup whole milk
2 pounds veal, cubed
1 large egg
1/4 cup grated parmesan cheese
1 tablespoon fresh parsley, chopped
1 tablespoon fresh basil, chopped
1 teaspoon fresh thyme leaves
1 teaspoon salt
1/4 teaspoon freshly ground pepper
5 cups My Favorite Tomato Sauce
(Or 4 cans Wolfgang Puck Tomato Basil Soup)
1 pound spaghetti
Chopped fresh flat leaf parsley for garnish
Parmesan cheese grated for garnish
My Spaghetti (cont.)
8 Wetting your hands with cold water, roll about 1/2 cup of meatball
mixture into a large, even meatball and place it on a large baking
sheet. Repeat with the remaining mixture, making 8 large meatballs
in all.
9 In a large stock pot or saucepan over medium heat, heat the tomato
sauce until it is very gently simmering. One at a time carefully lower
the meatballs into the simmering sauce. Reduce the heat and
simmer, covered until meatballs are cooked through and sauce has
thickened, about 45 minutes.
10 Bring a large pot of water to boil with a tablespoon of salt and oil.
Add the spaghetti and cook till “al dente,” tender but chewy, if using
dry follow manufacturers’ instruction.
1 1 With a slotted spoon, remove the meatballs from the sauce and
transfer
them to a plate. Remove 1 1/2 cups of sauce from the pan and keep
it warm. Drain the spaghetti thoroughly. Twirl or mound the pasta
into 8 warmed bowls. Top with meatball, sauce and garnishes.
Recipe courtesy Wolfgang Puck “Live Love Eat"
(Random House, 2002)
METHOD
1
Assemble and attach the food grinder to the stand mixer with
the coarse plate attached.
2 Grind the onion and garlic. Set aside.
3 Proceed to grind the meats. Set aside.
4 Grind the bread into the large bowl of the stand mixer.
5 Remove the coarse plate from the meat grinder and replace it
with the fine plate. Proceed to regrind the meats.
6 In a medium skillet, melt the butter. Add the onion and garlic and
sauté until soft, about 5 minutes, taking care not to brown the
onions. Set aside to cool. Add the milk to bread crumbs, set aside
until all the milk is absorbed. When onions are cooled, and milk
absorbed, add all the ingredients to the stand mixer bowl.
(Except the garnish items.)
7 With the dough hook attached, mix the ingredients on speed 4 for 1
to 2 minutes. Make sure to combine all the ingredients, but not over
beat them.
47 - Food Grinder Attachment
48 - Food Grinder Attachment
HSN_StandMixerManual_BPSM0050A2_HSN_StandMixerManual_BPSM0050A2 9/2/11 1:20 PM Page 49
Recipe Notes
Recipe Notes
49
50
HSN_StandMixerManual_BPSM0050A2_HSN_StandMixerManual_BPSM0050A2 9/2/11 1:20 PM Page 51
Recipe Notes
Limited Warranty
This warranty covers all defects in workmanship or materials in the
mechanical and electrical parts arising under normal usage and care;
in this product for a period of 12 months from the date of purchase
provided you are able to present a valid proof-of-purchase. A valid
proof-of-purchase is a receipt specifying item, date purchased, and
cost of item. A gift receipt with date of purchase and item is also an
acceptable proof-of-purchase.
This warranty covers the original retail purchaser or gift recipient.
During the applicable warranty period we will repair or replace, at
our discretion, any mechanical or electrical part which proves defective
or replace unit with a comparable model.
To obtain service under the terms of this warranty,
call Toll Free (800) 275-8273.
THIS LIMITED WARRANTY COVERS UNITS PURCHASED AND USED
WITHIN NORTH AMERICA AND DOES NOT COVER:
• Damages from improper installation.
• Defects other than manufacturing defects.
• Damages from misuse, abuse, accident, alteration, lack of proper
care and maintenance, or incorrect current or voltage.
• Damage from service by other than an authorized dealer or
service center.
51
52