1
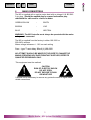
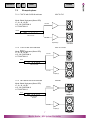
<
CONTENTS
>
PRINT
GUIDES
CONTENTS (ENGLISH)
1
INTRODUCTION
Page No
2
2
3
UNPACKING
INSTALLATION
2
2
4
MAINS CONNECTIONS
3
5
SIGNAL CONNECTIONS
5.1 Input connections
4
4
5.2 Output connections
6
INITIAL SETTINGS
4
5
7
6
M3 SYSTEM CONFIGURATIONS
Controller Code
M3-F12-F15
6
with add-on S15/S18 sub-bass
7.2 Bi-amped systems
M3-F12-F15SP
6
7.2.1 F12/F15 with S15/S18 sub-bass
7.2.2 F12/F15 with S218 sub-bass
M3-F12-F15
M3-F12-F15S2
M3-H2P
M3-H3A
7
7
M3-H2A & M3-218H2A
M3-H3A & M3-218H3
8
8
7.1 Passive systems
7.1.1 F12/F15 Full-range
7.1.2 F12/F15 Full-range
7.2.3 H2 Passive with S218 sub-bass
7.2.4 H3 Full-range
7.3 Tri-amped systems
7.3.1 H2 Active with S218 sub-bass
7.3.2 H3 with S218 sub-bass
8
LEVELS
9
10
11
12
LIMITERS
AMPLIFICATION
WARRANTY
TECHNICAL SPECIFICATIONS
6
7
7
8
8
9
MARTIN AUDIO
L O N D O N
The Martin Experience
Martin Audio – M3 System Controller
9
10
10
11
>
PRINT
GUIDES
This equipment conforms to the requirements of the
EMC Directive 89/336/EEC, amended by 92/31/EEC
and 93/68/EEC and the requirements of the Low
Voltage Directive 73/23/EEC, amended by 93/68/EEC.
Standards Applied
EMC
Emission
Immunity
Electrical Safety
1
EN55103-1:1996
EN55103-2:1996
EN60065:1998
INTRODUCTION
Thank you for purchasing a Martin Audio M3 system controller. The M3
controller is used to optimise the performance of the Blackline series of
loudspeakers in all modes of operation.
2
UNPACKING
Each Martin M3 controller is built and tested to the highest standard and
thoroughly inspected before it leaves the factory. After unpacking the unit,
please examine it carefully for any signs of transit damage and inform your
dealer if any such damage is found. It is suggested that you retain the
original packaging so that the unit can be repacked at a future date if
necessary.
Please note that Martin Audio and its distributors cannot accept
responsibility for damage to any returned product through the use of nonapproved packaging.
3
INSTALLATION
The M3 requires a vertical rack space of 1U (1.75"/44.5mm). As with any
low level signal processing equipment it is recommended that it is sited well
away from any high level sources of electromagnetic radiation, and should
not for example be placed directly above power amplifiers or lighting
dimmers, which could induce residual noise into the system.
2
Martin Audio – M3 System Controller
ENGLISH
<
CONTENTS
4
>
PRINT
GUIDES
MAINS CONNECTIONS
The M3 is supplied with a captive mains lead with an integral U.K. BS1363
3 pin plug. Should the moulded plug be removed and another plug
substituted the cable must be re-wired as below.
GREEN/YELLOW
-
EARTH
BROWN
-
LIVE
BLUE
-
NEUTRAL
WARNING: The M3 Controller must always be operated with the mains
safety earth connected.
The M3 is supplied from the factory in either 100-120V or
200-240V versions
Mains voltage tolerance +/- 10% on each setting
Fuse: - type ‘T’ semi-delay 160mA (L) 100-120V
Fuse: - type ‘T’ semi-delay 160mA (L) 220-240V
NO ATTEMPT SHOULD BE MADE BY THE USER TO CHANGE THE
MAINS OPERATING VOLTAGE FROM THAT SUPPLIED, REFER TO
QUALIFIED PERSONNEL ONLY.
This equipment must be earthed.
!
CAUTION
RISK OF ELECTRIC SHOCK
DO NOT OPEN
DO NOT EXPOSE TO RAIN
OR MOISTURE
It should not be necessary to remove any protective earth or signal cable
shield connections.
3
Martin Audio – M3 System Controller
ENGLISH
<
CONTENTS
5
>
PRINT
GUIDES
SIGNAL CONNECTIONS
5.1
Input connections
M3 inputs are on female XLR-type connectors and are electronically
balanced. Pin 1 is normally open circuit but may be linked to Ground
(chassis earth) or Lift (signal 0V) by positioning jumper links on the main
PCB (J1,J2).
The signal is always applied between pin 2 (hot +) and pin 3 (cold -).
Always use 2-core plus screen ‘balanced’ type signal cable, even for
unbalanced circuits. The screen should be regarded as separate from the
signal return, even if they are connected together at one end of the cable.
Cable lengths longer than 3 metres should be avoided for unbalanced
connections.
For either balanced or unbalanced operation, always connect the input
signal between Pins 2 and 3. The input cable screen should be derived
from the equipment which is sourcing the input provided that normal safety
requirements are met (i.e. the mains earth is connected correctly).
5.2
Output connections
M3 outputs are electronically balanced auto-compensating via male XLR
type connectors. Pin 1 can be configured to be open circuit or lifted
(signal 0V). The output signal appears between Pins 2 and 3.
Always use 2-core plus screen ‘balanced’ type signal cables, even for
unbalanced circuits. The cable screen should be regarded as separate
from the signal return, even if they are connected together at one end.
This is to keep the screen a true screen so that signal return currents do
not flow through it, which can induce signals in adjacent cables
For unbalanced use, whichever pin you have designated to be hot (+)
connect the corresponding cold pin (-) and Pin 1 together. The internal
output signal grounds J3, J4, J5, and J6 should be placed in the open
circuit position which allows the amplifier to be locally grounded (as
required for safety reasons) without causing a hum loop. If the signal is
taken between Pin 2 or 3 and Pin 1 a level loss and signal degradation will
occur. When using unbalanced connections avoid cable lengths greater
than 3 metres.
For balanced operation, the screen should be connected at the amplifier
end. To eliminate hum current loops jumpers J3, J4, J5 and J6 can be
placed in the open circuit position.
The power ratings of amplifiers connected to the M3 controller should lie
within the range recommended for the Blackline series of loudspeakers
being used. Please refer to the section on amplification for further
information.
4
Martin Audio – M3 System Controller
ENGLISH
<
CONTENTS
6
>
PRINT
GUIDES
INITIAL SETTINGS
M3 system controllers are supplied set up as follows:
Mains Voltage
-
220-240V
Pin 1 (input) J1, J2
-
OPEN CIRCUIT
Pin 1 (outputs)
J3, J4, J5, J6.
-
LIFT (0V)
Mono Sum CH1/3
J17
-
Disabled Position ‘A’
Limiters in/out
J7, J8, J9, J10.
-
IN
ABS Phase
J15, J16
-
Position ‘A’
Limiter threshold
-
0.7V
Mode switch
(Front panel)
-
High Pass (Green LED ‘ON’)
Depending on which Blackline
cabinets are being used, and in
which configuration, the mode
switch on the front panel will have
to be changed from the High
Pass position (Green LED ‘ON’)
to the Full Range position (Red
LED ‘ON’). In the high pass
mode, channels 2 and 4 are
switched to be high pass outputs,
with channels 1 and 3 active in a
low pass configuration. When in
full range mode the outputs from
channels 1 and 3 are muted and
outputs 2 and 4 are configured to
be full range outputs. Please refer
to section 7 for individual card set
up information.
5
Martin Audio – M3 System Controller
ENGLISH
<
CONTENTS
7
>
PRINT
GUIDES
M3 SYSTEM CONFIGURATIONS
There are many different system combinations possible with the blackline
series. Shown below are some typical configurations. Please note that for
simplicity only the left channel is shown.
7.1
Passive systems
7.1.1 F12/F15 Full-range
M3-F12-F15
Mode Switch Full-range (Red LED)
J7, J8, J9, J10 IN
J15, J16 POSITION ‘A’
Figure11.
J17 POSITION ‘A’
Ch2 Out
Left In
Optional M3 Controller
M3-F12-F15
Amplifier
7.1.2
F12/F15 Full-range with add-on S15/S18 sub-bass
F12/F15
M3-F12-F15SP
This provides a simple way of increasing bass performance without the
need for an additional amplifier. The switch at the rear of the sub-bass
enclosure should be switched to "passive" and a link lead run from the
sub-bass to the F12/F15. This configuration will present a 4 ohm load to
the amplifier.
Mode Switch Full-range (Red LED)
J7, J8, J9, J10 IN
J15, J16 POSITION ‘A’
J17 POSITION ‘A’
Figure12.
F12/F15
Ch2 Out
Left In
Optional M3 Controller
M3-F12-F15SP
Amplifier
6
Martin Audio – M3 System Controller
S15/S18
ENGLISH
<
CONTENTS
<
7.2
>
PRINT
GUIDES
Bi-amped systems
7.2.1 F12/F15 with S15/S18 sub-bass
Figure13.
Mode
Switch High-pass (Green LED)
J7, J8, J9, J10 IN
J15, J16 POSITION ‘A’
J17 POSITION ‘A’
M3-F12-F15
Ch2 Out
Left In
F12/F15
M3 Controller
M3-F12-F15
Ch1 Out
Amplifier(s)
7.2.2 F12/F15 with S218 sub-bass
S15/S18
M3-F12-F15S2
Figure14. High-pass (Green LED)
Mode Switch
J7, J8, J9, J10 IN
J15, J16 POSITION ‘A’
J17 POSITION ‘A’
Ch2 Out
Left In
F12/F15
M3 Controller
M3-F12-F15S2
Ch1 Out
Amplifier(s)
S218
7.2.3 H2 Passive with S218 sub-bass
M3-H2P
Figure15. High-pass (Green LED)
Mode Switch
J7, J8, J9, J10 IN
J15, J16 POSITION ‘A’
J17 POSITION ‘A’
Ch2 Out
H2
PASSIVE
Left In
M3 Controller
M3-H2P
Ch1 Out
Amplifier(s)
7
Martin Audio – M3 System Controller
S218
ENGLISH
CONTENTS
<
>
PRINT
GUIDES
7.2.4 H3 Full-range
M3-H3A
Figure16.
Ch2 Out
Left In
M3 Controller
M3-H3A
Mode Switch High-pass (Green LED)
J7, J8, J9, J10 IN
J15, J16 POSITION ‘A’
J17 POSITION ‘A’
7.3
7.3.1
Ch1 Out
Amplifier(s)
H3
H3
Tri-amped systems
H2 Active with S218 sub-bass
Mode Switch
High-pass (Green LED)
Figure17.
J7, J8, J9, J10 IN
J15, J16 POSITION ‘A’ J17 POSITION ‘A’
M3-H2A & M3-218H2A
Ch2 Out
Left In
M3 Controller
M3-H2A
H2
ACTIVE
Ch1 Out
Mode Switch High-pass (Green LED) J7, J9 IN J8, J10 OUT
J15, J16 POSITION ‘A’ J17 POSITION ‘A’
Ch2 Out
Left In
M3 Controller
M3-218H2A
Ch1 Out
Amplifiers
7.3.2 H3 with S218 sub-bass
Figure18.
Mode Switch
High-pass (Green LED)
J7, J8, J9, J10 IN
J15, J16 POSITION ‘A’ J17 POSITION ‘A’
S218
M3-H3A & M3-218H3
Ch2 Out
Left In
M3 Controller
M3-H3A
Ch1 Out
Mode Switch High-pass (Green LED) J7, J9 IN J8, J10 OUT
J15, J16 POSITION ‘A’ J17 POSITION ‘A’
H3
Ch2 Out
Left In
M3 Controller
M3-218H3
Ch1 Out
Amplifiers
S218
8
Martin Audio – M3 System Controller
ENGLISH
CONTENTS
8
>
PRINT
GUIDES
LEVELS
The system-specific plug-in top cards provide the necessary channel gain
or attenuation to provide approximate system balance when the level
control is in the 0dB position. This assumes the use of amplifiers with
identical gains. Plus and minus 3dB’s of gain or attenuation is available on
outputs 1 and 3 to adjust the balance of the system with respect to
channels 2 and 4 which have a nominal output level of 0dB.
Please note the M3 controller will always be shipped with the level control
set in the 0dB position. The screwdriver ‘slot’ in the end of the spindle is
un-calibrated and does not correspond to the front panel markings.
9
LIMITERS
Each M3 output has an associated limiter, which provides momentary gain
reduction when the output signal level exceeds a pre-set threshold value.
A red LED indicates the onset of limiting. Threshold settings for the limiters
may be adjusted by first disconnecting the power to the M3, then
removing the top cover (two screws on each side). The plug-in top card
must then be un-clipped from the four locating pillars and swung up on it’s
ribbon cable to reveal the four banks of selector pins J11, J12 J13, and
J14. Threshold values corresponding to the jumper link positions are
printed on the lid of the controller and duplicated in Section 6.
Each output channel limiter sets a maximum voltage level from the M3,
which in turn sets the maximum continuous voltage that the amplifier can
present to the loudspeaker.
The limiters in the M3 may be used to control the average continuous
power applied to the loudspeakers, if power amplifiers with a higher
maximum power rating than that recommended are used. (See Amplifier
section). Alternatively, if the loudspeakers selected will handle the full rated
power, or if maximum system headroom is required, the limiters may be set
to prevent the amplifiers being driven into hard clipping.
WARNING. Care should be taken to avoid amplifier clipping. It is important
to understand that a low power amplifier driven into clipping is more likely
to damage a loudspeaker than a higher power amplifier used within its
ratings. This is because music signals have a high peak to average "crest"
factor. When an amplifier is severely overdriven, its output waveform is
clipped (its peaks are squared off) – reducing the crest factor. In extreme
cases, the waveform can approach that of a square wave. An amplifier is
normally capable of producing far more power under these conditions than
its normal undistorted rated power output. Correct setting of the limiters will
automatically avoid amplifier clipping and prevent damage occurring to the
loudspeakers.
9
Martin Audio – M3 System Controller
ENGLISH
<
CONTENTS
<
>
PRINT
GUIDES
Each limiter may be completely defeated, by setting J7, J8, J9 and J10 to the
out position. If another M3 is to be driven from any of the output channels
(where one M3 splits the signal between sub-bass loudspeakers and the main
system crossovers), then the limiters should be defeated on those channels
to prevent them operating before the limiters in the following controller.
The use of very high power amplifiers with outputs greater than those
recommended is discouraged.
Care should be taken to avoid switch on surges, which can result in
momentary power peaks in excess of specified ratings. When powering up a
sound system it is important to switch on the amplifiers after the mixer and
control electronics have stabilised. When powering down the system, reverse
the sequence and switch off the amplifiers first.
10
AMPLIFICATION
Blackline Series loudspeakers are designed to be used with professional
power amplifiers capable of producing the following power outputs into 4
ohms per channel:F12
F15
H2
H2
H3
H3
S15
S18
S218
11
400-650W
400-800W
400-650W
100-400W
400-1000W
400-650W
400-1000W
400-1000W
800-2000W
MF/MF+HF
HF
LF
MF+HF
WARRANTY
Martin Audio M3 System Controllers are warranted against manufacturing
defects in materials or craftsmanship over a period of 1 year from the date of
original purchase. During the warranty period Martin Audio will, at it's
discretion, either repair or replace products which prove to be defective
provided that the product is returned in its original packaging, shipping
prepaid, to an authorised Martin Audio service agent or distributor.
Martin Audio Ltd. cannot be held responsible for defects caused by
unauthorised modifications, improper use, negligence, exposure to inclement
weather conditions, act of God or accident, or any use of this product that is
not in accordance with the instructions provided by Martin Audio.
Martin Audio is not liable for consequential damages.
This warranty is exclusive and no other warranty is expressed or implied.
This warranty does not affect your statutory rights.
10
Martin Audio – M3 System Controller
ENGLISH
CONTENTS
<
>
12
PRINT
GUIDES
TECHNICAL SPECIFICATIONS
M3
INPUTS
2 Electronically Balanced
IMPEDANCE
CMRR
CONNECTORS
20K ohms (10K ohms per leg single ended)
60dB 20Hz – 10KHz
3 Pin female XLR
OUTPUTS
4 Electronically Balanced
SOURCE IMPEDANCE
MIN LOAD IMPEDANCE
MAX OUTPUT
CONNECTORS
62 ohms
600 ohms
+20dBu into 600 ohms
3 Pin Male XLR
FREQUENCY RESPONSE -3dB @ 18 Hz 12dB/octave
-3dB @ 45KHz 12dB/octave
(ultimately set by system parameters)
DISTORTION+NOISE
0.01% THD @ 2V output (limiters cancelled)
SIGNAL+NOISE/
NOISE RATIO
>100dB @ 2V output
LIMITERS
Individual for each channel.
Ratio 20:1.Threshold range -12dBu to +12dBu
in 16 steps
MAINS SUPPLY
Captive 2m 3 core cable with integral
U.K. 3 pin plug
MAINS VOLTAGE
Internally selectable by hard wire link
100-120/220-240V
AC, 50/60Hz.Voltage tolerance
on each setting ± 10%
MAINS FUSE
100-120V and 220-240V: - 160mA Type ‘T’ (L)
DIMENSIONS
(W) 482mm x (H) 44mm x (D) 155mm
(W) 19ins x (H) 1.75ins x (D) 6.1ins
WEIGHT
2.4Kg
SHIPPING DIMENSIONS (W) 545mm x (H) 120mm x (D) 235mm
(W) 21.5ins x (H) 4.7ins x (D) 9.3ins
SHIPPING WEIGHT
2.9Kg
Due to our policy of continuous product improvement all specifications are
subject to change without notice.
11
Martin Audio – M3 System Controller
ENGLISH
CONTENTS
CONTENTS
<
>
PRINT
GUIDES
M3 System Controller
Please Click here to
return to main menu
Please Click here to
visit our website
MARTIN AUDIO
L O N D O N
The Martin Experience
Century Point, Halifax Road, Cressex Business Park, High Wycombe, Buckinghamshire HP12 3SL, England.
Telephone: +44 (0)1494 535312 Facsimile: +44 (0)1494 438669
Web: www.martin-audio.com E-mail: [email protected]
CONTENTS
<
>
PRINT
GUIDES
M3 System Controller
User’s Guide
ENGLISH
MARTIN AUDIO
L O N D O N
The Martin Experience