1
EMC® ViPR™
Version 1.1.0
Installation and Configuration Guide
302-000-479
02
Copyright © 2013-2014 EMC Corporation. All rights reserved. Published in USA.
Published March, 2014
EMC believes the information in this publication is accurate as of its publication date. The information is subject to change
without notice.
The information in this publication is provided as is. EMC Corporation makes no representations or warranties of any kind with
respect to the information in this publication, and specifically disclaims implied warranties of merchantability or fitness for a
particular purpose. Use, copying, and distribution of any EMC software described in this publication requires an applicable
software license.
EMC², EMC, and the EMC logo are registered trademarks or trademarks of EMC Corporation in the United States and other
countries. All other trademarks used herein are the property of their respective owners.
For the most up-to-date regulatory document for your product line, go to EMC Online Support (https://support.emc.com). For
documentation on EMC Data Domain products, go to the EMC Data Domain Support Portal (https://my.datadomain.com).
EMC Corporation
Hopkinton, Massachusetts 01748-9103
1-508-435-1000 In North America 1-866-464-7381
www.EMC.com
2
EMC ViPR 1.1.0 Installation and Configuration Guide
CONTENTS
Chapter 1
Prerequisites
7
Checklist for ViPR installation and configuration readiness..............................8
How ViPR virtual appliance is deployed......................................................... 11
ViPR Controller VM requirements................................................................... 11
Prerequisites for ViPR UI................................................................................ 11
VMware requirements................................................................................... 11
Prerequisites for ViPR CLI.............................................................................. 12
Environment preconfiguration....................................................................... 12
Preconfiguration requirements for VMAX arrays................................12
Preconfiguration requirements for VNX block................................... 12
Preconfiguration requirements for VNX file....................................... 12
Preconfiguration requirements for VPLEX systems............................ 13
Preconfiguration requirements for Isilon...........................................13
Preconfiguration requirements for NetApp arrays............................. 13
Preconfiguration requirements for fabrics.........................................14
Preconfiguration requirements for EMC RecoverPoint systems..........14
Preconfiguration requirements for SRDF........................................... 15
Preconfiguration requirements for hosts...........................................15
Collect information for ViPR Controller VM virtual machines............. 18
Chapter 2
Deployment Steps
19
ViPR deployment files....................................................................................20
ViPR deployment properties for Controller VMs..............................................20
Avoiding conflicts in ViPR virtual IP addresses..................................21
Deploying ViPR Controller VMs with vSphere Client....................................... 21
Obtaining the license file...............................................................................22
Installing the ViPR CLI on Linux......................................................................23
Installing the ViPR CLI on Windows................................................................24
Overview of configuration steps.................................................................... 26
Chapter 3
Upgrading ViPR Software
29
Upgrade........................................................................................................ 30
Pre-upgrade planning....................................................................................30
Unmount Linux volumes before upgrade.......................................... 30
Take virtual machine snapshots before upgrade.............................. 30
Upgrading ViPR software............................................................................... 31
Post-upgrade steps....................................................................................... 31
Reverting to pre-upgrade snapshots.............................................................. 32
Upgrading ViPR from an internal repository................................................... 32
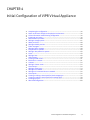
Chapter 4
Initial Configuration of ViPR Virtual Appliance
33
Completing the configuration........................................................................ 34
Avoid out-of-band changes to the physical environment................................34
Collect information needed during configuration........................................... 34
Collect Brocade configuration information........................................34
Collect Cisco configuration information............................................ 35
Validate EMC SMI-S Provider setup.................................................. 35
EMC ViPR 1.1.0 Installation and Configuration Guide
3
CONTENTS
Collect EMC SMI-S Provider information........................................... 36
Collect Isilon configuration information............................................36
Collect VNX file configuration information........................................ 37
Collect VPLEX information................................................................ 37
Collect NetApp configuration information.........................................38
Collect EMC RecoverPoint site information....................................... 38
Collect SMTP server information....................................................... 38
Initial login and setup................................................................................... 39
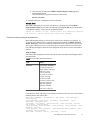
Authentication providers............................................................................... 40
Adding an authentication provider................................................... 40
Authentication provider settings...................................................... 41
Considerations when adding authentication providers..................... 45
Example of one authentication provider per domain.........................45
Example of one authentication provider managing multiple domains in
a single forest.................................................................................. 46
Adding a storage system............................................................................... 47
SMI-S providers.............................................................................................48
Adding an SMI-S provider..............................................................................48
Fabric managers............................................................................................48
Adding a fabric manager............................................................................... 48
Data protection systems................................................................................49
Adding a data protection system................................................................... 49
Hosts............................................................................................................ 49
Adding a host................................................................................................49
ViPR Clusters.................................................................................................50
Creating a ViPR cluster.................................................................................. 51
Edit hosts in a cluster.................................................................................... 51
vCenters........................................................................................................52
Adding a vCenter server.................................................................................52
Virtual arrays.................................................................................................52
Adding a virtual array.................................................................................... 53
Adding an IP network.................................................................................... 54
Adding an IP-connected host to a network.....................................................54
Virtual pools..................................................................................................54
Creating or editing a virtual pool for block storage type................................. 55
Setting RecoverPoint data protection criteria for a block virtual pool
........................................................................................................ 57
Setting VPLEX data protection criteria for a block virtual pool........... 57
Setting SRDF data protection criteria for a block virtual pool.............58
Creating or editing a virtual pool for file storage type..................................... 58
Creating a project.......................................................................................... 59
After ViPR configuration.................................................................................60
Chapter 5
Installation and Initial Configuration of ViPR Data Services
61
Setting up ViPR Data Services........................................................................62
Obtaining Data Services deployment files and HDFS support files................. 63
Data Services prerequisite steps................................................................... 63
Choosing an IP network to support Data Services.......................................... 64
Configuring the ViPR controller to allow access by data VMs..........................64
Deploying ViPR data VMs.............................................................................. 64
Adding a data services virtual pool................................................................67
Adding a data store....................................................................................... 67
Configuring the root tenant to use Data Services........................................... 68
Adding a Base URL........................................................................................ 69
Example of a base URL..................................................................... 69
4
EMC ViPR 1.1.0 Installation and Configuration Guide
CONTENTS
Using the Object Data Service....................................................................... 70
Adding an object data store key....................................................... 70
Testing the object service using the S3 Browser............................... 70
Chapter 6
Setting Up Multiple Tenants
73
Prerequisites for creating multiple tenants.................................................... 74
Configuring multiple tenants with the REST API..............................................74
Configuring multiple tenants with the CLI...................................................... 79
Creating data store (secret) keys................................................................... 82
EMC ViPR 1.1.0 Installation and Configuration Guide
5
CONTENTS
6
EMC ViPR 1.1.0 Installation and Configuration Guide
CHAPTER 1
Prerequisites
u
u
u
u
u
u
u
Checklist for ViPR installation and configuration readiness......................................8
How ViPR virtual appliance is deployed................................................................. 11
ViPR Controller VM requirements........................................................................... 11
Prerequisites for ViPR UI........................................................................................ 11
VMware requirements........................................................................................... 11
Prerequisites for ViPR CLI...................................................................................... 12
Environment preconfiguration............................................................................... 12
Prerequisites
7
Prerequisites
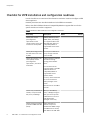
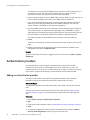
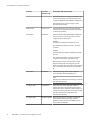
Checklist for ViPR installation and configuration readiness
Use the checklist as an overview of the information needed to install and configure a ViPR
virtual appliance.
Detailed procedures are described elsewhere in the ViPR documentation.
Refer to the EMC ViPR Data Sheet and Compatibility Matrix on support.EMC.com for the
specific models and versions supported.
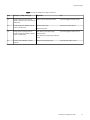
Table 1 Checklist for ViPR installation and configuration readiness
-
Basic step
Identify and confirm
preconfiguration
requirements for the
storage systems in the data
center to be used by ViPR.
-
Description
VNX file, VNX block, Isilon,
VMAX, VPLEX, and NetApp
are supported. Refer to the
EMC ViPR Data Sheet and
Compatibility Matrix on
support.EMC.com for exact
models.
Identify the storage pools in You can put a subset of an
the data center to be used
array's storage under the
by ViPR.
control of ViPR.
Identify the switches to be
used by ViPR, confirm
preconfiguration
requirements, and collect
credentials.
Adding switches to ViPR will
discover the storage
topology of the VSAN or
fabric.
Cisco and Brocade are
supported. Refer to the EMC
ViPR Data Sheet and
Compatibility Matrix on
support.EMC.com for
specific models.
For Cisco, obtain credentials
for an account that has
admin privileges on the
switch.
Brocade uses its own SMI-S
Provider.
8
Collect array credentials, IP
address, and port for VNX
file, Isilon, and NetApp.
When you add VNX file,
Isilon, or NetApp storage to
ViPR, you need to provide
credentials for an account
with administrator
privileges on the array.
Identify or deploy an SMI-S
provider for VMAX and VNX
(block).
SMI-S credentials, IP
address and port are
needed when VMAX storage
and VNX block are used by
ViPR. Refer to the EMC ViPR
EMC ViPR 1.1.0 Installation and Configuration Guide
-
Notes
-
Done?
Prerequisites
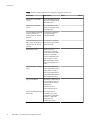
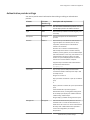
Table 1 Checklist for ViPR installation and configuration readiness (continued)
-
Basic step
-
Description
Data Sheet and
Compatibility Matrix on
support.EMC.com for
supported SMI-S versions.
Refer to "Configure the SMIS Provider" in the EMC ViPR
Installation and
Configuration Guide for
details.
-
Notes
-
Done?
Identify a vCenter Server
ViPR is deployed as a vApp.
and ESXi on which to deploy Refer to the EMC ViPR Data
the ViPR vApps.
Sheet and Compatibility
Matrix on support.EMC.com
for supported vCenter
Server and ESXi versions.
Collect credentials to
access the vCenter Server.
Deploying ViPR with
vSphere Client requires
credentials for an account
that has privileges to deploy
the OVA on the vCenter
Server.
Verify that the ESXi has
Refer to "ViPR Controller VM
sufficient resources for ViPR Requirements" and
vApp deployment.
"VMware requirements" in
the EMC ViPR Installation
and Configuration Guide.
Collect credentials for VNX
VNX File has an SMI-S
File onboard SMI-S Provider. Provider that runs on its
Control Station.
Identify an IP to act as the
In addition to the 3 or 5
virtual IP for Controller VMs. Controller VMs, ViPR uses a
virtual IP by which REST
clients and the UI access
the system.
Identify and configure a
load balancer for ViPR
Object Data Service VMs.
A separate load balancer
(not included) is required
for Object Data Service VMs.
Identify an authentication
provider and related
attributes.
ViPR validates added users
against an authentication
server. To use other than
the built-in user accounts,
you need to specify an
Active Directory or LDAP
server and related
attributes.
Checklist for ViPR installation and configuration readiness
9
Prerequisites
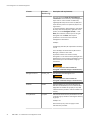
Table 1 Checklist for ViPR installation and configuration readiness (continued)
-
Basic step
Identify two or three DNS
servers.
Identify two or three NTP
servers.
-
Description
Two or three DNS server IPs
need to be supplied during
ViPR deployment.
Two or three NTP servers
need to be supplied during
ViPR deployment
For each ViPR Controller VM, You need this information
collect: IP address, IP
when deploying the
network mask, IP network
Controller VM OVA.
gateway.
For ViPR Object Data Service You need this information
VMs, collect: IP address, IP when deploying the Object
network mask, IP network
Data Service VM.
gateway.
Obtain EMC license.
Obtain the license
authorization code (LAC,
usually emailed from EMC)
and apply it at the EMC
License management web
page to obtain a .lic file.
After deployment, upload
the .lic file using the UI, CLI
or API.
Deploy the ViPR Controller
vApp.
Download the ViPR OVA
from support.EMC.com and
deploy. Refer to "Deploy
ViPR using vSphere Client"
in the EMC ViPR Installation
and Configuration Guide.
Log in to the ViPR UI.
Open https://ViPR_virtual_ip
in a supported browser to
proceed with site-specific
configuration,
infrastructure, and
provisioning operations.
Deploy the ViPR Object Data Refer to the steps in
Service VM.
"Installation and initial
configuration of ViPR Data
Services" in EMC ViPR
Installation and
Configuration Guide.
10
EMC ViPR 1.1.0 Installation and Configuration Guide
-
Notes
-
Done?
Prerequisites
How ViPR virtual appliance is deployed
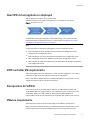
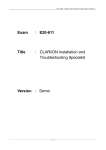
ViPR is deployed as three or five Controller VMs.
Deployment steps for the ViPR virtual appliance are described in this guide.
Figure 1 Deployment process
For ViPR Object Data Service support, additionally deploy one or more data VMs.
Deployment steps for Object Data Service are described in Installation and initial
configuration of Object Data Service on page 61.
Note
For the procedures to deploy the ViPR plugins, see their respective guides:
u
EMC ViPR Analytics Pack for VMware vCenter Operations Management Suite
Installation and Configuration Guide
u
EMC ViPR Plug-in for vCenter Orchestrator Installation and Configuration Guide
u
EMC ViPR Storage Provider for VMware vCenter Server Configuration Guide
u
EMC ViPR Add-in for Microsoft System Center Virtual Machine Manager Installation
and Configuration Guide
ViPR Controller VM requirements
ViPR virtual appliance can be deployed in a 3-VM or 5-VM configuration. You need to
verify that the ESX server has sufficient resources for deployment.
Refer to the EMC ViPR Data Sheet and Compatibility Matrix on support.EMC.com for
supported version numbers and other information.
Prerequisites for ViPR UI
The UI runs on a variety of web browsers. Refer to the EMC ViPR Data Sheet and
Compatibility Matrix on support.EMC.com for supported version numbers and other
information. Refer to the EMC ViPR Data Sheet and Compatibility Matrix on
support.EMC.com for specific information on supported web browsers and versions.
VMware requirements
ViPR deployment requires administrative rights to the VMware Virtual Center.
Refer to the EMC ViPR Data Sheet and Compatibility Matrix on support.EMC.com for
detailed information on supported VMware versions and related requirements.
How ViPR virtual appliance is deployed
11
Prerequisites
Prerequisites for ViPR CLI
The ViPR CLI can run on supported Linux and Windows computers.
Although the ViPR CLI is available on a ViPR Controller VM, it is recommended that you
install and run it on a different computer.
Refer to the EMC ViPR Data Sheet and Compatibility Matrix on support.EMC.com for
specific information on supported OS versions and additional requirements of the CLI.
Environment preconfiguration
Before you add physical assets such as storage systems and fabrics to ViPR, make sure
they fulfill the necessary prerequisites.
Preconfiguration requirements for VMAX arrays
The VMAX arrays that you add to ViPR must meet certain preconfiguration requirements.
Before adding a VMAX array to ViPR, you need to:
u
Create sufficient pools for storage provisioning.
u
Create storage tiers (for example, SSD, SAS, NL-SAS).
u
Define FAST policies.
Storage Tier and FAST Policy names must be consistent across all VMAX systems.
Note
You do not need to create any LUNs, storage groups, port groups, initiator groups, or
masking views.
The EMC ViPR Data Sheet and Compatibility Matrix on support.EMC.com is the
authoritative source of supported version numbers.
Preconfiguration requirements for VNX block
The VNX block storage that you add to ViPR must meet certain preconfiguration
requirements.
Before adding VNX block storage to ViPR:
u
Create sufficient pools for storage provisioning.
u
Create RAID groups.
u
If volume full copies are required, install SAN Copy enabler software on the array.
u
If volume continuous-native copies are required, create clone private LUNs on the
array.
The EMC ViPR Data Sheet and Compatibility Matrix on support.EMC.com is the
authoritative source of supported version numbers.
Preconfiguration requirements for VNX file
The VNX file storage that you add to ViPR must meet certain preconfiguration
requirements.
Before adding VNX file storage to ViPR, verify that:
12
EMC ViPR 1.1.0 Installation and Configuration Guide
Prerequisites
u
VNX File Control Stations are at a supported version. See the EMC ViPR Data Sheet
and Compatibility Matrix.
u
Storage pools for VNX File have been created.
u
Control Stations are operational and will be reachable from ViPR Controller VMs.
u
VNX SnapSure is installed, configured, and licensed.
Preconfiguration requirements for VPLEX systems
ViPR supports VPLEX in a Local or Metro configuration. VPLEX Geo configurations are not
supported.
Before adding a VPLEX system to ViPR, you need to:
u
Configure VPLEX metadata back-end storage.
u
Create VPLEX journal back-end storage.
u
Each VPLEX cluster needs to be in its own ViPR virtual array, so verify that the:
u
l
Ports for each cluster are in distinct fabrics. This will allow you to assign the fabric
as a ViPR network to its own virtual array.
l
Storage arrays to be used are connected to the networks containing the VPLEX
back-end ports.
l
Hosts to be used have initiators in the networks containing the VPLEX front-end
ports.
Verify that logging volumes are configured to support distributed volumes in a VPLEX
Metro configuration.
It is not necessary to preconfigure zones between the VPLEX and storage systems, or
between hosts and the VPLEX, except for those necessary to make the metadata backing
storage and journal backing storage available.
Preconfiguration requirements for Isilon
The Isilon storage systems that you add to ViPR must meet certain preconfiguration
requirements.
Before adding an Isilon system to ViPR, verify that:
u
OneFS version is listed in the EMC ViPR Data Sheet and Compatibility Matrix.
u
SmartConnect is configured as described in Isilon documentation. Be sure to verify
that:
l
the names for SmartConnect zones are set to the appropriate delegated domain.
l
DNS is in use for ViPR and provisioned hosts are delegating requests for
SmartConnect zones to SmartConnect IP.
u
There is a minimum of 3 nodes in the Isilon cluster configured.
u
Isilon clusters and zones will be reachable from ViPR Controller VMs.
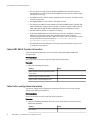
Preconfiguration requirements for NetApp arrays
The NetApp systems that you add to ViPR must meet certain preconfiguration
requirements.
Before adding a NetApp array to ViPR, verify that:
u
Aggregates are created.
Preconfiguration requirements for VPLEX systems
13
Prerequisites
u
ONTAP version is listed as supported in the EMC ViPR Data Sheet and Compatibility
Matrix.
u
ONTAP is in 7-mode configuration.
u
You have NetApp licenses for NFS, CIFS, and snapshots.
u
Run the cifs setup command to perform initial configuration of the filer for CIFS.
You must have installed the CIFS license before you run this command.
Preconfiguration requirements for fabrics
The SAN fabrics you add to ViPR must meet certain preconfiguration requirements.
The EMC ViPR Data Sheet and Compatibility Matrix on support.EMC.com is the
authoritative source of information on supported switches.
Cisco MDS / Nexus
Before adding a Cisco switch to ViPR, verify that:
u
SSH is enabled.
u
The VSANs to be used already exist. The appropriate interfaces must be already
assigned to the VSAN database.
u
Any ISL links, port channels, etc., for multiple switch networks, have been
preconfigured and are up. This will ensure that the FCNS database is correctly
distributed and up-to-date on any switches that you add to ViPR. It is highly
recommended that all ISL connections between switches be implemented
redundantly, so that the failure of a single ISL link will not partition VSANs.
u
Each VSAN is visible from at least one registered switch in ViPR. If multiple registered
switches have access to the same VSAN, switches directly connected to the storage
port(s) being zoned will be preferred as the control point to add or remove zones.
Brocade
Before adding Brocade switches to ViPR, verify that:
u
EMC Connectrix Manager Converged Network Edition (CMCNE) is installed and has
access to the switches with admin privileges. The switches should be prediscovered
using the CMCNE UI.
u
The fabrics to be used are already created, and have ports assigned. Any ISL links
needed to connect a fabric between multiple switches should be already configured.
It is highly recommended that all ISL connections between switches be implemented
redundantly, so that the failure of a single ISL link will not partition fabrics.
There is no restriction on the number of fabrics.
Note
You do not need to create any SAN zones.
Preconfiguration requirements for EMC RecoverPoint systems
The EMC RecoverPoint system you add to ViPR must meet certain preconfiguration
requirements.
14
u
RecoverPoint systems must be installed and licensed. Refer to the EMC ViPR Data
Sheet and Compatibility Matrix on support.EMC.com for information on supported
RecoverPoint versions.
u
If ViPR is not managing the SAN network, RecoverPoint systems must be zoned to the
storage arrays and RecoverPoint splitters must be attached.
EMC ViPR 1.1.0 Installation and Configuration Guide
Prerequisites
u
IP connectivity between RecoverPoint and the ViPR virtual appliance is required.
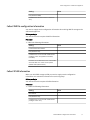
Preconfiguration requirements for SRDF
ViPR supports SRDF for use as a data protection type when you create a virtual pool. The
SRDF configuration must meet certain preconfiguration requirements.
u
VMAX running Enginuity versions as specified in the EMC ViPR Data Sheet and
Compatibility Matrix.
u
One or more front-end directors configured for RDF connectivity.
u
The source and destination arrays must already have one or more dynamic RDF
groups created of the desired policy type, either synchronous or asynchronous (not
both).
u
The RDF group label must match the ViPR project name associated with the provision
request. The label can be up to ten characters in length and is case-sensitive.
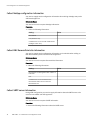
Preconfiguration requirements for hosts
The hosts that you add to ViPR must meet certain preconfiguration requirements.
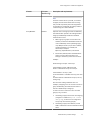
Host requirements
The requirements for hosts that ViPR can provision storage for are provided here.
Refer to the EMC ViPR Data Sheet and Compatibility Matrix on support.EMC.com for the
supported hosts and operating systems and versions. Supported hosts must also
conform to the configuration requirements in the table below.
Table 2 Host configuration requirements
-
Host Type
Linux
-
Requirements
Linux hosts must meet the following requirements:
SSH and LVM enabled.
EMC PowerPath or native Linux multipathing software installed.
Time synchronization configured.
Note
In some cases, it may be necessary to install lsb_release. If host discovery
fails due to compatibility, and logs indicate that the lsb_release command is
not found, the package that includes that command must be installed.
Windows
Windows hosts must meet the following requirements:
WinRM enabled. See Configuring a Windows host on page 16
EMC PowerPath or Microsoft MPIO (not both) enabled.
Time synchronization configured.
Preconfiguration requirements for SRDF
15
Prerequisites
Configuring multipath software on hosts
A supported host must have mulitpath software configured.
Refer to the following documentation for details on configuring multipath software on
hosts:
EMC PowerPath: EMC PowerPath for Linux Installation and Configuration Guide and
u
EMC PowerPath and PowerPath/VE for Microsoft Windows Installation and
Administration Guide.
u
SuSE Linux Enterprise Server (SLES): Storage Administration Guide under
"Configuring the System for Multipathing".
u
Red Hat Enterprise Linux (RHEL): DM Multipath Configuration and Administration.
u
Windows: Microsoft Multipath I/O Step-by-Step Guide.
Configuring a Windows host
Configures a Windows host to allow ViPR to run commands on it.
Before you begin
u
You must be logged in to the Windows host as administrator.
u
For the ViPR server to connect to Windows remote hosts, the host must accept remote
Windows PowerShell commands. You can do this by enabling Windows remote
access over HTTP.
Procedure
1. At an administrator command prompt on the Windows host, issue the following
command:
winrm quickconfig
This starts up a listener on port 5985. The port on which you start the listener must be
consistent with the port that you configure for the host in the host asset page.
2. You may need to make some configuration changes depending on how you want to
connect to the host.
l
If you want ViPR to connect to the host as a local user, you need to:
a. Check the winrm settings by running:
winrm get winrm/config/service
Basic Authentication and AllowUnencrypted must be set to true.
b. If basic authentication is not set to true, run:
winrm set winrm/config/service/auth @{Basic="true"}
c. If AllowUnencrypted is not set to true, run:
winrm set winrm/config/service @{AllowUnencrypted="true"}
d. The host must be added to the Admin > Physical Assets > Hosts page.
l
If you want ViPR to connect to the host as a domain user, you need to:
a. Ensure Kerberos is enabled. You can check using:
winrm get winrm/config/service
b. If you need to enable Kerberos, run:
winrm set winrm/config/service/auth @{Kerberos="true"}
c. Ensure that your domain has been configured as an authentication provider in
ViPR by a System Administrator (Admin > Security > Authentication Providers).
16
EMC ViPR 1.1.0 Installation and Configuration Guide
Prerequisites
d. The host must be added to the Admin > Physical Assets > Hosts page by a
System Administrator.
The credentials you supply for the host are of the form:
domain\username
3. Check that the host is displayed as valid in the table.
After you finish
After ViPR is deployed, you can check that the host is displayed as valid in Admin >
Physical Assets > Hosts. If you receive the following message WinRM may not be enabled
or configured properly, or there may be a network problem.
Failed to connect to host. Please ensure the connection details
are correct. [Error connecting: Connection refused]
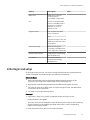
Linux host sudo command requirements
When ViPR attaches storage to a Linux host it needs to run commands on the host. To
access the host, ViPR uses the credentials entered for the host at the Admin > Physical
Assets > Hosts page. These are usually the credentials for the root account. If you do not
wish to give ViPR root access to a Linux host, you must ensure that the sudo command
has sufficient privileges to allow the user configured for the host to run the commands it
requires.
Sudo privileges
The sudoers file configuration for the host user account must have the privileges listed in
the table below.
Table 3 Sudo privileges required by ViPR user
-
Type
Command
-
Name
e2fsck, fdisk, multipath,
ifconfig, vgdisplay, sh,
mkdir, mke2fs, mkfs.ext3,
mkfs.ext4, mount,
umount, resize2fs,
iscsiadm, lsb_release,
lvcreate, lvchange,
lvremove, lvresize,
pvcreate, pvremove, rpm,
vgchange, vgremove,
vgextend, vgreduce,
vgcreate, powermnt
find, sed, ls, sleep, rm
For example, to allow "vipradmin" to run these commands as all users, you could add the
following lines to the sudoers file:
Cmnd_Alias VIPRMGMT = /sbin/e2fsck, /sbin/fdisk, /sbin/multipath, /
sbin/ifconfig,
/sbin/vgdisplay,/usr/bin/sh, /bin/mkdir, /sbin/mke2fs, /sbin/
mkfs.ext3, /sbin/mkfs.ext4,
/bin/mount, /bin/umount, /sbin/resize2fs, /sbin/iscsiadm, /usr/bin/
lsb_release, /sbin/lvcreate,
/sbin/lvchange, /sbin/lvremove, /sbin/lvresize, /sbin/pvcreate, /sbin/
pvremove, /bin/rpm,
/sbin/vgchange, /sbin/vgremove, /sbin/vgextend,/sbin/vgreduce, /sbin/
vgcreate, /sbin/powermnt,
/bin/find, /bin/sed, /bin/ls, /bin/sleep, /bin/rm
Preconfiguration requirements for hosts
17
Prerequisites
vipradmin ALL=(ALL) VIPRMGMT
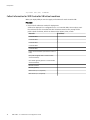
Collect information for ViPR Controller VM virtual machines
When you deploy ViPR you need to supply an IP address for each Controller VM.
Procedure
1. Record the IP addresses needed for deployment.
ViPR can be deployed in a configuration of 3 or 5 Controller VMs. Use a unique, static
IPv4 address for each Controller VM. All IP addresses must be IPv4, except for the
public virtual IP address, which can have an IPv4 address, IPv6, or both.
-
Host role
Controller VM 1
Controller VM 2
Controller VM 3
Controller VM 4
Controller VM 5
Public virtual IP address (can be IPv4 or IPv6 or
both)
IPv6 prefix length (if IPv6 is used for Public
virtual IP address)
IPv6 default gateway (if IPv6 is used for Public
virtual IP address)
Network netmask
Network gateway
DNS servers (2 or 3 required)
NTP servers (2 or 3 required)
18
EMC ViPR 1.1.0 Installation and Configuration Guide
-
IP address
CHAPTER 2
Deployment Steps
u
u
u
u
u
u
u
ViPR deployment files............................................................................................20
ViPR deployment properties for Controller VMs......................................................20
Deploying ViPR Controller VMs with vSphere Client................................................21
Obtaining the license file.......................................................................................22
Installing the ViPR CLI on Linux..............................................................................23
Installing the ViPR CLI on Windows........................................................................24
Overview of configuration steps............................................................................ 26
Deployment Steps
19
Deployment Steps
ViPR deployment files
ViPR Controller is available as an OVA file that you can download from the ViPR product
page on support.EMC.com.
-
File
-
vipr-<version>controller-2+1.ova
Description
For Controller virtual appliance deployment. One VM can go down
without affecting availability of the virtual appliance.
vipr-<version>controller-3+2.ova
For Controller virtual appliance deployment. Two VMs can go
down without affecting availability of the virtual appliance.
Recommended for deployment in production environments.
vipr-<version>-dataservice.zip
For Object Data Service deployment.
vipr-<version>.img
For environments where upgrade via an img file is needed, such
as at restricted sites.
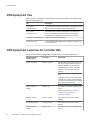
ViPR deployment properties for Controller VMs
A ViPR Controller VM has configurable properties that you set during deployment.
-
Property name in
vSphere Client
Server n IP address
Key name
-
network_n_ipaddr
Description
-
One IPv4 address for public network. You
will supply one IPv4 address for each of
the Controller VMs you are deploying.
Each VM requires a unique, static IPv4
address in the subnet defined by the
netmask.
Note
An address conflict across different ViPR
installations can result in ViPR database
corruption that would need to be restored
from a previous good backup.
Public virtual IPv4
address
network_vip
IPv4 address used for UI and REST client
access.
See also the restriction in Avoiding
conflicts in network virtual IP
addresses on page 21
20
Network netmask
network_netmask
IPv4 netmask for the public network
interface.
IPv4 default gateway
network_gateway
IPv4 address for the public network
gateway.
Public virtual IPv6
address
network_vip6
IPv6 address used for UI and REST client
access.
EMC ViPR 1.1.0 Installation and Configuration Guide
Deployment Steps
-
Property name in
vSphere Client
Key name
Description
-
-
You can have both an IPv4 address and an
IPv6 address for the public virtual
address.
See also the restriction in Avoiding
conflicts in network virtual IP
addresses on page 21
IPv6 prefix length
network_prefix_length
IPv6 prefix length. Default is 64.
IPv6 default gateway
network_gateway6
IPv6 address for the public network
gateway.
DNS servers
network_nameservers
Two or three IPv4 addresses (not FQDNs)
for DNS servers, separated by commas.
NTP servers
network_ntpservers
Two or three IPv4 addresses (not FQDNs)
for NTP servers, separated by commas.
Avoiding conflicts in ViPR virtual IP addresses
Restrictions exist on the ViPR virtual IP address when there are multiple ViPR instances in
the same subnet.
When more than one ViPR instance exists in the same subnet, use care when allocating
the ViPR virtual IP addresses, to prevent a conflict in the load balancer's virtual router ID.
The virtual router ID is calculated using the virtual IP address configuration with the
following algorithm:
u
IPv4 only or dual stack: virtual router ID is the last octet of the IPv4 address.
u
IPv6 only: virtual router ID is the decimal equivalent of the last two hex digits in the
IPv6 address.
For example, the following addresses in the same subnet would be invalid:
u
172.16.33.98 and 172.16.34.98 (because the last octets are the same, both 98)
u
172.16.33.98 and 2001:db8:170:2842::2462 (because 98 decimal equals 62 hex)
Deploying ViPR Controller VMs with vSphere Client
You can deploy ViPR Controller VMs using the vSphere Client.
Before you begin
u
You need access to the ViPR deployment files.
u
You need credentials to log in to vSphere Client.
Procedure
1. Download to a temporary directory the ViPR OVA file from the ViPR product page.
2. Start the vSphere Client and log in to the vCenter Server through which you will be
deploying the virtual appliance.
3. From the File menu, select Deploy OVF Template.
4. Browse to and select the ViPR OVA file, located in the temporary directory you created
earlier.
Avoiding conflicts in ViPR virtual IP addresses
21
Deployment Steps
5. On the OVF Template Details page, review the details about the appliance.
6. Accept the End User License Agreement.
7. Specify a name for the appliance.
8. Select the host or cluster on which to run the virtual appliance.
9. If resource pools are configured (not required for ViPR), select one.
10.If more than one datastore is attached to the ESX Server, select the datastore for your
appliance.
11.Select a disk format: Thick Provision Lazy Zeroed, Thick Provision Eager Zeroed
(recommended for production deployment), or Thin Provision.
12.On the Network Mapping page, map the source network to a destination network as
appropriate.
13.Enter values for the properties. See ViPR OVF settings for Controller VMs on page 20.
14.Power on the VM.
After you finish
Editable vApp properties can be changed in the ViPR UI at Admin > Configuration >
Network. Do not use the vSphere Client to modify Controller vApp properties. The
modifications will be saved in vCenter but they will have no effect on the ViPR appliance
itself.
Obtaining the license file
You need to obtain the license file (.lic) from the EMC license management web site for
uploading to ViPR.
Before you begin
In order to obtain the license file you must have the License Authorization Code (LAC),
which was emailed from EMC.
Procedure
1. Go to support.EMC.com
2. Select Support > Service Center.
3. Select Get and Manage Licenses.
4. Select ViPR Family from the list of products.
5. On the LAC Request page, enter the LAC code and Activate.
6. Select the entitlements to activate and Start Activation Process.
7. Select Add a Machine to specify any meaningful string for grouping licenses.
The "machine name" does not have to be a machine name of any kind; enter any
string that will help you keep track of your licenses.
8. Enter the quantities for each entitlement to be activated, or select Activate All. Click
Next.
9. Optionally specify an addressee to receive an email summary of the activation
transaction.
10.Click Finish.
11.Click Save to File to save the license file (.lic) to a folder on your computer.
This is the license file that is needed during initial setup after deployment.
22
EMC ViPR 1.1.0 Installation and Configuration Guide
Deployment Steps
Installing the ViPR CLI on Linux
You can install the ViPR command line interface executable directly from ViPR appliance
onto a supported Linux host.
Before you begin
u
You need access to the ViPR appliance host.
u
You need root access to the Linux host.
Procedure
1. Log in to the Linux server as root.
2. Create a temporary directory to download the CLI installer.
mkdir cli/temp
cd cli/temp
3. Either point your browser to https://<FQDN>:4443/cli or run the wget
command to retrieve the ViPR CLI installation bundle:
wget https://<FQDN>:4443/cli
Note
For sites with self-signed certificates or where issues are detected, optionally use
http://<ViPR_virtual_IP>:9998/cli only when you are inside a trusted
network. <ViPR_virtual_IP> is the ViPR public virtual IP address, also known as the
network vip. The CLI installation bundle is downloaded to the current directory.
4. Use tar to extract the CLI and its support files from the installation bundle.
tar -xvzf <cli_install_bundle>
5. Run the CLI installation program.
./Installer_viprcli.linux
6. Change directory to /opt/vipr/cli or to the directory where the CLI is installed.
7.
Note
Perform this step only when you have not provided the correct input in step 5.
Edit the file viprcli.profile using the vi command and set the VIPR_HOSTNAME to
the ViPR public virtual IP address and VIPR_PORT=4443 environment variable and
save the file.
# vi viprcli.profile
#!/usr/bin/sh
# Installation directory of ViPR CLI
ViPR_CLI_INSTALL_DIR=/opt/ViPR/cli
# Add the ViPR install directory to the PATH and PYTHONPATH env
variables
if [ -n $ViPR_CLI_INSTALL_DIR ]
then
export PATH=$ViPR_CLI_INSTALL_DIR/bin:$PATH
export PYTHONPATH=$ViPR_CLI_INSTALL_DIR/bin:$PYTHONPATH
fi
# USER CONFIGURABLE ViPR VARIABLES
Installing the ViPR CLI on Linux
23
Deployment Steps
# ViPR Host fully qualified domain name
ViPR_HOSTNAME=example.mydomain.com
# ViPR Port Number
ViPR_PORT=4443
:wq
8. Run the source command to set the path environment variable for the ViPR
executable.
source ./viprcli.profile
9. From the command prompt run: viprcli -h.
If the help for viprcli is displayed, then the installation is successful.
Installing the ViPR CLI on Windows
You can download and install the ViPR command line interface executable directly from
the ViPR appliance onto a supported Windows host.
Before you begin
u
You need access to the ViPR appliance host.
u
You need to be logged in to the Windows host as a user with administrator privileges.
Procedure
1. Log in to the Windows server as <admin user>.
2. Point your browser to http://<FQDN>:4443/cli
Note
For sites with self-signed certificates or where issues are detected, optionally use
http://<ViPR_virtual_IP>:9998/cli only when you are inside a trusted
network. <ViPR_virtual_IP> is the ViPR public virtual IP address, also known as the
network vip. The CLI installation bundle is downloaded to the current directory.
3. Save the CLI installer file ViPR-cli.tar from the path.
4. Extract the ViPR-cli.tar file to a folder of your choice. For example, c:\opt
\vipr\cli.
5. Navigate to the extract folder c:\opt\vipr\cli\Linux\.
6. From the Linux folder, extract the viprcli.tar zip file.
Note
Though the folder name is Linux, it contains the Windows CLI files.
7. Copy the extracted folders and files to the user-defined path before proceeding.
For example, c:\opt\vipr\cli.
8. Set the following environment variables:
24
EMC ViPR 1.1.0 Installation and Configuration Guide
Deployment Steps
Variable
Example Value
Set VIPR_HOSTNAME under <Fully Qualified Domain Name of a ViPR host or virtual IP
address of your ViPR configuration. For example, viprUser variable section.
system.mydomain.com
Set VIPR_PORT under
User variable section.
4443
Set Path under System
variable section.
Add the bin and python27 directories under the
installation folder c:\opt\vipr\cli\bin;C:
\Python27
Note
Python can be installed on a drive other than drive C:, if
your %HOMEDRIVE% is mapped to a different drive
letter. For example 'Boot-from-SAN configs'. Therefore,
use the drive letter used for the python installation
when setting the path.
9. Download and install Python 2.7.3.
Note
Installing lower or higher versions of Python may not work as expected.
10.Download and install the setuptools for Python 2.7.3.
11.Navigate to the extract folder c:\opt\vipr\cli\Linux\.
12.From the Linux folder, extract the argparse and requests packages.
13.Open a command prompt and change the directory to point to the extracted argparse
folder and run python setup.py install command to install the package.
14.From the command prompt change the directory to point to the extracted requests
folder and run python setup.py install to install the package.
Note
Starting from step #15 all the steps are done only to verify the Python tools and viprcli
were installed successfully.
15.From the command prompt run the python command.
16.Run the help() command in the Python interpreter.
17.Run the modules argparse command in the Python interactive help.
18.Run the modules requests command in the Python interactive help.
19.Run the quit command to exit the Python interactive help.
20.Run the quit() command to exit the Python interpreter.
21.Open a new command prompt and run viprcli -h command.
Installing the ViPR CLI on Windows
25
Deployment Steps
Overview of configuration steps
After installation, you can configure the ViPR virtual appliance by using the REST API, the
command line interface viprcli, or the UI.
Refer to the EMC ViPR Installation and Configuration Guide, EMC ViPR REST API Reference,
EMC ViPR CLI Reference, and the EMC ViPR Administrator Guide for detailed information
on steps, syntax, and payloads.
Table 4 Overview of configuration steps
-
Step
-
UI (https://ViPR_virtual_ip)
Complete the configuration steps
-
REST API
PUT /config/properties
-
CLI
1
Change passwords of root and system
accounts (Initial Setup wizard)
not available with CLI
2
Configure ConnectEMC settings (Initial
Setup wizard)
viprcli system connectemc-smtp
options
3
Specify an SMTP server (Initial Setup
wizard)
viprcli system set-properties options
4
Upload license (Initial Setup wizard)
POST /license
viprcli system add-license options
5
Add an authentication provider (AD/
LDAP) (Admin > Security >
Authentication Providers)
POST /vdc/admin/authnproviders
viprcli authentication add-provider
options
Assign roles to users
6
Assign roles to users (Admin > Security PUT /vdc/role-assignments
> Role Assignments)
viprcli tenant add-role options
Add storage, switches, data protection systems, hosts, clusters, vCenters
7
Add storage arrays (Admin > Physical
Assets > Storage Systems)
POST /vdc/storage-systems
viprcli storagesystem create options
8
Add switches (Admin > Physical Assets POST /vdc/network-systems
> Fabric Managers)
viprcli networksystem create options
9
Add data protection systems (Admin >
Physical Assets > Data Protection
Systems)
POST /vdc/protection-systems
viprcli protectionsystem create -name
name
10
Add hosts (Admin > Physical Assets >
Hosts)
POST /tenants/{id}/hosts
viprcli host create options
11
Add clusters (Admin > Physical Assets
> Clusters)
POST /tenants/{id}/clusters
viprcli cluster create options
12
Add vCenters (Admin > Physical Assets POST /tenants/{id}/vcenters
> vCenters)
viprcli vcenter create options
Create virtual arrays and virtual pools (also referred to as Virtual Storage Arrays and Virtual Storage Pools)
13
26
Create virtual arrays (Admin > Virtual
Assets > Virtual Arrays)
POST /vdc/varrays
EMC ViPR 1.1.0 Installation and Configuration Guide
viprcli varray create options
Deployment Steps
Table 4 Overview of configuration steps (continued)
-
Step
14
15
16
17
-
UI (https://ViPR_virtual_ip)
Assign networks to virtual arrays
(Admin > Virtual Assets > Virtual Arrays
> Networks)
-
REST API
-
POST /vdc/varrays/{id}/networks
Create virtual pools (Admin > Virtual
Assets > Virtual Pools)
POST /block/vpools
Assign physical storage pools to
virtual storage pools (Admin > Virtual
Assets > Virtual Pools)
PUT /block/vpools/{id}/assignmatched-pools
Create a project (Admin > Tenant >
Projects)
POST /tenants/{id}/projects
CLI
viprcli storageport update options
viprcli vpool create options
POST /file/vpools
viprcli storagepool update options
PUT /file/vpools/{id}/assign-matchedpools
viprcli project create options
Overview of configuration steps
27
CHAPTER 3
Upgrading ViPR Software
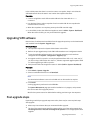
u
u
u
u
u
u
Upgrade................................................................................................................ 30
Pre-upgrade planning............................................................................................30
Upgrading ViPR software....................................................................................... 31
Post-upgrade steps............................................................................................... 31
Reverting to pre-upgrade snapshots...................................................................... 32
Upgrading ViPR from an internal repository........................................................... 32
Upgrading ViPR Software
29
Upgrading ViPR Software
Upgrade
Use the Admin > System > Upgrade page to:
u
View the present ViPR version installed on all VMs, and any newer versions available
in the upgrade repository.
Note
The upgrade repository is on an EMC server by default, and can be changed from the
Admin > System > Configuration > Upgrade page.
u
Upgrade to a newer version of ViPR.
Table 5 Supported upgrade paths to ViPR 1.1.0 Patch 1
-
Version
ViPR 1.0.0
-
Upgrade path to ViPR 1.1.0 Patch 1
Must first upgrade to ViPR 1.0.0 Patch 1, then to ViPR 1.1.0, then to ViPR
1.1.0 Patch 1.
ViPR 1.0.0 Patch 1 Must first upgrade to ViPR 1.1.0, then to ViPR 1.1.0 Patch 1.
ViPR 1.1.0
Upgrade directly to ViPR 1.1.0 Patch 1
Pre-upgrade planning
Some pre-upgrade steps are required and you should prepare for ViPR to be unavailable
for a period of time.
Prepare for the ViPR virtual appliance to be unavailable for a total of approximately 25
minutes, starting from the time you take the VMs offline for the snapshots, until the
upgraded ViPR virtual appliance state is stable.
u
Unmount Linux volumes on page 30.
u
Take offline virtual machine snapshots on page 30
u
Perform the upgrade on page 31
Unmount Linux volumes before upgrade
Linux volumes that were mounted in v1.0 cannot be expanded, unmounted, or deleted in
v1.1. Before upgrade, run the ViPR service Unmount Volume on Linux on mounted Linux
volumes.
Take virtual machine snapshots before upgrade
You should take snapshots of all ViPR controller VMs before upgrade.
Before you begin
This procedure is not supported and should not be used if data services VMs are
deployed.
This operation requires the System Administrator role in ViPR and root access to the ViPR
controller VMs.
30
EMC ViPR 1.1.0 Installation and Configuration Guide
Upgrading ViPR Software
In the unlikely event that there is a need to revert to a snapshot, keep in mind that the
ViPR database will be at the state it was in when the snapshot was taken.
Procedure
1. Connect using SSH to each ViPR controller VM and shut down with the halt
command.
2. Use vSphere Client to take a snapshot of each controller VM. Do not snapshot the
virtual machine's memory.
3. When the snapshots are complete, power up the ViPR controller vApp.
4. In the ViPR UI, look at the ViPR virtual appliance state in Admin > System > Dashboard.
When the state is Stable, you can proceed with the upgrade.
Upgrading ViPR software
New versions of software made available from the upgrade repository can be downloaded
and installed from the System > Upgrade page.
Before you begin
u
This operation requires the System Administrator role in ViPR.
u
Refer to the pre-upgrade steps in the EMC ViPR Installation and Configuration Guide.
u
To see the available software versions, the upgrade repository must have been
configured from the System > Configuration > Upgrade page.
u
An upgrade to ViPR 1.1 patch 1 can only be performed from ViPR 1.1 (1.1.0.0.425). If
you are running a ViPR version less than 1.1, follow a supported upgrade path to ViPR
1.1 before upgrading to ViPR 1.1 patch 1.
u
Verify that the ViPR virtual appliance status is Stable (Admin > System > Dashboard).
Procedure
1. Select Admin > System > Upgrade.
2. Select an available ViPR version and Download.
Note
The downloaded software is stored on the VM and can be installed at anytime.
3. Click Install.
A rolling upgrade is performed on the ViPR VMs.
The System Maintenance page opens while installation is in progess, and presents
the current state of the upgrade process.
Wait for the system state to be Stable before making provisioning or data requests.
Post-upgrade steps
Depending on which pre-upgrade steps were taken, there may be some required steps
after upgrade.
u
Mount any Linux volumes that you unmounted before upgrade.
u
The list of discovered unmanaged file systems will be out of date after upgrade. Run
File Storage Services > Discover Unmanaged File Systems on all storage systems after
upgrade.
Upgrading ViPR software
31
Upgrading ViPR Software
u
After a successful upgrade, discard the pre-upgrade snapshots. Resume regular ViPR
backups.
Reverting to pre-upgrade snapshots
If you need to revert to the VM snapshots made before upgrade, use the vCenter
Snapshot Manager.
Before you begin
You need access to the vCenter Server via vSphere Client where the ViPR VMs are located.
You need credentials that allow you to shut down the ViPR VM from the console.
Note that the ViPR database will be at the state it was in when the snapshot was taken.
Procedure
1. From vSphere Client, open the console on each controller VM and shut it down with
the halt command.
2. From vSphere Client, right-click each ViPR VM and select Snapshot > Snapshot
Manager.
3. For each VM, select the snapshot to which you want to revert and select Go to .
4. When the revert operations are complete, power on the controller VMs.
Upgrading ViPR from an internal repository
You can upgrade ViPR from an internal location by downloading a ViPR img file from
support.EMC.com and copying it to the ViPR virtual appliance for upgrade.
Before you begin
u
This operation requires the System Administrator role in ViPR.
u
You need credentials to access support.EMC.com.
Procedure
1. Download the ViPR img file from support.EMC.com and save it locally.
2. Run the following ViPR CLI command:
./viprcli -hostname ViPR_virtual_ip -cf cookie_file system
upload -imagefile locally_saved_img
This command copies the img file to a location on the ViPR virtual appliance where it
is found by the upgrade feature.
Refer to EMC ViPR CLI Reference for details of how to install and use the ViPR CLI.
3. In the ViPR UI select Admin > System > Upgrade.
4. Select Install next to the version you uploaded with the viprcli command.
32
EMC ViPR 1.1.0 Installation and Configuration Guide
CHAPTER 4
Initial Configuration of ViPR Virtual Appliance
u
u
u
u
u
u
u
u
u
u
u
u
u
u
u
u
u
u
u
u
u
u
u
u
u
u
u
u
Completing the configuration................................................................................ 34
Avoid out-of-band changes to the physical environment........................................34
Collect information needed during configuration................................................... 34
Initial login and setup........................................................................................... 39
Authentication providers....................................................................................... 40
Adding a storage system....................................................................................... 47
SMI-S providers.....................................................................................................48
Adding an SMI-S provider...................................................................................... 48
Fabric managers....................................................................................................48
Adding a fabric manager....................................................................................... 48
Data protection systems........................................................................................49
Adding a data protection system........................................................................... 49
Hosts.................................................................................................................... 49
Adding a host........................................................................................................49
ViPR Clusters.........................................................................................................50
Creating a ViPR cluster.......................................................................................... 51
Edit hosts in a cluster............................................................................................ 51
vCenters................................................................................................................52
Adding a vCenter server.........................................................................................52
Virtual arrays.........................................................................................................52
Adding a virtual array............................................................................................ 53
Adding an IP network............................................................................................ 54
Adding an IP-connected host to a network.............................................................54
Virtual pools..........................................................................................................54
Creating or editing a virtual pool for block storage type......................................... 55
Creating or editing a virtual pool for file storage type............................................. 58
Creating a project.................................................................................................. 59
After ViPR configuration.........................................................................................60
Initial Configuration of ViPR Virtual Appliance
33
Initial Configuration of ViPR Virtual Appliance
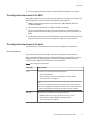
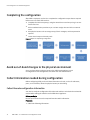
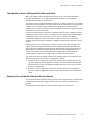
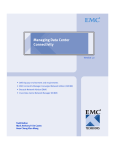
Completing the configuration
After ViPR is deployed, use the UI to complete the configuration steps that are required
before users can order ViPR services.
u
Complete the initial setup steps, using the wizard that runs when you log in as root
for the first time.
u
Add an authentication provider so you can later assign roles and ACLs to external
users.
u
Add physical assets such as storage arrays, fabric managers, and data protection
systems.
u
Create virtual arrays and virtual pools.
Figure 2 Steps for completing configuration
Avoid out-of-band changes to the physical environment
Once you have added a physical asset to the ViPR virtual appliance, avoid
reconfigurations with management tools other than the ViPR interfaces.
Collect information needed during configuration
Before configuring ViPR, you should have information at hand, such as IP addresses,
ports, and credentials, about the physical assets you are adding.
Collect Brocade configuration information
You need to verify the configuration of the Brocade switches and obtain the credentials
needed when adding the switches to the ViPR virtual appliance.
Before you begin
Be sure you have access to the required Brocade switch information.
Procedure
1. Obtain the following information:
34
EMC ViPR 1.1.0 Installation and Configuration Guide
Initial Configuration of ViPR Virtual Appliance
-
Setting
-
Obtain credentials for an account on CMCNE
that has admin privileges to the switches.
Value
Confirm that the switches have been
discovered through CMCNE.
Confirm that the CMCNE SMI-S provider
interface is enabled.
Obtain credentials for the SMI-S provider used
by CMCNE.
Confirm that fabrics have been created and
have ports assigned.
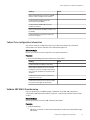
Collect Cisco configuration information
You need to verify the configuration of the Cisco switch and obtain the credentials
needed when you add the switches to the ViPR virtual appliance.
Before you begin
Be sure you have access to the required Cisco switch information.
Procedure
1. Record the following information about each Cisco switch:
-
Setting
-
Confirm that SSH is enabled on the switch.
Value
Obtain login credentials for an account with
privileges to provision (configure the mode of
zone, zonesets, VSAN) and to show the FCNS
database.
Confirm that ISL links and port channels are
configured and are up.
Confirm that enhanced zone mode is enabled
(not required but highly recommended).
Validate EMC SMI-S Provider setup
If you are planning to use VMAX storage or VNX block, then EMC SMI-S Provider (a
component of EMC Solutions Enabler) is required. Verify that your SMI-S Provider setup
is valid.
Before you begin
Be sure you have access to the SMI-S Provider information.
Procedure
1. Verify the following:
l
VNX array connection is over the IP network with connections to both VNX storage
processors.
Collect Cisco configuration information
35
Initial Configuration of ViPR Virtual Appliance
l
The host server running Solutions Enabler (SYMAPI Server) and SMI-S Provider
(ECOM) differs from the server where the VMAX service processors or VNX storage
processors are running.
l
For VMAX, the host is able to see the gatekeepers (six minimum). For VNX, the host
needs IP connectivity.
l
The VMAX/VNX array is discovered in the SMI-S Provider.
l
The remote host, SMI-S Provider (Solutions Enabler (SYMAPI Server) and EMC CIM
Server (ECOM)) are configured to accept SSL connections. (Refer to EMC Common
Object Manager (ECOM) Toolkit ECOM Deployment and Configuration Guide .)
l
The EMC storsrvd daemon is installed and running.
l
Ensure that SYMAPI Server and the ViPR server hosts are configured in the local
DNS server and that their names are resolvable by each other, for proper
communication between the two. If DNS is not used in the environment, be sure to
use the hosts files for name resolution (/etc/hosts or c:/Windows/
System32/drivers/etc/hosts).
l
The EMC CIM Server (ECOM) default user login, password expiration option is set
to "Password never expires."
Collect EMC SMI-S Provider information
Collect the following information to be used when adding EMC VMAX or VNX block
storage to ViPR.
Before you begin
Be sure you have access to the required SMI-S Provider information.
Procedure
1. Obtain the following information:
-
Setting
SMI-S Provider credentials (default is admin/
#1Password)
-
Value
SMI-S Provider port (default is 5989)
SMI-S Provider CLI Port (default is 2707)
Collect Isilon configuration information
You need to supply certain configuration information when you add an Isilon storage
system to the ViPR virtual appliance.
Before you begin
Be sure you have access to the required Isilon information.
Procedure
1. Obtain the following information about the Isilon arrays that you want to add to the
ViPR virtual appliance:
-
36
Setting
IPv4 address
EMC ViPR 1.1.0 Installation and Configuration Guide
-
Value
Initial Configuration of ViPR Virtual Appliance
-
Setting
-
Port (default is 8080)
Value
Credentials for the root account on the Isilon
array
Collect VNX file configuration information
You need to supply certain configuration information when adding VNX File storage to the
ViPR virtual appliance.
Before you begin
You need access to the required VNX File information.
Procedure
1. Obtain the following information:
-
Setting
-
Control Station IPv4 address
Value
Port (default is 443)
Credentials for an account with administrator
privileges on the array (default nasadmin/
nasadmin)
IP address and credentials for the onboard SMIS Provider that runs on the control system
(default admin/#1Password)
Collect VPLEX information
When you add VPLEX storage to ViPR you need to supply certain configuration
information and credentials information for use during setup.
Before you begin
You need access to the required VPLEX information.
Procedure
1. Collect the following information:
-
Setting
-
IPv4 address
Value
Port (default is 443)
Credentials for an account with administrator
privileges on the array
Collect VNX file configuration information
37
Initial Configuration of ViPR Virtual Appliance
Collect NetApp configuration information
You need to supply certain configuration information when adding a NetApp array to the
ViPR virtual appliance.
Before you begin
You need access to the required NetApp information.
Procedure
1. Collect the following information:
-
Setting
IPv4 address
-
Value
Port (default is 443)
Credentials for an account with administrator
privileges on the array
Collect EMC RecoverPoint site information
You need to supply certain configuration information and credentials when adding an
EMC RecoverPoint system to the ViPR virtual appliance.
Before you begin
You need access to the required RecoverPoint information.
Procedure
1. Obtain the following information:
-
Setting
RecoverPoint site management IPv4 address or
hostname
-
Value
Port
Credentials for an account that has the
RecoverPoint admin role to access the
RecoverPoint site
Collect SMTP server information
During ViPR configuration you need to supply information about the SMTP server to be
used for ConnectEMC and ViPR approvals.
Before you begin
You need access to the required SMTP information.
Procedure
1. Record the following information about the SMTP server:
38
EMC ViPR 1.1.0 Installation and Configuration Guide
Initial Configuration of ViPR Virtual Appliance
-
Setting
SMTP server
-
Description
SMTP server or relay for
sending email (For
ConnectEMC and Approvals)
Port
The port on which the SMTP
service on the SMTP server is
listening for connections.
Default is 25, or 465 is
TLS/SSL is used.
Encryption used?
Use TLS/SSL for the SMTP
server connections.
-
Value
Note
If TLS/SSL encryption used, the
SMTP server must have a valid
CA certificate.
Authentication type
Authentication type for
connecting to the SMTP server
(none, login, plain, cram-md5)
Username and password
Credentials for authenticating
with the SMTP server
From address
From email address for
sending email messages
(user@domain)
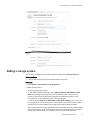
Initial login and setup
On first login as the root user, you need to change the ViPR root and system passwords,
set the ConnectEMC and email settings, and upload the ViPR license.
Before you begin
u
Wait 5 minutes after controller deployment before following the steps in this
procedure. This will give the required ViPR services time to start up.
u
Be prepared to provide new passwords for the ViPR root and system accounts.
u
You need the name of an SMTP server. If TLS/SSL encryption used, the SMTP server
must have a valid CA certificate.
u
You need access to the ViPR license file.
Procedure
1. Open https://ViPR_virtual_ip with a supported browser and log in as root.
Initial password is ChangeMe.
The ViPR_virtual_IP is the ViPR public virtual IP address, also known as the network.vip
(the IPv4 address) or the network.vip6 (IPv6). Either value, or the corresponding
FQDN, can be used for the URL.
2. Enter new passwords for the root and system accounts.
Initial login and setup
39
Initial Configuration of ViPR Virtual Appliance
The ViPR root account has all privileges that are needed for initial configuration; it is
also the same as the root user on the Controller VMs. The system accounts
(sysmonitor, svcuser, and proxyuser) are used internally by ViPR.
3. Select a transport option for ConnectEMC (FTPS (default), SMTP, or none) and enter an
email address (user@domain) for the ConnectEMC Service notifications.
If you select the SMTP transport option (required by the ViPR approval notification
feature), you must specify an SMTP server under SMTP settings in the next step.
"None" disables ConnectEMC on the ViPR virtual appliance.
4. Specify an SMTP server and port for notification emails, encryption type (TLS/SSL or
not), a From address, and authentication type (login, plain, CRAM-MD5, or none).
Optionally test the settings and supply a valid addressee. The test email will be from
the From Address you specified and will have a subject of "Mail Settings Test".
If TLS/SSL encryption used, the SMTP server must have a valid CA certificate.
5. Finish.
ViPR services restart (this can take several minutes) and the UI opens to the License
page.
6. Browse to and select the license file that was downloaded from the EMC license
management web site and Upload License.
Results
At the end of this procedure you are logged in to the UI as root user, at Admin > System >
Dashboard.
Authentication providers
User authentication is done through an authentication provider added to ViPR.
Except for the special built-in administrative users (root, sysmonitor, svcuser, and
proxyuser) there are no local users in ViPR. Users who can log in, and who are assigned
roles or ACLs, must be found through an authentication provider added to ViPR.
Adding an authentication provider
You need to add at least one authentication provider to ViPR in order to perform
operations using accounts other than the built-in administrative accounts.
Before you begin
This operation requires the Security Administrator role in ViPR. (The root user has this
role.)
You need access to the authentication provider information listed in Authentication
provider settings on page 41. Note especially the requirements for the Manager DN
user.
Procedure
1. Select Admin > Security > Authentication Providers
2. Add.
3. Enter values for the attributes. Refer to Authentication provider settings on page 41.
4. Save.
5. To verify the configuration, add a user from the authentication provider at Admin >
Security > Role Assignments, then try to log in as the new user.
40
EMC ViPR 1.1.0 Installation and Configuration Guide
Initial Configuration of ViPR Virtual Appliance
Authentication provider settings
You need to provide certain information when adding or editing an authentication
provider.
UI name
-
Name
-
CLI name
(Provider.cfg)
name
Description and requirements
-
The name of the authentication provider. You can
have multiple providers for different domains.
Type
mode
Active Directory or LDAP. In Provider.cfg (CLI), use
ad or ldap.
Description
description
Free text description of the authentication
provider.
Domains
domains
Active Directory and LDAP allow administrators to
organize objects of a network (such as users,
computers, and devices) into a hierarchical
collection of containers.
Domains are a collection of administratively
defined objects that share a common directory
database, security policies, and trust relationships
with other domains. In this way, each domain is an
administrative boundary for objects. A single
domain can span multiple physical locations or
sites and can contain millions of objects.
A typical entry in this field of the authentication
provider would look like this:
mycompany.com
Server URLs
url
ldap or ldaps (secure LDAP) with the domain
controller IP address. Default port for ldap is 389
and ldaps is 636.
Usage: one or more of
ldap://<Domain controller IP >:<port> (if not default
port)
or
ldaps://<Domain controller IP >:<port> (if not default
port)
If the authentication provider supports a
multidomain forest, use the global catalog server
IP and always specify the port number. Default is
3268 for ldap, 3269 for ldaps.
Usage: ldap(s)://<Global catalog server IP>:<port>
Manager DN
managerdn
Indicates the Active Directory Bind user account
that ViPR uses to connect to Active Directory or
LDAP server. This account is used to search Active
Directory when a ViPR administrator specifies a
user for role assignment, for example.
Requirement:
Authentication provider settings
41
Initial Configuration of ViPR Virtual Appliance
UI name
-
-
CLI name
(Provider.cfg)
Description and requirements
-
This user must have Read all inetOrgPerson
information in Active Directory. The InetOrgPerson
object class is used in several non-Microsoft,
Lightweight Directory Access Protocol (LDAP) and
X.500 directory services to represent people in an
organization.
To set this privilege in Active Directory, open Active
Directory Users and Computers, right click on the
domain, and select Delegate Control... . Click
Next, then select the user that you are using for
managerdn and click Next. The required
permission is on the next screen "Read all
inetOrgPerson information."
Example:
CN=Manager,CN=Users,DC=mydomaincontroller,D
C=com
In this example, the Active Directory Bind user is
Manager, in the Users tree of the
mydomaincontroller.com domain. Usually
managerdn is a user who has fewer privileges than
Administrator, but has sufficient privileges to query
Active Directory for users attributes and group
information.
WARNING
You must update this value in ViPR if the
managerdn credentials change in Active Directory.
Manager Password
passwd_user
The password of the managerdn user.
WARNING
You must update this value in ViPR if the
managerdn credentials change in Active Directory.
Disabled
disable
Select Disabled if you want to add the server to
ViPR but not immediately use it for authentication.
(Regardless of whether this property is true, ViPR
validates that the provider's name and domain are
unique.)
Group Attribute
groupattr
Indicates the Active Directory attribute that is used
to identify a group. Used for searching the directory
by groups.
Example: CN
Active Directory only. Does not apply to other
authentication providers.
42
EMC ViPR 1.1.0 Installation and Configuration Guide
Initial Configuration of ViPR Virtual Appliance
UI name
-
-
CLI name
(Provider.cfg)
Description and requirements
Note
Once this value is set for a provider, it cannot be
changed, because of the tenants that are using
this provider may already have role assignments
and permissions configured using group names in
a format using the current attribute.
Group Whitelist
whitelist
Optional. One or more group names as defined by
the authentication provider. This setting will filter
the group membership information that ViPR
retrieves about a user.
l
When a group or groups are included in the
whitelist, it means that ViPR will be aware of a
user's membership in the specified group[s]
only. Multiple values (one per line in ViPR UI,
comma-separated in CLI and API) and
wildcards (for example
MyGroup*,TopAdminUsers*) are allowed.
l
Blank value (default) means that ViPR will be
aware of any and all groups that a user
belongs to. Asterisk (*) is the same as blank.
Example:
UserA belongs to Group1 and Group2.
If the whitelist is blank, ViPR knows that
UserA is a member of Group1 and Group2.
If the whitelist is "Group1", ViPR
knows that UserA is a member of Group1, but does
not
know that UserA is a member of Group2 (or of any
other group).
Use care when adding a whitelist value. For
example, if mapping a user to a tenant is based on
group membership, then ViPR must be aware of
the user's membership in the group.
To restrict access to a tenant to users of certain
group(s) only, one must:
l
add these group(s) to the tenant user mapping
(using the CLI command viprcli tenant
add-group), so the tenant is configured to
accept only users of these group(s).
l
add these group(s) to the whitelist, so that
ViPR is authorized to receive information about
them
Authentication provider settings
43
Initial Configuration of ViPR Virtual Appliance
UI name
-
-
CLI name
(Provider.cfg)
Description and requirements
-
Note that by default, if no groups are added to the
tenant user mapping, users from any groups are
accepted, regardless of the whitelist configuration.
Active Directory only. Does not apply to other
authentication providers.
Search Scope
searchscope
One Level (search for users one level under the
search base) or Subtree (search the entire subtree
under the search base).
Search Base
searchbase
Indicates the Base Distinguished Name that ViPR
uses to search for users at login time and when
assigning roles or setting ACLs.
Example:
CN=Users,DC=mydomaincontroller,DC=com
This example searches for all users in the Users
container.
Example:
CN=Users,OU=myGroup,DC=mydomaincontroller,
DC=com
This example searches for all users in the Users
container in the myGroup organization unit.
Note that the structure of the searchbase value
begins with the "leaf" level and goes up to the
domain controller level--the reverse of the structure
seen in the Active Directory Users and Computers
UI.
Search Filter
searchfilter
Indicates the string used to select subsets of
users. Example: userPrincipalName=%u
Note
ViPR does not validate this value when you add the
authentication provider.
44
(not applicable)
maxpagesize
(not applicable)
validatecertificate When ldaps protocol is used, SSL validates the
certificate from the authentication provider.
Default is false. If set to true, the LDAP needs to
have a valid CA certificate.
EMC ViPR 1.1.0 Installation and Configuration Guide
Value that controls the maximum number of
objects returned in a single search result. This is
independent of size of the each returned object. If
specified must be greater than 0. Cannot be higher
than the max page size configured on the
authentication provider.
Initial Configuration of ViPR Virtual Appliance
Considerations when adding authentication providers
When you configure ViPR to work with Active Directory, you must decide whether to
manage several domains in a single authentication provider, or to add separate
authentication providers for each domain.
The decision to add a single authentication provider, or multiple, depends on the number
of domains in the environment, and the location on the tree from which the manager user
is able to search. Authentication providers have a single search_base from which
searches are conducted. They have a single manager account who must have read access
at the search_base level and below.
Use the one-authentication-provider-for-multiple-domains if you are managing an Active
Directory forest and these conditions are present: the manager account has privileges to
search high enough in the tree to access all user entries, and the search will be
conducted throughout the whole forest from a single search base, and not just the
domains listed in the provider. Otherwise, configure an authentication provider for each
domain.
Note that even if you are dealing with a forest and you have the correct privileges, you
might not want to manage all the domains with a single authentication provider. You
would still use one authentication provider per domain when you need granularity and
tight control on each domain, especially to set the search base starting point for the
search. Since there is only one search base per configuration, it needs to include
everything that is scoped in the configuration in order for the search to work.
The search base needs to be high enough in the directory structure of the forest for the
search to correctly find all the users in the targeted domains.
u
If the forest in the configuration contains ten domains but you target only three, do
not use a single provider configuration, because the search will unnecessarily span
the whole forest, and this may adversely affect performance. In this case, use three
individual configurations.
u
If the forest in the configuration contains ten domains and you want to target ten
domains, a global configuration is a good choice, because there is less overhead to
set up.
Example of one authentication provider per domain
In environments where the whole ViPR virtual data center integrates with a single domain,
or with several individually-managed domains, use one domain per authentication
provider.
The following example creates an authentication provider for security.local.
Considerations when adding authentication providers
45
Initial Configuration of ViPR Virtual Appliance
Example of one authentication provider managing multiple domains in a single
forest
In this example, the environment includes a forest with one top domain and two
subdomains. A single authentication provider manages all the domains.
In this example:
46
u
The port for the Global Catalog (central repository of domain information for the
forest) in the server URL is 3268.
u
The domains to be managed are the top domain, security.vipr.local, and the
subdomains east.security.vipr.local, and west.security.vipr.local.
u
The manager user on the Global Catalog has read access on the search base.
u
The search base is high enough in the hierarchy that it encompasses the subpaths to
include east and west subdomains. In this case, the common path between
users.security.vipr.local, users.east.security.vipr.local, and
users.west.security.vipr.local is security.vipr.local.
u
The search scope parameter is set to Subtree.
EMC ViPR 1.1.0 Installation and Configuration Guide
Initial Configuration of ViPR Virtual Appliance
Adding a storage system
You can add a supported storage system from the Admin view's Physical Assets tab.
Before you begin
u
This operation requires the System Administrator role in ViPR.
Procedure
1. Select Admin > Physical Assets > Storage Systems.
2. Add a storage system.
3. Select the storage system type.
4. To add VMAX or VNX block storage, select SMI-S Provider for EMC VMAX and VNX
Block as the storage system type and enter the SMI-S provider's host name, IP
address, port used for communication between the ViPR virtual appliance, and
credentials for an account that has administrator privileges.
To add file storage (EMC Isilon, EMC VNX File, EMC VPLEX, NetApp), enter a name for
the storage, the IP address of the host or control station, port (Isilon default is 8080,
otherwise 443), and credentials with storage system administrator privileges.
When adding VNX file storage, additionally enter information about the onboard SMI-S
provider that resides on the control station. You need to enter the provider host, SSL
setting, port (default 5989), and credentials for the onboard SMI-S provider.
Adding a storage system
47
Initial Configuration of ViPR Virtual Appliance
5. Save.
SMI-S providers
You can use the SMI-S Providers tab (Admin > Physical Assets > SMI-S Providers) to add
an SMI-S provider and discover all storage known to it.
Adding an SMI-S provider
You can add an SMI-S provider to ViPR and use it to discover VMAX and VNX block
storage.
Before you begin
u
This operation requires the System Administrator role in ViPR.
Procedure
1. Select Admin > Physical Assets > SMI-S Providers.
2. Add an SMI-S Provider.
3. Enter the SMI-S provider's host name, IPv4 address, port used for communication
between the ViPR virtual appliance, and credentials for an account that has array
administrator privileges. Enable SSL if used.
4. Save.
Storage discovered through the SMI-S provider is displayed on the Storage Systems
tab.
Fabric managers
Use the Fabric Managers tab (Admin > Physical Assets > Fabric Managers) to add a SAN
network system to ViPR, the first step in making SAN storage available for provisioning.
When you add a SAN switch, ViPR discovers the topology seen by the switch, and creates
a network for each Cisco VSAN or Brocade fabric.
Adding a fabric manager
Add a SAN network switch such as Cisco or Brocade to discover the storage topology.
Before you begin
u
This operation requires the System Administrator role in ViPR.
u
You need to provide the IPv4 address, port, and administrator credentials for a switch
or its SMI-S provider, depending on the switch type.
Procedure
1. Select Admin > Physical Assets > Fabric Managers.
2. Add a fabric manager.
3. Select a switch type and enter the switch's name, IPv4 address, the port used for
communication between the ViPR virtual appliance and switch, and credentials for an
account that has administrator privileges on the switch. For a Brocade switch, you
provide the IPv4 address, the port and credentials of the associated SMI-S provider,
not of the switch itself.
48
EMC ViPR 1.1.0 Installation and Configuration Guide
Initial Configuration of ViPR Virtual Appliance
4. Save.
The fabric manager is automatically registered and all discovered networks associated
with the switch are registered.
Data protection systems
You can use the Data Protection Systems tab (Admin > Physical Assets > Data Protection
Systems) to add a protection system such as EMC RecoverPoint to ViPR.
Adding a data protection system
You can add a data protection system on the Admin view's Physical Asset tab.
Before you begin
u
This operation requires the System Administrator role in ViPR.
Procedure
1. Select Admin > Physical Assets > Data Protection Systems.
2. Add a data protection system.
3. Enter a name for the data protection system and select a data protection type.
For RecoverPoint, enter the site management IPv4 address or fully-qualified domain
name of the host. The default port to communicate with RecoverPoint is 7225. The
credentials must be for an account that has the RecoverPoint admin role to access the
RecoverPoint site.
4. Save.
Hosts
Hosts are added to ViPR from the Admin > Physical Assets > Hosts Physical Hosts page.
The list of supported hosts is provided in the EMC ViPR Data Sheet and Compatibility
Matrix on support.EMC.com.
When provisioning storage for a host, ViPR needs to communicate with the host to
validate the host and connect storage to it. For Linux hosts, ViPR will SSH into the host;
for Windows hosts, ViPR needs to execute remote PowerShell commands on the host.
When a host is connected to a Fibre Channel (FC) fabric, ViPR uses information from the
fabric manager to discover storage systems and host initiator end-points and add them to
a network.
When an IP connected host is added, ViPR does not know if it is on the same IP network
as the storage system, so the host must be manually added to the IP network that
contains the storage system IP ports.
Adding a host
You must add a host to ViPR before you can attach provisioned storage to it.
Before you begin
u
This operation requires the Tenant Administrator role in ViPR .
u
You need to know the host credentials.
Data protection systems
49
Initial Configuration of ViPR Virtual Appliance
u
When adding Windows hosts using LDAP or Active Directory domain account
credentials, the domain user credentials must be in the same domain where the
Windows host is located; otherwise the Windows host discovery will fail.
Procedure
1. Select Admin > Physical Assets > Hosts.
2. Add a host.
3. Specify the operating system of the host, assign it a name by which it will be known in
ViPR, and enter its fully qualified domain name or IP address.
4. Enter the port that ViPR will use to contact the host.
l
Connection to Linux hosts is using SSH.
l
Connection to Windows hosts is using Windows Remote Management (WinRM).
WinRM must be configured on the host and must listen on the port that you have
specified here.
l
If adding a host other than a Linux, or Windows host, you will need to manually list
the World Wide Names (WWNs) with the ports, (Node WWN:Port WWN) or IP
addresses.
5. Check the status of the Validation on Save checkbox.
If you leave this box checked, ViPR checks that it can connect to the host before
saving the host details. If validation fails you will not be allowed to save the host
details.
If some of the information, such as the user credentials, are incorrect, but you still
want to save the information you have entered, uncheck the box. The host will fail
discovery but you can edit the host details later. Once corrected, the host will be
successfully discovered.
6. Save.
After you finish
Hosts that use ViPR services with the iSCSI protocol must have their iSCSI ports logged
into the correct target array ports before they can use the service.
ViPR Clusters
ViPR provides the capability to discover, and create clusters within the ViPR physical
assets, and perform service operations using the ViPR clusters or individual hosts.
Cluster discovery
When adding a Windows host to ViPR, if discovery is enabled, ViPR will identify if the
Windows host is part of a cluster, and add the cluster to the ViPR assets. Once it is added
to ViPR, the cluster can be managed and edited as a ViPR cluster. Changes made to the
Windows cluster from ViPR will only be made in the ViPR environment, and will not be
applied to the Windows configuration. ViPR imports the Windows cluster information with
the host, but does not discover the other hosts that are in the Windows cluster until the
hosts are manually added to the ViPR physical assets.
ESX and ESXi clusters are also automatically discovered by ViPR when a vCenter is added.
Once the ESX or ESXi cluster is added to ViPR, the cluster can be managed and edited as
a ViPR cluster. Changes made to the ESX or ESXi cluster from the ViPR Cluster page, will
only be made in the ViPR environment, and will not be applied to the vCenter
configuration.
ViPR cluster operations
Discovered clusters are displayed, and new clusters are created, and managed from the
Admim > Physical Assets > Clusters page of the ViPR UI. After a cluster is discovered or
50
EMC ViPR 1.1.0 Installation and Configuration Guide
Initial Configuration of ViPR Virtual Appliance
created, hosts are added to the cluster. Hosts can be added to the cluster while creating
or editing a host in ViPR, or from the Clusters page. A host can only exist in one cluster.
Once a host is part of a ViPR cluster, service operations can be performed exclusively on a
single host, or shared across the hosts in a cluster.
u
Hosts that are not currently in use in a ViPR service, can be moved to different
clusters by adding it to the new cluster. The host does not have to be removed from
the previous cluster, to move it to a new cluster. ViPR will recognize the last assigned
cluster as the cluster to which the host belongs.
u
Hosts that are in use cannot be removed from the cluster.
Creating a ViPR cluster
Clusters are created from the Admin > Physical Assets > Clusters tab.
Procedure
1. Go to the Admin > Physical Assets > Clusters tab.
2. Click Add.
3. Provide the Name, and click Save.
After you finish
Once the cluster is created hosts can be added at the time the host is created, or by
clicking the Edit button in the Clusters page.
Edit hosts in a cluster
Editing hosts in the cluster includes adding, and removing hosts from the cluster.
Before you begin
u
Clusters must be created before the hosts can be added to them.
u
Hosts can be also be added to the cluster while creating or editing a host in ViPR.
u
A host can only exist in one cluster.
u
Hosts that are not currently in use in a ViPR service, can be moved to different
clusters by adding it to the new cluster. The host does not have to be removed from
the previous cluster, to move it to a new cluster. ViPR will recognize the last assigned
cluster as the cluster to which the host belongs.
u
Hosts that are in use cannot be removed from the cluster.
Procedure
1. Go to the Admin > Physical Assets > Clusters tab.
2. Locate the cluster that will be edited in the list of clusters.
3. Click Edit Hosts in the right column in the same row as the cluster.
4. Check the box to the left of one or more of the hosts.
5. Click Add to add the selected hosts to the cluster.
Click Remove to remove the selected hosts from the cluster.
Creating a ViPR cluster
51
Initial Configuration of ViPR Virtual Appliance
vCenters
You can use the vCenters tab (Admin > Physical Assets > vCenters) to add a vCenter to
ViPR which storage can be exported and mounted as a datastore.
Adding a vCenter server
Add a vCenter Server to make provisioned volumes available to ESX hosts. You can add a
vCenter from the Admin view's Physical Asset tab.
Before you begin
u
This operation requires the System Administrator role in ViPR.
Procedure
1. Select Admin > Physical Assets > vCenters.
2. Add.
3. Enter the vCenter Server's name, its hostname or IP address, port used for
communication between the ViPR virtual appliance and the vCenter server, and
credentials for an account that has administrator privileges. Optionally validate the
connection on save.
Use care when identifying the vCenter; the UI does not prevent you from adding the
same vCenter twice: once with its hostname, and again with its IP address.
4. Check the status of the Validate Connection on Save checkbox.
If you leave this box checked, ViPR will check that it can connect to the host before
saving the host details. If validation fails you will not be allowed to save the host
details.
If some of the information, such as the user credentials, are incorrect, but you still
want to save the information you have entered, uncheck the box. The host will fail
discovery, however, you can edit the host details later and, once corrected, it will be
successfully discovered.
5. Save.
Virtual arrays
A virtual array is an abstract or logical array that is created to partition a virtual data
center into a group of connected compute, network, and storage resources.
In ViPR, a virtual array is created by giving it a meaningful name and defining whether
SAN zoning for the virtual array will be done automatically by ViPR or be manually
configured. Once the virtual array is created, it must be populated with at least one
network and one virtual pool.
A network consists of the storage ports and the host or initiator ports connected to the
SAN switches that were added to ViPR as fabric managers. The assignment of the network
to the virtual array, and the subsequent association of the virtual array with a virtual pool,
determines the storage that is available when a user requests a provisioning service.
Optionally, the devices available to a virtual array can be controlled by manually selecting
the storage ports to make available to the virtual array, and the physical storage pools
that will supply the storage for the virtual pools associated with the virtual array.
52
EMC ViPR 1.1.0 Installation and Configuration Guide
Initial Configuration of ViPR Virtual Appliance
Adding a virtual array
You should create one virtual array for each physical site, enterprise SAN, or computing
"pod".
Before you begin
u
This operation requires the System Administrator role in ViPR.
u
At a minimum, a virtual array defines the type of SAN Zoning that will occur when a
volume is exported from the array, and must include one or more networks
u
Storage systems are brought into the virtual array with the networks.
Procedure
1. Select Admin > Virtual Assets > Virtual Arrays.
2. Add.
3. Enter a name for the virtual array.
4. Either:
l
Accept the default SAN zoning setting of Automatic to allow ViPR to automatically
create the required zones in the SAN fabric when a provisioning request is made in
this virtual array.
l
Select Manual to configure the zones outside of ViPR.
– If there is an existing zone for the Host and Array:
After the ViPR provisioning operation completes, check the Port Group within
the Masking View to identify the FA ports that ViPR selected for the provisioning
request. Compare the FA ports in the zone to the FA ports in the Port Group. If
they match, no further action is required. If they do not match, reconfigure the
zone to use the same FA ports. Alternatively, a new zone can be created.
– If there is no existing zoning for the Host and Array:
After the ViPR provisioning operation completes, check the Port Group within
the Masking View to identify the FA ports that ViPR selected for the provisioning
request. Create a zone with the appropriate initiator and target ports.
5. Save.
One or more networks must be added to the virtual array before it can be managed by
ViPR.
6. Locate the added virtual array in the table.
7. Click Networks in the Edit column.
8. Click Add to add one or more Fibre Channel SAN, or existing IP networks to the virtual
array, or clickAdd IP Network to create a new IP network to add to the virtual array.
After you finish
Optionally, continue to assign storage ports and storage pools to the virtual array.
Adding a virtual array
53
Initial Configuration of ViPR Virtual Appliance
Adding an IP network
Networks for IP connected storage must be manually created, and added to the virtual
array.
Before you begin
u
This operation requires the System Administrator role in ViPR.
u
There are two ways to access the IP networks page either
Procedure
1. Go to the Add IP Networks page:
Option
Description
From the Networks page
a. Go to the Admin > Virtual Assets > Networks page.
b. Click Add IP Network.
From the Virtual Array
page
a. Go to the Admin > Virtual Assets > Virtual Arrays page.
b. Click Networks in the Edit column.
c. Click Add IP Network.
2. Enter the network Name.
3. Select the virtual arrays to which the network will be added.
4. Click Save.
Adding an IP-connected host to a network
After initial setup, use the Admin > Virtual Assets > Virtual Arrays > Edit IP Networks page
to add hosts to an IP network.
Before you begin
u
This operation requires the System Administrator role in ViPR.
Procedure
1. Select Admin > Virtual Assets > Virtual Arrays.
2. Select the virtual array to which the host will be connected.
3. At the Edit Virtual Array page, select Networks.
4. In the Networks table, select the IP network to which the host will be made available.
5. In the IP Ports table, select Add.
6. Enter IP ports in the Add Ports box and click Add.
Virtual pools
Virtual pools are created after virtual arrays have been created in ViPR. Virtual pools must
be associated with one or more virtual arrays.
Virtual pools are a collection of storage pools grouped together according to user-defined
characteristics.
For example, if your virtual array has a number of storage pools that can provide block
storage using SSDs, you can group those physical pools into a single virtual pool. In that
54
EMC ViPR 1.1.0 Installation and Configuration Guide
Initial Configuration of ViPR Virtual Appliance
case, the performance and protection characteristics of the virtual pool would determine
that it provides high performance storage. Hence, when giving a name to the virtual pool,
you might choose "gold" or "tier1" to indicate that the storage provides the highest
performance.
When a provisioning user requests the creation of a block volume from the "gold" virtual
pool, ViPR chooses the physical array/physical storage pool combination on which the
volume will be created. The virtual pool can comprise physical pools spanning a number
of arrays, so the actual array chosen could be any of them. The provisioning user does not
care which physical pool is chosen, only that it provides the level of performance
consistent with "gold" storage.
Automatic and manual virtual pools
When creating or editing a virtual pool, the UI helps you choose the physical pools that
match the performance and protection criteria that you are looking for by providing a set
of criteria and listing the pools that match the criteria. The storage pools table list all of
pools that are currently available that match the criteria and is dynamically updated as
you make criteria selections.
If you set the pool to be a "manual" pool, you can select the storage pools that will
comprise the pool. These storage pools will be fixed unless you edit the virtual pool.
If you select "automatic", the storage pools that comprise the virtual pools will be
automatically updated during the virtual pool's lifetime based on the availability of
storage pools in the virtual array.
An automatic virtual pool will be updated under the following circumstances:
u
During discovery of a storage system.
u
When a virtual pool is updated and saved (once a pool has associated assets only
protection criteria can be updated).
u
When a storage system, storage pool or port is registered or deregistered.
u
When the storage ports for a network are updated.
u
When the storage pools in a virtual array are updated.
u
When a network is assigned to a virtual array.
Creating or editing a virtual pool for block storage type
Create a virtual pool for block by specifying the criteria that physical storage pools must
match.
Before you begin
u
This operation requires the System Administrator role in ViPR.
u
When determining the minimum number of paths, maximum number of paths, and
paths per initiator:
l
The values must match the configuration and limitations of the physical
infrastructure.
l
There must be enough physical paths available to meet the criteria of the virtual
pool.
Procedure
1. Select Admin > Virtual Assets > Virtual Pools.
2. Click Add or select an existing virtual pool name to edit.
3. Name and describe the pool.
Creating or editing a virtual pool for block storage type
55
Initial Configuration of ViPR Virtual Appliance
4. Select the storage type, Block.
The criteria you specify will determine the physical storage pools that are eligible to
be part of this virtual pool.
5. Select a provisioning type (thick, thin).
6. Select one or more virtual storage arrays that can contribute physical storage pools to
the virtual pool.
A virtual pool must be associated with at least one virtual array.
7. Select one or more storage-type-specific protocols used to access the data: FC, iSCSI.
8. Select the minimum number of paths from the host to the storage array
9. Select the maximum number of paths that can be configured per host.
10.Select the number of paths (ports) to allocate to each initiator that is used. ViPR will
not allocate more paths than the Maximum Path allows. When the Maximum Path is
set too low there may be unused initiators which will not be zoned to ports.
11.Optionally, accept the default Expandable setting (enabled).
Storage pools that can be expanded non-disruptively are selected by default. Note
that this can decrease performance in some cases. If you disable this option, the
underlying storage selected for volume creation will consider performance over
expandability.
12.Enable multi-volume consistency if you want resources provisioned from the pool to
support the use of consistency groups. If not enabled, a resource cannot be assigned
to a consistency group when running ViPR block provisioning services.
13.Optionally select a drive type: SSD, FC, SAS, or SATA.
14.Optionally select a system type: EMC VNX Block or EMC VMAX.
15.Optionally specify select one or more RAID types.
16.Optionally specify an auto-tiering policy, that is, storage using Fully Automated
Storage Tiering (FAST).
For VNX Block, a ranking algorithm is applied to get matching pools. For VMAX, only
pools associated with VMAX auto-tier policies are matched.
17.Under Data Protection, select the maximum number of native (that is, ViPR) snapshots
allowed for resources from this virtual pool.
18.Select the maximum number of native continuous copies allowed for resources from
this virtual pool.
19.Optionally select an existing virtual pool (not the one you are creating in this
procedure) to use for native continuous copies (applicable only if native continuous
copies > 0).
20.Select a data protection type, such as EMC RecoverPoint, VPLEX Distributed, or VPLEX
Local.
Refer to data protection sections below for details.
21.Under Quota, optionally specify the maximum amount of of storage that can be
provisioned using this virtual pool. (The value can be overridden at the project level.)
22.Under Storage Pool Association, specify whether you want to manually select a
subset of eligible storage pools, or automatically assign all eligible physical pools to
the virtual pool.
23.Select Save.
56
EMC ViPR 1.1.0 Installation and Configuration Guide
Initial Configuration of ViPR Virtual Appliance
The matching physical storage pools (listed under Storage Pools) will be saved in this
virtual pool.
Setting RecoverPoint data protection criteria for a block virtual pool
You can set RecoverPoint criteria when you create or edit a block virtual pool.
Before you begin
u
This operation requires the System Administrator role in ViPR.
u
RecoverPoint data protection is part of the block virtual pool settings, so you need to
be creating or editing a block virtual pool to do these steps. Refer to Creating or
editing a virtual pool for block storage type on page 55.
u
You need a virtual array to act as the RecoverPoint target and optionally an existing
target virtual pool.
u
ViPR sets a default journal size, but if you have specific journal requirements, have
them available when creating the virtual pool.
Procedure
1. Select Admin > Virtual Assets > Virtual Pools.
2. Click Add or select an existing virtual pool name to edit.
3. Set properties as described in Creating or editing a virtual pool for block storage
type on page 55.
4. For Remote Protection/Availability, select EMC RecoverPoint.
5. Set the source journal size as needed. You can accept the RecoverPoint default (2.5
times protected storage) or select one of the following:
l
A fixed value (in MB, GB or TB)
l
A multiplier of the protected storage
l
Minimum allowable by RecoverPoint (10 GB)
6. Select Add Copy to add one or two RecoverPoint copies, specifying the destination
virtual array, optionally a virtual pool, and journal size.
The virtual pool specifies the characteristics of the RecoverPoint target and journal
volumes.
l
Set the journal size as needed. You can accept the RecoverPoint default (2.5 times
protected storage) or select one of the following:
– A fixed value
– A multiplier of the protected storage other than the default
– Minimum allowable by RecoverPoint (10 GB)
Setting VPLEX data protection criteria for a block virtual pool
You can set VPLEX data protection criteria when you create or edit a block virtual pool.
Before you begin
u
This operation requires the System Administrator role in ViPR.
u
VPLEX Distributed and VPLEX Local data protection are optional block virtual pool
settings, so you need to be creating or editing a block virtual pool to do these steps.
Refer to Creating or editing a virtual pool for block storage type on page 55.
Setting RecoverPoint data protection criteria for a block virtual pool
57
Initial Configuration of ViPR Virtual Appliance
Procedure
1. Select Admin > Virtual Assets > Virtual Pools.
2. Click Add or select an existing virtual pool name to edit.
3. Set properties as described in Creating or editing a virtual pool for block storage
type on page 55.
4. For Remote Protection, select VPLEX Distributed or VPLEX Local.
a. If you select VPLEX Distributed, select an existing virtual array to act as a
destination for the distributed volume. Optionally select a different virtual pool to
use when creating the distributed volume.
Setting SRDF data protection criteria for a block virtual pool
You can set SRDF criteria when you create or edit a block virtual pool.
Before you begin
u
This operation requires the System Administrator role in ViPR.
u
SRDF data protection is part of the block virtual pool settings, so you need to be
creating or editing a block virtual pool to do these steps. Refer to Creating or editing a
virtual pool for block storage type on page 55.
u
You need a virtual array to act as the SRDF target and optionally an existing target
virtual pool.
Procedure
1. Select Admin > Virtual Assets > Virtual Pools.
2. Click Add or select an existing virtual pool name to edit.
3. Set properties as described in Creating or editing a virtual pool for block storage
type on page 55.
4. For Remote Protection/Availability, select VMAX SRDF.
5. Select a copy mode, either Synchronous or Asynchronous.
6. Select Add Copy to add an SRDF copy, specifying the destination virtual array, and
optionally a virtual pool.
Creating or editing a virtual pool for file storage type
Create a virtual pool by specifying the criteria that physical storage pools must match.
You can also edit an existing virtual pool's settings except the storage type.
Before you begin
u
This operation requires the System Administrator role in ViPR.
Procedure
1. Select Admin > Virtual Assets > Virtual Pools.
2. Click Add or select an existing virtual pool name to edit.
3. Name and describe the pool.
4. Select File for the storage type.
The criteria you specify will determine the physical storage pools that are eligible to
be part of this virtual pool. Storage type is not editable once the virtual pool is
created.
58
EMC ViPR 1.1.0 Installation and Configuration Guide
Initial Configuration of ViPR Virtual Appliance
5. Select a provisioning type (thick, thin).
6. Select one or more virtual storage arrays that can contribute physical storage pools to
the virtual pool.
A virtual pool must be associated with at least one virtual array.
7. Select one or more storage-type-specific protocols used to access the data.
The options for file are NFS and CIFS.
8. Select a system type.
For file, the options are EMC VNX, EMC Isilon, NetApp, or none.
9. Under Data Protection, select the maximum number of local snapshots allowed for
resources from this virtual pool.
10.Under Quota, optionally specify the maximum amount of of storage that can be
provisioned using this virtual pool. (The value can be overridden at the project level.)
11.Under Storage Pool Association, specify whether you want to manually select a
subset of eligible storage pools, or automatically assign all eligible physical pools to
this virtual pool.
12.Select Save. The matching physical storage pools will be saved in the virtual pool.
Creating a project
Go to Admin > Tenant > Projects to create a new project and assign users to the project.
Before you begin
u
You must be either a Tenant Administrator or a Project Administrator to be allowed to
create projects. You will not see the Admin > Tenant > Projects menu item unless you
are in one of these roles.
u
Projects created by a Tenant Administrator can only be administrated by a Project
Administrator if the Project Administrator is the project owner.
u
Projects created by a Project Administrator are visible to, and can be administrated
by, a Tenant Administrator.
Procedure
1. Select Admin > Tenant > Projects.
2. Select Add.
3. Enter the name of the project.
4. In the Owner field, enter the name of the project owner.
This is the AD/LDAP name of the user. If you do not enter a name, you will be the
project owner.
The project owner should be a Project Administrator. This provides a way of allowing a
project created by a Tenant Administrator to be delegated to a Project Administrator.
If you are a Tenant Administrator, projects that you own cannot be administrated by
Project Administrator unless you make them the owner.
If you assign project ownership to a provisioning user, the user will not be able to
perform administration at the UI.
5. You can associate a quota with the project to limit the amount of storage provision for
the project.
Creating a project
59
Initial Configuration of ViPR Virtual Appliance
a. Check the Enable Quota box
b. In the Quota field, enter the maximum amount of storage that you want to allow.
6. To assign project permissions to other users, select Add ACL.
An ACL field is displayed allowing you enter a user or group name and assign a
permission.
7. Enter the name of a user or group and set the Type field to be consistent.
8. Select the access permission for the user as either ALL or BACKUP.
ALL permission allows users to provision resources that belong to a project and to run
services against resources owned by a project. BACKUP allows a user to view the
resources belonging to a project and perform data protection operations.
More information on adding users and groups to an access control list is provided in
Assigning permissions using ACLs.
9. To add more users or groups, select Add ACL again.
You can remove an ACL entry by clicking Remove.
10.When you have added all ACL entries, click Save.
After ViPR configuration
Once the ViPR virtual appliance is configured, users can place orders for services.
Deployment steps for Object Data Service are described in Installation and initial
configuration of Object Data Service on page 61.
Detailed user and administration information for the ViPR virtual appliance is described
in:
u
EMC ViPR User Guide
u
EMC ViPR Administrator Guide
The REST API and command-line interfaces are described in:
60
u
EMC ViPR CLI Guide
u
EMC ViPR REST API Reference
u
EMC ViPR Controller REST API Developer Guide
EMC ViPR 1.1.0 Installation and Configuration Guide
CHAPTER 5
Installation and Initial Configuration of ViPR Data
Services
u
u
u
u
u
u
u
u
u
u
u
Setting up ViPR Data Services................................................................................62
Obtaining Data Services deployment files and HDFS support files......................... 63
Data Services prerequisite steps........................................................................... 63
Choosing an IP network to support Data Services.................................................. 64
Configuring the ViPR controller to allow access by data VMs..................................64
Deploying ViPR data VMs.......................................................................................64
Adding a data services virtual pool........................................................................67
Adding a data store............................................................................................... 67
Configuring the root tenant to use Data Services................................................... 68
Adding a Base URL................................................................................................ 69
Using the Object Data Service............................................................................... 70
Installation and Initial Configuration of ViPR Data Services
61
Installation and Initial Configuration of ViPR Data Services
Setting up ViPR Data Services
One or more Data Services VMs must be added to ViPR, and a data services virtual pool
must be created and provisioned in the ViPR virtual data center, before users can perform
object or HDFS data operations using ViPR Data Services.
A summary of the procedure that must be performed to set up the Data Services is
provided below and is followed by the detailed steps.
Note
You need to have System Administrator, Security Administrator and Tenant Administrator
roles to perform the setup. The root user has these roles, or a Security Administrator can
assign these roles to a specific user.
Procedure
1. Make sure that you have an IP network and one or more file virtual pools.
Data Services uses file systems provided by a file virtual pool to supply the backing
storage.
2. Deploy one or more data VMs.
Data VMs are required to support the object data path. The Controller VM and data
VMs must be configured so that the data VMs can communicate with the Controller
VMs.
3. Assign an IP network for Data Services.
ViPR uses a single IP network for the data services. The IP network is used to access
the underlying file arrays.
4. Create a data services virtual pool.
A data services virtual pool is used to group data stores together.
5. Create one or more data stores.
The created data store(s) are added to the data services virtual pool specified during
data store creation. A data store uses a file virtual pool to provide its file storage.
6. Assign a namespace and default values to the tenant.
The tenant namespace provides a unique reference for a specific tenant, and enables
objects to be accessed by bucket and by tenant.
Once the tenant namespace has been assigned, users who are members of the tenant
can perform object data operations.
7. Create a base URL for use in object data path operations. (This step is optional.)
A base URL:
l
Is an option provided for those users who want to use applications written against
the Amazon S3 API.
l
Can be used to support virtual-hosted style access in object data requests.
l
Is not required for a user to perform object data operations, but the System
Administrator may choose to configure it.
To process object requests, required parameters include the tenant namespace and
bucket that the object belongs to; these may be included with or without a base URL.
62
EMC ViPR 1.1.0 Installation and Configuration Guide
Installation and Initial Configuration of ViPR Data Services
Option
Description
Without base URL Tenant namespace and bucket are provided with the x-emc
headers in the REST request.
With base URL
Encode the tenant namespace and bucket in the hostname part
of the URL.
Obtaining Data Services deployment files and HDFS support files
To install one or more data VMs to enable ViPR Data Services, you will need to download
the vipr-*-dataservice.zip from the ViPR product page on support.EMC.com.
In addition, if you intend to configure a Hadoop cluster to use ViPR HDFS storage, you will
need to obtain the ViPR HDFS zip file (vipr-hdfs-<version>.zip) from
support.EMC.com. This file contains a JAR file that must be deployed to each client node
in the Hadoop cluster and contains tools to aid the configuration of ViPR to allow access
from the Hadoop cluster.
Before you can set up a Hadoop cluster to use ViPR HDFS, you must complete the
installation and configuration of Data Services. You can then refer to the instructions on
configuring a Hadoop cluster to use ViPR HDFS provided in the Data Services Solutions
Guide.
Data Services prerequisite steps
Before you can set up Data Services, make sure that you have prepared the file system
storage that it will use. You also need to have a user account with the required roles to
access the Data Services area of the ViPR UI.
The Data Services area of the UI is designed to guide you through the setup procedure.
Make sure that the following prerequisite steps have been performed to verify that you
have a file virtual pool that can be used by the data service:
u
Create an IP network that contributes file storage to the virtual array (Adding an IP
network on page 54)
u
Create a file virtual pool (Creating or editing a virtual pool for file storage type on page
58 - supporting information is provided in: Virtual pools on page 54)
If you are using EMC Isilon, configure your DNS server to delegate resolution of the Isilon
SmartConnect name to the SmartConnect service. The SmartConnect service returns the
IP address used to connect to the Isilon cluster, based on the load balancing policy that
has been selected.
To access the Data Services area you must have the System Administrator role. Two
additional roles are required to complete the setup: Security Administrator and Tenant
Administrator. The root user account has all of the required roles. Alternatively, the
Security Administrator can assign these roles to a specific user who can perform the
configuration.
The pages in the Data Services area are arranged so that you can work through them from
left to right to complete the installation and configuration.
Obtaining Data Services deployment files and HDFS support files
63
Installation and Initial Configuration of ViPR Data Services
Choosing an IP network to support Data Services
Select the IP network that provides the file storage systems that underpin Data Services.
If an IP network that provides file storage does not exist, create it.
Before you begin
This operation requires the System Administrator role in ViPR.
Procedure
1. Select Admin > Data Services > Setup.
2. In the Network Configuration area, select the network that you want to provide the
virtual arrays used by the data services.
If you have not configured a network, you can do it from the Admin > Virtual Assets >
Virtual Arrays page by selecting a virtual array and using Create IP Network.
3. Select Save.
Configuring the ViPR controller to allow access by data VMs
Before you deploy data VMs, the addresses of the data VMs must be specified in the ViPR
controller node configuration to allow each data node to connect to the Controller
services.
Before you begin
This operation requires the Security Administrator role in ViPR.
Allocate IPv4 addresses for all data nodes that you intend to add. If you create a subnet
for the data VMs, you can use the subnet address. Using a subnet enables you to add
data VMs without having to perform this procedure.
The Controller node needs to know which data VMs it will access so that these nodes are
allowed to connect through its firewall to access the controller node coordination
services.
This configuration must be in place when the data VM first starts. If it is not, the data VMs
need to be restarted, one by one, after the data node addresses are added.
Procedure
1. Select Admin > System > Configuration.
2. In the Network > Data Services area of the Configuration page, enter the IPv4 address
of the data node VMs that you are adding in the Data VM IPs field. If you are adding
more than one, enter all addresses in a comma separated list. Alternatively, if you
have created a new subnet for the data VMs, enter the subnet address.
3. Select Save.
Deploying ViPR data VMs
For Data Services (object and HDFS storage) support, you need to deploy data VMs in
addition to the ViPR Controller VMs.
Before you begin
u
64
The ViPR virtual appliance to which you are adding data VMs must already be
deployed.
EMC ViPR 1.1.0 Installation and Configuration Guide
Installation and Initial Configuration of ViPR Data Services
u
The IPv4 address or hostname of all data VMs must have been added to the controller
node configuration using the procedure in Configuring the ViPR controller to allow
access by data VMs on page 64.
u
If you are deploying the data node(s) immediately after deploying the ViPR virtual
appliance, wait until the ViPR virtual appliance status on the Dashboard tab says
"Stable" (about 2 minutes).
u
The ESX host to which the data VM is deployed must meet the prerequisites listed
below.
Table 6 ViPR data VM prerequisites
-
Item
Number of CPUs
-
Value
8
Memory
32 GB
Disk
150 GB
Connectivity
Ensure all data VMs have connectivity to each
other.
u
You need to be able to access the UI for the deployed ViPR virtual appliance.
u
You need an available IPv4 address for each data VM and you need to know the
subnet mask and gateway address for the data node.
u
You need access to the ViPR data node VM distribution archive file.
u
Refer to the EMC ViPR Data Sheet and Compatibility Matrix for the CPU, memory, and
storage requirements of a data VM.
Procedure
1. Identify a working location that is accessible from the vCenter where you are
deploying ViPR and put the files required to install the ViPR data node VM in this
location.
These comprise a dataservice OVF, the ViPR virtual machine disk files (VMDKs), and a
configuration file that you download in this procedure. The working location does not
need to be on a ViPR VM. You can use laptop storage, for example.
2. Extract the ViPR dataservice OVF file and the VMDK files from the distribution archive,
vipr-*-dataservice.zip, to the working location.
The files are vipr-*-dataservice.ovf, vipr-*-disk1.vmdk, vipr-*disk2.vmdk, vipr-*-disk4.vmdk, and vipr-*-dataservice.mf.
3. Open a web browser window on https://ViPR_virtual_ip to run the ViPR UI.
4. Log in to the UI as a user who has the System Administrator role and the Security
Administrator role. The root user has these permissions or the Security Administrator
can assign these roles to a user.
The System Administrator role is required to access the Data Services area of the UI.
The Security Administrator role is required due to the need to download a file
containing secure configuration information.
5. Select Admin > Data Services > Setup.
6. Under Data Services Configuration, download the Data Services configuration file
(config.iso).
Deploying ViPR data VMs
65
Installation and Initial Configuration of ViPR Data Services
If you have a previously downloaded .iso file, do not use it if you have made any
controller node configuration changes since it was downloaded. Use a newly
downloaded .iso file.
During deployment, the ISO image is mounted by vCenter and configuration
information required by the data node VM is obtained. This information comprises the
addresses and ports of the controller node services that the data node needs to
access.
7. Using an OS command, file browser, or the like (not the ViPR UI), copy config.iso
from the download location to the working location where the OVF file and VMDK files
reside.
8. Log in to vCenter using the vSphere client and deploy vipr-*-dataservice.ovf
for each data VM using the following steps.
a. From the File menu, select Deploy OVF Template....
b. Browse to and select the dataservice OVF file, located in the working location
created earlier.
c. On the OVF Template Details page, review the details about the data node VM.
d. Accept the End User License Agreement.
e. Enter a name for the data node VM and select its location.
f. Select the host or cluster that hosts the VM.
If you selected a host or cluster before starting the deployment, you are not be
offered this selection.
g. Select a resource pool for the VM.
If you selected a resource pool before starting the deployment, you are not be
offered this selection.
When selecting the resource pool, do not select the controller vApp.
h. If more than one datastore is attached to the ESX host, select the datastore for
your VM.
i. Select a disk format: Thick Provision Lazy Zeroed, Thick Provision Eager Zeroed
(recommended for production deployment), or Thin Provision.
j. On the Network Mapping page, map the source network to a destination network
as appropriate.
k. Enter the properties for the VM.
Table 7 ViPR data node VM OVF properties
-
66
Property name in
vSphere Client
Data service IP address
OVF property key name
-
network_datanode_ipaddr
Description
-
One IPv4 address for
the data VM.
Data service network
netmask
network_datanode_netmask
IPv4 netmask for the
data VM.
Data service network
gateway IP address
network_datanode_gateway
IPv4 address for the
data VM.
EMC ViPR 1.1.0 Installation and Configuration Guide
Installation and Initial Configuration of ViPR Data Services
l. Review the selections you have made at the Ready to Complete page and select
Finish.
9. Once the deployment has completed successfully, start each data node VM, one at a
time, and check to see that the data node VM appears in the ViPR Virtual Appliance
area of the UI Dashboard: Admin > System > Dashboard.
Adding a data services virtual pool
Objects are stored in data services virtual pools and each pool must have at least one
data store to provide the underlying file system storage.
Before you begin
The following prerequisites apply:
u
This operation requires the System Administrator role in ViPR.
u
You must know whether the pool will be used for object, HDFS, or both object and
HDFS data.
Procedure
1. Select Admin > Data Services > Virtual Pools.
2. Enter a name for the virtual pool.
3. Optional. Enter a description for the virtual pool.
When the virtual pool has been created, the object description will be displayed on
the Virtual Pools page.
4. Select the Type of the virtual pool. The type is either: Object (default), HDFS, or Object
and HDFS.
5. Select Save.
The virtual pool will be displayed on the Admin > Data Services > Virtual Pools page.
After you finish
A data services virtual pool must have a data store before it can be used. This applies
even when you are intending to ingest data into object storage - a process which adds the
ingested file system as a data store.
Adding a data store
A data services virtual pool must be backed by one or more data stores, each of which is
associated with an underlying file system.
Before you begin
This operation requires the System Administrator role in ViPR.
Procedure
1. Select Admin > Data Services > Data Stores.
2. On the Data Stores page, select Add.
3. Enter a name for the data store.
The data store name can reflect the underlying file system storage that provides the
data store.
4. Optionally, add a description for the data store.
Adding a data services virtual pool
67
Installation and Initial Configuration of ViPR Data Services
5. Select the virtual array that will provide the data store.
The file virtual pools that you will be offered will be those associated with the selected
array.
6. Select the file virtual pool that will provide the file system that underlies the data
store.
7. Enter the size of the data store.
8. Select the data services virtual pool to which this data store belongs.
When creating object buckets, clients do not know which data stores underpin a data
services virtual pool. They choose the virtual pool based on its name.
9. Select Save.
Results
The state field in the Data Stores table should display "readytouse".
Configuring the root tenant to use Data Services
Enables the configuration of a namespace for the root tenant and configuration of default
values for the data services virtual pool and the project to which object storage for this
tenant should be assigned.
Before you begin
This operation requires the user to be assigned to more than one role, or to be assigned
additional permissions:
u
The System Administrator role is required to access the Admin > Data Services >
Tenant Configuration area.
u
The Tenant Administrator role, or ACL permissions for a project, is required in order to
choose the default project.
The root user account has these roles and can be used to perform this task.
Procedure
1. Select Admin > Data Services > Tenant Configuration.
2. Enter the identity of the namespace to use for this tenant.
The namespace must be unique for each tenant in the same ViPR virtual data center.
3. Select the default virtual pool. If a virtual pool has not been created yet, you can
create one by selecting Create Virtual Pool.
When using the Object Data Service, if a client does not specify a virtual pool, the
contents of the default virtual pool that is visible to the logged in user will be returned
by ViPR.
4. Select the default project that will be used when object requests are made.
If you are a Tenant Administrator you will be able to select Create Project and create a
new project. If you are a System Administrator with project permissions, you will be
presented with a list of projects that you are assigned to, but you will not be able to
create a new one.
5. Select Save.
68
EMC ViPR 1.1.0 Installation and Configuration Guide
Installation and Initial Configuration of ViPR Data Services
Adding a Base URL
This task is only necessary if you use object clients that encode the location of an object,
its namespace and bucket, in a URL. In that case you can specify a base URL that will be
used, together with the namespace, as the path to objects in a tenant.
Before you begin
This operation requires the System Administrator role in ViPR.
You must ensure that the domain specified in a request that uses a URL to specify an
object location resolves to the location of the ViPR appliance.
Procedure
1. Select Admin > Data Services > Base URLs.
2. Select Add.
The Create Base URL page is displayed.
3. Enter the name of the base URL. This will provide additional information about the
base URL when looking at the base URL table.
4. Enter the base URL.
If your objects location URLs are in the form: https://
mybucket.mynamespace.acme.com (that is, bucket.namespace.baseurl )
or https://mybucket.acme.com (that is, bucket.baseurl), the base URL
would be acme.com.
You can specify which format in the Use Namespace selector.
5. Choose the format in which your object address is encoded in the URL: with a
namespace or without a namespace.
6. Select Save.
Example of a base URL
As an example of the use of the Base URL, an object named myphoto.jpg in the images
bucket with a base URL of s3.amazonaws.com and a tenant namespace of viprdata,
would be addressable using the following URL: https://
images.viprdata.s3.amazonaws.com/myphoto.jpg
Note
The Object Data Service may include a list of base URLs.
Adding a Base URL
69
Installation and Initial Configuration of ViPR Data Services
Using the Object Data Service
Once you have configured data services, clients can access object storage using the ViPR
API or using an existing object client, such as the S3 browser.
Steps are provided to enable you to demonstrate that the object service is configured,
and that you can create buckets and store objects in the buckets using the S3 browser.
Object storage users are required to present an object data store key (also referred to as
a secret key) to enable them to authenticate with the object service. Object data store
keys can be generated programmatically by a client or can be generated manually from
the ViPR UI.
Adding an object data store key
An object data store key can be created in the UI and used to access ViPR object storage.
Before you begin
Object store keys can be created by ViPR users who are domain users and have access to
the UI.
Procedure
1. Select User Menu > Manage Data Store Keys.
2. Select Add.
A new key will be added to the Data Store Keys table. An object user can have a
maximum of 2 object data store keys. The key can be copied and used as the secret
key when accessing the ViPR object stores using an object client.
Testing the object service using the S3 Browser
You can test your installation by creating an object bucket using the ViPR Amazon S3 API
through the S3 Browser.
Before you begin
u
You will need to have the S3 Browser installed.
u
You will need an object data store key (a secret key) generated from the ViPR UI (refer
to Adding an object data store key on page 70).
u
You will need to have an authentication provider configured in ViPR so that one or
more domain users are available.
Procedure
1. In the S3 Browser, select Accounts > Add New Account.
2. At the Add New Account dialog, enter the required details listed below.
-
Account Setting
Account Name
Access Key Id
70
EMC ViPR 1.1.0 Installation and Configuration Guide
-
Description
The name of the account. This can be any name you choose.
This is the name of the ViPR account. It must be the same account name
that you used to generate an object store key. You can use the "root"
user or any other available user. For the root user you would simply enter
"root", for a normal ViPR user you would enter a name in the format:
[email protected].
Installation and Initial Configuration of ViPR Data Services
-
Account Setting
Secret Access Key
-
Description
This is the ViPR object store key that must be generated from the UI or by
using the ViPR CLI or API. You can copy it from the ViPR UI and paste it
into this field.
3. At the Add New Account Dialog, click Advanced (in the bottom left-hand corner).
4. Check the Use Amazon S3 Compatible Storage box.
5. Enter the hostname or IP address of the data node and specify the appropriate port for
the S3 service. For https the port is 9021, for http it is 9020.
For example: mc1234.yourco.com:9021
6. Select Close.
7. Complete the account creation by clicking Add New Account.
8. Select Buckets > Create New Bucket
9. Enter a name for the bucket and specify a region.
10.Select Create New Bucket.
Results
You can now upload files to the bucket.
Testing the object service using the S3 Browser
71
CHAPTER 6
Setting Up Multiple Tenants
u
u
u
u
Prerequisites for creating multiple tenants............................................................ 74
Configuring multiple tenants with the REST API......................................................74
Configuring multiple tenants with the CLI.............................................................. 79
Creating data store (secret) keys........................................................................... 82
Setting Up Multiple Tenants
73
Setting Up Multiple Tenants
Prerequisites for creating multiple tenants
ViPR can be configured with multiple tenants. Each tenant has its own environment for
creating and managing storage. Storage resources assigned to a tenant cannot be
accessed by users from other tenants.
Before creating additional tenants, you must have performed the deployment and initial
configuration of the ViPR controller described in the EMC ViPR Installation and
Configuration Guide chapter entitled "Initial configuration of ViPR virtual appliance".
The initial configuration of ViPR sets up a single-tenant environment. Only the provider
tenant is available by default. To set up a multi-tenant ViPR environment, you must use
the API procedure described in this chapter. (An analogous procedure using the ViPR CLI
is also available.) You cannot create subtenants under the provider tenant from the ViPR
User Interface.
Physical assets, such as storage systems and fabrics, added to ViPR are available to the
virtual data center and can be assigned to any tenant. Similarly, virtual arrays and virtual
pools created in ViPR are virtual data center assets and can be assigned to any tenant,
including new tenants that you create. For example, the configuration of virtual arrays
and virtual pools can be performed for the provider tenant from the UI. Those virtual
arrays and virtual pools can then be assigned to new tenants.
ViPR role requirements
The root user for your ViPR vApp has all the role assignments you need to complete the
multi-tenant setup.
Configuring multiple tenants with the REST API
This section shows how to configure multiple tenants with the ViPR API.
Before you begin
Complete the deployment and initial configuration steps in the EMC ViPR Installation and
Configuration Guide.
Procedure
1. Authenticate with ViPR using an account that has Security Administrator and System
Administrator roles. The root user has these roles and can be used.
How you authenticate depends on the HTTP client that you are using. If you are using a
browser-based client, you could log in at the ViPR UI and the session cookie created
will authenticate the HTTP client connection.
2. Ensure you have an authentication provider configured that will authenticate users in
your domain.
Either:
l
Create an authentication provider at the Admin > Security > Authentication
Providers menu of the ViPR UI.
l
Use the /vdc/admin/authnproviders API. For example:
Request
POST /vdc/admin/authnproviders
<authnprovider_create>
<mode>ad</mode>
<domains>
<domain>yourco.com</domain>
<domain>domain2.yourco.com</domain>
<domain>domain3.yourco.com</domain>
74
EMC ViPR 1.1.0 Installation and Configuration Guide
Setting Up Multiple Tenants
</domains>
<name>multi-domain forest</name>
<server_urls>
<server_url>ldaps://MyLDAPServer.yourco.com:3269</
server_url>
</server_urls>
<server_cert>my_server_certificate</server_cert>
<manager_dn>CN=manager_bind,OU=Test1,OU=Test,DC=yourco,DC=com</
manager_dn>
<manager_password>Password</manager_password>
<group_attribute>CN</group_attribute>
<search_base>DC=yourco,DC=com</search_base>
<search_filter>userPrincipalName=%u</search_filter>
<search_attribute_key>userPrincipalName</
search_attribute_key>
<group_whitelist_values></group_whitelist_values>
<search_scope>SUBTREE</search_scope>
</authnprovider_create>
3. Get the urn ID of the root provider tenant.
You must have the Tenant Administrator role to perform this operation.
Request
GET /tenant
Response
<tenant_info>
<id>urn:storageos:TenantOrg:e5013f5e-41d7-4cf9b1fd-4fecfad0c18c:</id>
<name>Provider Tenant</name>
<link href="/tenants/
urn:storageos:TenantOrg:e5013f5e-41d7-4cf9-b1fd-4fecfad0c18c:"
rel="self"/>
</tenant_info>
The urn of the root provider tenant in this example is:
urn:storageos:TenantOrg:e5013f5e-41d7-4cf9-b1fd-4fecfad0c18c:
Use this urn as the parent when creating a new tenant in the following step.
4. Create a new tenant and map users to it through a domain that is included in the
authentication provider.
Note
The set of LDAP users assigned to a subtenant is always a subset of the users mapped
to the Provider Tenant.
In this example, the users in the domain domain2.yourco.com are mapped into
the tenant called EMC tenant. You must have the Tenant Administrator role for the
parent tenant to perform this operation. The {id} variable is the URN of the provider
tenant.
Request
POST /tenants/{id}/subtenants
<tenant_create>
<name>EMC_tenant</name>
<user_mappings>
<user_mapping>
<domain>domain2.yourco.com</domain>
</user_mapping>
</user_mappings>
</tenant_create>
Configuring multiple tenants with the REST API
75
Setting Up Multiple Tenants
You can control the users mapped into a tenant by specifying attributes. For example,
if you only want users assigned to a specific department in AD to be mapped into the
tenant, you can set key/value attributes. For example:
<user_mapping>
<domain>domain2.yourco.com</domain>
<attributes>
<attribute>
<key>department</key>
<value>development</value>
</attribute>
<attributes>
</user_mapping>
Alternatively, you can map users into the tenant based on their AD group. The
following user mapping maps members of the "lab users" group into the tenant:
<user_mapping>
<domain>domain2.yourco.com</domain>
<groups>
<group>lab users</group>
</groups>
</user_mapping>
You can include more than one <user_mapping> to enable users to be mapped from
any of the specified mappings.
If you included more than one group in a <user_mapping>, the user must belong to all
groups. In the example below, users must belong to both "lab users" and "lab
administrators" groups to be mapped into the tenant.
<user_mapping>
<domain>domain2.yourco.com</domain>
<groups>
<group>lab users</group>
<group>lab administrators</group>
</groups>
</user_mapping>
Response
<tenant>
<creation_time>1378919846777</creation_time>
<id>urn:storageos:TenantOrg:4edc456cc7f5-4c54-84b2-29715cc8f504:</id>
<inactive>false</inactive>
<link href="/tenants/urn:storageos:TenantOrg:4edc456cc7f5-4c54-84b2-29715cc8f504:" rel="self"/>
<name>EMC tenant</name>
<tags/>
<parent_tenant>
<id>urn:storageos:TenantOrg:e5013f5e-41d7-4cf9b1fd-4fecfad0c18c:</id>
<link href="/tenants/
urn:storageos:TenantOrg:e5013f5e-41d7-4cf9-b1fd-4fecfad0c18c:"
rel="self"/>
</parent_tenant>
<user_mappings>
<user_mapping>
<attributes/>
<domain>domain2.yourco.com</domain>
<groups/>
</user_mapping>
</user_mappings>
</tenant>
5. If you want to assign access to a virtual array to the newly created tenant you can use
the following steps.
By default, the access control list (ACL) for a virtual array is wide open and all tenants
have access. Once you assign a tenant to the ACL for a virtual array, only that tenant
will have access unless you assign other tenants to the ACL.
76
EMC ViPR 1.1.0 Installation and Configuration Guide
Setting Up Multiple Tenants
a. Get a list of virtual arrays.
Request
GET /vdc/varrays
Response
<varrays>
<varray>
<id>urn:storageos:VirtualArray:1b86bbe1-c939-49d3b0ae-027dc95b1ccc:</id>
<link href="/vdc/varrays/urn:storageos:VirtualArray:
1b86bbe1-c939-49d3-b0ae-027dc95b1ccc:" rel="self"/>
<name>VSA</name>
</varray>
</varrays>
Use one of the virtual array IDs for the next step. This example shows the following
ID:
<id>urn:storageos:VirtualArray:1b86bbe1-c939-49d3b0ae-027dc95b1ccc:</id>
b. Assign the new tenant access to a virtual array by adding this tenant to the ACL for
the virtual array.
You must be authenticated as a user with the System Administrator or Security
Administrator role to perform this operation.
Request
PUT /vdc/varrays/urn:storageos:VirtualArray:1b86bbe1-c939-49d3b0ae-027dc95b1ccc:/acl
<acl_assignment_changes>
<add>
<privilege>USE</privilege>
<tenant>urn:storageos:TenantOrg:4edc456cc7f5-4c54-84b2-29715cc8f504:</tenant>
</add>
</acl_assignment_changes>
Response
<acl_assignments>
<acl_assignment>
<privilege>USE</privilege>
<tenant>urn:storageos:TenantOrg:4edc456cc7f5-4c54-84b2-29715cc8f504:</tenant>
</acl_assignment>
</acl_assignments>
6. If you want to a assign access to a virtual pool to the new tenant you can use the
following steps.
By default, the access control list (ACL) for a virtual pool is wide open and all tenants
have access. Once you assign a tenant to the ACL for a virtual pool, only that tenant
will have access unless you assign other tenants to the ACL.
a. Get a list of virtual pools. In the example below, file virtual pools have been listed.
Request
GET /file/vpools
Response
<vpool_list>
<virtualpool>
<id>urn:storageos:VirtualPool:58406f8b-5a0e-41c0a91b-5a8c59ac3a02:</id>
Configuring multiple tenants with the REST API
77
Setting Up Multiple Tenants
<link href="/file/vpools/urn:storageos:VirtualPool:
58406f8b-5a0e-41c0-a91b-5a8c59ac3a02:" rel="self"/>
<name>vsp1</name>
<vpool_type>file</vpool_type>
</virtualpool>
</vpool_list>
b. Retrieve the urn of a virtual pool and add the tenant to the ACL for that pool.
You must be authenticated as a user with the System Administrator or Security
Administrator role to perform this operation.
Request
PUT /file/vpools/urn:storageos:VirtualPool:58406f8b-5a0e-41c0a91b-5a8c59ac3a02:/acl
<acl_assignment_changes>
<add>
<privilege>USE</privilege>
<tenant>urn:storageos:TenantOrg:4edc456cc7f5-4c54-84b2-29715cc8f504:</tenant>
</add>
</acl_assignment_changes>
Response
<acl_assignments>
<acl_assignment>
<privilege>USE</privilege>
<tenant>urn:storageos:TenantOrg:4edc456cc7f5-4c54-84b2-29715cc8f504:</tenant>
</acl_assignment>
</acl_assignments>
7. To perform any tenant-specific administration, you need to have a Tenant
Administrator for the tenant. You can create a Tenant Administrator using the /
tenants/{id}/role-assignments path, as shown below:
Request
PUT /tenants/urn:storageos:TenantOrg:4edc456cc7f5-4c54-84b2-29715cc8f504:/role-assignments
<role_assignment_change>
<add>
<role>TENANT_ADMIN</role>
<subject_id>[email protected]</subject_id>
</add>
</role_assignment_change>
8. For users to provision file or block storage, or to access object storage, the user must
be assigned to a project. To create projects for the tenant, you can use /tenants/
{id}/projects. For example:
Request
POST /tenants/urn:storageos:TenantOrg:4edc456cc7f5-4c54-84b2-29715cc8f504:/projects
<project_create>
<name>marketing_project</name>
</project_create>
Response
<tenant_project>
<id>urn:storageos:Project:
60a3069e-74cc-4e79-9857-1c121ce1635a:</id>
<link href="/projects/urn:storageos:Project:
60a3069e-74cc-4e79-9857-1c121ce1635a:" rel="self"/>
<name>marketing_project</name>
</tenant_project>
78
EMC ViPR 1.1.0 Installation and Configuration Guide
Setting Up Multiple Tenants
If you have assigned a user to the Tenant Administrator role for the tenant, they will
automatically have access to the project.
You can use the projects/{id}/acl path to assign permissions to a user for the
project. For example:
Request
PUT projects/ urn:storageos:Project:
60a3069e-74cc-4e79-9857-1c121ce1635a:/acl
<acl_assignment_changes>
<add>
<privilege>USE</privilege>
<subject_id>[email protected]</subject_id>
</add>
</acl_assignment_changes>
9. If you want to use Data Services, you need to assign a namespace to the tenant and
assign a default data services virtual pool. You can also assign a default project. You
must be authenticated as a user with the System Administrator role to perform this
operation.
Request
POST /object/namespaces/namespace
<namespace_create>
<namespace>namespace1</namespace>
<vdcs>
<tenant>urn:storageos:TenantOrg:4edc456cc7f5-4c54-84b2-29715cc8f504:</tenant>
</vdcs>
</namespace_create>
Response
<namespace>
<id>namespace1</id>
<inactive>false</inactive>
<link href="/object/namespaces/namespace/namespace1"
rel="self"/>
<tags/>
<vdcs/>
</namespace>
Configuring multiple tenants with the CLI
This section describes how to configure multiple tenants with the ViPR CLI. Complete the
following procedure for each tenant you want to create.
Before you begin
u
This procedure uses the ViPR CLI. Follow the setup instructions in the EMC ViPR CLI
Reference to setup the command line interface.
u
Follow the ViPR initial configuration for the Controller and Data Services in the EMC
ViPR Installation and Configuration Guide.
Procedure
1. Authenticate using the "root" user.
viprcli authenticate -u root -d /tmp
Password: <enter user password>
2. Ensure you have an authentication provider that will authenticate users in your
domain.
Either:
Configuring multiple tenants with the CLI
79
Setting Up Multiple Tenants
l
Create an authentication provider at the Admin > Security > Authentication
Providers menu of the ViPR UI.
l
Create an authentication provider using the CLI, as follows:
a. Create a provider.cfg file in local folder. The content of provider.cfg
should resemble the example below.
[Camb AD]
mode:ad
url:ldap://192.0.2.20
certificate:test_cert
passwd_user:Password
managerdn:CN=Administrator,CN=Users,DC=mytown,DC=emc,DC=com
searchbase:CN=Users,DC=mytown,DC=emc,DC=com
searchfilter:sAMAccountName=%U
searchkey:sAMAccountName
groupattr:CN
name:ad configuration
domains:mytown.emc.com
whitelist:*Admins*,*Test*
b. Add AD/LDAP authentication provider. You must be authenticated as a user
with the Security Administrator role to do this operation.
viprcli authentication add-provider -configfile
provider.cfg
3. Create a new tenant that uses the domain covered by the authentication provider. You
need to be a Tenant Administrator for the parent tenant to create a tenant. For
example:
viprcli tenant create -name marketing -domain mytown.emc.com
4. You can control the users mapped into a tenant by specifying attributes or specifying
AD group. For example, if you only want users assigned to a specific department in AD
to be mapped into the tenant, you can set key/value attributes. For example:
viprcli tenant add-attribute -name marketing -key department
-value marketingdepartment
This provides the ability, if required, to map uses from the same domain into different
tenants by the appropriate attribute to their AD user.
To map user from an Active Directory group into the tenant, you can use the tenant
add-group. For example:
viprcli tenant add-group -name marketing -group "lab users"
-domain mytown.emc.com
5. If you want to assign access to a virtual array to the newly-created tenant, you can use
the following steps.
By default, the access control list (ACL) for a virtual array is wide open and all tenants
have access. Once you assign a tenant to the ACL for a virtual array, only that tenant
will have access unless you assign other tenants to the ACL.
a. Get a list of virtual arrays.
viprcli varray list
b. Assign an array to the ACL for the tenant. For example:
viprcli allow -name <varray name> -tn marketing
viprcli varray list
NAME
Isilon_Virtual_Array
v_array
80
EMC ViPR 1.1.0 Installation and Configuration Guide
Setting Up Multiple Tenants
viprcli varray allow -name Isilon_Virtual_Array -tenant
marketing
6. If you want to a assign access to a virtual pool to the newly-created tenant, you can
use the following steps.
By default, the access control list (ACL) for a virtual pool is wide open and all tenants
have access. Once you assign a tenant to the ACL for a virtual pool, only that tenant
will have access unless you assign other tenants to the ACL.
a. Get a list of virtual pools, using:
# viprcli vpool list -type file
viprcli vpool list -type file
Name
Isilon_Virtual_Pool
Type
file
Protocol
NFS
or:
viprcli vpool list -type block
b. Give the tenant access to a virtual pool using vpool allow, as below:
viprcli vpool allow -name Isilon_Virtual_Pool -tn
marketing
7. For users to provision file or block storage, or to access object storage, the user must
be assigned to a project. To create one or more projects for the tenant, use project
create. For example:
viprcli project create -name marketing_project -tn marketing
You can assign users to the project using the update-acl operation and specifying the
user and the appropriate privilege (own, use or backup).
For example, to assign privileges to use a project , you might use:
viprcli project update-acl -name marketing_project -tenant
marketing -privilege use -subjectid [email protected]
If you assign a user to the Tenant Administrator role for the tenant, they will
automatically have access to all projects in the tenant.
Note
The next several steps are specific to Object/HDFS storage.
8. If you want to use Data Services, you need to assign a namespace to the tenant and
assign a default data services virtual pool using the steps below. You can also assign
a default project.
a. Get a list of data services virtual pools.
viprcli objectvpool list
OBJECTVPOOL
Isilon_DS_Virtual_Pool
b. Create the namespace and assign a default virtual pool (cos). You can also assign
a default project. You must be authenticated as a user with the System
Administrator role to do this operation.
viprcli namespace create -name namespace1 -cos
Isilon_DS_Virtual_Pool -project marketing_project
Configuring multiple tenants with the CLI
81
Setting Up Multiple Tenants
Creating data store (secret) keys
Each object user requires their user id, from LDAP or Active Directory, and a secret key,
also called an object data store key.
To generate a secret key for a user, use one of these three methods:
u
Choose User Menu > Manage Data Store Keys from the ViPR UI.
u
Call the following CLI operation:
viprcli secretkeyuser add -uid <username from LDAP or AD>
u
Call this ViPR REST API.
POST object/secret-keys
Request body
<?xml version="1.0" encoding="UTF-8"?>
<secret_key_create_param>
<existing_key_expiry_time_mins>60</
existing_key_expiry_time_mins>
</secret_key_create_param>
Response
<user_secret_key>
<secret_key>...</secret_key>
<key_timestamp>...</key_timestamp>
<link rel="..." href="..." />
</user_secret_key>
82
EMC ViPR 1.1.0 Installation and Configuration Guide