1
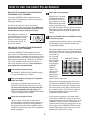
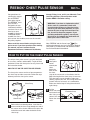
REEBOK® CHEST PULSE SENSOR
Congratulations for
selecting the state-ofthe-art REEBOK®
chest pulse sensor.
The REEBOK® chest
pulse sensor is
designed to let you
continuously monitor
your heart rate as you
exercise on your
treadmill. If you have
a REEBOK® ACD2
treadmill, the chest
pulse sensor also enables you to use the consoleʼs
two pulse programs.
Please read this manual before using the chest
pulse sensor. If you have questions after reading
this manual, call our Customer Service
Department toll-free at 1-800-999-3756, Monday
Model No.
RBMC11980
through Friday, 6 a.m. until 6 p.m. Mountain Time
(excluding holidays). Please mention model
number RBMC11980 when calling.
WARNING: If you have an implanted medical
device such as a pacemaker, check with
your physician before using the chest pulse
sensor. If you have heart problems, or if you
are over 60 years of age and have been inactive, do not use the pulse programs. If you
are taking medication regularly, consult your
physician to find whether the medication will
affect your exercise heart rate.
Note: REEBOK and the Vector Logo
are
registered trademarks and service marks of Reebok.
This product is manufactured and distributed under
license from Reebok International.
HOW TO PUT ON THE CHEST PULSE SENSOR
The unique chest pulse sensor is specially designed
for accuracy, comfort, and durability. To get the best
performance from the chest pulse sensor, please read
the instructions below.
2
HOW TO PUT ON THE CHEST PULSE SENSOR
The chest pulse sensor consists of two components:
the chest strap and the sensor unit. Follow the steps
below to put on the chest pulse sensor.
Chest Strap
3
Tab
1
Sensor Unit
Sensor
Unit
Buckle
Refer to the inset drawing above. Insert the tab
on one end of the chest strap through one end of
the sensor unit as shown. Make sure to press the
end of the sensor unit under the buckle on the
chest strap.
Wrap the
chest pulse
Logo
sensor
around your
chest.
Attach the
other end of
the chest
strap to the sensor unit as described at the left.
Adjust the length of the chest strap, if necessary.
The chest pulse sensor should be under your
clothing, against your skin, and as high under the
pectoral muscles or breasts as is comfortable.
Make sure that the logo is facing forward and is
right-side-up.
Pull the
sensor unit away from your
body a few
inches
Electrode
Areas
and locate the two electrode areas on the inner
side. Using a saline solution such as saliva or
contact lens solution, wet both electrode areas.
Return the sensor unit to a position against your
chest.
CHEST PULSE SENSOR TROUBLE-SHOOTING
• If the chest pulse sensor does not function properly
after you have followed all of the above instructions,
the battery should be replaced in the following way:
If the chest pulse sensor does not function properly, or if the displayed heart rate is excessively
high or low, try the trouble-shooting steps below.
Locate the battery
cover on the back of
the sensor unit. Insert
a coin into the slot in
the cover, turn the
cover counterclockwise, and remove the
cover.
• Make sure that the chest pulse sensor is under your
clothing, against your skin, and as high under the
pectoral muscles or breasts as is comfortable. Note:
If the chest pulse sensor does not function when positioned as described, try moving it slightly lower or
higher on your chest.
• Make sure that the logo on the sensor unit is facing
forward and is right-side-up.
Remove the old battery and insert a new
CR 2032 battery.
Make sure that the
battery is turned so
the writing is on
top. Replace the
battery cover and
turn it clockwise to
close it.
• Each time you use the chest pulse sensor, use
saline solution such as saliva or contact lens solution
to wet the two electrode areas on the sensor unit
(see the drawing below). If heart rate readings do not
appear until you begin perspiring, re-wet the electrode areas.
CR 2032
Battery
• As you walk or run on the treadmill, make sure that
you are near the center of the walking belt and within
armʼs length of the console. For the console to display heart rate readings, the user must be within
armʼs length of the console.
CHEST PULSE SENSOR CARE
• The operation of the chest pulse sensor can be affected by magnetic interference caused by high
power lines or other sources. If it is suspected that
magnetic interference may be causing a problem,
try relocating the treadmill.
• Store the chest pulse sensor in a warm, dry place.
Do not store the chest pulse sensor in a plastic bag
or other container that may trap moisture.
• Thoroughly dry the chest pulse sensor after each
use. The chest pulse sensor is activated when the
electrode areas are wetted and the chest pulse sensor is put on; the chest pulse sensor shuts off when
it is removed and the electrode areas are dried. If
the chest pulse sensor is not dried after each use, it
may remain activated longer than necessary, draining the battery prematurely.
• The chest pulse sensor is designed to work with
people who have normal heart rhythms. Heart rate
reading problems may be caused by medical conditions such as premature ventricular contractions
(pvcs), tachycardia bursts, and arrhythmia.
• Do not expose the chest pulse sensor to direct
sunlight for extended periods of time. Do not expose
the chest pulse sensor to temperatures above 122°
Fahrenheit (50° Celsius) or below 14° Fahrenheit
(-10° Celsius).
• If the chest pulse sensor still does not function properly, test the chest pulse sensor in the following way:
Hold the chest
pulse sensor
and place your
thumbs over
the electrode
areas as
shown.
Electrode Areas
• Do not excessively bend or stretch the sensor unit
when using or storing the chest pulse sensor.
• Clean the sensor unit using a damp cloth—never
use alcohol, abrasives, or chemicals. The chest
strap may be hand washed and air dried.
Next, hold the chest pulse sensor near the console.
While holding one thumb stationary, begin tapping
the other thumb against the electrode area at a rate
of about one tap per second. Check the heart rate
reading on the console.
2
HOW TO USE THE CHEST PULSE SENSOR
4
HOW TO USE THE CHEST PULSE SENSOR WITH
THE REEBOK® ACD1 TREADMILL
If you have a REEBOK® ACD1 treadmill, the chest
pulse sensor will continuously monitor your heart rate
during your workouts.
To use the chest pulse sensor, first put it on as
described on the front cover of this manual. Make sure
that you have read the information on page 2 of this
manual before using the chest pulse sensor.
Next, follow the instructions in
your treadmill userʼs manual to
operate the treadmill. As you
exercise, your heart rate will
be shown in the PULSE display on the console.
5
HOW TO USE THE CHEST PULSE SENSOR WITH
THE REEBOK® ACD2 TREADMILL
2
3
Insert the key into the console.
See HOW TO TURN ON THE POWER on page
11 of your treadmill userʼs manual.
Enter your weight, your age, and a maximum
heart rate setting.
Press the START button or the SPEED + button
to start the program.
A moment after the button is pressed, the walking
belt will begin to move. Hold the handrails and
carefully begin walking.
When only three seconds remain in the first period, both the CURRENT PERIOD column and
the column to the right will flash and three tones
will sound. All heart rate settings will then move
one column to the left. The heart rate setting of
the second period will then be shown in the
CURRENT PERIOD column.
If you enter your weight into the console, the
CALS/FAT CALS display will be more accurate.
To use a pulse program, you must enter your
age and a maximum heart rate setting. See
HOW TO ENTER USER INFORMATION on page
11 of your treadmill userʼs manual.
Put on the chest pulse sensor.
The chest pulse sensor must be worn when a
pulse program is used. Note: A pulse program can
be started without a heart rate reading; however,
the speed and/or incline of the treadmill will automatically decrease if your heart rate is not detected
during the program.
When the key is inserted,
the MANUAL mode will
be selected. To select a
pulse program, press the
MODE button repeatedly
until one of the pulse program indicators lights. The first thirteen settings of
the program you have selected will appear in the
LED matrix (the LED matrix will be explained in
step 5).
Each pulse program consists of thirty, one-minute
periods. One heart rate setting is programmed for
each period. The heart rate settings will be shown
in the LED matrix. The heart
rate setting of
CURRENT PERIOD
the first period
will be shown
in the flashing
CURRENT
PERIOD
column. The
settings of the
next twelve
periods will be
shown in the
twelve columns to the right.
If you have a REEBOK® ACD2 treadmill, the chest
pulse sensor will continuously monitor your heart rate
as described above. In addition, the chest pulse sensor
will enable you to use the consoleʼs two pulse programs.
Both programs automatically control the speed and incline of the treadmill to keep your heart rate near a
preset level based on your age. To use a pulse program, follow the instructions below.
1
Select the desired program.
3
As the program progresses, the speed and/or
incline of the treadmill will change at any time to
keep your heart rate near the setting shown in the
CURRENT PERIOD column. The program will
continue until the heart rate setting of the last period is shown in the CURRENT PERIOD column
and the TIME display counts down to zero. The
walking belt will then slow to a stop.
If your heart rate is not detected during the program, the letters “PLS” will flash in the PULSE display and the speed and/or incline of the treadmill
will automatically decrease. (See CHEST PULSE
SENSOR TROUBLE-SHOOTING on page 2.)
While the program is in progress, minor adjustments can be made to the speed or incline of the
treadmill with the SPEED or INCLINE buttons.
However, if you increase the speed, the incline will
automatically decrease; if you decrease the
speed, the incline will increase. If you increase the
incline, the speed will decrease; if you decrease
the incline, the speed will increase. The console
will always attempt to keep your heart rate near
the heart rate setting shown in the CURRENT
LIMITED WARRANTY
6
PERIOD column. Note: When the incline reaches
the lowest setting, the speed cannot be increased
any further. When the incline reaches the highest
setting, the speed cannot be decreased any further.
When you are finished exercising, remove the
key.
Make sure that the incline of the treadmill is at the
lowest setting. The incline must be at the lowest
setting when the treadmill is folded to the storage position or the treadmill will be damaged.
Remove the key from the console and put it in a
secure place. In addition, move the on/off switch to
the off position and unplug the power cord.
WHAT IS COVERED—The REEBOK® Chest Pulse Sensor (“product”) is warranted to be free of all defects in material and
workmanship.
WHO IS COVERED—The original purchaser or any person receiving the product as a gift from the original purchaser.
HOW LONG IS IT COVERED—ICON Health & Fitness, Inc. (“ICON”), warrants the product for one year after the date of purchase.
WHAT WE DO TO CORRECT COVERED DEFECTS—We will ship to you, without charge, any replacement part or component, or, at our option, we will replace the product.
WHAT IS NOT COVERED—Any failures or damage caused by unauthorized service, misuse, accident, negligence, improper assembly or installation, alterations, modifications without our written authorization or by failure on your part to use,
operate, and maintain as set out in your userʼs manual (“manual”). This warranty does not extend to products used for commercial or rental purposes or to products used as store display models.
WHAT YOU MUST DO—Always retain proof of purchase, such as your bill of sale; store, operate, and maintain the product
as specified in the manual; notify our Customer Service Department of any defect within 10 days after discovery of the defect; as instructed, return any defected part for replacement or, if necessary, the entire product, for repair.
USERʼS MANUAL—It is VERY IMPORTANT THAT YOU READ THIS MANUAL before operating the product. Remember to
do the maintenance requirements specified in the manual to assure proper operation and your continued satisfaction.
HOW TO GET PARTS AND SERVICE—Simply call our Customer Service Department at 1-800-999-3756 and tell them your
name and address and the serial number of your product. They will tell you how to get a part replaced, or advise you how to
ship the product for service. Before shipping, always obtain a Return Authorization Number (RA No.) from our Customer
Service Department; securely pack your product (save the original shipping carton if possible); put the RA No. on the outside
of the carton and insure the product. Include a letter explaining the product or problem and a copy of your proof of purchase
if you believe the service is covered by warranty.
ICON is not responsible or liable for indirect, special or consequential damages arising out of or in connection with the use or
performance of the product or damages with respect to any economic loss, loss of property, loss of revenues or profits, loss
of enjoyment or use, costs of removal, installation or other consequential damages of whatsoever nature. Some states do not
allow the exclusion or limitation of incidental or consequential damages. Accordingly, the above limitation may not apply to
you.
The warranty extended hereunder is in lieu of any and all other warranties and any implied warranties of merchantability or fitness for a particular purpose is limited in its scope and duration to the terms set forth herein. Some states do not allow limitations on how long an implied warranty lasts. Accordingly, the above limitation may not apply to you.
No one is authorized to change, modify or extend the terms of this limited warranty.
This warranty gives you specific legal rights and you may have other rights which vary from state to state.
ICON HEALTH & FITNESS, INC., 1500 S. 1000 W., LOGAN, UT 84321-9813
Part No. 153006 J00505-C R0399A
Printed in USA © 1999 ICON Health & Fitness, Inc.