1
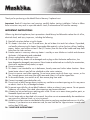
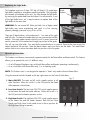
ELECTRIC Masonry Fireplace INSERT
Foyer Électrique de maçonnerie
Caja de fuego eléctrica para Chimenea
de albañilería
Model / Modèle / Modelo: MFI2500
Use & Care Guide
Guide d’utilisation et d’entretien
Manual d uso y cuidado
Please read this manual
before installing and
using your firebox
Veuillez lire ce manuel avant
l’installation et l’utilisation
de votre foyer fermé
Por favor lea las instrucciones
de instalación y de operación
antes de usar este fogón
If the information in this manual is not followed
exactly, an electrical shock or fire may result
causing property damage, personal injury or
loss of life
Si les renseignements de ce manuel ne sont
pas exactement suivis, un choc électrique
ou un incendie peut survenir, et causer des
dommages, des blessures ou la perte de vie
Si no sigue exactamente la información en este
manual, podría resultar en choques eléctricos
o incendio que pueden causar daños a la
propiedad, lesiones personales o la pérdida de
la vida.
REV00
Thank you for purchasing a Muskoka® Electric Masonry Fireplace Insert.
Important: Read all instructions and warnings carefully before starting installation. Failure to follow
these instructions may result in a possible electric shock, fire hazard and will void the warranty.
Important Instructions
When using electrical appliances, basic precautions should always be followed to reduce the risk of fire,
electrical shock, and injury to persons, including the following:
1. Read all instructions before using this heater.
2. This heater is hot when in use. To avoid burns, do not let bare skin touch hot surfaces. If provided,
use handles when moving this heater. Keep combustible materials, such as furniture, pillows, bedding,
papers, clothes, and curtains at least 3 feet (0.9 meters) from the front of the heater and keep them
away from the sides and rear.
3. Extreme caution is necessary when any heater is used by or near children or invalids and whenever
the heater is left operating and unattended.
4. Always unplug heater when not in use.
5. Do not operate any heater with a damaged cord or plug or after the heater malfunctions, has been dropped or damaged in any manner. Return heater to authorized service facility for examination,
electrical or mechanical adjustment, or repair.
6. Do not use outdoors.
7. This heater is not intended for use in bathrooms, laundry areas and similar indoor locations. Never
locate heater where it may fall into a bathtub or other water container.
8. Do not run power cord under carpeting. Do not cover power cord with throw rugs, runners, or the
like. Arrange power cord away from traffic area and where it will not be tripped over.
9. To disconnect heater, turn controls to off, then remove plug from outlet.
0.Connect to properly grounded outlets only.
1
1.Do not insert or allow foreign objects to enter any ventilation or exhaust openings as this may cause
1
an electric shock or fire, or damage the heater.
2.To prevent a possible fire, do not block firebox air intakes or exhaust in any manner. Do not operate
1
firebox on soft surfaces, like a bed, where openings may become blocked.
13.A heater has hot and arching or sparking parts inside. Do not use in areas where gasoline, paint, or
flammable liquids are used or stored.
14.Use this heater only as described in this manual. Any other use not recommended by the manufacturer
may cause fire, electrical shock, or injury to persons.
15.Avoid the use of an extension cord because the extension cord may overheat and cause a risk of fire.
However, if you have to use an extension cord, the cord shall be No.14ga minimum size and rated
not less than 2025 watts.
6.“SAVE THESE INSTRUCTIONS”
1
1
Fig. 1
Grounding Instructions
This heater is for use on 120 volts. The cord has a plug as shown
in figure A in the diagram. An adapter as shown in figure C is
available for connecting three-blade grounding-type plugs to two-slot
receptacles. The green grounding lug extending from the adapter must
be connected to a permanent ground such as a properly grounded
outlet box. The adapter should not be used if a three-slot grounded
receptacle is available.
A
Grounding Pin
Cover of Grounded Outlet Box
C
B
Adapter
Grounding Lug
Locating Your Insert
Metal Screw
Cover of Grounded Outlet Box
It is safe to set the fireplace insert close to non-combustibles. DO NOT
STORE OR USE GASOLINE OR OTHER FLAMMABLE VAPORS OR
LIQUIDS IN THE VICINITY OF THIS OR ANY OTHER APPLIANCE.
Specifications
MFI2500
Masonry Insert
Dimensions W x D x H
Net Weight
Gross Weight
Voltage
Frequency
Watts / Amps.
Heater Rating
24" x 10.8" x 19.5"
61cm x 27.4cm x 49.5cm
22 lbs / 10 kg
25.3 lbs / 11.5 kg
120 V
60 Hz
1400 W / 11.6 A
4770 BTUs
Electrical Connection
A 15 Amp, 120 Volt, 60 Hz circuit with a properly grounded outlet is required to operate this appliance.
Preferably, the fireplace insert will be on a dedicated circuit as other appliances on the same circuit
may cause the circuit breaker to trip or the fuse to blow when the heater is in operation. The unit comes
standard with a 6 ft (1.8 m) long 3 wire cord, exiting out the back of the fireplace insert. Plan the
installation to avoid the use of an extension cord. If an extension cord must be used, it must be a minimum
14 ga, 3 wire with grounding type plug and connector and rated not less than 2025 watts. The extension
cord shall not be more than 20 ft (6 m) in length.
WARNING: Electrical outlet wiring must comply with local building codes and other applicable regulations
to reduce the risk of fire, electrical shock and injury to persons.
WARNING: Do not use this masonry fireplace insert if any part of it has been under water. Immediately
call a qualified service technician to inspect the firebox and replace any part of the electrical system
which has been under water.
2
Service Instructions
For Your Safety service must be performed by qualified/authorized service personnel only.
Installation into an existing wood fireplace
WARNING: The MFI2500 electric masonry insert must be installed in an opening with the minimum
dimensions 26”w (66cm) x 21.5”h (54.6cm) x 12.8”d (32.5cm)
NOTE: To prevent personal injury always used a licensed electrician to install new outlets or electrical circuits.
NOTE: To prevent personal injury always use a professional to cap the chimney flue or cut a hole in the
existing fireplace for wiring.
NOTE: If returning your fireplace to its original use (ex. wood burning), it should be inspected by the local
building department prior to use to reduce the risk of fire and personal injury.
1. Seal all drafts and vents with non-fibrous insulation materials to prevent chimney debris from falling
onto the electric fireplace insert. Do not install into an existing fireplace that is prone to dampness.
2. Cap the top of the chimney flue and close the damper (if applicable) to prevent rain from entering
the chimney.
3. Plan your electric power supply. A 15 amp, 120 volt circuit is required for this electric fireplace
insert. A dedicated circuit is preferred but not essential in all cases. A dedicated circuit will be
required if after installation, the circuit breaker or fuse trips. Additional appliances may exceed the
current rating of the circuit breaker or fuse.
4. Install an outlet into the existing fireplace. If an outlet is not installed into the existing fireplace the
power cord can also run along the front of the hearth to an outlet near the fireplace.
5.Ensure the electric fireplace insert power is off. See operation Page 4. Plug the electric fireplace
insert into the outlet and slide the unit into the existing fireplace.
6. Push the insert into the fireplace and centre it within the opening. Adjust 1 or all of the 4 feet on the
bottom of the insert to ensure that your electric fireplace insert is level within the fireplace opening.
WARNING: The electric fireplace insert can be used with existing fireplace screens. Due to the heat
produced from the electric fireplace insert heater, existing fireplace screens must provide adequate airflow
in front of the electric fireplace insert. Do not use existing fireplace doors that close, sealing off the electric
fireplace insert from the room. If installed behind bi-fold doors, the doors must be open to allow the heat
to be exhausted.
USER Instructions
1. Any repairs to this appliance should be carried out by qualified/authorized service personnel only.
2. Under no circumstances should this appliance be modified. Parts having to be removed for servicing
must be replaced with original “OEM” (original equipment manufacturers) parts only.
3. This firebox is to be cleaned with a damp cloth (water) only.
IMPORTANT: Always unplug the power cord before cleaning the unit. Do not use any abrasive cleaners
on the unit.
4. Please unplug this firebox when not in use.
3
Fig. 2
Replacing the Light Bulbs
This fireplace insert uses 2 clear 120 Volt, 40 Watt, E-12 socket base
light bulbs (small base, chandelier candle type bulbs). The light bulbs
are located in the bottom of the unit. You can change the light bulbs
by removing the ember bed from the firebox. For convenience, if one
of the light bulbs burns out, it may be easier to replace both of the
light bulbs at the same time.
Black
Embers
WARNING: Do not exceed 40 Watts per bulb. Use of higher rated
light bulbs may cause overheating and result in a fire, causing
property damage, personal injury or loss of life.
There are 2 black embers in the ember bed – 1 on each of the right
and left sides. To remove the ember bed you must remove these black
embers. Turn each ember counter clockwise until it comes loose and
can be removed. Lift the ember bed straight up and out of the grate.
You will see two light bulbs. Turn each bulb counterclockwise to remove. Reverse the steps to put the
ember bed back into position. Take the black embers and insert them into the holes. Turn each black
ember clockwise to secure the ember bed into position within the grate.
Operating Instructions
This firebox insert features conveniently separate controls for the flame effect and heat control. This feature
allows you to operate the unit in 2 different ways;
• As a full featured fireplace insert with both flame effect and heater operating simultaneously.
• As a visual effect with flame effect only. (i.e. no heating cycle)
NOTE: This firebox insert is not designed to operate in “heat” only mode without a flame effect.
Using the manual controls located on the top right corner on the front of the firebox.
Fig. 3
1.Main ON/OFF: The main on/off switch supplies power to all
other functions. When this switch is in the ON position the flame
effect operates without heat.
2. Low Heat Switch: The low heat ON/OFF switch supplies power
to the heater fan and the heater element. When the switch is in
the ON position the heater operates on low.
3. High Heat Switch: The high heat ON/OFF switch supplies power
to the heater fan and the heater element. Both the Low Heat
Switch and High Heat Switch need to be in the on position for
the high heat setting to operate.
4
3
2
1
DO NOT RETURN THIS PRODUCT TO THE STORE:
Please contact Customer Service at: 1-866-253-0447
web: www.greenwayhp.com | email: [email protected]
Canada:400 Southgate Dr., Guelph, Ontario, Canada, N1G 4P5
USA: 6507 Fairfield Dr., Northwood,Ohio, USA, 43619
Limited Warranty Definitions
Greenway Home Products
(Greenway):
Manufacturer.
Fireplace Insert:
Fireplace insert manufactured by Greenway Home Products.
Purchaser:
Purchaser of the fireplace insert.
Distributor:
Facility authorized to sell Greenway Home Products.
Warranty Card: Greenway Home Products Limited Warranty Registration Card identifying the Purchaser and
product model.
Greenway Limited Warranty:
Greenway warrants to the Purchaser that the fireplace insert is free from defects in material and workmanship, under normal
use and service, for one (1) year (1 year limited parts) from the date of purchase.
All warranty repairs must be pre-authorized by Greenway Home Products. Greenway will, at its option, replace or repair free
of charge any defective part, which the Purchaser shall notify their Distributor or Greenway Home Products within the warranty
period. The obligation of Greenway Home Products under this warranty, is expressly limited to such replacement or repairs.
The provisions of this limited warranty shall not apply to the following:
1.
2.
3.
4.
5.
6.
Accidents.
Unauthorized repairs or alterations.
Normal maintenance.
Changes made to other units manufactured after this fireplace insert was manufactured.
Incidental damages caused by failure of the fireplace insert such as inconvenience or loss of use.
Improper installation.
The provisions of this limited warranty shall not apply to deterioration due to wear and exposure beyond the following
limitations:
1. For one (1) year from the date of purchase on electrical component and circuit boards (lightbulbs excluded).
Greenway Limited Warranty is void unless the following conditions are adhered to:
1.
2.
3.
4.
5.
Warranty registration must be completed and returned to Greenway Home Products.
All warranty repairs must be preauthorized by Greenway repair facility.
Greenway reserves the right to inspect defective parts that have been replaced under warranty.
Distributor is expected to hold defective parts for 60 days.
Only parts and accessories and other material, available through Greenway Home Products are to be used in the
performance of warranty service.
Purchasers are responsible for presenting/notifying their Distributor as soon as a problem exists. The warranty repairs
should be completed in a reasonable amount of time from the date of authorization. Not to exceed 30 days
past notification.
This limited warranty is expressly in lieu of any other expressed or implied warranty, including any implied warranty or
merchantability or fitness for a particular purpose and of any obligations or liabilities on Greenway Home Products which
neither assumes nor authorizes any other person to assume for it any other liability in connection with the fireplace insert
manufactured by it.
The warranty is null and void if used in commercial or industrial applications.
5