1
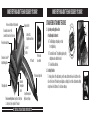
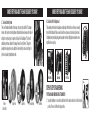
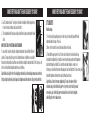
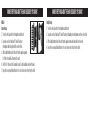
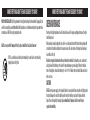
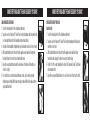
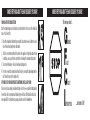
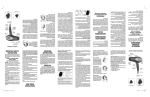
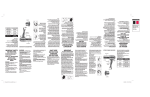
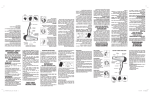
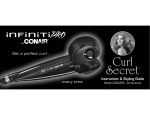
KNOW EVERYTHING ABOUT THE HAIR DESIGNER™ BY CONAIR
STRAIGHTENS • SHINES• CONTROLS FRIZZ• HEALTHY HAIR • VOLUME
TM
Instruction & Styling Guide
Model 208C
®
KNOW EVERYTHING ABOUT THE HAIR DESIGNER™ BY CONAIR
KNOW EVERYTHING ABOUT THE HAIR DESIGNER™ BY CONAIR
IMPORTANT SAFETY INSTRUCTIONS
1. This appliance should never be left unattended when plugged in.
2. This appliance should not be used by, on, or near children or by individuals with certain disabilities.
3. Use this appliance only for its intended use as described in this manual. Do not use attachments not recommended by the manufacturer.
4. Never operate this appliance if it has a damaged cord or plug, if it is not working properly, if it has been
dropped, damaged, or dropped into water. Return the appliance to a Conair service centre for examination and repair.
5. Keep the cord away from heated surfaces. Do not pull, twist, or wrap line cord around dryer, even during
storage.
6. Never block the air openings of the appliance or place it on a soft surface, such as a bed or couch, where the air
openings may be blocked. Keep the air openings free of lint, hair, and the like.
7. Never use while sleeping.
8. Never drop or insert any object into any opening or hose.
9. Do not use outdoors or operate where aerosol (spray) products are being used or where oxygen is being
administered.
®
When using electrical appliances, especially when children are present, basic safety precautions should always be
followed, including the following:
READ ALL INSTRUCTIONS BEFORE USING
KEEP AWAY FROM WATER
DANGER – Any hair dryer is electrically live even when the switch is off. To reduce the risk of death or injury by
electric shock:
1. Always unplug appliance immediately after using.
2. Do not use while bathing or in a shower.
3. Do not place or store appliance where it can fall or be pulled into a tub or sink.
4. Do not place in, or drop into, water or other liquid.
5. If an appliance falls into water, unplug it immediately. Do not reach into the water.
WARNING – To reduce the risk of burns, electrocution, fire, or injury to persons:
®
KNOW EVERYTHING ABOUT THE HAIR DESIGNER™ BY CONAIR
®
10. Do not use an extension cord to operate dryer.
11. Do not direct hot air toward eyes or other heat-sensitive areas.
12. Attachments may be hot during use. Allow them to cool before handling.
13. Do not place appliance on any surface while it is operating.
14. While using the appliance, keep your hair out of it. Keep your hair away from the air inlets.
15. Do not use with voltage converter.
SAVE THESE INSTRUCTIONS
OPERATING INSTRUCTIONS
This appliance is intended for household use only. Use on Alternating Current (60 hertz) only. Standard Dryers are
designed to operate at 110 to 125 volts A.C.
This appliance has a polarized plug (one blade is wider than the other). As a safety feature, this plug will fit in a
polarized outlet only one way. If the plug does not fit fully in the outlet, reverse the plug. If it still does not fit, contact a
qualified electrician. Do not attempt to defeat this safety feature.
KNOW EVERYTHING ABOUT THE HAIR DESIGNER™ BY CONAIR
®
IMPORTANT – 1875 WATT OPERATING GUIDE
Use of this dryer on the same circuit or fuse with other electrical products or appliances may trip a 15 amp circuit
breaker or blow a 15 amp fuse. NEVER replace the fuse with one rated higher than the capacity of the circuit.
Doing so could result in an electrical fire.
SUPER STYLING GUIDE
Your best looks begin with a good haircut that’s well maintained. Always treat hair right with superior quality
shampoos, conditioners, and finishing products.
The Hair Designer™ by Conair® is an innovative, revolutionary styler that has effectively eliminated the hair brush and
brought salon quality results to your home.
DRYING BASICS
1. Shampoo and condition hair with products of your choice. Rinse thoroughly. Towel dry hair to remove excess
moisture. Using the dryer, start at a lower setting and direct hot air through a section of hair at a time. Move dryer
steadily across each section so that the hot air passes through hair. Direct air flow at hair not scalp. Clouds of
KNOW EVERYTHING ABOUT THE HAIR DESIGNER™ BY CONAIR
®
negatively charged ions will help to reduce static electricity, control frizzy flyaways and contribute to your hair’s
shine.
2. Keep dryer’s air intake vents unobstructed and free from hair while drying.
3. To avoid over drying, do not concentrate heat on any one section for any extended length of time. Keep dryer
moving as you style.
4. For quick touch ups, between shampoos, dampen hair with a mist of water before styling with the dryer.
5. When using your dryer to create curls and waves, dry hair almost completely on the high temperature setting,
then finish styling with Cool Shot feature to close hair shaft and lock in style.
The professional Hair Designer™ by Conair® is very effective, even at lower temperatures, and helps to give
healthier-looking, shiny more manageable hair with maximum styling control.
KNOW EVERYTHING ABOUT THE HAIR DESIGNER™ BY CONAIR
®
BODY & VOLUME
To create extra volume, turn head upside down while drying. Position the air flow toward the roots for
maximum lift. When hair is dry, toss head back and brush hair into place.
STRAIGHTENING
Work with hair in sections when creating a super straight look. Using the patent-pending Tourmaline
Ceramic™ Straightening attachment, select a small section of hair and pass through each section to
smooth out curls and help control frizz. (See "How To Straighten Your Hair" section.)
MAKING WAVES
Tousled, natural-looking waves are easily created by grasping hair at the roots and scrunching between
fingertips while drying.
KNOW EVERYTHING ABOUT THE HAIR DESIGNER™ BY CONAIR
®
DRYER FEATURES:
1. Exceptional Power
Equipped with a powerful motor (1875 Watts) this hairdryer gives penetrating and quick drying results.
2. Tourmaline CeramicTM Technology
Ion output helps smooth the cuticle layer creating silky, shiny hair.
3. Ceramic Disk and Ionic Technology
Controls static electricity and also enhances the effectiveness of leave-in hair care. It facilitates your styling and
optimizes your hair’s shine and softness. It will be easier to style and shape your hair.
4. Unique Tourmaline Ceramic™ straightening attachment with tension control
One easy step straightening process. Dry, detangle, straighten and shine hair for professional results.
5. A Professional Concentrator Nozzle
Ultra-slim, this concentrator guarantees optimal precision in styling your hair.
6. Release Lock Buttons
Secure attachments into place and allow 360° rotation to use the right angle for styling.
7. Automatic Temperature Control
Automatically recognizes the attachment used and adjusts the temperature and airflow for perfect
KNOW EVERYTHING ABOUT THE HAIR DESIGNER™ BY CONAIR
®
straightening or drying.
8. 2 Temperature Settings
Low Setting: this position combines ideal air flow and temperature setting for shaping finer, damaged or
treated hair.
High Setting: combines stronger airflow with higher temperature, especially recommended for pre-drying and
also for styling and straightening thick hair.
9. The ‘cool shot’ button
A shot of cool air at the end of straightening sets the style for a ‘long-lasting’ effect.
Release lock buttons for attachments
Tourmaline Ceramic™ grill,
Ceramic Disk and Ionic Technology
Controls frizz,
straightens and shines
Professional
Concentrator
Professional length cord
Detangling comb
2 speed/temperature
Tension control system: 4 positions 1. Wavy hair
(High/Low) settings
2. Curly hair 3. Very curly hair 4. Thick hair
DRY, DETANGLE, STRAIGHTEN AND SHINE IN ONE STEP
ta
1875 watts
Automatic
temperature
control
pl
Tr i
e Ac tio
n
1. A patent-pending triple-action
straightening attachment:
A. The Detangling comb guides your hair
for straightening.
ng
B. Tourmaline Ceramic™ straightening plates gently
,
le,
S t r a i g h te n
straightens and conditions the hair.
C. Flocked disks add shine.
2. Rotating Position
To rotate positions of the attachment, press the two attachment release lock buttons on the
sides to the barrel of the hair dryer and adjust accordingly. Do not rotate attachments without
using release lock buttons as it could cause damage.
De
Cool shot
button
Tourmaline Ceramic™
straightening plates
®
STRAIGHTENER ATTACHMENT FEATURES
Hinged air filter
Flocked disks add shine
KNOW EVERYTHING ABOUT THE HAIR DESIGNER™ BY CONAIR
ine
®
Sh
KNOW EVERYTHING ABOUT THE HAIR DESIGNER™ BY CONAIR
C.
B.
A.
KNOW EVERYTHING ABOUT THE HAIR DESIGNER™ BY CONAIR
KNOW EVERYTHING ABOUT THE HAIR DESIGNER™ BY CONAIR
®
®
4. Exclusive 360° rotating head
This exclusive system makes the appliance exceptionally comfortable to use. Now you can easily
style both the right and left sides, as well as hard to reach areas such as the back of your head.
Straightening very long hair, giving your bangs and roots body or flipping the ends now becomes
simplified in one easy step.
3. Tension Control System
There are 4 fundamental kinds of hair: wavy, curly, very curly, and thick. This unique
tension control system on the straightener attachment has been developed to feature 4
settings for every hair type. Its expertise lets it give The Hair Designer™ by Conair®
unrivalled performance thanks to this unique Tension Control System. This patentpending technology allows you to adjust the tension setting to suit each hair type for
perfect salon quality straightening results.
Horizontal
Diagonal
Vertical
STEP-BY-STEP STRAIGHTENING
Tension
Control Dial
Wavy Hair
Curly Hair
Very Curly Hair
Thick Hair
PUTTING ON AND REMOVING THE ATTACHMENTS
1. Snap the straightener or concentrator attachment onto the barrel and rotate to lock into desired
position. There are 8 different locking positions.
1.
KNOW EVERYTHING ABOUT THE HAIR DESIGNER™ BY CONAIR
KNOW EVERYTHING ABOUT THE HAIR DESIGNER™ BY CONAIR
®
®
GETTING THE DRYER READY
1. Attach the straightener attachment.
2. Select the tension setting recommended for your hair type using the Tension Control Dial
located on the side of the straightener attachment. Expert's advice: The first time you use the
attachment, set it at tension 4 (strongest tension) to familiarize yourself with the Infiniti Hair
Designer ™. Gradually decrease the tension setting until you find the best setting for your
hair.
3. For best results, use the appliance set at high setting (Speed/temperature).
4. Using the release lock buttons set attachment at desired angle for professional, salon styling results.
2. To remove the attachment press the 2 attachment release buttons on the sides of the appliance
while gently removing the attachment.
3. Also use the release buttons when adjusting attachment angles.
HOW TO STRAIGHTEN YOUR HAIR
PREPARING YOUR HAIR
1. Carefully wash and comb out your hair.
Expert’s advice: Always start combing wet hair at the ends then slowly work your way up
towards the roots. Gentle combing prevents split ends from forming.
2. Towel dry your hair and pre dry using the Hair DesignerTM set at the high setting, using the
concentrator if necessary. For best results, towel dry and ensure hair is not soaking wet before
using the straightening attachment.
Expert’s Advice: A: Whatever type of hair you have, start the pre-drying process by bending
at the waist, allowing your hair to fall forward to better lift the roots and give your style
volume. B: If, however, you prefer less volume, stand with your head straight to pre-dry your
hair.
2.
A.
B.
Use CAUTION when changing settings while in use as straightening attachment tension control dial may be hot.
HAIR DESIGNER™ STRAIGHTENING TRIPLE ACTION STYLING PRINCIPLE
The patent-pending straightener attachment dries, straightens and shines your hair in just
one step. The unique principle integrates the 3 essential steps for perfect straightening results:
1. A detangling comb distributes your hair among the centre Tourmaline Ceramic™ straightening plates.
KNOW EVERYTHING ABOUT THE HAIR DESIGNER™ BY CONAIR
®
2. Each Tourmaline Ceramic™ centre plate is then able to straighten efficiently using tension
3.
to smooth out curls, eliminate static and control frizz.
2.
3. The straightened hair is then given a shiny, polished finish as it passes through the flocked
disks.
1.
HOW TO USE THE 360O ROTATING HEAD ATTACHMENT
o
To carry out the 3 steps effectively, the straightener attachment rotates 360 into 8 different
positions. To change the position, press the 2 attachment release lock buttons on each side of
the barrel, turn the attachment, and then release the buttons rotating the attachment until it ‘clicks’ into place. Do
not force rotation without using attachment release lock buttons.
Expert’s Advice: Ideally, the teeth of the detangling comb should be positioned facing down and used on the hair
first: by using this position hair gets detangled, is straightened and then shined for a silky, smooth, salon finish.
KNOW EVERYTHING ABOUT THE HAIR DESIGNER™ BY CONAIR
®
STYLING TIPS
Work in stages.
1. Section hair and clip-up the upper layers of hair on top of your head to begin with the hair
underneath and at the nape of the neck.
2. Move on to the hair at the back of your head and then on the sides.
3. Finish with the upper layers of hair. For best results, hold ends of selected strand to keep
hair taut while straightening. For straighter, sleeker strands slowly pass dryer with straightener
attachment through each strand. This concentrates heat and tourmaline, ceramic, ionic
technology on selected hair strand smoothing away curls and controlling frizz. For more volume, glide
dryer with straightener attachment more quickly through each strand.
Expert’s Advice: Smooth or volume straightening? To reduce the volume of thick or
voluminous hair, position the Hair Designer™ on top of the section of hair. If you want
more volume, place the Hair Designer™ underneath the section of hair to straighten
while lifting the roots for added volume.
KNOW EVERYTHING ABOUT THE HAIR DESIGNER™ BY CONAIR
®
LONG/SHOULDER LENGTH HAIR
1. Select the horizontal position for the straightener attachment.
2. Separate a section of hair about 1½" wide. Place the dryer (detangling comb facing down) at the
roots ensuring that the teeth of the detangling comb penetrate hair fully.
3. Hold ends of hair strand while straightening to keep hair taut and create tension for best results.
4. With a slight twisting motion of the wrist, turn the appliance under and slide it slowly down
the length of your hair to smooth out curls underneath strand.
5. Repeat if necessary until strand reaches the desired level of smoothness. Finish with a cool
air shot to set style.
6. For smoother hair, concentrate heat and tourmaline, ceramic, ionic technology by slowly
straightening each strand. With this new technology, results will still be faster and easier than
using a traditional brush.
KNOW EVERYTHING ABOUT THE HAIR DESIGNER™ BY CONAIR
®
CURLING THE ENDS OF YOUR HAIR
Curl Under Flip
1. Select the horizontal position for the straightener attachment.
2. Separate a section of hair about 1½" wide. Place the dryer (detangling teeth facing down)
under the section of hair.
3. With a slight twisting motion of the wrist, turn the appliance under and slide it slowly
towards the ends, using your free hand if necessary to turn the hair up.
4. Hold it for 5 to 10 seconds: this will give the action of the Tourmaline Ceramic™ and flocked
disks maximum effect.
5. Repeat if necessary and finish with a shot of cool air on the section of hair for perfect hold.
KNOW EVERYTHING ABOUT THE HAIR DESIGNER™ BY CONAIR
®
Flip Outwards
1. Select the vertical position for the straightener attachment.
2. Separate a section of hair about 1½" wide. Hold the dryer (detangling comb facing down) over
the section
of hair.
3. With a slight twisting motion of the wrist, turn the appliance over and slide it slowly towards the
ends, using your free hand if necessary to turn the hair up. Then follow instructions under 4 and 5
described on previous page.
KNOW EVERYTHING ABOUT THE HAIR DESIGNER™ BY CONAIR
®
ROOTS
1. Select the vertical position for the straightener attachment.
2. Separate a section of hair about 1½" wide. Hold the dryer (detangling comb
facing out) under the section of hair and place it at the roots ensuring that
the teeth penetrate the hair fully.
3. Gently pull the dryer to about 1" from the roots and turn under: this will give
the action of the Tourmaline Ceramic™ and flocked disks maximum effect.
4. Hold the dryer parallel to your scalp for 5 seconds.
5. Then slide the appliance slowly towards the ends.
6. Repeat if necessary and finish with a shot of cool air on the section of hair for perfect hold.
STRAIGHTENING AROUND THE CONTOURS OF THE FACE
Select the diagonal position for the straightener attachment. Then follow
instructions under 2, 3, 4, 5 and 6 described above.
KNOW EVERYTHING ABOUT THE HAIR DESIGNER™ BY CONAIR
®
BANGS
Curved bangs
1. Select the vertical position for the straightener attachment.
2. Separate a section of hair about 1½" wide. Place dryer
(detangling comb facing out) under the section of hair.
3. With a slight twisting motion of the wrist, turn the appliance upward
to lift the roots and slide it slowly over the ends.
4. Hold for 5 to 10 seconds: the Tourmaline Ceramic™ and flocked disks work best this way.
5. Repeat if necessary and finish with a shot of cool air on the section of hair for perfect hold.
KNOW EVERYTHING ABOUT THE HAIR DESIGNER™ BY CONAIR
®
Straight bangs
1. Select the vertical position for the straightener attachment.
2. Separate a section of hair about 1½" wide. Place dryer (detangling comb facing down) over the section of hair.
3. With a slight twisting motion of the wrist, turn the appliance down and slowly slide it over the ends.
4. Repeat if necessary and finish with a shot of cool air on the section of hair for perfect hold.
KNOW EVERYTHING ABOUT THE HAIR DESIGNER™ BY CONAIR
®
FINISHING WITH THE CONCENTRATOR
Once the straightening process is finished, set your style with a shot of ionic cool air to eliminate all
traces of static electricity
1. Detach the straightener attachment by pressing the 2 attachment release lock buttons on each
side of the barrel and gently remove attachment.
2. ‘Click’ the concentrator attachment into position on the appliance. Using the attachment release
lock buttons, you can position the concentrator to desired angle for maximum styling control.
3. Turn on the Hair Designer™, set in low heat/speed setting position.
4. Press the cool-air button, aiming the airflow at the top of your head first and working down the
hair. This will set your style for lasting effect.
IF YOU MUST USE YOUR HAIR DRYER IN THE BATHROOM, INSTALL A GFCI* NOW!
Your local electrician can help you decide which type is best for you—a portable unit that plugs into
the electrical outlet or a permanent unit installed by your electrician. The National Electrical Code
now requires GFCI’s in the bathrooms, garages, and outdoor outlets of all new homes.
KNOW EVERYTHING ABOUT THE HAIR DESIGNER™ BY CONAIR
®
This message about...
G
F
C
I
ROUND
AULT
IRCUIT
NTERRUPTERS
...can save a life!
KNOW EVERYTHING ABOUT THE HAIR DESIGNER™ BY CONAIR
KNOW EVERYTHING ABOUT THE HAIR DESIGNER™ BY CONAIR
®
WHY DO YOU NEED A GFCI? Electricity and water don’t mix. If your hair dryer falls in water while it’s plugged in, the
electric shock can kill you...even if the switch is off. A regular fuse or circuit breaker won’t protect you under these
circumstances. A GFCI offers you far greater protection.
A GFCI can save your life! Compared to that, the price is small! Don’t wait...install one now!
*GFCI is a sensitive device which reacts immediately to a small electric current leak by
stopping the electricity flow.
®
USER MAINTENANCE
Your dryer is virtually maintenance free. No lubrication is needed. For proper operating performance, the dryer
must be kept clean.
When cleaning is needed, unplug the cord, allow to cool and clean dust and lint from air intake openings with
a small brush or the brush attachment of a vacuum cleaner. The outer surface of the dryer should be wiped
clean with a cloth only.
Blocked or clogged air intake vents will cause the dryer to overheat. If overheating occurs, an automatic
safety device will shut the dryer or the heat off to prevent damage or personal injury. If the unit or the heat
turns off, unplug the cord and allow the dryer to cool for 10 to 15 minutes before restarting. Make sure the air
vents are clean.
CAUTION
NEVER allow the power supply cord to be pulled, twisted, or severely bent. Never wrap the cord tightly around
the dryer. Damage will occur at the high flex point of entry into the dryer, causing it to rupture and short.
Inspect the cord frequently for damage. Stop use immediately if damage is visible or unit stops or
operates intermittently.
KNOW EVERYTHING ABOUT THE HAIR DESIGNER™ BY CONAIR
®
If the cord or dryer is damaged or does not operate properly, return it for repair to an authorized Conair
service representative only. No repairs should be attempted by the consumer.
STORAGE - Important
When not in use, your dryer should be disconnected, allowed to cool and stored in a safe, dry location, out of
reach of children. Do not wrap line cord around dryer. Allow the cord to hang or lie loose and straight at the
point of entry into the dryer.
KNOW EVERYTHING ABOUT THE HAIR DESIGNER™ BY CONAIR
®
LIMITED FIVE YEAR WARRANTY
Conair will repair or replace (at our option) your unit free of charge for 60 months from the date of purchase if
the appliance is defective in workmanship or materials.
To obtain service under this warranty, return the defective product to the service centre listed below, together
with your purchase receipt and $7.00 for postage and handling.
ANY IMPLIED WARRANTIES, OBLIGATIONS, OR LIABILITIES, INCLUDING BUT NOT LIMITED TO THE IMPLIED
WARRANTY OF MERCHANTABILITY AND FITNESS FOR A PARTICULAR PURPOSE, SHALL BE LIMITED IN
DURATION TO THE 60 MONTH DURATION OF THIS WRITTEN, LIMITED WARRANTY.
IN NO EVENT SHALL CONAIR BE LIABLE FOR ANY SPECIAL, INCIDENTAL, OR CONSEQUENTIAL DAMAGES
FOR BREACH OF THIS OR ANY OTHER WARRANTY, EXPRESS OR IMPLIED, WHATSOEVER.
This warranty gives you specific legal rights, and you may also have other rights, which vary from province to
province.
KNOW EVERYTHING ABOUT THE HAIR DESIGNER™ BY CONAIR
®
DÉFRISE • LUSTRE • CONTRÔLE LES FRISET TES • CHEVEUX
SAINS • VOLUME
MD
par
Patent-pending
SERVICE CENTRE
CONAIR CONSUMER PRODUCTS INC.
156 Parkshore Drive,
Brampton, Ont. L6T 5M1
©2006 CONAIR CONSUMER PRODUCTS INC.
06CN1089
For more information on any Conair products call:
1-800-472-7606
visit us on the web at: www.conaircanada.ca
Consumer Call Centre E-mail:
[email protected]
IB-6854
Guide d’utilisation
et de coiffure
Modèle 208C