1
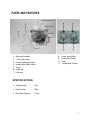
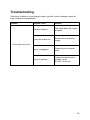
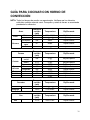
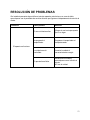
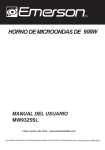
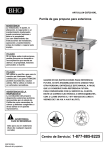
CONVECTION OVEN 7 Liter Capacity INSTRUCTION MANUAL Model: MCSGC07W THANK YOU FOR PURCHASING THIS MAGIC CHEF PRODUCT PLEASE READ ALL INSTRUCTIONS CAREFULLY BEFORE USING CONTENTS IMPORTANT SAFEGUARDS …………………..……………………...…… 4 PARTS AND FEATURES ………………...…………….….…...…….…… 7 BEFORE USE …………………………..…………………………….………… 8 OPERATING INSTRUCTIONS ………………….……….…………..…….… 9 CARE AND MAINTENANCE …….………………………………………….. 10 BENEFITS TO COOKING WITH A HALOGEN OVEN ………...……….. 11 CONVECTION OVEN COOKING GUIDE ………………………...……….. 12 COOKING TIPS …………………….……………..………….……….……… 13 RECIPES …………………………………………..………….……….……… 14 TROUBLESHOOTING …………………………..………….……….……… 26 WARRANTY ……………………………………..………….……….……… 27 2 What you need to know about Safety Instructions Warnings and Important Safety Instructions appearing in this manual are not meant to cover all possible conditions and situations that may occur. Common sense, caution and care must be exercised when installing, maintaining, or operating any appliance. Always contact your dealer, distributor, service agent or manufacturer about problems or conditions you do not understand. SAVE THESE INSTRUCTIONS FOR HOUSEHOLD USE ONLY 3 IMPORTANT SAFEGUARDS When using any electrical appliance, basic safety precautions should always be followed, including the following: 1. READ ALL INSRUCTIONS BEFORE USING. 2. Close supervision is necessary when any appliance is used near children. 3. Keep the product out of the reach of children and pets. This product is not intended for use by children. 4. Household use only. Do not use outdoors. 5. Use only when the voltage indicated on the base of the appliance corresponds to the voltage at a place you intend to use the product. 6. Always ensure the product is unplugged from the electrical outlet and cool before assembling, disassembling, relocating, or cleaning. 7. Do not leave the product unattended when in use. Always unplug the product from the electrical outlet when not in use. 8. To protect against electric shock, keep cord, plug(s), or lid from water or other liquid and do not immerse cord, plugs, or lid in water or other liquid. 9. Never move the appliance by pulling the cord. Do not put any stress on the power cord where it connects to the product, as the power cord may fray and break. 10. Do not let the electrical cord hang over the edge of a table or counter or touch hot surface. 11. Never use accessories which are not recommended by the manufacturer. They could constitute a danger to the user and risk damage to the appliance. 12. Only operate the appliance on a flat and stable surface. 13. Do not plug or unplug the product into or out from any electrical outlet with a wet hand. 14. Do not place the base, power cord, or plug of this product in or expose the parts to water or other liquids. 15. Do not plug the appliance into a damaged outlet. 16. Do not turn the power on unless the appliance is properly assembled. 17. Do not touch hot surfaces. Use handles or knobs. 18. Leave 6 to 8 inches of open space all around the exterior of the appliance during use. 4 19. Do not use this appliance as a fryer. Do not attempt to fill with oil or attempt to deep fry. Such actions may cause fire and injury. 20. Do not cover the appliance while in use. 21. Oversize foods or metal utensils must not be inserted in the appliance as they may create fire or risk of electric shock. Do not place the appliance near or touch flammable materials such as curtains, draperies and walls when in operation. 22. Always place the top unit or lid onto the bowl before plugging the power cord and switching on. 23. Extreme caution must be taken when moving an appliance containing hot liquids. 24. The oven should be operated on a separate electrical circuit from other operating appliances. If the electric circuit is overloaded with other appliances, this appliance may not operate properly. 25. Do not move or lift the appliance while the power cord is still connected to the wall outlet. 26. Before removing the lid: A. Turn off the timer. B. Disconnect power cord. C. Lift the top lid by the handle. 27. Do not place the hot underside of the lid directly onto laminated or wood surfaces, paper, plastic or other flammable surfaces. NOTE: Place lid on heat resistant surfaces only. 28. Never place the lid on an unstable surface while the product is plugged in and operating. 29. Do not clean with metal scouring pads. Pieces broken off the pad can touch electrical parts involving a risk of electric shock. 30. The included 7 Liter glass bowl container is designed for use only with this appliance. It must never be used on a range top. 31. Do not set a hot glass bowl container on a cold surface. 32. Do not use a cracked glass bowl container or a glass bowl container having loose or weakened handles. 33. Allow unit to completely cool and store in a cool dry place. 34. Do not operate the appliance if it has a damaged or cut power cord or plug, if wires are exposed, malfunctioning, dropped or damaged, or if the heater housing is dropped in or exposed to water. 35. This product has no user-serviceable parts. Do not attempt to examine or repair this product yourself. Only qualified service personnel should perform any servicing. 36. Do not use this appliance other than its intended use. 5 WARNING To protect against electric shock, fire, and injury to person(s), do not immerse main cord, plug or unit in water or any other liquid. CAUTION It is not recommended to use the plug with an extension cord. If an extension cord is required, be sure the extension cord is of the proper power and voltage rating. Do not alter the plug of the appliance or any extension cord used with this appliance. Do not attempt to defeat the safety purpose of the 3 prong grounded plug. 6 PARTS AND FEATURES 1. 2. 3. 4. 5. 6. 7. Base and handles 7 Liter glass bowl Lid and heating element Handle with safety switch Tongs High rack Low rack 8. 9. 10. 11. Power lamp (Red) Heat lamp (Green) Timer Temperature Control SPECIFICATIONS: Voltage Rating: 120V Power Rating: 750W Glass Bowl Capacity: 7 Liters 7 BEFORE USE 1. Carefully unpack the convection oven and remove all packaging materials. 2. Select a flat, heat-resistant, and non-flammable surface to place the convection oven. 3. Do not immerse the heating element or lid in water or any other liquid. 4. To remove any dust that may have accumulated on the removable parts during packaging, clean the surface with a damp cloth and remove any stickers (except for any warning/caution stickers). 5. Wash the glass bowl container in warm soapy water. Rinse and dry thoroughly. 6. Before first use, heat up the oven, empty, at maximum temperature for five minutes. This will burn off the brand new scent. A little smoke may occur. This is normal and will soon disappear during usage. 7. After the timer has turned off and the oven is completely cooled, wipe the inside of the glass bowl container once more. THREE-PRONG PLUG CAUTION: To ensure continued protection against the risk of electric shock, connect to properly grounded outlets only. This appliance has a three-prong plug (meaning there are three prongs to fit into a power outlet). To reduce the risk of electric shock, this plug is intended to fit into a three-prong electrical outlet only in one direction. If it does not fit, contact a qualified electrician. Do not attempt to modify the plug in any way. 8 OPERATING INSTRUCTIONS WARNING: ALWAYS ASSEMBLE THE PRODUCT COMPLETELY BEFORE PLUGGING IT INTO AN ELECTRICAL OUTLET. CAUTION: ALWAYS PLACE A PAN OR BOWL ON TOP OF ONE OF THE INCLUDED RACKS. DO NOT PLACE A PAN OR BOWL DIRECTLY ONTO THE BOTTOM OF THE GLASS BOWL CONTAINER. 1. Place the low rack in the glass bowl container before the food is placed. . Keep the food approximately 1 to 1.25 inch from the glass wall to allow maximum hot air circulation. NOTE: High rack is used for achieving crispness or browning of the food. 2. Place the top lid securely on the glass bowl container. NOTE: Make sure that the food does not touch the heating element located on the bottom of the lid. 3. Insert the power cord firmly into the wall outlet. 4. Use the temperature control knob to set the desired cooking temperature (250 F to 480 F). 5. Set the timer to the desired time (5 to 60 minutes). The power light (red) and heat light (green) will illuminate. 6. Fold the handle until it snaps into place. The heating element and fan will only activate if the handle is folded completed down. As a safety feature, the convection oven will switch off when the handle is lifted up. To turn the unit back on, swing the handle all the way down until it snaps into place. 7. The timer will switch “off” after the preset time period has passed and a bell will sound momentarily to alert you that the cooking time is over. 8. Use the tongs to lift the rack (with food) out of the bowl. 9. Unplug the cord from the power outlet before removing the lid. 10. Do not put the oven lid directly on the countertop, table or cooking surface, otherwise, the cooking surface may stain. 11. Always use wooden, heat proof plastic or nylon utensils while cooking. Metal utensils may scratch the glass bowl container. 12. Allow the unit to completely cool before moving and/or cleaning. Defrost Setting The halogen oven has a defrost setting (low temperature) that should be used to defrost foods. This setting is indicated on the temperature control knob. 9 CARE AND MAINTENANCE WARNING: ALWAYS UNPLUG THE UNIT FROM THE ELECTRICAL OUTLET AND ALLOW ALL PARTS TO COMPLETELY COOL BEFORE DISASSEMBLING IT FOR CLEANING. NEVER IMMERSE THE HEATING ELEMENT OR LID IN WATER OR ANY OTHER LIQUID. NOTE: Clean the product after each use. 1. Unplug the oven and let it cool. 2. Wash the glass bowl in hot, soapy water and dry thoroughly. Clean the exterior of the base by wiping it with a soft, damp cloth. 3. Wipe the lid and fan housing using a damp, clean dish cloth or sponge with a little mild dishwashing detergent. Do not clean the glass bowl or lid with steel-wool pads or abrasive materials. 4. Wash the wire racks in mild dishwashing detergent and water. 5. Clean metal parts using a sponge or dish cloth with mild dishwashing detergent, then wipe clean. If scrubbing is necessary, use a nylon or polyester mesh pad or a brush. 6. Store in a cool, dry area. WASH Setting The oven has a WASH setting on the temperature control. The combination of the heat, swirling motion of water and detergent will rinse the glass bowl. 1. Remove any food and drain fat away from the base. 2. Pour small amount of water in the bowl and turn the convection oven to WASH. 3. The racks can be left in the bowl at the same time to soften any deposits. 4. You may need to use a washing brush for any stubborn debris before rinsing and wiping clean. 10 BENEFITS TO COOKING WITH HALOGEN OVEN 1. It roasts, grills, bakes, fries, barbecues, reheats, and even steams food perfectly. 2. The transparent glass bowl allows you to view your food while it’s cooking. 3. The Halogen Oven combines a circular glass bowl, heating element and a fan mounted in the lid to circulate hot air. This creates a “convection” effect that constantly circulates superheated air to cook and brown foods quickly and thoroughly. 4. The cooking racks allow you to cook two levels of food at the same time. 5. Does the work of 10 cooking appliances: standard oven, toaster oven, broiler oven, microwave oven, deep fryer, slow cooker, grill, rotisserie, electric frying pan, and electric steamer. 6. It’s portable. You can take it with you when you move or travel. 7. The Halogen Oven is considerably more efficient than a standard oven. Cooks up to 30% faster than a standard oven. 8. Has a built-in WASH setting that makes cleaning easy and fast. 11 CONVECTION OVEN COOKING GUIDE NOTE: All cooking times are approximate. Always ensure that food is fully cooked inside before serving. For chicken and roasts, preheating is strongly recommended. Poultry Chicken Eggs Whole Parts Poached SoftBroiled Omelet Meats Steak Hot Dog Rare Medium Well Fresh Frozen Bacon Sausage Links Ribs Seafood Fish Crab Bread Bread Cooking Time (min) 35-40 18-25 6-8 Temperature Rack Used 350 -400 F 350 -400 F 350 F Low Rack High Rack Low Rack 5-7 400 F Low Rack 12-14 350 F Low Rack Temperature Rack Used Cooking Time (min) 6-8 9-12 14-17 3-5 6-9 8-9 F F F F F F High Rack High Rack High Rack Low Rack Low Rack Low Rack 5-7 400 F Low Rack 18-25 475 F Low Rack Temperature Rack Used 250 -300 F 275 -325 F Low Rack Low Rack Temperature Rack Used 250 -275 F Low Rack Cooking Time (min) 18-25 15-20 Cooking Time (min) 10-15 475 475 475 400 400 400 12 COOKING TIPS Broiling and Grilling 1. Place food directly on the low rack without covering. Use the high rack to bring food closer to heat source for additional crispness and browning of food. 2. If the meat or fish is very lean, brush the rack with cooking oil before arranging the food on the rack. 3. For a glazing affect, set the food 4 inches away from top heating unit. 4. Apply the desired glaze and broil at 400ºF to 475ºF until the desired shade of brown is reached. Fruit jams, preserves and jellies work well as a glaze for broiled foods. Baking When baking cakes, biscuits, brownies, muffins and cookies make sure the containers fit within the glass bowl and on top of rack. Disposable aluminum foil mini-loaf pans work well as they allow for faster and even cooking. Preheating is not necessary for baking in a convection oven. Air Frying 1. Little or no oil is used, yet the effect is like pan-frying or deep frying. If oil is used, only a thin layer of oil should be evenly applied to the food with the aid of a pastry brush. 2. Spray or brush vegetable oil onto the rack to assist with easier removal of cooked food. 3. Once food has finished cooking, remove the top lid from the glass bowl, otherwise, the steam will cause the food to become soggy instead of crispy. NOTE: NEVER FILL THE GLASS BOWL WITH OIL. THIS APPLIANCE IS NOT TO BE USED AS A DEEP FRYER! Steaming 1. Place food in a bowl or small pan on top of the low rack, making sure that the food does not contact the sides of your container. 2. Pour water or broth into the bottom of the bowl or pan using half cup of liquid for every 1 lb of food. 3. Cover tightly with aluminum foil making sure food does not come in contact with the foil. 4. Place wrapped container into the oven and cook at 350ºF for 5 to 10 minutes, depending upon individual taste. 13 RECIPES All cooking times are approximate. Always ensure that food is fully cooked inside before serving. The following recipe, temperature settings and cooking times are for guidance only; cooking times may vary according to the weight of the food being cooked and individual taste. NOTE: Ingredients, cookware and ovenware are not included. All supplies in this receipe must be obtained by the user. ROAST BEEF WITH GINGER AND MUSTARD Ingredients 1 medium piece of topside beef 1 teaspoon ground ginger 1 teaspoon fresh mustard Salt Freshly ground black pepper 2 tablespoons water 1 tablespoons corn flour Method Preheat the oven to 350ºF. Cut slits in the beef and place in a metal roasting tin. Combine ginger, mustard, salt and pepper, and rub over the beef. Wrap the beef in foil. Place beef on low rack for approximately 1 hour depending on the degree of rareness that is required. Baste occasionally. Remove the meat and keep it wrapped in foil. To make the gravy, blend the corn flour with the water and add to the roasting tin, bringing gently to the boil, stirring as it thickens. BAKED CRUMB-TOPPED COD Serves: 4 Ingredients 2 1⁄2 oz skinless firm white cod steaks 1 beef steak tomato 1 medium leek 4 tablespoons stuffing mix 4 oz grated mature cheddar cheese Method Preheat the oven to 400ºF, wash and pat dry the fish steaks and place on the baking sheet lined with baking parchment. Thinly slice the tomato. Trim and shred the leek. Arrange the tomato over the fish overlapping and pile on the leek. Sprinkle over the stuffing mix, and top with the cheese. Place fish on the low rack and bake in the oven for 10 to15 minutes or until tender and cooked thoroughly. ROASTED WHOLE CHICKEN Method Wash and dry the chicken and rub with desired spices. Let seasoning penetrate the chicken for a few hours (overnight is best) before roasting. Line the bottom of the glass bowl with aluminum foil to catch drippings. Place whole chicken on low rack and roast at 400 F for about 10 minutes per pound. For crisper skin, increase temperature to 450 F and continue to roast for an additional 5 to 10 minutes. 14 MACARONI BAKE Serves: 4 Ingredients 4 oz leeks, thinly sliced 2/3 cup macaroni 2 red onions, finely sliced 1 red pepper, finely chopped 3 teaspoons olive oil 5 oz carton natural yogurt 5 oz light cream cheese 14 oz can chopped tomatoes, drained salt and freshly ground black pepper 2 oz cheddar cheese, grated Method Preheat the oven to 350 F. Cook the macaroni in a large pan of boiling salted water for 10 to12 minutes. Drain and mix the onions and pepper together. Heat the oil in a large frying pan and fry for 3 to 4 minutes until softened. In a bowl, mix the yogurt, cream cheese, tomatoes and seasoning, mix in the macaroni and the vegetables. Put them into a suitable dish and sprinkle with grate cheese. Bake for 20 to 30 minutes until golden. SAUSAGE STUFFED MUSHROOMS Ingredients 15 medium white mushrooms 4 oz Italian style sausage Method Remove the stem from the mushrooms and press equal amounts of the sausage into each mushroom cap. Place in a pie plate and cook on high rack on high setting for 10 minutes CREAMY EGGS Ingredients 1 tablespoon butter 2 large eggs shredded cheese of choice 2 tablespoons heavy cream salt and pepper to taste 2 tablespoons chopped parsley Method Butter the inside of a glass or aluminum custard cup or ceramic ramekin. Crack the eggs into the cup and add the other ingredients. Place on the low rack and cook on high setting for 10 minutes. 15 HAM AND EGGS Ingredients Instead of buying expensive, cooked, sliced ham, or hamin a can, bake a small ham with your oven and cut into serving size pieces. Store in self-closing plastic bags until you need it for a recipe. 2 large eggs 3 oz slice of ham salt and pepper to taste Method Crack the eggs in a shallow dish and place on the pan liner. Place the ham on the high rack to the side of the eggs. Cook on high setting for 10 minutes. BACON AND/OR SAUSAGE WITH EGGS Ingredients 2 large eggs 2 slices of bacon or 2 sausage patties or links salt and pepper to taste Method Crack the eggs in a shallow dish and place on the pan liner. Lay the bacon or sausage on the high rack and cook on high setting for 10 minutes or until the eggs are set. SCRAMBLED EGGS AND HAM Ingredients 2 large eggs 3 oz of chopped ham salt and pepper to taste 2 tablespoons chopped parsley Method Mix everything in a shallow dish and place on the high rack. Cook on high setting for about 7 minutes. Stir and serve. STEAK AND EGGS Ingredients 4 oz, 1/2 inch thick sirloin or other tender steak seasoned salt 2 large eggs 1 scallion, thinly sliced 1/2 tomato, seeds removed 2 tablespoons grated Parmesan cheese Method Crack the eggs in a shallow dish and place on the pan liner. Place the steak and tomato on the high rack to the side of the eggs. Season the steak and add the cheese to the tomatoes. Cook on high setting for 10 minutes. If using a frozen steak, place it on the high rack and cook on high setting for 5 minutes, add the eggs and tomato and cook another 10 minutes. 16 CHEESY EGGS Ingredients 2 large eggs 2 oz shredded cheese of choice 2 tablespoons chopped parsley salt and pepper to taste Method Spread the cheese over the bottom of a shallow dish and crack the eggs over. Place on the high rack, season and cook on high setting for about 7 minutes or until the eggs have set. Add parsley and serve. SCRAMBLED LOX Ingredients This recipe is like lox and bagels but without the bagel. 2 large eggs 2 oz lox 2 tablespoons cream cheese 1 scallion, thinly sliced 1 tablespoon capers 1/2 cup shredded Swiss cheese salt and pepper to taste Method Mix everything in a shallow dish and place on the 1 inch rack. Cook on high setting for about 8 minutes or until the eggs are barely set. Stir and serve. TOFU SCRAMBLE Ingredients This recipe provides a little variety in an animal protein diet. 2 large eggs 3 oz firm tofu, crumbled 2 tablespoons salsa 2 tablespoons grated Parmesan cheese Method Mix everything in a shallow bowl and place on the high rack. Cook on high setting for about 7 minutes or until the eggs are set. 17 CHORIZO SAUSAGE AND EGGS Ingredients 2 large eggs 3 oz chorizo sausage 2 tablespoons salsa 2 oz shredded Monterey Jack cheese hot sauce to taste Method Press the sausage around the edge of a saucer. Crack the eggs in the center and top with salsa and cheese. Place on the 1 inch rack and cook on high setting for 10 minutes or until the eggs are set. CHORIZO SCRAMBLE Method Use the same ingredients in the above recipe but crumble the sausage and mix everything together in a shallow bowl. Place on the high rack and cook on high setting for 7 minutes. MEAT CRUST PIZZA Ingredients This delicious recipe provides all the flavor of a multi-ingredient pizza without the crust. It's also a great dish for lunch or dinner. 4 oz Italian sausage 4 tablespoons prepared pizza sauce 1 teaspoon dried Italian herbs 1 scallion, thinly sliced 1 large white mushroom, sliced 2 oz shredded mozzarella cheese 1 tablespoon grated Parmesan cheese Method Press the sausage into a 6-inch disk on a dinner plate or pie plate. Spread on the sauce and spread the other ingredients over the sauce. Place on the high rack and cook on high setting for 10 minutes. KIPPERS AND CRACKERS Ingredients Find kippers with the sardines at your local grocer. They have a mild, salty fish taste and are delicious when prepared with the oven. 1 tin smoked kippers 4 saltine crackers 1/2 tomato, thinly sliced lemon juice Method Place the crackers in a shallow dish and top with the tomato, kippers, and lemon juice. Place the dish on the 4 inch rack and cook high for 4 minutes or until heated through. 18 CHICKEN PIECES Method Estimate the cooking time at 18-20 minutes. Check out the spice section of your local grocery store for the variety of spice and herb blends designed for chicken. Select the ones that appeal to you and use to provide variety in your chicken cooking. Season as desired and place on the high rack and cook for 18-20 minutes. ROSEMARY CHICKEN Ingredients 4 tablespoons dried rosemary or chopped fresh 4 large cloves garlic minced 4 tablespoons butter 3 pound chicken salt and pepper to taste Method Loosen the skin of the chicken by running a chopstick or plastic spatula handle between the skin and flesh of the bird. Mix the rosemary, garlic and butter and microwave for 30 seconds or until melted. Pour the butter mixture under the chicken's skin and massage to all areas of the bird. Place, breast side down, on the 1 inch rack and cook on high setting for 20 minutes. Turn the bird over and baste with the juices in the liner pan and cook for another 25 minutes or until internal temperature reaches 180ºF. BREADED CHICKEN BREASTS Ingredients 1 cup fine texture TVP 2 tablespoons butter 1 egg, beaten 4 to 6 oz chicken breast, with or without skin 2 tablespoons chopped parsley Method Place the TVP in a shallow oval dish. Dip the chicken in the egg and roll in the TVP. Place the butter on top and cook on the high rack for 8 minutes. Sprinkle with parsley and serve. NUT BREADING CHICKEN BREAST Ingredients 1 egg beaten or 1/4 cup egg substitute 1/2 cup ground pecans 1 tablespoon wheat germ 1 teaspoon dried Italian seasoning blend salt and pepper to taste 4-6, oz chicken breast chopped parsley Method Mix the nuts, wheat germ, and seasonings in a shallow oval dish. Dip the chicken in the egg and roll in the nut mixture. Place on the high rack and cook for 8 minutes. Sprinkle with parsley and serve. 19 BUTTERY CHICKEN BREAST Ingredients 4 to 6 chicken breast with skin 2 tablespoons butter 4 tablespoons chopped parsley salt and pepper to taste Method Place the chicken in a shallow ova dish and add the other ingredients. Place on the high rack and cook on high setting for 8 minutes. CREAMY CHICKEN BREAST WITH APPLE AND AVOCADO Ingredients 4 to 6 oz chicken breast 1/4 ripe avocado, chopped 1/4 hard apple, chopped 1/2 cup cream salt and pepper to taste Method Place the chicken in a shallow oval dish and place the avocado and apple around the sides. Pour the cream and season. Place on the high rack and cook for 13 to 15 minutes. KOREAN STYLE RIBS Ingredients 2 meaty ribs from a prime roast (find at your local supermarket) 4 tablespoons Korean style barbecue sauce (available at Asian food stores) Method Place the ribs and sauce in a plastic bag and marinate for 1 hour. Place the ribs on the high rack and cook on high setting for 5 minutes per side. CREAMY CHICKEN BREAST WITH MUSHROOMS AND PEPPERS Ingredients 4 to 6 oz chicken breast 2 large mushrooms sliced 1/2 red, yellow, or green bell pepper, cut into 1 inch pieces 1/2 cup cream salt and pepper to taste Method Place the chicken in a shallow oval dish and add the other ingredients to the sides of the chicken. Place on the high rack and cook on high setting for 13-15 minutes. 20 CHICKEN LEG AND THIGH IN SALSA Ingredients 6 oz chicken leg and thigh 1 cup prepared salsa as hot as you desire 4 cloves whole garlic Method Mexican spice blend (check the spice section at the grocery store) Place the salsa in a shallow dish with the garlic and place the chicken on tip. Season and place on the high rack and cook on high setting for about 15 minutes. CHICKEN THIGH WITH ANCHOVY Ingredients 6 oz chicken thigh, boned 2 filets canned anchovy 6 black olives 1/2 red bell pepper, diced salt and pepper to taste Method Place the anchovies on the bottom of a shallow dish and pound the chicken to 1/2 inch thickness. Lay the chicken on the anchovies. Place the olives and pepper around the chicken. Place the dish on the high rack and cook on high setting for 8 minutes. CHICKEN BREAST ITALINO Ingredients 5 oz chicken breast with skin 2 oz pepperoni sausage, chopped 2 oz shredded mozzarella or Monterey Jack cheese 1 oz grated Parmesan cheese 1/4 cup prepared spaghetti sauce Method Pound the chicken to 3/8 inch thickness and lay on the sausage and cheese. Roll into a cylinder with the skin stretched over the top and secure with a toothpick. Place on the high rack and cook on high setting for 13 minutes. Meanwhile heat the sauce by microwave. Place the chicken roll in a serving dish and pour the sauce over. 21 CURRY CHICKEN Ingredients 4-6 oz chicken breast, cut into bite size pieces 1 scallion, cut into 1/2-inch pieces 1/2 green bell pepper, diced 2 cloves garlic, minced 2 tablespoons grated fresh ginger 1 tablespoon curry powder or paste 1/4 cup sour cream chopped coriander leaves salt and pepper to taste Method Mix everything, except the coriander and sour cream, in a soup bowl. Place on the high rack and cook on high setting for 15 minutes. Stir in the cream and sprinkle with coriander and serve. TANDOURI CHICKEN Method Prepare and cook the same as the curry chicken but substitute tandouri paste (available at Asian food stores) for the curry powder or paste. THAI CHICKEN Ingredients 4-6 oz chicken breast, cut into bite size pieces 2 tablespoons Thai green curry paste 2 tablespoons grated fresh ginger 2 tablespoons minced garlic 2 tablespoons olive oil 1/4 cup shredded raw coconut, unsweetened Method Mix everything in a shallow soup bowl and place on the 4 inch rack. Cook on high setting for 15 minutes. Stir and serve. CUBE STEAK WITH PARSLEY BUTTER Ingredients 1 cube steak 2 tablespoons butter or brown butter (see sauces) 2 tablespoons minced parsley Method Place the steak and butter in a shallow dish and place on the high rack. Cook on high setting for 5 to 7 minutes depending on how well done you like your steak. Sprinkle with parsley before serving. 22 TURKEY BREAST ENCHILADAS (serves 4) Ingredients Use the turkey for the wrap instead of tortillas and you eliminate all the carbs. 4 to 4 oz turkey cutlets 4 slices mozzarella or Mexican white cheese, (about 4 oz) Mexican style seasoning to taste 1/2 cup prepared salsa 1/2 cups sour cream chopped cilantro Method Pound the turkey cutlets to 3/8 inch thickness and lay on the cheese and seasoning. Roll up and lay, seam side down, around the edge of a pie plate. Spray with cooking oil and place on the high rack and cook on high setting for 10 minutes. Meanwhile, heat the salsa for 1 minute. Pour the sauce over the turkey and sprinkle with cilantro. DUCK PIECES Ingredients (serves 2 to 3) Ducks are usually frozen which makes it difficult to cut them up. If you don't think you can cut one into pieces, ask your friendly butcher to thaw a 5 to 6 pound bird and cut it up for you. Use the back, neck and giblets for stock. 2 legs, 2 thighs, 2 wings, 2 breasts cut in half salt and pepper to taste 4 tablespoons crushed caraway seed Method Pierce the skin, several times, of the pieces with a fork or knife. Season on both sides of the pieces and lay on the 1 inch rack, skin side up. Cook on high setting for 30 minutes. FLORENTINE STYLE STEAK Ingredients 1 tenderloin steak about 2-inches thick, about 6 oz salt and pepper to taste 1/4 cup olive oil juice of half a lemon Method Place everything in a plastic bag and marinate for 1 hour. Place the marinade in a pie plate and the steak on the 4 inch rack. Pat the steak dry with a paper towel before cooking. Cook on high setting for 7 minutes turn over and cook another 5 minutes for rare. 23 PEPPER STEAK (steak au poivre) (serves 4 to 6) Ingredients 1-2 pound sirloin steak salt to taste 1/2 cup crushed peppercorns 4 oz butter, melted 1/4 teaspoon cayenne pepper 3 tablespoons Worcestershire sauce 1 tablespoon lemon juice chopped parsley Method Place the butter pepper and Worcestershire sauce in a 10 inch pie plate on the liner pan. Salt the meat and press the pepper into both sides of the meat and lay on the 4 inch rack. Cook on high setting for 5 minutes, turn over and cook another 5 minutes. Cut into 1 inch wide slices and serve with the sauce. ROAST BEEF Method The oven does a great job of reheating. So prepare any beef roast as directed in the cookbook and refrigerate. When you want a nice portion of roast beef, cut off 4 to 6 oz portions and place on a dinner plate. Heat on the high rack on high power for about 5 minutes. STEAK BERRY WALL Ingredients 2 tablespoons butter 1/4 teaspoon dry mustard 1/2 teaspoon Worcestershire sauce Minced parsley 6 oz tender steak, sirloin tenderloin, rib, strip, etc. 1 1/2-inch thick salt and pepper to taste Method Season the steak and cook on the high rack on high setting for 5 minutes per side. Meanwhile mix the other ingredients. Place the steak on a plate and spread the butter mixture over the surface. JAPANESE STYLE STEAK Ingredients 4 to 6- oz sirloin steak 1/4 cup miso paste (available at Asian food stores) 2 tablespoons sake or dry white wine 2 tablespoons, pickled ginger slices Method Mix the miso and sake and spread over the steak and marinate for 1 hour in a shallow dish. Cook on the high rack on high setting for 5 minutes per side and serve with the ginger. 24 SICILIAN STYLE STEAK Ingredients 4 to 6 oz sirloin or rib steak 2 teaspoons grated Parmesan cheese 1 canned anchovy filet 1/4 cup canned, chopped tomato 1 tablespoon capers 1 tablespoon olive oil Method Cook the steak on the high rack on high setting for 5 minutes per side. Meanwhile mix the other ingredients. Spread the mixture over the steak and cook another 3 minutes. RUSSIAN STYLE BEEF PATTIES Ingredients 5 oz ground beef 1 scallion, thinly sliced 1 tablespoon butter 1 teaspoon beef stock granules 1 tablespoon cream 1/4 teaspoon grated nutmeg 2 tablespoons chopped parsley Method Mix everything and form into a 1 inch thick patty. Place in a shallow dish and cook on the high rack on high setting for 6 minutes. MEAT LOAF (serves 3 to 5) Ingredients 1 pound ground beef 1 egg 1 fine ground TVP 1 tablespoons Italian style herb blend 1⁄2 cup spaghetti sauce 2 slices bacon Method Mix everything, except the bacon and form into a 4 inch oval loaf, 3 inches high. Lay on the bacon and place on a sheet of foil on the 1 inch rack. Cook on high setting for 45 to 50 minutes. 25 Troubleshooting If the device is defective, do not attempt to repair it yourself, in case of damage, contact the listed customer service department. Problem Possible Cause Solution Handle is folded up. Fold handle down until it snaps into place. Timer has not been set. Set the timer to the desired setting. Unit is not plugged in Connect the unit to a power outlet. Device is defective. Unplug the unit and contact customer service. DO NOT use the unit. Device does not turn on. 26 LIMITED WARRANTY MC Appliance Corporation warrants each new Glass Bowl Convection Oven to be free from defects in material and workmanship, and agrees to remedy any such defect or to furnish a new part(s), at the company’s option, for any part(s) of the unit that has failed during the warranty period. Parts and labor expenses are covered on this unit for a period of one year from the date of purchase. A copy of the dated sales receipt or invoice is required to receive warranty service by an authorized service agent. This warranty covers appliances in use within the continental United States, Alaska, Hawaii, and Puerto Rico. The warranty does not cover the following: Damages due to shipping damage or improper installation. Damages due to misuse or abuse. Content losses due to failure of the unit. Inside components such as light bulbs, etc. Repairs performed by unauthorized service agents. Service calls that do not involve defects in material and workmanship such as instructions on proper use of the product or improper installation. Replacement or resetting of house fuses or circuit breakers. Failure of this product if used for other than for its intended purpose. Disposal costs for any failed unit not returned to our factory. Any delivery costs incurred as the result of a unit that fails to perform as specified. Expenses for travel and transportation for product service if your appliance is located in a remote area where service by an authorized service technician is not available. The removal and reinstallation of your appliance if it is installed in an inaccessible location or is not installed in accordance with published installation instructions. Limitations of Remedies and Exclusions: Product repair in accordance with the terms herein, is your sole and exclusive remedy under this limited warranty. Any and all implied warranties including merchantability and fitness for a particular purpose are hereby limited to one year or the shortest period allowed by law. MC Appliance Corporation is not liable for incidental or consequential damages and no representative or person is authorized to assume for us any other liability in connection with the sale of this product. Under no circumstances is the consumer permitted to return this unit to the factory without prior written consent of MC Appliance Corporation. Some states prohibit the exclusion or limitation of incidental or consequential damages, or limitations on implied warranties. This warranty gives you specific legal rights, and you may also have other rights which very from state to state. Model MCSGC07W Parts One-Year Labor One-Year Type of Service Carry In For Service or Assistance, please call 888-775-0202. Or visit us on the web at www.mcappliance.com to request warranty service or order parts. HORNO DE CONVECCIÓN Capacidad 7 litros MANUAL DE INSTRUCCIONES Modelo: MCSGC07W GRACIAS POR COMPRAR ESTE PRODUCTO MAGIC CHEF LEER ATENTAMENTE TODAS LAS INSTRUCCIONES ANTES DE USAR ÍNDICE MEDIDAS IMPORTANTES DE SEGURIDAD ................................ 31 PARTES Y CARACTERÍSTICAS ................................................... 34 ANTES DE USAR .......................................................................... 35 INSTRUCCIONES PARA OPERAR............................................... 36 CUIDADO Y MANTENIMIENTO ................................................... 37 BENEFICIOS DE COCINAR CON UN HORNO HALÓGENO ....... 38 GUÍA PARA COCINAR CON HORNO DE CONVECCIÓN ........... 39 RECOMENDACIONES PARA COCINAR ...................................... 40 RECETAS ...................................................................................... 41 RESOLUCIÓN DE PROBLEMAS .................................................. 53 GARANTÍA .................................................................................... 54 29 ¿Qué necesita saber sobre las instrucciones de seguridad? Las advertencias e instrucciones de seguridad importantes que aparecen en este manual no cubren todas las condiciones y situaciones que pueden presentarse. Cuando instale, utilice o realice el mantenimiento de cualquier electrodoméstico, aplique el sentido común, y opere con precaución y cuidado. Si tiene alguna duda, póngase en contacto con su proveedor, distribuidor, agente de servicios o fabricante. RECONOCER SÍMBOLOS DE SEGURIDAD, PALABRAS, RÓTULOS ADVERTENCIA ADVERTENCIA: Peligros o prácticas inseguras que PUEDEN ocasionar lesiones personales graves o muerte. PRECAUCIÓN PRECAUCIÓN: Peligros o prácticas inseguras que PUEDEN ocasionar lesiones personales leves. GUARDAR ESTAS INSTRUCCIONES USO DOMÉSTICO EXCLUSIVO 30 MEDIDAS IMPORTANTES DE SEGURIDAD Siempre que utilice un electrodoméstico, asegúrese de observar las precauciones básicas de seguridad, incluyendo las siguientes: 1. LEER TODAS LAS INSTRUCCIONES ANTES DE USAR 2. Es necesario supervisar atentamente el uso de cualquier electrodoméstico en presencia de niños. 3. Mantener el producto fuera del alcance de niños y mascotas. Este producto no está preparado para ser utilizado por niños. 4. Uso doméstico exclusivo. No utilizar en exteriores. 5. Usar únicamente cuando el voltaje indicado en la base del electrodoméstico se corresponda con el voltaje del lugar donde intenta usar el producto. 6. Asegurarse siempre de que el producto no esté enchufado en el toma corriente y esté frío antes de armar, desarmar, cambiar de lugar o limpiar. 7. No dejar el producto sin supervisión cuando esté en uso. Desenchufar el producto de la red eléctrica cuando no esté en uso. 8. Para protegerse de un choque eléctrico, evitar que el cable, los enchufes y la tapa estén en contacto con agua u otro líquido y no sumergir cables, enchufes o tapa en el agua o en otro líquido. 9. No mover el electrodoméstico jalando del cable. No poner peso sobre el cable de la corriente donde se conecta con el producto ya que el cable puede deshilacharse y romperse. 10. No dejar el cable colgando sobre el borde de la mesa o mesada, o en contacto con las superficies calientes. 11. No usar accesorios que no están recomendados por el fabricante. Pueden constituir un peligro para el usuario y dañar el equipo. 12. Sólo poner en funcionamiento el electrodoméstico sobre una superficie plana y estable. 13. No enchufar ni desenchufar del tomacorriente con las manos húmedas. 14. No colocar la base, el cable o el enchufe de este producto en el agua ni exponer estas partes al agua u otros líquidos. 15. No enchufar el artefacto en un tomacorriente que no esté en buen estado. 16. No poner en funcionamiento el aparato antes de armar correctamente. 31 17. No tocar las superficies calientes. Utilizar asas o perillas. 18. Dejar de 6 a 8 pulgadas de espacio alrededor de la parte externa del aparato mientras esté en uso. 19. No usar este electrodoméstico como freidora. No llenar con aceite ni usar para freír. Estas acciones pueden provocar un incendio y causar lesiones. 20. No cubrir el aparato mientras esté en uso. 21. No introducir trozos de alimentos de gran tamaño ni utensilios de metal ya que pueden provocar incendios o golpes de corriente. No colocar el artefacto cerca o en contacto con material inflamable como cortinas, tapizados o paredes mientras esté en funcionamiento. 22. Colocar siempre la parte superior de la unidad o la tapa sobre el bol antes de conectar a la red eléctrica y poner en funcionamiento. 23. Deben extremarse las medidas de precaución cuando se traslade el artefacto con líquidos calientes en el interior. 24. El horno debe conectarse a un circuito eléctrico independiente del que se esté utilizando para otros electrodomésticos. Si el circuito eléctrico está recargado con otro electrodoméstico, este artefacto quizá no funcione adecuadamente. 25. No mover ni levantar el artefacto mientras el cable de alimentación esté aún conectado al tomacorriente de la pared. 26. Antes de retirar la tapa: A. Apagar el temporizador. B. Desconectar el cable de alimentación. C. Levantar la tapa superior tomando del asa. 27. No colocar la parte inferior caliente de la tapa sobre superficies laminadas de madera, papel, plástico u otros materiales inflamables. NOTA: Apoye la tapa sólo sobre superficies resistentes al fuego. 28. No colocar nunca la tapa sobre una superficie inestable mientras el artefacto esté enchufado y en funcionamiento. 29. No limpiar con esponjas metálicas. Se pueden desprender partículas que podrían provocar un choque eléctrico al tomar contacto con los elementos eléctricos. 30. El recipiente de vidrio con capacidad para 7 litros está diseñado para uso exclusivo en este artefacto. No debe utilizarse sobre la hornalla. 31. No colocar el recipiente caliente de vidrio sobre una superficie fría. 32. No usar un recipiente de vidrio rajado o un recipiente de vidrio que tenga un asa floja o debilitada. 32 33. Dejar enfriar completamente la unidad y guardar en un lugar seco y fresco. 34. No poner en funcionamiento el electrodoméstico si el cable o el enchufe están dañados o cortados, si hay cables a la vista, en mal funcionamiento, deteriorados o dañados o si el gabinete del calentador ha estado sumergido o expuesto al agua. 35. Este producto no tiene repuestos que puedan ser reparados por el usuario. No trate de revisar o reparar este producto por su cuenta. Sólo el personal de servicio calificado debe realizar el mantenimiento. 36. No utilizar este electrodoméstico para otro uso fuera del indicado. ADVERTENCIA Para evitar riesgos de golpes de corriente, incendios o lesiones personales, no sumergir el cable, el enchufe o la unidad en agua u otro líquido. PRECAUCIÓN No se recomienda utilizar el enchufe con un alargue. Si se necesita utilizar un alargue, asegúrese de usar un alargue que tenga la adecuada capacidad de potencia y voltaje. No modifique el enchufe del aparato o de cualquier alargue que utilice con este aparato. No intente burlar el dispositivo de seguridad del enchufe polarizado de 3 patas. 33 PARTES Y CARACTERÍSTICAS 1. 2. 3. 4. 5. 6. 7. 8. Lámpara de potencia (roja) 9. Lámpara de temperatura (verde) 10. Temporizador 11. Control de temperatura Base y asas Recipiente de vidrio de 7 litros Tapa y resistencia Asa con llave de seguridad Pinzas Rejilla superior Rejilla inferior CARACTERÍSTICAS: Capacidad de voltaje: 120V Capacidad de potencia: 750W Capacidad de recipiente de vidrio: 7 litros 34 ANTES DE USAR 1. Desembalar con cuidado el horno de convección y retirar todos los materiales de embalaje. 2. Elegir una superficie lisa, resistente al calor y no inflamable para apoyar el horno. 3. No sumergir la resistencia ni la tapa en agua u otro líquido. 4. Para retirar el polvo acumulado en las partes removibles durante el proceso de embalaje, limpiar la superficie con un paño húmedo y retirar las etiquetas (salvo las etiquetas de advertencia o precaución). 5. Lavar el recipiente de vidrio con agua jabonosa tibia. Enjuagar y secar cuidadosamente. 6. Antes de usar por primera vez, calentar el horno, vacío, a temperatura máxima durante cinco minutos. De esta forma se eliminará el olor a nuevo. Puede producirse un poco de humo. Es normal y desaparecerá durante el uso. 7. Después de apagar el temporizador y una vez que el horno esté completamente frío, limpiar el interior del recipiente de vidrio una vez más. ENCHUFE DE TRES PATAS PRECAUCIÓN: Para asegurar protección permanente contra el riesgo de choque eléctrico, conectar en tomacorrientes con descarga a tierra únicamente. Este aparato tiene un enchufe de tres patas (es decir, hay tres patas para enchufar en el tomacorriente de electricidad). Para reducir el riesgo de choque eléctrico, el enchufe está preparado para que pueda ubicarse en un tomacorriente de tres patas sólo en un sentido. Si no logra enchufarlo, llame a un electricista autorizado. No intente modificar el enchufe de ninguna forma. 35 INSTRUCCIONES PARA OPERAR ADVERTENCIA: TERMINAR DE ARMAR EL PRODUCTO COMPLETAMENTE ANTES DE ENCHUFAR EN UN TOMACORRIENTE ELÉCTRICO. PRECAUCIÓN: COLOCAR SIEMPRE UN RECIPIENTE O BOL ENCIMA DE UNA DE LAS REJILLAS PROVISTAS. NO COLOCAR EL RECIPIENTE O BOL DIRECTAMENTE SOBRE EL FONDO DEL RECIPIENTE DE VIDRIO. 1. Colocar la rejilla inferior en el recipiente de vidrio antes de colocar los alimentos. Mantener los alimentos a una distancia aproximada de 1 – 1.25 pulgadas de la pared de vidrio para permitir la máxima circulación del aire caliente. NOTA: La rejilla superior se utiliza para dorar los alimentos o para lograr que estén crocantes. 2. Ajustar bien la tapa superior del recipiente de vidrio. NOTA: Asegurarse de que los alimentos no toquen la resistencia ubicada en la parte inferior de la tapa. 3. Insert the power cord firmly into the wall outlet. 4. Use the temperature control knob to set the desired cooking temperature (250 F to 480 F). 5. Programar el temporizador con el tiempo deseado (de 5 a 60 minutos). Se prenderán las luces de potencia (roja) y de la temperatura (verde). 6. Plegar el asa hasta que quede fija en su lugar. La resistencia y el ventilador sólo se activarán si el asa está completamente plegada. Por seguridad, el horno de convección se apagará cuando se levante el asa. Para volver a encender el horno, vuelva a plegar toda el asa hacia abajo hasta que encaje en su lugar. 7. El temporizador se apagará una vez transcurrido el tiempo preseleccionado y sonará una campanilla para avisar que finalizó el tiempo de cocción. 8. Usar las pinzas para sacar la rejilla (con los alimentos) del bol. 9. Desenchufar el cable del tomacorriente antes de retirar la tapa. 10. No apoyar la tapa del horno directamente sobre la mesada, mesa o superficie para cocinar; se puede manchar la superficie. 11. Para cocinar, usar siempre utensilios de madera, plástico resistente al calor o nylon. Los utensilios de metal pueden raspar el recipiente de vidrio. 12. Dejar enfriar la unidad por completo antes de mover y/o limpiar. Programación del descongelamiento El horno halógeno tiene un programa para descongelar (baja temperatura) que debe usarse con los alimentos congelados. Este programa está marcado en la perilla de control de temperatura. 36 CUIDADO Y MANTENIMIENTO CUIDADO: DESENCHUFAR SIEMPRE LA UNIDAD DEL TOMACORRIENTE ELÉCTRICO Y DEJAR QUE LAS PARTES SE ENFRÍEN POR COMPLETO ANTES DE DESARMAR PARA LIMPIAR. NUNCA SUMERGIR LA RESISTENCIA O LA TAPA EN EL AGUA NI EN OTRO LÍQUIDO. NOTA: Limpiar el producto después de cada uso. 1. Desenchufar el horno y dejar enfriar. 2. Lavar el bol de vidrio con agua jabonosa caliente y secar bien. Limpiar la parte externa de la base con un paño suave húmedo. 3. Limpiar la tapa y el gabinete del ventilador con una esponja o paño limpio y húmedo y un poco de detergente suave para lavavajillas. No limpiar el bol de vidrio ni la tapa con esponja de alambre ni use materiales abrasivos. 4. Lavar las rejillas de alambre con agua y detergente suave para lavavajillas. 5. Limpiar las partes de metal con una esponja o paño y detergente suave para lavavajillas; luego repasar con un paño limpio. Si necesita refregar, use una esponja o cepillo de nylon o poliéster. 6. Guardar en un lugar seco y fresco. WASH Indicado El horno tiene un programa WASH indicado en el control de temperatura. La combinación de calor, movimiento giratorio del agua y el detergente servirán para limpiar el bol de vidrio. 1. Retirar todos los alimentos y dejar escurrir la grasa de la base. 2. Vertir una pequeña cantidad de agua en el bol y poner en funcionamiento el horno de convección en la posición "Wash". 3. Las rejillas pueden quedarse en el bol al mismo tiempo para ablandar los restos de alimentos depositados. 4. Quizá necesite utilizar un cepillo para los restos más rebeldes antes de enjuagar y terminar de limpiar. 37 BENEFICIOS DE COCINAR CON UN HORNO HALÓGENO 1. Sirve para grillar, hornear, freír, asar, calentar e incluso cocinar al vapor alimentos perfectamente. 2. El bol de vidrio transparente le permite ver los alimentos mientras se están cocinando. 3. El horno halógeno combina un bol de vidrio circular, una resistencia y un ventilador instalados en la tapa para forzar la circulación del aire caliente. Esto crea un efecto de convección que obliga a la circulación constante del aire recalentado para que cocine y dore los alimentos rápido y en forma pareja. 4. Las rejillas permiten cocinar en dos niveles al mismo tiempo. 5. Realiza el trabajo de 10 dispositivos de cocción: horno estándar, horno tostador, horno asador, microondas, freidora, olla para cocción lenta, grill, rotisera, sartén eléctrica, y vaporiera eléctrica. 6. Es portátil. Puede llevarla cuando se traslada o se va de viaje. 7. El horno halógeno es considerablemente más eficiente que un horno estándar. Cocina hasta el 30% más rápido que un horno convencional. 8. Tiene incorporado un programa que facilita una rápida limpieza. 38 GUÍA PARA COCINAR CON HORNO DE CONVECCIÓN NOTA: Todos los tiempos de cocción son aproximados. Verifique que los alimentos estén bien cocidos antes de servir. Para pollos y cortes de carnes se recomienda precalentar los alimentos. Aves Pollo Huevos Entero partes Escalfados Pasado por agua Omelette Carnes Chuleta Perros calientes Tocino Salchicha Costillas Vuelta y vuelta Medio Bien cocida Fresca Congelado Pescados Pescado Cangrejo Pan Pan Tiempo de cocción (min) 35-40 18-25 6-8 Temperatura Rejilla usada 350 -400 F 350 -400 F 350 F Rejilla inferior Rejilla superior Rejilla inferior 5-7 400 F Rejilla inferior 12-14 350 F Rejilla inferior Tiempo de cocción (min) Temperatura Rejilla usada 6-8 475 F Rejilla superior 475 475 400 400 400 400 475 Rejilla superior Rejilla superior Rejilla inferior Rejilla inferior Rejilla inferior Rejilla inferior Rejilla inferior 9-12 14-17 3-5 6-9 8-9 5-7 18-25 Tiempo de cocción (min) 18-25 15-20 Tiempo de cocción (min) 10-15 F F F F F F F Temperatura Rejilla usada 250 -300 F 275 -325 F Rejilla inferior Rejilla inferior Temperatura Rejilla usada 250 -275 F Rejilla inferior 39 RECOMENDACIONES PARA COCINAR Asado y grillado 1. Colocar los alimentos directamente sobre la rejilla inferior sin cubrir. Usar la rejilla superior para acercar a la fuente de calor y obtener alimentos más crujientes y dorados. 2. Si la carne o el pescado es muy magro, rociar la rejilla con aceite de cocina antes de colocar los alimentos. 3. Para dar brillo, colocar las piezas a 4 pulgadas de distancia de la resistencia superior. 4. Aplicar la preparación deseada para dar brillo y asar a 400-475ºF hasta obtener el dorado deseado. Los dulces de frutas, jaleas y mermeladas son indicados para dar brillos a los alimentos asados. Horneado Al hornear tortas, bollos, brownies, muffins y galletas, asegúrese de que los moldes quepan dentro del recipiente de vidrio encima de la rejilla. Los moldes desechables de aluminio funcionan bien ya que permiten una cocción más rápida y pareja. El precalentado no es necesario para hornear en un horno de convección. Para freír 1. Se utiliza poco o nada de aceite pero el resultado es como haber freído en la sartén o en la freidora. Si se usa aceite, sólo debe aplicarse sobre el alimento una capa delgada con ayuda de un pincel de repostería. 2. Pulverice aceite vegetal o aplique con pincel sobre la rejilla para facilitar el retiro de los alimentos cocidos. 3. Una vez que el alimento esté cocido, retire la tapa superior del recipiente de vidrio para que el vapor no ablande la comida y quede crocante. NOTA: NO LLENE NUNCA EL RECIPIENTE DE VIDRIO CON ACEITE. ESTE ELECTRODOMÉSTICO NO ESTÁ DISEÑADO PARA SER UTILIZADO COMO FREIDORA. Cocción al vapor 1. Coloque los alimentos en un bol o sartén pequeña sobre la rejilla inferior sin que la comida toque los lados del recipiente. 2. Vierta agua o caldo en el fondo del bol o sartén. Calcule media taza de líquido por cada libra de alimentos. 3. Cubra bien con papel de aluminio sin que el papel esté en contacto con los alimentos. 4. Coloque el envase así envuelto en el horno y cocine a 350ºF durante 5-10 minutos, a gusto. 40 RECETAS Todos los tiempos de cocción son aproximados. Verifique que los alimentos estén bien cocidos antes de servir. Las siguientes recetas, temperaturas de cocción y tiempos de cocción son una guía solamente; los tiempos de cocción pueden variar según el peso de los alimentos que se cocinan y el gusto particular de cada persona. NOTA: Ingredientes, utensilios de cocina y vajilla no están incluidos. Todos los suministros de esta receta se debe obtener por el usuario. CARNE CON JENGIBRE Y MOSTAZA Ingredientes 1 rostbeef mediano de la parte superior 1 cucharadita de jengibre molido 1 cucharadita de mostaza fresca Sal Pimienta negra recién molida 2 cucharadas de agua 1 cucharada de harina de maíz Preparación Precalentar el horno a 350ºF. Hacer tajos en la pieza de carne y colocar en una bandeja de metal para hornear. Combinar el jengibre, la mostaza, la sal y la pimienta y untar la carne. Envolver la carne en papel de aluminio. Colocar la carne en la rejilla inferior durante 1 hora aproximadamente según el gusto Rociar con su jugo cada tanto. Retirar la carne y mantenerla envuelta en el aluminio. Para preparar la salsa, mezclar la harina de maíz con el agua y agregar a la bandeja donde se asó, llevando al hervor suave y mezclando a medida que espesa. BACALAO REBOZADO AL HORNO Porciones: 4 Ingredientes 2 1⁄2 onzas de filetes de bacalao sin piel 1 tomate grande 1 puerro mediano 4 cucharadas de rebozador 4 onzas de queso chedar maduro Preparación Precalentar el horno a 400ºF, lavar y secar los filetes de pescado y colocar en la asadera cubierta con papel apergaminado para cocinar. Cortar el tomate en rodajas finas. Rallar el puerro. Cubrir los filetes con el tomate y acomodar el puerro encima. Rociar por encima el rebozador y coronar con el queso. Colocar el pescado sobre la rejilla inferior y hornear durante 10-15 minutos o hasta que esté tierno y bien cocido. POLLO ENTERO ASADO Preparación Lavar y secar el pollo; condimentar con las especias deseadas. Antes de asar, dejar descansar durante algunas horas (toda la noche es mejor) para que el condimento penetre. Cubrir el fondo del recipiente de vidrio con papel de aluminio para retener los jugos. Colocar el pollo entero sobre la rejilla inferior y asar a 400ºF durante 10 minutos por libra. Para que la piel quede crocante, aumentar la temperatura a 450ºF y seguir asando durante otros 5-10 minutos. 41 FIDEOS GRATINADOS Porciones: 4 Ingredientes 4 onzas de puerro, cortado fino 2/3 taza de fideos 2 cebollas coloradas, cortadas en rodajas finas 1 pimiento rojo, picado fino 3 cucharaditas de aceite de oliva 5 onzas de yogur natural 5 onzas de queso crema liviano Lata de14 onzas de tomates picados, sal y pimienta negra recién molida 2 onzas de queso Chedar rallado Preparación Precalentar el horno a 350ºF. Cocinar los fideos en un recipiente grande en agua con sal durante 10-12 minutos. Colar y mezclar las cebollas y el pimiento. Calentar el aceite en una sartén grande y freír 3-4 minutos hasta ablandar. En un bol, mezclar el yogur, queso crema, tomates y condimentos, combinar con los fideos y las verduras. Colocar en una fuente adecuada y rociar con queso rallado. Cocinar de 20 a 30 minutos hasta que estén dorados. CHAMPIÑONES RELLENOS CON SALCHICHA Ingredientes 15 champiñones blancos medianos 4 onzas de salchicha italiana Preparación Retirar el cabo de los champiñones y rellenar con cantidades iguales de salchicha en cada sombrerito. Colocar en una bandeja y cocinar en la rejilla superior a temperatura elevada durante 10 minutos. HUEVOS A LA CREMA Ingredientes 1 cucharada de manteca 2 huevos grandes queso rallado (el que prefiera) 2 cucharadas de crema espesa sal y pimienta a gusto. 2 cucharadas de perejil picado Preparación Enmantecar el interior de un molde individual de vidrio o aluminio o pote individual de cerámica. Romper los huevos en el molde y agregar los demás ingredientes. Colocar en la rejilla inferior y cocinar a temperatura elevada durante 10 minutos. 42 HUEVOS CON JAMÓN Ingredientes En lugar de comprar jamón cocido cortado en fetas, o jamón en lata, que resulta costoso, cocine un jamón pequeño en el horno y corte en porciones para servir. Guardar en un recipiente hermético de plástico hasta que lo necesite para su receta. 2 huevos grandes 3 onzas de jamón en fetas sal y pimienta a gusto. Preparación Romper los huevos en una fuente plana y colocar sobre la cubierta del molde. Colocar el jamón sobre la rejilla superior al costado de los huevos. Cocinar a temperatura elevada durante 10 minutos. TOCINO Y/O SALCHICHA CON HUEVOS Ingredientes 2 huevos grandes 2 rodajas de tocino o 2 croquetas o tiras de salchicha sal y pimienta a gusto. Preparación Romper los huevos en una fuente plana y colocar sobre la cubierta del molde. Colocar el tocino o salchicha en la rejilla superior y cocinar a temperatura elevada durante 10 minutos o hasta que los huevos estén firmes. HUEVOS REVUELTOS CON JAMÓN Ingredientes 2 huevos grandes 3 onzas de jamón picado sal y pimienta a gusto. 2 cucharadas de perejil picado Preparación Combinar todos los ingredientes en una fuente plana y colocar en la rejilla superior. Cocinar a temperatura alta durante 7 minutos. Revolver y servir FILETE CON HUEVOS Ingredientes 4 onzas de filetes tiernos de carne vacuna de 1⁄2 pulgada de espesor sal saborizada 2 huevos grandes 1 cebolla de verdeo, en rodajas finas 1⁄2 tomate, sin semillas 2 cucharadas de queso Parmesano rallado Preparación Romper los huevos en una fuente plana y colocar sobre la cubierta del molde. Colocar el filete y el tomate sobre la rejilla superior al costado de los huevos. Sazonar la carne y agregar el queso a los tomates. Cocinar a temperatura elevada durante 10 minutos. Si usa carne congelada, colocar en la rejilla superior y cocinar a temperatura alta durante 5 minutos, agregar los huevos y el tomate y cocinar otros 10 minutos. 43 HUEVOS CON QUESO Ingredientes 2 huevos grandes 2 onzas de queso rallado (el que prefiera) 2 cucharadas de perejil picado sal y pimienta a gusto. Preparación Colocar el queso sobre el fondo de una fuente plana y romper los huevos encima. Colocar en la rejilla superior, sazonar y cocinar a temperatura alta durante 7 minutos o hasta que los huevos estén firmes. Agregar el perejil y servir. SALMÓN REVUELTO Ingredientes Esta receta es similar al salmón con bagel pero sin los bagel. 2 huevos grandes 2 onzas de salmón 2 cucharadas de queso crema 1 cebolla de verdeo, en rodajas finas 1 cucharada de alcaparras 1⁄2 taza de queso Suizo rallado sal y pimienta a gusto. Preparación Combinar todos los ingredientes en una fuente plana y colocar en la rejilla de 1 pulgada. Cocinar a temperatura elevada durante 8 minutos o hasta que los huevos estén apenas firmes. Revolver y servir TOFU REVUELTO Ingredientes Esta receta constituye una pequeña variación en una dieta de proteínas animales. 2 huevos grandes 2 onzas de tofu firme, en trozos 2 cucharadas de salsa 2 cucharadas de queso Parmesano rallado Preparación Combinar todos los ingredientes en un bol plano y colocar en la rejilla superior. Cocinar a temperatura elevada durante 7 minutos o hasta que los huevos estén firmes. 44 CHORIZO Y HUEVOS Ingredientes 2 huevos grandes 3 onzas de chorizo 2 cucharadas de salsa 2 onzas de queso Monterey Jack rallado salsa picante a gusto Preparación Colocar la salchicha alrededor del borde de la fuente. Romper el huevo en el centro y rociar con salsa y queso. Colocar en la rejilla de 1 pulgada y cocinar a temperatura elevada durante 10 minutos o hasta que los huevos estén firmes. CHORIZO REVUELTO Preparación Usar los mismos ingredientes de la receta anterior pero trozar la salchicha y mezclar todo en un bol plano. Colocar en la rejilla superior y cocinar a temperatura elevada durante 7 minutos. PIZZA CON MASA DE CARNE Ingredientes Esta deliciosa receta ofrece todo el sabor de una pizza con ingredientes combinados pero sin masa. Es un plato muy indicado para el almuerzo o la cena 4 onzas de salchicha Italiana 4 cucharadas de salsa para pizza 1 cucharadita de hierbas secas 1 cebolla de verdeo, en rodajas finas 1 champignon grande y blanco, en fetas 2 onzas de queso mozzarela rallado 1 cucharada de queso Parmesano rallado Preparación Colocar la salchicha en un plato o fuente de 6 pulgadas. Colocar encima la salsa y encima los demás ingredientes. Colocar en la rejilla superior y cocinar a temperatura elevada durante 10 minutos. ARENQUE CON GALLETAS Ingredientes Buscar arenques con las sardinas en la tienda local. Tienen un suave gusto a pescado salado y son deliciosos cuando se preparan en el horno. 1 lata de arenque ahumado 4 galletas saladas 1⁄2 tomate cortado en rodajas finitas jugo de limón Preparación Colocar las galletas en una fuente plana y cubrir con el tomate, arenques y jugo de limón. Colocar la fuente en la rejilla de 4 pulgadas y cocinar a temperatura elevada durante 4 minutos o hasta que esté todo bien caliente. 45 POLLO TROZADO Preparación Calcular tiempo de cocción de 18-20 minutos. Visitar la sección de especias de la tienda local para conocer las distintas especias y combinaciones especiales para pollo. Elegir las que prefiera y usar para sazonar el pollo con distintos gustos. Sazonar a gusto y colocar en la rejilla superior; cocinar durante 18-20 minutos. POLLO AL ROMERO Ingredientes 4 cucharadas de romero seco o fresco picado 4 dientes grandes de ajo picados 4 cucharadas de manteca 3 libras de pollo sal y pimienta a gusto. Preparación Aflojar la piel del pollo con una espátula de plástico para despegar la piel de la carne. Combinar el romero, ajo y la manteca y cocinar en microondas durante 30 segundos o hasta derretir. Verter la mezcla debajo de la piel del pollo y frotar todas las áreas. Colocar con el lado de la pechuga hacia abajo, en la rejilla de 1 pulgada y cocinar a temperatura elevada durante 20 minutos. Dar vuelta y rociar con los jugos de la bandeja; cocinar durante otros 25 minutos o hasta que la temperatura del interior del pollo llegue a 180ºF. PECHUGAS DE POLLO REBOZADAS Ingredientes 1 taza de TVP textura fina 2 cucharadas de manteca 1 huevo batido 4 a 6 onzas de pechuga de pollo, con o sin piel 2 cucharadas de perejil picado Preparación Colocar el TVP en una fuente oval plana. Sumergir el pollo en el huevo y rebozar en el TVP. Colocar la manteca encima y cocinar en la rejilla superior durante 8 minutos. Salpicar con perejil y servir. PECHUGAS DE POLLO CON FRUTAS SECAS Ingredientes 1 huevo batido o 1⁄4 de taza de sucedáneo de huevo 1⁄2 taza de nueces pacanas molidas 1 cucharada de germen de trigo 1 cucharadita de hierbas secas italianas sal y pimienta a gusto 4-6 onzas de pechuga de pollo perejil picado Preparación Combinar las nueces, germen de trigo y condimentos en una fuente oval plana. Sumergir el pollo en el huevo y rebozar en la mezcla con nueces. Colocar en la rejilla superior y cocinar durante 8 minutos. Salpicar con perejil y servir. 46 PECHUGAS DE POLLO A LA MANTECA Ingredientes 4 a 6 pechugas de pollo con piel 2 cucharadas de manteca 4 cucharadas de perejil picado sal y pimienta a gusto Preparación Colocar el pollo en una fuente oval plana y agregar los demás ingredientes. Colocar en la rejilla superior y cocinar a temperatura elevada durante 8 minutos. PECHUGAS DE POLLO CON CREMA DE MANZANAS Y AGUACATE Ingredientes 4 a 6 onzas de pechuga de pollo 1⁄4 aguacate maduro, picado 1⁄4 manzana dura, picada 1/2 taza de crema sal y pimienta a gusto Preparación Colocar el pollo en una fuente oval plana y colocar el aguacate y la manzana a los lados. Verter la crema y sazonar. Colocar en la rejilla superior y cocinar durante 13 -15 minutos. COSTILLAS AL ESTILO COREANO Ingredientes 2 costillas con carne de res (buscar en supermercado local) 4 cucharadas de salsa de barbacoa estilo coreano (puede comprarse en tiendas de productos asiáticos) Preparación Colocar las costillas y la salsa en bolsa de plástico y marinar durante 1 hora. Colocar las costillas en la rejilla superior y cocinar a temperatura elevada durante 5 minutos de cada lado. PECHUGAS DE POLLO CON CREMA DE CHAMPIÑONES Y PIMIENTOS Ingredientes 4 a 6 onzas de pechuga de pollo 2 champiñones grandes cortados en rodajas 1⁄2 pimiento rojo, amarillo o verde, cortado en trozos de 1 pulgada 1/2 taza de crema sal y pimienta a gusto Preparación Colocar el pollo en una fuente oval plana y agregar los demás ingredientes al lado del pollo. Colocar en la rejilla superior y cocinar a temperatura elevada durante 13-15 minutos. 47 PATA Y MUSLO DE POLLO CON SALSA Ingredientes 6 onzas de pata y muslo de pollo 1 taza de salsa preparada tan picante como guste 4 dientes enteros de ajo Preparación Combinación de especias mejicanas (visite la sección de especias de la tienda de alimentos) Colocar la salsa en una fuente plana con el ajo y colocar el pollo encima. Sazonar y colocar en la rejilla superior; cocinar a temperatura elevada durante 15 minutos. MUSLO DE POLLO CON ANCHOAS Ingredientes 6 onzas de muslo de pollo deshuesado 2 filetes de anchoas en lata 6 aceitunas negras 1⁄2 pimiento rojo, cortado de dados sal y pimienta a gusto Preparación Colocar las anchoas sobre el fondo de una fuente plana; machacar el pollo para que tenga 1⁄2 pulgada de altura. Colocar sobre las anchoas. Ubicar las aceitunas y el pimiento alrededor del pollo. Colocar la fuente en la rejilla superior y cocinar a temperatura elevada durante 8 minutos. PECHUGA DE POLLO ITALINO Ingredientes 5 onzas de pechuga de pollo con la piel 2 onzas de salchichón, picado 2 onzas de queso mozzarella o Monterey Jack rallado 1 onza de queso Parmesano rallado 1⁄4 taza de salsa preparada para spaghetti Preparación Machacar el pollo para que tenga 3/8 de espesor y colocar sobre el salchichón y el queso. Arrollar en cilindros con la piel estirada por encima; asegurar con un palillo para dientes. Colocar en la rejilla superior y cocinar a temperatura elevada durante 13 minutos. En el ínterin, calentar la salsa en el microondas. Colocar al arrollado de pollo en una fuente para servir y verter encima la salsa. 48 POLLO AL CURRY Ingredientes 4-6 onzas de pechuga de pollo, cortada en trozos pequeños 1 cebolla de verdeo, cortada en trozos de 1⁄2 pulgada 1⁄2 pimiento verde, cortado de dados 2 dientes de ajo, picados 2 cucharadas de jengibre fresco, rallado 1 cucharada de curry en polvo o pasta 1/4 taza de crema agria hojas de cilantro, picadas sal y pimienta a gusto Preparación Combinar todos los ingredientes menos el cilantro y la crema agria en una sopera. Colocar en la rejilla superior y cocinar a temperatura elevada durante 15 minutos. Incorporar la crema agria, espolvorear el cilantro y servir. POLLO TANDOURI Preparación Preparar y cocinar de la misma forma que el pollo al curry pero reemplazar el curry en polvo o pasta con tandouri en pasta (preferentemente en tiendas de comestibles asiáticos). POLLO THAI Ingredientes 4-6 onzas de pechuga de pollo, cortada en trozos pequeños 2 cucharadas de curry verde en pasta Thai 2 cucharadas de jengibre fresco, rallado 2 cucharadas de ajo picado 2 cucharadas de aceite de oliva 1⁄4 taza de coco crudo rallado, sin endulzar Preparación Combinar todos los ingredientes en una sopera plana y colocar en la rejilla de 4 pulgadas. Cocinar a temperatura elevada durante 15 minutos. Revolver y servir CUBE STEAK CON MANTECA APEREJILADA Ingredientes 1 cube steak (carne de res) 2 cucharadas de manteca o manteca dorada (ver salsas) 2 cucharadas de perejil picado Preparación Colocar la carne y la manteca en una fuente plana y ubicar en la rejilla superior. Cocinar a temperatura elevada durante 5-7 minutos según como quiera cocinar la carne. Salpicar con perejil antes de servir. 49 ENCHILADAS DE PAVO (4 porciones) Ingredientes Usar el pavo para envolver en lugar de usar tortillas; de este modo eliminará todos los hidratos de carbono. 4 a 4 onzas de chuletas de pavo 4 fetas de mozzarella o queso blanco mexicano, (4 onzas aprox.) Condimento estilo mexicano a gusto 1⁄2 taza de salsa preparada 1/2 taza de crema agria cilantro picado Preparación Machacar las chuletas de pavo para que tengan 3/8 de espesor y colocar sobre el queso; condimentar. Enrollar y acomodar, con la costura hacia abajo alrededor del borde de la fuente. Rociar con aceite de cocina y colocar en la rejilla superior; cocinar a temperatura elevada durante 10 minutos. En el ínterin, calentar la salsa durante 1 minuto. Verter la salsa sobre el pavo y espolvorear con el cilantro. TROZOS DE PATO Ingredientes (2 a 3 porciones) El pato, por lo general, se consigue congelado, lo que dificulta el trozado. Si piensa que no lo podrá trozar, pregunte al carnicero amigo que descongele un pato de 5-6 libras y lo troce. Usar la espalda, cuello y menudillos para caldo. 2 patas, 2 muslos, 2 alas y 2 pechugas cortadas por la mitad sal y pimienta a gusto 4 cucharadas de carvi triturado Preparación Perforar la piel varias veces con un tenedor o cuchillo. Sazonar ambos lados de las piezas y colocar sobre la rejilla de 1 pulgada con la piel hacia abajo. Cocinar a temperatura elevada durante 30 minutos. CHULETA A LA FLORENTINA Ingredientes 1 chuleta de unas 2 pulgadas de espesor, unas 6 onzas sal y pimienta a gusto 1⁄4 taza de aceite de oliva jugo de medio limón Preparación Colocar todo en una bolsa de plástico y marinar durante 1 hora. Colocar la marinada en una fuente y la chuleta en la rejilla de 4 pulgadas. Secar la chuleta con toalla de papel antes de cocinar. Cocinar a temperatura elevada durante 7 minutos, dar vuelta y cocinar otros cinco minutos para comer 'vuelta y vuelta'. 50 CHULETA A LA PIMIENTA (steak au poivre) 4 a 6 porciones) Ingredientes 1-2 libras de entrecot (sirloin steak) sal a gusto 1⁄2 taza de pimienta en grano molida 4 onzas de manteca, derretida 1⁄4 cucharadita de pimienta de cayena 3 cucharadas de salsa Worcestershire 1 cucharada de jugo de limón perejil picado Preparación Colocar la manteca, pimienta y salsa Worcestershire en un fuente plana de 10 pulgadas, forrada. Salar la carne y machacar la pimienta a ambos lados de la carne. Colocar en rejilla de 4 pulgadas. Cocinar a temperatura elevada durante 5 minutos, dar vuelta y cocinar otros 5 minutos. Cortar en tajadas de 1 pulgada y servir con la salsa. ROAST BEEF Preparación El horno es muy indicado para recalentar. Prepare el roast beef según las instrucciones del recetario culinario y refrigere. Cuando desee una porción de roast beef, corte porciones de 4 a 6 onzas y coloque en una fuente. Caliente en la rejilla superior a temperatura máxima durante 5 minutos. CHULETAS BARRY WALL Ingredientes 2 cucharadas de manteca 1⁄4 cucharadita de mostaza en polvo 1/2 cucharadita de salsa Worcestershire perejil picado 6 onzas de chuletas tiernas, entrecot, costillas, asado, etc. de 1 1⁄2 de espesor sal y pimienta a gusto Preparación Condimentar las chuletas y cocinar en la rejilla superior a temperatura elevada durante 5 minutos de cada lado. En el ínterin, combinar los demás ingredientes. Colocar la chuleta sobre el plato y sazonar con la mezcla de manteca. CHULETA A LA JAPONESA Ingredientes 4 a 6 onzas de chuletas de entrecot 1⁄4 de taza de pasta miso (se compra en tiendas de alimentos asiáticos) 2 cucharadas de sake o vino blanco seco 2 cucharadas de rodajas de jengibre en vinagre Preparación Combinar el miso y el sake y verter sobre la chuleta; marinar durante 1 hora en una fuente plana. Cocinar en la rejilla superior a temperatura elevada durante 5 minutos de cada lado; servir con el jengibre. 51 CHULETA A LA SICILIANA Ingredientes 4 a 6 onzas de chuleta de entrecot o de costilla 2 cucharadas de queso Parmesano rallado 1 filete de anchoa en lata 1⁄4 taza de tomates en lata, picados 1 cucharada de alcaparras 1 cucharada de aceite de oliva Preparación Cocinar la chuleta en la rejilla superior a temperatura elevada durante 5 minutos de cada lado. En el ínterin, combinar los demás ingredientes. Verter la mezcla sobre la chuleta y cocinar otros 3 minutos. HAMBURGUESAS DE RES A LA RUSA Ingredientes 5 onzas de carne picada 1 cebolla de verdeo, en rodajas finas 1 cucharada de manteca 1 cucharadita de granos de caldo de res 1 cucharada de crema 1⁄4 de cucharadita de nuez moscada rallada 2 cucharadas de perejil picado Preparación Combinar todos los ingredientes para formar una hamburguesa de 1 pulgada de espesor. Colocar en una bandeja plana y cocinar en la rejilla superior a temperatura elevada durante 6 minutos. PAN DE CARNE (3 a 5 porciones) Ingredientes 1 libra de carne picada 1 huevo 1 TVP de grano fino 1 cucharada de combinación de hierbas estilo italiano 1⁄2 taza de salsa para spaghetti 2 fetas de tocino Preparación Combinar todos los ingredientes, salvo el tocino, y formar un pan oval de 4 pulgadas por 3 pulgadas. Cubrir con el tocino y colocar en asadera de aluminio sobre la rejilla de 1 pulgada. Cocinar a temperatura elevada de 45 a 50 minutos. 52 RESOLUCIÓN DE PROBLEMAS Si el artefacto presenta alguna falla no trate de repararlo usted mismo; en caso de daño, comuníquese con el proveedor de servicios técnico que figura en el departamento de servicio al cliente. Problema Causa posible Solución El asa está hacia arriba. Pliegue el asa hasta que queda fija en su lugar. No programó el temporizador. Programe el temporizador el tiempo deseado. La unidad no está enchufada. Conecte la unidad al tomacorriente de energía. El aparato tiene fallas. Desenchufe la unidad y comuníquese con el servicio al cliente. NO use la unidad. El aparato no funciona. 53 GARANTÍA LIMITADA MC Appliance Corporation garantiza que todas los hornos de convección con bol de vidrio carecen de defectos en el material y la mano de obra y acuerda solucionar cualquiera de estos defectos o instalar la(s) parte(s) nueva(s) (a elección de la compañía) en caso de que la unidad haya fallado durante el periodo de garantía. Las partes y gastos de reparación están cubiertos en esta unidad por un periodo de un año a partir de la fecha de compra. Se requiere una copia de la factura o recibo de compra para recibir el servicio de garantía por parte de un agente de servicio autorizado. Esta garantía cubre los aparatos que se usen dentro de los Estados Unidos continentales, Alaska, Hawái y Puerto Rico. La garantía no cubre lo siguiente: Daños causados por embarque o por instalación inadecuados. Daños debido al mal uso o abuso. Pérdidas de contenido debido a falla de la unidad. Componentes internos como bombillas, etc. Reparaciones hechas por agentes de servicio no autorizados. Llamadas a servicio no relacionadas con defectos en el material o mano de obra como uso instalación inadecuada del producto. Reemplazo o restablecimiento de fusibles o interruptores de circuito. Falla de este producto si se usa con fines distintos a los que fue diseñado Gastos de eliminación por unidades con falla no regresadas a nuestra fábrica. Cualquier costo de envío en que se incurra como resultado de una unidad que no funcione como se especificó. Gastos por transporte para trabajos de servicio del producto si su aparato está ubicado en un área remota donde no esté disponible el trabajo de servicio de un técnico autorizado. La desinstalación y reinstalación de su aparato si está instalado en un sitio inaccesible o no está instalado de acuerdo con las instrucciones publicadas. Limitaciones de remedios y exclusiones: La reparación del producto de acuerdo con los términos de este documento, es el único y exclusivo remedio determinado en esta garantía limitada. Todas y cada una de las garantías implicadas, incluyendo la calidad de comerciable y capacidad para un propósito particular, se limitan mediante la presente a un año o el periodo más corto permitido por la ley. MC Appliance Corporation no es responsable por daños incidentales ni resultantes y ningún representante o persona alguna están autorizados para asumir de parte nuestra ninguna otra responsabilidad en relación con la venta de este producto. Bajo ninguna circunstancia se le permite al consumidor regresar esta unidad a la fábrica sin consentimiento previo por escrito de MC Appliance Corporation. Algunos estados prohíben la exclusión o limitación por daños incidentales o resultantes, o limitaciones en las garantías implícitas. Esta garantía le otorga a usted derechos legales específicos, y usted puede también tener otros derechos que varían según la entidad federativa donde se encuentre. Modelo MCSGC07W Partes Un Año Manos de Obra Un Año Tipo de Servicio Transporte Para Servicio o Asistencia, llame por favor al 888-775-0202. O visítenos en www.mcappliance.com para solicitar el servicio de garantía u ordenar piezas.