1
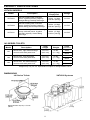
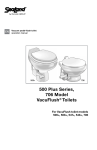
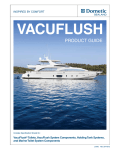
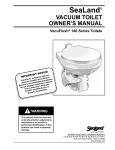
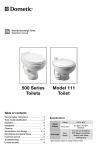
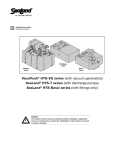
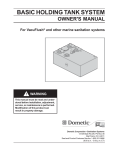
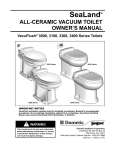
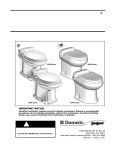
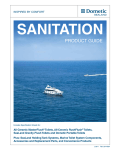
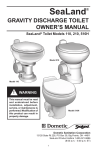
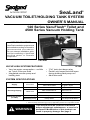
SeaLand® Vacuum Toilet/HOLDING TANK SYSTEM Owner’s Manual 140 Series VacuFlush® Toilet and 4500 Series Vacuum Holding Tank IMPORTANT NOTICE VacuFlush® sanitation systems must be installed according to Dometic’s r e c o m m e n d e d p r o c e d u r e s . Do not attempt installation without first contacting a VacuFlush certified dealer or Dometic Corporation. VHT4501 VF149 VacuFlush SYSTEM FEATURES • Very low water consumption – as little as 1 pint/.5 liter per flush • Integrated vacuum pump and holding tank • “Full” tank shut-down relay • Pedal Lock keeps flush ball open during holding tank pump-out • Adult-size seat SYSTEM Specifications Water Supply Water hose connection Thread size 2 gpm/ 7.6 lpm Standard 1.5 inch / 38 mm Hose ID Discharge Piping Electrical System (12 VDC) Hose runs 1/2 inch (13 mm) NPT Flow rate at toilet Max. horizontal run Max. vertical run 20 ft. / 6.1 m* 3 ft. / 0.9 m* Vacuum pump 3-amp draw 5-amp fuse/breaker** Discharge pump 6-amp draw 10-amp fuse/breaker** * Distance between toilet discharge and vacuum holding tank inlet. ** Vacuum pump and discharge pump (if applicable) should be on separate circuits. WARNING This manual must be read and understood before adjustment, maintenance, or service is performed. Modification of this product can result in property damage. See page 3. 1 Product Specifications VHT4500 Models Model Description Weight – Empty/Full Voltage VHT4501 Vacuum holding tank. Indicator panel. 9-gallon (34-liter) capacity. Straight fitting (vertical) discharge. 30 lbs. (14 Kg)/ 102 lbs. (46 Kg) 12 VDC VHT4502 Vacuum holding tank. Indicator panel. 9-gallon (34-liter) capacity. Elbow fitting (horizontal) discharge. 30 lbs. (14 Kg)/ 102 lbs. (46 Kg) 12 VDC VHT4511 Vacuum holding tank with discharge pump. Indicator panel. 9-gallon (34-liter) capacity. Swivel fitting discharge. 38 lbs. (17 Kg)/ 110 lbs. (50 Kg) 12 VDC 140 Series Toilets Model Description Seat Height Weight Color (ceramic) 147 Above-floor, right side discharge vacuum toilet with pedal lock. 13-1/2 in. (343 mm) 25 lbs. (11.3 Kg) White 148 Above-floor, rear discharge vacuum toilet with pedal lock. 13-1/2 in. (343 mm) 25 lbs. (11.3 Kg) White 149 Above-floor, left side discharge vacuum toilet with pedal lock. 13-1/2 in. (343 mm) 25 lbs. (11.3 Kg) White Bone Bone Bone Weights may vary ± 2-3%. Specifications subject to change without notice. Dimensions VHT4500 Systems 140 Series Toilets Toilet dimensions may vary ± 3/8-inch (10mm). 2 Table of Contents System Features.......................................... 1 System Specifications ................................. 1 Product Specifications, Dimensions............. 2 Warnings ..................................................... 3 Toilet System Components........................... 4 Installation...............................................5 - 8 Before Operation.......................................... 9 System Start-Up........................................... 9 Toilet Operation............................................ 9 Holding Tank Pump-out.............................. 10 Proper Bowl Cleaning . .............................. 10 Clearing Discharge Lines........................... 11 Winterizing.................................................. 11 Maintaining the System.............................. 11 Deodorants and Special Tissue . ............... 12 Marine Sanitation Regulations................... 12 Troubleshooting...................................13 - 15 Toilet Model Identification........................... 15 Ordering Parts............................................ 15 Customer Service and Warranty................ 16 Warnings SeaLand vacuum toilet systems must be installed according to Dometic’s recommended procedures. Dometic also recommends that a qualified marine technician or electrician install or service this product. Equipment damage, injury to personnel or death could result from improper installation. DOMETIC SANITATION CORPORATION ACCEPTS NO RESPONSIBILITY OR LIABILITY FOR DAMAGE TO EQUIPMENT, OR INJURY OR DEATH TO PERSONNEL THAT MAY RESULT FROM IMPROPER INSTALLATION, SERVICE OR OPERATION OF THIS PRODUCT. back siphonage of seawater into the boat. Failure to do so can result in flooding which can cause loss of property and life. * if connected to raw water WARNING! HAZARD OF FLOODING – If the toilet uses fresh water for flushing and is connected directly or indirectly to a shoreside municipal water system at ANY time, shoreside water connections MUST be disconnected if the boat is unattended (even for a brief period). Failure to comply can result in flooding which can cause loss of property and life. WARNING! HAZARD OF FLOODING – If the toilet system is connected to ANY through-the-hull fittings, properly installed seacocks MUST be installed in all piping connected to through-the-hull fittings. Seacocks MUST be easily accessible to all users of the toilet system or secondary valves fitted in hoses where they are easily accessible. ALWAYS close seacocks when toilet system is not in use (even if boat is unattended for a brief period. All valves MUST be full bore valves and marine quality. Screw-to-close gate valves are not recommended. Failure to comply can result in flooding which can cause loss of property and life. WARNING! HAZARD OF FLOODING – If toilet uses raw water for flushing at ANY time, a raw water pump controlled by an automatically operating demand switch MUST NOT be installed. If the onboard water valve or any plumbing connections were to leak, the automatically operated pump would start and could flood the boat. Failure to comply can cause loss of property and life. WARNING! HAZARD OF FLOODING – Before beginning any work on this product, be sure that all electrical power to the unit has been turned off. Failure to do so can result in flooding which can cause loss of property and life. WARNING! HAZARD OF FLOODING – If toilet is connected to ANY through-the-hull fittings, ALL flexible hoses must be of marine sanitation quality and must be secured to ANY fittings (such as those at seacock, vented loop or toilet) with two stainless steel, worm-drive hose band clamps at each connection. Connections MUST be checked frequently for integrity. Failure to comply can result in flooding which can cause loss of property and life. WARNING! HAZARD OF SHOCK OR FIRE – Always use recommended fuse, circuit breaker and wire size. Failure to do so can result in fire that can cause the loss of property and life. CAUTION: Overfilling the holding tank can create serious damage to the sanitation system, such as rupturing the holding tank and releasing tank contents into the bilge. To help prevent this possibility, the VHT4500 includes a “full” tank safety shut-down relay to the vacuum pump. The “full” signal is generated by a built-in tank level probe. WARNING! HAZARD OF FLOODING – If toilet rim is below the waterline at ANY time (during any conditions of heel, load or trim) and is connected to ANY through-the-hull fittings, properly positioned ventilated (vented) loops MUST be installed in intake* or discharge piping to prevent potential 3 Toilet System Components DOCKSIDE DISCHARGE Indicator Panel Vent Filter DISCHARGE Pump (opt.) 140 Series Vacuum Toilet Overboard DISCHARGE VHT4500 Series Vacuum Holding Tank VACUUM TOILET The VacuFlush 140 series (EcoVac) offers a space-saving design with adult-sized seat. All come with an attractive, easy-to-use flush pedal that also locks open during tank discharge. Medium-height 140 series toilets are available in three discharge models: a rear discharge unit, a right-side discharge unit, and a left-side discharge unit. VACUUM HOLDING TANK (VHT) The VHT4500 produces and stores vacuum between flushes. The vacuum pump draws only 3 amps of electrical current at 12 VDC. The VHT contains a pressure differential switch that deactivates the pump when the proper level of vacuum is generated. The VHT system is equipped with “3/4-full” and “full” level float switches. The “full” float switch is wired to an automatic shutdown relay that prohibits the vacuum pump from generating vacuum once the tank is full. TANKWATCH STATUS PANEL Indicates when holding tank is 3/4 full and completely full. When red “full” light is on, vacuum pump shuts down until the holding tank is pumped out. VHT DISCHARGE PUMP (VHT4511) Diaphragm-style pump for overboard discharge of effluent. Runs dry without harm. Pumps out in less than three minutes. On-off switch available separately. Discharge holding tank only in waters where permitted – check with local Coast Guard. 4 Installation Locating the Components Component Location Checklist Vacuum toilet Bathroom compartment 1. Check dimensions of mounting space. 2. Determine best toilet discharge connection: right, left or rear discharge (above floor only). 3. Allow at least 1½-inch (38 mm) clearance between toilet rear and wall. 4. Make sure compartment, shower and vanity doors will clear toilet bowl. 5. Check location nearest cold water line. 6. Water line must be at least ½-inch ID and provide a minimum flow of 2 gallons per minute (7.6 liters per minute). 7. Check clearances to side wall for installation of flush lever cover and back wall for best clearance. Vacuum holding tank (VHT) Any space that permits access to remove entire unit 1. The vacuum holding tank inlet must be located no more than 20 feet (6.1 m) from the toilet discharge. 2. The VHT inlet must not be located more than 3 feet (0.9 m) above the outlet of the toilet. (NOTE: The lower the tank, the better the system efficiency.) 3. The VHT must be mounted in a horizontal position. 4. The VHT must not be exposed to temperatures over 120°F (49°C). Do not place near heat sources such as engine manifolds, water heaters, generators, etc. Mounting space must provide for free air flow. Vacuum hose and fittings Follow routing instructions 1. OdorSafe Plus Sanitation Hose should be used; it is sized to use SeaLand fittings in the system, minimizing vacuum leakage. 2. It is important that restrictions in the vacuum hose be kept to a minimum. Where a bend must occur in a hose run, the radius of the bend must not be less than 8.5 inches (216 mm). If a tighter radius is required, use a SeaLand 90° bend kit to assure a clog-free transition. Installing Vacuum Toilet 1. Toilet must be installed on a horizontal surface, and located so that the toilet seat can be lifted and the foot pedal operated without interference from other fixtures. 2. Place toilet in desired location at least 1.5 inches (38 mm) from back wall. 3. Use screws included to fasten toilet to floor. Cover screw heads with caps provided. 4. Attach 1/2” ID water supply pipe or hose from water system to 1/2” NPT connection on back of water valve. 5. Connect sanitation hose to toilet discharge fitting by following same instructions for attaching hose to vacuum holding tank (see page 7). 5 Installation (cont’d) Routing Sanitation Hose B. Maximum length of hose between toilet and vacuum tank is 20 ft. (6.1 m). A. Maximum difference in height from toilet to vacuum tank is 3 ft. (0.9 m). A B Route the sanitation hose from the toilet outlet to the intended location for the vacuum holding tank inlet (see tips for hose installation on page 7). Make sure the hose layout does not exceed the rise and run distances shown above. Hose Layouts YES YES NO! YES 6 Installation (cont’d) Vacuum Holding Tank The Vacuum Holding Tank (VHT) can be located in any accessible space as long as the 1.5-inch hose is not longer than 20 feet (6.1 m) and the VHT inlet is not higher than 3 ft. (0.9 m) from the toilet outlet. The VHT must be mounted horizontally. 1. Position VHT in space intended. Make sure there is enough space around top of VHT to make all plumbing and electrical connections. 2. Secure the VHT with four 1/4 inch x 1-1/2 inch long lag screws and washers on all tank mounting feet. Secure at all four mounting feet. Connecting Sanitation Hose 1. To connect 1.5-in. (38 mm) ID sanitation hose (not supplied) from toilet outlet fitting to the VHT inlet fitting, place two 2-inch (51 mm) hose clamps on hose near each end that will attach to discharge and inlet fittings. Apply liquid dishwashing soap to outside of fitting and inside hose. Twist hose as it is pushed onto fitting. Hose end should be flush against the fitting shoulder when properly installed. After pushing hose and fitting together, tighten both hose clamps to tighten the connection. 2. Connect 1.5-in. (38 mm) ID sanitation hose(s) (not supplied) to tank outlet fitting(s) with two 2-inch clamps per connection, then connect other end(s) to other discharge fittings. 3. Connect 5/8-in. (16 mm) ID vent hose (not supplied) between vacuum pump discharge and through-hull vent fitting. Install SaniGard™ vent filter (available separately) in vent line for added protection against malodors. How To Make Hose Installation Easier Other than dishwashing liquid, do not use any other lubricants, sealants or adhesives when connecting sanitation hoses and fittings. Do not restrict the ability to pull the hose or pipe. YES YES Avoid binding corners and sharp bends. Do not use wire ties to secure the hose or pipe. Trough support Vertical hose runs should be installed as vertical as possible (no long runs at an angle) for maximum vacuum efficiency. EXCELLENT 7 Installation (cont’d) Electrical System Wiring Diagram TankWatch Status Panel Electrical installation must follow ABYC standards and be performed by qualified personnel only! 1. Select a location for the holding tank status panel. Make sure that wires from tank level probes and status panel can be connected with panel in chosen location. 2. Cut an access hole in the wall according to template (below). 3. Connect wires from panel to probe wires according to wiring diagram (supplied separately). 4. Fasten panel to wall with two fasteners that are provided. VACUUM PUMP Vacuum pump must be protected by a 5-amp fuse or circuit breaker. Connect wires according to wiring diagram. Tank Level Probes “3/4 FULL” and “FULL” tank level probes are pre-installed in the vacuum holding tank. Connect wires to the TankWatch Status Panel according to the wiring diagram. Fastener locations Light/wiring access hole Discharge Pump (VHT4511) Discharge pump must be protected by a 10-amp fuse or circuit breaker. Fuse or circuit breaker for discharge pump must be on circuit that is separate from toilet electrical circuit. Connect wires according to wiring diagram. 1 in. (25mm) 1-7/8 in. (48mm) 2-9/32 in. (58mm) TankWatch Panel Mounting Template (actual size) 8 Before Operation 1. Fill freshwater tank and add deodorant to holding tank through toilet bowl. (See System Start-Up section, below.) 2. Make sure all guests understand the operation of the VacuFlush system and the instruction label is in plain sight and easy for guests to read. If this label is not visible under the toilet seat lid, please contact SeaLand Customer Service immediately. 3. Remember, the vacuum pump starts automatically. Shut off the system before servicing and do not leave the boat with toilet system breaker on. 4.Never use drain openers, alcohol, solvents, etc. in the system. 5. If the system does not function properly, refer to the Troubleshooting section of this manual and repair as necessary. If problem persists, contact your local SeaLand dealer or see the Customer Service section of this manual. System Start-up 1. Turn on inlet water supply. 2. Turn on electrical power to system. 3. Flush water into system by depressing flush lever until water starts flowing to the vacuum pump, approximately 15 seconds. The vacuum pump will run for approximately three minutes until system reaches operating vacuum level and then will shut off. Toilet Operation 1. To add water to the toilet before using, raise flush lever until desired water level is reached. Generally, more water is needed only when flushing solids. Raise pedal to add water. 2. To flush toilet, press flush lever sharply down to the floor until contents clear bowl. A sharp popping noise is normal when the vacuum seal is broken and flushing action begins. Hold lever down for three (3) seconds. Release pedal, letting it snap back into original position. If flush lever is accidentally released before waste clears bowl, do not flush again until vacuum pump stops running. A small amount of water remains in bowl after flushing. Press pedal to flush. 3. Do not dispose of sanitary napkins or other non-dissolving items in toilet, such as facial tissue or paper towels. These items can cause plugging of the system. Refer to the Deodorants and Special Tissue section in this manual for more information. 9 Do not flush foreign objects. Holding Tank Pump-out Operation NOTE: Before pumping out holding tank, turn off water supply to toilet and electrical power to vacuum pump. Follow steps below to assure thorough tank discharge. 1. a. Press down fully on Pedal, then b. press Lock. 2. Slowly bring Pedal up while holding Lock down against Pedal until Pedal stops. The Lock prevents the flush ball inside the toilet bowl from closing completely. 3. Pump out holding tank. 4. After pump-out is complete, press down on Pedal fully, then release to close flush ball. Proper Bowl Cleaning To maintain the toilet’s original, lustrous appearance, use SeaLand® Toilet Bowl Cleaner or other non-abrasive bathroom and toilet bowl cleaners. Follow label directions. Caution To avoid damaging the toilet system’s seals and valves, do not clean toilet with abrasive cleaners, caustic chemicals, or lubricants and cleaners that contain alcohols or petroleum distillates. 10 Extended periods of non-use – Clearing Discharge Lines Sanitation hoses should be cleared if toilet will not be needed for an extended period of time (more than two weeks). 1. Fill toilet bowl with water and add 4 oz. (120 ml) of biodegradable laundry detergent (should not contain bleach). 2. Flush toilet, holding pedal down for about two minutes. Close flush ball. 3. Turn off water supply to toilet. 4. Flush the toilet without water, allowing the vacuum pump to shut off after the flush. Repeat three times. (This procedure will minimize any remaining water in the sanitation hoses.) 5. Turn off power to the vacuum pump. 6. Completely pump out holding tank. If system will be subjected to freezing temperatures, please follow above procedure, then winterize system as described below. Winterizing At the end of each season, the SeaLand toilet should be winterized for storage by using potable water-safe antifreeze in the system. To use antifreeze: 1. Drain potable water tank. 2. Add freshwater antifreeze to potable water tank. 3. Flush potable water antifreeze and water mixture through toilet and into the waste holding tank. Each installation is different, so amounts may vary. User discretion is required. 4. Empty holding tank. NOTE: Use nontoxic antifreeze designated for potable water systems. (See vehicle owner’s manual.) CAUTION: Never use automotive-type antifreeze in freshwater systems. Maintaining The System This chart is a general guide for keeping your sanitation system 100% ready for use at any time. Maintenance Procedure Service Interval Additional Information Ro uti ne Check all clamped hose joints below water line for leaks. Check filter screen in water valve. Replace vent filter (if installed in holding tank vent line). Monthly – After first year of service, then as needed if water flow is noticeably slower. Screen is located inside water valve inlet. Annually – M ajo r system m ai ntenanc e Replace flush ball seal and flush ball (if required). Every three years 11 See toilet parts list for replacement kit part number. Deodorants and Special Tissue Your SeaLand toilet system may require the regular addition of a deodorant product to reduce malodors and to help break down holding tank contents. Several factors should be considered in selecting a deodorant product. Liquid or Granulated. Liquid products work more quickly by readily going into solution. Granulated powder formulations have the advantage of requiring less storage space and are less likely to leak if the package is inadvertently damaged. Formaldehyde versus Non-Formaldehyde. Dometic manufactures both types of deodorants. Generally speaking, formaldehyde formulas control odor very effectively at all temperatures and with all degrees of water hardness. Both SeaLand® NATURAL and Clean ‘n Green™ brands, which are formaldehyde-free, are similarly effective. How Much Deodorant and How to Add It. The deodorant is added directly into the toilet bowl, then flushed into the holding tank. Follow bottle or package instructions. Conditions of extremely warm weather, longer waste holding time and larger tank capacities may require more deodorant treatment. Also, to maintain optimum efficiency in odor control, the waste holding tank should be cleaned thoroughly at least once or more each season depending on use. Why Not Use Household Toilet Paper in Your Toilet. Household tissues often contain adhesives which bond together the paper fibers from which the tissue is made. The adhesives prevent the tissue from breaking apart, and their use in “ultra-low flow” systems can cause system clogging. SeaLand tissue is especially designed for use in low water toilet systems. Its rapid dissolving properties minimize the amount of residual paper in the holding tank and allow deodorizers to work more efficiently. SeaLand Brand versus Other Brands. We constantly strive to provide our system owners with effective products that have minimal environmental impact and good value. Many deodorant products do not measure up to our standards of performance and value. SeaLand® Rapid-Dissolving Toilet Tissue Four 400-sheet rolls Part No. 379441204 SeaLand® Cleaner 16-oz. bottle Part No. 379314016 SeaLand® Clean ‘n Green Bowl Cleaner/Tank Deodorant 12-2 oz. drop-in pouches Part No. 379512602 SeaLand® NATURAL Liquid Deodorant 32-oz. bottle Part No. 379114032 Marine Sanitation Regulations All boats with fixed toilets in U.S. waters and in the waters of some other countries are required to have an operable marine sanitation device (MSD). The VacuFlush vacuum sanitation system, when installed in a boat, is a holding tank or Type III system as defined by the U.S. Coast Guard. Type III systems permit operation of the toilet without direct discharge of untreated waste after every flush. Type III systems can be discharged at marina dockside pump-out stations or, if in coastal waters, a minimum of three miles offshore. Overboard discharge capability must remain secured while within the three-mile limit. The overboard discharge pump is activated by a keyed switch in the toilet compartment. This key should be removed at all times except when discharge pump is operating. Sewage from any source should not be discharged directly into our waters. If you are interested in learning more about this issue, please visit our website at www.DometicSanitation.com. 12 Troubleshooting Problem Possible CauseService Instructions 1.Water will not stay in bowl. a.Loose clamp ring. b.Improper seal around flush ball due to dirt or debris on underside of ball seal. c.Worn or damaged seal. d.Worn or damaged flush ball. 2.Plastic flush ball will not close a.Too much friction between flush completely. ball and ball seal. b.Water valve screws are too tight. c.Defective spring cartridge. a.Tighten clamp ring adjusting nut. b.Inspect flush ball and underside of seal for foreign objects. Clean flush ball and under seal if needed. c.Replace seal. d.Replace flush ball. a.Lubricate between flush ball and ball seal with furniture polish or cooking spray. b.Loosen screws slightly. c.Check spring tension by pushing flush lever down, then release it suddenly. If lever does not snap back into original position, replace spring cartridge. 3.Flush ball will not open. a.Broken shaft. b.Shaft not fully engaged in the spring cartridge. a.Replace shaft. b.Put pressure on shaft from under the flush ball (pushing into spring cartridge) until it engages. You may have to rotate flush ball slightly until shaft lines up with square in spring cartridge. 4.Water does not shut off in toilet (toilet overflows). a.Dirt lodged in water valve seal. a.Disassemble and clean water valve. 5.Water does not enter toilet bowl properly. a.Insufficient water flow rate at toilet. a.Check water flow rate at toilet. Rate should be 2 gpm (7.6 lpm) at toilet. b.Water valve clogged. b.Remove and clean screen located at inlet of water valve. c.Plugged rim wash holes in toilet. c.Clean holes. If still a problem, replace the toilet bowl. 6.Water leaking from water valve. a.Water valve body cracked due to freeze damage. b.Water line connection is loose or not seated properly. c.Defective water valve. d.Stripped threads. 13 a.Replace water valve. b.Insure that threads are not cross-threaded and tighten. c.Replace water valve. d.Replace water valve. Troubleshooting (cont’d) Problem Possible CauseService Instructions 7.Water leaking from rear of toilet bowl. a.Worn or defective vacuum breaker. a.Remove vacuum breaker cover and look into top of vacuum breaker. Flush toilet. If water leaks during flush, vacuum breaker needs to be replaced. b.Loose vacuum breaker. b.Secure vacuum breaker connection. c.Cracked or defective toilet bowl. c.Replace toilet bowl. 8.Water is leaking from the base/toilet connection. a.Clamp ring may be loose. b.Ball seals may be worn or defective. a.Tighten the clamp ring. b.Replace ball seals. 9.Vacuum pump running too much between flushes. a.Flush ball in toilet leaks. a.Leave small amount of water in toilet. If water drains from bowl, see problems 1 - 2. b.Tighten all hose connections at pump, vacuum tank, holding tank, and toilet. c.Disassemble air pump and inspect under the two flat disk valves. If foreign material is present, remove it and reassemble pump. d.Inspect diaphragm in pump for small hole or rip. Replace if necessary. e.Disassemble discharge outlet and inspect duckbill valve. Clean or repair if necessary. b.Vacuum line leak. c.Foreign material has fouled air pump valves. d.Pump diaphragm worn or damaged. e.Duckbill valve in discharge fitting stuck open. 10. Toilet will not flush. (No vacuum.) a.Vacuum pump will not run. b.Plugged vacuum discharge line. c.Plugged vacuum pump valve. d.Vacuum pump discharge or intake lines plugged. 11. Vacuum pump will not run. a.No power. b.Loose or broken electrical wiring. c.Improper electrical connections. d.Faulty vacuum switch. e.Faulty motor. 12. Vacuum pump will not shut off. a.Insufficient vacuum. b.Excessive vacuum leak. c.Faulty vacuum switch. d.Improper wiring. 14 a.See problem 11. b.Blockage usually at base of toilet below flush ball. Disconnect line and clear. c.Inspect and clean pump valves. Replace if needed. d.Disassemble lines and clean. a.Check input power, circuit breaker and fuse. b.Tighten or reconnect wires at pump and vacuum tank. c.Make certain wires at vacuum switch are connected to the “B” terminals. d.To check vacuum switch, short across “B” terminals with jumper wire. e.Replace motor. a.Verify pump pulls minimum 10 in. Hg of vacuum. b.See problem 9. c.To check switch, remove one “B” terminal wire. d.Check wiring. Refer to Wiring Diagram (page 8). Troubleshooting (cont’d) Problem 13. Vacuum pump is making a loud noise. Possible CauseService Instructions a. Loose set screw in crank assembly. b.Pump bearing is worn. c.Dirt or debris in pump body. d.Worn or defective motor. e.Motor loose from mounting bracket. a.Remove cover from pump and check crank assembly setscrew for tightness. b.Check pump bearing for wear. Replace if needed. c.Disassemble air pump assembly and inspect inside of pump body for foreign objects. d.Replace motor assembly. e.Tighten the four (4) screws securing the motor to the mounting bracket. 14. Vacuum pump running too slow, overheating, blowing fuses or circuit breakers. a.Improper voltage. 15. Difficulty in emptying waste from holding tank. a.The toilet pedal is not locked open during holding tank pump-out. a.Lock the toilet pedal open (see “Holding Tank Pump-out Operation”, page 10). 16. Vacuum pump emits odor. a.Worn, torn, or punctured pump diaphragm. a.Replace pump diaphragm. 17. System emits odor. a.Check for improper flexible hose. a.Replace hose where necessary. a.Check input power for low voltage. b.Loose or broken electrical wiring. b.Tighten or reconnect wires. c.Improper wire size. c.Wire size too small – check electrical diagram for proper wire size for voltage of pump used. d.Motor worn or defective. d.Check motor and replace if necessary. e.Tank is overfilled – air pump forced e.Disassemble air pump and to pump water. empty out water. Clearing blockage in toilet base 1. Turn off water to the toilet. 2. Press pedal to open the flush ball. 3. Use a plunger to dislodge the foreign material from the 1-inch diameter orifice at the bottom of the base, or use a small diameter blunt rod to attempt to push the blockage through the orifice. 4. Make sure vacuum action pulls material into discharge line before turning on water supply. Toilet Model Identification Ordering parts The model identification label is located on the base of the toilet. It shows the model number and serial number of the product. A similar label is also located on the vacuum holding tank. Dometic is ready to assist you in the event service is required. Before calling, please have the following information available: 1. Toilet model number. 2. Part number, description, color (if applicable), and quantity. Refer to separate parts list for details. 15 Customer Service There is a strong, worldwide network to assist in servicing and maintaining your sanitation system. For the Authorized Service Center near you, please call from 8:00 a.m. to 5:00 p.m. (ET) Monday through Friday. Telephone: Fax: Web site: You may also contact or have your local dealer contact the Parts Distributor nearest you for quick response to your replacement parts needs. They carry a complete inventory for the SeaLand product line. 1 800-321-9886 U.S.A. and Canada 330-439-5550 International 330-496-3097 U.S.A. and Canada 330-439-5567 International http://www.DometicSanitation.com http://www.Dometic.com Manufacturer’s one-Year Limited Warranty Dometic Corporation warrants, to the original purchaser only, that this VacuFlush vacuum toilet system, if used for personal, family or household-like purposes, and if installed according to Dometic’s recommended procedures, is free from defects in material and workmanship for a period of one (1) year from the date of purchase. If this Dometic product is placed in commercial or business use, it will be warranted, to the original purchaser only, to be free of defects in material and workmanship for a period of ninety (90) days from the date of purchase. Dometic reserves the right to replace or repair any part of this product that proves, upon inspection by Dometic, to be defective in material or workmanship. All labor and transportation costs or charges incidental to warranty service are to be borne by the purchaser-user. EXCLUSIONS IN NO EVENT SHALL DOMETIC BE LIABLE FOR INCIDENTAL OR CONSEQUENTIAL DAMAGES, FOR DAMAGES RESULTING FROM IMPROPER INSTALLATION, OR FOR DAMAGES CAUSED BY NEGLECT, ABUSE, ALTERATION, OR USE OF UNAUTHORIZED COMPONENTS. THIS INCLUDES FAILURES WHICH MAY RESULT FROM NOT FOLLOWING THE WINTERIZATION OR CLEANING PROCEDURES AS DESCRIBED IN THIS MANUAL. ALL IMPLIED WARRANTIES, INCLUDING ANY IMPLIED WARRANTY OF MERCHANTABILITY OR FITNESS FOR ANY PARTICULAR PURPOSE, ARE LIMITED TO A PERIOD OF ONE (1) YEAR FROM DATE OF PURCHASE. IMPLIED WARRANTIES No person is authorized to change, add to, or create any warranty or obligation other than that set forth herein. Implied warranties, including those of merchantability and fitness for a particular purpose, are limited to one (1) year from the date of purchase for products used for personal, family or household-like purposes, and ninety (90) days from the date of purchase for products placed in commercial or business use. OTHER RIGHTS Some states do not allow limitations on the duration of an implied warranty, and some states do not allow exclusions or limitations regarding incidental or consequential damages; so, the above limitations may not apply to you. This warranty gives you specific legal rights, and you may have other rights which vary from state to state. To obtain warranty service, first contact your local dealer from whom you purchased this product. Dometic Group is a customer-driven, world-leading provider of leisure products for the RV, automotive, truck and marine markets. We supply the industry and aftermarket with a complete range of air conditioners, refrigerators, awnings, cookers, sanitation systems, lighting, mobile power equipment, comfort and safety solutions, windows, doors and other equipment that make life more comfortable away from home. Dometic Group supplies a wide range of workshop equipment for service and maintenance of built-in air conditioners. Dometic Group also provides specially designed refrigerators for hotel rooms, offices, wine storage and transport and storage of medical products. Our products are sold in almost 100 countries and are produced mainly in wholly-owned production facilities around the world. 600345395 04/13 Dometic Corp, Sanitation Division 13128 State Rt 226, PO Box 38 Big Prairie, OH 44611 SeaLand Product Customer Service: 1-800-321-9886 Email: [email protected] www.DometicSanitation.com ® Registered; ™ Trademark of Dometic Corporation Dometic Corporation 16