1
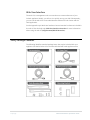
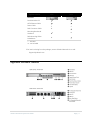
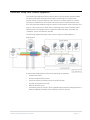
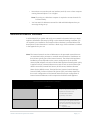
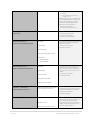
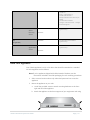
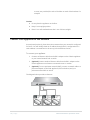
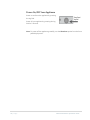
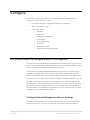
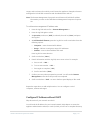
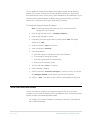
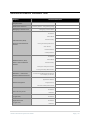
Quick Start Guide © 2013 Celestix Networks, Inc. All rights reserved. The example companies, organizations, products, domain names, e-mail addresses, logos, people, places, and events depicted herein are fictitious. No association with any real company, organization, product, domain name, e-mail address, logo, person, place, or event is intended or should be inferred. Celestix and Celestix logo are trademarks of Celestix Networks, Inc. Microsoft, Microsoft logo, Microsoft Windows Server, Microsoft Forefront, Threat Management Gateway, Unified Access Gateway, Active Directory, Windows, Windows NT are either registered trademarks or trademarks of Microsoft Corporation in the United States and/or other countries. The names of actual companies and products mentioned herein may be the trademarks of their respective owners. Updated: June 20, 2013 Part Number: (CCD) 1008-00000011 i | Page Document Number: DAX0020-962-010 Celestix DAX Series Quick Start Guide Contents Introduction ................................................................................................................................................. 1 Quick Start Guide Usage Notes ............................................................................................................2 Verify Package Contents ........................................................................................................................3 Appliance Hardware Features ...............................................................................................................4 Overview: Using Your Celestix Appliance ............................................................................................6 Appliance Installation ................................................................................................................................. 7 Installation Assumptions........................................................................................................................7 Network Information Worksheet ..........................................................................................................8 Rack Your Appliance............................................................................................................................ 10 Connect Your Appliance to the Network.......................................................................................... 11 Power Your Celestix Appliance .......................................................................................................... 12 Front Panel Controls................................................................................................................................ 14 Front Panel Display .............................................................................................................................. 14 Jog Dial Operation ............................................................................................................................... 14 Configure .................................................................................................................................................. 15 Front Panel Controls to Configure Access to Your Appliance ....................................................... 15 Web User Interface Access ................................................................................................................. 17 Quick Setup Steps................................................................................................................................ 18 Last Good Version (LGV) ......................................................................................................................... 26 Software Updates .................................................................................................................................... 28 Appendices ............................................................................................................................................... 29 Safety Precautions ............................................................................................................................... 30 Product Reclamation and Recycling.................................................................................................. 31 Network Information Worksheet Form............................................................................................. 32 Celestix DAX Series Quick Start Guide Page | ii Introduction Celestix Networks delivers an exceptional combination of perimeter security features, scalability, and simplicity in cost-efficient appliances. Ready-to-deploy security solutions offer reduced product complexity and ease of management. Your new appliance provides the best solution for today's demanding remote access needs. Celestix DAX appliance delivers always on VPN connectivity to the corporate network with Microsoft Windows Server 2012 DirectAccess. With DirectAccess, corporate users devices running compatible versions of Windows 7 or Windows 8 can transparently connect to the corporate network, regardless of location, without the need for complex interaction. This “always on” concept simplifies access for the user and provides them with the same rich experience they would get when sitting at their office desk. Celestix DAX is a hardened and secure appliance platform and is optimized to ensure a secure Windows deployment out of the box. There is no need for the administrator to spend time hardening the operating system, enabling them to move quickly to applying configurations. Organizations deploying DirectAccess also benefit from the ability to remotely manage clients. The foundation of your Celestix appliance is the Comet engine. Comet provides convenient access to administration functions like setup, network configuration, and server task management through a web user interface. The web user interface is referred to as the web UI in both print and online documentation. All aspects of DirectAccess and Windows Server 2012 can be managed through the award winning COMET management console 1 | Page Celestix DAX Series Quick Start Guide Quick Start Guide Usage Notes This Quick Start Guide (QSG) is intended to help system administrators install and configure a new appliance with a base level setup as quickly as possible. The instructions cover steps for a common deployment scenario. The guide does not provide extensive reference information. Please consult online help for more information about your appliance. This document is intended for system administrators who are familiar with: Windows server management Microsoft’s Active Directory® Networking technology The guide also assumes that you will use Microsoft’s reference information to configure DirectAccess for your organization’s deployment. Document conventions include: Instructions are generally intended for administrators to manage the appliance installation through Comet’s web user interface administration tool. The appliance administration website, or web user interface, is referred to as the web UI. Instructions are presented in the order you should follow to set up your appliance. Web UI on-screen items are noted in bolded type for easy identification. Features on the appliance front and rear panels are also noted in bolded type. When referring to subsections in the QSG, the hierarchy is delineated by a colon. For example, the location of the section To enable the alert email feature would be delineated as Quick Setup Steps : Alert Email : To enable the alert email feature. Instructions assume the reader will navigate from the web UI main menu bar. For example, to access appliance static routes, hover over the Network option on the main menu bar, scroll to and hover over Routing, then scroll to and click Static Routes. The navigation path will be delineated as Network|Routing|Static Routes. While network interface connections are commonly referred to as NICs, ports and adapters, the QSG uses network adapters as a simplified reference. The QSG generally refers to the appliance when discussing your DAX appliance. Celestix DAX Series Quick Start Guide Page | 2 Web User Interface The web UI is a management tool to access the most common features of your Celestix appliance. Initially, you will use it to quickly set up your DAX. Subsequently, you can use the web UI to access administrative features for both Comet and the TMG application. See the Appendix topic Web User Interface Content Overview for features included in the web UI. See the help topic Web User Interface Overview for more information about using the web UI (Help|Contents|Web UI Overview). Verify Package Contents The following identifies standard package items that may be included with your appliance. See the list below it for the items included with each appliance series. 3 | Page Celestix DAX Series Quick Start Guide Appliance Series 6200 8200 Documentation CD CAT6 Ethernet Cable Power Cable 2 2 RJ45 Connector Cable Mounting Brackets & Hardware Rack Mounting Slides & Hardware Contents - included - not included If an item is missing from the package, contact Celestix Networks via e-mail: [email protected] Appliance Hardware Features Celestix DAX Series Quick Start Guide Page | 4 5 | Page Celestix DAX Series Quick Start Guide Overview: Using Your Celestix Appliance The Celestix DAX appliance allows remote users to securely access internal network file shares, Web sites, and applications without connecting to a virtual private network (VPN). An internal network is also known as a private network or intranet. DirectAccess establishes bi-directional connectivity with an internal network every time a DirectAccess-enabled computer connects to the Internet, even before the user logs on. Users never have to think about connecting to the internal network and IT administrators can manage remote computers outside the office, even when the computers are not connected to the VPN. The following diagram illustrates some common aspects of DAX appliance deployments: A DirectAccess deployment consists of the following components: DirectAccess clients At least one DirectAccess server An Active Directory® Domain Services (AD DS) domain A public key infrastructure (PKI) Network location server An Internet Protocol version 6 (IPv6)-capable internal network and applications or Network Address Translation-Port Translation (NAT-PT) devices Celestix DAX Series Quick Start Guide Page | 6 Appliance Installation The QSG provides a system administrator with concise instructions for a Celestix appliance base deployment. It covers common installation requirements and is not intended to be comprehensive. Your installation may require additional configuration. Installation instructions first cover assumptions the guide takes into account for a common deployment. Assumptions are followed by the network information worksheet. The worksheet helps you to gather necessary information that will help in the installation process. Preparation steps are followed by instructions to rack, connect to the network, and power your appliance. Installation Assumptions The following sections provide information about necessary skills/knowledge administrators should have and the assumptions that cover appliance installation for a majority of network settings. These assumptions address general deployment scenarios. Your environment may require adjustments or advanced configuration. Skills and Knowledge System administrators should be familiar with: Windows server management Microsoft’s Active Directory Networking technology Network Settings The following general conditions apply to the instructions contained in this QSG. Again, your network settings may differ and could require some adjustment to the general information presented herein. 7 | Page Your LAN is configured for DHCP. You will use DHCP initially to assign an IP address to the LAN network adapter. You can find the assigned IP address on the front panel display. The appliance will be deployed in a Microsoft domain. User authentication occurs against Active Directory (AD). Celestix DAX Series Quick Start Guide Instructions to access the web user interface (web UI) cover a client computer running Internet Explorer 7.0® or higher. Note: IE running on a Windows computer is required to access the web UI’s full functionality. You have static IP addresses reserved for LAN and WAN adapters that you can assign during set up. Network Information Worksheet It will be helpful if you gather and verify your network information before you begin appliance installation and setup. By filling out the Network Planning worksheet, you can expedite your installation. An example of the worksheet is provided below with descriptions for the information it includes. A blank copy of the worksheet is included in the Appendix for your use. Note: The internal network consists of addresses on the protected network that are not associated with a perimeter or external network interface. IP addresses on the LAN are typically part of the internal network. The Celestix DAX appliance installation process depends on the correct configuration of the internal network (LAN) adapter so that the Celestix DAX appliance firewall system policy is applied correctly. Network infrastructure services such as Active Directory® domain controllers, internal DNS servers, DHCP servers, Windows Internet Name Service (WINS) servers, Terminal Services, Internet Control Message Protocol (ICMP), Common Internet File System (CIFS), and others depend on the correct configuration of the internal network. Incorrect configuration of internal network addresses could compromise the DAX firewall appliance. Network Information Worksheet (example) Property Network Information (example) Computer Name Explanation The appliance must be assigned a computer name. The computer name must be 15 alphanumeric characters or less. This information is needed in: Quick Setup : Server Name Administrator Password [Celest1x] (default) The administrator password is the password used to log on to the appliance. Define the administrator password during setup using at least six characters and at least three of these four categories: Uppercase letters Celestix DAX Series Quick Start Guide Page | 8 Lowercase letters Number Non-alphanumeric characters (for example, !, $, #, %) Note: The default user name is “administrator” and the default password is “[Celest1x]” (case sensitive, brackets included). The system administrator should change the default password in the Quick Setup steps. This information is needed in: Quick Setup : Administrator Password Workgroup or Domain name Record the name of the Workgroup or Domain that will be joined during setup. This information is needed in: Quick Setup : Server Membership LAN Information (Eth 0) IP Address: The LAN (private network interface) adapter of the appliance is the interface assigned to internal network traffic. Private or Internal Network Interface Subnet Mask: This information is needed in: Quick Setup : Interfaces Default Gateway: Primary/Secondary DNS Server(s): Static Routes: Network Address: Gateway Address: WAN Information (Eth 1) IP Address: The WAN (public network interface) adapter of the appliance is the interface assigned to external network traffic. This configures how the WAN, or public interface connects to the internet. Public or External Network Interface Subnet Mask: This information is needed in: Default Gateway: Quick Setup : Interfaces Primary/Secondary DNS: Primary/Secondary WINS: DMZ (Eth 2 +) Information Additional Network Interfaces Include the IP Address/Subnet Mask for each adapter you will use. The DMZ adapters are optional configuration. This information is only necessary if you will assign static IP addresses to these adapters. This information is needed in: Quick Setup : Interfaces Remote Management Appliance IP address: Range (from/to): Subnet IP address/Subnet mask: 9 | Page For security reasons, the default policy does not allow connections to the appliance. To be able to manage the appliance remotely, Remote Management computers need to be defined, and can be designated three ways: Computer - Specific IP Address Celestix DAX Series Quick Start Guide Range - IP Range, e.g. 192.168.1.1 to 192.168.1.10 Subnet - A Subnet Range, e.g. 192.168.1.0/255.255.255.0 Multiple combinations of the above may be defined. This information is needed in: Configure : Front Panel Controls… : Configure Remote Management… Active Directory Server PKI IP Address: Hostname: IP Address: This information may be needed for application setup. IP Address: This information may be needed for application setup. (if applicable) Application Server This information may be needed for application setup. Hostname: Rack Your Appliance Your Celestix appliance is a 1U or 2U device that should be attached to a standard 19-inch equipment rack as follows: Note: If you’re appliance shipped with slides instead of brackets, see the instructions included in the slide packaging for rack mounting procedures. 1. Select a secure location where only authorized personnel can access the appliance. 2. Mount the appliance on your rack: a. Use all the provided screws to attach mounting hardware to the front right and left of the appliance. b. Attach the appliance to the front supports of your equipment rack using Celestix DAX Series Quick Start Guide Page | 10 a screw (not provided) for each of the holes on each of the brackets. For example: Caution: Do not place the appliance on the floor. Keep it in an upright position. Place it in a well-ventilated area that is out of direct sunlight. Connect Your Appliance to the Network As mentioned previously, these instructions assume that your network is configured for DHCP. You will initially obtain an IP address through DHCP; configuration for a static address is covered later in the set up (in the Interfaces section). To connect your appliance: 1. Connect an Ethernet cable from the Eth 0 adapter on the Celestix appliance to your internal network hub or switch. 2. [Optional] Connect another Ethernet cable from the Eth 1 adapter on the Celestix appliance to an Internet-connected router or modem. 3. [Optional] To use a perimeter network (DMZ), connect a network cable to a perimeter adapter on the DAX appliance (Eth 2 and above) and your perimeter network hub or switch. The diagram below provides a reference. 11 | P a g e Celestix DAX Series Quick Start Guide Note: Your appliance hardware may look somewhat different from the example, but the general principle applies. Network Interface LED indicators: Each of the network adaptors contains a pair of lights to help identify connection speed and usage. See below for details (listed by model number: 6200 Right light – displays connection speed (unlit 10Mbps, green 100 Mbps, orange 1000 Mbps). Left light – displays activity (blinking indicates traffic, unlit indicates no traffic). 8200 Right light – displays connection. Left light – displays activity (blinking indicates traffic, unlit indicates no traffic). Power Your Celestix Appliance The following instructions guide you through connecting power and turning on your appliance. To connect your appliance to a power source: 1. Connect the power cable(s) from your power source (typically a UPS) to the power inlet on the rear panel. The power cable is included in the appliance packaging. 2. The display will show the System Off message: Celestix DAX Series Quick Start Guide Page | 12 Power On/Off Your Appliance Power on and boot the appliance by pressing the Jog Dial. Power off your appliance by pressing the Jog Dial for 5 seconds. Note: To power off the appliance gracefully, use the Shutdown option from the front panel display menu. 13 | P a g e Celestix DAX Series Quick Start Guide Front Panel Controls The front panel contains an LED display and Jog Dial. These controls allow you to view system information and to directly manage some configuration settings on the appliance. Front Panel Display The front panel display operates in two modes: Idle mode – the default mode; status screens cycle through display. Configuration mode – press the Jog Dial to enter configuration mode; use the [ ] cursor to scroll to options, the > < cursor to edit selections, and press the jog dial to accept selections. See the Jog Dial Operation section below for more information. Jog Dial Operation The Jog Dial on the appliance front panel is used to navigate the LED display. Turn to scroll through screen options. The square brackets cursor [ ] allows you to scroll through items on the screen when the front panel display is in configuration mode. The following example shows the Add option selected by the cursor: [ Add ] The angle brackets cursor > < allows you to edit options after selection when the front panel display is in configuration mode. The following example shows the Delete option selected by the cursor: Add > Delete < Press to select options. Celestix DAX Series Quick Start Guide Page | 14 Configure This section provides instructions for the appliance setup configuration that is required for all deployments. It covers: Front Panel Controls to Configure Access to Your Appliance Web User Interface Access Quick Setup Steps: Interfaces Date/Time Administrator Password Server Name Server Membership Alert Email Quick Setup Finish DirectAccess (DA) Configuration Front Panel Controls to Configure Access to Your Appliance Front panel controls include the front panel display and Jog Dial. The Jog Dial can be used to power on and off your appliance, and it can also be used with the front panel display to perform some appliance management functions. The first section, Configure Remote Management Access Settings, explains how to configure the settings that enable access to the appliance through either an RDP session or the web UI. Setting remote access will be necessary for most deployments. The instructions in the second section below, Configure IP Address without DHCP, are included in case they are necessary for some deployments. While the appliance can be deployed in a network that does not use DHCP, it is generally easier to start setup with an automatically assigned IP address for your internal network (LAN) adapter if DHCP is available. The Jog Dial/front panel display can also be used to assign a static IP address to any of the appliance adapters. Configure Remote Management Access Settings Configure Remote Management to enable administration access to your appliance from any terminal on your LAN. You will need to include all remote terminals, IP 15 | P a g e Celestix DAX Series Quick Start Guide ranges, and/or subnets from which you will access the appliance. Examples of remote management include RDP connections and the administration web UI. Note: The Remote Management front panel control feature will add the IP address information you enter to the TMG Remote Management Computers Computer Set. To add remote management IP address sets: 1. Press the Jog Dial and scroll to > Remote Management <. 2. Press the Jog Dial again to select. 3. At Operation, make sure [ Add ] is selected, the scroll to [ Next ] and press the Jog Dial. 4. At Add New Rule Element, press the Jog Dial to scroll to and select from the following options: Computer – enter the terminal IP address. Range – indicate a contiguous range of IP addresses. Subnets – enter a subnet address and mask. Press Jog Dial to enter selection. 5. Scroll to and select [ Next ]. 6. Enter IP information with the Jog Dial, one octet at a time. For example: a. Press to edit > 000 <. b. Turn to enter number > 192 <. c. Press again to complete [ 192 ]. d. Scroll to and select [ Next ]. 7. Confirm your entry when prompted to proceed. You will see the Remote Management screen when the process has completed. 8. Scroll to and select > Back < to return the front panel display to idle mode. Repeat the steps above to add multiple entries. You can configure a mix of computers, subnets and ranges. Configure IP Address without DHCP Skip this section if your network uses DHCP. You will need the IP address for your internal network (LAN) adapter to access the appliance administration website, or web UI, which you will use to complete the setup Celestix DAX Series Quick Start Guide Page | 16 for your appliance. Initially, this IP address is normally assigned through DHCP by default. If you cannot use DHCP for the initial IP address setting, the Jog Dial and front panel display can be used to enter a static IP address for the LAN adapter. If you enter the internal network adapter IP address through the front panel, you will not need to do it in the later section, Quick Setup Steps : Interfaces. To change the internal network IP address: Note: You will only need to follow this step if you do not have DHCP configured for your network. 1. Press the Jog Dial and scroll to > Configure Network <. 2. Press the Jog Dial again to select. 3. If necessary, press the Jog Dial and to scroll and select LAN. The display should show [ LAN ]. 4. Scroll to and select [ Next ] to continue. 5. Scroll to and select [ Static IP ]. 6. Enter the IP address: a. Press the Jog Dial to edit the first octet of the IP address. b. Turn the dial to change the number. c. Press the Jog Dial again to complete entry. d. Repeat for the remaining octets. 7. Scroll to and select [ Next ] to continue. 8. Enter a Netmask if needed. 9. Scroll to and select [ Proceed to Configure ] to save your entry. You will see the Configure Network screen when the process has completed. 10. Scroll to > Back < and select to return the front panel display to idle mode. Web User Interface Access You are now ready to configure your appliance using the web UI. From a client computer on your network, default access to the appliance web UI is through Internet Explorer at https://ServerName|IP address:8098. For example, if your server IP address is 192.168.30.4, the web UI URL would be https://192.168.30.4:8098 17 | P a g e Celestix DAX Series Quick Start Guide Note: You may see a certificate warning when you access the site because it uses a self-signed certificate. You will need to accept the certificate to access your appliance administration. You will be prompted to enter your administrative credentials. Before going through the Quick Setup process, the credentials to login are: User name: administrator Password: [Celest1x] Notes: The password is case-sensitive and the brackets are included. You may be required to enter the user name in the “domain\administrator” format. Quick Setup Steps The following sections provide instructions for basic appliance configuration. They are presented in the order in which you should complete them. You can access Quick Setup through the Start menu in the web UI. Interfaces The Interfaces function provides access to appliance network adapter configuration. A network adapter is used for Ethernet connections and is both the physical interface, or connector, and the hardware for access to a network. An adapter is also commonly referred to as an adapter card or a network interface card (NIC). This section provides a brief description of the configuration settings in the Interfaces web UI feature and how to access them. Use the Interfaces function to assign either DHCP or static IP addresses to the LAN and WAN adapters. You can assign addresses to the DMZ adapters (Eth 2 and above) the same way, but these are for optional additional networks that may either be perimeter or internal. The list of interfaces includes the following information: Name – displays Ethernet connection identification. Device Name – displays hardware adapter identification. IP Address – displays the Internet Protocol address. Celestix DAX Series Quick Start Guide Page | 18 Configuration – indicates either a DHCP or Static IP address. Status – indicates Up for adapters with connected cables; indicates Down for either an unused adapter or a connection issue. General Properties Select a connector to enable the General Properties button. Use this function to assign DHCP or static address configurations. A static address includes these settings: Internet Protocol (IP) address Subnet mask Gateway address You can also specify automatic or preferred DNS server settings on this screen. To access network connection configuration: 1. Navigate to Network|Interfaces. 2. Select an adapter. 3. Click General Properties. Note: An interface, or adapter, must be connected before it can be configured. A warning will be displayed if you attempt to configure an unconnected adapter. Date/Time This section provides a brief description of the configuration settings in the date and time web UI feature and how to access them. To access date and time configuration: 1. Navigate to Maintenance|Date/Time. 2. See the settings description below for information. Date and Time Settings Include: 19 | P a g e Date: format mm/dd/yyyy. Time: format hh:mm:ss am/pm. Time zone: select a city that represents your time zone from the drop menu. Automatically adjust clock for daylight savings: select to instruct the server to change time according to daylight saving/standard time. Celestix DAX Series Quick Start Guide Click the OK button to save your settings, click Cancel to return to the Maintenance screen without saving changes. Administrator Password Your appliance ships with a default administrator password. You should change the password when you set up your appliance as this password is public knowledge. This section provides a brief description of the configuration settings in the Administrator Password web UI feature and how to access them. Notes: The Administrator password feature only allows you to change the administrator account password; it does not provide access to change passwords for members of the local Administrators group. Domain users are not allowed to change the administrator account password. You must be logged in using the administrator account to change its password. To change the administrator account password: 1. Navigate to Start | Quick Setup | Administrator Password. 2. When the Administrator Password screen opens, you will see the following fields: User Name – the administrator user account name is displayed. New password – enter a new password. Confirm password – confirm the new password. 3. Password complexity requirements are noted on the Administrator Password screen. 4. Click OK. An error message will inform if the change was not successful. Server Name Server names are used to help identify your appliance on the network and to facilitate client access. This section provides a brief description of the configuration settings in the Server Name web UI feature and how to access them. To add or change server or domain settings: Note: You will need to reboot the server to complete these steps. Celestix DAX Series Quick Start Guide Page | 20 1. Navigate to Network|Server Name. 2. Enter information for the following fields: Server Name – specify a name for your appliance. DNS suffix – optional; this field sets the primary DNS suffix. Specify the DNS suffix to create a fully qualified server name. Change primary DNS suffix when domain membership changes – check this box if you want to update the primary DNS suffix when the appliance domain membership is changed (for example, at Network|Server Membership). The web UI will refresh and open to the Quick Setup screen after the appliance has finished the configuration change. Changing the Server Name may cause Internet Explorer to prompt you to accept the server certificate again. Server Membership Server Membership indicates the type of network to which your appliance is connected. This section provides a brief description of the configuration settings in the Server Name web UI feature and how to access them. While domain membership is optional, your appliance needs to belong to some type of network group, like a workgroup or Microsoft Active Directory. If you use Active Directory on your network, you will select the Domain option and specify the name associated with it. If your deployment does not require joining a domain, select the Workgroup option and provide a name to identify it in the accompanying text field. Workgroup is the default setting. Note: If you join your appliance to a domain, it is a recommended practice to add at least one domain user to the local administrators group and to use that account to administer the appliance. To join the appliance to a domain: Notes: These instructions require credentials for a user with permission to add a computer to the domain. 1. 21 | P a g e You will need to reboot the server to complete these steps. Navigate to Network| Server Membership. Celestix DAX Series Quick Start Guide 2. Select the Domain option and enter your network domain name in the text field. 3. Enter a User name and Password in the text fields provided. 4. Click OK. 5. You will be prompted to reboot your appliance to complete the above changes: Click OK to proceed with restarting your appliance. Click Cancel to skip restarting your appliance. (You will need to restart the appliance later to complete the membership changes to Network |Server Membership.) The web UI will refresh and open to the Quick Setup screen after the appliance has finished the configuration change. Alert Email Use the Alert Email function to allow/disallow your appliance to send system alert messages through a network SMTP server to addresses you specify. SMTP is required to use the Alert Email function. This section provides a brief description of the configuration settings in the Alert Email web UI feature and how to access them. Note: Alert email is an optional configuration. Use the following information to configure alert email: Send error alert email – informs your appliance to send alert types where the level is set to Error. Send warning alert email – informs your appliance to send alert types where the level is set to Warning. Send informational alert email – informs your appliance to send alert types where the level is set to Information. To – indicate one or multiple recipients. For multiple addresses, use a comma to separate each address. From – indicate an address that the recipient will recognize. With – enter your network SMTP server name or IP address. Test Settings – click this screen button to send a test email using the settings you entered. To enable the alert email feature: 1. Navigate to Maintenance|Alerting|Alert Email. Celestix DAX Series Quick Start Guide Page | 22 2. Select Enable alert email. 3. Select the check boxes for the alert levels (error, warning, critical) you want email to be sent. 4. Enter a recipient address in the To field. 5. Enter a send address in the From field. 6. Enter your network’s SMTP gateway name or IP address in the With field. 7. To test the email delivery, click Test Settings. Note: The alert email function will indicate whether a test email was sent. If the test email is not received after the alert email feature indicates that one was sent, the error is most likely due to SMTP server settings. An error will occur if the SMTP service is not running or if your appliance is not correctly configured to see the SMTP server. Confirm your SMTP server and network settings before trying to test again. 8. Click OK to complete. To disable the alert email feature: 1. Navigate to Maintenance|Alerting|Alert Email. 2. Select Disable alert email. 3. Click OK to complete. Quick Setup Finish The finish screen provides any final instructions or information if necessary for your installation. In addition, it provides a link to register your product with Celestix. Access the finish screen through the web UI at Start|Quick Setup|Quick Setup Finish. You have completed the initial setup for your appliance. The next section, TMG Configuration explains how to access the application tool that will help you finish deploying the appliance on your network. 23 | P a g e Celestix DAX Series Quick Start Guide DirectAccess (DA) Configuration Now that your appliance is up and running, you need to configure DirectAccess for your environment. Please refer to Microsoft Windows Server 2012: DirectAccess administrator’s guide for more information. The following instructions explain how to use the web UI to access the DA management console (MMC). You will be accessing the MMC through an RDP session in your browser. The first time you launch the console, the Getting Started Wizard will open automatically. To access the wizard: 1. Navigate to Start|DA Management. 2. If prompted, allow the connection. 3. The application management console opens in your browser window. 4. Follow the steps in the Getting Started Wizard to complete your deployment configuration. 5. When you are done, navigate to File|Exit in the remote desktop window to close and return to the DA screen in the web UI. Closing the application logs off the RDP session to your appliance and is recommended to release management resources. To access the DA Getting Started Wizard at a later point: 1. Navigate to Start|DAManagement. 2. If prompted, allow the connection. 3. The application management console opens in your browser window. 4. In the console’s left pane, select your appliance. It should be listed under DirectAccess. 5. In the right pane, select the Tasks tab. 6. Under DA Configuration, click Launch Getting Started Wizard. 7. When you are done, navigate to File|Exit in the remote desktop window to close and return to the DA screen in the web UI. Closing the application logs off the RDP session to your appliance and is recommended to release management resources. Celestix DAX Series Quick Start Guide Page | 24 Now that you have completed the configuration for your appliance, you should use the Last Good Version feature to create a system copy that can help to resolve issues that may result from configuration changes. See the next section for information. 25 | P a g e Celestix DAX Series Quick Start Guide Last Good Version (LGV) Last Good Version (LGV) takes a snapshot of a currently running system which can then be used if configuration changes or other events compromise system performance or functionality. LGV provides another tool to protect your system in addition to regular backups. It is recommended that you create an LGV after you complete the setup for your appliance. The LGV image is created in the recovery system process where the main operating system is not running. Due to its offline nature, the LGV feature is not recommended in lieu of a normal backup procedure. Also, there is only one LGV image possible at any one time, and the creation of a new LGV image will replace an existing image. Thus, be sure your configuration works as expected before replacing an existing LGV image. To create an LGV: Notes: You will need to shut down your appliance and then start it again to access the system recovery process. It may help to read through all of the instructions before starting the procedure. 1. Shutdown the appliance. 2. The front panel display shows the System Off message after shutdown has completed. 3. Press the Jog Dial to start the appliance; the front panel display shows System On, and the system beeps once for system startup. 4. The front panel display next shows the System Ready message, and the system will beep again. On this second beep, turn the Jog Dial clockwise two full rotations to initiate the recovery system. Note: Timing when you turn the Jog Dial is more important than how long you turn it. Two full rotations should be adequate to start the recovery system process. 5. The front panel display will show Celestix Appliance Installer when the recovery process launches. Menu options will display when the recovery system has loaded. 6. Turn the Jog Dial to scroll to the option Create Last Good Version << and press to select. 7. Confirm the operation when prompted. Celestix DAX Series Quick Start Guide Page | 26 The Saving System Image screen will show a progress indicator and an estimated time to completion for the image copy process. After the image has been created, the system will reboot. DO NOT ACCESS OR TURN OFF THE APPLIANCE DURING THIS PROCESS. The appliance will shut down when the LGV process is complete. Now that you have completed the configuration and Last Good Version setup steps, you should check for appliance software updates. See the next section for information. 27 | P a g e Celestix DAX Series Quick Start Guide Software Updates The Software Update Service allows administrators to keep appliance software current through hotfixes, service packs, and upgrades. Software updates include the following applications: Windows Server® Celestix Comet After you have configured your appliance and created an LGV, use the Software Update Service to ensure you have the latest application patches for all your appliance software. Access the update service through the web UI (Maintenance|Software Updates). See the online help if you need additional information. Thank you for purchasing the Celestix DAX Series Firewall and Secure Web Gateway Appliance. You have now completed all the setup and configuration steps for baselevel deployment. Celestix DAX Series Quick Start Guide Page | 28 Appendices Use the links to jump to a topic: 29 | P a g e Safety Precautions Product Reclamation and Recycling Network Information Worksheet Form Celestix DAX Series Quick Start Guide Safety Precautions Do not overload the AC supply branch circuit that provides power to the server. Do not disable the power cord grounding plug. The grounding plug is an important safety feature. Plug the power cord into a grounded electrical outlet that is easily accessible at all times. Unplug the power cord from the inlet on the appliance rear panel to disconnect power to the server. Do not place anything on the power cords or cables. Arrange them so that no one can accidentally step on or trip over them. Do not pull on a cord or cable. When unplugging the cord from the electrical outlet, grasp the cord by the plug. Do not plug telecommunications/telephone connectors into the NIC connectors. This server contains an internal lithium battery. There is a risk of fire and burns if battery is not handled properly. Do not attempt to recharge the battery. Do not expose the battery to temperatures higher than 60 C. Do not disassemble, crush, puncture, short external contact, or dispose of battery in fire or water. Danger of explosion if battery is incorrectly replaced. Replace only with the same or equivalent type recommended by Celestix. Dispose of used batteries according to local regulations for hazardous waste. WARNING: RISK OF EXPLOSION IF BATTERY IS REPLACED BY AN INCORRECT TYPE. DISPOSE OF USED BATTERIES ACCORDING TO HAZARDOUS WASTE PROCEDURES AS REQUIRED IN YOUR AREA. HAZARDOUS MOVING PARTS KEEP FINGERS AND OTHER BODY PARTS AWAY Celestix DAX Series Quick Start Guide Page | 30 Product Reclamation and Recycling Celestix Networks is committed to environmentally responsible behavior. As part of this commitment, we work to comply with environmental standards such as the European Union’s Waste Electrical and Electronic Equipment (WEEE) Directive and the Restriction of Hazardous Substances (RoHS) Directive. These directives and other similar regulations from countries outside the European Union regulate electronic waste management and the reduction or elimination of specific hazardous materials in electronic products. The WEEE Directive requires electrical and electronics manufacturers to provide mechanisms for the recycling and reuse of their products. The RoHS Directive restricts the use of certain substances that are commonly found in electronic products today. Restricted substances include heavy metals, like lead and polybrominated materials. The RoHS Directive, with some exemptions, applies to all electrical and electronic equipment. In accordance with Article 11(2) of Directive 2002/96/EC (WEEE), products put on the market after 13 August 2005 are marked with the following symbol or include it in their documentation: a crossed-out wheeled waste bin with a bar beneath. Celestix Networks provides recycling support for our equipment to comply with the WEEE Directive. For recycling information, send e-mail to [email protected] indicating the type of Celestix Networks equipment that you wish to dispose of and the country where it is currently located, or contact your Celestix Networks account representative. Products returned through our reclamation process are recycled, recovered, or disposed of in a responsible manner. 31 | P a g e Celestix DAX Series Quick Start Guide Network Information Worksheet Form Property Network Information Computer Name Administrator Password [Celest1x] (default – change during setup) Workgroup or Domain name Workgroup / Domain Name IP Address: Subnet Mask: Default Gateway: LAN Information (Eth 0) Private or Internal Network Interface Primary/Secondary DNS Server: Static Routes: Network Address: Gateway Address: IP Address: Subnet Mask: WAN Information (Eth 1) Public or External Network Interface Default Gateway: Primary/Secondary DNS Servers: Primary/Secondary WINS Servers: DMZ (Eth 2 +) Information Include the IP Address/Subnet Mask for Additional Network Interfaces each adapter you will use: Appliance IP address: Remote Management Range (from:to): Subnet IP address/Subnet mask: IP Address: Active Directory Server PKI (if applicable) Application Server (if applicable) Celestix DAX Series Quick Start Guide Hostname: IP Address: IP Address: Hostname: Page | 32