1
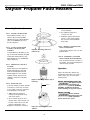
1TGP7, 1TGP8 and 1TGP9
Operating Instructions & Parts Manual
Please read and save these instructions. Read carefully before attempting to assemble, install, operate or maintain the product described.
Protect yourself and others by observing all safety information. Failure to comply with instructions could result in personal injury and/or
property damage! Retain instructions for future reference.
Dayton Propane
Patio Heaters
®
Description
This is a propane patio heater. It is intended for the heating of outdoor patios,
decks, spas, pool and open working areas. LP cylinder is not included.
Dimensions
Model
Unit Net Weight
Diameter
Model No.
Length (Port/Suspnd)
Width (Port/Suspnd)
Height
1TGP7
1TGP8
1TGP9
59 lbs
59 lbs
59 lbs
32 5/16”
32 5/16”
32 5/16”
Height (
7’4” (88”)
7’4” (88”)
7’4” (88”)
H
D
Figure 1 - 1TGP7 Stainless Steel
Deluxe Propane Patio Heater
Figure 2 - Dimensions
Specifications
Model
Finish / Head Design
1TGP7
1TGP8
1TGP9
Stainless Steel / Deluxe
Propane LP
Copper / Deluxe
Propane LP
Powder Coated Black / Deluxe Propane LP
Form 5S5685
Fuel
Supply Pressure
Manifold
Pressure
Heat Output
Max 150 PSI, Min 5 PSI
Max 150 PSI, Min 5 PSI
Max 150 PSI, Min 5 PSI
11 inches W.C.
11 inches W.C.
11 inches W.C.
40,000 BTU/Hr
40,000 BTU/Hr
40,000 BTU/Hr
Printed in Korea
09663
0307/036/VCPVP
PIN018
03/07
1TGP7, 1TGP8 and 1TGP9
Dayton Operating Instructions and Parts Manual
Dayton Propane Patio Heaters
®
Unpacking
Remove the heater and all of its
packaging materials form the shipping
carton.
NOTE: Save the box and packaging
materials for future use.
General Safety Information
Do not operate this
heater until you have
read, and thoroughly understand these
safety and operating instructions.
Failure to comply with the precautions
and instructions provided with this
heater can result in death, serious
bodily injury, property loss or damage
from the hazards of fire, explosion,
burns, or electric shock. Only persons
who can read and understand these
instructions should use or service
this heater. Not for residential,
household or recreational vehicle use.
Please read this manual
Proposition 65
warning: Fuels used
in gas, wood burning or oil-fired
appliances, and the products of combustion of such fuels, contain chemicals
known to the State of California to
cause cancer, birth defects and other
reproductive harm.
FIRE, BURN,
INHALATION AND
EXPLOSION HAZARD
1. Keep solid combustibles, such as
building materials, paper or
cardboard a safe distance away from
the heater as recommended by the
instructions in this manual (at least 2
feet away from sides and 3 feet
from top of head assembly. See
Figure 13 on Page 5).
NEVER use the heater
in locations which do
or may contain volatile or airborne
combustibles, or products such as
gasoline, solvents, paint thinner, dust
particles or unknown chemicals.
2. These heaters are design certified as
gas-fired infrared patio heaters
under CSA 2901-81 standards.
3. This heater is hot when in use. To
avoid burns, do not let bare skin
touch hot surfaces. Do not move
heater when in use OR for at least
45 minutes after using.
4. Keep combustible materials, such as
furniture, pillow, bedding, papers,
clothes and curtains at least 2 feet
away from sides and 3 feet from top
of head assembly. (see Figure 13 on
page 5).
Never let children
operate or allow near
any heater. Never leave heater
operating and unattended.
Always turn off
heater at control
knob and then close LP cylinder when
not in use.
5. Do not operate any heater with a
damaged regulator or after the
heater malfunctions, or has been
dropped or damaged in any manner.
Return heater to an authorized
service facility for examination, or
mechanical adjustment, or repair.
6. Do not use this heater in a
residential or household area. For
OUTDOOR use only. If stored
indoors, detach and leave the LP
cylinder outdoors.
7. Never replace the regulator with any
regulator other than the factory
suggested replacement.
2
8. This heater should be secured or
moved inside if winds exceed 22
miles per hour to prevent damage to
heater.
9. Do not insert or allow any foreign
objects to enter any ventilation or
exhaust opening as this may cause a
fire, or damage to the heater.
10. Do not paint emtter screen, control
panel or reflector assembly.
11. Use this heater only as described in
this manual. Any other use not
recommended by the manufacturer
may cause a fire or injury to persons.
12. Be sure heater is used where fresh
air ventilation is available.
13. Do not modify or alter this heater in
any way or operate any heater that
has been modified from its original
state. For example, do not use
heater without reflector assembly or
emitter screen.
14. It is hard to anticipate every use
which may be made of the heater.
Check with your local fire safety
authority if you have any questions
about heater application.
15. Be sure heater is on a solid and level
surface.
16. Do not shorten the burner post
assembly.
Features
The Dayton Propane Patio Heaters
come with safety features including
anti-tilt switch and auto shutoff switch.
The features of the Dayton Propane
Patio Heaters are shown in Figure 3 on
page 3.
Dayton Operating Instructions and Parts Manual
Models 1TGP7, 1TGP8 and 1TGP9
Features (Continued)
Assembly
ASSEMBLING THE HEATER
Reflector
Assembly
TOOLS REQUIRED
7/16” Wrench
3/8” Open End Wrench
Adjustable Opening Wrench, 8” Long
Head Assembly
Phillips Head Screwdriver
Leak Detection Solution (Instructions
how to make solution are included in
Step 8).
Figure 5 – Attaching cylinder cover.
Post
Cylinder
Cover
STEP 1 - ATTACH POST TO BASE
ASSEMBLY
Attach the Post to the post mounts
(Figure 4) using M5 x 8 Bolts (6 pcs)
and 5mm Washers (6 pcs).
STEP 2 - ATTACH CYLINDER COVER
Cylinder
Base
Figure 3 – Features
Attach the Cylinder Cover to the post
mounts (Figure 5).
STEP 3 - ATTACH HEAD ASSEMBLY TO
POST
Load Head Assembly by inserting Gas
Hose into Post.
Figure 6 – Attaching head assembly to
post.
Insert Head Assembly into Post
(Figure 6).
Tighten securely using M4 x 8 Bolts
(5 pcs) and 4mm Washers (5 pcs).
STEP 4 - ATTACH DOUBLE POINTED
BOLTS TO HEAD ASSEMBLY
Attach M6 x 70 Double Pointed Bolts
(3 pcs) and 6mm Washers (3 pcs) to
the top of the Head Assembly and
tighten the bolts securely (Figure 7).
Figure 7 – Attaching double pointed
bolts to head assembly.
Figure 4 – Attaching post to base
assembly.
3
1TGP7, 1TGP8 and 1TGP9
Dayton Operating Instructions and Parts Manual
Dayton Propane Patio Heaters
®
Assembly (Continued)
3. Inspect the connections and
look for bubbles.
STEP 5 - ASSEMBLY OF REFLECTOR
4. If no bubbles appear, the
connection is safe.
Attach Reflector Rap to top of
reflector (4 pcs) using the M6 x
10mm Bolts (12 pcs), 6mm Washers
(12 pcs) and M6 Nuts (12 pcs) as
shown in Figure 8.
STEP 6 - ATTACH THE REFLECTOR
ASSEMBLY TO TOP OF HEAD
ASSEMBLY
Load the Reflector Assembly to the
top of the Head Assembly using M6
x 70 Double Pointed Bolts (3 pcs),
6mm Washers (3 pcs) and M6 Nuts
(3pcs). (Figure 9).
5. If bubbles appear, then there is
a leak. Loosen and re-tighten
the connection where bubbles
are present.
STEP 9 - LOWER LP CYLINDER COVER
ONTO CYLINDER BASE
Figure 8 – Attaching reflector to
reflector cap.
STEP 10 - DISCONNECT LP CYLINDER
WHEN STORING OR TRANSPORTING
Turn off heater and turn off valve on
LP cylinder. Disconnect the Regulator
and remove LP cylinder.
STEP 7 - CONNECT GAS LINE TO LP
CYLINDER
Attach Gas Hose to the Regulator
(Figure 10) with 3/8” open end
wrench and adjustable wrench.
Attach Regulator to LP cylinder.
Tighten securely, then move LP
cylinder to the plate of the Base
assembly.
Operation
Dayton Propane Patio Heaters are
designed for the heating of outdoor
patios, decks, spas, pool and open
working areas.
Figure 9 – Attaching reflector assy to
head assy
STEP 8 - CHECK FOR LEAK
Item 5
Your Patio Heater has been checked
at all factory connections for leaks.
To check the connection of the Gas
Hose / Regulator / LP cylinder:
BEFORE TURNING GAS SUPPLY ON
Your Dayton Propane
Patio Heater was
designed and approved for OUTDOOR
USE ONLY. Do NOT use this heater
inside a building, or any enclosed area.
BEFORE LIGHTING
1. Make leak test solution by
mixing 1 part liquid dish soap
and 3 parts water.
2. Spoon several drops (or use a
squirt bottle) of the solution onto
bottle) of the solution onto the
Gas Hose / Regulator or the
Regulator / LP cylinder connection.
Lower the LP cylinder cover onto the
Cylinder Base.
Heater should be
thoroughly inspected
before each use, and by a qualified
person at least once a year.
Figure 10 – Connect gas line to LP
cylinder
4
Dayton Operating Instructions and Parts Manual
Models 1TGP7, 1TGP8 and 1TGP9
Operation (Continued)
6) If after repeating steps 3 & 4 unit
does not light, then
- If relighting a hot heater, wait at
least 5 minutes. See Figure 13 for
space tolerances.
- Push in Control Knob and turn
counterclockwise to “PILOT”.
LIGHTING INSTRUCTIONS
1) Turn the Control Knob to the “OFF”
position (Figure 11a).
2) Fully open LP cylinder valve.
3) Push in gas Control Knob and turn
counterclockwise to “IGNITE” then to
“PILOT” (Figure 11b) to light the
pilot. If needed, keep depressing and
turning Control Knob counterclockwise until the pilot lights (You
should hear 2 clicking sounds).
4) Once the pilot is lit, continue to
depress the Control Knob for 30
seconds.
5) If the pilot does not stay lit, repeat
steps 3 and 4.
Figure 11a – Control knob in OFF
position
- As you are depressing theControl
Knob, place long stem lighter into
the ignition hole (Figure 12) on the
Emitter Screen to light the pilot.
- Repeat step 4.
7) Push in and turn the Control Knob to
the “LOW” position, then release
Control Knob. If you want a higher
temperature, push in the Control
Knob and turn counterclockwise to
the “HIGH” position.
NOTE: The flame pattern at the Emitter
Screen should be visually checked
whenever heater is operated. Normally
the burner flame is blue, but little
yellow flame is acceptable.
If flames extend beyond surface of the
Emitter Screen or a black spot is
accumulating on the Emitter Screen or
reflector, shut off the heater. See
Troubleshooting on page 8. Do not
operate until heater has been serviced
or repaired.
Do NOT touch or move
heater for at least 45
minutes after use. Allow Emitter and
Reflector to cool before touching.
If at anytime you are
unable to light the
burner and smell gas, wait 5 minutes to
allow gas to dissipate before
attempting to light again.
AFTER FIRST LIGHTING
- The burner may be noisy when
initially turned on. To eliminate
excessive noise form the burner, set
the Control Knob to “LOW”, then
turn the Control Knob to heat level
desired.
- White smoke may appear around the
Emitter Screen during the first few
minutes of initial lighting. This is the
heater burning up the oil used in
manufacturing. Both smoke and
odor will dissipate after
approximately 30 minutes.
WHEN HEATER IS ON
- The Emitter Screen will become
bright red due to the intense heat.
Burner may display tongues of blue
flame. These flames should not be
yellow or produce thick black smoke,
which indicates that there is an
obstruction of airflow through the
burners.
- If flame is very low it is because there
is not enough pressure. Check your
LP cylinder.
36”
24”
Emitter Screen
Ignition Hole
Figure 11b – Control knob in PILOT
position
Figure 12 – Emitter Screen and Ignition
Hole
5
Figure 13 – Space Tolerances
24”
1TGP7, 1TGP8 and 1TGP9
Dayton Operating Instructions and Parts Manual
Dayton Propane Patio Heaters
®
Operation (Continued)
RELIGHTING
1) Turn the Control Knob to the “OFF”
position.
2) Wait at least 5 minutes before
attempting to relight the pilot.
3) Repeat steps beginning with step 2
under ‘Lighting Instructions’.
SHUT DOWN INSTRUCTIONS
1) Push in and turn Control Knob to the
“OFF” position.
2) Turn gas valve on LP cylinder
clockwise until tight to close.
Always be sure
Control knob is OFF
and cylinder is OFF when leaving heater.
Never leave this patio heater
unattended while in use.
NOTE: After use, some discoloration of
the emitter screen is normal.
Do not touch or move
heater during
operation or for at least 45 minutes
after use. Serious injury or death may
occur.
Maintenance
To enjoy years of performance from
your heater be sure to perform the
following maintenance activities on a
regular basis:
- Keep the exterior surfaces clean by
using warm soapy water. Never use
flammable or corrosive cleaning
agents.
- In salt-air environments (such as near
an ocean) corrosion occurs more
quickly than normal. Frequently
check for corroded areas and repair
them promptly.
- Be SURE to keep the area around the
burner and pilot assembly dry at all
times. If the gas control is exposed to
water in any way, do not try to use it.
It may need to be replaced.
Storage
- Air flow must be UNOBSTRUCTED.
Keep controls, burner and circulating
air passageways clean. Signs of
possible blockage include:
- Turn control valve on LP cylinder to
OFF.
1) Gas odor with extreme yellow
tipping of flame.
2) Heater does not reach the desired
temperature.
3) Heater glow is excessively uneven.
4) Heater makes popping noises.
- Spiders and insects can nest in burner
or orafices. This dangerous condition
can damage the heater and render it
unsafe for use. Clean burner holes by
using a heavy-duty pipe cleaner.
Compressed air may help clear away
smaller particles.
- Carbon deposits may create a fire
hazard. Clean dome and emitter
with warm soapy water if any carbon
deposits develop. - At least ONCE A
YEAR check the section of the hose
inside the post.
BETWEEN USES
- Turn Control Knob to OFF position
- Store your Patio Heater upright in a
dry place that is sheltered from
inclement weather such as rain, sleet,
hail, snow, dust and debris. DO NOT
store Patio Heater indoors with LP
cylinder still connected.
- If desired, cover heater to protect
exterior surfaces and to help prevent
debris in air passageways.
DURING EXTENDED PERIODS OR
WHEN TRANSPORTNING
- Turn control knob to OFF position
- Disconnect LP cylinder and move to a
well-ventilated location outdoors.
Do not store LP cylinder indoors.
- Store your Patio Heater unright in a
dry place that is sheltered from
inclement weather such as rain, sleet,
hail, snow, dust and debris.
- If desired, cover heater to protect
exterior surfaces and to help prevent
debris in air passageways.
NOTE: Wait until Patio Heater is
completely cool before covering.
- The flame pattern at the Emitter
Screen (Figure 14) should be visually
checked whenever the heater is
operated. Normally the burner flame
is blue, but little yellow flame is
acceptable.
Emitter
Screen
Figure 14 – Emitter Screen Check
6
1TGP7, 1TGP8 and 1TGP9
Dayton Operating Instructions and Parts Manual
For Repair Parts, call 1-800-323-0620
12
11
24 hours a day – 365 days a year
2
Please provide following information:
-Model number
-Serial number (if any)
-Part description and number as shown in parts list
1
18
Address parts correspondence to:
Grainger Parts
P.O. Box 3074
1657 Shermer Road
Northbrook, IL 60065-3074 U.S.A.
3
4
14
15
5
6
11
12
13
14
15
16
13
16
7
1
10
17
9
10
8
Figure 15 – Exploded Parts Illustration
Repair Parts List for Dayton Propane Patio Heaters
Ref
No.
1
2
3
4
5
6
7
8
9
10
11
12
13
14
15
16
17
Description
Part Numbers for Model:
1TGP7
1TGP8
1TGP9
Qty
M6 x 10 Bolt
Reflector Assembly
Head Assembly
Internal Gas Hose
Post
Cylinder Cover
Post Mounts
Cylinder Base
Wheel Assembly
Regulator
M6 Nut
6mm Washer
5mm Washer
4mm Washer
M4 x 8 Bolt
M5 x 8 Bolt
M6 x 70 double pointed Bolt
HV650010100G
HV650020200G
HV650030200G
HV650040100G
HV650050200G
HV650060200G
HV650070100G
HV650080200G
HV650080250G
HV650090100G
HV650100100G
HV650100200G
HV650100300G
HV650100400G
HV650110100G
HV650110200G
HV650110300G
HV650010100G
HV650020200G
HV650030100G
HV650040100G
HV650050100G
HV650060100G
HV650070100G
HV650080100G
HV650080150G
HV650090100G
HV650100100G
HV650100200G
HV650100300G
HV650100400G
HV650110100G
HV650110200G
HV650110300G
12
5
1
1
1
1
3
1
1
1
15
18
6
5
5
6
3
7
HV650010100G
HV650020200G
HV650030300G
HV650040100G
HV650050300G
HV650060300G
HV650070100G
HV650080300G
HV650080350G
HV650090100G
HV650100100G
HV650100200G
HV650100300G
HV650100400G
HV650110100G
HV650110200G
HV650110300G
1TGP7, 1TGP8 and 1TGP9
Dayton Operating Instructions and Parts Manual
Dayton Propane Patio Heaters
®
Troubleshooting Chart
Symptom
Possible Cause(s)
Corrective Action
Pilot will not light.
1. Gas valve may be OFF.
1. Turn the gas valve ON.
2. LP cylinder is empty.
2. Refill LP Cylinder.
3. Orifice blocked.
3. Remove and clean and replace if needed.
4. Air in supply system.
4. Purge air from lines.
5. Loose connection.
5. Check all fittings and connections.
1. Debris around pilot.
1. Clean pilot area.
2. Loose connection.
2. Tighten connection at the LP cylinder.
3. Thermocouple is bad.
3. Replace thermocouple.
4. Leak in fuel line.
4. Check connections.
5. Lack of fuel pressure.
5. LP cylinder is near empty. Refill LP cylinder.
1. Pressure is low.
1. LP cylinder is near empty. Refill LP cylinder.
2. Orifice blocked.
2. Remove and clean and replace if needed.
3. Control valve is not ON.
3. Turn valve to ON.
4. Thermocouple is bad.
4. Replace thermocouple.
5. Pilot light assembly is bent or not in
the correct location.
5. Place pilot in proper position and retry.
Pilot will not stay on.
Burner will not light.
8
1TGP7, 1TGP8 and 1TGP9
Dayton Operating Instructions and Parts Manual
Notes
9
1TGP7, 1TGP8 and 1TGP9
Dayton Operating Instructions and Parts Manual
Notes
10
1TGP7, 1TGP8 and 1TGP9
Dayton Operating Instructions and Parts Manual
Notes
11
1TGP7, 1TGP8 and 1TGP9
Dayton Operating Instructions and Parts Manual
Dayton Propane Patio Heaters
®
LIMITED WARRANTY
DAYTON ONE-YEAR LIMITED WARRANTY. DAYTON® PROPANE PATIO HEATERS COVERED IN THIS MANUAL, ARE
WARRANTED BY DAYTON ELECTRIC MFG. CO. (DAYTON) TO THE ORIGINAL USER AGAINST DEFECTS IN WORKMANSHIP OR
MATERIALS UNDER NORMAL USE FOR ONE YEAR AFTER DATE OF PURCHASE. ANY PART WHICH IS DETERMINED TO BE
DEFECTIVE IN MATERIAL OR WORKMANSHIP AND RETURNED TO AN AUTHORIZED SERVICE LOCATION, AS DAYTON
DESIGNATES, SHIPPING COSTS PREPAID, WILL BE, AS THE EXCLUSIVE REMEDY, REPAIRED OR REPLACED AT DAYTON’S
OPTION. FOR LIMITED WARRANTY CLAIM PROCEDURES, SEE “PROMPT DISPOSITION” BELOW. THIS LIMITED WARRANTY
GIVES PURCHASERS SPECIFIC LEGAL RIGHTS WHICH VARY FROM JURISDICTION TO JURISDICTION.
LIMITATION OF LIABILITY. TO THE EXTENT ALLOWABLE UNDER APPLICABLE LAW, DAYTON’S LIABILITY FOR
CONSEQUENTIAL AND INCIDENTAL DAMAGES IS EXPRESSLY DISCLAIMED. DAYTON’S LIABILITY IN ALL EVENTS IS LIMITED TO
AND SHALL NOT EXCEED THE PURCHASE PRICE PAID.
WARRANTY DISCLAIMER. A DILLIGENT EFFORT HAS BEEN MADE TO PROVIDE PRODUCT INFORMATION AND ILLUSTRATE
THE PRODUCTS IN THIS LITERATURE ACCURATELY; HOWEVER, SUCH INFORMATION AND ILLUSTRATIONS ARE FOR THE SOLE
PURPOSE OF IDENTIFICATION, AND DO NOT EXPRESS OR IMPLY A WARRANTY THAT THE PRODUCTS ARE MERCHANTABLE,
OR FIT FOR A PARTICULAR PURPOSE, OR THAT THE PRODUCTS WILL NECESSARILY CONFORM TO THE ILLUSTRATIONS OR
DESCRIPTIONS. EXCEPT AS PROVIDED BELOW, NO WARRANTY OR AFFIRMATION OF FACT, EXPRESSED OR IMPLIED, OTHER
THAN AS STATED IN THE “LIMITED WARRANTY” ABOVE IS MADE OR AUTHORIZED BY DAYTON.
Technical Advice and Recommendations, Disclaimer. Notwithstanding any past practice or dealings or trade custom,
sales shall not include the furnishing of technical advice or assistance or system design. Dayton assumes no obligations or
liability on account of any unauthorized recommendations, opinions or advice as to the choice, installation or use of
products.
Product Suitability. Many jurisdictions have codes and regulations governing sales, construction, installation, and/or use of
products for certain purposes, which may vary from those in neighboring areas. While attempts are made to assure that
Dayton products comply with such codes, Dayton cannot guarantee compliance, and cannot be responsible for how the
product is installed or used. Before purchase and use of a product, review the product applications, and all applicable
national and local codes and regulations, and be sure that the product, installation, and use will comply with them.
Certain aspects of disclaimers are not applicable to consumer products; e.g., (a) some jurisdictions do not allow the exclusion
or limitation of incidental or consequential damages, so the above limitation or exclusion may not apply to you; (b) also,
some jurisdictions do not allow a limitation on how long an implied warranty lasts, consequently the above limitation may
not apply to you; and (c) by law, during the period of this Limited Warranty, any implied warranties of implied
merchantability or fitness for a particular purpose applicable to consumer products purchased by consumers, may not be
excluded or otherwise disclaimed..
Prompt Disposition. A good faith effort will be made for prompt correction or other adjustment with respect to any
product which proves to be defective within limited warranty. For any product believed to be defective within limited
warranty, first write or call dealer from whom the product was purchased. Dealer will give additional directions. If unable to
resolve satisfactorily, write to Dayton at address below, giving dealer’s name, address, date, and number of dealer’s
invoice,and describing the nature of the defect. Title and risk of loss pass to buyer on delivery to common carrier. If product
was damaged in transit to you, file claim with carrier.
Manufactured for Dayton Electric Mfg. Co., 5959 W. Howard St., Niles, Illinois 60714 U.S.A.
12