1
Workingman’s 2X10C
OWNER’S MANUAL
SWR • CORONA, CA • USA
INTRODUCTION
Congratulations on your purchase of the Workingman's 2x10C Bass Combo Amplifier! You now own the most powerful combo amp in
SWR's world-renowned Workingman's Line of products, a line designed for bassists who expect typical SWR professional quality at
affordable prices.
In today's crowded market, it's easy to forget that SWR pioneered the concept of the 2x10 + tweeter bass combo amp in the late
1980's with the introduction of the now-famous Redhead. The piece quickly became the first-call amplifier of first-call studio musicians
in New York and Los Angeles, attaining legendary status for its crystal-clear sound, studio-specific feature set, and ample headroom.
As its reputation grew, more and more people began using it as a live application amplifier, sometimes with a 2x10 or 1x15 extension
cabinet hooked up to take full advantage of the amplifier's tone and power capabilities.
Meanwhile, over time, we received numerous requests from our customers to produce a line of products that would incorporate
SWR's accurate sound, high reliability, quality components, and hand-made craftsmanship − but at an overall lower cost. This resulted in the development of the Workingman's Series of amplification from SWR. The precision electronic section featured in the
Workingman's Series is entirely hand-built, employing a variety of technologies selected for their sound quality and practical usefulness in a roadworthy and studio-ready amplifier, including an all-discrete initial gain stage in the preamplifier section and discrete
solid-state design in the power amplifier. Regardless of its lower price, the Workingman's Series offers no compromises of the essential SWR design and construction philosophy. Corners are not cut from a more elaborate model: rather, each product's design parameters are conceived from the ground up and the best available components are selected for each application. Such was the case
with the Workingman's 4004 amplifier, a 260/400 watt head that has proven to be one of the most successful and widely-used products in SWR's history since its release in 1999.
We constantly strive to listen to our customers, and you've told us repeatedly that you wanted a 2x10 + tweeter combo amp in the
Workingman's Series. Keeping SWR's design philosophy in mind, we custom-designed a 10" driver specifically for this combo amp,
tweaked the design of the popular Workingman's 4004 head, and listened and soundtested repeatedly until it met and exceeded the
demands of the many bassists (from inside and outside the company) who tried it. The fast all-solid-state response, the 260-watts
(stand-alone)/400 watts (with any Workingman's extension speaker) power delivery, and the famous SWR sound are all there. Just like
you asked for.
It's all part of SWR's commitment to providing today's bassists with the tools necessary for the pursuit of the ultimate goal: finding
equipment that not only does the job, but actually enhances the overall musical experience and contributes to the creative process.
Everyone here at SWR sincerely hopes that the purchase of your Workingman's 2x10C helps you get there from here…and beyond.
Please take the time to read your Owner's Manual thoroughly and completely, so that you can realize the full potential of your new
Workingman's 2x10C Bass Combo Amplifier. Once again, thanks for your purchase, and for letting SWR help Amplify Your Future.™
Sincerely,
SWR
Note: Please take a moment to verify that the following items were included in your SWR Workingman's 2x10C packaging: AC
Cable, (4) heavy-duty caster wheels, SWR Catalog.
2 • WORKINGMAN’S 2X10C
WORKINGMAN'S 2X10C - FRONT PANEL FEATURES
• Discrete Solid State Front End
• Balanced XLR Output
• Tuner Out Jack
• High and Low Sensitivity 1/4" Input Jacks
• Gain Control with LED peak clipping indicator
• Aural Enhancer Control
• Bass Level Control
• Lo Mid Level Control
• Mid Level Control
• Hi Mid Level Control
• Treble Level Control
• Effects Blend Control
• Variable Limiter with Pull Defeat Option
• Master Volume Control
• Speakers (both internal and extension) On/Off Switch
• Stereo Headphones Jack
• Single Open Rack Space for effects unit of your choice
WORKINGMAN'S 2X10C - REAR PANEL FEATURES (chassis and cabinet)
• Side-Chain Effects Loop (Effects Send and Effects Return 1/4" jacks)
• Extension Speaker 1/4" Output Jack
• Speaker Fuse
• Line Fuse
• AC Power Cord Receptacle
• Internal Speaker On/Off Switch
• 3-Way Tweeter Mode Selector Switch (Full Range, -6db, Off)
SPECIFICATIONS
Power Ratings (minimum)
260 Watts @ 8 ohms (internal cabinet)
400 Watts @ 4 ohms (with 8-ohm extension cabinet)
Minimum Impedance (amplifier)
4 ohms
Frequency Response (power amplifier)
-3dB @ 20 Hz and 40 kHz
Speaker Complement
(2) 10" custom designed cast-frame SWR drivers
(1) LeSon TLX-1 Piezo Tweeter
WORKINGMAN’S 2X10C • 3
Cabinet Construction and Features
5/8" 7-ply, Maple or Birch plywood construction, waterproof glue.
All joints Dado and Rabbet, glued and nailed.
Front Slot Port designed to eliminate unwanted noise
Heavy Duty Removable Casters
Heavy Duty Spring Handles
Midnight Blue Carpeting with Stack Lock Corners
Midnight Blue Stamped Steel Vibration-Free Grill
Dimensions
23"W x 23"H x 16.75"D
Weight
76 lbs.
WORKINGMAN'S 2X10C - GETTING STARTED
Remove the AC cable from the accessory pack and connect it from the amplifier to a standard wall outlet. Make sure that the "Gain"
and "Master Volume" controls are set to the minimum position (fully counter-clockwise). Locate the power switch on the right side of
the front of the unit and turn the amplifier on. Upon powering up, don't be surprised if you hear a small pop. This is absolutely normal
and will not cause damage to your speaker system.
(Eliminating this "power on transient" would require a component called a relay. SWR chose not to incorporate this type of component due to the fact that relays degrade signal quality and often fail, causing the unit to have no output and requiring a trip to a local
service center. If you wish not to hear the pop upon power up, locate the "Speakers On/Off" switch on the front panel and set it to the
down position before you turn the unit on. Be sure to remember to set the switch back to "On" afterwards, or you may find yourself
wondering why you don't hear anything.)
Plug your instrument into the desired input jack (refer to "Front Panel Features" for greater detail). Turn your instrument's volume up
to at least 75% of maximum and slowly adjust the gain control. Once you begin to play your instrument and you see the red light
(marked "preamp clip") over the gain control illuminate, back off the gain a bit. Now turn up the "Master Volume" and you should hear
the sound of your instrument amplified through the Workingman's 2x10C. For more detailed information, please read the entire manual carefully so that you can fully realize the potential of your new Workingman's 2x10C.
For those who wish to use an extension speaker cabinet with the Workingman's 2x10C, please skip ahead to the section marked
"Extension Speaker Output Section."
4 • WORKINGMAN’S 2X10C
WORKINGMAN'S 2X10C - FRONT PANEL FEATURES
BALANCED D.I. (XLR) OUTPUT
The Balanced XLR output is a true balanced output. No front panel controls affect its signal. The tone and output levels are controlled
only by the instrument plugged into one of the input jacks. To use this feature, run an XLR cable from the Balanced D.I. Output to the
input of a tape machine, mixing console, etc. This output is also suitable for sending a signal to a house mixer in live situations.
Wiring for the XLR connector is American standard (as follows):
Pin 1 = ground, Pin 2 = +, Pin 3 = TUNER OUT
The Tuner Out function allows the user to plug their instrument tuner into this jack and "tune up" without having to unplug and go back
and forth from amp to tuner. This feature is totally isolated from the rest of the preamp and will function regardless of the settings on
the front panel. Being isolated on a side chain avoids loading down of the instrument, which can cause a loss in dynamic range.
To use this feature, connect a shielded patch cord from the Tuner Out jack on your Workingman's 2x10C to the input jack on your
tuner. Turn the amplifier on and you're ready to go. If you do not wish to monitor your sound during the tuning process, you may either
turn down the Master Volume, or set the Speakers On/Off switch to the down position.
INPUT JACKS
Both input jacks accept a standard 1/4" phone plug and both inputs can be used at the same time. Since the two inputs are totally
independent, no loss in volume or tone will occur by using two instruments simultaneously. However, the main applicational use for the
two separate input jacks is their difference in level, as the Passive/Active input has five times more gain than the Active input. In other
words, it's not necessarily intended as a "submixer" for two instruments, but no harm will come from having two instruments plugged
in at once. Please read below for more details.
PASSIVE/ACTIVE INPUT JACK
This input jack is designed to accommodate both "passive" instruments and most "active" instruments. A passive instrument has no
built-in preamp and does not use a battery, while an active bass utilizes a battery-operated preamp for gain, tone controls, or both.
The Passive/Active Input will work with all instruments having a maximum output of less than 1 volt RMS. Some active pickups such
as EMG, Bartolini, etc., use batteries for operation and will work perfectly using this input. Instruments made by MTD, Sadowsky,
Modulus, etc., have active electronics that are suited for use in the Passive/Active input.
Generally speaking, try this input first. If you hear a small amount of distortion and the preamp clip LED is not activated, try using the
Active input jack. If the Active input does not correct any audible distortion, check the battery in your bass.
ACTIVE INPUT JACK
The Active input jack should be used with instruments having a built-in (on board) preamp or other sound sources that will produce
output levels greater than 1 volt RMS. The number of bass manufacturers has increased significantly over the years, and it's impossible to try and keep track of them all. Generally, if you have very "hot" pickups and/or tone controls installed in your instrument, and
you use them to boost the level of your bass signal 10 dB or more, you may find the Active input more compatible. The best judge is
your own ears.
If you're using a keyboard or bass pedal with the Workingman's 2x10C, we have found the best choice to be the Active input.
NOTE: Using the Active input with passive basses (active instruments will always employ a battery) may result in a loss of high end
transients. Players who roll off their high end starting at about 2kHz, or prefer a "darker" sound, may find this input more to their liking.
If you hear some distortion with your active bass and are using the Active Input, make sure the preamp clip LED indicator is not
lighting. If the preamp stage is not being driven into clipping, replace the battery in your instrument.
WORKINGMAN’S 2X10C • 5
GAIN CONTROL
The Gain control adjusts the volume of the preamp section. Since the Gain control is similar to a "pad," a small amount of signal will
be heard even with the Gain control rotated fully counter-clockwise ("MIN") if the Master Volume is up.
After all EQ settings and the Aural Enhancer are set, the Gain control should be raised until the preamp clip LED barely flashes when
your loudest note is struck. This will insure maximum signal to noise ratio and prevent unwanted clipping of the preamp section.
NOTE: The Gain can serve as an EFFECTS SEND LEVEL ADJUSTMENT. If your effect is being overdriven, turn down the Gain control and readjust your Master Volume for overall loudness.
PREAMP CLIP LED
The preamp clip LED will light whenever the preamp, tone section or output buffer reach clipping (run out of headroom). In the event
the clip indicator lights, turn down the Gain control. Since this circuit monitors the tone controls, boosting any one of them can cause
the clip LED to activate. Once again, you may leave the tone control at its desired level, but turn the Gain control down further.
NOTE: Even though the Preamp Clip LED lighting indicates that at some point the preamp is clipping, no harm is being done to
your amplifier. However, clipping of the power amp can cause damage to your speakers and is not recommended.
AURAL ENHANCER
The Aural Enhancer is a feature that's been on just about every SWR amplifier since the company's inception in 1984, and is a trademark part of the "SWR Sound" people have come to know and love. It was developed to help bring out the fundamental low notes of
the bass guitar, enhance the high-end transients, and reduce certain frequencies that help "mask" the fundamentals. The ultimate
result is:
1. A more transparent sound, especially noticeable when slapping and popping.
2. It can make a passive bass take on an "active" type of quality when set at positions of "2 o'clock" or further clockwise.
Let's take a second to learn how the Aural Enhancer works. Think of it as a variable tone curve that changes depending on where you
set the Aural Enhancer control knob. As you raise the control clockwise from the "MIN" position, you are elevating a whole range of
sound (lows, mids, and highs) at a variety of frequency points selected specifically because they're different than those selected for
the individual Tone Controls.
This remains true up to about the "2 o'clock" position. This position − a favorite for many users − brings out both the low end fundamentals and crisp highs and, at the same time, adds a little lower midrange to help cut through the band. However, if you go further
clockwise and past the 2:00 position, selected mids will start to drop off − specifically, a group of frequencies centered around 200
Hz. At this point and after, the effect becomes much more pronounced. However, the curves involved here are gentle, as opposed to
the very extreme curves you can create by boosting or cutting the Active Tone Controls (EQ).
Most significantly for basses, the Aural Enhancer will help bring out the fundamentals of your lower registers without masking them
with overtones, as is possible when using the Bass control only. At the same time, it opens up the sibilance characteristics of all
instruments without being harsh.
Obviously, numbers and curves and circuits all mean nothing compared to what you hear with your own ears. Play a chord, a repeated
lick, or a harmonic, and turn the Aural Enhancer control to various points on the knob to hear the effect for yourself. As always, your
ears are the best judge when it comes to settings that affect the tone of your instrument.
6 • WORKINGMAN’S 2X10C
WORKINGMAN'S 2X10C - 5-BAND GRAPHIC EQ SECTION
OVERVIEW
Your Workingman's 2x10C comes equipped with a 5-band graphic equalizer for versatile, active tone shaping in an easy-to-use interface. Each of the five bands utilizes a slider control that can cut or boost its designated frequency range by up to 15db. For each EQ
control, sliding the knob up will boost its designated band or frequency, while sliding the knob down will reduce its designated frequency. Each control also has a flat (center-click) position that defeats its function. In other words, when an EQ control sits in the center-click position, that EQ control does not cut or boost anything − it is inactive.
The center frequencies for each EQ control are as follows:
Bass:
Lo Mid:
Mid:
Hi Mid:
Treble:
80 Hz
160 Hz
400 Hz
800 Hz
3kHz
USING THE 5-BAND GRAPHIC EQ SECTION
BASS CONTROL
The Bass Control (band 1) itself, as stated above, works in a range that will be useful under most "normal" conditions. Its musical use
might be thought of as a "fatness" control. The overall "punch" of your instrument, from your low E-string on up to about two octaves
(midway up the G-string), will be determined with this control. With passive instruments, this will be straightforward. With active instruments having bass-boost controls, more exploration will be worthwhile. (Some active tone circuits have boost-cut controls such as
Tobias, Sadowsky, etc. Others such as Music Man, may be straight boost controls. Take a little time and see how the EQ onboard
your bass interacts with the Bass Control on the 2x10C.)
MIDRANGE CONTROLS
The Midrange Controls (bands 2, 3, & 4 - Lo Mid, Mid, and Hi Mid respectively) operate in a crucial area for most instruments. Many
basses, particularly with roundwound strings, can have a very "honky" or nasal sound. Locating and cutting the correct midrange frequencies can go a long way toward smoothing out your tone. But it's worth remembering that what sounds best when listening to
your tone by yourself may not be what works best in a band or recording. Sometimes that objectionable quality may be just the right
"hair" on your note to still have an audible presence in the track or onstage.
Some hints: If you need to "cut through" the band a little more, try boosting the Mid Control. If you like a more transparent or
"scooped" sound, try cutting the Hi Mid Control. The midrange controls are also especially useful in controlling fretless basses and
their inherent qualities.
TREBLE CONTROL
The Treble Control (band 5) operates in a tonal area that extends through and beyond the usual "treble" range. Boosting the control
will open up the sound of a dull instrument, particularly in conjunction with the tweeter. However, this is also the range of string rattle,
finger slides and pickup clicks. Again, we recommend you experiment with the control alone with your instrument while finding your
tone, and then listen again in a band context, both near to and away from your speaker system. Bass-oriented qualities like punch and
fatness can be fairly well spread out. However, what most people know as treble, despite the broad dispersion of most tweeters, is a
very directional quality. Spend some time exploring what you can hear in this area as you move around.
WORKINGMAN’S 2X10C • 7
EFFECTS BLEND CONTROL
The Effects Blend Control "blends" the signal sent from your instrument with the signal coming from an outboard effects unit of your
choice. With the Effects Blend fully counter-clockwise ("DRY"), no signal from your outboard effects unit will be heard. As you turn this
control clockwise, more of the effect can be heard in the overall sound. When the Effects Blend control is set fully clockwise ("WET"),
no true or unaffected signal is heard other than what your outboard effects unit provides. If your outboard effects unit has a similar
control, adjust it to the fully clockwise ("WET") position. This will avoid any possible phasing problems.
The Effects Blend circuit is similar to that used on recording consoles with the effects loop on a "side chain" to the normal circuit.
Unless the control is set to the full "wet" position, you will always get the full sound of your instrument AND get the diversity an
effects unit offers. This circuit is also effective in reducing noise generated by effects units because it is located after the gain
stages in the preamp.
The Effects Blend control functions only when the Effects Loop is being used. It is activated when a 1/4" phone plug is inserted into
the Effects Receive jack (for more information, please see the heading titled "Effects Loop" in the "Rear Panel Features" section later
in this manual).
VARIABLE LIMITER CONTROL (with defeat option)
The Limiter in the Workingman's 2x10C is designed to provide the user with maximum flexibility of control, while at the same time
provide protection for the power amplifier from clipping, a condition that can cause damage to itself and the speaker system over
time if allowed to occur.
The Limiter circuit is located after (post) the Master Volume and before (pre) the power amplifier, so the Limiter itself is driven by the
Master Volume control. You can set the threshold of the Limiter with the Limiter Control. Turning the control clockwise sets the
threshold to increase the amount of limiting, while turning the control counter-clockwise will decrease the amount of limiting. As
always, your ears will help you determine the right amount of limiting to use, as levels vary greatly from player to player due to playing style, output levels of basses, EQ settings, and many other factors. This feature can also be helpful in preventing speaker damage
when running your system at high volumes.
NOTE: When listening to hear if there is distortion present in your signal, make sure you are not confusing power amp distortion
with preamp distortion. To make sure preamp distortion is not present, be sure to set the Gain Control to where the Preamp Clip LED
is not illuminating. Then you can make a clear determination as to how best to set the Limiter.
DEFEATING THE LIMITER CIRCUIT
Regardless of where the Variable Limiter Control is set, you may defeat the Limiter circuit at any time by pulling out on the Limiter
knob itself. (It doubles as an on/off switch for the Limiter.) To defeat the Limiter, simply pull "out" on the knob of this control until you
hear and feel a "click." To re-engage the Limiter, push the control back in to its original position, and the Limiter circuit will reactivate
at the threshold setting you chose originally. This may be useful in determining just how much limiting is occurring in an "A/B" type of
test. You can also hear in an instant if your limiter is set to where it is actually stopping the power amp from clipping, because if you
suddenly hear distortion that wasn't there when the limiter was engaged, that's exactly what's occurring. (This is especially key to
remember when using your 2x10C with an extension cabinet at high volumes.)
LIMITER ACTIVE LED
When the threshold (starting point) of the Limiter circuit is reached, the Limiter Active LED will light, indicating that the Limiter Circuit
is active and helping to protect your power amplifier from clipping. The Limiter LED will not illuminate when: a) the Limiter has been
defeated by pulling out on the Limiter control; b) when playing at levels not high enough to engage the circuit.
NOTE: If you have defeated the Limiter and you hear a loud, sharp distortion present in your sound − and the Preamp Clip LED is
not lighting up − re-engage the Limiter by pushing the Limiter control back in. If the distortion goes away, you were probably clipping
the power amp, which is not a good thing. Remember, the Limiter circuit is there to protect your amplifier from such a state of operation.
8 • WORKINGMAN’S 2X10C
MASTER (VOLUME) CONTROL
The Master (meaning "Master Volume") control adjusts the level being sent to the power amplifier in your Workingman's 2x10C − it
controls the overall volume of the unit. Turning the control counter-clockwise reduces the overall level, while turning the control clockwise boosts the overall level.
Two notes: The Master control never affects the level present at the XLR or effects send jacks − it only affects the level being sent to
the power amplifier, and subsequently, your internal speaker system and extension speaker output only. Also, losses caused by outboard effects units can be recovered by increasing the Master control.
SPEAKERS ON/OFF SWITCH
This two-position switch controls the signal sent from the power amplifier to the speaker section of your Workingman's 2x10C and an
extension speaker if connected (hence the term "speakers"). When set to the On (top) position (default setting from the factory), the
Workingman's 2x10C will operate normally, and the sound of your amplified bass will be heard from the speaker section and any connected extension speaker. When set to the Speakers (bottom) position, that signal will be defeated regardless of the settings on the
front panel. This can be useful for silent practicing (in conjunction with the Headphones Jack, listed below), or for defeating the audio
while you re-patch cables or plug and unplug your instrument. This switch will not affect the signal present at the various audio outputs (XLR, Effects Send, Tuner Out). It will also not affect the signal present at the Headphone Jack.
NOTE: If the volume on your instrument is up, and your Gain and Master Volume controls are up, and especially if you're seeing
the Preamp Clip and Limiter Active LED's illuminate while you're playing… and you can't understand why you're not getting any audible
output from the Workingman's 2x10C, check the position of this switch!
HEADPHONES JACK (stereo only)
By inserting a set of stereo headphones into this jack, you can monitor your sound more closely in a studio situation, or practice
silently (when the Speakers On/Off Switch is set to "Off") so as not to completely annoy your neighbors. The headphone volume level
is adjusted by the Master Volume. We suggest you begin with the Master Volume full off (counter-clockwise), then slowly bring up the
volume to the desired level. If you hear some distortion in your headphones that isn't present through your speaker system, turn
down the Master Volume. You are probably overdriving your headphones and could ruin them, to say nothing of what you may be
doing to your ears.
Any impedance headphones will work. However, optimum impedance is 75 ohms.
POWER ON/OFF SWITCH
This switch turns the complete unit on or off. Setting the switch upwards to the "On" position turns on the unit, and the switch itself
will illuminate in red. Setting the switch downward to the "Power" position will turn the unit off, and the red light inside the power
switch will turn off as well.
WORKINGMAN’S 2X10C • 9
WORKINGMAN'S 2X10C - REAR PANEL FEATURES (chassis and cabinet)
EFFECTS LOOP (for outboard effects devices)
As mentioned previously in the "Effects Blend Control" section of the manual, the Effects Blend circuit in your Workingman's 2x10C is
similar to that used on recording consoles, with the effects loop on a "side chain" to the normal circuit. Unless the Effects Blend control is set to the full "wet" position, you will always get the full sound of your instrument AND get the diversity an outboard effects unit
offers. Use of the effects loop will reduce the noise generated by outboard effects units (as compared to using the effect between
your instrument and the input jack, though many people use it in this fashion anyway). This is because the loop is after the preamp
gain stages.
The Effects Loop is compatible with most individual or multi-effect outboard effects devices. Many effects devices on the market
have input level adjustments. For instance, some units have a switch that you can set for either -20 dB or +4 dB. In all cases, these
should be set for 0 dB (if available) or +4 dB. The level going to your effect is controlled by the Gain control on the front panel.
NOTE: The Effects Loop is used in conjunction with the Effects Blend control on the front panel. When the Effects Blend Control is
in the full counter-clockwise ("DRY") position, no effects will be heard. This is normal.
CONNECTING AN OUTBOARD EFFECTS DEVICE TO THE WORKINGMAN'S 2X10C EFFECTS LOOP
Obtain two high-quality shielded patch cables, preferably as short as possible. Route them in the most direct way possible. (Running
patch cables over the top of the Workingman's 2x10C − as with any amplifier − can induce hum in the cables and is not recommended.) Take one cable and connect it from the Effects Send jack on the Workingman's 2x10C to the input of your outboard effects
device. Take the second cable and connect it from the output of your outboard effects device to the Effects Return jack on your
Workingman's 2x10C. To set levels, follow the instructions as previously listed in the "Effects Blend Control" heading under "Front
Panel Features."
EFFECTS SEND
This jack's primary function is to send a post-EQ signal to an outboard effects device for use in the Workingman's 2x10C Effects
Loop. However, it can also be used as:
1. A line level output for use in conjunction with an additional (slave) power amp − such as SWR's
2. An unbalanced output suitable for recording or live mixing board purposes.
Power 750.
The output impedance of the Effects Send jack is 100 Ohms.
EFFECTS RECEIVE
This jack's primary function is to complete the Effects Loop circuit by routing the post-outboard-effects device signal back into the
power amp of the Workingman's 2x10C, where it can be blended back in with the original signal by using the Effects Blend control on
the front panel. However, it can also be used as:
1. A power amp input jack. If, for some reason, you wished to bypass the entire front end and use the Workingman's 2x10C strictly as a powered monitor, you could take the output of whatever line-level audio source you wished and connect it to this jack. Then,
set the Effects Blend control to the full clockwise ("WET") position. Use the Master control to set the overall level, and your
Workingman's 2x10C is now a powered speaker cabinet.
2. An input for pre-recorded music, for playing along and practicing purposes. To accomplish this, insert a CD player or other
sound source into the Effects Receive jack. (It must be a MONO 1/4" plug that goes
into this input, so you'll have to use a
stereo-to-mono cable adapter of some kind.) You can adjust the level of recorded music versus the "live" sound of your instrument
by using both the Effects Blend control (the more clockwise the control, the more pre-recorded music signal you'll hear) and the
volume control of your CD (or other) audio source. The mixed sound will be heard through your speaker(s). Besides pre- recorded
music, this is also an excellent way to practice along with a drum machine.
Input impedance of the Receive jack is 27k Ohms minimum.
10 • WORKINGMAN’S 2X10C
NOTE: Inserting a plug into the Effects Receive jack activates the Effects Blend control. The control receives this command
through the ground created by the phone plug making contact with the jack. The plug must be a mono plug (tip and ground). If you
have a stereo plug only, it will be necessary to tie the ring and the ground together.
COMBO CABINET JACK/PLUG ASSEMBLY
The black cable/plug assembly that comes out of the cabinet and is connected to the rear panel (near the text marked "Combo
Cabinet") is the means by which the power amp in your Workingman's 2x10C sends its signal to the speaker complement. Both the
plug and the jack it connects to are a special size, slightly less than the typical 1/4" found on instrument and speaker cables alike.
SWR strongly recommends that you not disconnect this cable, as it is not meant to be (nor can it be) used as either an extension
speaker output or a speaker cabinet input. For proper connection of an extension speaker to your Workingman's 2x10C, please read
below.
EXTENSION SPEAKER OUTPUT SECTION
This section of the manual will deal with the proper connection of extension speaker cabinets to the power amplifier in the
Workingman's 2x10C. We recommend that you read this section carefully, as power amplifiers, impedance and speaker cabinets are
all crucial in determining how best to operate your new Workingman's 2x10C with an extension speaker cabinet.
HOW IMPEDANCE AFFECTS POWER RATINGS
People often have questions about impedance. What is it? The root of the word "impedance" is the verb "impede," which means to
block or resist. That's what impedance is − resistance to power.
Solid-state power amps do not have a pre-determined impedance. They deliver power at whatever impedance the speaker cabinet
tells it to. That's why you hear the term "slave amp" − amplifiers only do what they're told. So if someone tells you that they have a "4
ohm power amp," their terminology and understanding of the concept is way off the mark.
Unlike power amps, every speaker cabinet has a pre-determined impedance rating measured in "ohms." In most cases this rating is
either 4 or 8 ohms (though there may still be some old 2 ohm creakers out there). The higher the impedance of the speaker cabinet,
the more resistance to power it will offer. The lower the resistance of the speaker cabinet, the less resistance to power it will offer. In
other words, HIGHER IMPEDANCE MEANS LESS POWER CAN ENTER THE SPEAKER CABINET. LOWER IMPEDANCE MEANS MORE
POWER CAN ENTER THE SPEAKER CABINET.
You may be thinking that you've found the solution to the universe − just use speaker cabinets with really low impedances and you
can get skull-crushing power out of your amplifier, right? Wrong. There's a catch. Power amps have limits as to how low an impedance
they can drive safely. This is what's known as an amplifier's "Minimum Impedance Rating." If you try and operate a power amp below
its minimum impedance rating, it will give you lots and lots of power for about five minutes…and then overheat, short out and fail completely. In other words, THE LOWER THE OPERATING IMPEDANCE OF THE AMPLIFIER, THE HOTTER IT WILL GET.
WORKINGMAN'S 2X10C POWER AMPLIFIER MINIMUM IMPEDANCE RATINGS
Here's what this means to the power amp in the Workingman's 2x10C. Like most combos, the Workingman's 2x10C contains a mono
power amp, which makes things fairly simple. The operating impedance of the internal speaker system in your
Workingman's 2x10C is 8 ohms, so that's your starting point. When you add an extension cabinet to the Workingman's 2x10C,
invariably the total operating impedance of the amplifier will get lower. The Minimum Impedance Rating of the Workingman's
2x10C is 4 ohms. This means that you can safely connect to the extension speaker jack:
- One 8 ohm speaker enclosure (4 ohms total impedance)
- Two 16 ohm speaker enclosures (4 ohms total impedance)
Operation at 4 ohms will provide 400 watts, a nice increase over the 260 watts available when used in a stand-alone configuration.
But as previously mentioned, the lower the operating impedance, the hotter the amplifier will run. An amp that runs at or near its minimum impedance all the time may wear the life of its components faster than normal. Furthermore, damage to the power amplifier
WORKINGMAN’S 2X10C • 11
section of the Workingman's 2x10C may occur if speaker enclosures with total impedances less than the minimum loads listed
above are connected to the speaker output section. The owner's manual that came with your speaker cabinet should state its total
impedance. On SWR speaker enclosures, the total impedance is generally indicated on the speaker's input panel.
So how do you determine the total impedance of two cabinets hooked up to your Workingman's 2x10C? Here's a quick key of the
most common setups:
One 8 ohm enclosure (internal) + one 8 ohm enclosure (extension) = 4 ohms total impedance
This is OK. However:
One 8 ohm enclosure (internal) + one 4 ohm enclosure (extension) = 2.6 ohms total impedance
This is NOT OK! The power amp will eventually overheat and fail.
Here's another formula: To figure out the total impedance of two or more cabinets of equal value hooked up in parallel, divide the
impedance of one cabinet by the number of cabinets:
Impedance of one cabinet / number of cabinets = total impedance
(For an even more in-depth discussion of impedance and power rating issues, go to the SWR Website at www.swrsound.com, click on
"Support", then click on "Technical Articles," then click on "Plug and Play - Setup Tips for Amps and Speakers"-an article by SWR
founder Steve Rabe that ran in the August '92 issue of Bass Player Magazine.)
WORKINGMAN'S 2X10C POWER DELIVERY CAPABILITIES (Power Ratings)
After determining how the extension cabinet you wish to use affects the total operating impedance, you need to take into account the
power handling capabilities of that speaker cabinet as compared to what the Workingman's 2x10C can deliver at that operating
impedance. Those ratings are as follows:
260 Watts @ 8 ohms (internal speaker system only)
400 Watts @ 4 ohms (internal system with one 8 ohm extension cabinet)
So if you use an 8 ohm extension speaker cabinet along with your internal speaker system, it will get up to 200 watts of power (400
watts split in half), and more during transient peaks. Make sure your extension speaker cabinet can handle the power.
There is also the situation known as under powering your speakers. This is caused when the power amp, in the process of trying to
drive one or more speaker cabinets, reaches its limit and goes into clipping. That "clipped" waveform (or "square wave") will quickly
heat up the voice coils in speakers, and if operating continually while clipping, eventually will burn the voice coils and cause the
speakers to fail. Speakers abused in this fashion are easy to detect and generally not covered under a manufacturer's warranty.
(Remember, engaging the Limiter will not allow the power amp to clip, so we recommend that you not disengage the Limiter when
running at low total impedances in general.)
Also be aware that when running the amp at 4 ohms, you are operating at the maximum capacity of the power amplifier. With
extreme settings on the Gain and Master controls and the Limiter circuit disengaged, you may hear audible clipping of the power
amp. If so, you have exceeded the maximum capacity of the power amp. POWER AMP CLIPPING CAN CAUSE DAMAGE BOTH TO
ITSELF AND YOUR SPEAKER CABINETS. Either re-engage the Limiter (by pushing in on the Limiter control) to help smooth out the
peaks, or back off on the Gain and Master controls.
Remember, it's always better to have a little too much power than just barely enough. If you find yourself constantly wanting more
power than the Workingman's 2x10C provides, either:
a) tell your bandmates to turn down
b) tell the monitor engineer to turn you up
c) (better option) take the time to investigate getting an external power amp for the additional speaker cabinets to supplement
your rig
d) (best option) investigate getting a larger rig (perhaps something modular, with a large head and two speaker cabinets) for
those gigs where more power and volume is needed
12 • WORKINGMAN’S 2X10C
NOTE: The frequency response of the Workingman's 2x10C is far greater than usually found in musical instrument amplifiers (20
Hz to 40K Hz). This was engineered in order to give the bass player the same punch and clarity on stage as found in the studio or
concert P.A. systems. Therefore, it is doubly important that you are aware of the impedance and power rating of the extension speakers that you intend to use, and that they are compatible with the Workingman's 2x10C. Speakers that have been overdriven are easy
to detect and generally do not fall under a manufacturer's warranty.
EXTENSION SPEAKER OUTPUT JACKS
One 1/4" phone jack is provided for connection of an extension speaker to the Workingman's 2x10C. Only SPEAKER CABLE of 18
gauge or heavier (the heavier the cable, the lower the gauge) should be used to connect an extension speaker to your Workingman's
2x10C. Do not use shielded instrument cable in this application, as this can result in intermittent power loss, cause your amp to oscillate and damage itself and/or your speakers, and render the cable useless for any purpose.
Recommended SWR Speaker enclosures for use as an extension cabinet with the Workingman's 2x10C include:
Workingman's 2x10T
Workingman's 1x15T
Workingman's 4x10T
Big Ben (1x18 sub)
SPEAKER FUSE
The speaker fuse is provided to protect your speakers in the unlikely event of a power amp failure or to protect your power amplifier
from incorrect speaker impedances or hookups. Size and rating of the fuse is 3AG, 10 amp, fast-blo. Do not defeat the purpose of
this feature by using a higher rated fuse as it can damage your amplifier and void your warranty.
The fuse can open as a result of a fault in the speaker cable, the speakers themselves, or the power amp being sent well into clipping. With this in mind, it is wise to carry extra fuses at all times.
INTERNAL SPEAKER MODE SWITCH
Located on the small panel on the rear of the Workingman's 2x10C's speaker cabinet, this two-position switch controls the signal
sent from the power amplifier to the internal speaker cabinet only. When set to the On (top) position (default setting from the factory),
the Workingman's 2x10C will operate normally and the sound of your amplified bass will be heard from the internal speaker cabinet.
When set to the Off (bottom) position, the internal cabinet's signal will be defeated, but any extension speaker connected will still be
audible. This could be extremely useful if you wish to use the amplifier in your 2x10C in a head-only configuration, at which point you
could connect any speaker cabinets to the amplifier just so long as the resulting total impedance was no lower than 4 ohms. This can
also be useful for silent practicing (in conjunction with the Headphones Jack, listed previously), or for defeating the audio while you repatch cables or plug and unplug your instrument. This switch will not affect the signal present at the various audio outputs (XLR Out,
Effects Send, Tuner Out).
In some ways, this switch is similar to the Speakers On/Off Switch on the front panel, but remember: the Speakers On/Off Switch on
the front panel will defeat all speakers connected to the amplifier, while the Internal Speaker On/Off Switch will only defeat the internal speaker system. But since either one can defeat the internal speaker system, they can override each other when set to the bottom position. Make sure that both switches are in the "On" position if you want to hear sound from your internal speaker system.
NOTE: One last time − if the volume on your instrument is up, and your Gain and Master Volume controls are up, and especially if
you're seeing the Preamp Clip and Limiter Active LED's illuminate while you're playing…and you can't understand why you're not getting any audible output from the Workingman's 2x10C, check the position of this switch!
WORKINGMAN’S 2X10C • 13
TWEETER MODE SWITCH
Also located on the small panel on the rear of the Workingman's 2x10C's speaker cabinet, this three-position switch gives you three
different options for operation of the piezo tweeter. In the Full Range (top) position, the tweeter will reproduce an unattenuated signal of every frequency it sees (roughly 2 kHz up to 15 kHz, within certain tolerances). The -6db (bottom) position reduces the level of
the tweeter's outputs by 6 decibels, which to the ear sounds roughly as if cut in half compared to the Full Range position. The Off
(middle) position will defeat the tweeter's output entirely.
Try starting with the switch in the Full Range position. If this sounds too "treble-y" to your ear and you still want the touch of crispness that a tweeter provides, you can: a) set the Tweeter Mode Switch to -6db; b) adjust the Treble tone control on the front panel; c)
a combination of both. Those users with a predisposition against a tweeter in general have the option to turn it off and leave it off,
but we recommend trying it out first.
LINE FUSE (A/C OR MAINS FUSE)
This fuse is provided to protect the internal electronics against power surges, etc. It also protects the unit against itself should one of
the internal components fail. If this fuse should open, replace it with the same type of fuse and rating. Do not defeat the purpose of
this feature by using a higher rated fuse as it can void your warranty.
United States: 3AG 7 amp slo-blo
Japan: 3AG 8 amp slo-blo
Europe (230V-240V): 3AG 4 amp slo-blo
A/C CORD RECEPTACLE
This receptacle accepts a standard A/C power cable (supplied with the Workingman's 2x10C in the United States) used with almost
all current musical, professional and household electronic devices. We recommend great care when packing up. If your unit is not in a
rack case, put the cable in your instrument or accessory case or leave it attached and looped around one of the rack handles. If it
does become misplaced, a replacement cable can be purchased at almost any music or computer store.
NOTE: The rating for this cable is 3 conductor, 10 amperes minimum. Look for this rating on the cable. Make sure the cable is
plugged in all the way in both the amp and the wall socket.
REMOVABLE CASTER WHEELS
Your Workingman's 2x10C comes with a set of four, heavy-duty, removable caster wheels. SWR uses only closed shaft sockets so as
to prevent air leaks or unwanted noise when the enclosure is in use. To install the caster wheels on your Workingman's 2x10C, carefully turn the unit upside down (or on its side) so that the caster base/sockets are visible. Insert the shaft of each caster wheel into a
socket on the underside of the Workingman's 2x10C. When all four wheels are firmly in place, return the Workingman's 2x10C to its
upright position and you're ready to roll. You can leave the casters in place during performance, but it's recommended that they be
removed so as to allow the Workingman's 2x10C's speaker compartment to couple to the floor, which can be helpful in extending its
bass response. Please note that the ball bearing type caster wheels provided with your Workingman's 2x10C may require periodic
replacement depending on usage and care. Replacement caster wheels can be purchased from the SWR Service Department.
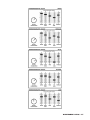
WORKINGMAN'S 2X10C SUGGESTED SETTINGS
The following pages include examples of tone control options for various styles of music. These settings are intended for use as a
starting point for dialing in your own individual sound, so feel free to make adjustments based on your own playing style, instrument
and speaker cabinet configuration.
14 • WORKINGMAN’S 2X10C
WORKINGMAN’S 2X10C • 15
WORKINGMAN’S 2X10C LIMITED WARRANTY
The WORKINGMAN’S 2X10C from SWR is warranted to the original consumer purchaser for ONE
YEAR from the date of purchase against defects in materials and workmanship, provided that it is
purchased from an Authorized SWR dealer. This warranty applies only to products purchased in
the USA or Canada.
This warranty is VOID if the unit has been damaged due to accident, improper handling, installation or operation, shipping damage, abuse or misuse, unauthorized repair or attempted repair, or if
the serial number has been defaced or removed. FMIC reserves the right to make such determination on the basis of inspection by an Authorized FMIC Service Center.
All liability for any incidental or consequential damages for breach of any expressed or implied
warranties is disclaimed and excluded herefrom.
Some states do not allow limitations on how long an implied warranty lasts, or the exclusion or
limitation of incidental or consequential damages, so that the above exclusion may not apply to
you. This warranty gives you specific legal rights and you may also have other rights which vary
from state to state.
SHOULD YOUR SWR AMPLIFIER REQUIRE SERVICE OR REPAIR, PLEASE USE THE
FOLLOWING PROCEDURE:
1
2
Locate your original receipt showing date of purchase, model and serial number.
Determine the closest Authorized FMIC Service Center to your location. The fastest way to get a complete list of Authorized FMIC Service
Centers is on the web at:
http://www.mrgearhead.com/faq/allservice.html
You can also get this information by calling FMIC Consumer Relations at (480) 596-7195
3
To receive warranty service, return the complete product to an Authorized FMIC Electronics Service Center, with proof of purchase, during
the applicable warranty period. Transportation costs are not included in this Limited Warranty.
4
Defective products that qualify for coverage under this warranty will be repaired or replaced, at FMIC’s discretion, with a like or comparable
product, without charge.
For a complete list of Authorized FMIC
Service Centers, and the latest SWR
news, interviews, and more, check out
our website:
swrsound.com
WORKINGMAN’S 2X10C OWNER’S MANUAL • Part # 0066583000 • 08/03
Copyright © 2003 SWR
SWR
8860 E Chaparral Rd, Suite 100
Scottsdale, AZ 85250-2618 USA
PHONE: (480) 596-9690
FAX: (480) 367-5262
EMAIL: [email protected]
WEB: swrsound.com