1
Thank you for purchasing the HyperDrive COLORSPACE O
The HyperDrive COLORSPACE O is a high performance memory card backup device with
a high resolution 3.2" color LCD screen. Supporting 11 different types of memory card
formats, the COLORSPACE O has the world's fastest memory card backup speed at
25MB/s (backup 1GB in 1 minute) and an extremely long battery life (backup up to
120GB on a single battery charge). With unique features like 32-bit copy verification,
built-in card/data recovery and hard drive S.M.A.R.T. monitoring system in an ultra
compact package, the COLORSPACE O is designed as the ultimate photo backup device
for photographers to safely backup, store and view their photos on the go without the
need for a computer.
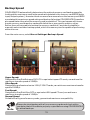
Test the Device Before Using
Before using HyperDrive COLORSPACE O, read this User Manual to
understand device operations. Test backup a few files from all the memory
cards that you will be using and check with a computer that all the data is
properly copied to the COLORSPACE. Incorrect usage, incompatible
memory cards, computer viruses and hardware failure may result in data
loss. Sanho, the manufacturer, is only responsible for the repair or
replacement of device to its original factory conditions within the warranty
period and cannot be held liable for any loss or inconvenience caused. If
you do not agree to these terms, do not use this device and return it to the
dealer whom you purchase from. Usage of the device constitute your
agreement to these terms.
Inspect the contents of the package and contact your dealer if you find any missing
items or defects. Included are the following:
USB Cable
Soft Carry Case
Screwdriver
User Manual
HyperDrive COLORSPACE O
Li-Ion Battery (installed in device)
AC Adapter
Car Charger
The HyperDrive COLORSPACE O is available both with and without a hard drive installed.
Ensure that the capacity of the hard drive suits your needs.
The information in this manual is correct at the time of printing. Due to the continual
improvements being made to the product, new features and functions may be added to
the product which are not described in this User Manual. Kindly refer to
www.hyperdrive.com for any updates.
1
Safety Information
Warning!
Install only 18650 Li-Ion batteries from authorized HyperDrive sources.
Installing other types of batteries may prevent the COLORSPACE O from
operating properly and cause damage.
Moreover, observe correct polarity when installing a battery. Incorrect
polarity may prevent the COLORSPACE O from operating properly and
cause serious damage if the battery short-circuits.
If the COLORSPACE O emits any strange sounds or smells, high hear or
smoke, power off the device immediately and remove the battery. Remove
the battery carefully to avoid burning yourself.
Do not use the COLORSPACE O in a moist environment. Do not handle the
device with wet hands. If water enters the device, remove the battery
immediately and return the device to your dealer for inspection. If liquid
corrodes the device, it may short-circuit and cause a fire.
2
Table of Contents
Basic Operation
Nomenclature
Keypad Operation
Hard Drive Installation
Orientation Sensor
Battery Replacement
Battery Charging
Power On/Off
4
5
6
7
8
9
10
Memory Card Backup
Common Backup Error Messages
Backup Folder Name
Backup Speed
Copy Verification
Visual Backup
Recommended Settings
11
12
14
15
16
17
18
USB Connection to Computer
USB Connection in Windows
USB Connection in Mac OS
19
20
21
Photo Management
Photo Browser
Photo Browser Settings
Photo Zoom
EXIF Display Settings
Photo Recovery
22
28
31
32
33
Memory Card Tools
CF Card Authenticity Verification
Memory Card Erase
Memory Card Scan & Repair
34
35
36
Advanced Functions
File Management
Hard Drive Formatting
Hard Drive Information
Firmware Update
Custom Background/Button Setup
Screen Brightness Adjustment and Screensaver
39
40
41
42
43
45
Product Specifications
46
3
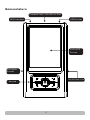
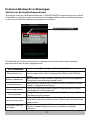
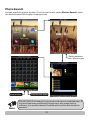
Nomenclature
CompactFlash, MicroDrive Slot
LED Indicator
USB Socket
Color LCD
Screen
DC Power
Socket
MS/SD/MMC Slot
Keypad
4
Keypad Operation
Turn on device
Press and hold
Turn off device
Normal shutdown: Press
button when at the main menu
Forced shutdown: Press and hold
button (when device is in
vertical position) until the device shuts down.
Select a function on
a menu screen
button for a few seconds followed by
button
Press the button corresponding to the function you want to
select (see below)
Select an option on a Press the button corresponding to the option at the bottom of
the screen (see below)
function screen
To backup a
memory card
Insert a memory card into the appropriate card slot and select
"Backup" on the main menu
To view photos
From the main menu, select "Photo" and followed by "Browser”
Under different screens, the buttons correspond to different functions:
On this menu screen, pressing
button connects the device
to a computer via USB
On this function screen,
pressing
button moves
the cursor upwards
5
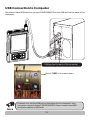
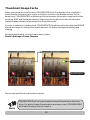
Hard Drive Installation
NOTE
Refer to this section only if you have purchased a COLORSPACE O (casing
only) without a hard drive installed or if you plan to upgrade or change the
internal hard drive.
Remove the screw on the back cover as illustrated. Slide the back cover in the direction
of the arrow
18650 Li-Ion Battery
2.5" Hard Drive
Hard Drive
Connector Socket
Use the appropriate 2.5" hard drive as recommended by your dealer. Ensure that the
hard drive is set to Master mode. Insert the hard drive as shown in the above diagram
with the hard drive information sticker facing outwards and the hard drive circuit
board facing inwards. Ensure that the pins of the hard drive align properly and insert
fully into the socket of the COLORSPACE O. Some of the pins on the hard drive may be
unused but if the hard drive is installed properly, you will be able to close the back
cover. If you cannot close the back cover properly, check that you have installed the
hard drive correctly.
Do not turn on the COLORSPACE O without its back cover in place.
Warning!
6
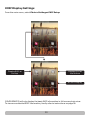
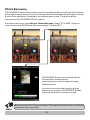
Orientation Sensor
HyperDrive COLORSPACE O features an orientation sensor which detects when you
rotate the device from portrait (vertical) to landscape (horizontal) and automatically
changes the contents of the display. If you wish, you can disable the orientation sensor
and make the device operate exclusively in portrait or landscape mode.
COLORSPACE
From the main menu, select More>Settings>Interface>Direction
COLORSPACE
Landscape (Horizontal) Mode
Portrait (Vertical) Mode
7
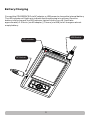
Battery Replacement
Your COLORSPACE O already comes with a battery installed. Refer to this section only if
you are replacing the battery.
Warning!
If you insert the battery with the polarity incorrect, the device
will not operate and under certain circumstances, may even
damage the device.
To replace the battery, remove the back cover, insert the new battery in the correct
polarity and replace the back cover.
Battery Compartment
After you have replaced the battery, turn on the COLORSPACE O to check
that the device will power on.
8
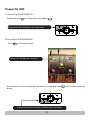
Battery Charging
Connect the COLORSPACE O via AC adapter or USB power to charge the internal battery.
The LED indicator will light up to indicate that the charging is in process. Once the
battery is fully charged, the LED indicator light will dim or turn off. It will take
approximately 2.5 hours (via AC adapter) / 5 hours (via USB) to full charge an almost
empty battery.
USB Socket
LED Indicator
DC Socket
9
Power On/Off
To turn on the COLORSPACE O:
Press and hold
for 2 seconds, followed by
.
Press and hold this button for 2 seconds
To turn off the COLORSPACE O:
Press
on the main menu
Select the "Shutdown" function
Alternatively, to force shutdown the device, press and hold
down.
Press and hold this button until device shuts down
10
until the device shuts
Memory Card Backup
Insert a memory card into the appropriate slot on COLORSPACE O.
Turn on COLORSPACE O by pressing and holding
for 2 seconds.
On the main menu, press
("Backup") to start the memory card backup process.
Image that is currently
being copied
Backup speed mode
Verification mode
Average backup speed
Current file name
Time elapsed and remaining
After the backup process is completed, you have the option to return to main menu
(press
), shutdown device (press
), erase memory card (press
) or browse
the recently copied photos on the hard drive (press
).
NOTE
If the source memory card has errors, bad sectors or very fragmented
space, the copy process bar may not be accurate. If this happens,
reformat your memory card before the next usage.
11
Common Backup Error Messages
Fatal error during backup process:
During the memory card backup process, if COLORSPACE O encounters an error which
it is unable to resolve or ignore, a read error message window will immediately appear
to inform you that the backup process cannot continue.
Specific error message
The table below list the common error messages encountered during the backup
process as well as resolution suggestions:
Error message
File system error
Memory card error
Hard drive error
Not enough space
Too many files
Data verification fail
Subfolder nesting
too deep
Error explanation and solution
Source memory card or hard drive has file system errors which
can be repaired by either Windows ScanDisk or Mac OS Disk
Utility.
Backup speed is set too fast or memory card is not compatible.
Please use normal backup speed mode.
Bad sectors in hard drive or hard drive not compatible. Please
check or change the hard drive.
There is not enough memory space in the hard drive. Delete
some data from the hard drive.
A single folder can only contain up to 2,048 files. Lesser if the
files have long file names.
Data verification found inconsistencies between data on the
hard drive and on the memory card . Please use normal backup
speed mode
Source memory card subfolder nesting is too deep or too many
folders. Please backup only memory cards from digital
cameras.
12
Common Backup Error Messages
For the following 3 types of errors, it is possible to skip or ignore these errors and
continue with rest of the memory card backup process. However, there may be data loss
specially at the regions where the errors occurred.
Memory card error: Skipping or ignoring this error may result in data loss of the
file/photo currently being copied
Hard drive error: Skipping or ignoring this error may result in hard drive data loss
Data verification fail: Skipping or ignoring this error may result in data loss of the
file/photo currently being copied
13
Backup Folder Name
Every time a memory card is backed up, COLORSPACE O will create a new folder in the
root directory to store all the contents of the memory card. The default folder name is
COLORXXX where XXX are incremental numbers, for example COLOR001, COLOR002,
COLOR003 and so on. You can change this backup folder name from "COLOR" to
something else.
From the main menu, select More>Settings>Backup>Folder>Input
Cancel folder
name change
Confirm
folder name
14
Backup Speed
COLORSPACE O automatically determines the optimal memory card backup speed by
looking at the maximum read/write speed rating stated in the memory card BIOS (basic
input/output system). However there are some rare cases where the memory card BIOS
overstates this maximum speed rating and backup fails when COLORSPACE O transfers
at a speed faster than what the memory card is capable of. This can happen with lesser
known memory card brands or cards with defective or poor quality memory chips.
Rather than not being able to backup the memory card at all, we make it possible to
manually select a slower backup speed, which the memory card is capable of performing
without errors.
From the main menu, select More>Settings>Backup>Speed
Hyper Speed:
Designed for SanDisk Extreme III/IV CF or equivalent speed CF cards, can achieve the
maximum transfer speed of 25MB/s
Ultra Speed:
Designed for professional series 120X/133X CF cards, can achieve a maximum transfer
speed of 16MB/s
Fast Speed:
Designed for SanDisk Ultra II CF or equivalent 80X speed CF card, can achieve a
maximum transfer speed of 12MB/s.
Normal Speed
Suitable for all types of memory cards, guaranteed maximum compatibility.
Note
Always do a test backup with all your memory cards and check with a
computer that all the data is properly copied before using COLORSPACE O
for actual backups.
15
Copy Verification
COLORSPACE O is able to perform data verification during the backup process. Each
time a file is copied to the COLORSPACE O, the device compares the data on the hard
drive against the data on the memory card to ensure that they are identical. Using copy
verification can help to ensure data integrity.
From the main menu, select More> Settings> Backup> Verify
Full Verification:
After copying a file, the file on the COLORSPACE O hard drive is compared bit by bit with
the same file on the memory card to ensure that the data is identical and hence
successfully transferred. If the data is not identical, COLORSPACE O will attempt to copy
the file again until the data is verified to be identical. This is the slower but the most
accurate verification process.
Quick Verification:
This verifies 1 out of every 32 blocks of data. If there is any data mismatch, the backup
process will stop and COLORSPACE O will report "Data verification fail". If you encounter
this kind of error, you should perform the backup process again with Full Verification.
Auto Verification:
Performs Quick Verification first and if there is any error, will recheck the data with Full
Verification.
Off:
No copy verification is performed.
16
Visual Backup
Visual Backup is a new innovative feature that allows you to see the images as they
download, thereby eliminating the need for subsequent visual confirmation of which
images were backed up.
To setup visual backup, from the main menu, select More> Settings> Visual
Hard Drive:
Display image thumbnail from the hard drive just after it is copied to the COLORSPACE
O. This option also serves to confirm that the image has been copied to the COLORSPACE
O.
Card:
Display image thumbnail from the memory card just before it is about to be copied to the
COLORSPACE O. This option will yield a faster card backup speed than the previous
option.
Off:
Does not display any image during the backup process. This option will yield the fastest
backup speed.
17
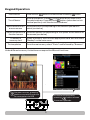
Recommended Settings
COLORSPACE O is an advanced system offering many ways to customize your settings.
In order to simplify your setup process, we recommend the following settings catered to
different situations.
If you are traveling:
Backup Speed:
Verification:
Visual Backup:
Extreme
Quick
Card
If you are a professional photographer:
Backup Speed:
Ultra
Verification:
Full
Visual Backup:
Hard Drive
If you want to backup in the shortest amount of time:
Backup Speed:
Extreme
Verification:
Off
Visual Backup:
Off
If you have never tested the COLORSPACE O and memory card combination
before or if you are helping others with their memory card backups:
Backup Speed:
Normal
Verification:
Quick
Visual Backup:
Card
Always test a memory card and settings combination prior to actual
backup usage.
Note
18
USB Connection to Computer
Use the provided USB cable to connect COLORSPACE O to the USB port on the back of the
computer.
USB port on the back of the computer
Select "USB" in the main menu
Note
Connect only via the USB port on the back of your computer. Your
computer may not detect COLORSPACE O if you connect via a USB
extension cable or a USB hub.
19
USB Connection in Windows
When Windows detects COLORSPACE O, it will appear as a "Removable Disk" in “ My
Computer”. You can then access COLORSPACE O just like any ordinary hard drive.
Drive Icon
Safely Disconnecting COLORSPACE O from Windows
Click on the “Safely Remove Hardware” icon and select “USB Mass Storage Device”.
After Windows confirms that COLORSPACE O has been removed, unplug the USB cable.
The COLORSPACE O screen will then return to the main menu.
Note
Please disconnect COLORSPACE O from the computer before shutting
down or restarting the device. Otherwise, press
to forcefully
disconnect the USB connection.
20
USB Connection in Mac OS
When Mac OS detects COLORSPACE O, a drive icon will appear on the desktop.
COLORSPACE
COLORSPACE
Drive icon
Safely Disconnecting COLORSPACE O from Mac OS
Drag the COLORSPACE O removable drive icon to the trash bin to eject the device.
Unplug the USB cable and the COLORSPACE O screen will return to the main menu.
Note
Please disconnect COLORSPACE O from the computer before shutting
down or restarting the device. Otherwise, press to forcefully
disconnect the USB connection.
21
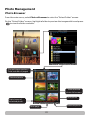
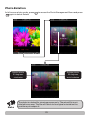
Photo Management
Photo Browser
From the main menu, select Photo>Browser to enter the "Select Folder" screen.
On the "Select Folder" screen, highlight a folder to preview the images within and press
to view the folder contents.
Current page number /
Total number of pages
Selected photo
View selected
photo full screen
Next photo
Path/name of
selected photo
Previous photo
Next page
22
Auto Realignment of Portrait / Landscape Display
COLORSPACE O is able to detect the orientation of the device and change the screen
display automatically so that you would see the photo or menu in its appropriate portrait
or landscape aspect ratio
Full screen portrait view
of selected photo
Note
Full screen portrait view
of selected photo
This function may not work when the system is loading a new image file
or if the system is busy.
You may need to enable this function by selecting
More>Settings>Interface>Direction>Auto from the main menu.
23
Photo Zoom
COLORSPACE O is able to zoom the photo to 100% (1:1) view.
Change Direction
Zoom into
selected area
Zoom into
selected area
Move cursor left
Move cursor right
Change Direction
24
Back
Move cursor down
Move cursor up
Move cursor left,
right, up, down
Photo Rotation
In full screen photo mode, press
again to select Rotate
to access the Photo Management Menu and press
Rotate photo
90 degrees
clockwise
Note
Rotate photo
90 degrees
anticlockwise
The photo is rotated for viewing purpose only. The actual file is not
altered in any way. The file will return to its original orientation the
next time you reopen it.
25
Photo EXIF Information
In full screen photo mode, press
to select EXIF.
In the EXIF information page, press
Note
to access the Photo Management Menu and press
/
to scroll up/down the page respectively.
Some photo files may not have any EXIF information. COLORSPACE O
only display commonly used EXIF information and may not show all the
EXIF information.
26
Photo Histogram
In full screen photo mode, press
to select Histogram.
Note
to access the Photo Management Menu and press
Like most digital cameras, COLORSPACE O displays a luminance
(brightness) histogram, which is useful for checking for proper
exposure.
27
Photo Browser Settings
Thumbnail Size
COLORSPACE O is able to display multiple thumbnail images on a single page.
To setup the thumbnail image size, from the main menu, select
Photo>Settings>Thumbs Size
20 thumbnail
images per page
12 thumbnail
images per page
28
6 thumbnail
images per page
Thumbnail Image Cache
When you view a photo full screen, COLORSPACE O will first display a low-resolution
version while it is scanning in a high-resolution version to the display screen. At the
same time, COLORSPACE O is obtaining all the necessary information required to allow
zooming, EXIF and histogram display. Depending on the photo file size, this process
typically takes between a few seconds to tens of seconds.
In order to reduce the loading time, COLORSPACE O is able to cache an optimized 252KB
thumbnail image for every photo that is opened, for faster subsequent loading and
viewing.
To toggle this feature, from the main menu, select
Photo>Settings>Cache Thumbs
Turn on cache
Turn off cache
We recommend that the cache be turned on.
COLORSPACE O will only cache photo/image files stored on the hard
drive. For photo/image files stored on a memory card, COLORSPACE O
will load a file every time you open it.
Note
29
EXIF Display Settings
From the main menu, select Photo>Settings>EXIF Setup
Display EXIF at
the top
Display EXIF at
the bottom
No EXIF display
COLORSPACE O will only display the basic EXIF information in full screen photo view.
To view more detailed EXIF information, kindly refer to instructions on page 26.
30
Build Thumbs
Every time a photo is being viewed full screen, COLORSPACE O will scan/load the photo
to obtain all the necessary information required to allow zooming, EXIF and histogram
display. Depending on the photo file size, this process typically takes between a few
seconds to tens of seconds.
In order to reduce loading times, you can create optimized 252KB "thumb" version of
the photos for subsequent faster loading and viewing on the COLORSPACE O screen.
From the main menu, select Photo>Build Thumbs. Select the folder where the photos
are located and COLORSPACE O will build "thumbs" for all the photos in the selected
folder. These "thumbs" will be stored on the hard drive.
Note
As this process may take a while to
complete, we recommend that you
connect COLORSPACE O to AC power to
prevent the process from being
interrupted due to insufficient battery
power.
31
Photo Search
You can search for photos by date. From the main menu, select Photo>Search, enter
the date and select the location to be searched.
Switch between
Year / Month input
View photos
Note
Jump to next week
COLORSPACE O will search for photos according to its modified date. If
the photo has been modified by Photoshop or any image editing
software, the modified date will be different from the date the photo
was shot.
32
Photo Recovery
COLORSPACE O is the only portable memory card backup device in the world to possess
advanced photo recovery, which provides you with a simple and efficient way to recover
photos from a deleted, formatted or corrupted memory card. The photos will be
recovered to the COLORSPACE O hard drive.
From the main menu, select More>Tools>Recover. Select "CF to HDD" if you are
recovering from a CF/MD card. Otherwise select "Card to HDD".
COLORSPACE O can recover a wide variety
of image files. Please refer to
www.hyperdrive.com for types of image
files supported.
In order to maintain data integrity during
the recovery process, COLORSPACE O does
not write any data to the memory card.
Photo recovery will only be successful if the deleted photos have not yet been
overwritten by newer data.
Note
33
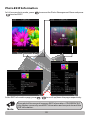
Memory Card Tools
CF Card Authenticity Verification
COLORSPACE O can verify a CF (CompactFlash) memory card for authenticity to ensure
that the card is made by the original manufacturer and is not an imitation.
Insert a CF card into the COLORSPACE O.
From the main menu, select More>Tools>Card Tools>Card Info.
If COLORSPACE O identifies the CF card, an image of the card will appear on the screen.
Refer to www.hyperdrive.com for a list of CF cards that COLORSPACE O can verify for
authenticity.
COLORSPACE O looks at the chip information to identify the memory card. It
will not be able to identify the memory card if the chip is not genuine.
Note
34
Memory Card Erase
COLORSPACE O can erase all the contents of a memory card.
From the main menu, select More>Tools>Card Tools>Erase Card.
Note
COLORSPACE O cannot erase FAT12 formatted memory cards. In addition,
erasing a card only erases all the data in the FAT table and all records of root
folders. Erasing does not format a card.
35
Memory Card Scan & Repair
Most digital camera memory cards use NAND flash memory. As the NAND flash has a
usage lifespan of 20,000 times rewritable, some memory card sectors may become
unusable over time. A digital camera will not operate properly with a defective memory
card. COLORSPACE O is the only portable memory card backup device in the world with
the ability to scan memory cards for errors and repair them if necessary.
Scan Settings:
Before scanning the memory card, you can adjust scan settings to determine if you wish
to automatically repair any bad memory card sectors that are found. From the main
menu, select More>Tools>Card Tools>Scan/Repair>Scan Setup
Scan/Repair:
COLORSPACE O will first delete all the data on the memory card before scanning. It will
then record the defective sectors detected to the memory card file system so that they
will be remapped and not be used in the future. This feature only works with FAT16 or
FAT32 formatted memory cards. It will not work with unformatted or FAT12 formatted
memory cards.
Scan Only:
COLORSPACE O will scan the memory card and report the scan results. This feature
works with all memory cards including those that are unformatted or FAT12 formatted
memory cards.
Before you scan the memory card, make sure that you have
backed up all the data on the memory card, as the Scan/Repair
process will delete all the data on the memory card.
36
Quick Scan and Standard Scan
After you have setup the scan settings, you can start scanning the memory card. From
the main menu, select More>Tools>Card Tools>Scan/Repair
Quick Scan:
This process will write in data and read out data from every sector of the memory card.
The memory card is considered to be error-free if the write in and read out process is
successful and the read/write data is consistent. All data in the memory card will be
deleted in the process. Before you do a Quick Scan, make sure that the memory card
does not contain any data that you might need.
Standard Scan:
In this process, the data in the memory card is first copied to COLORSPACE O hard drive
before the write/read scan as described in Quick Scan above is performed. After the
scan is completed, the original data is copied back to the memory card again. As
read/write process is performed twice, this process is slower than Quick Scan but it will
preserve all the data on the memory card. However, if there are defective sectors, the
risk of losing the data stored on these sectors will still be present.
As some memory cards use dynamic remapping technology, it is normal
for defective sectors to either disappear or change location.
Note
37
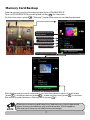
Scan Process and Results
During the memory card scanning process, blue sectors are good sectors, red sectors
are bad sectors and white sectors are sectors that have not yet been scanned or
repaired. The flashing orange sector is the sector that is currently being scanned or
repaired.
Sectors that
have been
scanned
Sector that is
currently being
scanned
Sectors that
has not been
scanned yet
At the end of the every scan/repair process, COLORSPACE O will give an overall report as
illustrated below:
Note
Memory cards that have been scanned and repaired can be used directly.
If you reformat the memory card, all repairs done on the memory card will
be removed.
38
Advanced Functions
File Management
You can navigate and manage the files/folders in COLORSPACE O just like in any
Windows or Mac OS environment and perform file/folder operations like Cut, Copy,
Paste, Delete and Move files.
Open file/folder
operations menu
Enter folder
Delete the selected
file/folder
Paste clipboard contents to
the current folder
Copy the selected file/folder
to clipboard
Note
COLORSPACE O cannot write or delete any file/folder on a FAT12
formatted memory card.
39
Hard Drive Formatting
Warning!
Only format the COLORSPACE O internal hard drive with the
device itself. Using a computer or other means to format the
COLORSPACE O hard drive may cause the device to
malfunction and/or result in data loss.
You must format the COLORSPACE O hard drive before you can use it.
From the main menu, select More>Tools>Drive Tools>Format and then follow the
on-screen instructions.
Formatting a hard drive will completely delete all data on the drive.
If the drive has multiple partitions, they will all be removed.
Warning!
40
Hard Drive Information
From the hard drive information, you can view the S.M.A.R.T. (Self-Monitoring,
Analysis, and Reporting Technology) diagnostic information. Using this information,
you can monitor the hard drive for potential problems, predict if the hard drive is about
to fail and take preventive measures to protect your data if necessary.
From the main menu, select More>Tools>Drive Tools>Information:
S.M.A.R.T. Information
Note
The S.M.A.R.T. Diagnostic information is provided by the hard drive itself.
COLORSPACE O only reads and display this information from the hard drive
and can not guarantee its validity. Visit www.hyperdrive.com to learn more
about what these numbers mean.
41
Firmware Update
From time to time, firmware updates will be released to improve upon the functionality
and performance of the COLORSPACE O.
Download the latest firmware update file from www.hyperdrive.com and copy the file to
COLORSPACE O. You may need to unzip to obtain the firmware update file.
From the main menu, select More>Settings>Firmware
Browse to the firmware update file and press the top-left "Select" button.
Warning!
Please follow the steps carefully
when updating the firmware as any
errors in the process may cause the
COLORSPACE O to malfunction. If
this occurs, please send the
COLORSPACE O to an authorized
dealer for repair.
Once the firmware has been updated, press to turn off COLORSPACE O. COLORSPACE
O will use the new firmware the next time you turn it on.
42
Custom Background/Button Setup
If you wish to use your own graphics for the COLORSPACE O wallpaper/background and
button icons, you will need to enable this feature.
From the main menu, select More>Settings>Interface Setup>Custom Icon>On.
COLORSPACE O background image must be a 320 x 240 pixels bitmap .bmp file.
Button icon images must be 32 x 32 pixels bitmap .bmp file.
Refer to the table below for the filenames of the respective background and button icon
images.
File name
Location
BG.bmp
Wallpaper image
001_COPY.bmp
Main menu>Backup
002-START.bmp
Main menu>More>Settings>Interface>Startup
003-MORE.bmp
Main menu>More
004-FUN.bmp
Main menu>More>Tools
005-DISK.bmp
Main menu>More>Tools>Drive Tools
006-PHOTO.bmp
Main menu>Photo
007-SETUP.bmp
Main menu>More>Settings
008-SPEED.bmp
Main menu>More>Settings>Backup>Speed
009-CARD.bmp
Main menu>More>Tools>Card Tools
010-VERIFY.bmp
Main menu>More>Settings>Backup>Verify
011-SYSSET.bmp
Main menu>More>Settings>Interface
012-EXPLORER.bmp
Main menu>More>Explorer
013-VISUAL.bmp
Main menu>More>Settings>Backup>Visual Backup
014-OFF.bmp
Main menu>Shutdown
015-SYSINFO.bmp
Main menu>More>System Info
016-USB.bmp
Main menu>USB
018-FORMART.bmp
Main menu>More>Tools>Drive Tools>Format
019-CARDINFO.bmp
Main menu>More>Tools>Card Tools>Card Info
43
File name
020-EARSE.bmp
Location
Main menu>More>Tools>Card Tools>Erase Card
021-CARDSCAN.bmp Main menu>More>Tools>Card Tools>Scan/Repair
022-RECOVER.bmp
Main menu>More>Tools>Recover
023-BROWSER.bmp
Main menu>Photo>Browser
024-SEARCH.bmp
Main menu>Photo>Search
025-PREVSET.bmp
Main menu>Photo>Settings
029-RESTORE.bmp
Main menu>More>Settings>Reset
038-USERICON.bmp
Main menu>More>Settings>Interface>Custom Icon
040-RETURN.bmp
Back
055-UPDATE.bmp
Main menu>Photo>Settings>Firmware
059-COPYSET.bmp
Main menu>Photo>Settings>Backup
070-THUMBS.bmp
Main menu>Photo>Build Thumbs
Name your custom image files accordingly and copy them to
/C/CONFIG.SHO/USERICON/ directory in COLORSPACE O hard drive. You may need to
create this directory if it does not exist. The customized graphics will appear after you
restart the COLORSPACE O.
44
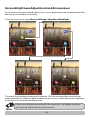
Screen Brightness Adjustment and Screensaver
To conserve energy and extend battery life, you can adjust the screen brightness and set
the time for screensaver to activate.
From the main menu, select More>Settings>Interface>Backlight
The maximum brightness setting will consume 12% more energy than the minimum
brightness setting . When the device battery power is low, you can set screen brightness
to the minimum to extend the battery life.
Note
If the screen brightness is not set to the maximum, the display may have
an occasional slight flashing, this is normal.
45
Product Specifications
Dimensions
Weight
LCD Display
LCD Resolution
Memory Card Slots
Backup Speed
Copy Verification
Computer Interface
USB Transfer Speed
Battery
Battery Voltage
Battery Performance
Power
Hard Drive
Capacity
File System
Operating System
Operating Temperature
Temperature Rate of Change
Relative Humidity
Altitude
Included Accessories
Optional Accessories
133 x 75 x 25mm / 5.24" x 2.95" x 0.98"
280g / 9.9oz (with HDD & battery)
3.2" 262K color TFT LCD
High resolution QVGA 320 x 240 pixels
2 slots supporting 11 memory card formats
CompactFlash CF Type I/II, MicroDrive MD,
Secure Digital SD, SDHC, MultiMedia Card
MMC,MemoryStick MS, MS MagicGate, MS
Select,MS PRO, MS PRO MagicGate
50MB/s (max), 25MB/s (sustained)
Hardware based 32-bit ECC checksum data
verifier2 verification modes: full, quick (1:32)
USB 2.0 Hi-Speed Mode via UDMA66
USB 1.1 backwards compatible
Max 480Mbps, typical 28MB/s
User replaceable rechargeable 18650 Li-Ion cell
3.7V, 2200mAh
Backup 120GB on a single battery charge
AC power adapter (5V, 1000mA)
Car charger (12V DC, 500mA)
USB bus powered (5V, 500mA)
2.5" IDE/PATA ATA-6/ATA-100
40/60/80/100/120/160/250GB and above
(over 128GB, 48-bit LBA mode)
Hard Drive: FAT32
Memory Card: FAT12/16/32
Windows 2000/XP/Vista
Mac OS 9.x, 10.x & above Linux
5~40 degree Celsius
41~104 degree Fahrenheit
<20 degree Celsius per hour
<36 degree Fahrenheit per hour
8% ~ 90% non condensing
Operating: 3,000m (10,000 ft)
Non-operating (Storage): 12,000m (40,000 ft)
Universal voltage (100-240V) AC adapter
USB cable
Soft carry case
Screwdriver
Screws
User manual
18650 lithium ion battery
12V car charger
External 4 x AA battery pack
External 18650 Li-Ion battery charger
46