1
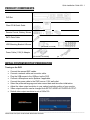
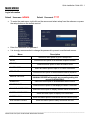
Quick Installation Guide V2.1.1 H.264 High Definition DVR Quick Guide HD Models: HD-0405M, HD-0810M, HD-1620S Analog Models: N-0441U, N-0440MH, N-0840MH, N-1640MH [N-0441U] [HD-0405M, HD-0810M, N-0440MH, N-0840MH, N-1640MH] [HD-1620S] __________________________________________________________________________________________ PLEASE READ THIS QUICK GUIDE BEFORE OPERATING YOUR DVR Quick Installation Guide V2.1.1 PRODUCT COMPONENTS DVR Set Client CD & Quick Guide / Remote Control, Battery, Mouse / / SATA Data Cable HDD Mounting Bracket & Screw [HD-0405M, HD-0810M] [HD-1620S] Power Cable (110V) & Adaptor [HD-0410M, HD-0810M] [HD-1620S] INITIAL SYSTEM BOOTUP PREPARATION Turning on the DVR Connect the camera BNC cables. Connect a network cable and a monitor cable. Plug the USB mouse to the USB port on the DVR. Connect a Microphone and a Speaker if applicable. Connect the power cable to the DVR from an 110V wall outlet. Select the preferred language and enter correct date and time after initialization. Adjust the video output resolution to your optimal resolution setting of your monitor. Video output resolution can be changed from SETUPDISPLAYVIDEO OUTPUT. Default video output resolution is set at 1280x720. __________________________________________________________________________________________ PLEASE READ THIS QUICK GUIDE BEFORE OPERATING YOUR DVR Quick Installation Guide V2.1.1 MAIN MENU Login Information Default Username: admin Default Password: 1111 To enter the main menu, right click on the mouse and select setup from the submenu or press the setup button on the remote control. Enter the username and password. It is strongly recommended to change the password to prevent unauthorized access. Menu SETUP AUDIO SEARCH CAMERA PTZ SEQUENCE MANUAL RECORD ALARM OUT CONTROL BAR CHANNEL INFORMATION SYSTEM INFORMATION SYSTEM LOCK SYSTEM SHUTDOWN Description Select this menu option to go to a setup menu. Select this menu option to set an audio reception channel. Select this menu option to enter the search mode. Select this menu option to open PTZ control OSD menu. Select this menu option to enable/disable channel sequence. Select this menu option to enable/disable Manual Recording. *MANUAL RECORD will override any recording setting and record CONTINUOUSLY. Select this menu option to enable/disable alarm function. Select this menu option to hide/display the Menu Control bar. Select this menu option to display channel related information. Select this menu option to display DVR information. Select this menu option to lock/unlock the DVR control inputs. Select this menu option to safely shut down the DVR. __________________________________________________________________________________________ PLEASE READ THIS QUICK GUIDE BEFORE OPERATING YOUR DVR Quick Installation Guide V2.1.1 RECORDING MODE SETUP All DVR models are preconfigured to record CONTINUOUSLY. To setup a different recording schedule, select SCHEDULE in the RECORD menu. Navigate through the items using the mouse or the remote control. Select CHANNEL Select CONTINUOUS, MOTION, or SENSOR Select desired Date & Time. To copy a schedule to a different channel, select the channel from the COPY menu. NETWORK SETUP Network IP address must be configured on the DVR before remote connection. To setup an IP address, select DHCP or STATIC on NETWORK TYPE in the NETWORK menu. If DHCP is selected, the DVR will automatically retrieve an IP information from a router. *DHCP must be enabled from a router. If STATIC is selected, all IP information (IP, SUBNET MASK, GATEWAY, DNS addresses) must be manually configured. __________________________________________________________________________________________ PLEASE READ THIS QUICK GUIDE BEFORE OPERATING YOUR DVR Quick Installation Guide V2.1.1 NETWORK SETUP (Continued) Free DDNS service for Dynamic IP users is provided. Please follow the instruction if your public IP address is a dynamic IP. - Select SERVER1 from DDNS. - Select ddnscenter.com from DDNS SERVER NAME. - Select desired time interval from DDNS INTERVAL. - Go to www.ddnscenter.com from a PC. - Enter MAC address and Serial number from the DVR. - Create a preferred Domain Name and click on Duplication Check button. - Special characters and spaces cannot be included in Domain Name. - Confirm a desired Domain Name is available and click on the Register button. o e.g.) yourowndomainname.ddnscenter.com* Instruction for the DVR installed under firewall / gateway / router / modem-router combo LAN. If your DVR is on LAN (using private IP address), PORT 5445 (Default Port) and WEB PORT 80 (Default Web Port) must be open and forwarded to the IP address of the DVR. Please refer to the firewall / gateway / router user manual or consult with your IT personnel. NETWORK ACCESS via MOBILE PHONE Free iPhone / iPad and Android OS Phones application is provided. Go to the iPhone App Store / Google Play Store. Search for “iUMS” and install the application on your phone. Apple iPhone / iPad: Tap icon for SITE ADDITION. In the SITE INFORMATION, enter the following information; SITE, IP/DNS, PORT, ID, PASSWORD. Tap SAVE to save the SITE. Android Phone: Tap icon for SITE ADDITION. In the SITE INFORMATION, enter the following information; SITE, IP/URL, PORT, ID, PASSWORD. Tap ADD to save the SITE. __________________________________________________________________________________________ PLEASE READ THIS QUICK GUIDE BEFORE OPERATING YOUR DVR Quick Installation Guide V2.1.1 NETWORK ACCESS via WEB BROWSER Web browser connection uses WEB PORT (Default 80). Please make sure to open and forward the WEB PORT to the IP address of the DVR. Make sure ‘Popup’ is enabled from Internet Explorer. Open Internet Explorer and enter the IP address or the domain name of the DVR to open the Web Client. Install the ActiveX when prompted. Ensure the message ‘Initialize Success’ appears on the bottom information bar. Click on the button to open Login window. Enter the DVR Port, DVR ID, and the DVR Password. Click on the Connect button. Click on the button to switch to the playback mode. __________________________________________________________________________________________ PLEASE READ THIS QUICK GUIDE BEFORE OPERATING YOUR DVR Quick Installation Guide V2.1.1 How to make a backup Insert a USB flash drive in the USB port on the DVR. Right click on the main screen and click on the SEARCH to open the SEARCH menu. Click on ‘GO TO SPECIFIC TIME’ and enter the specific date and time. Move the mouse pointer to the bottom of the screen and the following SEARCH bar will appear. Click on the BACKUP button Select STILL IMAGE, NSF, or AVI format. Select USB STICK for a BACKUP less than an hour, or select USE HDD for a BACKUP for more than an hour. Select the specific channel number. Enter the specific BACKUP duration. to open the BACKUP window. __________________________________________________________________________________________ PLEASE READ THIS QUICK GUIDE BEFORE OPERATING YOUR DVR Quick Installation Guide V2.1.1 Information Design, function, and specifications are subject to change without notice. iPhone® and iPad® are registered trademarks of Apple Inc. Android™ is a trademark of Google Inc. *Special characters and spaces cannot be included in the Domain Name. *Google Chrome, Opera, Mozilla Firefox, and Safari is not compatible. DVR Network Information Table DVR IP DVR Subnet Mask DVR Gateway DVR DNS (Primary) DVR DNS (Secondary) Network Port Web Port Domain Name (if applicable) Public IP (if applicable) .ddnscenter.com __________________________________________________________________________________________ PLEASE READ THIS QUICK GUIDE BEFORE OPERATING YOUR DVR