1
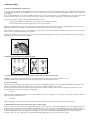
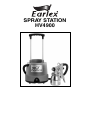
SPRAY STATION
HV4900
1) SAFETY OPERATING INSTRUCTIONS
PLEASE READ BEFORE USE
• Never under any circumstances aim the gun at a person or animal. In the event of an accident, seek expert
medical advice immediately.
• The spray gun must only be used with paints and solvents that have a flash point suitable for spraying. If in
doubt, consult the paint or solvent manufacturer’s instructions.
• Always ensure there is adequate ventilation in the room when spraying.
• NEVER spray near a naked flame, including a pilot light.
• NEVER smoke whilst spraying.
• NEVER let children use or play with the spray station.
• This appliance is not intended for use by persons (including children) with reduced physical, sensory or mental
capabilities, or lack of experience and knowledge, unless they have been given supervision or instruction
concerning use of the appliance by a person responsible for their safety.
• Always read the solvent manufacturer’s instructions before use.
• Always disconnect the spray station from the mains supply when filling the paint container.
• Always disconnect the spray station from the mains supply before cleaning the appliance.
• Always wear a suitable protective mask when spraying. We would also recommend the use of suitable gloves,
goggles and a coverall.
• After each use, thoroughly clean the spray gun and grease the needle.
• Use only genuine manufacturer replacement parts.
• Wear ear protection.
• If the supply cord is damaged, it must be replaced by the manufacturer, its service agent
or similarly qualified persons in order to avoid a hazard
WARNING: The substances used with this spray gun (paints, solvents, etc.) may contain dangerous, harmful, explosive
or corrosive materials. ALWAYS COMPLY WITH THE SAFETY INSTRUCTIONS ISSUED WITH THIS PRODUCT AND
THE MATERIAL BEING USED.
Only use the spray station as described in this manual.
TECHNICAL SPECIFICATION
Wattage: 650 Watts
Voltage: 230 V
Air output: 131/s
Sound pressure level: 80dB(4)
Maximum viscosity: 120DIN/sec
Container capacity: 0.9 litres
Air hose length: 4 m
Dynamic air pressure: 0.14 bar
2
2) EXPLODED PARTS DIAGRAM
PARTS LIST
No. Description
01. Air Cap Ring
02. Air Cap
03. Spray Direction Plate
04. 2.5 mm Fluid Tip
05. Fluid Tip Seal
06. 2.5 mm Fluid Needle
07. Spring
08. Fluid Adjustment Screw
09. Gland Nut
10. Gland Seal
11. Paint Feed Tube
12. Paint Container Seal
13. Paint Container
14. Hose Assembly
15. Viscosity Cup
16. Filter
17. Trigger
18. Pivot Pin
Part No
L0215
L0205
L0206
L0531
L0211
L0550
L0216
L0210
L0208
L0272
L0214
L0335
L0878
L0942
SG243
L0058
L0202
L0209
8
7
6
9
5
10
17
18
4
3
2
1
14
11
15
12
13
16
3
3) INTRODUCTION
The concept
The Earlex HV4900 is referred to as a ‘Spray Station’ in order to illustrate that it is highly versatile; it goes without saying that in addition to paints, this
spray station can also be used with other products.
A motor feeds out a high volume of air (HV) and enables products to be sprayed at a low pressure (LP). The product is released from the fluid tip of the
spray gun at a very low pressure (0.14 bar) and is enclosed in a high volume of air. The hose feeds the air produced by the motor to the spray gun.
Advantages
• Substantial reduction in the amount of mist which means that far less covering (protective tape, plastic covers) is required and that an
equally substantial amount of paint can be saved; up to 30% compared to use with a traditional spray gun and between 20% and 30%
compared to use with a roller (because the product is applied evenly). Financial savings achieved as such will soon offset the cost of a
HVLP spray station.
• Quality results achieved with the added bonus that the spray station is easy to use. (In addition, the high volume of air enclosing the fluid
which is sprayed speeds up the drying time and this helps improve the finish quality of the surface to which the fluid is being applied.)
• Given its versatility, an extensive range of products can be sprayed using HVLP technology.
A method of painting which is environmentally friendly
The clear savings in paint which can be made compared to using a roller or a traditional high-pressure spray gun make HVLP spraying an environmentally-friendly technique. For this purpose, we would advise the user to always give preference to paints with a low VOC rate.
.
Uses for the spray station and compatible products
• From a chalet that needs completely repainting to decorative arts.
• All types of water- and solvent-based paints; (synthetic, glycerophthalic, acrylic, vinyl, polyurethane, cellulose, alkyd).
• Undercoats.
• Certain outer wall paints.
• Dyes, varnishes, wood dyes, protective oils for teak furniture.
• Anti-corrosion products and other technical paints.
• Products for ship hulls.
• Slurry! (Mix of cement and water) see section HELPFUL HINTS.
4) SELECTION OF PAINT AND APPLICATION TEMPERATURE
Even when the level of thinning is reduced, this powerful turbine motor can still spray an extensive range of fluids. In many cases, painting can even be
carried out without thinning the product.
Nonetheless, there will still be certain products which are not compatible with the spray gun.
TEXTURED paints (containing particles which may clog the tip and therefore stop the product from being released) should be not be used under any
circumstances whatsoever.
USING SUCH PRODUCTS WILL CAUSE PREMATURE WEAR OF THE SPRAY GUN AND VOID THE GUARANTEE.
Always make sure that the paint you purchase can be thinned. Good quality paints contain, among other things, a high percentage of dry particles
which make thinning possible. This is not the case with certain bottom-end products, which are not really suitable for thinning.
Earlex provides an up-to-date list on its website www.earlex.fr of all the products which have been successfully sprayed using the HV4900 spray station
without thinning, including those products which have been 5% or 10% thinned.
Users should also bear in mind that cold temperatures will make paint less smooth. We would therefore recommend that paints be sprayed with the
gun at a temperature of no less than 15°C.
5) PREPARATION
• Carefully cover areas which are not to be painted with a plastic cover and protective tape.
• Wear a suitable mask when spraying solvent-based products (and make sure there is adequate ventilation in the room
when working indoors).
• Clean the surface you are going to paint. As well as being clean, it must also be dry and smooth.
• Check that the spray gun is working correctly and that the fluid tip is not clogged (by any remaining dry paint for example).
• Practice first on some old wooden planks to make sure you are holding the spray gun correctly.
6) PREPARING THE PAINT
•
•
•
•
•
•
•
•
•
•
Stir the paint well using a mixer where possible.
Make sure there are no solid particles in the paint.
Fill the container and then carry out an initial test on a piece of cardboard.
Many products can be sprayed without being thinned. However, if the application is not good, thin the product progressively in stages of 5%.
Most paints can be sprayed by being thinned just a little, e.g. by 5% or 10%.
Some thick paints such as outer wall paints and certain undercoats will need to be thinned by 20% or 25%.
Use water to thin a water-based product.
Use white spirit to thin solvent-based paints.
Certain manufacturers will indicate on the can whether a specific thinner is to be used.
Earlex provides an up-to-date list on its website www.earlex.fr of the products which have been successfully sprayed using the spray station
and will indicate the thinning levels which were applied. (This information is given as an indication only and as such does not constitute a
guarantee of the end result).
Generally speaking, the spray gun can be used with products which have a viscosity ranging from about 25 to 150 seconds.
4
The viscosity, which is expressed in DIN/sec, is the time it takes for the paint to stop running as a continuous flow through the viscosity cup (Figure 2).
Fig.2
Your Spray Station 4900 comes with a fluid tip and a 2.5 mm needle fitted.
For the best results with products which are more runny (liquid dyes, varnishes, runny paints, wood dyes), we recommend that you attach the 1.5 mm
fluid tip-needle assembly to your spray station, included.
This applies for products which have a viscosity between 25 and 50 DIN/sec, i.e., which will take between 25 and 50 seconds to run through the viscosity cup. Refer to the chapter on cleaning to see how the fluid tip and needle can be removed and switched for a smaller/larger fluid tip-needle
assembly.
7) OPERATION
Fill the container with the product to be sprayed.
Stir well (as mentioned above).
Make sure the feed tube (11) is firmly fitted into the base of the gun (in the base fitting from which nothing should be protruding.
The base fitting is designed to allow air to enter).
Screw the container to the base of the spray gun and tighten accordingly.
Unroll the motor unit air hose and attach it to the back of the spray gun.
Unroll the power cable and attach the plug to the mains supply.
Switch the spray station on. This will immediately cause some air to be produced, which is quite NORMAL.
However, none of the product will be sprayed until the gun trigger is pulled.
Pressing on the trigger pulls the fluid tip needle back slightly and releases some of the paint.
The amount of paint released depends on how far you pull the trigger.
Very important: when spraying for the first time, we recommend that you always leave the motor to run for 1 to 2 minutes before applying the product,
which allows the air to be slightly heated and makes it much easier to apply the product effectively.
8) SPRAYING TECHNIQUE
3 spray patterns
By slightly loosening the adjustment ring (at the front) you can turn the air cap a little (catch locking system) and obtain 3 different spray patterns:
Vertical spray
Horizontal spray
Round spray
The ‘crisscross’ technique (using the vertical and horizontal spray patterns)
The most commonly used technique for painting a wall is the ‘crisscross’ technique, i.e. you apply the product in horizontal lines and then cross over
these lines by applying the product in vertical lines;
1) Adjust the air cap to obtain a vertical spray, then pull the trigger and move your arm across to the right.
2) When you get to the end of the line, release the trigger for a moment and then apply the product in the opposite direction just beneath the line you
have sprayed.
3) Proceed in this manner applying the product in horizontal lines one underneath the other.
4) Next, adjust the air cap to obtain a horizontal spray and apply the product in horizontal lines over the lines you have just sprayed.
Release the trigger to avoid
overspraying which will cause the
product to run.
Cross over the horizontal lines (spayed with a vertical pattern) with vertical lines (sprayed with a horizontal pattern).
Depending on how far your arm can reach, apply your product using the ‘crisscross’ technique over areas of about 1m2.
Try to move your arm and pull the trigger in such a manner so as to achieve the most even spray possible. Don’t attempt to cover the
whole line in one go.
Round spray
This will be used for alcoves or even for small, round objects or finishing work.
5
9) HELPFUL HINTS
1) Using the fluid adjustment screw (8). Fig.1
This screw stops the trigger from being pulled back. The more you tighten the screw, the less far back the trigger can be pulled, which means that less
of the product is released. The reverse applies if you loosen the screw. In other words, the screw allows you to apply a consistent amount of pressure
on the trigger.
For a very small application, on a stencil for example, tighten the screw as much as possible to be sure of obtaining an even, mini spray. If on the other
hand you’re about to take on one of the outer walls of your chalet, loosen the screw to obtain a larger spray, as you will need a high output.
The amount of product you spray on the work surface depends on 2 factors:
a) The pressure applied to the trigger (the more you pull, the more product is released).
b) The speed at which you move the spray gun in front of your work surface.
While users will find it relatively easy to move their arms in a steady manner, they should nonetheless use the fluid adjustment screw (at least at the
beginning) to alter how far the trigger can be pulled back so that a consistent amount of product is sprayed.
With a little practice and common sense, users will be able to apply the paint evenly, which is difficult to achieve with a roller. Users can soon save up
to 20% or 30% of the product or paint they are spraying!
It should be noted that is it not essential for users who become familiar with operating the spray station to use the adjustment screw if they are able to
apply the correct amount of pressure to the trigger.
Fig 3.
2) Only the forearm should move, not the wrist (fig.4)
Fig 4.
3) It is better to underspray than overspray (you can always spray over what you have done).
In addition, you should also avoid spraying over a surface without moving the spray gun so that the product does not run.
The main problem for novice users is how to avoid overspraying, as this can cause products to run.
4) Floors and ceilings
The HVLP spray gun can be used at an angle, even at a 90° angle, when applying a product to a floor or ceiling, provided that a few common-sense
rules are observed. No unsightly touch-up marks will be left if you use a HVLP spray gun to paint a ceiling.
In particular, ensure that the motor is switched on before the spray gun is held at an angle so that none of the product runs down into the air hose.
(The air produced by the motor will stop this from happening)
a) Floors
Make sure that the angled feed tube in the container points towards the front of the spray gun, i.e., in a position consistent with the angle at which the
spray gun needs to be held to the floor.
b) Ceilings
When the spray gun is aimed at the ceiling, the feed tube should be pointing in the opposite direction towards the handle of the gun.
5) What distance should I hold my gun from the surface I want to spray?
There is no set answer to this question as the distance will depend on the viscosity of the product being sprayed as well as the desired accuracy. First,
the user should test the distance and move forwards or backwards as s/he sees fit. The product can be applied from just a few centimetres away for
small touch-ups in corners, alcoves or other types of decorative work, each time a certain level of accuracy is required. (For this kind of work, the user
should only apply light pressure to the trigger, hence the interest for novice users of tightening the fluid adjustment screw as mentioned above).
For large surfaces, the user should crisscross horizontal and vertical lines from about 15 to 20 cm away from the surface.
6
6) Spray 2 coats in an instant!
One of the key advantages of the HVLP system is that you can spray 2 coats, one on top of the other (wet on wet), provided
you avoid any brush marks.
7) Innovative ability to apply slurry to basement or garage breeze-blocks.
This is one of the most spectacular uses of the HVLP spray station, which for all those users who want to cover bare breeze-blocks in a garage or
basement, or even ceilings, is a good enough reason alone for purchasing this system.
Breeze-blocks are the source of a lot of dust in a basement and painting them white with a roller would require a lot of patience and above all several
coats, which would be quite costly given that the breeze-blocks would ‘soak up’ quite a lot of paint at X euros a litre…
This problem can now be tackled at less expense by spraying white slurry with a spray gun (no, your eyes are not deceiving you!) and a single coat of
paint on top.
Slurry is a mixture of white cement and water, which must be measured out in equal quantities. Slurry ‘stops’ dust forming on breeze-blocks and even
at the drying stage gives a clean, white and more even appearance than paint. As a result, a coat of acrylic or glyptal paint is no longer needed. (One
coat of paint will suffice over the slurry)
How do I go about spraying slurry onto breeze-blocks?
a) Thin the cement with about an equal amount of water and use the 2.5 mm fluid tip-needle assembly.
b) Shake the gun at frequent intervals to stop the cement resting on the bottom of the container; spraying will otherwise be impossible. The mixture
must be consistent at all times.
c) Put 2 marbles in the container to help the mixture stay consistent.
Drying time: users should bear in mind that cement always takes a very long time to dry, even with a supply of air from the motor. The cement should
be left for 3 days before painting over it.
8) Accessories
Don’t hesitate to regularly visit our website, where you will find accessories and additional advice.
10) CLEANING
• Just like a paint brush, a spray gun needs to be thoroughly cleaned once the work is complete. If the gun is only superficially or partly
cleaned and the paint inside dries, the gun will soon be inoperable. This of course is not covered by the guarantee.
• For those users who follow a few simple rules, cleaning a spray gun will not take much longer than cleaning a paint brush.
• When applying water-based products, the gun should be cleaned using water.
• When applying solvent-based products, the gun should be cleaned using a solvent.
• Simply empty the gun container, remove any grease using a cloth, add a little water or solvent as appropriate, reattach the container to the
gun and then spray the contents onto some newspaper to clear out everything inside.
• The solvent (or water) passing through the inside of the tubes dissolves any of the remaining product and carries it out of the gun.
Removing the fluid tip-needle assembly (for cleaning or switching to a smaller/larger diameter). Your HV4900 comes with 2 fluid tip-needle assemblies:
a 2.5 mm assembly for thick products and a 1.5 mm assembly for runny products.
•
•
•
•
•
•
•
•
•
Unscrew the adjustment ring (1).
Remove the air cap (2), the fluid adjustment screw (8) and the spring (7).
Pull the needle out (6). Press the trigger to help remove the needle.
Remove the fluid tip (4) using an open-end spanner, the air flow plate (3) and the fluid tip seal (5).
Remove the gland nut (9) and the gland seal (10). (Not required if changing from one size of needle to another).
Place all the parts into a container and clean them using a brush (a tooth brush is ideal) and water or solvent, as necessary.
Clean inside the gun once you have removed, cleaned and dried the container seal (12).
Thoroughly dry the parts.
Wipe the needle, apply a small drop of oil to the tip and then reassemble all the parts in reverse order.
Important: each needle is manufactured to fit the size of the corresponding fluid tip. Do not try to fit a 1.5 mm needle to a 2.5 mm fluid tip.
• NEVER DISPOSE OF PAINTS OR SOLVENTS DOWN THE DRAIN. ALWAYS USE YOUR LOCAL WASTE COLLECTION SITE.
• The motor unit itself does not require any specific maintenance apart from checking that the filter is not clogged up (the filter can be removed
and washed). The filter can be found in a sort of cassette at the front of the motor unit.
7
11) TROUBLESHOOTING
PROBLEM
CAUSE
ACTION REQUIRED
The paint drips onto the item being painted
Paint too diluted
Paint output too high
Add undiluted paint
Reduce the paint output by adjusting the screw
(8)
Increase speed of application
Moving too slowly
Paint is too thin or irregular
No paint being released
Paint leaking from the gland nut (9) in front of
the trigger
Gun trigger held for too long
Release trigger sooner
Gun too close
Moving too fast
Gun clogged
Increase the distance between the gun and the
work surface
Add undiluted paint
Increase the paint output by adjusting the screw
(8)
Reduce speed of application
Clean the gun
Gun too far away
Move the gun closer to the work surface
Paint too thick
Fluid tip clogged
Feed tube clogged
Add thinner
Clean the fluid tip
Clean feed tube
Air hose split
Grainy paint
Replace air hose
Filter the paint
Container almost empty
Refill container
Gun at an angle
Check that the feed tube is pointing towards the
paint (11)
Air inlet blocked
Check the condition of the filter and clean if necessary (16)
Gland seal(10) not attached or the wrong way
round or not tight enough.
Reattach the gland seal (10) and retighten gland
nut.
Over time the gland seal (10) will wear and need
adjusting
To check the gland nut is correctly fitted you will
need a small adjustable spanner. Pull the trigger
(17) back and gradually tighten the gland but by
turning it in a clockwise direction until the needle
is not free to move when the trigger is released.
Paint too diluted
Paint output too low
8
PLEASE NOTE: We have done all we can to ensure that when used correctly and in accordance with these instructions the spray gun has a
long and fault-free life. We accept no responsibility for damage caused by the use of incorrect or unsuitable substances, paints or liquids
which have not been thinned correctly or which are not suitable for the surfaces to which they are applied, health hazards arising from a
lack of ventilation when working in confined spaces or equipment which is faulty due to inadequate cleaning of the components after use. If
in doubt, test a small inconspicuous area first. Always read the manufacturer’s instructions before use. Neither our guarantee nor the above
statement affects your statutory rights.
MAINS CONNECTION
Your spray station has been supplied with a mains lead which is fitted with a plug.
• If the plug is cut off from the mains lead, it must be disposed of safely. NEVER under any circumstances insert a plug which is cut off from the mains
lead into socket.
If you are using an extension lead, it must be rated at a minimum of 5 amps and must be fully unwound.
ENVIRONMENTAL INFORMATION
Please do not dispose of tools with your household waste collected by the council.
We would remind you that all councils have now implemented a selective waste collection scheme. These schemes contribute to
recycling, reuse and other forms of recovery of these tools. Sorting waste reduces the potentially harmful effects on the environment
and public health caused by dangerous substances which may be contained in certain electrical and electronic products. The symbol
above indicates that electrical and electronic goods are collected and sorted under such schemes.
EC Declaration of Conformity
We hereby declare that the HV4900 spray station conforms to LVD standards,
2006/95/EC, EN 60335-1, EMC 2004/108/EC, EN55014-1, EN55014-2,
EN61000-3-2 and EN61000-3-3.
Tim Hopper Technical Director
Design Registration: GB 2106529, DE 402 04 314.6,FR 02 3314, US 29/161, 395
All rights reserved © 2008
EARLEX LTD. WILL ACCEPT NO RESPONSIBILITY FOR THE USE OF THIS PRODUCT IF USED FOR ANY OTHER
PURPOSES THAN THOSE DETAILED HEREIN.
GUARANTEE and HELPLINE
This product is guaranteed for a period of 24 months against faulty manufacture or materials. It is not guaranteed for industrial or hire purposes. This guarantee does not affect your statutory rights. For further information or any user
advice, please phone our helpline between 9 am and 5 pm Mondays to Fridays (excluding Bank Holidays),
or visit our website www.earlex.fr
Earlex (Limited liability company), Tel: + 33 (0)4 76 67 18 46
E-mail: [email protected]
9