1
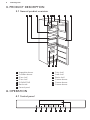
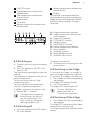
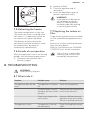
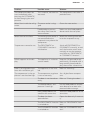
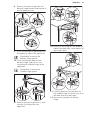
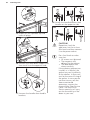
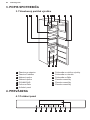
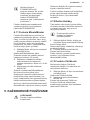
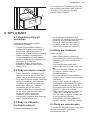
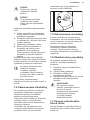
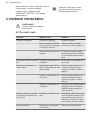
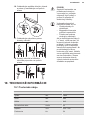
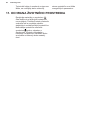
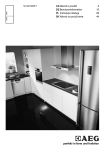
S83430CTX2
EN User Manual
SK Návod na používanie
2
24
2
www.aeg.com
CONTENTS
1. SAFETY INFORMATION...........................................................................................3
2. SAFETY INSTRUCTIONS.......................................................................................... 4
3. PRODUCT DESCRIPTION........................................................................................ 6
4. OPERATION.............................................................................................................. 6
5. DAILY USE..................................................................................................................9
6. HINTS AND TIPS..................................................................................................... 12
7. CARE AND CLEANING.......................................................................................... 14
8. TROUBLESHOOTING.............................................................................................15
9. INSTALLATION....................................................................................................... 18
10. TECHNICAL INFORMATION...............................................................................23
FOR PERFECT RESULTS
Thank you for choosing this AEG product. We have created it to give you
impeccable performance for many years, with innovative technologies that help
make life simpler features you might not find on ordinary appliances. Please
spend a few minutes reading to get the very best from it.
Visit our website for:
Get usage advice, brochures, trouble shooter, service information:
www.aeg.com
Register your product for better service:
www.registeraeg.com
Buy Accessories, Consumables and Original spare parts for your appliance:
www.aeg.com/shop
CUSTOMER CARE AND SERVICE
Always use original spare parts.
When contacting our Authorised Service Centre, ensure that you have the
following data available: Model, PNC, Serial Number.
The information can be found on the rating plate.
Warning / Caution-Safety information
General information and tips
Environmental information
Subject to change without notice.
ENGLISH
1.
3
SAFETY INFORMATION
Before the installation and use of the appliance,
carefully read the supplied instructions. The
manufacturer is not responsible if an incorrect
installation and use causes injuries and damages. Always
keep the instructions with the appliance for future
reference.
1.1 Children and vulnerable people safety
•
•
•
•
This appliance can be used by children aged from 8
years and above and persons with reduced physical,
sensory or mental capabilities or lack of experience
and knowledge if they have been given supervision or
instruction concerning use of the appliance in a safe
way and understand the hazards involved.
Do not let children play with the appliance.
Cleaning and user maintenance shall not be made by
children without supervision.
Keep all packaging away from children.
1.2 General Safety
•
•
•
•
•
This appliance is intended to be used in household
and similar applications such as:
– Farm houses; staff kitchen areas in shops, offices
and other working environments
– By clients in hotels, motels, bed and breakfast and
other residential type environments
Keep ventilation openings, in the appliance enclosure
or in the built-in structure, clear of obstruction.
Do not use mechanical devices or other means to
accelerate the defrosting process, other than those
recommended by the manufacturer.
Do not damage the refrigerant circuit.
Do not use electrical appliances inside the food
storage compartments of the appliance, unless they
are of the type recommended by the manufacturer.
4
www.aeg.com
•
•
•
•
Do not use water spray and steam to clean the
appliance.
Clean the appliance with a moist soft cloth. Only use
neutral detergents. Do not use abrasive products,
abrasive cleaning pads, solvents or metal objects.
Do not store explosive substances such as aerosol
cans with a flammable propellant in this appliance.
If the supply cord is damaged, it must be replaced by
the manufacturer, its service agent or similarly
qualified persons in order to avoid a hazard.
2. SAFETY INSTRUCTIONS
2.1 Installation
WARNING!
Only a qualified person must
install this appliance.
• Remove all the packaging.
• Do not install or use a damaged
appliance.
• Obey the installation instruction
supplied with the appliance.
• Always be careful when you move the
appliance because it is heavy. Always
wear safety gloves.
• Make sure the air can circulate around
the appliance.
• Wait at least 4 hours before
connecting the appliance to the
power supply. This is to allow the oil
to flow back in the compressor.
• Do not install the appliance close to
radiators or cookers, oven or hobs.
• The rear of the appliance must stand
against the wall.
• Do not install the appliance where
there is direct sunlight.
• Do not install this appliance in areas
that are too humid or too colds, such
as the construction appendices,
garages or wine cellars.
• When you move the appliance, lift it
by the front edge to avoid scratching
the floor.
2.2 Electrical connection
WARNING!
Risk of fire and electrical
shock.
• The appliance must be earthed.
• All electrical connections should be
made by a qualified electrician.
• Make sure that the electrical
information on the rating plate agrees
with the power supply. If not contact
an electrician.
• Always use a correctly installed
shockproof socket.
• Do not use multi-plug adapters and
extension cables.
• Make sure not to cause damage to
the electrical components (e.g. mains
plug, mains cable, compressor).
Contact the Service or an electrician
to change the electrical components.
• The mains cable must stay below the
level of the mains plug.
• Connect the mains plug to the mains
socket only at the end of the
installation. Make sure that there is
access to the mains plug after the
installation.
• Do not pull the mains cable to
disconnect the appliance. Always pull
the mains plug.
ENGLISH
2.3 Use
WARNING!
Risk of injury, burns,
electrical shock or fire.
• Do not change the specification of
this appliance.
• Do not put electrical appliances (e.g.
ice cream makers) in the appliance
unless they are stated applicable by
the manufacturer.
• Be careful not to cause damage to
the refrigerant circuit. It contains
isobutane (R600a), a natural gas with a
high level of environmental
compatibility. This gas is flammable.
• If damage occurs to the refrigerant
circuit, make sure that there are no
flames and sources of ignition in the
room. Ventilate the room.
• Do not let hot items to touch the
plastic parts of the appliance.
• Do not put soft drinks in the freezer
compartment. This will create
pressure on the drink container.
• Do not store flammable gas and
liquid in the appliance.
• Do not put flammable products or
items that are wet with flammable
products in, near or on the appliance.
• Do not touch the compressor or the
condenser. They are hot.
• Do not remove or touch items from
the freezer compartment if your hands
are wet or damp.
• Do not freeze again food that has
been thawed.
• Obey the storage instructions on the
packaging of frozen food.
2.4 Care and cleaning
WARNING!
Risk of injury or damage to
the appliance.
5
• Before maintenance, deactivate the
appliance and disconnect the mains
plug from the mains socket.
• This appliance contains hydrocarbons
in the cooling unit. Only a qualified
person must do the maintenance and
the recharging of the unit.
• Regularly examine the drain of the
appliance and if necessary, clean it. If
the drain is blocked, defrosted water
collects in the bottom of the
appliance.
2.5 Disposal
WARNING!
Risk of injury or suffocation.
• Disconnect the appliance from the
mains supply.
• Cut off the mains cable and discard it.
• Remove the door to prevent children
and pets to be closed inside of the
appliance.
• The refrigerant circuit and the
insulation materials of this appliance
are ozone-friendly.
• The insulation foam contains
flammable gas. Contact your
municipal authority for information on
how to discard the appliance
correctly.
• Do not cause damage to the part of
the cooling unit that is near the heat
exchanger.
6
www.aeg.com
3. PRODUCT DESCRIPTION
3.1 General product overview
1
2
3
4
5
6 7
8
9
10
13 12 11
1
2
3
4
5
6
7
Vegetable drawer
FreshBox drawer
Glass shelf
Glass shelf
DYNAMICAIR
Bottle rack
Control panel
8
9
10
11
12
13
Dairy shelf
Door shelf
Bottle shelf
Freezer drawer
Freezer drawer
Freezer drawer
4. OPERATION
4.1 Control panel
1
2
3
4
5
6
7
8
ENGLISH
1 ON/OFF button
2 Top compartment temperature
colder button
3 Top compartment temperature
warmer button
4 Mode button
5 OK button
6 Bottom compartment temperature
colder button
A
B
C D E
Off COOL
MATIC
F
G
FROST
MATIC
min
L
K J
I
H
4.2 Switching on
1. Connect the mains plug to the power
socket.
2. Press the appliance ON/OFF if the
display is off.
The alarm buzzer could operate after few
seconds.
The temperature indicators show the set
default temperature.
To reset the alarm refer to "High
temperature alarm".
To select a different set temperature
refer to "Temperature regulation".
If "dEMo" appears on the display, refer
to "What to do if..." chapter.
If the door remains open for
some minutes, the light will
turn off automatically. The
light is reset by closing and
opening the door itself.
4.3 Switching off
1. Press the appliance ON/OFF button
for a few seconds.
7 Bottom compartment temperature
warmer button
8 Display
It is possible to change predefined
sound of buttons by pressing together
Mode button and Temperature colder
button for some seconds. Change is
reversible.
A) Fridge compartment indicator
B) Fridge temperature indicator and
timer indicator
C) Fridge OFF indicator
D) COOLMATIC function
E) Holiday function
F) FROSTMATIC function
G) Freezer temperature indicator
H) Freezer compartment indicator
I) Alarm indicator
J) ChildLock function
K) MinuteMinder function
L) DYNAMICAIR function
The display switches off.
2. Disconnect the mains plug from the
power socket.
4.4 Switching on the fridge
To switch on the fridge it is enough to
press the fridge temperature regulator.
To switch on the fridge in the other way:
1. Press Mode until the corresponding
icon appears.
The Fridge OFF indicator flashes.
2. Press OK to confirm.
The fridge OFF indicator goes off.
To select a different set
temperature refer to
"Temperature regulation".
4.5 Switching off the fridge
1. Press Mode until the corresponding
icon appears.
The fridge OFF indicator and the fridge
compartment indicator flash.
The fridge temperature indicator shows
dashes.
7
8
www.aeg.com
2. Press OK to confirm.
The fridge OFF indicator is shown.
4.6 Temperature regulation
Set temperature of the fridge and of the
freezer by pressing the temperature
regulators.
Default temperatures:
• +5°C for the fridge
• -18°C for the freezer
The temperature indicators show the set
temperature.
After a power failure the set
temperature remains stored.
The set temperature will be
reached within 24 hours.
The appliance activates a function mode
that permit to optimize the food
preservation and energy consumption.
This guarantees the maximum silentness
during the performance of the appliance.
4.7 High temperature alarm
An increase in the temperature in the
freezer compartment (for example due to
an earlier power failure or door is open)
is indicated by:
• flashing the alarm and freezer
temperature indicators;
• sounding of buzzer.
To reset the alarm press any button.
The buzzer switches off.
The freezer temperature indicator shows
the highest temperature reached for a
few seconds. Then show again the set
temperature.
The alarm indicator continues to flash
until the normal conditions are restored.
When the alarm has
returned the alarm indicator
goes off.
4.8 COOLMATIC function
If you need to insert a large amount of
warm food, for example after doing
grocery shopping, we suggest activating
the COOLMATIC function to chill the
products more rapidly and to avoid
warming the other food which is already
in the refrigerator.
1. Press Mode until the corresponding
icon appears.
The COOLMATIC indicator flashes.
2. Press OK to confirm.
The COOLMATIC indicator is shown.
The COOLMATIC function
shuts off automatically after
52 hours. To switch off the
function before its automatic
end, repeat the steps until
the COOLMATIC indicator
goes off.
4.9 FROSTMATIC function
The FROSTMATIC function accelerates
the freezing of fresh food and, at the
same time, protects foodstuffs already
stored from undesirable warming.
1. Press Mode button until the
corresponding icon appears.
The FROSTMATIC indicator flashes.
2. Press OK button to confirm.
The FROSTMATIC indicator is shown.
The FROSTMATIC function
shuts off automatically after
52 hours. To switch off the
function before its automatic
end, repeat the steps until
the FROSTMATIC indicator
goes off.
4.10 DYNAMICAIR function
1. Press Mode until the corresponding
icon appears.
The DYNAMICAIR indicator flashes.
2. Press OK to confirm.
The DYNAMICAIR indicator is shown.
The activation of the
DYNAMICAIR function
increases energy
consumption. If the function
is activated automatically,
the DYNAMICAIR indicator
is not shown (refer to "Daily
use").
To switch off the function, repeat the
steps until the DYNAMICAIR indicator
goes off.
ENGLISH
9
4.11 MinuteMinder function
4.12 Holiday mode
The MinuteMinder function is to be used
to set an acoustic alarm at the preferred
time, useful for example when a recipe
requires to cool down food products for
a certain length of time or when a
reminder is needed in order not to forget
the bottles placed in the freezer for fast
cooling.
This function allows you to keep the
refrigerator closed and empty during a
long holiday period without the
formation of a bad smell.
1. Press Mode until the corresponding
icon appears.
The MinuteMinder indicator flashes.
The Timer shows the set value (30
minutes) for a few seconds.
2. Press the Timer regulator to change
the Timer set value from 1 to 90
minutes.
3. Press OK to confirm.
The MinuteMinder indicator is shown.
The Timer starts to flash (min).
It is possible to change the time at any
time during the countdown and at the
end by pressing the Temperature colder
button and the Temperature warmer
button.
1. Press the Mode button until the
Holiday indicator icon appears.
The Holiday icon flashes.
The fridge temperature indicator shows
the set temperature.
2. Press the OK button to confirm.
The Holiday icon appears.
To turn off the Holiday mode, repeat the
procedure until the Holiday indicator
icon goes off.
At the end of the countdown, the
MinuteMinder indicator flashes and an
audible alarm sounds. Press OK to switch
off the sound and terminate the function.
It is possible to deactivate the function at
any time during the countdown by
repeating the function steps, until the
indicator turns off.
Empty the fridge
compartment before turning
the Holiday mode on.
4.13 ChildLock function
Activate the ChildLock function to lock
the buttons from unintentional
operation.
1. Press Mode until the corresponding
icon appears.
The ChildLock indicator flashes.
2. Press OK to confirm.
The ChildLock indicator is shown.
To deactivate the ChildLock function,
repeat the procedure until the ChildLock
indicator goes off.
5. DAILY USE
WARNING!
Refer to Safety chapters.
5.1 Initial power on
CAUTION!
Before inserting the power
plug in to the outlet and
switching on the cabinet for
the first time, leave the
appliance standing upright
for at least 4 hours. This will
assure a sufficient amount of
time for the oil to return to
the compressor. Otherwise
the compressor or electronic
components may sustain
damage.
10
www.aeg.com
5.2 Cleaning the interior
Before using the appliance for the first
time, the interior and all internal
accessories should be washed with
lukewarm water and some neutral soap
to remove the typical smell of a brandnew product, then dried thoroughly.
CAUTION!
Do not use detergents or
abrasive powders, as these
will damage the finish.
5.3 Storage of frozen food
When first starting-up or after a period
out of use, before putting the products
in the compartment let the appliance run
at least 2 hours with the FROSTMATIC
function turned on. The freezer drawers
ensure that it is quick and easy to find
the food package you want. If large
quantities of food are to be stored,
remove all drawers except for the
bottom drawer which needs to be in
place to provide good air circulation. On
all shelves it is possible to place food
that protrude until 15 mm from the door.
WARNING!
In the event of accidental
defrosting, for example due
to a power failure, if the
power has been off for
longer that the value shown
in the technical
characteristics chart under
"rising time", the defrosted
food must be consumed
quickly or cooked
immediately and then refrozen (after cooling).
Place the fresh food to be frozen in the
top compartment.
The maximum amount of food that can
be frozen in 24 hours is specified on the
rating plate, a label located on the
inside of the appliance.
The freezing process lasts 24 hours:
during this period do not add other food
to be frozen.
When the freezing process is completed,
return to the required temperature (see
"FROSTMATIC Function").
In this condition, the
refrigerator compartment
temperature might drop
below 0°C. If this occurs
reset the temperature
regulator to a warmer
setting.
5.5 Thawing
Deep-frozen or frozen food, prior to
being used, can be thawed in the
refrigerator compartment or at room
temperature, depending on the time
available for this operation.
Small pieces may even be cooked still
frozen, directly from the freezer: in this
case, cooking will take longer.
5.6 Movable shelves
The walls of the refrigerator are
equipped with a series of runners so that
the safety glass shelves can be
positioned as desired.
5.4 Freezing fresh food
The freezer compartment is suitable for
freezing fresh food and storing frozen
and deep-frozen food for a long time.
To freeze small amount of fresh foods it
is not necessary to change the present
setting.
To freeze fresh food activate the
FROSTMATIC function at least 24 hours
before placing the food to be frozen in
the freezer compartment.
CAUTION!
Do not move the glass shelf
above the FreshBox drawer
to ensure correct air
circulation.
ENGLISH
11
5.7 Bottle rack
Place the bottles (with the opening
facing front) in the pre-positioned shelf.
Place only closed bottles.
5.10 DYNAMICAIR
The refrigerator compartment is
equipped with a device that allows for
rapid cooling of foods and more uniform
temperature in the compartment.
This device activates by itself when
needed, for example for a quick
temperature recovering after door
opening or when the ambient
temperature is high.
5.8 FreshBox drawer
To switch on the device manually, refer
to DYNAMICAIR mode.
The drawer is suitable for storing fresh
food like fish, meat, seafood, because
the temperature is lower here than in the
rest of the fridge.
CAUTION!
Before placing or removing
the FreshBox drawer inside
the appliance, pull out the
vegetable drawer and glass
cover.
5.9 MaxiBox drawer
The drawer is suitable for storing fruit
and vegetables.
The DYNAMICAIR device
stops when the door is open
and restarts immediately
after the door closing.
5.11 Carbon Air Filter
Your appliance is equipped with a
carbon filter CLEANAIR CONTROL in a
drawer in the rear wall of the fridge
compartment.
The filter purifies the air from unwanted
odours in the fridge compartment
meaning that the storage quality will be
further improved.
12
www.aeg.com
CAUTION!
During the operation, always
keep the air ventilation
drawer closed.
2. Reposition the shelf as required.
5.13 Removal of freezing
baskets from the freezer
The freezing baskets have a limit stop to
prevent their accidental removal or
falling out. At the time of its removal
from the freezer, pull the basket towards
yourself and, upon reaching the end
point, remove the basket by tilting its
front upwards.
5.12 Positioning the door
shelves
To permit storage of food packages of
various sizes, the door shelves can be
placed at different heights.
To make these adjustments proceed as
follows:
2
1
1. Gradually pull in the direction of the
arrows until it comes free.
At the time of putting it back, slightly lift
the front of the basket to insert it into the
freezer. Once you are over the end
points, push the baskets back in their
position.
6. HINTS AND TIPS
6.1 Normal operating sounds
The following sounds are normal during
operation:
• A faint gurgling and bubbling sound
from coils sound when refrigerant is
pumped.
• A whirring and pulsating sound from
the compressor when refrigerant is
pumped.
• A sudden cracking noise from inside
appliance caused by thermic
dilatation (a natural and not
dangerous physical phenomenon).
• A faint click noise from the
temperature regulator when the
compressor switches on or off.
6.2 Hints for energy saving
• Do not open the door frequently or
leave it open longer than absolutely
necessary.
• If the ambient temperature is high
and the Temperature Regulator is set
to low temperature and the appliance
is fully loaded, the compressor may
run continuously, causing frost or ice
ENGLISH
on the evaporator. If this happens, set
the Temperature Regulator toward
warmer settings to allow automatic
defrosting and so a saving in
electricity consumption.
6.3 Hints for fresh food
refrigeration
To obtain the best performance:
• do not store warm food or
evaporating liquids in the refrigerator
• do cover or wrap the food, particularly
if it has a strong flavour
• position food so that air can circulate
freely around it
6.4 Hints for refrigeration
Useful hints:
• Meat (all types) : wrap in polythene
bags and place on the glass shelf
above the vegetable drawer.
• For safety, store in this way only one
or two days at the most.
• Cooked foods, cold dishes, etc..:
these should be covered and may be
placed on any shelf.
• Fruit and vegetables: these should be
thoroughly cleaned and placed in the
special drawer(s) provided.
• Butter and cheese: these should be
placed in special airtight containers or
wrapped in aluminium foil or
polythene bags to exclude as much
air as possible.
• Bottles: these need a cap and should
be stored on the door bottle shelf, or
(if equipped) on the bottle rack.
• Bananas, potatoes, onions and garlic,
if not packed, must not be kept in the
refrigerator.
6.5 Hints for freezing
To help you make the most of the
freezing process, here are some
important hints:
• the maximum quantity of food which
can be frozen in 24 hrs. is shown on
the rating plate;
13
• the freezing process takes 24 hours.
No further food to be frozen should
be added during this period;
• freeze only top quality, fresh and
thoroughly cleaned, foodstuffs;
• prepare food in small portions to
enable it to be rapidly and completely
frozen and to make it possible
subsequently to thaw only the
quantity required;
• wrap up the food in aluminium foil or
polythene and make sure that the
packages are airtight;
• do not allow fresh, unfrozen food to
touch food which is already frozen,
thus avoiding a rise in temperature of
the latter;
• lean foods store better and longer
than fatty ones; salt reduces the
storage life of food;
• water ices, if consumed immediately
after removal from the freezer
compartment, can possibly cause the
skin to be freeze burnt;
• it is advisable to show the freezing in
date on each individual pack to
enable you to keep tab of the storage
time.
6.6 Hints for storage of frozen
food
To obtain the best performance from this
appliance, you should:
• make sure that the commercially
frozen foodstuffs were adequately
stored by the retailer;
• be sure that frozen foodstuffs are
transferred from the foodstore to the
freezer in the shortest possible time;
• not open the door frequently or leave
it open longer than absolutely
necessary;
• once defrosted, food deteriorates
rapidly and cannot be refrozen;
• do not exceed the storage period
indicated by the food manufacturer.
14
www.aeg.com
7. CARE AND CLEANING
WARNING!
Refer to Safety chapters.
7.1 General warnings
CAUTION!
Unplug the appliance before
carrying out any
maintenance operation.
This appliance contains
hydrocarbons in its cooling
unit; maintenance and
recharging must therefore
only be carried out by
authorized technicians.
The accessories and parts of
the appliance are not
suitable for washing in a
dishwasher.
7.2 Cleaning the interior
Before using the appliance for the first
time, the interior and all internal
accessories should be washed with
lukewarm water and some neutral soap
to remove the typical smell of a brandnew product, then dried thoroughly.
CAUTION!
Do not use detergents or
abrasive powders, as these
will damage the finish.
7.3 Periodic cleaning
CAUTION!
Do not pull, move or
damage any pipes and/or
cables inside the cabinet.
CAUTION!
Take care of not to damage
the cooling system.
CAUTION!
When moving the cabinet,
lift it by the front edge to
avoid scratching the floor.
The equipment has to be cleaned
regularly:
1. Clean the inside and accessories with
lukewarm water and some neutral
soap.
2. Regularly check the door seals and
wipe clean to ensure they are clean
and free from debris.
3. Rinse and dry thoroughly.
4. If accessible, clean the condenser
and the compressor at the back of
the appliance with a brush.
This operation will improve the
performance of the appliance and
save electricity consumption.
The lowest shelf, dividing the cooler
compartment from the compartment can
be removed only for cleaning. To remove
pull out the shelf straight.
To make sure fully
functionality of the FreshBox
compartment the lowest
shelf and cover plates must
be put back in their original
position after cleaning.
The cover plates above the drawers in
the compartment can be taken out for
cleaning.
7.4 Defrosting of the
refrigerator
Frost is automatically eliminated from the
evaporator of the refrigerator
compartment every time the motor
compressor stops, during normal use.
The defrost water drains out through a
trough into a special container at the
back of the appliance, over the motor
compressor, where it evaporates.
It is important to periodically clean the
defrost water drain hole in the middle of
the refrigerator compartment channel to
prevent the water overflowing and
dripping onto the food inside.
ENGLISH
15
2. Remove all food.
3. Clean the appliance and all
accessories.
4. Leave the door/doors open to
prevent unpleasant smells.
WARNING!
If the cabinet will be kept on,
ask somebody to check it
once in a while to prevent
the food inside from spoiling
in case of a power failure.
7.5 Defrosting the freezer
The freezer compartment is frost free.
This means that there is no build up of
frost when it is in operation, neither on
the internal walls nor on the foods.
The absence of frost is due to the
continuous circulation of cold air inside
the compartment, driven by an
automatically controlled fan.
7.6 Periods of non-operation
7.7 Replacing the carbon air
filter
To get the best performance the carbon
air filter should be changed once every
year.
New active air filters can be purchased
from your local dealer.
Refer to "Installation of the CLEANAIR
CONTROL filter" for the instructions.
When the appliance is not in use for long
periods, take the following precautions:
1. Disconnect the appliance from
electricity supply.
The air filter is a consumable
accessory and as such is not
covered by the guarantee.
8. TROUBLESHOOTING
WARNING!
Refer to Safety chapters.
8.1 What to do if...
Problem
Possible cause
Solution
The appliance does not operate.
The appliance is switched
off.
Switch on the appliance.
The mains plug is not con- Connect the mains plug to the
nected to the mains socket mains socket correctly.
correctly.
The appliance is noisy.
There is no voltage in the
mains socket.
Connect a different electrical
appliance to the mains socket.
Contact a qualified electrician.
The appliance is not supported properly.
Check if the appliance stands
stable.
16
www.aeg.com
Problem
Possible cause
Audible or visual alarm is on. The cabinet has been recently switched on or the
temperature is still too
high.
Solution
Refer to "Door Open Alarm"or
"High Temperature Alarm".
The temperature in the ap- Refer to "Door Open Alarm"or
pliance is too high.
"High Temperature Alarm".
The temperature in the ap- Contact a qualified electrician
pliance is too high.
or contact the nearest Authorized Service Centre.
A square symbol is shown in- Temperature sensor probstead of numbers on the
lem.
Temperature Display.
Contact the nearest Authorized Service Centre (the cooling system will continue to
keep food products cold, but
temperature adjustment will
not be possible).
The lamp does not work.
The lamp is in stand-by.
Close and open the door.
The lamp does not work.
The lamp is defective.
Contact the nearest Authorized Service Centre.
The compressor operates
continually.
Temperature is set incorrectly.
Refer to "Operation" chapter.
Many food products were
put in at the same time.
Wait some hours and then
check the temperature again.
The room temperature is
too high.
Refer to climate class chart on
the rating plate.
Food products placed in
the appliance were too
warm.
Allow food products to cool to
room temperature before storing.
The door is not closed cor- Refer to "Closing the door".
rectly.
The FROSTMATIC function Refer to "FROSTMATIC funcis switched on.
tion".
The COOLMATIC function Refer to "COOLMATIC funcis switched on.
tion".
The compressor does not
start immediately after
pressing the FROSTMATIC,
or after changing the temperature.
This is normal, no error has The compressor starts after a
occurred.
period of time.
ENGLISH
Problem
Possible cause
The compressor does not
start immediately after
pressing the COOLMATIC,
or after changing the temperature.
This is normal, no error has The compressor starts after a
occurred.
period of time.
Water flows inside the refrig- The water outlet is clogerator.
ged.
Food products prevent
that water flows into the
water collector.
17
Solution
Clean the water outlet.
Make sure that food products
do not touch the rear plate.
Water flows on the floor.
The melting water outlet is Attach the melting water outnot connected to the
let to the evaporative tray.
evaporative tray above the
compressor.
Temperature cannot be set.
The FROSTMATIC or
COOLMATIC function is
switched on.
DEMO appears on the display.
The appliance is in demon- Keep the OK pressed for apstration mode.
proximately 10 seconds until a
long sound is heard and display shuts off for a short time.
Door is misaligned or interferes with ventilation grill.
The appliance is not levelled.
The temperature in the appliance is too low/too high.
The temperature regulator Set a higher/lower temperais not set correctly.
ture.
Switch off FROSTMATIC or
COOLMATIC manually, or wait
until the function resets automatically to set the temperature. Refer to "FROSTMATIC
or COOLMATIC function".
Refer to "Levelling".
The door is not closed cor- Refer to "Closing the door".
rectly.
The food products' temperature is too high.
Let the food products temperature decrease to room temperature before storage.
Many food products are
stored at the same time.
Store less food products at the
same time.
The door has been
opened often.
Open the door only if necessary.
The FROSTMATIC function Refer to "FROSTMATIC funcis switched on.
tion".
The COOLMATIC function Refer to "COOLMATIC funcis switched on.
tion".
18
www.aeg.com
Problem
Possible cause
Solution
There is no cold air circula- Make sure that there is cold air
tion in the appliance.
circulation in the appliance.
If the advice does not lead
to the desired result, call the
nearest brand-mark service.
8.2 Closing the door
1. Clean the door gaskets.
2. If necessary, adjust the door. Refer to
"Installation".
3. If necessary, replace the defective
door gaskets. Contact the After Sales
Service.
8.3 Replacing the lamp
The appliance is equipped with a longlife
LED interior light.
Only service is allowed to replace the
lighting device. Contact your After Sales
Service.
9. INSTALLATION
WARNING!
Refer to Safety chapters.
9.1 Positioning
This appliance can be installed in a dry,
well ventilated indoor where the ambient
temperature corresponds to the climate
class indicated on the rating plate of the
appliance:
Some functional problems
might occur for some types
of models when operating
outside of that range. The
correct operation can only
be guaranteed within the
specified temperature
range. If you have any
doubts regarding where to
install the appliance, please
turn to the vendor, to our
customer service or to the
nearest Service Centre
Climate
class
Ambient temperature
SN
+10°C to + 32°C
9.2 Electrical connection
N
+16°C to + 32°C
ST
+16°C to + 38°C
T
+16°C to + 43°C
• Before plugging in, ensure that the
voltage and frequency shown on the
rating plate correspond to your
domestic power supply.
• The appliance must be earthed. The
power supply cable plug is provided
with a contact for this purpose. If the
domestic power supply socket is not
earthed, connect the appliance to a
separate earth in compliance with
current regulations, consulting a
qualified electrician.
• The manufacturer declines all
responsibility if the above safety
precautions are not observed.
• This appliance complies with the
E.E.C. Directives.
ENGLISH
19
9.3 Location
It must be possible to
disconnect the appliance
from the mains power
supply; the plug must
therefore be easily
accessible after installation.
The appliance should be installed well
away from sources of heat such as
radiators, boilers, direct sunlight etc.
Ensure that air can circulate freely around
the back of the cabinet. To ensure best
performance, if the appliance is
positioned below an overhanging wall
unit, the minimum distance between the
top of the cabinet and the wall unit must
be at least 100 mm . Ideally, however, the
appliance should not be positioned
below overhanging wall units. Accurate
levelling is ensured by one or more
adjustable feet at the base of the
cabinet.
9.5 Installation of the
CLEANAIR CONTROL filter
The carbon air filter is an active carbon
filter which absorbs bad odors and
permits to maintain the best flavour and
aroma for all foodstuffs without risk of
odor cross contamination.
On delivery the carbon filter is in a plastic
bag to preserve performance. The filter
should be placed in the drawer before
the appliance is turned on.
100 mm
min
1.
2.
3.
4.
Open the drawer.
Take the filter out of the plastic bag.
Insert the filter in the drawer.
Close the drawer.
B
20 mm
A
CAUTION!
In order to guarantee proper
functioning in ambient
temperature above 38°C, it
is advised to have a 30mm
separation between the
sides of the appliance and
surrounding furniture.
9.4 Levelling
When placing the appliance ensure that
it stands level. This can be achieved by
two adjustable feet at the bottom in
front.
The filter should be handled
carefully so fragments do
not loosen from the surface.
Make sure that the air lever
drawer is closed to obtain
proper function.
20
www.aeg.com
9.6 Door reversing
1
WARNING!
Before carrying out any
operations, remove the plug
from the power socket.
Before carrying out any
operation, please be sure
that the appliance is empty.
If not, please move all goods
into right temperature for
proper food storage reason.
2
5. Unscrew the top door stopper and
the top handle strut, then replace
them.
CAUTION!
To carry out the following
operations, we suggest that
this be made with another
person that will keep a firm
hold on the doors of the
appliance during the
operations.
1
2
1. Remove all plugs from the top door
cap.
2. Remove the top door cap.
4
3
1
2
1
6. Remove the spacer and middle hinge
from the appliance, then carefully
remove the bottom door.
3. Securing the door, unscrew the top
hinge.
4. Carefully remove the top door from
the appliance.
1
2
7. Remove the bottom hinge spacer
then unscrew the bottom hinge
bracket.
ENGLISH
8. Remove the pivot hinge from the
bottom hinge bracket and replace it
on the opposite side.
1
21
2
1
2
3
3
9. Install the bottom hinge bracket on
the opposite side of the appliance.
12. Install the top hinge on the opposite
side of the appliance, then replace all
top hinge covers.
Remember to attach the
bottom hinge spacer.
10. Install the bottom door on the
bottom hinge, and secure it by
attaching the middle hinge to the
appliance.
1
Remember to attach the
middle hinge spacer.
2
2
1
11. Remove the top hinge covers, then
unscrew the hinge from the
appliance.
3
13. Carefully position the top door on
the middle hinge, then continue to fit
the door onto the top hinge.
14. Secure the top door to the top
hinge.
22
www.aeg.com
h1
h2
h3
2
18. Attach the handle brackets then
handles on the opposite side.
1
h4
h5
h6
15. Reposition the top door cap and
insert all plugs.
2
2
1
16. Unscrew the lower door stopper and
then install it on the opposite side
17. Unscrew the handles then handle
brackets.
CAUTION!
Reposition, level the
appliance, wait for at least
four hours and then connect
it to the power socket.
Do a final check to make
sure that:
• All screws are tightened.
• The magnetic seal
adheres to the cabinet.
• The door opens and
closes correctly.
If the ambient temperature
is cold (i.e. in Winter), the
gasket may not fit perfectly
to the cabinet. In that case,
wait for the natural fitting of
the gasket. In case you do
not want to carry out the
above mentioned
operations, contact the
nearest After Sales Service
Force. The After Sales
Service specialist will carry
out the reversibility of the
doors at your cost.
ENGLISH
23
10. TECHNICAL INFORMATION
10.1 Technical data
Height
mm
1840
Width
mm
595
Depth
mm
642
Rising time
Hours
20
Voltage
Volts
230 - 240
Frequency
Hz
50
The technical information are situated in
the rating plate, on the external or
internal side of the appliance and in the
energy label.
11. ENVIRONMENTAL CONCERNS
Recycle the materials with the symbol .
Put the packaging in applicable
containers to recycle it. Help protect the
environment and human health and to
recycle waste of electrical and electronic
appliances. Do not dispose appliances
marked with the symbol with the
household waste. Return the product to
your local recycling facility or contact
your municipal office.
24
www.aeg.com
OBSAH
1. BEZPEČNOSTNÉ INFORMÁCIE.....................................................................25
2. BEZPEČNOSTNÉ POKYNY............................................................................ 26
3. POPIS SPOTREBIČA.......................................................................................28
4. PREVÁDZKA.................................................................................................... 28
5. KAŽDODENNÉ POUŽÍVANIE.......................................................................... 31
6. TIPY A RADY................................................................................................... 35
7. OŠETROVANIE A ČISTENIE...........................................................................36
8. RIEŠENIE PROBLÉMOV................................................................................. 38
9. INŠTALÁCIA.....................................................................................................41
10. TECHNICKÉ INFORMÁCIE........................................................................... 45
DOSIAHNITE TIE NAJLEPŠIE VÝSLEDKY
Ďakujeme vám, že ste si vybrali tento výrobok značky AEG. Vyrobili sme ho tak,
aby vám dlhé roky poskytoval dokonalý výkon, s využitím inovačných technológií,
ktoré uľahčujú život. To sú vlastnosti, ktoré u bežných spotrebičov možno
nenájdete. Venujte, prosím, niekoľko minút tomuto návodu a dôkladne si ho
prečítajte, aby ste svoj spotrebič mohli využívať čo najlepšie.
Navštívte našu stránku, kde nájdete:
Tipy na používanie, brožúry, riešenie problémov a informácie o údržbe:
www.aeg.com
Zaregistrujte si produkt a využite tak ešte lepší servis:
www.registeraeg.com
Do spotrebiča si môžete zakúpiť príslušenstvo, spotrebný materiál a originálne
náhradné diely:
www.aeg.com/shop
STAROSTLIVOSŤ A SLUŽBY ZÁKAZNÍKOM
Odporúčame, aby ste používali originálne náhradné diely.
Keď budete kontaktovať autorizované servisné stredisko, nezabudnite si pripraviť
nasledujúce údaje: Model, číslo výrobku, sériové číslo.
Tieto informácie nájdete na typovom štítku.
Varovanie/upozornenie – Bezpečnostné pokyny
Všeobecné informácie a tipy
Ochrana životného prostredia
Vyhradzujeme si právo na zmeny bez predchádzajúceho upozornenia.
SLOVENSKY
1.
25
BEZPEČNOSTNÉ INFORMÁCIE
Pred inštaláciou a používaním spotrebiča si pozorne
prečítajte priložený návod na používanie. Výrobca nie je
zodpovedný za škody a zranenia spôsobené
nesprávnou inštaláciou a používaním. Návod na
používanie uchovávajte vždy v blízkosti spotrebiča, aby
ste doň mohli v budúcnosti nahliadnuť.
1.1 Bezpečnosť detí a zraniteľných osôb
•
•
•
•
Tento spotrebič smú používať deti staršie ako 8 rokov
a osoby so zníženou fyzickou, zmyslovou alebo
psychickou spôsobilosťou alebo nedostatkom
skúseností a znalostí, iba ak sú pod dozorom
zodpovednej osoby alebo ak boli zodpovednou
osobou poučené o bezpečnom používaní spotrebiča a
rozumejú prípadným rizikám.
Nedovoľte, aby sa deti hrali so spotrebičom.
Čistenie a údržbu nesmú vykonávať deti bez dozoru.
Obaly uschovajte mimo dosahu detí.
1.2 Všeobecné bezpečnostné pokyny
•
•
•
•
•
Tento spotrebič je určený na používanie v domácnosti
a podobnom prostredí, ako sú napr.:
– Vidiecke domy, kuchynky pre zamestnancov v
obchodoch, kanceláriách a inom pracovnom
prostredí.
– Pre klientov v hoteloch, moteloch, ubytovacích
zariadeniach s raňajkami a iných obytných
objektoch.
Vetracie otvory na spotrebiči alebo v skrinke na
zabudovanie musia zostať voľné.
Na urýchlenie odmrazovania nepoužívajte
mechanické nástroje ani iné prostriedky, ak ich
neodporučil výrobca.
Nepoškodzujte chladiaci okruh.
Vnútri skladovacieho priestoru nepoužívajte elektrické
spotrebiče, ak ich neodporučil výrobca.
26
www.aeg.com
•
•
•
•
Na čistenie spotrebiča nepoužívajte prúd vody ani
paru.
Spotrebič čistite vlhkou mäkkou handričkou.
Používajte iba neutrálne saponáty. Nepoužívajte
abrazívne prostriedky, drôtenky, rozpúšťadlá ani
kovové predmety.
V tomto spotrebiči neskladujte výbušné látky ako napr.
aerosólové plechovky s horľavým propelantom.
Ak je poškodený elektrický napájací kábel, musíte ho
dať vymeniť u výrobcu, v autorizovanom servise alebo
u kvalifikovanej osoby, aby sa predišlo
nebezpečenstvu.
2. BEZPEČNOSTNÉ POKYNY
2.1 Montáž
VAROVANIE!
Tento spotrebič smie
nainštalovať iba
kvalifikovaná osoba.
•
•
•
•
•
•
•
•
•
•
•
Odstráňte všetok obalový materiál.
Poškodený spotrebič neinštalujte ani
nepoužívajte.
Dodržiavajte pokyny na inštaláciu
dodané so spotrebičom.
Pri premiestňovaní spotrebiča buďte
vždy opatrní, pretože je ťažký. Vždy
používajte bezpečnostné rukavice.
Uistite sa, že okolo spotrebiča môže
voľne cirkulovať vzduch.
Pred zapojením spotrebiča do
elektrickej siete počkajte aspoň 4
hodiny. Je to potrebné na to, aby olej
stiekol späť do kompresora.
Spotrebič neinštalujte blízko
radiátorov, sporákov, rúr ani varných
panelov.
Zadnú stranu spotrebiča je potrebné
umiestniť oproti stene.
Neinštalujte spotrebič na miesta, kde
dopadá priame slnečné svetlo.
Tento spotrebič neinštalujte na
miestach, ktoré sú príliš vlhké alebo
chladné, ako napr. prístavby, garáže
alebo vínne pivnice.
Pri presúvaní spotrebiča nadvihnite
jeho prednú hranu, aby ste
nepoškriabali podlahu.
2.2 Zapojenie do elektrickej
siete
VAROVANIE!
Hrozí nebezpečenstvo
požiaru a zásahu
elektrickým prúdom.
•
•
•
•
•
•
•
•
Spotrebič musí byť uzemnený.
Všetky práce spojené so zapojením
do elektrickej siete smie vykonať
výlučne kvalifikovaný elektrikár.
Uistite sa, že elektrické údaje
uvedené na typovom štítku spotrebiča
zodpovedajú parametrom elektrickej
siete. Ak nie, kontaktujte elektrikára.
Vždy používajte správne inštalovanú
uzemnenú zásuvku.
Nepoužívajte adaptéry, rozdvojky ani
predlžovacie prívodné káble.
Dbajte na to, aby ste nespôsobili
poškodenie elektrických častí (napr.
zástrčky napájacieho kábla,
elektrického napájacieho kábla,
kompresora). Ak je potrebná výmena
elektrických komponentov, obráťte sa
na servisné stredisko alebo
elektrikára.
Elektrický napájací kábel musí zostať
vždy nižšie ako zástrčka napájacieho
kábla.
Zástrčku zapojte do zásuvky až na
konci inštalácie. Uistite sa, že je
napájací elektrický kábel po inštalácii
prístupný.
SLOVENSKY
•
Pri odpájaní spotrebiča od elektrickej
siete neťahajte za prívodný kábel.
Vždy ťahajte za zástrčku.
•
•
2.3 Použite
VAROVANIE!
Nebezpečenstvo zranenia,
popálenín, zásahu
elektrickým prúdom alebo
požiaru.
•
•
•
•
•
•
•
•
•
•
Nemeňte technické charakteristiky
tohto spotrebiča.
Do spotrebiča nevkladajte iné
elektrické spotrebiče (napr. výrobníky
zmrzliny), pokiaľ nie sú výslovne
určené výrobcom na tento účel.
Dbajte na to, aby ste nespôsobili
poškodenie chladiaceho okruhu.
Obsahuje izobután (R600a), prírodný
plyn s vysokou kompatibilitou so
životným prostredím. Tento plyn je
horľavý.
V prípade poškodenia chladiaceho
okruhu zabezpečte, aby sa v
miestnosti nenachádzali žiadne
plamene ani iné zápalné zdroje.
Miestnosť dobre vyvetrajte.
Dbajte na to, aby sa horúce predmety
nedostali do kontaktu s plastovými
časťami spotrebiča.
Do mraziaceho priestoru nedávajte
sýtené a nealkoholické nápoje.
Spôsobí to vznik nadmerného tlaku v
nádobe s nápojom.
V spotrebiči neskladujte horľavé plyny
ani kvapaliny.
Horľavé látky ani predmety, ktoré sú
nasiaknuté horľavými látkami,
neklaďte do spotrebiča, do jeho
blízkosti ani naň.
Nedotýkajte sa kompresora ani
kondenzátora. Sú horúce.
Ak máte mokré alebo vlhké ruky, z
mraziaceho priestoru nevyberajte
žiadne predmety ani sa ich
nedotýkajte.
27
Rozmrazené potraviny nikdy znovu
nezmrazujte.
Dodržiavajte pokyny ohľadne
správneho uskladnenia uvedené na
obale mrazených potravín.
2.4 Ošetrovanie a čistenie
VAROVANIE!
Hrozí nebezpečenstvo
zranenia alebo poškodenia
spotrebiča.
•
•
•
Pred vykonávaním údržby spotrebič
vypnite a vytiahnite jeho zástrčku zo
sieťovej zásuvky.
Tento spotrebič obsahuje uhľovodíky
v chladiacej jednotke. Údržbu a
dopĺňanie jednotky smie vykonať iba
kvalifikovaná osoba.
Pravidelne kontrolujte odtok
spotrebiča a v prípade potreby ho
vyčistite. Ak je odtok upchatý,
odmrazená voda sa bude
zhromažďovať na dne spotrebiča.
2.5 Likvidácia
VAROVANIE!
Nebezpečenstvo poranenia
alebo udusenia.
•
•
•
•
•
•
Spotrebič odpojte od elektrickej siete.
Odrežte elektrický kábel a zlikvidujte
ho.
Odstráňte dvierka, aby ste zabránili
uviaznutiu detí a domácich zvierat v
spotrebiči.
Chladiaci okruh a izolačné materiály
tohto spotrebiča nepoškodzujú
ozónovú vrstvu.
Penová izolácia obsahuje horľavý
plyn. Informácie o správnej likvidácii
spotrebiča vám poskytne váš miestny
úrad.
Nepoškoďte tú časť chladiacej
jednotky, ktorá sa nachádza blízko
výmenníka tepla.
28
www.aeg.com
3. POPIS SPOTREBIČA
3.1 Všeobecný prehľad výrobku
1
2
3
4
5
6 7
8
9
10
13 12 11
1
2
3
4
5
6
7
Zásuvka na zeleninu
Zásuvka FreshBox
Sklenená polica
Sklenená polica
DYNAMICAIR
Polica na fľaše
Ovládací panel
8
9
10
11
12
13
Priehradka na mliečne výrobky
Priehradka na dverách
Priehradka na fľaše
Zásuvka mrazničky
Zásuvka mrazničky
Zásuvka mrazničky
4. PREVÁDZKA
4.1 Ovládací panel
1
2
3
4
5
6
7
8
SLOVENSKY
1 Tlačidlo ON/OFF
2 Tlačidlo zníženia teploty horného
priestoru
3 Tlačidlo zvýšenia teploty horného
priestoru
4 Tlačidlo Mode
5 Tlačidlo OK
6 Tlačidlo zníženia teploty dolného
priestoru
A
B
C D E
Off COOL
MATIC
F
G
FROST
MATIC
min
L
K J
I
H
29
7 Tlačidlo zníženia teploty dolného
priestoru
8 Displej
Predvolenú hlasitosť zvukových signálov
pri stláčaní tlačidiel môžete zmeniť
súčasným stlačením tlačidla Mode a
tlačidla zníženia teploty na niekoľko
sekúnd. Vykonané zmeny môžete vrátiť
späť.
A) Ukazovateľ priestoru chladničky
B) Ukazovateľ teploty v chladničke a
ukazovateľ časomeru
C) Ukazovateľ chladničky OFF
D) Funkcia COOLMATIC
E) Funkcia Holiday
F) Funkcia FROSTMATIC
G) Ukazovateľ teploty v mrazničke
H) Ukazovateľ priestoru mrazničky
I) Ukazovateľ alarmu
J) Funkcia ChildLock
K) Funkcia MinuteMinder
L) DYNAMICAIR function
4.2 Zapnutie
4.3 Vypnutie
1. Zapojte zástrčku spotrebiča do
sieťovej zásuvky.
2. Ak je displej vypnutý, stlačte tlačidlo
ON/OFF.
O niekoľko sekúnd sa môže spustiť
výstražná zvuková signalizácia.
Ukazovatele teploty zobrazujú nastavenú
predvolenú teplotu.
Ak chcete vypnúť alarm, pozrite si časť
„Alarm pri zvýšení vnútornej teploty“.
1. Stlačte tlačidlo spotrebiča ZAP/VYP
na niekoľko sekúnd.
Displej sa vypne.
2. Vytiahnite zástrčku napájacieho
kábla zo zásuvky elektrickej siete.
Ak chcete nastaviť inú teplotu, pozrite si
časť „Regulácia teploty“.
Ak sa na displeji zobrazí "dEMo", pozrite
si kapitolu „Čo robiť, keď...“.
Ak dvierka ponecháte
niekoľko minút otvorené,
osvetlenie automaticky
zhasne. Po zatvorení a
otvorení dvierok sa funkcia
osvetlenia opäť obnoví.
4.4 Zapnutie chladničky
Na zapnutie chladničky stačí stlačiť
regulátor teploty chladničky. Alternatívny
spôsob zapnutia chladničky:
1. Stláčajte Mode, až kým sa nezobrazí
príslušná ikona.
Ukazovateľ chladničky OFF bliká.
2. Nastavenie potvrďte stlačením
tlačidla OK.
Ukazovateľ OFF chladničky sa vypne.
Ak chcete nastaviť inú
teplotu, pozrite si časť
„Regulácia teploty“.
4.5 Vypnutie chladničky
1. Stláčajte Mode, až kým sa nezobrazí
príslušná ikona.
30
www.aeg.com
Začne blikať ukazovateľ chladničky OFF
a ukazovateľ chladiaceho priestoru.
Indikátor teploty chladničky zobrazuje
pomlčky.
2. Nastavenie potvrďte stlačením
tlačidla OK.
Zobrazí sa ukazovateľ OFF chladničky.
4.6 Regulácia teploty
Stlačením tlačidiel regulácie teploty
upravte nastavenú teplotu chladničky a
mrazničky.
Predvolené teploty:
• +5 °C v chladničke
• -18 °C v mrazničke
Ukazovatele teploty zobrazujú nastavenú
teplotu.
Po výpadku elektrického
prúdu zostane nastavená
teplota uložená. Nastavená
teplota sa dosiahne do 24
hodín.
Spotrebič zapne režim, ktorý umožňuje
optimalizovať uchovávanie potravín a
spotrebu energie. To zaručuje najnižšiu
hlučnosť počas prevádzky spotrebiča.
4.7 Alarm pri zvýšení
vnútornej teploty
Zvýšenie teploty v mraziacom priestore
(napríklad následkom predchádzajúceho
výpadku elektrického prúdu alebo pri
otvorení dvierok) indikujú:
• blikajúci ukazovateľ alarmu a
ukazovateľ teploty v mrazničke,
• zvukový signál.
Alarm vynulujete stlačením
ktoréhokoľvek tlačidla.
Zvukový signál sa vypne.
Ukazovateľ teploty mrazničky na niekoľko
sekúnd zobrazí najvyššiu dosiahnutú
teplotu. Potom znovu zobrazí nastavenú
teplotu.
Ukazovateľ alarmu bude naďalej blikať,
kým sa neobnovia normálne podmienky.
Keď sa alarm vypne, vypne
sa aj ukazovateľ alarmu.
4.8 Funkcia COOLMATIC
Ak potrebujete vložiť veľké množstvo
teplých potravín, napríklad po veľkom
nákupe, odporúčame vám zapnúť
funkciu COOLMATIC, aby sa potraviny
rýchlejšie vychladili a aby nedošlo k
otepleniu potravín, ktoré už máte v
chladničke.
1. Stláčajte Mode, až kým sa nezobrazí
príslušná ikona.
Ukazovateľ COOLMATIC bliká.
2. Nastavenie potvrďte stlačením
tlačidla OK.
Zobrazí sa ukazovateľ COOLMATIC.
Funkcia COOLMATIC sa
automaticky vypne po 52
hodinách. Ak chcete funkciu
deaktivovať pred jej
automatickým uplynutím,
zopakujte uvedené kroky,
kým nezhasne ukazovateľ
COOLMATIC.
4.9 Funkcia FROSTMATIC
Funkcia FROSTMATIC urýchľuje
zmrazenie čerstvých potravín a zároveň
chráni už uskladnené potraviny pred
neželaným ohriatím.
1. Stláčajte tlačidlo Mode, až kým sa
nezobrazí príslušná ikona.
Ukazovateľ FROSTMATIC bliká.
2. Stlačte tlačidlo OK na potvrdenie.
Zobrazí sa ukazovateľ FROSTMATIC.
Funkcia FROSTMATIC sa
automaticky vypne po 52
hodinách. Ak chcete funkciu
deaktivovať pred jej
automatickým uplynutím,
zopakujte uvedené kroky,
kým nezhasne ukazovateľ
FROSTMATIC.
4.10 Funkcia DYNAMICAIR
1. Stláčajte Mode, až kým sa nezobrazí
príslušná ikona.
Ukazovateľ DYNAMICAIR bliká.
2. Nastavenie potvrďte stlačením
tlačidla OK.
Zobrazí sa ukazovateľ DYNAMICAIR.
SLOVENSKY
Aktivácia funkcie
DYNAMICAIR zvýši
spotrebu energie. Ak sa táto
funkcia zapne automaticky,
nezobrazí sa ukazovateľ
funkcie DYNAMICAIR
(pozrite si časť „Každodenné
používanie").
Funkciu deaktivujete zopakovaním
uvedených krokov, kým nezhasne
ukazovateľ DYNAMICAIR.
4.11 Funkcia MinuteMinder
Funkcia MinuteMinder sa používa na
nastavenie zvukového alarmu v určitom
čase, čo môže byť užitočné, napr. ak je
podľa receptu potrebné potraviny chladiť
len určitú dobu, alebo ak potrebujete
pripomenúť, že máte v mrazničke fľaše,
ktoré sa majú rýchlo vychladiť.
1. Stláčajte Mode, až kým sa nezobrazí
príslušná ikona.
Ukazovateľ MinuteMinder bliká.
Časovač zobrazí na niekoľko sekúnd
nastavenú hodnotu (30 minút).
2. Stláčaním ovládacieho tlačidla
časovača zmeníte nastavenú
hodnotu časovača v škále od 1 do 90
minút.
3. Nastavenie potvrďte stlačením
tlačidla OK.
Zobrazí sa ukazovateľ MinuteMinder.
Na časovači začne blikať (min).
Nastavenie časovača môžete zmeniť
kedykoľvek počas odpočítavania a na
konci nastaveného času prostredníctvom
tlačidla zníženia alebo zvýšenia teploty.
Na konci odpočítavania bliká ukazovateľ
MinuteMinder a spustí sa zvukový signál.
5. KAŽDODENNÉ POUŽÍVANIE
VAROVANIE!
Pozrite si kapitoly ohľadne
bezpečnosti.
31
Stlačením tlačidla OK vypnete zvukový
signál a ukončíte funkciu.
Funkciu môžete deaktivovať kedykoľvek
počas odpočítavania zopakovaním
funkčných krokov, kým ukazovateľ
nezhasne.
4.12 Režim Holiday
Táto funkcia vám umožní počas dlhšej
dovolenky nechať chladničku zatvorenú
a prázdnu bez toho, aby sa tvoril
nepríjemný zápach.
Pred zapnutím režimu
Holiday vyprázdnite
chladiaci priestor.
1. Stláčajte tlačidlo Mode, až kým sa
nezobrazí ikona ukazovateľa Holiday.
Ikona Holiday bliká.
Ukazovateľ teploty chladničky zobrazuje
nastavenú teplotu.
2. Potvrďte stlačením tlačidla OK.
Zobrazí sa ikona Holiday.
Režim Holiday vypnete zopakovaním
postupu, kým nezhasne ikona
ukazovateľa Holiday.
4.13 Funkcia ChildLock
Aktivovaním funkcie ChildLock
uzamknete tlačidlá, čím zabránite ich
náhodnému stlačeniu.
1. Stláčajte Mode, až kým sa nezobrazí
príslušná ikona.
Ukazovateľ ChildLock bliká.
2. Nastavenie potvrďte stlačením
tlačidla OK.
Zobrazí sa ukazovateľ ChildLock.
Funkciu ChildLock deaktivujete
zopakovaním postupu, kým nezhasne
ukazovateľ ChildLock.
32
www.aeg.com
5.1 Prvé zapnutie
POZOR!
Pred zasunutím zástrčky do
sieťovej zásuvky a prvým
zapnutím spotrebiča
nechajte spotrebič vo
vzpriamenej polohe
minimálne 4 hodiny. Toto
opatrenie zabezpečí
dostatok času na to, aby sa
olej vrátil do kompresora. V
opačnom prípade môže
dôjsť k poškodeniu
kompresora alebo
elektronických
komponentov.
5.2 Čistenie vnútrajška
Pred prvým použitím spotrebiča treba
jeho vnútro a všetky jeho diely umyť
vlažnou vodou s prídavkom neutrálneho
umývacieho prostriedku, aby ste
odstránili typický zápach nového
spotrebiča. Potom všetky povrchy
dôkladne osušte.
POZOR!
Nepoužívajte abrazívne
čistiace prostriedky ani
prášky, pretože by poškodili
povrch.
5.3 Skladovanie mrazených
potravín
Pri prvom uvedení do prevádzky alebo
po dlhodobom odstavení nechajte
spotrebič pred vložením potravín bežať
najmenej 2 hodiny so zapnutou funkciou
FROSTMATIC. Zásuvky mrazničky
zaisťujú rýchle a jednoduché hľadanie
požadovaných potravín. Ak je potrebné
zmraziť veľké množstvo potravín, vyberte
všetky zásuvky okrem dolnej zásuvky,
ktorá musí zostať na svojom mieste, aby
bola zaistená správna cirkulácia
vzduchu. Na všetky police môžete
položiť potraviny, ktoré vyčnievajú až do
15 mm od dverí.
VAROVANIE!
V prípade neúmyselného
rozmrazenia potravín,
napríklad v dôsledku
výpadku elektrického prúdu,
za predpokladu, že čas
trvania výpadku energie bol
dlhší ako údaj uvedený v
technických údajoch pod
položkou „akumulačná
doba“, rozmrazené potraviny
treba čo najskôr spotrebovať
alebo uvariť a potom znova
zmraziť (po ochladení).
5.4 Zmrazovanie čerstvých
potravín
Mraziaci priestor je vhodný na
zmrazovanie čerstvých potravín a na
dlhodobé uchovávanie mrazených a
hlboko mrazených potravín.
Pri zmrazovaní malého množstva
čerstvých potravín nie je nutné meniť
predvolené nastavenie spotrebiča.
Pri zmrazovaní čerstvých potravín
zapnite funkciu FROSTMATIC najmenej
24 hodín pred vložením potravín
určených na zmrazenie do mraziaceho
priestoru.
Čerstvé potraviny určené na zmrazenie
vložte do hornej priehradky.
Maximálne množstvo potravín, ktoré
možno zmraziť za 24 hodín, sa uvádza
na typovom štítku, ktorý sa nachádza
vo vnútri spotrebiča.
Proces zmrazovania trvá 24 hodín: v
tomto čase nepridávajte ďalšie potraviny
na zmrazenie.
Keď sa skončí zmrazovanie, znova
nastavte požadovanú teplotu (pozri
„FunkciaFROSTMATIC").
V takýchto podmienkach
môže klesnúť teplota
chladiaceho priestoru pod 0
°C. Ak sa tak stane, nastavte
na regulátore teploty vyššiu
teplotu.
SLOVENSKY
5.5 Rozmrazovanie
Hlboko zmrazené alebo mrazené
potraviny sa pred použitím môžu
rozmrazovať v chladiacom priestore
alebo pri izbovej teplote, v závislosti od
času, ktorý máme k dispozícii.
Malé kúsky možno dokonca variť, aj keď
sú ešte zmrazené, priamo z mrazničky: v
tomto prípade varenie potrvá dlhšie.
5.6 Prestaviteľné poličky
Steny chladničky sú vybavené
niekoľkými lištami, ktoré umožňujú
umiestniť police do želanej polohy.
5.8 Zásuvka FreshBox
POZOR!
Nepremiestňujte sklenenú
policu nad zásuvkou
FreshBox, aby bola
zaručená správna cirkulácia
vzduchu.
5.7 Polica na fľaše
Fľaše ukladajte (hrdlom vpred) na
príslušnú policu.
Ukladajte iba zatvorené
fľaše.
Zásuvka je vhodná na skladovanie
čerstvých potravín ako ryby, mäso a
morské plody, pretože teplota v nej je
nižšia ako v ostatných častiach
chladničky.
POZOR!
Pred vložením alebo
vybratím zásuvky FreshBox
do/zo spotrebiča vytiahnite
zásuvku na zeleninu a
sklenený kryt.
5.9 Zásuvka MaxiBox
Zásuvka je vhodná na skladovanie
ovocia a zeleniny.
33
34
www.aeg.com
5.12 Umiestnenie poličiek na
dverách
5.10 DYNAMICAIR
Chladiaci priestor je vybavený
zariadením, ktoré umožňuje rýchle
chladenie potravín a jednotnejšiu teplotu
v chladničke.
Toto zariadenie sa samo aktivuje podľa
potreby, napríklad na rýchlu obnovu
teploty po otvorení dvierok alebo pri
vysokej okolitej teplote.
Pre manuálne zapnutie zariadenia si
pozrite režim DYNAMICAIR.
Zariadenie DYNAMICAIR sa
zastaví pri otvorení dvierok a
znovu sa spustí ihneď po ich
zatvorení.
5.11 Vzduchový filter s uhlím
Váš spotrebič je vybavený filtrom s uhlím
CLEANAIR CONTROL v zásuvke v
zadnej stene chladiaceho priestoru.
Filter čistí vzduch od nežiaducich pachov
v chladiacom priestore, čo znamená, že
kvalita skladovania bude ešte vyššia.
POZOR!
Počas prevádzky nechávajte
vzduchovú ventilačnú
zásuvku vždy zatvorenú.
Poličky na dverách možno umiestniť v
rôznej výške, aby ste mohli uložiť balenia
potravín rôznych veľkostí.
Pri týchto úpravách postupujte
nasledovne:
1. Poličku postupne ťahajte v smere
šípok, až kým sa neuvoľní.
2. Upravte polohu poličky podľa
potreby.
5.13 Vybratie zmrazovacích
košov z mrazničky
Zmrazovacie koše sú vybavené
zarážkami, ktoré bránia ich náhodnému
vybratiu alebo vypadnutiu. Pri vyberaní
košov z mrazničky potiahnite kôš
smerom k sebe a pri dosiahnutí koncovej
polohy vyberte kôš naklonením jeho
prednej časti nahor.
SLOVENSKY
35
Pri ich opätovnom vkladaní prednú časť
koša mierne nadvihnite a kôš vložte do
mrazničky. Po prekonaní zarážky
zatlačte koše na miesto.
2
1
6. TIPY A RADY
6.1 Normálne zvuky pri
prevádzke
Nasledovné zvuky sú pri bežnej
prevádzke normálne:
•
•
•
•
Cievka vydáva slabé bublanie a
zurčanie pri prečerpávaní chladiva.
Kompresor vydáva bzučanie a
pulzovanie pri prečerpávaní chladiva.
Náhle praskanie vychádzajúce z
vnútra spotrebiča býva spôsobené
tepelnou dilatáciou (prirodzený a nie
nebezpečný fyzický jav).
Regulátor teploty vydáva slabé
kliknutie pri zapnutí alebo vypnutí
kompresora.
6.2 Rady pre úsporu energie
•
•
Dvere spotrebiča neotvárajte príliš
často a nenechávajte ich otvorené
dlhšie, ako je absolútne nevyhnutné.
Ak je okolitá teplota vysoká, regulátor
teploty je nastavený na intenzívne
chladenie a spotrebič je úplne plný,
kompresor môže byť v činnosti
nepretržite, pričom sa vytvorí
námraza alebo ľad na výparníku. Ak
sa tak stane, nastavte regulátor
teploty na menej intenzívne
chladenie, aby sa umožnilo
automatické odmrazovanie a aby ste
ušetrili elektrickú energiu.
6.3 Rady na chladenie
čerstvých potravín
V záujme optimálnej účinnosti:
•
•
•
do chladničky nevkladajte teplé
potraviny ani odparujúce sa kvapaliny,
potraviny prikryte alebo zabaľte,
hlavne ak majú prenikavú arómu,
potraviny uložte tak, aby vzduch
mohol voľne cirkulovať okolo nich.
6.4 Rady pre chladenie
Užitočné rady:
•
•
•
•
•
•
•
Mäso (všetky druhy): zabaľte do
polyetylénových vreciek a položte na
sklenenú policu nad zásuvkou na
zeleninu.
Kvôli bezpečnosti mäso takto
uchovávajte najviac jeden alebo dva
dni.
Varené a studené jedlá a pod: treba
ich prikryť a potom uložiť na
ktorúkoľvek policu.
Ovocie a zelenina: treba dôkladne
očistiť a vložiť do špeciálnej zásuvky
(zásuviek).
Maslo a syry: treba ich vložiť do
špeciálnych vzduchotesných nádob,
zabaliť do alobalu alebo vložiť do
polyetylénových vreciek, aby sa k nim
dostalo čo najmenej vzduchu.
Fľaše: musia mať uzáver a treba ich
skladovať v poličke na fľaše na
dverách alebo v stojane na fľaše (ak
je ním spotrebič vybavený).
V chladničke sa nesmú skladovať
banány, zemiaky, cibuľa ani cesnak.
6.5 Rady pre zmrazovanie
Tu je niekoľko dôležitých tipov, ktoré vám
pomôžu zabezpečiť optimálne
zmrazovanie potravín:
36
www.aeg.com
•
•
•
•
•
•
•
•
maximálne množstvo potravín, ktoré
je možné zmraziť počas 24 hodín, je
uvedené na typovom štítku
spotrebiča,
zmrazovanie trvá 24 hodín. V tomto
čase sa nesmú pridávať žiadne ďalšie
potraviny na zmrazovanie;
zmrazujte iba potraviny špičkovej
kvality, čerstvé a dôkladne vyčistené;
potraviny rozdeľte na malé porcie, aby
sa mohli rýchlo a úplne zmraziť a aby
ste neskôr mohli odmraziť iba
potrebné množstvo;
potraviny zabaľte do alobalu alebo do
polyetylénovej fólie; dbajte, aby boli
zabalené vzduchotesne;
nedovoľte, aby sa čerstvé,
nezmrazené potraviny dotýkali
potravín, ktoré sú už zmrazené,
predídete tak zvýšeniu ich teploty,
potraviny s nízkym obsahom tuku sa
uchovávajú lepšie a vydržia dlhšie
ako potraviny s vysokým obsahom
tukov; soľ znižuje dobu skladovania
potravín;
zmrzliny konzumované bezprostredne
po vybraní z mraziaceho priestoru
•
môžu spôsobiť poranenie kože
mrazom;
odporúča sa označiť každé balenie
dátumom zmrazovania, aby ste mohli
presne sledovať dobu skladovania.
6.6 Rady na uchovávanie
mrazených potravín
Keď chcete maximálne využiť možnosti
tohto spotrebiča, riaďte sa nasledujúcimi
pokynmi:
•
•
•
•
•
uistite sa, že maloobchodný predajca
adekvátne skladuje komerčné
mrazené potraviny,
dbajte, aby ste mrazené potraviny
preniesli z predajne potravín do
mrazničky podľa možnosti čo
najrýchlejšie,
neotvárajte dvierka spotrebiča príliš
často a nenechávajte ich otvorené
dlhšie, ako je absolútne nevyhnutné,
po rozmrazení sa potraviny rýchlo
kazia a nesmú sa znova zmrazovať,
neprekračujte dobu skladovania
stanovenú výrobcom potravín.
7. OŠETROVANIE A ČISTENIE
VAROVANIE!
Pozrite si kapitoly ohľadne
bezpečnosti.
7.1 Všeobecné upozornenia
POZOR!
Pred akoukoľvek údržbou
spotrebič odpojte od
elektrickej siete.
V chladiacej jednotke
spotrebiča sa nachádzajú
uhľovodíky, preto smie
údržbu a doplnenie chladiva
vykonať výhradne
autorizovaný technik.
Príslušenstvo a časti
spotrebiča sa nesmú umývať
v umývačke riadu.
7.2 Čistenie vnútrajška
Pred prvým použitím spotrebiča treba
jeho vnútro a všetky jeho diely umyť
vlažnou vodou s prídavkom neutrálneho
umývacieho prostriedku, aby ste
odstránili typický zápach nového
spotrebiča. Potom všetky povrchy
dôkladne osušte.
POZOR!
Nepoužívajte abrazívne
čistiace prostriedky ani
prášky, pretože by poškodili
povrch.
7.3 Pravidelné čistenie
POZOR!
Neťahajte, neposúvajte a
nepoškodzujte žiadne rúrky
a/alebo káble v spotrebiči
alebo na ňom.
SLOVENSKY
POZOR!
Dbajte na to, aby ste
nepoškodili chladiaci
systém.
37
pretekaniu vody a jej kvapkaniu na
potraviny vnútri chladničky.
POZOR!
Pri presúvaní spotrebiča
nadvihnite jeho prednú
hranu, aby ste nepoškriabali
podlahu.
Vybavenie spotrebiča treba pravidelne
čistiť:
1. Vnútro spotrebiča a príslušenstvo
umyte vlažnou vodou s prídavkom
neutrálneho saponátu.
2. Pravidelne kontrolujte tesnenia dverí
a vyutierajte ich, aby boli čisté a bez
zvyškov potravín.
3. Opláchnite a dôkladne osušte.
4. Kefou vyčistite kondenzátor a
kompresor na zadnej strane
spotrebiča, ak sú prístupné.
Touto operáciou zvýšite výkonnosť
spotrebiča a usporíte elektrickú
energiu.
Najnižšiu priehradku, ktorá oddeľuje
chladiaci priestor od zvyšného priestoru,
môžete odstrániť iba za účelom čistenia.
Vytiahnete ju priamym potiahnutím.
Ak chcete zabezpečiť plnú
funkčnosť priestoru
FreshBox, najnižšiu
priehradku a krycie dosky je
potrebné po čistení vrátiť na
pôvodné miesto.
Krycie dosky nad zásuvkami v
chladiacom priestore je možné vybrať a
vyčistiť.
7.4 Odmrazovanie chladničky
7.5 Odmrazovanie mrazničky
Priestor mrazničky je beznámrazový.
Znamená to, že sa tu počas prevádzky
netvorí námraza, a to ani na vnútorných
stenách, ani na potravinách.
Absencia námrazy sa dosahuje
nepretržitým obehom studeného
vzduchu v tomto priestore, ktorý je
poháňaný ventilátorom s automatickou
reguláciou.
7.6 Obdobia mimo prevádzky
Ak spotrebič nebudete dlhší čas
používať, vykonajte nasledujúce
opatrenia:
1. Spotrebič odpojte od elektrického
napájania.
2. Vyberte všetky potraviny.
3. Spotrebič a všetky časti
príslušenstva vyčistite.
4. Nechajte dvierka pootvorené, aby sa
zabránilo vzniku nepríjemného
zápachu.
VAROVANIE!
Ak spotrebič necháte
zapnutý, požiadajte niekoho,
aby ho raz za čas
skontroloval a zabránil tak
znehodnoteniu obsahu
v prípade výpadku
elektrického prúdu.
Pri normálnom používaní sa námraza
automaticky odstraňuje z výparníka
chladiaceho priestoru pri každom
zastavení motora kompresora.
Odmrazená voda odteká cez žliabok do
osobitnej nádoby na zadnej stene
spotrebiča nad motorom kompresora,
z ktorej sa odparuje.
7.7 Výmena vzduchového
filtra s uhlím
Je dôležité, aby ste odtokový otvor
v strednej časti chladiaceho priestoru
pravidelne čistili, aby sa zabránilo
Aby sa dosiahla čo najvyššia účinnosť,
vzduchový filter s uhlím treba vymeniť
každý rok.
38
www.aeg.com
Nové vzduchové filtre s aktívnym uhlím si
môžete kúpiť u svojho predajcu.
Pozrite si časť „Inštalácia filtra
CLEANAIR CONTROL”, kde nájdete
ďalšie pokyny.
Vzduchový filter patrí medzi
spotrebný materiál, preto sa
naň nevzťahuje záruka.
8. RIEŠENIE PROBLÉMOV
VAROVANIE!
Pozrite si kapitoly ohľadne
bezpečnosti.
8.1 Čo robiť, keď...
Problém
Možné príčiny
Riešenie
Spotrebič nefunguje.
Spotrebič je vypnutý.
Spotrebič zapnite.
Sieťová zástrčka spotrebi‐ Sieťovú zástrčku zapojte
ča nie je správne zapojená správne do sieťovej zásuvky.
do sieťovej zásuvky.
Sieťová zásuvka nie je pod Do sieťovej zásuvky skúste
napätím.
zapojiť iný spotrebič. Obráťte
sa na kvalifikovaného elektri‐
kára.
Nadmerná hlučnosť spotreb‐ Spotrebič nestojí pevne na Skontrolujte, či spotrebič sta‐
iča.
podklade.
bilne stojí.
Zapol sa zvukový alebo vi‐
zuálny alarm.
Spotrebič ste zapli iba ne‐ Pozrite si časť „Alarm pri ot‐
dávno alebo teplota je ešte vorených dvierkach“ alebo
stále vysoká.
„Alarm pri zvýšení vnútornej
teploty“.
Teplota v spotrebiči je prí‐
liš vysoká.
Pozrite si časť „Alarm pri ot‐
vorených dvierkach“ alebo
„Alarm pri zvýšení vnútornej
teploty“.
Teplota v spotrebiči je prí‐
liš vysoká.
Obráťte sa na kvalifikovaného
elektrikára alebo kontaktujte
najbližšie autorizované ser‐
visné stredisko.
Namiesto čísiel sa na teplot‐ Problém so snímačom te‐
nom displeji zobrazuje sym‐ ploty.
bol štvorca.
Kontaktujte najbližšie autorizo‐
vané servisné stredisko (chla‐
diaci systém bude udržovať
potraviny v chlade, ale nasta‐
venie teploty nebude možné).
Nesvieti žiarovka.
Zatvorte a otvorte dvierka.
Žiarovka je v pohotovost‐
nom režime.
SLOVENSKY
39
Problém
Možné príčiny
Riešenie
Nesvieti žiarovka.
Žiarovka je vypálená.
Obráťte sa na najbližšie autori‐
zované servisné stredisko.
Kompresor pracuje nepretr‐
žite.
Teplota nie je nastavená
správne.
Pozrite si časť „Prevádzka”.
Do spotrebiča ste vložili
naraz veľa potravín.
Počkajte niekoľko hodín a po‐
tom opäť skontrolujte teplotu.
Okolitá teplota v miestnosti Pozrite si údaje o klimatickej
je príliš vysoká.
triede uvedené na typovom
štítku.
Potraviny vložené do spo‐
trebiča boli príliš teplé.
Pred vložením nechajte potra‐
viny vychladnúť na izbovú te‐
plotu.
Dvierka spotrebiča nie sú
správne zatvorené.
Pozrite si časť „Zatvorenie
dvierok“.
Je zapnutá funkcia
FROSTMATIC.
Pozrite si časť „Funkcia
FROSTMATIC“.
Je zapnutá funkcia COOL‐ Pozrite si časť „Funkcia
MATIC.
COOLMATIC“.
Kompresor sa nezapne
ihneď po stlačení FROST‐
MATIC alebo po zmene te‐
ploty.
Je to normálne, nie je to
porucha.
Kompresor sa zapne po urči‐
tom čase.
Kompresor sa nezapne
ihneď po stlačení COOL‐
MATIC alebo po zmene te‐
ploty.
Je to normálne, nie je to
porucha.
Kompresor sa zapne po urči‐
tom čase.
Voda steká do chladiaceho
priestoru.
Upchaný odtokový kanálik
na rozmrazenú vodu.
Vyčistite odtokový kanálik.
Potraviny uložené v spo‐
Dávajte pozor, aby sa potravi‐
trebiči bránia odtekaniu vo‐ ny nedotýkali zadnej steny.
dy do odtokového kanáli‐
ka.
Voda vyteká na podlahu.
Odtokový kanálik na vodu Odtokový kanálik pripevnite k
z rozmrazenej námrazy nie odparovacej miske.
je pripojený k odparovacej
miske nad kompresorom.
40
www.aeg.com
Problém
Možné príčiny
Riešenie
Nedá sa nastaviť teplota.
Je zapnutá funkcia
FROSTMATIC alebo
COOLMATIC.
Funkciu FROSTMATIC alebo
COOLMATIC vypnite man‐
uálne alebo počkajte, kým sa
funkcia nevypne automaticky.
Pozrite si časť „Funkcia
FROSTMATIC alebo COOL‐
MATIC“.
Na displeji sa zobrazí
DEMO.
Spotrebič je v predvádza‐
com režime.
Tlačidlo OK podržte stlačené
po dobu asi 10 sekúnd, kým
nezaznie dlhý zvukový signál
a displej sa na krátku dobu ne‐
vypne.
Dvierka nie sú zarovnané
alebo zasahujú do ventilač‐
nej mriežky.
Spotrebič nie je vo vodor‐
ovnej polohe.
Pozrite si časť „Vyrovnanie do
vodorovnej polohy“.
Teplota vnútri spotrebiča je
Nie je správne nastavený
príliš nízka alebo príliš vyso‐ regulátor teploty.
ká.
Nastavte vyššiu alebo nižšiu
teplotu.
Dvierka spotrebiča nie sú
správne zatvorené.
Pozrite si časť „Zatvorenie
dvierok“.
Teplota potravín je príliš
vysoká.
Pred vložením do spotrebiča
nechajte potraviny najprv vy‐
chladnúť na izbovú teplotu.
Do spotrebiča ste vložili
naraz veľa potravín.
Do spotrebiča vkladajte naraz
menej potravín.
Dvierka ste otvárali príliš
často.
Dvierka otvorte, len ak je to
potrebné.
Je zapnutá funkcia
FROSTMATIC.
Pozrite si časť „Funkcia
FROSTMATIC“.
Je zapnutá funkcia COOL‐ Pozrite si časť „Funkcia
MATIC.
COOLMATIC“.
V spotrebiči neprúdi stude‐ Zabezpečte prúdenie studené‐
ný vzduch.
ho vzduchu v spotrebiči.
Ak pomocou horeuvedených
pokynov nedosiahnete
požadovaný výsledok,
zavolajte najbližší značkový
servis.
8.2 Zatvorenie dvierok
1. Očistite tesnenia dvierok.
2. V prípade potreby nastavte dvierka.
Pozrite si časť „Inštalácia“.
3. V prípade potreby vymeňte
poškodené tesnenia dvierok.
Zavolajte servisné stredisko.
8.3 Výmena žiarovky
Spotrebič je vybavený trvácnym
vnútorným osvetlením LED.
SLOVENSKY
41
Žiarovku smie vymieňať len servisné
stredisko. Zavolajte servisné stredisko.
9. INŠTALÁCIA
VAROVANIE!
Pozrite si kapitoly ohľadne
bezpečnosti.
Tento spotrebič môžete nainštalovať do
suchého a dobre vetraného interiéru, kde
teplota prostredia zodpovedá klimatickej
triede uvedenej na typovom štítku
spotrebiča:
Klima‐
tická
trieda
Teplota prostredia
SN
+10 °C až +32 °C
N
+16 °C až +32 °C
ST
+16 °C až +38 °C
T
+16 °C až +43 °C
Pri niektorých typoch
modelov pri prevádzke mimo
tohto rozsahu môže dôjsť k
určitým problémom s
funkčnosťou. Správnu
prevádzku je možné zaručiť
len v rámci uvedeného
teplotného rozsahu. Ak máte
akékoľvek pochybnosti
týkajúce sa miesta inštalácie
spotrebiča, obráťte sa na
predajcu, na náš zákaznícky
servis alebo na najbližšie
servisné stredisko.
•
•
9.3 Umiestnenie
Spotrebič sa musí dať
odpojiť od sieťového
napájania. Preto musí byť
zásuvka po inštalácii
spotrebiča ľahko prístupná.
Spotrebič by mal byť nainštalovaný v
dostatočnej vzdialenosti od tepelných
zdrojov, ako sú radiátory, ohrievače
vody, priame slnečné svetlo a pod.
Dbajte na to, aby za zadnou stenou
spotrebiča mohol voľne prúdiť vzduch.
Ak je spotrebič umiestnený pod
presahujúcou nástennou skrinkou, v
záujme optimálneho výkonu musí byť
vzdialenosť medzi spotrebičom a
nástennou skrinkou aspoň 100 mm.
Ideálnym riešením však je
neumiestňovať spotrebič pod
presahujúcu nástennú skrinku. Presné
vyrovnanie do vodorovnej polohy sa
zaručí pomocou jednej alebo viacerých
nastaviteľných nožičiek spotrebiča.
100 mm
min
9.1 Umiestnenie
uzemnená, spotrebič pripojte
k samostatnému uzemneniu v súlade
s platnými predpismi. Poraďte sa s
kvalifikovaným elektrikárom.
Výrobca odmieta akúkoľvek
zodpovednosť pri nedodržaní hore
uvedených bezpečnostných opatrení.
Tento spotrebič spĺňa smernice EHS.
9.2 Zapojenie do elektrickej
siete
•
Pred pripojením sa presvedčte, či
napätie a frekvencia uvedené na
typovom štítku zodpovedajú
parametrom vašej domácej elektrickej
siete.
Spotrebič musí byť uzemnený.
Napájací elektrický kábel je na tento
účel vybavený príslušným kontaktom.
Ak domáca sieťová zásuvka nie je
A
20 mm
•
B
42
www.aeg.com
POZOR!
Odporúčame vám ponechať
medzi bočnými stenami
spotrebiča a okolitým
nábytkom medzeru 30 mm,
aby bola zabezpečená
správna funkčnosť
spotrebiča pri teplotách
okolia nad 38 ºC.
9.4 Vyrovnanie do
vodorovnej polohy
Pri umiestňovaní spotrebiča dbajte na to,
aby bol vyrovnaný do vodorovnej polohy.
Vyrovnanie do vodorovnej polohy
zabezpečte pomocou dvoch
nastaviteľných nožičiek vpredu v dolnej
časti spotrebiča.
S filtrom manipulujte
opatrne, aby sa z jeho
povrchu neuvoľňovali
čiastočky. Filter správne
funguje, keď je zásuvka
ventilačnej páčky zatvorená.
9.6 Zmena smeru otvárania
dvierok
VAROVANIE!
Pred akýmkoľvek zásahom
vytiahnite zástrčku
spotrebiča zo zásuvky
elektrickej siete.
9.5 Inštalácia filtra CLEANAIR
CONTROL
Vzduchový filter s uhlím je filter s
aktívnym uhlím, ktorý absorbuje
nepríjemné pachy a zachováva čo
najlepšiu arómu všetkých potravín bez
rizika vzájomného prenosu pachov.
Pri dodaní je filter s uhlím v plastovom
obale, aby si uchoval účinnosť. Filter
treba vložiť do zásuvky ešte pred
zapnutím spotrebiča.
1.
2.
3.
4.
Otovrte zásuvku.
Vyberte filter z plastového obalu.
Vložte filter do zásuvky.
Zásuvku zatvorte.
Pred vykonaním
akéhokoľvek úkonu sa
uistite, či je spotrebič
prázdny. Ak nie je,
premiestnite všetky
potraviny na miesto s
vyhovujúcou teplotou, aby
boli správne skladované.
POZOR!
Pri vykonávaní
nasledujúcich úkonov
odporúčame, aby vám
pomáhala druhá osoba,
ktorá počas týchto úkonov
pevne pridrží dvierka
spotrebiča.
1. Vyberte z lišty horných dvierok
všetky krytky.
2. Vyberte lištu horných dvierok.
SLOVENSKY
43
1
2
1
1
2
3. Zaistite dvierka, odskrutkujte horný
záves.
4. Opatrne odoberte horné dvierka zo
spotrebiča.
1
7. Odoberte vymedzovaciu vložku
dolného závesu, následne
odskrutkujte držiak dolného závesu.
8. Vyberte čap z držiaku dolného
závesu a vymeňte ho na opačnej
strane.
1
2
2
5. Odskrutkujte zarážku horných
dvierok a výstuž hornej rukoväte,
potom ich vymeňte.
3
1
2
9. Nainštalujte držiak dolného závesu
na opačnej strane spotrebiča.
4
3
6. Zo spotrebiča odoberte
vymedzovaciu vložku a stredný
záves a potom opatrne odoberte
dolné dvierka.
Nezabudnite pripevniť
vymedzovaciu vložku
dolného závesu.
10. Nainštalujte dolné dvierka na dolný
záves a zaistite ich pripevnením
stredného závesu k spotrebiču.
Nezabudnite pripevniť
vymedzovaciu vložku
stredného závesu.
44
www.aeg.com
1
2
1
2
11. Odoberte kryty horného závesu a
následne odskrutkujte záves zo
spotrebiča.
2
1
3
13. Opatrne umiestnite horné dvierka na
stredný záves, potom pokračujte v
osadzovaní dvierok na horný záves.
14. Zaistite horné dvierka k hornému
závesu.
2
3
1
12. Horný záves nainštalujte na opačnú
stranu spotrebiča, potom vymeňte
všetky kryty horného závesu.
15. Vráťte čiapočku horných dierok späť
na svoje miesto a vložte všetky kryty.
2
2
1
SLOVENSKY
16. Odskrutkujte zarážku dolných dvierok
a potom ju nainštalujte na opačnú
stranu
Vykonajte záverečnú
kontrolu a uistite sa, že:
• Všetky skrutky sú
dotiahnuté.
• Magnetické tesnenie
prilieha k spotrebiču.
• Dvierka sa správne
otvárajú a zatvárajú.
Ak je okolitá teplota nízka (t.
j. v zime), môže sa stať, že
tesnenie nebude dokonale
priliehať. V takom prípade
počkajte, kým sa tesnenie
samovoľne neprispôsobí. Ak
predchádzajúce úkony
nechcete robiť sami, obráťte
sa na najbližšie autorizované
servisné stredisko. Zmenu
smeru otvárania dvierok
vykoná technik servisného
strediska za poplatok.
17. Odskrutkujte rukoväte a potom
konzoly rukovätí.
h1
h2
h3
18. Konzoly rukovätí a následne
rukoväte pripevnite na opačnú
stranu.
h4
h5
POZOR!
Spotrebič umiestnite na
požadované miesto a
vyrovnajte ho, počkajte
najmenej štyri hodiny a
potom ho pripojte do
elektrickej zásuvky.
h6
10. TECHNICKÉ INFORMÁCIE
10.1 Technické údaje
Výška
mm
1840
Šírka
mm
595
Hĺbka
mm
642
Akumulačná doba
Hodín
20
Napätie
Volt
230 - 240
Frekvencia
Hz
50
45
46
www.aeg.com
Technické údaje sú uvedené na typovom
štítku, na vonkajšej alebo vnútornej
strane spotrebiča a na štítku
energetických parametrov.
11. OCHRANA ŽIVOTNÉHO PROSTREDIA
Recyklujte materiály so symbolom .
Obal hoďte do príslušných kontajnerov
na recykláciu. Chráňte životné prostredie
a zdravie ľudí a recyklujte odpad z
elektrických a elektronických spotrebičov.
Nelikvidujte spotrebiče označené
symbolom spolu s odpadom z
domácnosti. Výrobok odovzdajte v
miestnom recyklačnom zariadení alebo
sa obráťte na obecný alebo mestský
úrad.
*
SLOVENSKY
47
280153762-A-122014
www.aeg.com/shop